uni-app(优医咨询)项目实战 - 第5天

学习目标:
- 掌握云开发环境的创建及使用
- 能够结合 Composable 封装公共逻辑
- 能够基于 scroll-view 组件上拉加载数据
- 掌握问诊数据的缓存及回显的实现方法
一、首页模块
在首页面中能够查看医疗相关知识的相关文章列表以及关注科室医生。
1.1 布局模板
首先在配置文件中将首页面的导航栏设置为自定义的导航栏:
{
  "pages": [
      {
      "path": "pages/index/index",
      "style": {
        "navigationBarTitleText": "优医咨询",
        "navigationStyle": "custom"
      }
    }
  ]
}
接下来是布局结构相关的代码:
<!-- pages/index/index.vue -->
<script setup>
  // 获取安全区域数据
  const { safeAreaInsets } = uni.getSystemInfoSync()
</script>
<template>
  <scroll-page>
    <view
      class="index-page"
      :style="{ backgroundPositionY: -48 + safeAreaInsets.top + 'px' }"
    >
      <!-- 页面导航 -->
      <view
        :style="{ paddingTop: safeAreaInsets.top + 'px' }"
        class="page-navbar"
      >优医</view>

      <!-- 搜索栏 -->
      <view class="search-bar">
        <input
          placeholder-class="input-placeholder"
          placeholder="搜一搜: 疾病/症状/医生/健康知识"
          class="input"
          type="text"
        />
        <view class="icon-search">
          <uni-icons size="22" color="#C3C3C5" type="search" />
        </view>
      </view>
      <!-- 快速入口 -->
      <view class="quick-entry">
        <navigator hover-class="none" class="quick-entry-item">
          <image
            class="quick-entry-icon"
            src="/static/images/quick-entry-1.png"
          />
          <text class="label">问医生</text>
          <text class="small">按科室查问医生</text>
        </navigator>
        <navigator
          hover-class="none"
          class="quick-entry-item"
          url="/subpkg_consult/quickly/index"
        >
          <image
            class="quick-entry-icon"
            src="/static/images/quick-entry-2.png"
          />
          <text class="label">极速问诊</text>
          <text class="small">20s医生极速回复</text>
        </navigator>
        <navigator hover-class="none" class="quick-entry-item">
          <image
            class="quick-entry-icon"
            src="/static/images/quick-entry-3.png"
          />
          <text class="label">开药门诊</text>
          <text class="small">线上买药更方便</text>
        </navigator>
      </view>
      <!-- 快速查看 -->
      <view class="quick-view">
        <navigator
          hover-class="none"
          class="quick-view-item"
          url="/subpkg_medicine/order_list/index"
        >
          <image
            class="quick-view-icon"
            src="/static/images/quick-view-1.png"
          />
          <text class="label">药品订单</text>
        </navigator>
        <navigator
          hover-class="none"
          class="quick-view-item"
          url="/subpkg_archive/list/index"
        >
          <image
            class="quick-view-icon"
            src="/static/images/quick-view-2.png"
          />
          <text class="label">健康档案</text>
        </navigator>
        <navigator hover-class="none" class="quick-view-item">
          <image
            class="quick-view-icon"
            src="/static/images/quick-view-3.png"
          />
          <text class="label">我的处方</text>
        </navigator>
        <navigator hover-class="none" class="quick-view-item">
          <image
            class="quick-view-icon"
            src="/static/images/quick-view-4.png"
          />
          <text class="label">疾病查询</text>
        </navigator>
      </view>
      <!-- 广告位 -->
      <view class="banner-placeholder">
        <swiper
          class="uni-swiper"
          indicator-dots
          indicator-color="#ffffff99"
          indicator-active-color="#fff"
          circular
        >
          <swiper-item>
            <navigator hover-class="none" class="navigator" url=" ">
              <image class="banner-image" src="/static/images/banner-1.png" />
            </navigator>
          </swiper-item>
          <swiper-item>
            <navigator hover-class="none" class="navigator" url=" ">
              <image
                class="banner-image"
                src="/static/images/banner-1.png"
                mode="aspectFill"
              />
            </navigator>
          </swiper-item>
        </swiper>
      </view>
      <!-- 标签页列表 -->
    </view>
  </scroll-page>
</template>
<style lang="scss">
  @import './index.scss';
</style>
最后是布局样式相关的代码:
// pages/index/indexscss
.index-page {
  min-height: 260rpx;
  background-image: url(https://consult-patient.oss-cn-hangzhou.aliyuncs.com/static/images/index-page-header-bg.png);
  background-size: contain;
  background-repeat: no-repeat;
  /* #ifdef H5 */
  padding-top: 10rpx;
  /* #endif */
}

.page-navbar {
  height: 88rpx;
  line-height: 88rpx;
  padding: 0 30rpx;
  font-size: 34rpx;
  color: #fff;
}

.search-bar {
  height: 80rpx;
  padding: 0 30rpx;
  margin-top: 10rpx;
  /* #ifdef H5 */
  margin-top: 0rpx;
  /* #endif */
  position: relative;

  .input {
    height: 100%;
    padding-left: 80rpx;
    padding-right: 40rpx;
    border-radius: 80rpx;
    background-color: #fff;
    font-size: 26rpx;
    color: #3c3e42;
    box-shadow: 0px 10rpx 22rpx rgba(0, 0, 0, 0.1);
  }

  .input-placeholder {
    color: #979797;
  }

  .icon-search {
    position: absolute;
    top: 50%;
    transform: translate(24rpx, -50%);
    margin-top: 2rpx;
  }
}

.quick-entry {
  display: flex;
  justify-content: space-around;
  line-height: 1;
  padding: 50rpx 30rpx 40rpx;

  &-item {
    display: flex;
    align-items: center;
    flex-direction: column;
  }

  .label {
    margin: 20rpx 0 10rpx;
    font-size: 28rpx;
    color: #121826;
  }

  .small {
    font-size: 22rpx;
    color: #848484;
  }

  &-icon {
    width: 92rpx;
    height: 92rpx;
  }
}

.quick-view {
  display: flex;
  justify-content: space-around;
  line-height: 1;
  padding: 10rpx 30rpx;

  &-item {
    display: flex;
    align-items: center;
    flex-direction: column;
  }

  .label {
    margin: 20rpx 0 10rpx;
    font-size: 28rpx;
    color: #121826;
  }

  &-icon {
    width: 62rpx;
    height: 62rpx;
  }
}

.banner-placeholder {
  height: 200rpx;
  padding: 0 30rpx;
  margin: 20rpx 0;
  position: relative;
  z-index: 101;

  .uni-swiper {
    height: 200rpx;
  }

  .banner-image {
    width: 100%;
    height: 200rpx;
    // border-radius: 30rpx;
  }
}

.doctor-feeds {
  // position: relative;
}
1.1.1 custom-tabs
按 easycom 组件规范新建组件,该组件的交互逻辑在前面阶段已经完成了,将其拷贝过来即可。
<!-- components/custom-tabs/custom-tabs.vue -->
<script setup>
  import { ref, onMounted, getCurrentInstance, computed } from 'vue'
  // 接收组件外部传入的数据
  const customTabsProps = defineProps({
    list: {
      type: Array,
      default: [],
    },
  })
  // 自定义事件
  const customTabsEmit = defineEmits(['click'])
  // 初始默认第一个 tab 高亮
  const tabIndex = ref(0)
  // 记录节点信息,宽度和位置
  const tabBarRect = ref([])
  // 生命周期
  onMounted(() => {
    // 在组件中应用,获取组件内部节点信息时需要调用 in 方法
    // 传入当页面实例,通过 getCurrentInstance 获取,相当于选项 API 中的 this
    const selectorQuery = uni.createSelectorQuery().in(getCurrentInstance())
    // 查找【所有节点】信息,用 selectAll 方法
    selectorQuery
      .selectAll('.custom-tabs, .tabbar-text')
      .boundingClientRect(([parent, ...data]) => {
        // 记录每个 tab 文字宽度和位置
        tabBarRect.value = data.map(({ width, left }) => {
          return { left: left - parent.left, width }
        })
      })
    // 执行节点查询
    selectorQuery.exec()
  })
  // 计算游标的位置
  const cursorPosition = computed(() => {
    if (tabBarRect.value.length === 0) return
    const { width, left } = tabBarRect.value[tabIndex.value]
    return left + (width - 20) / 2
  })
  // 用户点击 tab
  function onTabChange(index, tab) {
    // 显示/隐藏组件
    tabIndex.value = index
    // 触发自定义事件
    customTabsEmit('click', { index, ...tab })
  }
</script>

<template>
  <view class="custom-tabs">
    <view
      v-for="(tab, index) in customTabsProps.list"
      :key="tab.label"
      @click="onTabChange(index, tab)"
      :class="{ active: tabIndex === index }"
      class="custom-tabs-bar"
    >
      <text class="tabbar-text">{{ tab.label }}</text>
    </view>
    <view
      class="custom-tabs-cursor"
      :style="{ left: cursorPosition + 'px' }"
    ></view>
  </view>
</template>

<style lang="scss">
  // 自定义tabbar
  .custom-tabs {
    display: flex;
    position: relative;
    padding: 0 30rpx;
  }

  .custom-tabs-bar {
    height: 80rpx;
    line-height: 80rpx;
    color: #979797;
    padding-right: 30rpx;
    position: relative;

    &.active {
      color: #121826;
      font-weight: 500;
    }
  }

  .tabbar-text {
    font-size: 30rpx;
  }

  .custom-tabs-cursor {
    position: absolute;
    bottom: 3px;
    left: 20px;

    width: 20px;
    height: 2px;
    border-radius: 2px;
    background-color: #2cb5a5;
    transition: all 0.3s ease-out;
  }
</style>
1.1.2 custom-sticky
<!-- components/custom-sticky/custom-sticky.vue -->
<script setup>
  import { computed } from 'vue'

  // 接收组件外部传入的数据
  const stickyProps = defineProps({
    offsetTop: {
      type: [String, Number],
      default: 0,
    },
    backgroundColor: {
      type: String,
      default: '#fff',
    },
  })

  // 组件样式
  const stickStyle = computed(() => {
    return {
      paddingTop: stickyProps.offsetTop,
      backgroundColor: stickyProps.backgroundColor,
    }
  })
</script>

<template>
  <view :style="stickStyle" class="custom-sticky">
    <slot></slot>
  </view>
</template>

<style lang="scss">
  .custom-sticky {
    position: sticky;
    z-index: 100;
    top: 0;
  }
</style>
最后将两个组件引入到首页中
<!-- pages/index/index.vue -->
<script setup>
  import { ref } from 'vue'
  // 获取安全区域数据
  const { safeAreaInsets } = uni.getSystemInfoSync()
  // 标签页索引值
  const tabIndex = ref(0)
  // 标签页数据
  const feedTabs = ref([
    { label: '推荐', },
    { label: '关注', },
    { label: '减脂', },
    { label: '饮食', },
  ])

  // 切换标签页
  function onFeedTabChange({ index }) {
    tabIndex.value = index
  }
</script>

<template>
  <scroll-page>
    <view
      class="index-page"
      :style="{ backgroundPositionY: -48 + safeAreaInsets.top + 'px' }"
    >
      <!-- 省略前面小节的代码... -->

      <!-- 标签切换 -->
      <view
        class="doctor-feeds"
        :style="{ marginTop: -safeAreaInsets.top + 'px' }"
      >
        <custom-sticky :offset-top="safeAreaInsets.top + 'px'">
          <custom-tabs @click="onFeedTabChange" :list="feedTabs" />
        </custom-sticky>
      </view>
    </view>
  </scroll-page>
</template>

<style lang="scss">
  @import './index.scss';
</style>
1.2 知识列表
知识列表分为关注、推荐、减脂和饮食4个类别,每个类别的布局结构是一致的,只是数据各不相同。
1.2.1 布局模板
不同类型的知识列表的布局结构是一致的,我们将其封装成一个公共的组件:
<!-- pages/index/components/feed-list.vue -->
<script setup>
  import { onMounted } from 'vue'

  onMounted(() => {
    console.log('mounted...')
  })

  // 接收组件外部传入的数据
  const props = defineProps({
    list: Array,
  })
</script>

<template>
  <view class="feed-list">
    <view class="feed-list-item">
      <view class="feed-meta">
        <image class="doctor-avatar" src="/static/uploads/doctor-avatar.jpg" />
        <view class="doctor-info">
          <text class="name">王医生</text>
          <text class="desc">积水潭 皮肤科 主任医师</text>
        </view>
        <button class="doctor-button" plain>+ 关注</button>
      </view>
      <view class="feed-topic">炎热夏季如何防晒?</view>
      <view class="feed-relation"># 儿童健康</view>
      <view class="feed-content">
        <view class="text">
          炎热的夏季,那大太阳无时不刻在考验着我们的肌肤,过强、过多的阳光中紫外线的
        </view>
        <view class="picture">
          <image
            mode="aspectFill"
            class="uni-image"
            src="/static/uploads/feed-1.jpeg"
          />
          <image
            mode="aspectFill"
            class="uni-image"
            src="/static/uploads/feed-2.jpeg"
          />
          <image
            mode="aspectFill"
            class="uni-image"
            src="/static/uploads/feed-3.jpeg"
          />
        </view>
      </view>
      <view class="feed-extra">
        <text>12 收藏</text>
        <text>120 评论</text>
      </view>
    </view>
  </view>
</template>

<style lang="scss">
  .feed-list-item {
    padding: 40rpx 0;
    margin: 0 30rpx;
    border-bottom: 1rpx solid #ededed;

    &:last-child {
      border-bottom: none;
    }
  }

  .feed-meta {
    display: flex;
    height: 80rpx;
    position: relative;
  }

  .doctor-avatar {
    width: 80rpx;
    height: 80rpx;
    border-radius: 50%;
  }

  .doctor-info {
    flex: 1;
    display: flex;
    justify-content: space-evenly;
    flex-direction: column;
    padding-left: 20rpx;

    .name {
      font-size: 28rpx;
      color: #3c3e42;
    }

    .desc {
      font-size: 24rpx;
      color: #c3c3c5;

      @include text-overflow(1);
    }
  }

  .doctor-button {
    display: flex;
    width: 140rpx;
    height: 56rpx;
    line-height: 56rpx;
    font-size: 24rpx;
    color: #2cb5a5 !important;
    border: 2rpx solid #2cb5a5 !important;
    border-radius: 60rpx;
  }

  .feed-topic {
    line-height: 1;
    margin: 30rpx 0 24rpx;
    font-size: 32rpx;
    font-weight: 500;
    color: #121826;
  }

  .feed-relation {
    line-height: 1;
    margin: 24rpx 0 20rpx;
    font-size: 24rpx;
    color: #2cb5a5;
  }

  .feed-content {
    font-size: 28rpx;
    color: #6f6f6f;

    .picture {
      display: flex;
      justify-content: space-between;
      padding: 20rpx 0;
    }

    .uni-image {
      width: 212rpx;
      height: 212rpx;
      border-radius: 20rpx;
    }
  }

  .feed-extra {
    font-size: 24rpx;
    color: #c3c3c5;
  }
</style>
1.2.2 组件交互
切换标签页时,每个标签页对应了一个数据列表,这些数据列表要满足以下要求:
- 每个列表只被初始化一次
- 每个列表有自已的页码
- 每个列表的数据互不影响
为此我们要构造一个数据结构:
<!-- pages/index/index.vue -->
<script setup>
  import { ref } from 'vue'
  // 获取安全区域数据
  const { safeAreaInsets } = uni.getSystemInfoSync()
  // 标签页索引值
  const tabIndex = ref(0)

  // 标签页数据
  const feedTabs = ref([
    { label: '推荐', type: '', current: 1, hasMore: true, list: [], rendered: true },
    { label: '关注', type: '', current: 1, hasMore: true, list: [], rendered: false },
    { label: '减脂', type: '', current: 1, hasMore: true, list: [], rendered: false },
    { label: '饮食', type: '', current: 1, hasMore: true, list: [], rendered: false },
  ])

  // 切换标签页
  function onFeedTabChange({ index }) {
    tabIndex.value = index
  }
</script>
在这个数据结构的基础上根据索引值的变化来获取当前标签页对应的数据:
<!-- pages/index/index.vue -->
<script setup>
  import { ref, computed } from 'vue'
  // 获取安全区域数据
  const { safeAreaInsets } = uni.getSystemInfoSync()
  // 标签页索引值
  const tabIndex = ref(0)

  // 标签页数据
  const feedTabs = ref([
    { label: '推荐', type: '', current: 1, hasMore: true, list: [], rendered: true },
    { label: '关注', type: '', current: 1, hasMore: true, list: [], rendered: false },
    { label: '减脂', type: '', current: 1, hasMore: true, list: [], rendered: false },
    { label: '饮食', type: '', current: 1, hasMore: true, list: [], rendered: false },
  ])

  // 标签页对应的类型 type
  const feedType = computed(() => feedTabs.value[tabIndex.value].type)
  // 标签页对应的页码 current
  const feedCurrent = computed(() => feedTabs.value[tabIndex.value].current)
  // 每次请求多少条数据
  const feedPageSize = ref(5)

  // 切换标签页
  function onFeedTabChange({ index }) {
    tabIndex.value = index
    // 每个标签页只被初始一次
    feedTabs[index].rendered = true
  }
</script>
<template>
  <scroll-page @scrolltolower="onScrollToLower">
    <view
      class="index-page"
      :style="{ backgroundPositionY: -48 + safeAreaInsets.top + 'px' }"
    >
			<!-- 省略前面小节的代码... -->
      <view
        class="doctor-feeds"
        :style="{ marginTop: -safeAreaInsets.top + 'px' }"
      >
        <custom-sticky :offset-top="safeAreaInsets.top + 'px'">
          <custom-tabs @click="onFeedTabChange" :list="feedTabs" />
        </custom-sticky>
      </view>
			<!-- 关注知识列表 -->
      <view
        v-for="(feed, index) in feedTabs"
        :key="feed.type"
        v-show="tabIndex === index"
      >
        <feed-list :list="feed.list" v-if="feed.rendered" />
      </view>
    </view>
  </scroll-page>
</template>
以上代码中要关注的重点:
- 标签页显示或隐藏使用
v-show指令 - 标签页的初次渲染使用
v-if指令,当rendered值变为true时表示已经渲染过一次了 - 使用
:list属性向标签页组件内传入数据
1.2.3 获取数据
根据接口文档封装调用接口的方法,接口文档地址在这里。
// services/doctor.js
// 导入封装好的网络请求模块
import { http } from '@/utils/http'

/**
 * 首页知识列表
 */
export const feedListApi = (data) => {
  return http.get('/patient/home/knowledge', { params: data })
}
接下来在页面中调用方法获取数据并渲染。
<!-- pages/index/index.vue -->
<script setup>
  import { ref, computed, reactive } from 'vue'
  import { feedListApi } from '@/services/doctor'

  // 省略前面部分代码...

  // 切换标签页
  function onFeedTabChange({ index }) {
    // 标识当前选中的标签页
    tabIndex.value = index
    // 获取标签页数据
    if (!feedTabs.value[index].rendered) getFeedList()
    // 每个标签页只被初始一次
    feedTabs.value[index].rendered = true
  }

  // 获取知识列表
  async function getFeedList() {
    // 调用接口获取知识列表
    const { code, data, message } = await feedListApi({
      type: feedType.value,
      current: feedCurrent.value,
      pageSize: feedPageSize.value,
    })
    // 检测接口是否调用成功
    if (code !== 10000) return uni.utils.toast(message)
    // 列表中原来的数据
    const list = feedTabs.value[tabIndex.value].list
    // 追加方式渲染新请求来的数据
    feedTabs.value[tabIndex.value].list = [...list, ...data.rows]
  }
  // 渲染默认标签页数据
  getFeedList()
</script>
在上述代码中大家要注意三点:
- 在
rendered值为false时才请求数据,避免重复请求 - 每次请求的数据是合并进来的,这么做的目的是为后面的分页功能做准备的
- 数据是由后端爬取过来的,内容中包含了很多 html 标签,需要利用正则替换
最后将请求的数据渲染到页面当中:
<!-- pages/index/components/feed-list.vue -->
<script setup>
	// 省略前面小节的代码...
</script>
<template>
  <view class="feed-list">
    <view v-for="item in list" :key="item.id" class="feed-list-item">
      <view class="feed-meta">
        <image class="doctor-avatar" :src="item.creatorAvatar" />
        <view class="doctor-info">
          <text class="name">{{ item.creatorName }}</text>
          <text class="desc">
            {{ item.creatorHospatalName }}
            {{ item.creatorDep }}
            {{ item.creatorTitles }}
          </text>
        </view>
        <button v-if="item.likeFlag === 1" class="doctor-button" plain>已关注</button>
        <button v-else class="doctor-button" plain>+ 关注</button>
      </view>
      <view class="feed-topic">{{ item.title }}</view>
      <view class="feed-relation"># {{ item.topic }}</view>
      <view class="feed-content">
        <view class="text">
          {{ item.content }}
        </view>
        <view class="picture">
          <image
            v-for="picture in item.coverUrl"
            mode="aspectFill"
            class="uni-image"
            :src="picture"
          />
        </view>
      </view>
      <view class="feed-extra">
        <text>12 收藏</text>
        <text>120 评论</text>
      </view>
    </view>
  </view>
</template>
<style lang="scss">
	// 省略前面小节的代码...

  .feed-content {
    font-size: 28rpx;
    color: #6f6f6f;

		// 处理文字溢出
    .text {
      @include text-overflow(3);
    }
    // 省略前面小节代码...
  }

</style>
在渲染文章数据时内容字数太多了,结合 css 只保留 3 行,多余的部分用省略号代替,这段 css 代码我们已经封装到 sass 中了。
1.2.4 分页数据
在移动设备分页请求数据常常结合的交互是滚动加载或者叫上拉加载,实现这个交互需要做到3点:
- 监听页面滚动是否滚动到底部了,在
scroll-view组件上监听的是scrolltolower事件 - 记录每次请求数据的页码,并在请求结束后将页码加1
- 判断是否还有更多的数据,根据页码数值来判断
<!-- pages/index/index.vue -->
<script setup>
  import { ref, computed, reactive } from 'vue'
  import { feedListApi } from '@/services/doctor'

  // 省略前面小节的代码...

  // 滚动加载更多数据
  function onScrollToLower() {
    // hasMore 为 true 时才去请求
    if (feedTabs.value[tabIndex.value].hasMore) getFeedList()
  }

  // 获取知识列表
  async function getFeedList() {
    // 调用接口获取知识列表
    const { code, data, message } = await feedListApi({
      type: feedType.value,
      current: feedCurrent.value,
      pageSize: feedPageSize.value,
    })
    // 检测接口是否调用成功
    if (code !== 10000) return uni.utils.toast(message)

    // 过滤掉 html 标签
    data.rows.forEach((row) => {
      row.content = row.content.replace(/<[^>]+>/g, '')
    })

    // 列表中原来的数据
    const list = feedTabs[tabIndex.value].list
    // 追加方式渲染新请求来的数据
    feedTabs.value[tabIndex.value].list = [...list, ...data.rows]

    // 列表数据的页码
    const current = feedTabs.value[tabIndex.value].current
    // 更新标签页码
    feedTabs.value[tabIndex.value].current = current + 1
    // 判断是否有更多数据
    feedTabs.value[tabIndex.value].hasMore = current + 1 <= data.pageTotal
  }

  // 省略前面小节的代码...
</script>
<template>
	<scroll-page @scrolltolower="onScrollToLower">
    ...
  </scroll-page>
</template>
上述监听滚动时并未做防抖的处理,大家自已来完善一下。
1.3 医生列表
获取推荐的医生列表,允许用户关注医生。
1.3.1 布局模板
<!-- pages/index/components/doctor-list.vue -->
<script setup>
  // 接收组件外部传入的数据
  const props = defineProps({
    list: Array,
  })
</script>

<template>
  <view class="doctor-list">
    <view class="doctor-list-header">
      <text class="title">推荐关注</text>
      <navigator hover-class="none" url=" " class="more">查看更多</navigator>
      <uni-icons color="#c3c3c5" type="forward" />
    </view>
    <scroll-view scroll-x :show-scrollbar="false">
      <view class="doctor-list-wrapper">
        <view class="doctor-list-item">
          <image
            class="doctor-avatar"
            src="/static/uploads/doctor-avatar.jpg"
          />
          <view class="name">王医生</view>
          <view class="unit">积水潭 皮肤科</view>
          <view class="level">主任医师</view>
          <button class="follow">+ 关注</button>
        </view>
      </view>
    </scroll-view>
  </view>
</template>

<style lang="scss">
  .doctor-list {
    height: 480rpx;
    padding-top: 20rpx;
    background-color: #f6f7f9;
  }

  .doctor-list-header {
    display: flex;
    align-items: center;
    height: 60rpx;
    padding: 0 15rpx 0 30rpx;
    margin-bottom: 10rpx;
    font-size: 28rpx;

    .title {
      color: #121826;
      flex: 1;
    }

    .more {
      color: #c3c3c5;
    }
  }

  .doctor-list-wrapper {
    display: flex;
    width: 1500rpx;
    padding-right: 30rpx;
  }

  .doctor-list-item {
    display: flex;
    flex-direction: column;
    align-items: center;
    width: 270rpx;
    height: 380rpx;
    padding: 30rpx;
    margin-left: 30rpx;
    box-sizing: border-box;
    border-radius: 20rpx;
    background-color: #fff;

    .doctor-avatar {
      width: 120rpx;
      height: 120rpx;
      border-radius: 50%;
      margin-bottom: 20rpx;
    }

    .name {
      font-size: 26rpx;
      color: #121826;
    }

    .unit,
    .level {
      width: 100%;
      font-size: 24rpx;
      text-align: center;
      color: #c3c3c5;
      text-overflow: ellipsis;
      overflow: hidden;
      white-space: nowrap;
    }

    .follow {
      width: 150rpx;
      height: 58rpx;
      text-align: center;
      line-height: 58rpx;
      margin-top: 20rpx;
      font-size: 24rpx;
      border-radius: 60rpx;
      color: #fff;
      background-color: #16c2a3;
    }
  }
</style>
1.3.2 获取数据
根据接口文档的要求封装调用接口的方法,接口文档地址在这里。
// services/doctor.js
// 导入封装好的网络请求模块
import { http } from '@/utils/http'

// 省略前面小节的代码...

/**
 * 推荐医生列表
 */
export const doctorListApi = (current = 1, pageSize = 5) => {
  return http.get('/home/page/doc', { params: { current, pageSize } })
}
接下来调用接口获取数据
<!-- pages/index/index.vue -->
<script setup>
  import { ref, computed, reactive } from 'vue'
  import { doctorListApi, feedListApi } from '@/services/doctor'

  // 省略前面小节的代码...

  // 医生列表
  const doctorItems = ref([])

  // 省略前面小节的代码...

  // 获取推荐医生列表
  async function getDoctorList() {
    // 医生列表接口
    const { code, data, message } = await doctorListApi()
    //检测接口是否调用成功
    if (code !== 10000) return uni.utils.toast(message)
    // 渲染数据
    doctorItems.value = data.rows
  }

  // 渲染默认标签页数据
  getFeedList()
  // 医生列表
  getDoctorList()
</script>

<template>
  <scroll-page @scrolltolower="onScrollToLower">
    <view
      class="index-page"
      :style="{ backgroundPositionY: -48 + safeAreaInsets.top + 'px' }"
    >

      <!-- 医生列表 -->
      <doctor-list :list="doctorItems" v-show="feedType === 'recommend'" />

    </view>
  </scroll-page>
</template>
数据渲染相关的代码如下:
<!-- pages/index/components/doctor-list.vue -->
<script setup>
  const props = defineProps({
    list: Array,
  })
</script>
<template>
  <view class="doctor-list">
    <view class="doctor-list-header">
      <text class="title">推荐关注</text>
      <navigator hover-class="none" url=" " class="more">查看更多</navigator>
      <uni-icons color="#c3c3c5" type="forward" />
    </view>
    <scroll-view scroll-x :show-scrollbar="false">
      <view class="doctor-list-wrapper">
        <view v-for="item in props.list" :key="item.id" class="doctor-list-item">
          <image class="doctor-avatar" :src="item.avatar" />
          <view class="name">{{ item.name }}</view>
          <view class="unit"> {{ item.hospitalName }} {{ item.depName }} </view>
          <view class="level">{{ item.positionalTitles }}</view>
          <button v-if="item.likeFlag === 1">已关注</button>
          <button v-else class="follow">+ 关注</button>
        </view>
      </view>
    </scroll-view>
  </view>
</template>
1.3.3 关注医生
根据接口文档的要求封装调用接口的方法,接口文档的地址在这里。
// services/doctor.js
import { http } from '@/utils/http'

// 省略前面小节的代码...

/**
 * 关注医生
 */
export const followDoctorApi = (id, type = 'doc') => {
  return http.post('/like', { id, type })
}
然后调用接口关注医生,并变更按钮的样式。
<!-- pages/index/components/doctor-list.vue -->
<script setup>
  import { ref } from 'vue'
  import { followDoctorApi } from '@/services/doctor'
  // 接收组件外部的数据
  const props = defineProps({
    list: Array,
  })

  // 关注医生
  async function onFollowButtonClick(doctor) {
    // 关注医生接口
    const { code, data, message } = await followDoctorApi(doctor.id)
    // 检测接口是否调用成功
    if (code !== 10000) return uni.utils.toast(message)
    // 关注成功
    doctor.likeFlag = 1
  }
</script>
<template>
  <view class="doctor-list">
		<!-- 省略前面小节的代码... -->
    <scroll-view scroll-x :show-scrollbar="false">
      <view class="doctor-list-wrapper">
        <view
          v-for="(item, index) in list"
          :key="item.id"
          class="doctor-list-item"
        >
          <!-- 省略前面小节的代码... -->
          <button v-if="item.likeFlag === 1" class="follow">已关注</button>
          <button v-else @click="onFollowButtonClick(item)" class="follow">
            + 关注
          </button>
        </view>
      </view>
    </scroll-view>
  </view>
</template>
二、极速问诊
按如下配置文件的分包配置创建页面,共4个页面,要先创建好页面,再去添加配置文件。
{
  "subPackages": [
    {
      "root": "subpkg_consult",
      "pages": [
        {
          "path": "quickly/index",
          "style": {
            "navigationBarTitleText": "极速问诊"
          }
        },
        {
          "path": "department/index",
          "style": {
            "navigationBarTitleText": "选择科室"
          }
        },
        {
          "path": "description/index",
          "style": {
            "navigationBarTitleText": "图文问诊"
          }
        },
        {
          "path": "patient/index",
          "style": {
            "navigationBarTitleText": "选择患者"
          }
        }
      ]
    }
  ]
}
2.1 问诊类型
问诊类型分为三甲图文和普通图文两种。
2.1.1 布局模板
<!-- subpkg_consult/quickly/index.vue -->
<script setup></script>

<template>
  <scroll-page>
    <view class="quickly-page">
      <image class="quickly-banner" src="/static/images/quickly-consult.png" />
      <view class="quickly-tips">
        <text class="highlight">20s</text>
        快速匹配专业医生
      </view>
      <uni-list :border="false" class="consult-type">
        <uni-list-item
          title="三甲图文问诊"
          note="三甲主治及以上级别医生"
          show-arrow
          thumb="/static/images/consult-type-1.png"
          thumb-size="lg"
        />
      </uni-list>
      <uni-list :border="false" class="consult-type">
        <uni-list-item
          title="普通图文问诊"
          note="二甲主治及以上级别医生"
          show-arrow
          thumb="/static/images/consult-type-2.png"
          thumb-size="lg"
        />
      </uni-list>
    </view>
  </scroll-page>
</template>

<style lang="scss">
  @import './index.scss';
</style>// subpkg_consult/quickly/index.scss
.quickly-page {
display: flex;
flex-direction: column;
align-items: center;
padding: 80rpx 30rpx 0;
}
.quickly-banner {
width: 480rpx;
height: 412rpx;
margin-bottom: 36rpx;
}
.quickly-tips {
margin-bottom: 70rpx;
font-size: 32rpx;
color: #3c3e42;
.highlight {
color: #2cb5a5;
}
}
.consult-type {
width: 100%;
margin-bottom: 30rpx;
overflow: hidden;
border: 1rpx solid #e5e5e5;
border-radius: 8rpx;
}
:deep(.uni-list-item__container) {
padding: 36rpx 30rpx !important;
}
:deep(.uni-list-item__content-title) {
font-size: 32rpx !important;
color: #3c3e42 !important;
}
:deep(.uni-list-item__content-note) {
font-size: 26rpx !important;
color: #848484 !important;
}
:deep(.uni-list--lg) {
width: 80rpx !important;
height: 80rpx !important;
}2.2.2 传递参数
在页面跳转的过程需要跨页面传递数,可以使用地址参数或者 Pinia 来实现跨页面数的共享。
<!-- pages/index/index.vue -->

<!-- 省略前面小节的代码... -->
<navigator hover-class="none" class="quick-entry-item" url="/subpkg_consult/quickly/index?type=2">
  <image class="quick-entry-icon" src="/static/images/quick-entry-2.png"/>
  <text class="label">极速问诊</text>
  <text class="small">20s医生极速回复</text>
</navigator>
<!-- 省略前面小节的代码... -->
接收地址的参数,并继续传到下一个页面,到此总计有两个参数,参数的名称及含义都是由接口规定好的:
type值为2表示极速问诊illnessType问诊的类型,值为1表示三甲图文,值为0表示普通图文
<!-- subpkg_consult/quickly/index.vue -->
<script setup>
  // 接收地址参数
  const props = defineProps({
    type: String,
  })
</script>

<template>
  <scroll-page>
    <view class="quickly-page">
      <image class="quickly-banner" src="/static/images/quickly-consult.png" />
      <view class="quickly-tips">
        <text class="highlight">20s</text>
        快速匹配专业医生
      </view>
      <uni-list :border="false" class="consult-type">
        <uni-list-item
          title="三甲图文问诊"
          note="三甲主治及以上级别医生"
          show-arrow
          :to="`/subpkg_consult/department/index?type=${props.type}&illnessType=1`"
          thumb="/static/images/consult-type-1.png"
          thumb-size="lg"
        />
      </uni-list>
      <uni-list :border="false" class="consult-type">
        <uni-list-item
          title="普通图文问诊"
          note="二甲主治及以上级别医生"
          show-arrow
          :to="`/subpkg_consult/department/index?type=${props.type}&illnessType=0`"
          thumb="/static/images/consult-type-2.png"
          thumb-size="lg"
        />
      </uni-list>
    </view>
  </scroll-page>
</template>
2.2 选择科室
选择问诊医生的科室,分为一级科室和二级科室
2.2.1 布局模板
<!-- subpkg_consult/department/index.vue -->
<script setup></script>

<template>
  <view class="department-page">
    <scroll-view scroll-y class="department-primary">
      <view class="department-item active">内科</view>
      <view class="department-item">外科</view>
      <view class="department-item"></view>
    </scroll-view>
    <scroll-view class="department-secondary">
      <navigator
        hover-class="none"
        url="/subpkg_consult/description/index"
        class="department-item"
      >
        普通内科
      </navigator>
    </scroll-view>
  </view>
</template>

<style lang="scss">
  @import './index.scss';
</style>// subpkg_consult/department/index.vue
.department-page {
display: flex;
height: 100vh;
/* #ifdef H5 */
height: calc(100vh - 45px);
/* #endif */
border-top: 1rpx solid #eee;
}
.department-primary {
width: 220rpx;
padding: 20rpx 0;
background-color: #f6f6f6;
.department-item {
line-height: 1.5;
padding: 20rpx 40rpx;
font-size: 28rpx;
color: #6f6f6f;
&.active {
color: #16c2a3;
background-color: #fff;
}
}
}
.department-secondary {
flex: 1;
padding: 20rpx 0;
.department-item {
line-height: 1.5;
padding: 20rpx 40rpx;
font-size: 28rpx;
color: #3c3e42;
}
}2.2.2 获取数据
根据接口文档的要求封装调用接口的方法,接口文档地址在这里。
// services/consult.js
import { http } from '@/utils/http'

/**
 * 医生科室列表
 */
export const departmentListApi = () => {
  return http.get('/dep/all')
}
然后在页面中调用接口获取科室数据列表
<!-- subpkg_consult/department/index.vue -->
<script setup>
  import { ref } from 'vue'
  import { departmentListApi } from '@/services/consult'
  // 科室列表
  const departmentList = ref([])
  // 科室列表
  async function getDepartmentList() {
    // 科室列表接口
    const { code, data, message } = await departmentListApi()
    // 检测接口是否调用成功
    if (code !== 10000) return uni.utils.toast(message)
    // 渲染列表数据
    departmentList.value = data
  }

  // 获取科室列表
  getDepartmentList()
</script>

<template>
  <view class="department-page">
    <scroll-view scroll-y class="department-primary">
      <view class="department-item active">内科</view>
      <view
        v-for="department in departmentList"
        :key="department.id"
        class="department-item"
      >
        {{ department.name }}
      </view>
      <view class="department-item"></view>
    </scroll-view>
    <!-- 省略前面小节代码... -->
  </view>
</template>

<style lang="scss">
  @import './index.scss';
</style>
2.2.3 标签切换
在点击一级科室时被点击的一级科室要被高亮显示,即添加 active 类名:
- 监听一级科室的点击事件
- 记录一级科室的索引值
<!-- subpkg_consult/department/index.vue -->
<script setup>
  import { ref } from 'vue'
  import { departmentListApi } from '@/services/consult'
  // 科室列表
  const departmentList = ref([])
  // 一级科室的索引值
  const tabIndex = ref(0)

	// 省略前面小节的代码...

  // 切换选择二级科室
  function onTopDeparmentClick(index) {
    tabIndex.value = index
  }

  // 获取科室列表
  getDepartmentList()
</script>

<template>
  <view class="department-page">
    <scroll-view scroll-y class="department-primary">
      <view
        v-for="(department, index) in departmentList"
        :key="department.id"
        @click="onTopDeparmentClick(index)"
        :class="{ active: tabIndex === index }"
        class="department-item"
      >
        {{ department.name }}
      </view>
      <view class="department-item"></view>
    </scroll-view>
    <!-- 省略前面小节的代码... -->
  </view>
</template>
2.2.4 二级科室
分析返回的数据后发现,二级科室的数据和一级科室数据是嵌套的关系,因此可根据一级科室的索值来获取相应的二级科室数据。
<!-- subpkg_consult/department/index.vue -->
<script setup>
  import { ref, computed } from 'vue'
  import { departmentListApi } from '@/services/consult'

	// 省略前面小节的代码...

  // 二级科室的数据
  const childDepartmentList = computed(() => {
    return departmentList.value[tabIndex.value]?.child
  })

  // 省略前面小节的代码...
</script>

<template>
  <view class="department-page">
		<!-- 省略前面小节的代码... -->
    <scroll-view class="department-secondary">
      <navigator
        v-for="childDepartment in childDepartmentList"
        :key="childDepartment.id"
        hover-class="none"
        url="/subpkg_consult/description/index"
        class="department-item"
      >
        {{ childDepartment.name }}
      </navigator>
    </scroll-view>
  </view>
</template>
2.2.5 传递参数
接收地址中的参数并继续传递到下一个页面,到此总计有 3 个参数,参数的名称及含义是由接口规定的:
type值为 2 表示极速问诊illnessType问诊的类型,值为1表示三甲图文,值为0表示普通图文depId科室的 ID 值
<!-- subpkg_consult/department/index.vue -->
<script setup>
  import { ref, computed } from 'vue'
  import { departmentListApi } from '@/services/consult'

  // 接收地址中的参数
  const props = defineProps({
    type: String,
    illnessType: String,
  })

  // 省略前面小节的代码...
</script>

<template>
  <view class="department-page">
		<!-- 省略前面小节的代码... -->
    <scroll-view class="department-secondary">
      <navigator
        v-for="childDepartment in childDepartmentList"
        :key="childDepartment.id"
        hover-class="none"
        :url="`/subpkg_consult/description/index?type=${props.type}&illnessType=${props.illnessType}&depId=${childDepartment.id}`"
        class="department-item"
      >
        {{ childDepartment.name }}
      </navigator>
    </scroll-view>
  </view>
</template>
2.3 病情描述
对病情进行简短的描述,包括是否就诊、患病时长等信息。
2.3.1 布局模板
<!-- subpkg_consult/description/index.vue -->
<script setup></script>

<template>
  <scroll-page>
    <view class="description-page">
      <!-- 在线医生 -->
      <view class="doctor-online">
        <image
          src="/static/uploads/doctor-avatar-2.png"
          class="doctor-avatar"
        />
        <view class="doctor-info">
          <view class="name">在线医生</view>
          <view class="message">
            请描述你的疾病或症状、是否用药、就诊经历,需要我听过什么样的帮助
          </view>
          <view class="tips">
            <text class="iconfont icon-shield"></text>
            内容仅医生可见
          </view>
        </view>
      </view>
      <!-- 患者信息 -->
      <view class="patient-info">
        <view class="description">
          <uni-easyinput
            type="textarea"
            :styles="{ backgroundColor: '#f6f6f6' }"
            :input-border="false"
            placeholder-style="font-size: 30rpx; color: #979797"
            placeholder="请详细描述您的病情,病情描述不能为空"
          />
        </view>

        <view class="title">本次患病多久了?</view>
        <view class="tags">
          <text class="tag active">一周内</text>
          <text class="tag">一个月内</text>
          <text class="tag">半年内</text>
          <text class="tag">大于半年</text>
        </view>

        <view class="title">此次病情是否去医院就诊过?</view>
        <view class="tags">
          <text class="tag">就诊过</text>
          <text class="tag active">没有就诊过</text>
        </view>
      </view>
      <!-- 上传图片 -->
      <view class="patient-picture">
        <uni-file-picker
          title="上传病情相关图片 (仅医生可见)"
          limit="8"
          :image-styles="{ width: '160rpx', height: '160rpx' }"
          file-extname="png,jpg,gif,webp"
        />
      </view>
    </view>
    <!-- 下一步操作 -->
    <view class="next-step">
      <button class="uni-button">下一步</button>
    </view>
  </scroll-page>
</template>

<style lang="scss">
  @import './index.scss';
</style>// subpkg_consult/description/index.scss
.description-page {
padding: 30rpx 30px 200rpx;
}
.doctor-online {
display: flex;
padding-bottom: 30rpx;
border-bottom: 1rpx solid #ededed;
.doctor-avatar {
width: 110rpx;
height: 110rpx;
}
.doctor-info {
flex: 1;
margin-left: 20rpx;
}
.name {
line-height: 1;
padding-left: 20rpx;
font-size: 32rpx;
color: #121826;
}
.message {
line-height: 1.5;
padding: 20rpx;
margin: 20rpx 0;
color: #6f6f6f;
font-size: 26rpx;
border-radius: 20rpx;
background-color: #f6f6f6;
}
.tips {
display: flex;
align-items: center;
color: #6f6f6f;
font-size: 24rpx;
}
.icon-shield {
font-size: 28rpx;
margin-right: 5rpx;
}
}
.patient-info {
margin-top: 30rpx;
.description {
width: 100%;
height: 240rpx;
padding: 30rpx;
border-radius: 20rpx;
box-sizing: border-box;
font-size: 30rpx;
color: #121826;
background-color: #f6f6f6;
}
.title {
margin: 30rpx 0 10rpx;
font-size: 28rpx;
color: #3c3e42;
}
.tags {
display: flex;
flex-wrap: wrap;
.tag {
line-height: 1;
padding: 16rpx 20rpx 14rpx;
margin: 20rpx 20rpx 20rpx 0;
font-size: 26rpx;
border-radius: 10rpx;
color: #3c3e42;
border: 1rpx solid transparent;
background-color: #f6f6f6;
&.active {
color: #2cb5a5;
border-color: #2cb5a5;
background-color: rgba(44, 181, 165, 0.1);
}
}
}
}
.patient-picture {
margin-top: 30rpx;
:deep(.uni-file-picker__header) {
padding-top: 0;
padding-bottom: 30rpx;
}
:deep(.file-title) {
font-size: 28rpx;
color: #3c3e42;
}
:deep(.file-count) {
font-size: 28rpx;
}
:deep(.file-picker__box-content) {
background-color: #f6f6f6;
border: none !important;
border-radius: 10rpx !important;
}
:deep(.icon-add) {
width: 60rpx;
height: 4rpx;
background-color: #ccc;
}
:deep(.icon-del-box) {
right: -3px !important;
top: -3px !important;
background-color: rgba(0, 0, 0, 0.3) !important;
transform: scale(0.6) rotate(-45deg) !important;
}
}
.next-step {
position: sticky;
right: 0;
left: 0;
bottom: env(safe-area-inset-bottom);
z-index: 100;
padding: 30rpx 40rpx;
background-color: #fff;
}2.3.2 病情数据
- 病情描述使用了
uni-easyinput组件,通过v-model即可获取数据
<!-- subpkg_consult/description/index.vue -->
<script setup>
  import { ref } from 'vue'

  // 病情描述数据
  const illnessInfo = ref({
    illnessDesc: '',
  })

</script>

<template>
  <scroll-page>
    <view class="description-page">
      <!-- 省略前面小节的代码... -->
      <!-- 患者信息 -->
      <view class="patient-info">
        <view class="description">
          <uni-easyinput
            v-model="illnessInfo.illnessDesc"
            type="textarea"
            :styles="{ backgroundColor: '#f6f6f6' }"
            :input-border="false"
            placeholder-style="font-size: 30rpx; color: #979797"
            placeholder="请详细描述您的病情,病情描述不能为空"
          />
        </view>
  		</view>
      <!-- 省略前面小节的代码... -->
    </view>
    <!-- 下一步操作 -->
    <view class="next-step">
      <button class="uni-button">下一步</button>
    </view>
  </scroll-page>
</template>- 患病时长,需要根据点击事件来获取数据
<!-- subpkg_consult/description/index.vue -->
<script setup>
  import { ref } from 'vue'

  const illnessInfo = ref({
    illnessDesc: '',
    illnessTime: '',
  })

  // 患病时长
  const illnessTimes = [
    { value: 1, text: '一周内' },
    { value: 2, text: '一月内' },
    { value: 3, text: '半年内' },
    { value: 4, text: '半年以上' },
  ]

    // 选择患病时长
  function onTimeTagClick(value) {
    // 记录用户选择的数据
    illnessInfo.value.illnessTime = value
  }
</script>

<template>
  <scroll-page>
    <view class="description-page">
      <!-- 省略前面小节的代码... -->
      <!-- 患者信息 -->
      <view class="patient-info">
        <!-- 省略前面小节的代码... -->
        <view class="title">本次患病多久了?</view>
        <view class="tags">
          <text
            v-for="illnessTime in illnessTimes"
            :key="illnessTime.value"
            @click="onTimeTagClick(illnessTime.value)"
            :class="{ active: illnessTime.value === illnessInfo.illnessTime }"
            class="tag"
          >
            {{ illnessTime.text }}
          </text>
        </view>
				<!-- 省略前面小节的代码... -->
      </view>
      <!-- 省略前面小节的代码... -->
    </view>
    <!-- 下一步操作 -->
    <view class="next-step">
      <button class="uni-button">下一步</button>
    </view>
  </scroll-page>
</template>- 是否就诊
<!-- subpkg_consult/description/index.vue -->
<script setup>
  import { ref } from 'vue'

  const illnessInfo = ref({
    illnessDesc: '',
    illnessTime: '',
    consultFlag: ''
  })

	// 省略前面小节的代码...

  // 是否就诊过
  const consultFlags = [
    { value: 1, text: '就诊过' },
    { value: 0, text: '没有就诊过' },
  ]

	// 省略前面小节的代码...

  function onFlagTagClick(value) {
    // 记录用户选择的数据
    illnessInfo.value.consultFlag = value
  }
</script>

<template>
  <scroll-page>
    <view class="description-page">
      <!-- 省略前面小节的代码... -->
      <!-- 患者信息 -->
      <view class="patient-info">
        <!-- 省略前面小节的代码... -->
				<view class="title">此次病情是否去医院就诊过?</view>
        <view class="tags">
          <text
            v-for="consultFlag in consultFlags"
            :key="consultFlag.value"
            @click="onFlagTagClick(consultFlag.value)"
            :class="{ active: consultFlag.value === illnessInfo.consultFlag }"
            class="tag"
          >
            {{ consultFlag.text }}
          </text>
        </view>
      </view>
      <!-- 省略前面小节的代码... -->
    </view>
    <!-- 下一步操作 -->
    <view class="next-step">
      <button class="uni-button">下一步</button>
    </view>
  </scroll-page>
</template
2.3.3 uniCloud
扩展组件 uni ui 提供了文件上传的扩展组件 uni-file-picker,通过该组件可以轻松的将图片上传到云空间,在使用 uni-file-picker 组件之前先来开通免费的云空间。
- 使用注册前面课程中注册好的账号来登录 uniCloud 的控制台
- 新建服务空间
- 新建 uniCloud 开发环境
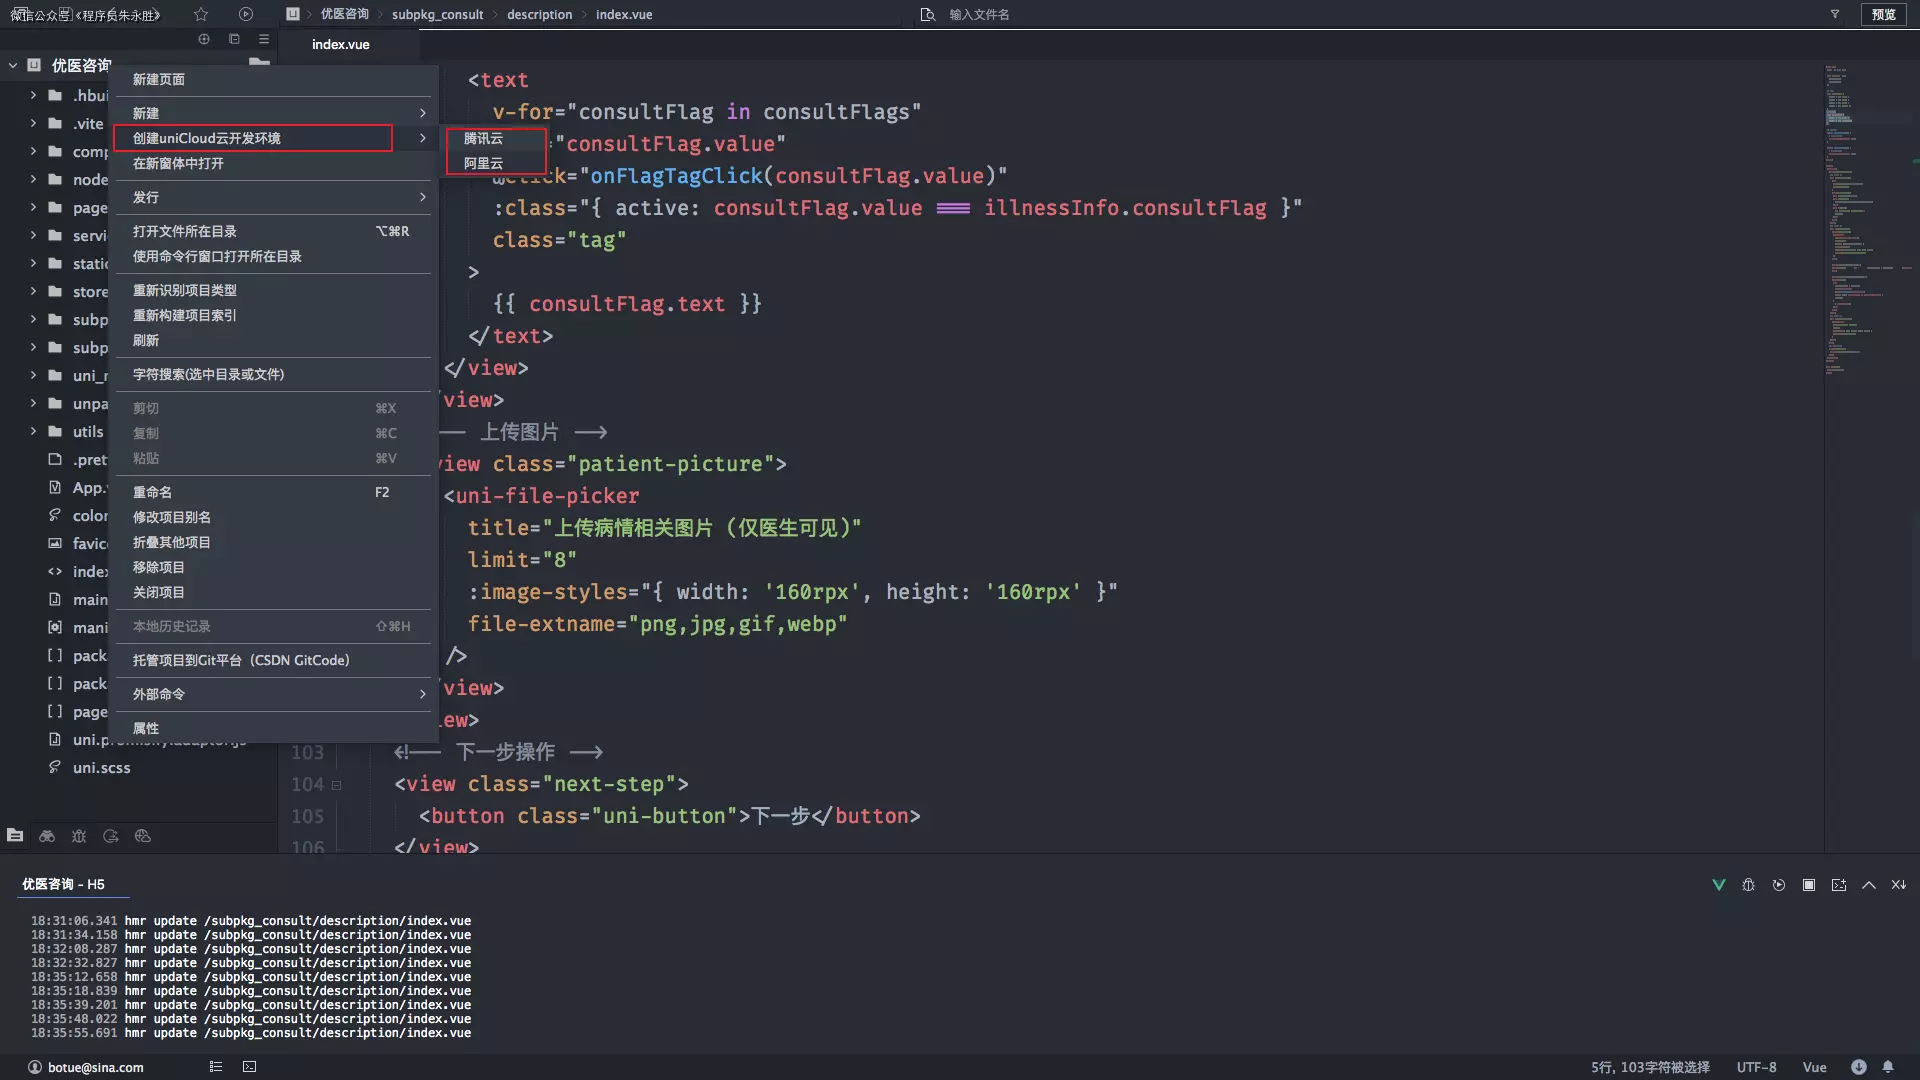
- 关联服务空间
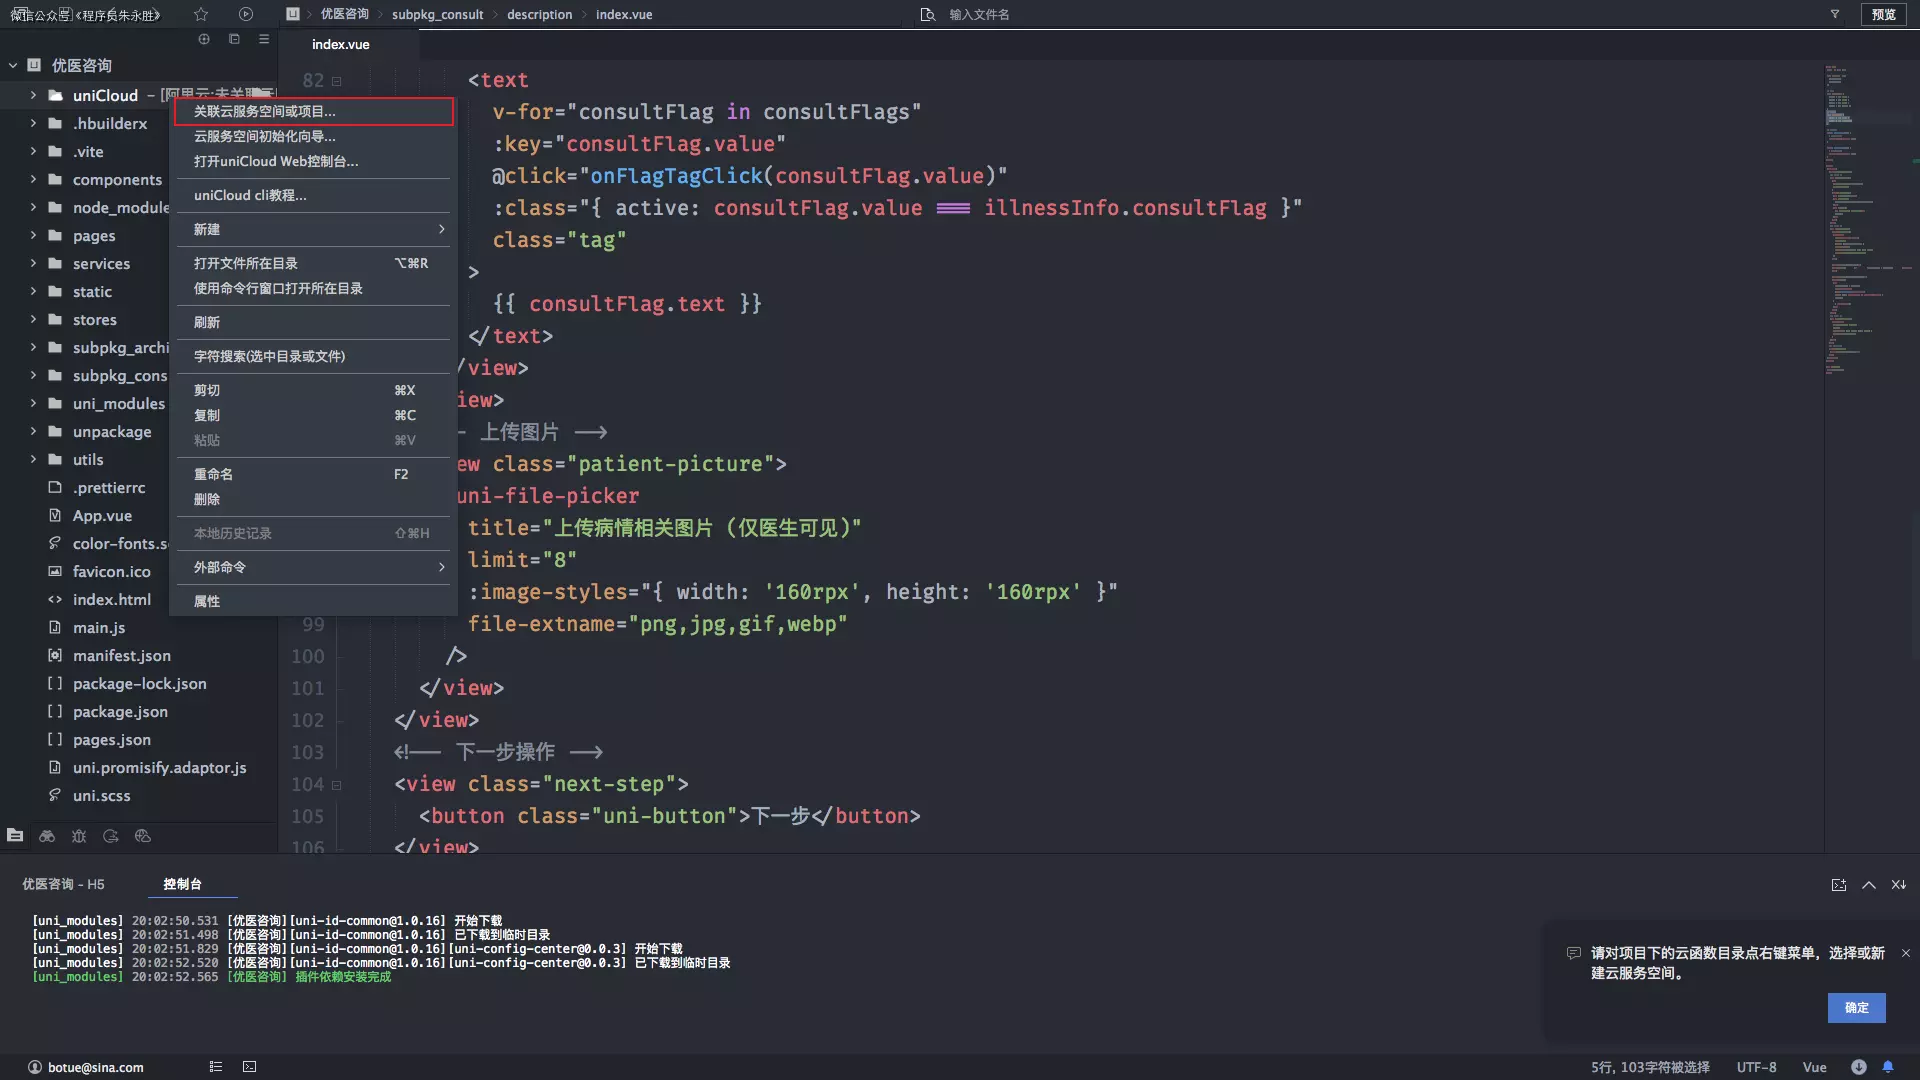
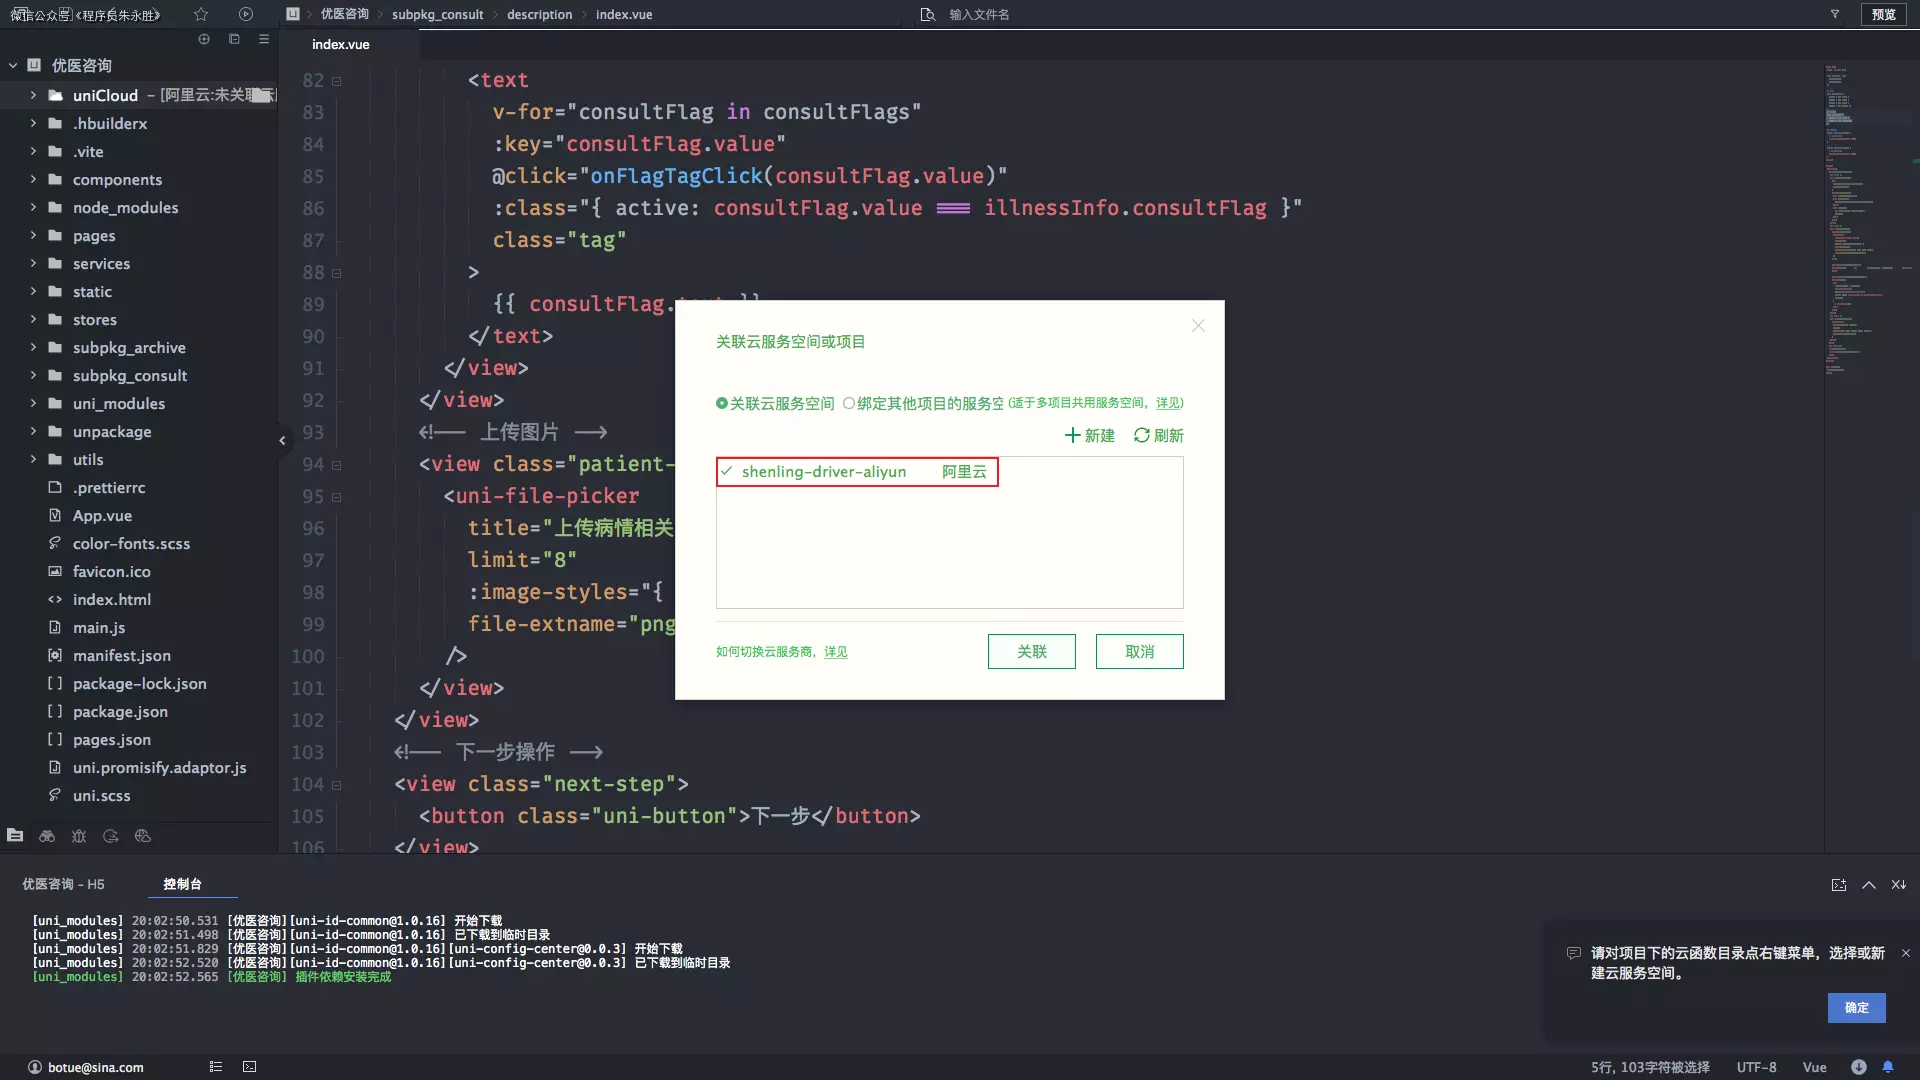
- 获取 AppID

- 重新启动项目。!!!非常重要!!!
- 上传图片,通过
uni-file-picker将病情相关的图片上传到云空间
<!-- subpkg_consult/description/index.vue -->
<script setup>
  import { ref } from 'vue'
	// 病情相关数据
  const illnessInfo = ref({
    illnessDesc: '',
    illnessTime: '',
    consultFlag: '',
    // 接收上传到云空间的图片
    pictures: [],
  })

  // 省略前面小节的代码...
</script>

<template>
  <scroll-page>
    <view class="description-page">
      <!-- 省略前面小节的代码... -->
      <!-- 上传图片 -->
      <view class="patient-picture">
        <uni-file-picker
          title="上传病情相关图片 (仅医生可见)"
          v-model="illnessInfo.pictures"
          limit="8"
          :image-styles="{ width: '160rpx', height: '160rpx' }"
          file-extname="png,jpg,gif,webp"
        />
      </view>
    </view>
    <!-- 下一步操作 -->
    <view class="next-step">
      <button class="uni-button">下一步</button>
    </view>
  </scroll-page>
</template>
在上述代码中关键的部分如下:
v-model用来回显和获取上传的图片limit限制可以上传图片的数量file-extname限制上传图片的类型image-styles回显图片的尺寸等样式
2.3.4 数据验证
要求病情描述、患病时长、是否就诊必填。
<!-- subpkg_consult/description/index.vue -->
<script setup>
  import { ref, computed } from 'vue'

  // 省略前面小节的代码...

  // 是否允许下一步操作
  const nextStepEnable = computed(() => {
    // 验证必要数据是否填写(接口中只要求病情描述必填)
    return (
      illnessInfo.value.illnessDesc !== '' &&
      illnessInfo.value.illnessTime !== '' &&
      illnessInfo.value.consultFlag !== ''
    )
  })

  // 省略前面小节的代码...
</script>
<template>
  <scroll-page>
    <!-- 省略前面小节的代码... -->

    <!-- 下一步操作 -->
    <view class="next-step">
      <button :disabled="!nextStepEnable" class="uni-button">下一步</button>
    </view>
  </scroll-page>
</template>
2.3.5 数据缓存
- 将患者填写的病情描述信息缓存在本地,配合 Pinia 来实现。
illnessInfo用来记录病情描述数据并要求持久化存储initialValue的作用是重置illnessInfo
// stores/consult.js
import { ref } from 'vue'
import { defineStore } from 'pinia'

export const useConsultStore = defineStore(
  'consult',
  () => {
    // 患者病情初始数据
    const initalValue = ref({
      illnessDesc: '',
      illnessTime: '',
      consultFlag: '',
      pictures: [],
    })

    // 患者病情数据
    const illnessInfo = ref({ ...initalValue.value })

    return { illnessInfo, initalValue }
  },
  {
    persist: {
      paths: ['illnessInfo'],
    },
  }
)- 在页面中应用 Pinia 的数据
<!-- subpkg_consult/description/index.vue -->
<script setup>
  import { ref, computed } from 'vue'
  import { storeToRefs } from 'pinia'
  import { useConsultStore } from '@/stores/consult'

  // 病情相关的数据
  const { illnessInfo, initalValue } = storeToRefs(useConsultStore())

  // 省略前面小节的代码...
</script>- 是否重置患者描述的数据
<!-- subpkg_consult/description/index.vue -->
<script setup>
  import { ref, computed } from 'vue'
  import { storeToRefs } from 'pinia'
  import { useConsultStore } from '@/stores/consult'

  // 病情相关的数据
  const { illnessInfo, initalValue } = storeToRefs(useConsultStore())

  // 省略前面小节的代码...

  // 提示用户是否恢复之前填写的病情数据
  if (illnessInfo.value.illnessDesc) {
    uni.showModal({
      title: '温馨提示',
      content: '是否恢复之前填写的病情信息?',
      confirmText: '确认',
      confirmColor: '#16C2A3',
      cancelColor: '#848484',
      success({ confirm }) {
        // 清空 Pinia 中记录的数据
        if (!confirm) illnessInfo.value = { ...initalValue.value }
      },
    })
  }
</script>- 将地址中的参数与缓存到本地
// stores/consult.js
import { ref } from 'vue'
import { defineStore } from 'pinia'
export const useConsultStore = defineStore(
  'consult',
  () => {
    // 患者病情初始数据
    const initalValue = ref({
      illnessDesc: '',
      illnessTime: '',
      consultFlag: '',
      pictures: [],
    })

    // 患者病情数据
    const illnessInfo = ref({ ...initalValue.value })

    // 极速问诊
    const type = ref('')
    // 问诊类型
    const illnessType = ref('')
    // 科室ID
    const depId = ref('')

    return { illnessInfo, initalValue, type, illnessType, depId }
  },
  {
    persist: {
      paths: ['illnessInfo', 'type', 'illnessType', 'depId'],
    },
  }
)
此处特意做出说明,地址中的 type、illnessType、depId 三个参数,将来会和病情描述的数据一起来创建问诊订单,并且这些数据全都是要跨页面来使用,因此配合 Pinia 将其缓存到本地。
那为什么一开始不使用 Pinia 而是通过地址传参的呢?
答:前面的步骤都是通过链接跳转来实现的,比较适合地址参数的方式来传递数据,而在病情描述这个页面中用户点击的【下一步】是个按钮,在点击事件回调中使用 Pinia 存数据比较方便。
<!-- subpkg_consult/description/index.vue -->
<script setup>
  import { ref, computed } from 'vue'
  import { storeToRefs } from 'pinia'
  import { useConsultStore } from '@/stores/consult'

  // 病情相关的数据
  const { illnessInfo, initalValue } = storeToRefs(useConsultStore())

  // 接收地址的参数
  const props = defineProps({
    type: String,
    illnessType: String,
    depId: String,
  })

  // 省略前面小节的代码...

  // 下一步选择患者
  function onNextStepClick() {
    // 问诊相关数据
    const consultStore = useConsultStore()
    // 缓存地址参数
    consultStore.type = props.type
    consultStore.illnessType = props.illnessType
    consultStore.depId = props.depId

    // 跳转到下一页
    uni.navigateTo({url: '/subpkg_consult/patient/index'})
  }

  // 省略前面小节的代码...
</script>

<template>
  <scroll-page>
    <!-- 省略前面小节的代码... -->
    <!-- 下一步操作 -->
    <view class="next-step">
      <button
        @click="onNextStepClick"
        :disabled="!nextStepEnable"
        class="uni-button"
      >
        下一步
      </button>
    </view>
  </scroll-page>
</template>