使用 Filebeat 采集 Nginx 日志发送 ElasticSearch
原创使用 Filebeat 采集 Nginx 日志发送 ElasticSearch
原创
软件书桌
发布于 2024-05-07 18:00:20
发布于 2024-05-07 18:00:20
定位排查问题时,都是结合记录的服务日志来排查的。
直接使用 Linux 命令查询服务日志的话,体验不好,效率较低。
可以使用 Filebeat 采集服务日志发送到 ElasticSearch 中进行搜索查看,这种方式体验好、效率高。
下面是一个 “使用 Filebeat 采集 Nginx 日志发送 ElasticSearch” 例子,掌握了这个基础例子,就可以在此基础上不断摸索和学习 Filebeat 和 ElasticSearch 相关的功能了。
- 部署 ElasticSearch
vi /etc/yum.repos.d/elasticsearch.repo

[elasticsearch]
name=Elasticsearch repository for 7.x packages
baseurl=https://artifacts.elastic.co/packages/7.x/yum
gpgcheck=1
gpgkey=https://artifacts.elastic.co/GPG-KEY-elasticsearch
enabled=0
autorefresh=1
type=rpm-md


yum install --enablerepo=elasticsearch elasticsearchvim /etc/elasticsearch/elasticsearch.yml
# 集群名称
cluster.name: my-application
# 节点名称
node.name: node-1
# 网络设置
network.host: 0.0.0.0
http.port: 9200
# 集群设置
cluster.initial_master_nodes: ["node-1"]
# 不加这个 elasticsearch-head 会连不上 ElasticSearch
http.cors.enabled: true
http.cors.allow-origin: "*"systemctl daemon-reload
systemctl enable elasticsearch
systemctl start elasticsearch
systemctl status elasticsearch
# 访问
http://178.104.163.125:9200/?pretty- 部署 ElasticSearch Header
yum install npm
npm config set registry https://registry.npmmirror.com
npm install -g grunt-cli

yum install git
git clone https://github.com/mobz/elasticsearch-head.git
cd elasticsearch-head
yum install bzip2
npm install

#修改app.js 搜索localhost,将localhost修改为安装ElasticSearch服务器的ip
vim _site/app.js

# 补充 hostname
vi Gruntfile.js
                connect: {
                        server: {
                                options: {
                                        hostname: '178.104.163.125',
                                        port: 9100,
                                        base: '.',
                                        keepalive: true
                                }
                        }
                }

# 使用nohup启动 日志会输出在当前文件夹nohup.out里面,启动端口默认为9100
nohup grunt server &

# 访问 elasticsearch-head
http://178.104.163.125:9100/
- 部署 filebeat
# 下载
curl -L -O https://artifacts.elastic.co/downloads/beats/filebeat/filebeat-7.6.2-linux-x86_64.tar.gz

# 解压
tar xzvf filebeat-7.6.2-linux-x86_64.tar.gz -C /usr/local


# 配置,例如:监听 stdin 输入,并输出到 console。
cd /usr/local/filebeat-7.6.2-linux-x86_64
vim filebeat-std.yml

filebeat.inputs:
- type: stdin
  enabled: true
output.console:
  pretty: true
  enable: true

# 启动
# 参数说明
# -e: 输出到标准输出,默认输出到 syslog 和 logs 下
# -c: 指定配置文件
./filebeat -e -c filebeat-std.yml
输入数据后,在 console 上看到输出数据,代表 filebeat 正常运行了。
- 收集 Nginx Log 到 ElasticSearch
1、测试 filebeat 是否可以正常采集 Nginx 日志。
# 配置读取日志文件 filebeat-nginx-log.yml
vim filebeat-nginx-log.yml

filebeat.inputs:
- type: log
  enabled: true
  paths:
    - /var/log/nginx/*.log
setup.template.settings:
  index.number_of_shards: 3
output.console:
  pretty: true
  enable: true
2、启动,执行测试。
./filebeat -e -c filebeat-nginx-log.yml

# 参数说明
-e: 输出到标准输出,默认输出到syslog和logs下
-c: 指定配置文件

# 访问 Nginx
curl 178.104.163.125

# 控制输出如下内容,则测试正常。
{
  "@timestamp": "2024-05-06T03:27:39.844Z",
  "@metadata": {
    "beat": "filebeat",
    "type": "_doc",
    "version": "7.6.2"
  },
  "log": {
    "offset": 1713,
    "file": {
      "path": "/var/log/nginx/access.log"
    }
  },
  "message": "178.104.163.125 - - [06/May/2024:11:27:35 +0800] \"GET / HTTP/1.1\" 200 4833 \"-\" \"curl/7.29.0\" \"-\"",
  "input": {
    "type": "log"
  },
  "ecs": {
    "version": "1.4.0"
  },
  "host": {
    "name": "desktop-ad54"
  },
  "agent": {
    "version": "7.6.2",
    "type": "filebeat",
    "ephemeral_id": "b732ec2a-6727-44c5-a8e5-f615a208fd00",
    "hostname": "desktop-ad54",
    "id": "8de47476-56b2-4d41-af7d-6d0f1c6b2833"
  }
}
3、配置输出到 ElasticSearch。
vi /etc/filebeat/filebeat.yml

filebeat.inputs:
- type: log
  enabled: true    # 行号 24,启用输入配置。
  paths:
    - /var/log/nginx/*.log    # 行号 28,收集日志文件的路径。
    filebeat.config.modules:
  path: ${path.config}/modules.d/*.yml
  reload.enabled: true    # 行号 73,启动 filebeat 模块。

output.elasticsearch:
  hosts: ["178.104.163.125:9200"]


# 启动
nohup ./filebeat -e -c filebeat.yml > filebeat.log &
ps -a
kill -9 [pid]
Elasticsearch-head http://178.104.163.125:9100/
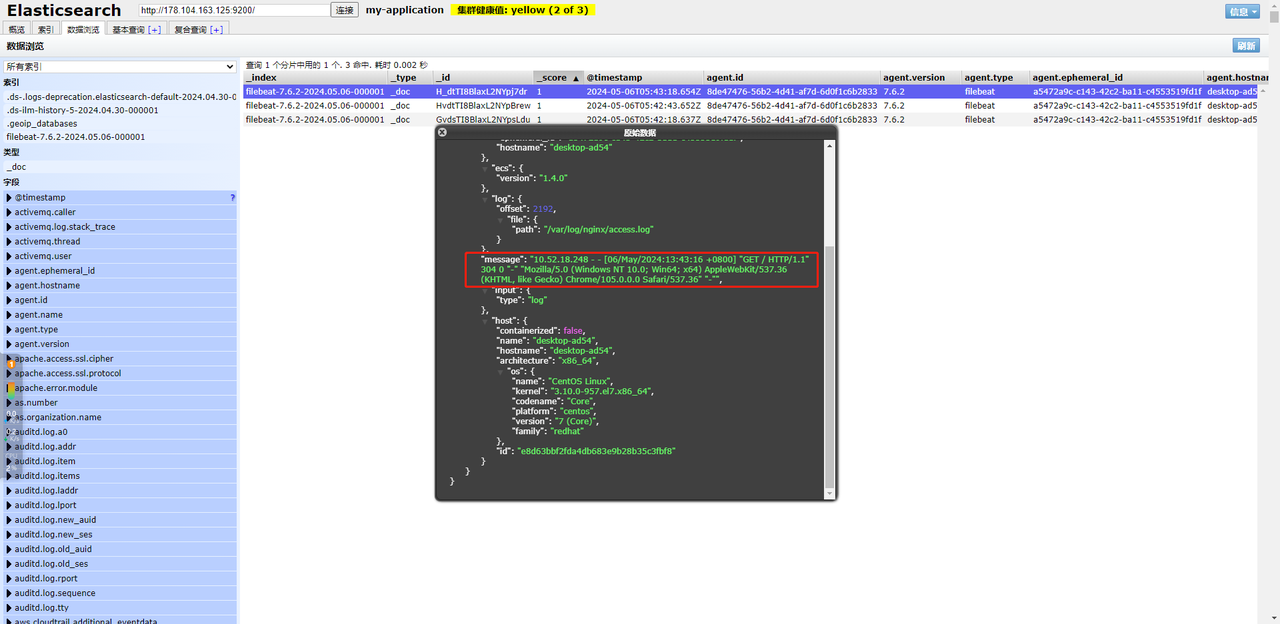
# ElasticSearch 中 log 存储形式
"message": "10.52.18.248 - - [06/May/2024:13:43:16 +0800] "GET / HTTP/1.1" 304 0 "-" "Mozilla/5.0 (Windows NT 10.0; Win64; x64) AppleWebKit/537.36 (KHTML, like Gecko) Chrome/105.0.0.0 Safari/537.36" "-"",

# Nginx Log 原始格式
10.52.18.248 - - [06/May/2024:13:43:16 +0800] "GET / HTTP/1.1" 304 0 "-" "Mozilla/5.0 (Windows NT 10.0; Win64; x64) AppleWebKit/537.36 (KHTML, like Gecko) Chrome/105.0.0.0 Safari/537.36" "-"
一行日志被当成一个 Message 属性,存储到了 ElasticSearch 中。
这样搜索起来不一定方便,最好将一行日志拆解成多个属性,存入 ElasticSearch 中。
可以使用 filebeat 内置 nginx 模板收集 nginx 日志。
- 使用 filebeat 内置 nginx 模板收集 nginx 日志
# 启用 Nginx Module
# 查看 Filebeat 支持模块
./filebeat modules list

# 启动
./filebeat modules enable nginx

# 禁用
./filebeat modules disable nginx# 配置 nginx log file Path
vi modules.d/nginx.yml
# Module: nginx
# Docs: https://www.elastic.co/guide/en/beats/filebeat/7.6/filebeat-module-nginx.html
- module: nginx
# Access logs
access:
enabled: true
# Set custom paths for the log files. If left empty,
# Filebeat will choose the paths depending on your OS.
var.paths: ["/var/log/nginx/access.log"]
# Error logs
error:
enabled: true
# Set custom paths for the log files. If left empty,
# Filebeat will choose the paths depending on your OS.
var.paths: ["/var/log/nginx/error.log"]# 编写 Nginx 配置文件
vi a_nginx.yml
# 输入
filebeat.inputs:
# 增加标签
tags: ["nginx10"]
# 指定索引的分区数
setup.template.settings:
index.number_of_shards: 1
# 使用 filebeat modules
filebeat.config.modules:
path: ${path.config}/modules.d/*.yml
reload.enabled: false
# 输出到指定ES的配置
output.elasticsearch:
hosts: ["178.104.163.125:9200"]# 启动运行
./filebeat -e -c a_nginx.yml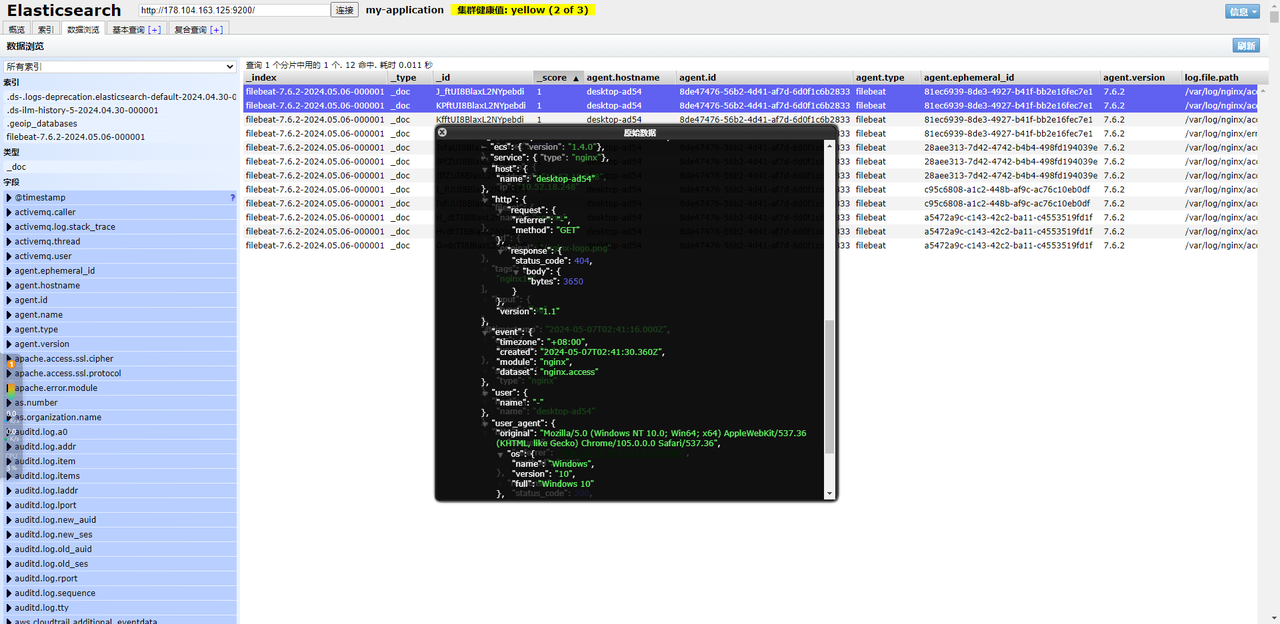
可以看到不再是一个 Message 字段,而是被拆分成了多个字段,这样搜索起来更方便。
原创声明:本文系作者授权腾讯云开发者社区发表,未经许可,不得转载。
如有侵权,请联系 cloudcommunity@tencent.com 删除。
原创声明:本文系作者授权腾讯云开发者社区发表,未经许可,不得转载。
如有侵权,请联系 cloudcommunity@tencent.com 删除。
评论
登录后参与评论
推荐阅读
相关产品与服务
Elasticsearch Service
腾讯云 Elasticsearch Service(ES)是云端全托管海量数据检索分析服务,拥有高性能自研内核,集成X-Pack。ES 支持通过自治索引、存算分离、集群巡检等特性轻松管理集群,也支持免运维、自动弹性、按需使用的 Serverless 模式。使用 ES 您可以高效构建信息检索、日志分析、运维监控等服务,它独特的向量检索还可助您构建基于语义、图像的AI深度应用。