vue 项目中自定义布局与左侧菜单及路由跳转功能的实现(简易版)
vue 项目中自定义布局与左侧菜单及路由跳转功能的实现(简易版)

在 Vue项目中,实现自定义布局与左侧菜单及路由跳转功能,对于笔者这种不是精通前端开发的同学一向是比较困难的。以前都是在开源项目的基础上扩展自己的功能,比较著名的开源项目 vue-element-admin 就是开源项目的作者通过定义实现的左侧菜单和路由跳转的。不过 vue-element-admin 项目使用的 vue 版本还停留在 vue2,现在市场上新项目普遍都用 vue3 技术了, 但是 vue-element-admin 项目也相应地出了 Vue3 版本,对应的 gitee 仓库地址为:https://gitee.com/youlaiorg/vue3-element-admin.git
笔者要实现的自定义左侧菜单和路由跳转功能也是参考vue-element-admin 项目中的Layout组件实现的,不过遵循先易后难的原则,我们先实现只有两级菜单和路由跳转的功能,后面迭代的时候再做动态权限控制和三级以上的菜单功能。
本文基于笔者个人的gitee项目, 项目仓库地址:https://gitee.com/heshengfu1211/exam-vue-admin.git
需要查看项目完整代码的读者可以从gitee上克隆下来参考,登录和首页功能在笔者去年发布的文章Vue3项目集成CKEditor富文本编辑器,支持代码语法高亮显示! 中实现,本文中主要介绍左侧菜单和路由跳转功能的实现。
定义路由数组
src/router/index.js 文件中修改constantRoutes
export const constantRoutes = [
    {
        path: '/login',
        name: 'login',
        level: null,
        component: ()=>import('@/views/Login.vue'),
        meta: {
            requiresAuth: false,
            icon: 'login',
            title: '登陆'
        },
        hidden: true
    },
    {
        path: '/',
        component: Layout,
        level: 1,
        index: '1',
        hidden: false,
        redirect: '/home',
        meta: { title: '一级菜单', icon: 'Folder'},
        name: 'home',
        children: [
            {
                path: '/home',
                name: 'home',
                level: 2,
                index: '1-1',
                component: () => import('@/views/Home.vue'),
                meta: { title: '首页', icon: 'HomeFilled' },
                hidden: false,
                requiresAuth: true
            }
        ]
    },
    {
        path: '/examManagement',
        name: 'examManagement',
        redirect: '/examManagement/examCategories',
        level: 1,
        index: '2',
        component: Layout,
        meta: {
            requiresAuth: true,
            icon: 'Folder',
            title: '面试题管理'
        },
        hidden: false,
        children: [
            {
                path: '/examManagement/examCategories',
                name: 'examCategories',
                level: 2,
                index: '2-1',
                component: ()=>import('@/views/examManagement/examCategories/index.vue'),
                meta: {
                    requiresAuth: true,
                    icon: 'Document',
                    title: '面试题类目'
                },
                hidden: false
            },
            {
                path: '/examManagement/examList',
                name: 'examList',
                level: 2,
                index: '2-2',
                component: ()=>import('@/views/examManagement/examList/index.vue'),
                meta: {
                    requiresAuth: true,
                    icon: 'Document',
                    title: '面试题列表'
                },
                hidden: false
            }
        ]
    },
    { path: '/404',
      component: () => import('@/views/404.vue'),
      hidden: true,
      children: [],
      level: null,
      hidden: true
    }
]
完整源码请参考链接:https://gitee.com/heshengfu1211/exam-vue-admin/blob/master/src/router/index.js
新增全局数据缓存
在vue项目的src 目录下新增store目录, store目录下新建app.js、permission.js 和 user.js 分别用于缓存与设备、路由权限和用户登录信息等数据的全局数据。
1)app.js
import { defineStore } from 'pinia'

const useAppStore = defineStore({
    id: 'app',
    state: ()=>({
        sidebar: {
            opened: sessionStorage.getItem('sidebarStatus')=='1',
            withoutAnimation: false,
        },
        device: 'desktop'
    }),
    getters: {
        side: (state)=>state.sidebar,
        vice: (state)=>state.device
    },
    actions: {
        toggleSidebar(){
            if(this.sidebar.opened){
                sessionStorage.setItem('sidebarStatus', '0')
            }else{
                sessionStorage.setItem('sidebarStatus', '1')
            }
            this.sidebar.opened=!this.sidebar.opened
        },
        closeSidebar(withoutAnimation){
            sessionStorage.setItem('sidebarStatus', '0')
            this.sidebar.withoutAnimation = withoutAnimation
            this.sidebar.opened = false
        },
        toggleDevice(device){
           this.device = device
        }
    }
})

export default useAppStore2)permission.js
import { defineStore } from 'pinia'
import { constantRoutes } from '../../router/index'

const usePermissionStore = defineStore({
    id: 'permission',
    state: ()=>({
        dynamicRoutes: [],
        routes: constantRoutes
    }),
    getters: {
        routeList: (state)=>state.routes
    },
    actions: {
        setDynamicRoutes(dynamicRoutes){
           this.dynamicRoutes = dynamicRoutes
           this.routes = this.constantRoutes.concat(dynamicRoutes)
        }
    }
})

export default usePermissionStore3)user.js
源码内容较多,请参加项目源码文件:https://gitee.com/heshengfu1211/exam-vue-admin/blob/master/src/store/modules/user.js
定义 Layout 相关组件
在vue项目的src/views 目录下新增layout目录,在此目录下新增新建左侧菜单和页面布局需要的组件
1)layout目录下新建 mixin 目录,并在mixin 目录下新建 ResizeHandler.js 文件,用于实现页面窗口大小根据设备自适应
import useAppStore from "@/store/modules/app"
import { onBeforeMount, onMounted } from "vue"

const appStore = useAppStore()
const { body } = document
const WIDTH = 1024
const RATIO = 3

export default {
    watch: {
        $route(route){
            if(appStore.device==='mobile' && appStore.sidebar.opened){
                appStore.closeSidebar(false)
            }
        }
    },
    setup(){
        const isMobile =()=> {
            const rect = body.getBoundingClientRect()
            return rect.width - RATIO < WIDTH
        }
        onBeforeMount(()=>{
            window.addEventListener('resize', resiseHandler)
        })
        onMounted(()=>{
            const isMobile = isMobile()
            appStore.toggleDevice('mobile')
            appStore.closeSidebar(true)
        })
        const resiseHandler = ()=>{
            if(!document.hidden){
                const isMobile = isMobile()
                appStore.toggleDevice(isMobile?'mobile':'desktop')
            }
            if(isMobile){
                appStore.closeSidebar(true)
            }
        }

    }
}2)layout目录下新建 components 目录,并在该目录下继续新建Sidebar 目录,并在该目录下新建两个文件SidebarItem.vue 和 index.vue
SidebarItem.vue
<template>
   <div class="menu-wrapper">
        <template v-for="item in routes"  :key="item.name">
            <router-link :to="item.redirect" >
                <el-sub-menu :index="item.index">
                    <template #title>
                        <el-icon><component :is="iconMap[item.meta.icon]"/></el-icon>
                        <span slot="title">{{ item.meta.title }}</span>
                    </template>
                    <template v-for="child in item.children" :key="child.name">
                        <router-link :to="child.path">
                            <el-menu-item :index="child.index">
                                <el-icon><component :is="iconMap[child.meta.icon]"/></el-icon>
                                <span slot="title">{{ child.meta.title }}</span>
                            </el-menu-item>
                        </router-link>
                    </template>
                </el-sub-menu>
            </router-link>
        </template>
   </div>
</template>

<script setup>
import {
  Document,
  Folder,
  HomeFilled
} from '@element-plus/icons-vue'
const props = defineProps({
    routes: {
        type: Array,
        required: true,
        default: []
    }
})
// 图标放到一个Map中,通过路由对象中的icon字段映射
const iconMap = {
    'Document': Document,
    'Folder': Folder,
    'HomeFilled': HomeFilled
}
</script>在这个文件中,我们初步实现两级菜单,并结合router-link组件实现点击菜单时右边主内容区的页面跳转功能。左侧菜单能否正确展示,主要就看这个文件里的代码是否准确无误。
index.vue
<template>
    <div class="sidebar-area" style="width: 200px; height: 100%; float: left; border: solid 2px lightgray;">
        <scroll-bar>
            <el-menu mode="vertical"
            :show-timeout="200"
            :default-active="activeIndex"
            :collapse="isCollapse"
            background-color="#304156"
            text-color="#bfcbd9"
            active-text-color="#409EFF"
            >
               <sidebar-item :routes="routes"></sidebar-item>
            </el-menu>
        </scroll-bar>
    </div>
</template>

<script>
  import SidebarItem from './SidebarItem.vue'
  import ScrollBar from '@/components/ScrollBar/index.vue'
  import useAppStore from '@/store/modules/app'
  import usePermissionStore from '@/store/modules/permission'
  import {computed} from 'vue'
  import { useRoute } from 'vue-router'

  export default {
    name: 'Sidebar',
    components: {
        SidebarItem,
        ScrollBar
    },
    setup(){
        const appStore = useAppStore()
        const permissionStore = usePermissionStore()
        const sidebar = computed(()=>{
            return appStore.sidebar
        })
        const routes = computed(()=>{
            return permissionStore.routes.filter((route)=>{
                if(route.children && route.children.length>0){
                    route.children = route.children.filter((child)=>{
                        return !child.hidden
                    })
                }
                return !route.hidden
            })
        })
        const isCollapse = computed(()=>{
            return !appStore.sidebar.opened
        })
        const route = useRoute()
        const activeIndex = route.path
        return {
            sidebar,
            routes,
            isCollapse,
            activeIndex
        }
    }
  }
</script>从permissionStore 全局路由数据缓存中获取路由数组,然后过滤掉所有需要隐藏的非菜单路由。
3)右侧主内容区
layout 目录下新建AppMain.vue 文件,用于展示右侧主内容页面
<template>
    <section class="app-main">
        <router-view></router-view>
    </section>
</template>
<script setup>
import { onMounted} from 'vue'
onMounted(()=>{

})
</script>可以看到AppMain组件需要一个RouterView组件包括
4)主页导航栏区
layout 目录下新建Navbar.vue 文件,主要用于展示用户头像以及用户退出登录按钮
源码内容较多,请参加项目源码文件:https://gitee.com/heshengfu1211/exam-vue-admin/blob/master/src/views/layout/components/Navbar.vue
5)布局文件
layout 目录下新建layout.vue文件,用于集成各个组件完成主页面的布局
<template>
   <div class="app-wrapper" :class="classObj">
      <sidebar class="sidebar-container">
      </sidebar>
      <div class="main-container" style="float: left;">
        <navbar></navbar>
        <app-main></app-main>
      </div>
   </div>
</template>

<script>
import Navbar from './components/Navbar.vue'
import Sidebar from './components/Sidebar/index.vue'
import AppMain from './components/AppMain.vue'
import ResizeHandler from './mixin/ResizeHandler'
import useAppStore from '@/store/modules/app'
import { computed } from 'vue'

export default {
    name: 'layout',
    components: {
        Navbar,
        Sidebar,
        AppMain
    },
    mixins: [ResizeHandler],
    setup(){
        const appStore = useAppStore()
        const sidebar = computed(()=>{
            return appStore.sidebar
        })
        const device = computed(()=>{
            return appStore.device
        })
        const  classObj = computed(()=>{
            return {
                hideSidebar: !sidebar.opened,
                withoutAnimation: sidebar.withoutAnimation,
                mobile: device=='mobile'
            }
        })
        return {
            classObj
        }
    }
}
</script>

<style lang="scss" scoped>
@import "src/styles/mixin.scss";
  .app-wrapper {
    @include clearfix;
    position: relative;
    height: 100%;
    width: 100%;
  }
</style>面试题管理菜单下对应的面试题类目和面试题列表对应的组件源码请参考如下两个文件中的代码
https://gitee.com/heshengfu1211/exam-vue-admin/blob/master/src/views/examManagement/examCategories/index.vue
https://gitee.com/heshengfu1211/exam-vue-admin/blob/master/src/views/examManagement/examList/index.vue
路由守卫控制页面跳转
在vue项目的根目录下新建permission.js,为了尽快看到效果,目前只做了身份认证拦截,权限控制我们后面再根据需求来添加。
permission.js
import router from "./router";
import NProgress from "nprogress";
import 'nprogress/nprogress.css'// Progress 进度条样式
import useUserStore from './store/modules/user'
import { storeToRefs } from  "pinia"


const whiteList = ['/login'] // 不重定向白名单

router.beforeEach((to, from, next)=>{
    NProgress.start()
    const userStore = useUserStore()
    let { authToken }  = storeToRefs(userStore)
    if(authToken.value || sessionStorage.getItem('authToken')){ // 已登录过
        if(to.path==='/login'){
            next({path: '/home'})
            // if current page is dashboard will not trigger afterEach hook, so manually handle it
            NProgress.done()
        } else {
            next()
        }
    }else{
        // 未登录先判断是否白名单页面
        if(whiteList.indexOf(to.path)!=-1){
            next()
        }else{
            // 不是白名单页面跳转到登录页面进行身份认证
            next('/login')
            NProgress.done()
        }
    }
})

router.afterEach(() => {
    NProgress.done() // 结束Progress
})然后在main.js文件中导入permission.js文件
import { createApp } from 'vue';
import './style.css'
import App from './App.vue'
import router from '@/router/index'
import { createPinia } from 'pinia'
import ElementPlus from 'element-plus'
import * as ElementPlusIconsVue from '@element-plus/icons-vue'
import 'element-plus/dist/index.css'
import CKEditor from '@ckeditor/ckeditor5-vue'
import 'highlight.js/styles/atom-one-light.css'
import '@/permission' // 导入 permission.js 的目的进行路由跳转拦截处理

const app = createApp(App)
app.use(createPinia())
app.use(ElementPlus)
// 注册element-plus的图标组件
for(const [key, component] of Object.entries(ElementPlusIconsVue)){
    app.component(key, component)
}
app.use(router)
app.use(CKEditor)
app.mount('#app')
导入 permission.js 的目的进行路由跳转拦截处理,从而对操作用户进行身份认证和鉴权。
效果测试
启动后台blogserver 项目后,在 vue 前端项目的根目录下执行如下命令启动 UI
yarn run dev控制台出现如下日志信息表示启动成功
yarn run v1.22.21
$ vite

  VITE v5.0.3  ready in 937 ms

➜ Local: http://localhost:3000/输入用户账号zhangsan和登录密码zhangsan1990后 会自动进入系统首页

点击下面的面试题管理 菜单,菜单由折叠变展开,右侧的主内容区就会跳转到面试题类目页面
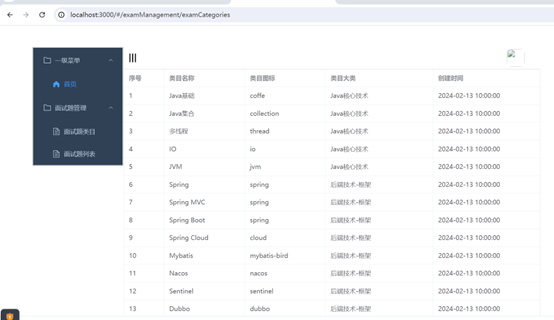
然后再点击下面的面试题列表菜单,则右侧主内容区跳转到面试题列表页面
本文后台blogserver项目的gitee仓库地址:https://gitee.com/heshengfu1211/blogserver.git
需要验证功能的小伙伴可以自行从gitee上克隆到自己本地磁盘把前后端项目跑起来。
结语
可以看到左侧菜单栏点击跳转功能没什么问题,但是右侧主内容区上面的Navbar组件下面的退出登录按钮目前还没显示,后面还需要调试,面试题管理一级菜单下面对应的页面功能也需要进一步完善。这个项目是一个小程序面试题的后台管理系统,最终的目的笔者是想做一款面试题的小程序产品处理,后面再结合AI生成问答内容,相信到时上线后会有市场需求,现在最重要的问题就是尽快把产品做出来。