关于setContentView方法
关于setContentView方法

转载请以链接形式标明出处: 本文出自:103style的博客
base on Android-29
文中相关的源码有删减
可以带着以下问题来看本文:
- 为什么从代码设置属性和主题,得在 setContentView 之前?
- setContentView 添加的 View 加载完成的回调方法?
- setContentView 的执行流程?
- LayoutInflater 的 inflate 方法不同参数对加载的View有什么区别?
如果上面这些问题你都知道,那你很棒棒哦!
目录
- 继承自 Activity 的 setContentView
- LayoutInflater.inflate 的源码分析
- LayoutInflater.inflate 示例验证
- 继承自 AppCompatActivity 的 setContentView
- 问题解答
- 参考文章
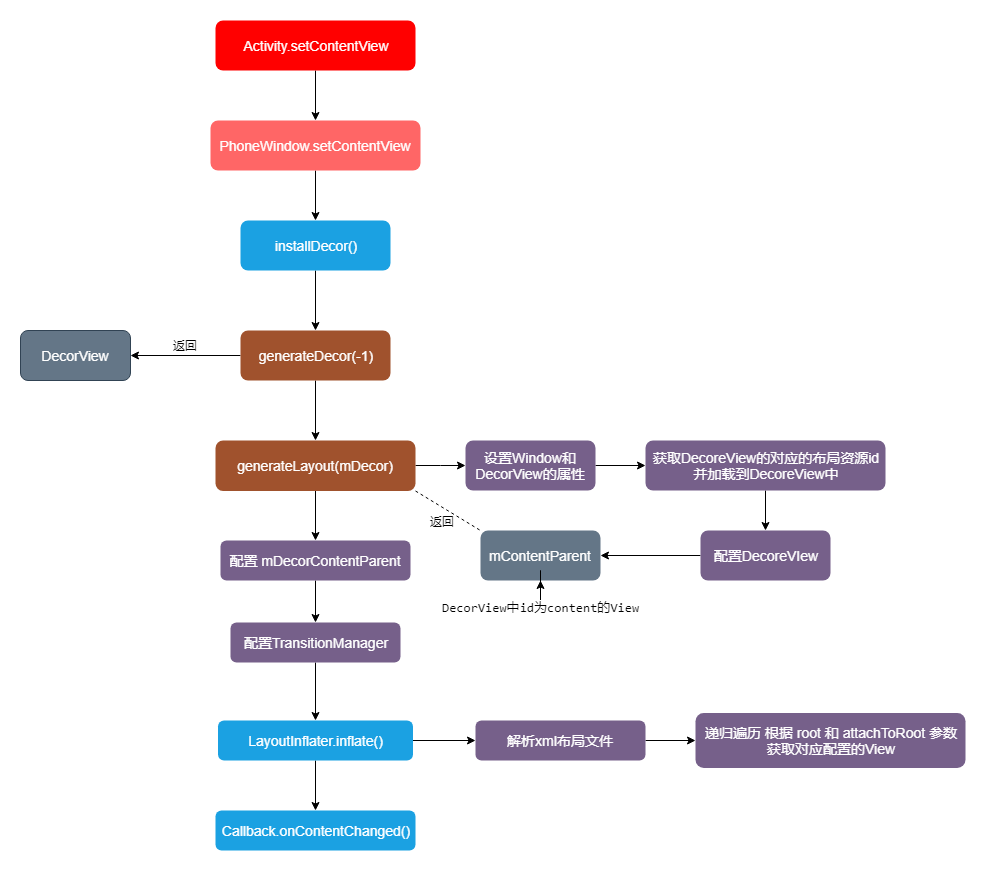
先上一个流程图:
继承自 Activity 的 setContentView
我们直接看看 Activity 的三个 setContentView 方法的源码:
//android.app.Activity.java
public void setContentView(@LayoutRes int layoutResID) {
    getWindow().setContentView(layoutResID);
    initWindowDecorActionBar();
}
public void setContentView(View view) {
    getWindow().setContentView(view);
    initWindowDecorActionBar();
}
public void setContentView(View view, ViewGroup.LayoutParams params) {
    getWindow().setContentView(view, params);
    initWindowDecorActionBar();
}
我们先来看看 getWindow():
public Window getWindow() {
    return mWindow;
}
final void attach(...) {
        ...
        mWindow = new PhoneWindow(this, window, activityConfigCallback);
        ...
}
我们可以看到 getWindow() 返回的是 mWindow,而它在 attach() 方法中被初始化为 PhoneWindow。
接下来我们直接看 PhoneWindow 的 setContentView 的方法.
PhoneWindow 的 setContentView
我们先来看看 setContentView(int layoutResID):
public void setContentView(int layoutResID) {
    //1.初始化 或者 清除之前的内容来复用
    if (mContentParent == null) {
        installDecor();
    } else if (!hasFeature(FEATURE_CONTENT_TRANSITIONS)) {
        mContentParent.removeAllViews();
    }
    //2 加载布局内容
    if (hasFeature(FEATURE_CONTENT_TRANSITIONS)) {
        final Scene newScene = Scene.getSceneForLayout(mContentParent, layoutResID,
                getContext());
        transitionTo(newScene);
    } else {
        mLayoutInflater.inflate(layoutResID, mContentParent);
    }
    mContentParent.requestApplyInsets();
    //3.加载完成之后通知回调
    final Callback cb = getCallback();
    if (cb != null && !isDestroyed()) {
        cb.onContentChanged();
    }
    mContentParentExplicitlySet = true;
}
主要就是以下三步:
1、首先判断 mContentParent 是否为空, 为空就通过 installDecor() 去创建,不为空并且没有 FEATURE_CONTENT_TRANSITIONS 默认 false,则清空所有子View。
2、然后通过 mLayoutInflater.inflate() 解析xml布局文件来加载布局到 mContentParent 中。
3、最后加载完成之后通过 onContentChanged 通知回调。
然后我们看看 setContentView(View view) 和 setContentView(View view, ViewGroup.LayoutParams params):
public void setContentView(View view) {
    setContentView(view, new ViewGroup.LayoutParams(MATCH_PARENT, MATCH_PARENT));
}
public void setContentView(View view, ViewGroup.LayoutParams params) {
    if (mContentParent == null) {
        installDecor();
    } else if (!hasFeature(FEATURE_CONTENT_TRANSITIONS)) {
        mContentParent.removeAllViews();
    }
    if (hasFeature(FEATURE_CONTENT_TRANSITIONS)) {
        view.setLayoutParams(params);
        final Scene newScene = new Scene(mContentParent, view);
        transitionTo(newScene);
    } else {
        mContentParent.addView(view, params);
    }
    mContentParent.requestApplyInsets();
    final Callback cb = getCallback();
    if (cb != null && !isDestroyed()) {
        cb.onContentChanged();
    }
    mContentParentExplicitlySet = true;
}
可以看到 setContentView(View view) 实际上是调用了 setContentView(View view, ViewGroup.LayoutParams params),默认布局参数为铺满布局。
而 两个参数的方法 又和 setContentView(int layoutResID) 差不多,仅仅在加载内容到 mContentParent 的逻辑不同。这里通过 mContentParent.addView() 直接添加,而传 id 的通过 mLayoutInflater.inflate() 加载。
PhoneWindow 的 installDecor()
上面我们说到 mContentParent 为空的时候,会通过 installDecor() 去初始化,我们来看看里面做了什么,这个方法比较长,精简为如下:
private void installDecor() {
    mForceDecorInstall = false;
    //创建 DecorView 并绑定当前Window
    if (mDecor == null) {
        mDecor = generateDecor(-1);
        ...
    } else {
        mDecor.setWindow(this);
    }

    if (mContentParent == null) {
        //创建 mContentParent
        mContentParent = generateLayout(mDecor);

        //根据配置 设置 DecorView
        ...

        if (hasFeature(FEATURE_ACTIVITY_TRANSITIONS)) {
            //创建TransitionManager 来管理过渡配置
            ...
        }
    }
}
我们可以看到:
1、首先判断是否需要创建 DecorView,有的话就绑定当前window,没有就先初始化,初始化的时候就绑定了,后面看 generateDecor 方法会看到。
2、然后如果 mContentParent 为空的话则通过 generateLayout(mDecor) 去初始化 mContentParent。
3、然后根据配置去设置 DecorView 中id 为 decor_content_parent 的控件, 代码已省略。
4、最后看是否有 FEATURE_ACTIVITY_TRANSITIONS 属性,有的话就创建 TransitionManager 来管理过渡配置。
接下来我们看看 generateDecor(-1) 和 generateLayout(mDecor) 这两个方法。
PhoneWindow 的 generateDecor(-1)
上面我们说到这个方法是用来 创建 DecorView 并且绑定当前Window的,我们来看看是不是。
public PhoneWindow(Context context, Window preservedWindow,
                   ActivityConfigCallback activityConfigCallback) {
    ...
    mUseDecorContext = true;
    ...
}
protected DecorView generateDecor(int featureId) {
    // 系统进程是没有上下文的,所以我们得使用已有得上下文
    Context context;
    if (mUseDecorContext) {
        Context applicationContext = getContext().getApplicationContext();
        if (applicationContext == null) {
            context = getContext();
        } else {
            context = new DecorContext(applicationContext, getContext());
            if (mTheme != -1) {
                context.setTheme(mTheme);
            }
        }
    } else {
        context = getContext();
    }
    return new DecorView(context, featureId, this, getAttributes());
}
这里很简单, 首先根据条件获取上下文,然后直接把 上下文 和 当前 window 直接传给创建的 DecorView。
因为系统在初始化 PhoneWindow 的时候,调到三个参数的方法,所以 mUseDecorContext 为 ture,而此时我们的 applicationContext 是不为 null 的,所以最后等到的上下问即是一个持有当前上下文和全局上下文的 DecorContext。
PhoneWindow 的 generateLayout(mDecor)
这里的主要作用就是加载对应我们配置参数对应的布局,即 Window 对应的视图。
public static final int ID_ANDROID_CONTENT = com.android.internal.R.id.content;
protected ViewGroup generateLayout(DecorView decor) {
    // 根据当前主题配置window的属性
    ...
    if (a.getBoolean(R.styleable.Window_windowNoTitle, false)) {
        requestFeature(FEATURE_NO_TITLE);
    } else if (a.getBoolean(R.styleable.Window_windowActionBar, false)) {
        requestFeature(FEATURE_ACTION_BAR);
    }
    ...

    //根据设定好的features值选择不同的窗口修饰布局文件,得到layoutResource值
    int layoutResource;
    int features = getLocalFeatures();
    if () {
    } else if () {
    ...
    } else {
        layoutResource = R.layout.screen_simple;
    }

    //准备加载过程调用 DecorView 对应的回调
    mDecor.startChanging();
    //把对应的 layoutResource 添加到 DecorView 对象里
    mDecor.onResourcesLoaded(mLayoutInflater, layoutResource);
    ...
    ViewGroup contentParent = (ViewGroup)findViewById(ID_ANDROID_CONTENT);
    if (contentParent == null) {
        throw new RuntimeException("Window couldn't find content container view");
    }
    //继续一堆属性设置
    ...
    //DecorView 加载完成
    mDecor.finishChanging();
    return contentParent;
}
这个方法主要作用就是根据配置设置Window的属性。 然后根据配置得到对应的 xml布局文件,加载到 mDecor. 然后获取 id 为 content 的 FrameLayout 返回给 mContentParent 对象。
其中的一个features对应的布局文件如下:
//R.layout.screen_simple
<LinearLayout xmlns:android="http://schemas.android.com/apk/res/android"
    android:layout_width="match_parent"
    android:layout_height="match_parent"
    android:fitsSystemWindows="true"
    android:orientation="vertical">
    <ViewStub android:id="@+id/action_mode_bar_stub"
              android:inflatedId="@+id/action_mode_bar"
              android:layout="@layout/action_mode_bar"
              android:layout_width="match_parent"
              android:layout_height="wrap_content"
              android:theme="?attr/actionBarTheme" />
    <FrameLayout
         android:id="@android:id/content"
         android:layout_width="match_parent"
         android:layout_height="match_parent"
         android:foregroundInsidePadding="false"
         android:foregroundGravity="fill_horizontal|top"
         android:foreground="?android:attr/windowContentOverlay" />
</LinearLayout>
至此我们知道 installDecor() 实际上就是创建和配置 mDecor 和 mContentParent。
然后再回到 PhoneWindow 的 setContentView,通过 installDecor() 配置完之后, 就是开始通过 mLayoutInflater.inflate(layoutResID, mContentParent) 或者 mContentParent.addView(view, params) 添加我们自己的布局内容了,后面这个 addView 很好理解,就没啥说的了。
我们来看看 mLayoutInflater.inflate() 里面是怎么做的。
LayoutInflater.inflate()
这个方法即为解析xml布局文件然后加载到 对应的 root 布局中。
public View inflate(@LayoutRes int resource, @Nullable ViewGroup root) {
    return inflate(resource, root, root != null);
}
public View inflate(@LayoutRes int resource, @Nullable ViewGroup root, boolean attachToRoot) {
    final Resources res = getContext().getResources();
    View view = tryInflatePrecompiled(resource, res, root, attachToRoot);
    if (view != null) {
        return view;
    }
    XmlResourceParser parser = res.getLayout(resource);
    try {
        return inflate(parser, root, attachToRoot);
    } finally {
        parser.close();
    }
}
可以看到这里先通过 tryInflatePrecompiled() 尝试去获取提前编译的View,如果没有获取到的话,
再通过 xml解析器 去解析对应的布局文件,
然后通过 inflate(parser, root, attachToRoot) 去解析控件。
这里我们先看下 tryInflatePrecompiled 方法:
private @Nullable View tryInflatePrecompiled(...) {
    if (!mUseCompiledView) {
        return null;
    }
    String pkg = res.getResourcePackageName(resource);
    String layout = res.getResourceEntryName(resource);
    try {
        Class clazz = Class.forName("" + pkg + ".CompiledView", false, mPrecompiledClassLoader);
        Method inflater = clazz.getMethod(layout, Context.class, int.class);
        View view = (View) inflater.invoke(null, mContext, resource);
        if (view != null && root != null) {
            ....
    } catch (Throwable e) {
    } finally {
    }
    return null;
}
我们可以看到内部是通过 ClassLoader 去获取提前编译好的 packageName + ".CompiledView" 这个类,然后获取对应的方法,再获取View实例。
不过开头的 有个判断条件 mUseCompiledView,我们可以看到 LayoutInflater 的两个构造方法调用 initPrecompiledViews 方法,里面设置的 mUseCompiledView 为 false,所以默认 tryInflatePrecompiled 直接返回的 null 的。
protected LayoutInflater(Context context) {
    mContext = context;
    initPrecompiledViews();
}
protected LayoutInflater(LayoutInflater original, Context newContext) {
    ...
    initPrecompiledViews();
}
private void initPrecompiledViews() {
    boolean enabled = false;
    initPrecompiledViews(enabled);
}
private void initPrecompiledViews(boolean enablePrecompiledViews) {
    mUseCompiledView = enablePrecompiledViews;
    if (!mUseCompiledView) {
        mPrecompiledClassLoader = null;
        return;
    }
    ...
}
继续看 inflate(parser, root, attachToRoot),:
public View inflate(...) {
    synchronized (mConstructorArgs) {
        ...
        try {
            advanceToRootNode(parser);
            final String name = parser.getName();
            //判断是不是merge标签
            if (TAG_MERGE.equals(name)) {
                //merge 标签必须满足  root!=null  attachToRoot 为true  因为merge不代表具体的View
                if (root == null || !attachToRoot) {
                    throw new InflateException("<merge /> can be used only with a valid "
                            + "ViewGroup root and attachToRoot=true");
                }
                //继续加载其他的控件
                rInflate(parser, root, inflaterContext, attrs, false);
            } else {
                //创建一个对应标签的view
                final View temp = createViewFromTag(root, name, inflaterContext, attrs);
                ViewGroup.LayoutParams params = null;
                if (root != null) {
                    //根据root生成适合的布局参数
                    params = root.generateLayoutParams(attrs);
                    if (!attachToRoot) {
                        //如果不附加到Root上则直接设置 从root获取的布局参数
                        temp.setLayoutParams(params);
                    }
                }
                //继续加载其他的控件
                rInflateChildren(parser, temp, attrs, true);
                if (root != null && attachToRoot) {
                    //添加到对应的布局,布局参数为根据root生成的布局参数
                    root.addView(temp, params);
                }
                if (root == null || !attachToRoot) {
                    //直接返回解析xml得到的控件,并且设置和父布局相关的布局属性失效
                    result = temp;
                }
            }
        } catch () {
        } finally {
        }
        return result;
    }
}
1、首先通过 advanceToRootNode(parser) 来判断是不是根标签,不是得话直接抛出异常。
2、然后检查是不是 merge 标签,是的话得满足 root != null && attachToRoot,因为merge不是一代表具体View,满足则同构 rInflate() 去加载剩下得控件。
3、然后创建一个标签对应的View。如果 root 不为 null,则根据root生成适合的布局参数,如果当前 View 不附加到 root 上,则直接设置生成View得布局参数为根据root生成的布局参数。
4、然后当满足 root != null && attachToRoot 时,则直接根据布局参数添加到root上。
5、而满足 root == null || !attachToRoot 则直接返回通过 createViewFromTag 创建的View.
从上面的代码我们可以看出 root 和 attachToRoot 的不同组合会返回不同的结果 , 以下节选自参考文章:
- inflate(xmlId, parent, false); 创建temp的View,然后执行temp.setLayoutParams(params);然后再返回temp。
- inflate(xmlId, parent, true); 创建temp的View,然后执行root.addView(temp, params);最后返回root。
- inflate(xmlId, null, false); 只创建temp的View,然后直接返回temp。
- inflate(xmlId, null, true); 只创建temp的View,然后直接返回temp。
而我们经常使用View的 layout_width 和 layout_height 来设置View的大小,而且一般都可以正常工作,所以有人时常认为这两个属性就是设置View的真实大小一样;然而实际上这些属性是用于设置View在ViewGroup布局中的大小的;这就是为什么Google的工程师在变量命名上将这种属性叫作 layout_width 和 layout_height,而不是 width 和 height 的原因了。
inflate(layoutId, parent,true)能正确显示我们设置的宽高是因为我们的View在设置 setLayoutParams 时 params = root.generateLayoutParams(attrs) 不为空。inflate(layoutId, parent,false )可以正确处理,因为 temp.setLayoutParams(params); 这个 params 正是 root.generateLayoutParams(attrs); 得到的。inflate(layoutId, null, true)与inflate(layoutId, null, false)不能正确处理我们设置的宽和高是因为 layout_width,layout_height 是相对了父级设置的,而此 temp 的 getLayoutParams 为null。
这里我们可以写个实例来验证下。
LayoutInflater.inflate 示例验证
合并下 inflate 的测试方法,主要就是以下四个:
inflate(layoutId, parent, false)inflate(layoutId, parent, true)inflate(layoutId, null, false)inflate(layoutId, null, true)
//LayoutInflateTestActivity.java
public class LayoutInflateTestActivity extends AppCompatActivity {
    ListView listView;
    @Override
    protected void onCreate(Bundle savedInstanceState) {
        super.onCreate(savedInstanceState);
        setContentView(R.layout.activity_layout_inflate);
        listView = findViewById(R.id.lv_test);
        listView.setAdapter(new TestAdapter(this));
    }
}//activity_layout_inflate.xml
<?xml version="1.0" encoding="utf-8"?>
<ListView xmlns:android="http://schemas.android.com/apk/res/android"
android:id="@+id/lv_test"
android:layout_width="match_parent"
android:layout_height="match_parent" />//TestAdapter.java
public class TestAdapter extends BaseAdapter {
private Context mContext;
public TestAdapter(Context mContext) {
this.mContext = mContext;
}
@Override
public int getCount() {
return 4;
}
@Override
public Object getItem(int position) {
return position;
}
@Override
public long getItemId(int position) {
return position;
}
@Override
public View getView(int position, View view, ViewGroup parent) {
View[] views = {
LayoutInflater.from(mContext).inflate(R.layout.item_test, parent, false),
// LayoutInflater.from(mContext).inflate(R.layout.item_test, parent, true),
LayoutInflater.from(mContext).inflate(R.layout.item_test, null, false),
LayoutInflater.from(mContext).inflate(R.layout.item_test, null, true)
};
view = views[position % views.length];
TextView textView = view.findViewById(R.id.item_tv);
textView.setText(String.valueOf(position));
return view;
}
}//item_test.xml
<?xml version="1.0" encoding="utf-8"?>
<FrameLayout xmlns:android="http://schemas.android.com/apk/res/android"
android:layout_width="300dp"
android:layout_height="100dp"
android:background="@android:color/holo_blue_dark">
<TextView
android:id="@+id/item_tv"
android:layout_width="200dp"
android:layout_height="50dp"
android:layout_margin="8dp"
android:background="@android:color/holo_orange_light"
android:padding="8dp" />
</FrameLayout>运行程序:
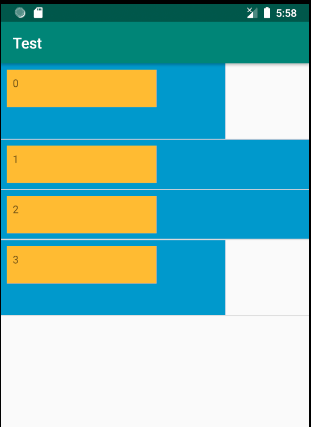
可以看到只有 inflate(layoutId, parent, false) 显示的效果才满足需求。
而当 parent 为空时,item根布局设置的宽高都失效了。
而当我们打开 inflate(R.layout.item_test, parent, true),运行程序则会崩溃,报错如下:
android.view.InflateException: Binary XML file line #2: addView(View, LayoutParams) is not supported in AdapterView
Caused by: java.lang.UnsupportedOperationException: addView(View, LayoutParams) is not supported in AdapterView
把 listview 换成 recyclerview 的效果有不一样了:
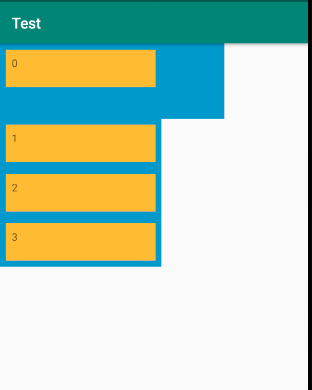
打开 inflate(R.layout.item_test, parent, true),运行程序则会崩溃,报错如下:
java.lang.IllegalStateException: ViewHolder views must not be attached when created.
Ensure that you are not passing 'true' to the attachToRoot parameter of LayoutInflater.inflate(..., boolean attachToRoot)
这是因为二者item的宽高计算不一样。 二者的报错都是因为 默认的 root 不支持 addView 操作。
而 setContentView 中 root 是一个 LinearLayout 或者 FrameLayout,是支持 addView 操作的。
继承自 AppCompatActivity 的 setContentView
//AppCompatActivity.java
public void setContentView(@LayoutRes int layoutResID) {
    getDelegate().setContentView(layoutResID);
}
public void setContentView(View view) {
    getDelegate().setContentView(view);
}
public void setContentView(View view, ViewGroup.LayoutParams params) {
    getDelegate().setContentView(view, params);
}
public AppCompatDelegate getDelegate() {
    if (mDelegate == null) {
        mDelegate = AppCompatDelegate.create(this, this);
    }
    return mDelegate;
}
这里我们可以看到都是通过 getDelegate() 获取代理然后调用代理的对应方法。
而代理 mDelegate 是通过 AppCompatDelegate.create(this, this)来创建的。
public static AppCompatDelegate create(@NonNull Activity activity,
                                       @Nullable AppCompatCallback callback) {
    return new AppCompatDelegateImpl(activity, callback);
}
我们直接来看 AppCompatDelegateImpl 的对应的 setContentView 方法:
public void setContentView(View v) {
    ensureSubDecor();
    ViewGroup contentParent = mSubDecor.findViewById(android.R.id.content);
    contentParent.removeAllViews();
    contentParent.addView(v);
    mAppCompatWindowCallback.getWrapped().onContentChanged();
}
public void setContentView(int resId) {
    ensureSubDecor();
    ViewGroup contentParent = mSubDecor.findViewById(android.R.id.content);
    contentParent.removeAllViews();
    LayoutInflater.from(mContext).inflate(resId, contentParent);
    mAppCompatWindowCallback.getWrapped().onContentChanged();
}
public void setContentView(View v, ViewGroup.LayoutParams lp) {
    ensureSubDecor();
    ViewGroup contentParent = mSubDecor.findViewById(android.R.id.content);
    contentParent.removeAllViews();
    contentParent.addView(v, lp);
    mAppCompatWindowCallback.getWrapped().onContentChanged();
}
可以看到这三个方法很相似,区别就是设置 contentParent 的内容的方法不同。
并且这里的逻辑和 PhoneWindow 的 setContentView 的逻辑也很一致,
通过 ensureSubDecor() 去创建和加载 DecorView,
然后修改 id 为 content 的 布局的内容,
再通过 onContentChanged 回调通知。
ensureSubDecor() 方法中的流程和 PhoneWindow 中的 installDecor() 差不多,就不再赘述了。
二者的区别就是 继承自 AppCompatActivity 能支持 Android高版本的一些特性,比如 Android 5 开始的 material design 风格等。
问题解答
- Q:为什么从代码设置属性和主题,得在 setContentView 之前? A:通过上面的分析我们知道,主题等配置都在 setCotentView 方法里面, 所以如果我们在setContentView之后设置,是不会被调用的。
- Q:setContentView 添加的 View 加载完成的回调方法?
A:
onContentChanged(),所以我们可以在 Activity 中重写这个方法,做一些对应的操作。 - Q:setContentView 的执行流程? A:见开头的流程图。
- Q:LayoutInflater 的 inflate 方法不同参数对加载的View有什么区别?
A:主要是
ViewGroup root和boolean attachToRoot这两个参数。当 root 为null时,布局文件最外层设置的 layout_xxx 属性就会失效。而当 root 不为null时, attachToRoot 为true就是调用root.addView()去添布局,此时 root 得是ViewGroup,否则会报错;而当 attachToRoot 为false,则会正常设置 最外层 layout_xxx 属性给当前得布局文件。
参考文章
Android应用setContentView与LayoutInflater加载解析机制源码分析
以上
如果有描述错误的,请提醒我,感谢!
如果觉得不错的话,请帮忙点个赞呗。