React修仙笔记,筑基初期之更新数据


在之前的一篇文章中我们有了解到react函数组件和class组件,以及react数据流,状态提升,以及react设计哲学,在我们了解了这些基本的知识后,我们需要了解react内部更深的一些知识
在开始本文之前,主要会从以下几个点去认识react,以及我们那些我们常常遇到的坑
react是如何更新数据的,更新数据到底有些注意点react中setState有哪些你需要知道的- 如何优化组件渲染
- Context[1]跨组件通信
正文开始...
react是如何更新数据的
我们在react中更新数据都是调用setState这个方法去更新的,这个更新也是批量异步更新的,在setState更新数据,主要发生了什么,我们看一个简单的栗子,这也是我们上次的一个例子
import React from "react";
class List extends React.Component {
    constructor(props) {
        super(props);
        this.state = {
            count: 0,
            price: 0,
            type: 0, // 0 人民币 1 代表美元
        }
    }
    handleAdd = () => {
        // this.setState({
        //     count: ++this.state.count
        // })
        this.setState(state => {
            return {
                ...state,
                count: state.count + 1
            }
        })
    }
    handleReduce = () => {
        this.setState(state => {
            return {
                count: state.count - 1
            }
        })
    }
    handleRmbInput = (e) => {
        const val = e.target.value;
        console.log(e)
        this.setState({
            price: val,
            type: 0
        })
    }
    handleDollInput = (e) => {
        const val = e.target.value;
        this.setState({
            price: val,
            type: 1
        })
    }
    render() {
        const { count, price, type } = this.state;
        const ExchangeInput = ({ price, handleChange, type }) => {
            return (<fieldset>
                <legend>{type === "RmbInput" ? '人民币' : '美元'}</legend>
                <input value={price}
                    onChange={handleChange} />
            </fieldset>)
        }
        const rmbVal = type === 0 ? price : price * 7.34;
        const dollVal = type === 1 ? price : 0.14 * price;
        return (<div className="list-app" style={{ padding: '10px' }}>
            <hr />
            <button onClick={this.handleAdd}>+</button>
            <span>{count}</span>
            <button onClick={this.handleReduce}>-</button>
            <hr />
            <ExchangeInput handleChange={this.handleRmbInput} price={rmbVal} type="RmbInput"></ExchangeInput>
            <hr></hr>
            <ExchangeInput handleChange={this.handleDollInput} price={dollVal} type="DollarInput"></ExchangeInput>
        </div>)
    }
}
export default List
我们先看下这个计数器,当我点击+时,数字就会+1,当我点击-时,就会-1
handleAdd = () => {
    this.setState({
        count: ++this.state.count
    });
    console.log(this.state, 'count')
}
这样貌似就可以更新数据了,我们会发现state打印的值是{count: 1, price: 0, type: 0}
在这之前不是说setState是一个异步的操作吗?怎么打印是好像是同步的一样?但事实并非如此,如果你是这么改,那么你会发现
handleAdd = () => {
    this.setState({
        count: 2
    });
    console.log(this.state, 'count')
}
此时的结果就是{count: 0, price: 0, type: 0} 'count'
这就证明setState这个方法就是异步的,也就说明在handleAdd这个内部方法中,优先执行了同步任务执行打印操作,然后再执行setState的
但是上面的一个例子貌似表现跟这个不太一样,那是因为对象值引入的问题,上面那段代码可以拆分下面这样
handleAdd = () => {
    this.state.count+=1;
    const initState = {
      count: this.state.count
    }
    this.setState(initState);
    console.log(this.state, 'count')
}
因为++this.state.count相当于this.state.count+=1,在调用setState方法时,实际上这个state的count就已经更改,而this.setState这个方法是异步,所以会先执行打印,所以打印的值自然是修改的值了,都是同一个对象的引用。
setState
对于setState设置数据是异步的,我们还需要知道如果想立即获取修改后的数据呢,我们先看下setState这个方法
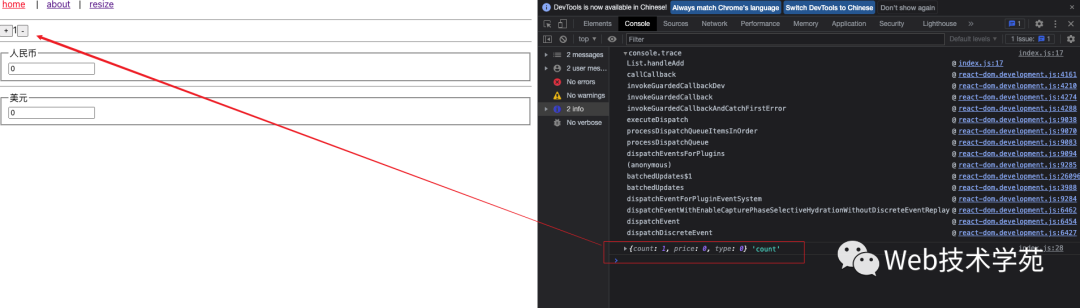
handleAdd = () => {
   console.log(this.setState);
   this.setState({
      count: 2
  });
  console.trace()
}
在源码里,就是这样的
Component.prototype.setState = function (partialState, callback) {
  if (typeof partialState !== 'object' && typeof partialState !== 'function' && partialState != null) {
    throw new Error('setState(...): takes an object of state variables to update or a ' + 'function which returns an object of state variables.');
  }


  this.updater.enqueueSetState(this, partialState, callback, 'setState');
};
我们看到源码setState方法是挂载在Component的prototype上的,所以我们用this就能访问该组件上的setState,而Component就是一个构造函数
function Component(props, context, updater) {
  this.props = props;
  this.context = context; // If a component has string refs, we will assign a different object later.


  this.refs = emptyObject; // We initialize the default updater but the real one gets injected by the
  // renderer.


  this.updater = updater || ReactNoopUpdateQueue;
}
我们看到setState内部方法有对入参进行类型判断,也就是说必须是传入一个对象或者函数而且不为null否则就会抛出错误
所以我们可以把setState的第一个参数也可以改成函数试试,但是必须返回一个对象,否则并不会更新UI
handleAdd = () => {
    this.setState(state => {
        return {
            ...state,
            count: state.count + 1
        }
    })
    // 这里依然是上一次的值
    console.log(this.state, 'count')
}
从源码我们知道setState除了第一个参数是对象或者函数外,也提供了第二个回调参数callback,这个通常在项目中也会很有用,就是在你更新state后想立即拿着state去做一些其他操作时
handleAdd = () => {
    this.setState(state => {
        return {
            ...state,
            count: state.count + 1
        }
    }, () => {
        // 立即获取修改后的值
        console.log(this.state)
    })
}
看下结果
我们可以修改值后,在回调函数后就立即更新值了,我们从执行setState这个方法中也看到实际上更新UI的过程中也调用内部其他很多方法,每次触发setState都会执行render函数
而我们注意到在开发环境render内部的console.log会被打印两次,这点,官方有解释[2],主要是开发环境双调用了渲染生命周期,帮助在渲染中可以查找出副作用引出的问题.
所以我们可以把ExchangeInput组件可以提出去,不在render中定义,这样性能上会更好
组件渲染优化
一个组件当state或者props发生变化时,就会更新组件,具体写个例子
新建一个组件Box组件,我可以通过父组件可以控制其宽度与高度,并且点击背景可以换肤
// Box.js
import React from "react";
class Box extends React.Component {
    constructor(props) {
        super(props);
        this.state = {
            divStyle: {
                width: props.count ? `${props.count * 100}px` : '100px',
                height: props.count ? `${props.count * 100}px` : '100px',
            },
            color: 'red'
        }
    }
    // 优化,默认是返回true,如果返回false,则不会渲染组件
    shouldComponentUpdate(nextProps, nextState) {
        if (this.props.count !== nextProps.count) {
            return true
        }
        if (this.state.color !== nextState.color) {
            return true;
        }
        return false
    }
    updateStyle = () => {
        const { divStyle } = this.state;
        if (!this.props.count) {
            return divStyle
        }
        return {
            width: `${this.props.count * 100}px`,
            height: `${this.props.count * 100}px`,
        }
    }
    handleChangeBg = () => {
        this.setState({
            color: this.state.color === 'red' ? 'green' : 'red'
        })
    }
    render() {
        return (<div style={{ ...this.updateStyle(), backgroundColor: this.state.color }} onClick={this.handleChangeBg}>
            <p>color: {this.state.color}</p>
            <p>count: {this.props.count}</p>
        </div>)
    }
}
export default Box
在index.js中引入
import React from "react";
import Box from './Box'
class List extends React.Component {
    constructor(props) {
        super(props);
        this.state = {
            count: 1,
            price: 0,
            type: 0, // 0 人民币 1 代表美元
        }
    }
    render() {
        // console.log(222)
        // console.trace();
        const { count, price, type } = this.state;
        const rmbVal = type === 0 ? price : price * 7.34;
        const dollVal = type === 1 ? price : 0.14 * price;
        return (<div className="list-app" style={{ padding: '10px' }}>
            <hr />
            <button onClick={this.handleAdd}>+</button>
            <span>{count}</span>
            <button onClick={this.handleReduce}>-</button>
            <hr />
            <Box count={count}></Box>
        </div>)
    }
}
export default List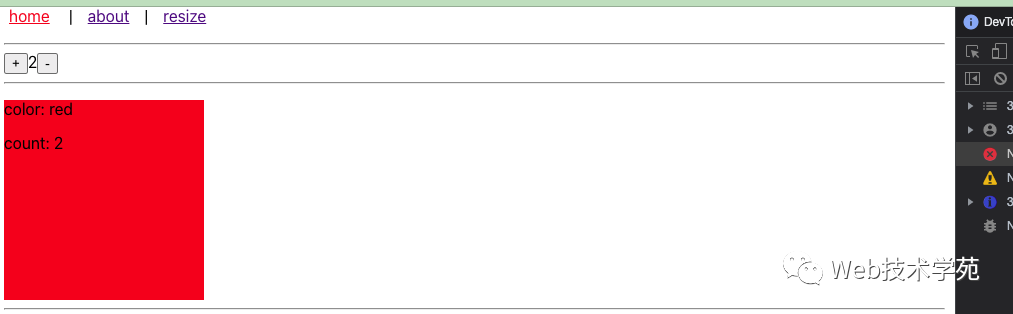
当修改count时,就会更新这个box的宽度与高度
在Box组件主要看这段代码
shouldComponentUpdate(nextProps, nextState) {
    if (this.props.count !== nextProps.count) {
        return true
    }
    if (this.state.color !== nextState.color) {
        return true;
    }
    return false
}
当我们调用setState后,就会调用这个钩子函数,这个钩子函数默认是返回true,如果你想优化,在某些条件下可以返回false不渲染组件。官方也说明了这个是一个浅比较[3],如果是引用数据类型,最好不要在原有数据上进行操作,因为是同一份引用,容易出问题。
关于浅比较,官方也给出了一种比较替换方案,你可以用PureComponent组件替代你这种现有做的优化
因此你可以替换成下面这样
import React from "react";


class Box extends React.PureComponent {
    constructor(props) {
        super(props);
        this.state = {
            divStyle: {
                width: props.count ? `${props.count * 100}px` : '100px',
                height: props.count ? `${props.count * 100}px` : '100px',
            },
            color: 'red'
        }
    }
    // 优化,默认是返回true,如果返回false,则不会渲染组件
    // shouldComponentUpdate(nextProps, nextState) {
    //     if (this.props.count !== nextProps.count) {
    //         return true
    //     }
    //     if (this.state.color !== nextState.color) {
    //         return true;
    //     }
    //     return false
    // }
    updateStyle = () => {
        const { divStyle } = this.state;
        if (!this.props.count) {
            return divStyle
        }
        return {
            width: `${this.props.count * 100}px`,
            height: `${this.props.count * 100}px`,
        }
    }
    handleChangeBg = () => {
        this.setState({
            color: this.state.color === 'red' ? 'green' : 'red'
        })
    }
    render() {
        return (<div style={{ ...this.updateStyle(), backgroundColor: this.state.color }} onClick={this.handleChangeBg}>
            <p>color: {this.state.color}</p>
            <p>count: {this.props.count}</p>
        </div>)
    }
}
export default Box
所以PureComponent算是优化组件渲染简洁最快速的一种方法了
跨组件通信
在react父子数据传递都是通过props,如果遇到嵌套组件好几级情况下,那么props传递将会一层一层传入孙组件中,有没有更好的解决办法呢?
有两种通用的方案,在react中你也可以用状态管理工具,比如redux将状态存储到全局的store中,那么跨组件任意一个组件都可以访问了,除了这种还有一种方案那么就是Context,这种方案有点类似vue中的provide/inject也是跨组件传递数据,不过react的做法要稍微复杂一些
// index.js
import React from "react";
import Box from './Box'
const initColor = {
    color: 'yellow',
    text: '黄色'
}
export const ColorContext = React.createContext(initColor);
class List extends React.Component {
    constructor(props) {
        super(props);
        this.state = {
            count: 1,
            price: 0,
            type: 0, // 0 人民币 1 代表美元
            initColor
        }
    }
    render() {
        return (<div className="list-app" style={{ padding: '10px' }}>
           ...
            <ColorContext.Provider value={this.state.initColor} >
                <Box count={count}></Box>
            </ColorContext.Provider>

        </div>)
    }
}
export default List
从以上代码中可以看出主要是做了以下几件事
- 创建
createContext对象 - 创建对象调用
Provider包裹子组件Box并传入value初始值
我们继续看下Box这个组件
import React from "react";
import OtherContent from './OtherContent'
class Box extends React.PureComponent {
    constructor(props) {
        super(props);
        this.state = {
            divStyle: {
                width: props.count ? `${props.count * 100}px` : '100px',
                height: props.count ? `${props.count * 100}px` : '100px',
            },
            color: 'red'
        }
    }
    ...
    render() {
        return (<div style={{ ...this.updateStyle(), backgroundColor: this.state.color }} onClick={this.handleChangeBg}>
            <p>color: {this.state.color}</p>
            <p>count: {this.props.count}</p>
            <OtherContent></OtherContent>
        </div>)
    }
}
export default Box
你会发现又引入了一个其他的组件OtherContent,这个组件就是孙组件,所以想要父组件的数据直接在孙组件上使用,那么我们可以在OtherContent组件中这么做
import React from "react";
import { ColorContext } from './index';
const OtherContent = () => {
    const state = React.useContext(ColorContext);
    console.log(state);
    const Pdom = () => <p style={{ color: state.color }}>context: {state.text}</p>
    return <Pdom></Pdom>
}


export default OtherContent;
从以上代码中我们可以看出,我们必须要做以下几件事
- 引入创建的
Contenxt - 调用
useContext函数,其中形参就是我们引入创建的Contenxt,返回初始值
因此我们看到最终的结果就是下面这样的
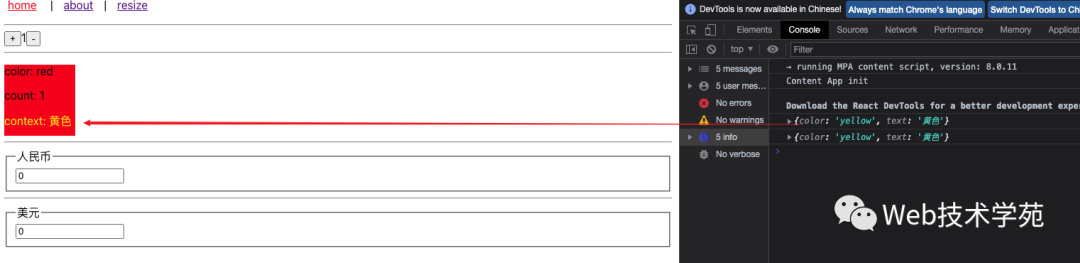
最顶层的数据就传入了孙子组件中去了。
如果我想改变孙组件OtherContent的状态呢?
只需要在初始数据中挂载一个回调函数,注意changeColor会从value传入子组件中
// index.js
import React from "react";
import Box from './Box'
const initColor = {
    color: 'yellow',
    text: '黄色',
    changeColor: () => { }
}
export const ColorContext = React.createContext(initColor);
class List extends React.Component {
    constructor(props) {
        super(props);
        this.state = {
            count: 0,
            price: 0,
            type: 0, // 0 人民币 1 代表美元
            initColor: {
                ...initColor,
                changeColor: this.changeColor
            },


        }
    }
    changeColor = () => {
        this.setState((state, props) => {
            return {
                ...state,
                initColor: {
                    ...state.initColor,
                    color: this.state.initColor.color === 'yellow' ? 'blue' : 'yellow',
                    text: this.state.initColor.text === '黄色' ? '蓝色' : '黄色',


                }
            }
        })
    }
    ...
    render() {
        const rmbVal = type === 0 ? price : price * 7.34;
        const dollVal = type === 1 ? price : 0.14 * price;
        return (<div className="list-app" style={{ padding: '10px' }}>

            <ColorContext.Provider value={this.state.initColor} >
                <Box count={count}></Box>
            </ColorContext.Provider>


        </div>)
    }
}
export default List
然后我们看下Box组件
import React from "react";
import OtherContent from './OtherContent'
import { ColorContext } from './index';


class Box extends React.PureComponent {
    ...
    render() {
        return (<div style={{ ...this.updateStyle(), backgroundColor: this.state.color }} onClick={this.handleChangeBg}>
            <p>color: {this.state.color}</p>
            <p>count: {this.props.count}</p>
            <ColorContext.Consumer>
                {
                    ({ changeColor }) => {
                        return (<>
                            <a href="javascript:void(0)" onClick={(e) => {
                                changeColor();
                                e.stopPropagation();
                            }}>改变OtherContent</a>
                            <OtherContent></OtherContent>
                        </>)
                    }
                }
            </ColorContext.Consumer>


        </div>)
    }
}
export default Box
如果我们想在Box组件改变OtherContent的组件状态,那么只需要用ColorContext.Consumer包裹起来,但是这里面必须返回一个组件才行,这个changeColor实际上就是父组件value传入到子组件里面的。
最后修改OtherContent的状态还是调用根组件上changeColor方法,也是调用setState修改了原初始值的数据。
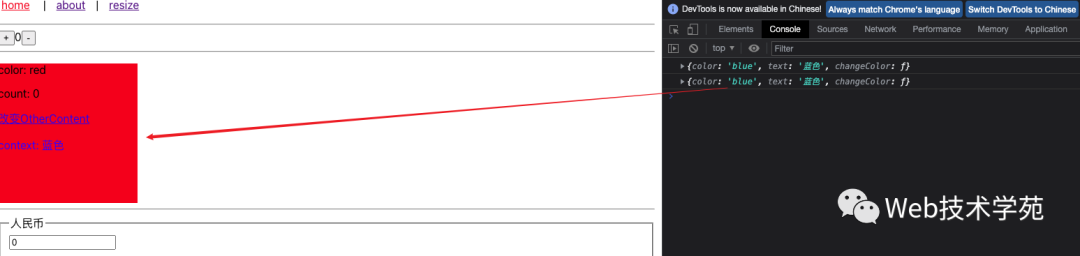
当我们点击OtherContent上面的文字时,就可以改变自身元素的state了。
总结
- 当我们更新
state主要是依赖setState这个方法,这个方法修改值是异步调用的 - 我们要知道
setState的第一个参数可以是对象也可以是函数,当是函数时必须返回一个对象才行,第二个回调参数可以立即获取到修改后的state值,而且setState修改数据是批量异步更新的 - 组件优化可以用
React.PureComponent代替原有的React.Component,主要是替代原有的shouldComponentUpdate钩子做了一层浅比较,会帮你做一些优化,不必要的重复渲染,shouldComponentUpdate钩子默认返回true,当返回false时,不会渲染组件 - 跨组件通信,主要利用内置的API
React.createContext实现跨组件通信,有点类似vue中的provide/inject功能 - 本文示例code example[4]
参考资料
[1]Context: https://react.docschina.org/docs/context.html
[2]官方有解释: https://github.com/facebook/react/issues/17786
[3]浅比较: https://react.docschina.org/docs/optimizing-performance.html
[4]code example: https://github.com/maicFir/lessonNote/tree/master/react/01-react-demo
最后,看完觉得有收获的,点个赞,在看,转发,收藏等于学会,欢迎关注Web技术学苑,好好学习,天天向上!