【论文学习】End-to-End Object Detection with Transformers

【论文学习】End-to-End Object Detection with Transformers

YoungTimes
发布于 2023-03-09 15:02:32
发布于 2023-03-09 15:02:32
“论文: https://arxiv.org/pdf/2005.12872.pdf 代码: https://github.com/facebookresearch/detr (pytorch) ”
DETR是Facebook在2020年提出的基于Transformer的端到端目标检测方法,克服了在传统目标检测中对Anchor和非极大值抑制(Non-Maximum Suppression, NMS)等先验知识的依赖 ,简化了目标检测的处理流程。

DETR的运作流程
1. Dataset
1.1 Pytorch数据集处理
由于图像的大小可能存在差异,所以要统一输入图像在各个维度上的尺寸,然后对尺寸小的图像进行填充(Padding),同时设置mask指示哪些位置是Padding的,引导模型在有效区域内学习。
def nested_tensor_from_tensor_list(tensor_list: List[Tensor]):
				......
        # TODO make it support different-sized images
        # 计算所有图像每个维度的最大尺寸
        max_size = _max_by_axis([list(img.shape) for img in tensor_list])
        # min_size = tuple(min(s) for s in zip(*[img.shape for img in tensor_list]))
        # batch_shape = [b] + [c, h, w]
        batch_shape = [len(tensor_list)] + max_size
        b, c, h, w = batch_shape
        dtype = tensor_list[0].dtype
        device = tensor_list[0].device
        # 用于统一各个图像在各个维度上的尺寸
        tensor = torch.zeros(batch_shape, dtype=dtype, device=device)
        # 用于存储Padding的位置
        mask = torch.ones((b, h, w), dtype=torch.bool, device=device)
        for img, pad_img, m in zip(tensor_list, tensor, mask):
            pad_img[: img.shape[0], : img.shape[1], : img.shape[2]].copy_(img)
            # 非Padding的部分设置为False
            m[: img.shape[1], :img.shape[2]] = False
				......
    return NestedTensor(tensor, mask)
通过collate_fn将Batch数据重新组装成自定义的形式。
def collate_fn(batch):
    # batch = [(data1,label1),(data2,label2),...]
    batch = list(zip(*batch))
    # batch = [(data1, data2, ...), (label1, label2,...)]
    batch[0] = nested_tensor_from_tensor_list(batch[0])
    # 把data数据尺寸归一化,并增加mask
    return tuple(batch)

data_loader_train = DataLoader(dataset_train, batch_sampler=batch_sampler_train,
                                   collate_fn=utils.collate_fn, num_workers=args.num_workers)
data_loader_val = DataLoader(dataset_val, args.batch_size, sampler=sampler_val,
                                 drop_last=False, collate_fn=utils.collate_fn, num_workers=args.num_workers)
1.2 COCO数据集
COCO数据集中的Annotation字段格式:
annotation {
  "id": int,
  "image_id": int,
  "category_id": int,
  "segmentation": RLE or [polygon],
  "area": float,
  "bbox": [x,y,width,height],
  "iscrowd": 0 or 1,
}
iscrowd = 0: 表示标注的是单个对象; iscrowd = 1: 用于标注大量的密集对象。
在训练代码中,只保留iscrowd=0的数据,并将box的坐标形式从[x, y, w, h]转换为[x1, y1, x2, y2]。并过滤掉异常数据(minX > maxX || minY > maxY)。
anno = target["annotations"]

anno = [obj for obj in anno if 'iscrowd' not in obj or obj['iscrowd'] == 0]

boxes = [obj["bbox"] for obj in anno]
# guard against no boxes via resizing
boxes = torch.as_tensor(boxes, dtype=torch.float32).reshape(-1, 4)
boxes[:, 2:] += boxes[:, :2]
boxes[:, 0::2].clamp_(min=0, max=w)
boxes[:, 1::2].clamp_(min=0, max=h)

......

keep = (boxes[:, 3] > boxes[:, 1]) & (boxes[:, 2] > boxes[:, 0])
boxes = boxes[keep]
classes = classes[keep]

......

target["boxes"] = boxes
target["labels"] = classes
Mask生成。 Detr中的self.return_masks = True时,会将每个多边形结合图像尺寸解码为掩码。
def convert_coco_poly_to_mask(segmentations, height, width):
    masks = []
    for polygons in segmentations:
        rles = coco_mask.frPyObjects(polygons, height, width)
        mask = coco_mask.decode(rles)
        if len(mask.shape) < 3:
            mask = mask[..., None]
        mask = torch.as_tensor(mask, dtype=torch.uint8)
        mask = mask.any(dim=2)
        masks.append(mask)
    if masks:
        masks = torch.stack(masks, dim=0)
    else:
        masks = torch.zeros((0, height, width), dtype=torch.uint8)
    return masks
数据增强。 Detr的数据增强使用了归一化、随机反转、缩放、裁剪等操作。
normalize = T.Compose([
        T.ToTensor(),
        T.Normalize([0.485, 0.456, 0.406], [0.229, 0.224, 0.225])
    ])

    scales = [480, 512, 544, 576, 608, 640, 672, 704, 736, 768, 800]

    if image_set == 'train':
        return T.Compose([
            T.RandomHorizontalFlip(),
            T.RandomSelect(
                T.RandomResize(scales, max_size=1333),
                T.Compose([
                    T.RandomResize([400, 500, 600]),
                    T.RandomSizeCrop(384, 600),
                    T.RandomResize(scales, max_size=1333),
                ])
            ),
            normalize,
        ])
2. DETR Model
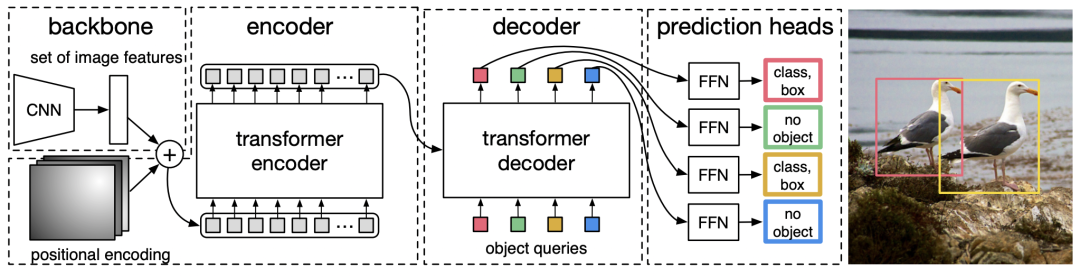
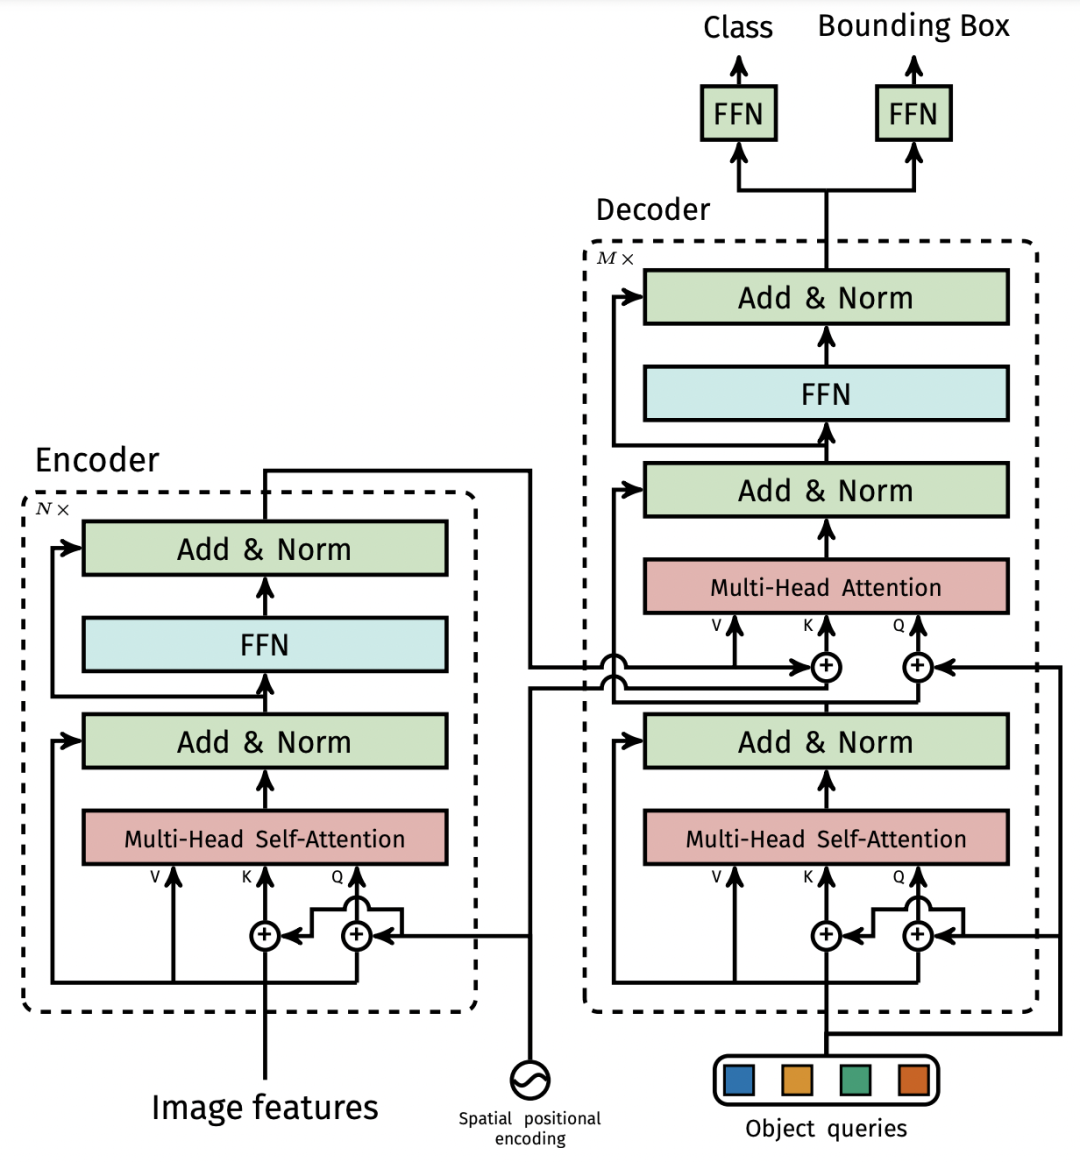
完整的DETR框架如上图所示,它主要包含三个部分: CNN Backbone、Encoder-Decoder Transformer、Feed Forward Network (FFN)。
2.1 CNN Backbone
目标检测的图一般比较大,直接使用Transformer在计算上吃不消,所以先用CNN进行特征提取并缩减尺寸,然后再使用Transformer。
DETR使用的Backbone是ImageNet预训练好的Resnet-50。
backbone = getattr(torchvision.models, name)(
            replace_stride_with_dilation=[False, False, dilation],
            pretrained=is_main_process(), norm_layer=FrozenBatchNorm2d)
class BackboneBase(nn.Module):

    def __init__(self, backbone: nn.Module, train_backbone: bool, num_channels: int, return_interm_layers: bool):
        super().__init__()
        for name, parameter in backbone.named_parameters():
            if not train_backbone or 'layer2' not in name and 'layer3' not in name and 'layer4' not in name:
                parameter.requires_grad_(False)
        if return_interm_layers:
            return_layers = {"layer1": "0", "layer2": "1", "layer3": "2", "layer4": "3"}
        else:
            return_layers = {'layer4': "0"}
        self.body = IntermediateLayerGetter(backbone, return_layers=return_layers)
        self.num_channels = num_channels

    def forward(self, tensor_list: NestedTensor):
        xs = self.body(tensor_list.tensors)
        out: Dict[str, NestedTensor] = {}
        for name, x in xs.items():
            m = tensor_list.mask
            assert m is not None
            mask = F.interpolate(m[None].float(), size=x.shape[-2:]).to(torch.bool)[0]
            out[name] = NestedTensor(x, mask)
        return out
mask = F.interpolate(m, size=x.shape[-2:])[0] #[batch_size, feat_h, fea_w],将mask插值到与输出特征图尺寸一致。
class Backbone(BackboneBase):
    """ResNet backbone with frozen BatchNorm."""
    def __init__(self, name: str,
                 train_backbone: bool,
                 return_interm_layers: bool,
                 dilation: bool):
        backbone = getattr(torchvision.models, name)(
            replace_stride_with_dilation=[False, False, dilation],
            pretrained=is_main_process(), norm_layer=FrozenBatchNorm2d)
        num_channels = 512 if name in ('resnet18', 'resnet34') else 2048
        super().__init__(backbone, train_backbone, num_channels, return_interm_layers)
在Backbone中,有个replace_stride_with_dilation的操作,查了一下Dilated Convolution。
Dilated Convolution(空洞卷积)
空洞卷积(dilated convolution)是针对图像语义分割问题中下采样会降低图像分辨率、丢失信息而提出的一种卷积思路。它的好处是不做pooling损失信息的情况下,加大了感受野,让每个卷积输出都包含较大范围的信息。在图像需要全局信息或者语音文本需要较长的sequence信息依赖的问题中,都能很好的应用。
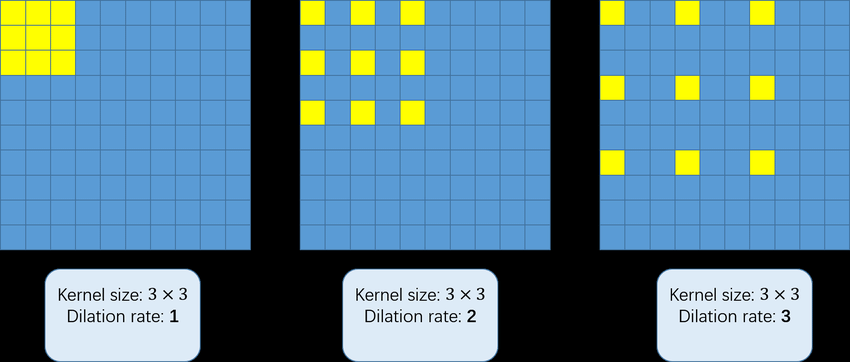
图片来源: https://www.researchgate.net/figure/3-3-convolution-kernels-with-different-dilation-rate-as-1-2-and-3_fig9_323444534
Backbone Build
Detr使用Joiner将Backbone和Position encoding集成在一个nn.Module中,Joiner是nn.Sequential的子类,通过初始化使得self[0]=Backbone,self[1]=Position Encoding。
在Foward传播过程中对Backbone的每层输出都进行位置编码,并返回Backbone的输出及对应的位置编码结果。
def build_backbone(args):
    position_embedding = build_position_encoding(args)
    train_backbone = args.lr_backbone > 0
    return_interm_layers = args.masks
    backbone = Backbone(args.backbone, train_backbone, return_interm_layers, args.dilation)
    model = Joiner(backbone, position_embedding)
    model.num_channels = backbone.num_channels

    return model
2.2 Position Encoding
“为什么要进行Position Encoding? ”
“Since the transformer architecture is permutation-invariant, we supplement it with fixed positional encodings that are added to the input of each attention layer. ”
DETR中提供了两种编码方式,一种是正弦编码(PositionEmbeddingSine),一种是可以学习的编码(PositionEmbeddingLearn ed)。
2.2.1 正弦编码
其中:
嵌入向量在输入句子中的位置;
嵌入向量中维度的索引
是所在层的输出维度。
Detr总的Position Encoding将一维扩展到了二维,理解起来有点费劲,网上有个讲的非常详细的文章,这里简要记录下。(https://blog.csdn.net/weixin_42715977/article/details/122135262)。
1) 创建Mask
假设图像的大小为3x3,生成的Mask为4×4,如下图所示。
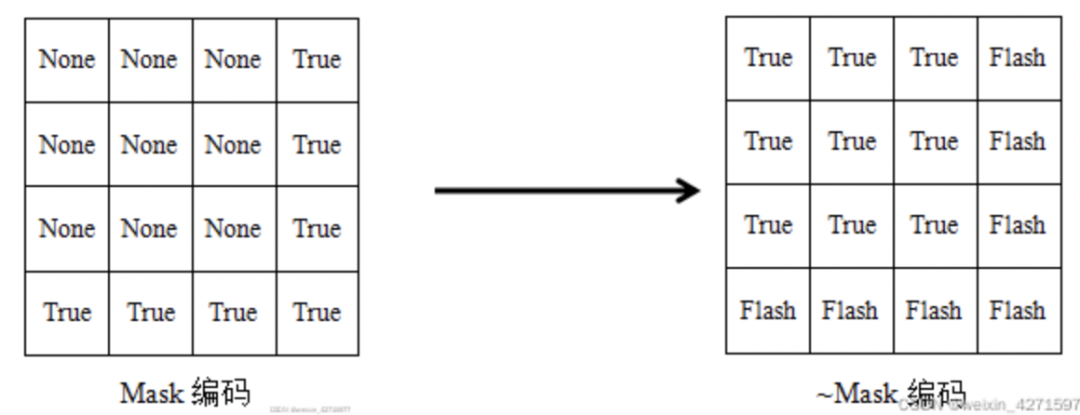
图片来源:https://blog.csdn.net/weixin_42715977/article/details/122135262
2) 生成x_embed和y_embed的tensor
y_embed = not_mask.cumsum(1, dtype=torch.float32)#在行方向累加#(b , h , w)
x_embed = not_mask.cumsum(2, dtype=torch.float32)#在列方向累加#(b , h , w)
生成的x_embed和y_embed如下图所示:
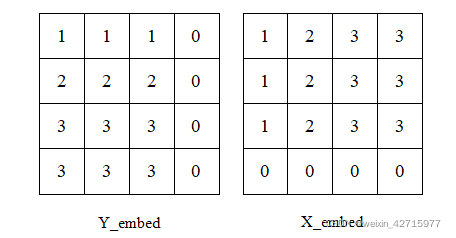
图片来源:https://blog.csdn.net/weixin_42715977/article/details/122135262
3) 进行位置编码
num_pos_feats = 10
temperature = 10000
dim_t = torch.arange(num_pos_feats, dtype=torch.float32, device=a.device)#生成10维数
dim_t = temperature ** (2 * (dim_t // 2) / num_pos_feats) #对10维数进行位置编码计算
第3行代码生成10个tensor数据,第4行代码对应位置编码的
。
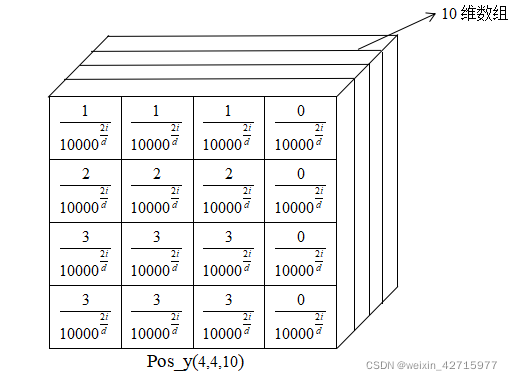
4) 生成pos_x以及pos_y
pos_x = x_embed[:, :, None] / dim_t
pos_y = y_embed[:, :, None] / dim_t
pos_x = torch.stack((pos_x[:, :, 0::2].sin(), pos_x[:, :, 1::2].cos()), dim=3).flatten(2)#不降维
pos_y = torch.stack((pos_y[:, :, 0::2].sin(), pos_y[:, :, 1::2].cos()), dim=3).flatten(2)#不降维

图片来源:https://blog.csdn.net/weixin_42715977/article/details/122135262
图片来源:https://blog.csdn.net/weixin_42715977/article/details/122135262
5) 组合Pos_x和Pos_y
pos = torch.cat((pos_y, pos_x), dim=2)
为了体现图像在x和y维度上的信息,作者的代码里分别计算了两个维度的Positional Encoding,然后Cat到一起。
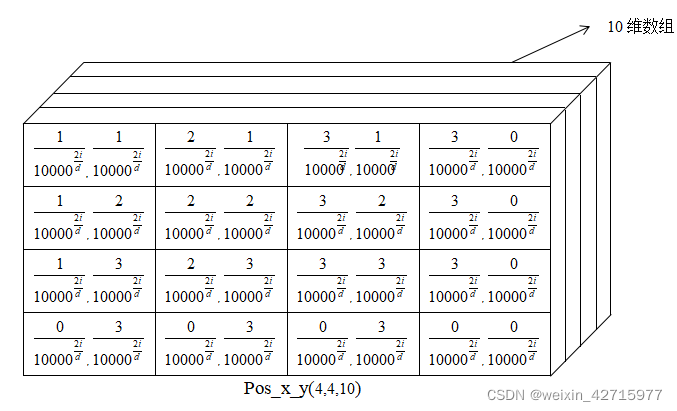
图片来源:https://blog.csdn.net/weixin_42715977/article/details/122135262
Detr中完整的Position Encoding代码如下:
x = tensor_list.tensors
mask = tensor_list.mask
assert mask is not None
not_mask = ~mask
y_embed = not_mask.cumsum(1, dtype=torch.float32)
x_embed = not_mask.cumsum(2, dtype=torch.float32)

dim_t = torch.arange(self.num_pos_feats, dtype=torch.float32, device=x.device)
dim_t = self.temperature ** (2 * (dim_t // 2) / self.num_pos_feats)

pos_x = x_embed[:, :, :, None] / dim_t
pos_y = y_embed[:, :, :, None] / dim_t
pos_x = torch.stack((pos_x[:, :, :, 0::2].sin(), pos_x[:, :, :, 1::2].cos()), dim=4).flatten(3)
pos_y = torch.stack((pos_y[:, :, :, 0::2].sin(), pos_y[:, :, :, 1::2].cos()), dim=4).flatten(3)
pos = torch.cat((pos_y, pos_x), dim=3).permute(0, 3, 1, 2) #[b, c, h, w]
2.3 Transformer Encoder
经过Backbone后,将输出特征图reshape为HW x Batch Size x C。
bs, c, h, w = src.shape

# flatten NxCxHxW to HWxNxC
src = src.flatten(2).permute(2, 0, 1)

# (h*w,bs,hidden_dim)
pos_embed = pos_embed.flatten(2).permute(2, 0, 1)

# (bs, h*w)
mask = mask.flatten(1)
然后,通过多层Transformer对Feature Map进行Encode。Transformer计算每个像素相对于其它所有像素的相关性,可以获得比CNN更大的感受野。
memory = self.encoder(src, src_key_padding_mask=mask, pos=pos_embed)

......

output = src
for layer in self.layers:
    output = layer(output, src_mask=mask,
             src_key_padding_mask=src_key_padding_mask, pos=pos)
src_key_padding_mask: 是backbone最后一层Feature Map对应的mask,Mask值为True的位置代表Feature Map Padding的部分,Padding的部分在计算Attention的时候会被忽略。
src_mask: 是Transformer中用来“防作弊”的,即忽略这些位置,不计算与其相关的注意力权重,实际训练中其实并未使用这个Mask。
q = k = self.with_pos_embed(src, pos)
src2 = self.self_attn(q, k, value=src, attn_mask=src_mask,
                 key_padding_mask=src_key_padding_mask)[0]
在计算MultiHeadAttention时,先对Key和Query进行Postion Embedding,然后计算Query和Key在图像特征总各个位置之间的相关性,用相关性作为对Value加权得到全局相关性的Feature Map。
src = src + self.dropout1(src2)
src = self.norm1(src)

src2 = self.linear2(self.dropout(self.activation(self.linear1(src))))
src = src + self.dropout2(src2)
src = self.norm2(src)
MultiHeadAttention之后做了Dropout、残差连接、层归一化和FFN的Dropout、残差连接、层归一化。
2.4 Transformer Decoder
def forward(self, tgt, memory,
                tgt_mask: Optional[Tensor] = None,
                memory_mask: Optional[Tensor] = None,
                tgt_key_padding_mask: Optional[Tensor] = None,
                memory_key_padding_mask: Optional[Tensor] = None,
                pos: Optional[Tensor] = None,
                query_pos: Optional[Tensor] = None):
tgt: 是Query Embedding,[num_queries, batch_size, hidden_dim]。
tgt_mask: 用来“防作弊”的,实际未使用。
memory: 是Encoder的输出,[H*W, batch_size, hidden_dim]。
memory_mask: 用来“防作弊”的,实际未使用。
tgt_key_padding_mask: 用来指示tgt的哪些部分是Padding的。
memory_key_padding_mask: 用来指示memory的哪些部分是Padding的。
pos: memory对应的Position Embedding,[H*W, batch_size, hidden_dim]。
query_pos: tgt对应的Position Embedding,[num_queries, batch_size, hidden_dim]。
q = k = self.with_pos_embed(tgt, query_pos)
tgt2 = self.self_attn(q, k, value=tgt, attn_mask=tgt_mask,
                     key_padding_mask=tgt_key_padding_mask)[0]
tgt = tgt + self.dropout1(tgt2)
tgt = self.norm1(tgt)

tgt2 = self.multihead_attn(query=self.with_pos_embed(tgt, query_pos),
                            key=self.with_pos_embed(memory, pos),
                            value=memory,
														attn_mask=memory_mask,
                            key_padding_mask=memory_key_padding_mask)[0]
Decode包含两层Attention网络层,第一个Attention网络层是self-Attention,输入均不来自Encode的输出;第二个Attention是常规的Cross-Attention,计算目标物体与图像特征各个位置的相关性,然后加权到Encoder编码后的图像特征上。
2.5 Query Embedding
Query Embedding有点像自学习的Anchor,源码中使用了nn.Embedding实现,其中num_queries代表图像中有多少个目标(默认是100个)。
self.query_embed = nn.Embedding(num_queries, hidden_dim)

# [num_queries, batch_size, hidden_dim]
query_embed = query_embed.unsqueeze(1).repeat(1, bs, 1)
Query Embedding应该加在我们需要预测的目标上,由于网络一开始没有输出,不知道预测目标在哪里,于是直接将它初始化为全0。然后它会在Decoder的各层不断被refine,相当于一个coarse-to-fine的过程。但是真正要学习的是query embedding,学习到的是整个数据集中目标物体的统计特征。
# 每次forward时,tgt都会初始化为0
tgt = torch.zeros_like(query_embed)
Query Embedding在Transformer的前向传播过程与Position Encoding的方式相同,就是直接相加。
def with_pos_embed(self, tensor, pos: Optional[Tensor]):
        return tensor if pos is None else tensor + pos

q = k = self.with_pos_embed(src2, pos)
3.匈牙利匹配算法
其中:
: Ground Truth Set Of Objects;Ground Truth集合的第i个元素
,
是Target Class Label,
is a vector that defines ground truth box center coordinates and its height and width relative to the image size。
: Predictions Set。
其中:
: Predictions Set的第
个元素的分类为
的概率;
3.1 Loss Function
Detr的Loss函数与其它Detectors相似,都是Class Loss(a negative log-likelihood for class prediction) + Box Loss组成。
Class Loss
为了解决Class Imbalance的问题,
的权重除以10;
@torch.no_grad()
def forward(self, outputs, targets):
    """ Performs the matching
    Params:
        outputs: This is a dict that contains at least these entries:
             "pred_logits": Tensor of dim [batch_size, num_queries, num_classes] with the classification logits
             "pred_boxes": Tensor of dim [batch_size, num_queries, 4] with the predicted box coordinates
        targets: This is a list of targets (len(targets) = batch_size), where each target is a dict containing:
             "labels": Tensor of dim [num_target_boxes] (where num_target_boxes is the number of ground-truth
                       objects in the target) containing the class labels
             "boxes": Tensor of dim [num_target_boxes, 4] containing the target box coordinates
    Returns:
        A list of size batch_size, containing tuples of (index_i, index_j) where:
            - index_i is the indices of the selected predictions (in order)
            - index_j is the indices of the corresponding selected targets (in order)
        For each batch element, it holds:
            len(index_i) = len(index_j) = min(num_queries, num_target_boxes)
    """
    bs, num_queries = outputs["pred_logits"].shape[:2]

    # We flatten to compute the cost matrices in a batch
    out_prob = outputs["pred_logits"].flatten(0, 1).softmax(-1)  # [batch_size * num_queries, num_classes]
    out_bbox = outputs["pred_boxes"].flatten(0, 1)  # [batch_size * num_queries, 4]

    # Also concat the target labels and boxes
    tgt_ids = torch.cat([v["labels"] for v in targets])
    tgt_bbox = torch.cat([v["boxes"] for v in targets])

    # Compute the classification cost. Contrary to the loss, we don't use the NLL,
    # but approximate it in 1 - proba[target class].
    # The 1 is a constant that doesn't change the matching, it can be ommitted.
    cost_class = -out_prob[:, tgt_ids]
Bounding box loss
其它的Detectors需要Initial Guesses,Detr则不需要Initial Guesses,而是直接预测Bounding Box。
> While such approach simplify the implementation it poses an issue with relative scaling of the loss. The most commonly-used L1 loss will have different scales for small and large boxes even if their relative errors are similar。
Loss的定义如下:
其中:
、
是超参数(hyperparameters)。
# Compute the L1 cost between boxes
cost_bbox = torch.cdist(out_bbox, tgt_bbox, p=1)

# Compute the giou cost betwen boxes
cost_giou = -generalized_box_iou(box_cxcywh_to_xyxy(out_bbox), box_cxcywh_to_xyxy(tgt_bbox))
3.2 匈牙利匹配算法
匈牙利算法是在图论中的二部图中找到最佳的匹配的算法。以下图宠物领养为例,左侧是人,右侧是宠物,中间的连线和数字代表人对宠物的喜爱程度。通过匈牙利算法,可以给出全局最优的匹配结果,让每个人都最大可能的领养到最喜爱的宠物。
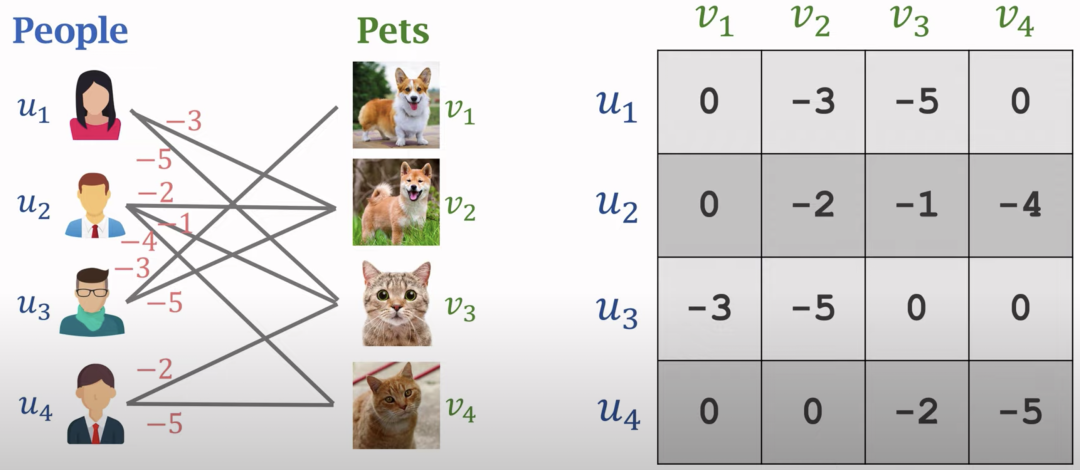
图片来源: https://www.youtube.com/watch?v=bSoZQkxc1Zw
scipy.optimize中提供了linear_sum_assignment函数实现了匈牙利匹配算法。Detr代码中针对每个Query执行一次匹配算法。
C = C.view(bs, num_queries, -1).cpu()

sizes = [len(v["boxes"]) for v in targets]
indices = [linear_sum_assignment(c[i]) for i, c in enumerate(C.split(sizes, -1))]
3.3 一些有意思的训练过程
最后记录一些网友的训练过程,来源: 【不知道DETR怎么训练,来看看object query匹配gt的可视化过程】(https://zhuanlan.zhihu.com/p/592381828)
初期-中期-后期的整个训练过程中,Object Query预测的BBox一步步在全局坐标上靠近GT的过程。
训练前期。对于中大目标,Object Query在250个step后基本能找到;但小目标比较难找,会出现Pred BBox在GT附近震荡。图片来源: https://zhuanlan.zhihu.com/p/592381828
训练中后期。Pred BBox在各自的gt附近晃动,小目标的Object Query输出的BBox开始偏向稳定。图片来源: https://zhuanlan.zhihu.com/p/592381828
训练到收敛阶段。各个GT BBox的Object Query变得稳定。图片来源: https://zhuanlan.zhihu.com/p/592381828
参考材料
1.源码解析目标检测的跨界之星DETR(二)模型训练过程与数据处理(https://zhuanlan.zhihu.com/p/372260417)
2.深度学习之目标检测(十一)-DETR详解(https://blog.csdn.net/baidu_36913330/article/details/120495817)
3.源码解析目标检测的跨界之星DETR(三)Backbone与位置编码(https://www.jianshu.com/p/1d93cde5581a)
4.Transformer|DETR目标检测中的位置编码position_encoding代码详解(https://blog.csdn.net/weixin_44649780/article/details/127162890)
5.源码解析目标检测的跨界之星DETR(四)Detection with Transformer(https://zhuanlan.zhihu.com/p/372298511)
6.Why use nn.Embedding for object query in the first decoder layer(https://github.com/facebookresearch/detr/issues/225)
7.DETR损失函数源码解读(匈牙利算法)(https://zhuanlan.zhihu.com/p/519938072)
8.不知道DETR怎么训练,来看看object query匹配gt的可视化过程(https://zhuanlan.zhihu.com/p/592381828)
9.Dilated Convolution(https://www.geeksforgeeks.org/dilated-convolution/)
本文参与 腾讯云自媒体同步曝光计划,分享自微信公众号。
原始发表:2023-01-28,如有侵权请联系 cloudcommunity@tencent.com 删除
目录
腾讯云开发者

Copyright © 2013 - 2026 Tencent Cloud. All Rights Reserved. 腾讯云 版权所有
深圳市腾讯计算机系统有限公司 ICP备案/许可证号:粤B2-20090059 ![]() 粤公网安备44030502008569号
粤公网安备44030502008569号
腾讯云计算(北京)有限责任公司 京ICP证150476号 | 京ICP备11018762号