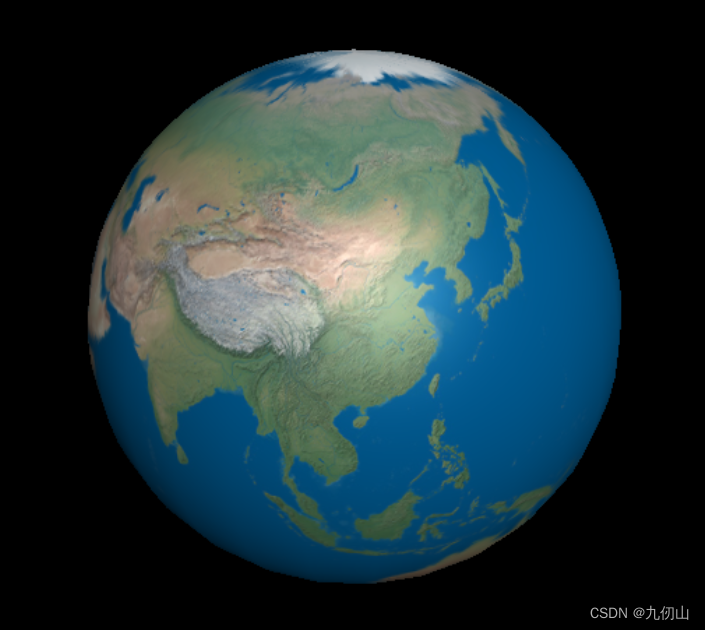
Threejs入门之十一:创建旋转的地球
Threejs入门之十一:创建旋转的地球
经过前面几个章节的介绍,我们对Threejs已经有了一个相对深入的了解,下面我们通过Threejs来做一个旋转的地球效果。 1.首先在电脑上创建一个earth文件夹,在earth文件夹中创建images文件夹用于存放图片文件;创建一个js文件夹用于存放JavaScript代码;创建一个css文件用于存放css样式表文件; 2.拷贝资源,将Threejs源码中的three.module.js拷贝到js文件夹,将地图的贴图文件拷贝到images文件夹 3.用vscode打开earth文件夹,在根目录下新建index.html文件,在index.html中引入three.module.js,在index.html中创建一个id为webgl的div
<div id="webgl"></div>
<script type="importmap">
    {
      "imports" : {
        "three":"./js/three.module.js"
      }
    }
  </script>
4.在css文件夹新建style.css文件,清空浏览器默认样式,并将style.css文件在index.html中引入,设置div水平居中
* {
  margin: 0;
  padding: 0;
}
#webgl {
  margin: 0 auto;
}
5.在根目录下新建index.js文件,并在index.html中引入
<script type="module" src="./index.js"></script>6.在index.js中编写代码 引入Threejs
import * as THREE from 'three'创建场景对象
const scene = new THREE.Scene()创建球形几何体 设置球体半径,水平分段数和垂直分段数参数
const geometry = new THREE.SphereGeometry(150,32,32)创建材质 这里使用MeshPhongMaterial创建材质,并加载images中准备好的地球材质
const material = new THREE.MeshPhongMaterial({
  map:new THREE.TextureLoader().load('./images/earth.js')
})
创建物体 创建网格对象并使用上面创建的几何体和材质作为参数传给对象,设置对象的坐标位置,并将其添加到场景中
const earth = new THREE.Mesh(geometry,material)
earth.position.set(0,10,0)
scene.add(earth)
创建相机 设置视窗的宽度为800,高度为600,创建相机,并设置相机的角度,宽高比,最近点和最远点;
// 视窗尺寸
const width = 800
const height = 600
// 创建相机
const camera = new THREE.PerspectiveCamera(75,width/height,0.1,800)
设置相机的位置和相机朝向的物体
// 相机位置
camera.position.set(200,200,200)
// 相机朝向
camera.lookAt(earth.position)
创建光源 创建一个点光源
// 创建点光源
const light = new THREE.PointLight(0xffffff,1,100)
light.position.set(0,0,0)
scene.add(light)
创建一个环境光
// 创建环境光
const directionalLight = new THREE.DirectionalLight(0xffffff,1)
// 设置光源的方向
directionalLight.position.set(80,100,50)
// 设置光的target
directionalLight.target = earth
scene.add(directionalLight)
创建渲染器
// 创建渲染器
const renderer = new THREE.WebGLRenderer()
renderer.setSize(width,height)
将渲染器挂载到div上
// 挂载到id为webgl的div
document.getElementById('webgl').appendChild(renderer.domElement)
创建循环调用函数 创建animation函数,在函数里面调用earth.rotation.y += 0.01,使其每次渲染都旋转0.01弧度,使用renderer.render(scene,camera)渲染
// 循环调用
function animation() {
  requestAnimationFrame(animation)
  earth.rotation.y += 0.01
  renderer.render(scene,camera)
}
animation()
保存,刷新浏览器,可以看到一个漂亮的地球已经渲染到浏览器,并自动旋转

至此,旋转的地球已经创建完成,完整的代码和地球贴图材质可以通过以下地址下载:https://download.csdn.net/download/w137160164/87650456
核心代码如下:
import * as THREE from 'three'
// 场景
const scene = new THREE.Scene()
// 球体
const geometry = new THREE.SphereGeometry(150, 32, 32)
// 材质
const material = new THREE.MeshPhongMaterial({
  map: new THREE.TextureLoader().load('./images/earth.jpg')
})
// 物体
const earth = new THREE.Mesh(geometry, material)
earth.position.set(0, 10, 0)
scene.add(earth)
// 视窗尺寸
const width = 800
const height = 600
// 创建相机
const camera = new THREE.PerspectiveCamera(75, width / height, 0.1, 800)
// 相机位置
camera.position.set(200, 200, 200)
// 相机朝向
camera.lookAt(earth.position)
// 创建点光源
const light = new THREE.PointLight(0xffffff, 1, 100)
light.position.set(0, 0, 0)
scene.add(light)
// 创建环境光
const directionalLight = new THREE.DirectionalLight(0xffffff, 1)
// 设置光源的方向
directionalLight.position.set(80, 100, 50)
// 设置光的target
directionalLight.target = earth
scene.add(directionalLight)
// 创建渲染器
const renderer = new THREE.WebGLRenderer()
renderer.setSize(width, height)
// 挂载到id为webgl的div
document.getElementById('webgl').appendChild(renderer.domElement)
// 循环调用
function animation() {
  requestAnimationFrame(animation)
  earth.rotation.y += 0.01
  renderer.render(scene,camera)
}
animation()
