Hexo博客利用GitHub Action自动化部署
Hexo博客利用GitHub Action自动化部署

777nx
发布于 2023-05-02 14:44:56
发布于 2023-05-02 14:44:56
一、前置知识
CI\CD 即:持续集成(Continuous Integration)、持续交付(Continuous Delivery)、持续部署(Continuous Deployment)。GitHub Actions 是一个持续集成和持续交付 (CI/CD) 平台,可用于自动执行构建、测试和部署管道,换句话说就是通过 Actions 帮助我们去执行 hexo s & hexo g & hexo d 的操作并推到 xxx.github.io 仓库中
二、参考教程
以下将使用特定的常量名来指代一些名词。此处建议读者直接使用教程内容的常量名。在最后再逐一搜索替换。这样可以避免对各种常量名的混淆。
常量 | 解释 |
|---|---|
[Blogroot] | 本地存放博客源码的文件夹路径 |
[SourceRepo] | 存放博客源码的私有仓库名 |
[SiteBlogRepo] | 存放编译好的博客页面的公有仓库名 |
[Github Actions 执行自动化部署] | 执行 hexo clean & hexo g & hexo d |
- 使用 Github Action 自动部署
- Github Action 自动部署博客:推送到 Github 公共仓库 + 服务器私有仓库 + 刷新腾讯云 CDN | 心流
- Hexo博客利用GitHub Action自动化部署
三、解决方案
申请令牌
Settings->Developer->Personal access tokens->Generate new token
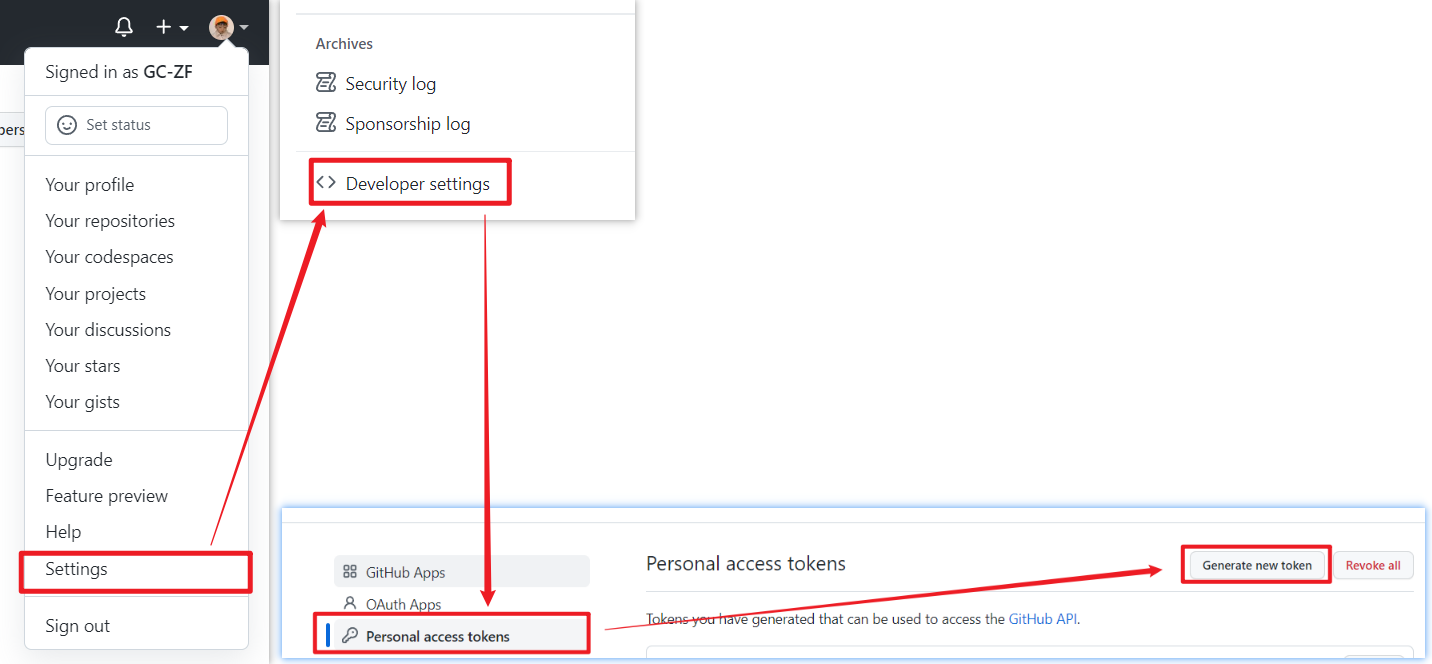
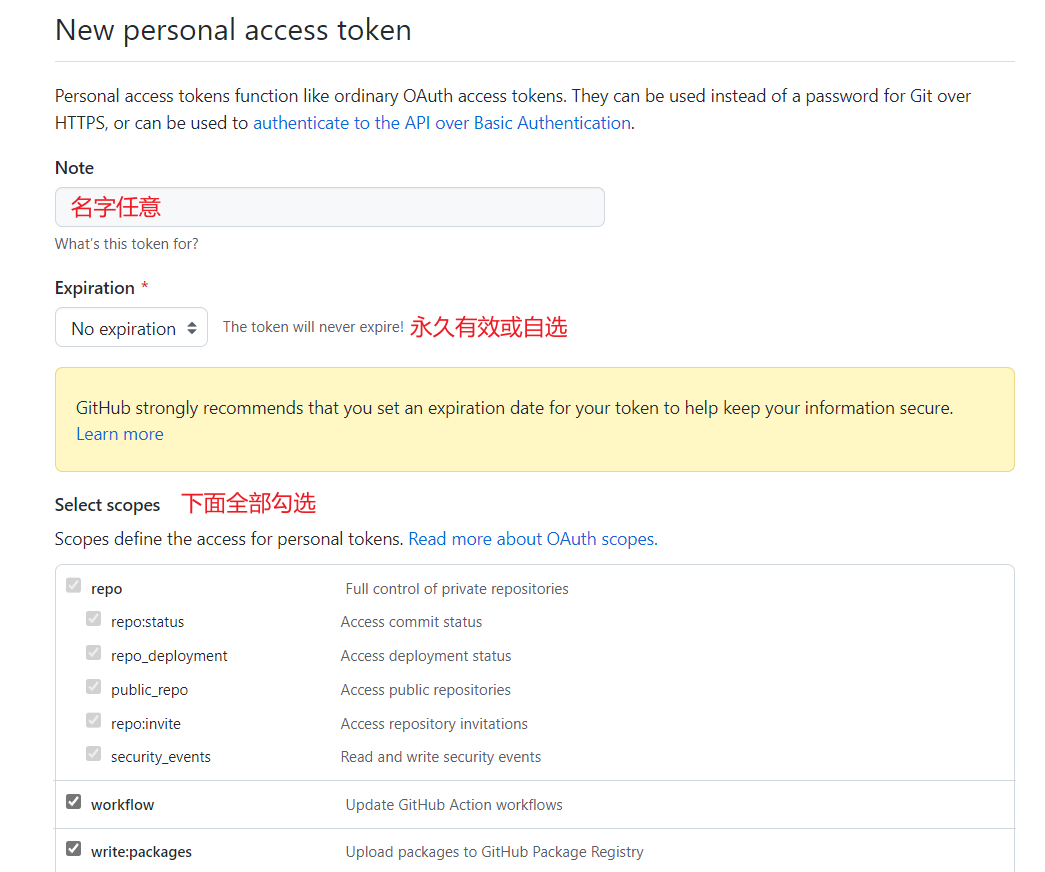
生成的令牌只会显示一次,记住令牌,如果忘记保存就删了重弄
新建仓库并上传
新建一个 Github 私有仓库
在博客根路径下,找到主题文件 [Blogroot]\themes\butterfly,将 .git 移出来
在博客根路径下的 .gitignore 加入忽略规则
.DS_Store
Thumbs.db
db.json
*.log
node_modules/
public/
.deploy*/
.vscode/
/.idea/
.deploy_git*/
.idea
themes/butterfly/.git
在博客根路径下执行
git init
git add .
git commit -m "init"
git branch -M main
git remote add origin https://github.com/用户名/私有仓库名.git
git push -u origin main
之后就可以在仓库中看到博客源码
配置刷新CDN
刷新 CDN 通过 Action 一并实现,没有 CDN 此项跳过 如果小白没跑通整个 Action 而放弃使用 Action 部署(滴滴小张也可以滴),类似插件推荐:腾讯云CDN主动刷新插件 张洪 Heo
为了保证安全性,使用子用户的 secretId、secretKey,打开用户 - 控制台新建用户
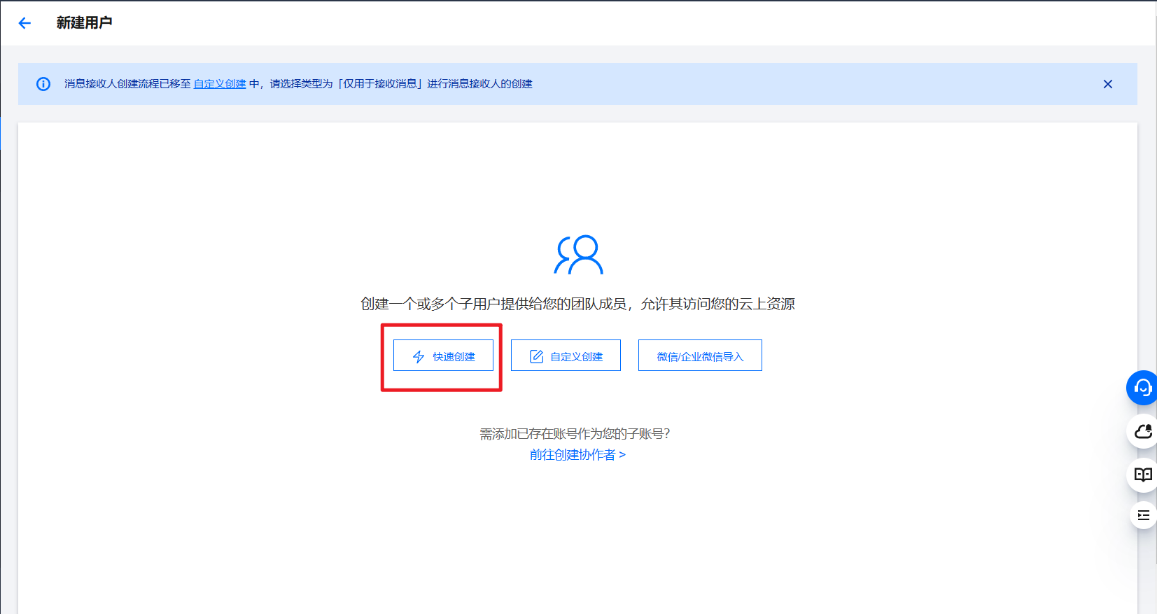
依次编辑用户名、访问方式、用户权限

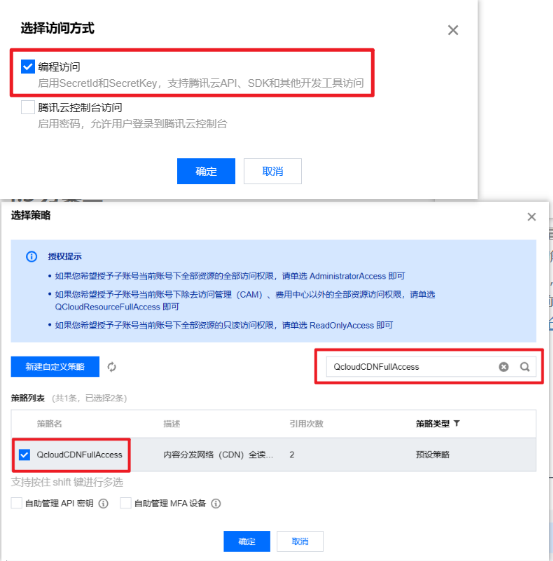
在博客根目录下创建 cdn.py,填写 cred、params 变量
import json
from tencentcloud.common import credential
from tencentcloud.common.profile.client_profile import ClientProfile
from tencentcloud.common.profile.http_profile import HttpProfile
from tencentcloud.common.exception.tencent_cloud_sdk_exception import TencentCloudSDKException
from tencentcloud.cdn.v20180606 import cdn_client, models
try:
    # 实例化一个认证对象,入参需要传入腾讯云账户secretId,secretKey,此处还需注意密钥对的保密
    # 密钥可前往https://console.cloud.tencent.com/cam/capi网站进行获取
    cred = credential.Credential("SecretId", "SecretKey")
    # 实例化一个http选项,可选的,没有特殊需求可以跳过
    httpProfile = HttpProfile()
    httpProfile.endpoint = "cdn.tencentcloudapi.com"

    # 实例化一个client选项,可选的,没有特殊需求可以跳过
    clientProfile = ClientProfile()
    clientProfile.httpProfile = httpProfile
    # 实例化要请求产品的client对象,clientProfile是可选的
    client = cdn_client.CdnClient(cred, "", clientProfile)

    # 实例化一个请求对象,每个接口都会对应一个request对象
    req = models.PurgePathCacheRequest()
    params = {
        "Paths": [ "https://www.777nx.cn" ],
        "FlushType": "delete"
    }
    req.from_json_string(json.dumps(params))

    # 返回的resp是一个PurgePathCacheResponse的实例,与请求对象对应
    resp = client.PurgePathCache(req)
    # 输出json格式的字符串回包
    print(resp.to_json_string())

except TencentCloudSDKException as err:
    print(err)
配置GitHub Action
新建 [Blogroot]\.github\workflows\autodeploy.yml
- 第六步
hexo algolia为algolia搜索,gulp为文件压缩任务,按需删除(教程记录在博客搭建博文) - 第七步 clean-exclude 变量为 Hexo-SEO-AutoPush SEO 自动提交插件的配置,按需删除(教程记录在博客搭建博文,原则上可以一起写到此工作流里通过 curl 请求提交,但是这个插件是真的好用!)
- 第九步刷新腾讯云 CDN 资源,按需删除
- 第十步备份源码至 Gitee,按需删除
name: Deploy # 部署

on: # 触发条件
  push:
    branches:
      - main # 推送到 main 分支(这里的分支名很重要,不要弄错了

  workflow_dispatch: # 手动触发

jobs:
  build:
    runs-on: ubuntu-latest

    steps:
      - name: 1. 检出仓库 # Checkout
        uses: actions/checkout@v2
        with:
          ref: main

      - name: 2. 安装 Node.js # Setup Node
        uses: actions/setup-node@v3
        with:
          node-version: "16.x"

      - name: 3. 安装 Hexo # Install Hexo
        run: |
          npm install hexo-cli -g

      - name: 4. 缓存 Node 插件 # Cache Modules
        uses: actions/cache@v1
        id: cache-modules
        with:
          path: node_modules
          key: ${{runner.OS}}-${{hashFiles('**/package-lock.json')}}

#      - name: 安装主题
#        run: |
#          git clone -b master https://github.com/jerryc127/hexo-theme-butterfly.git themes/butterfly
#          npm install hexo-renderer-pug hexo-renderer-stylus --save

      - name: 5. 安装依赖 # Install Dependencies 如果没有缓存或 插件有更新,则安装插件
        if: steps.cache-modules.outputs.cache-hit != 'true'
        run: | # **如果仓库里没有 package-lock.json,上传一下,npm ci 必须要有 package-lock.json**
          npm ci

      - name: 6. 生成静态文件 # Generate,其中hexo algolia为algolia搜索,hexo gulp为全站压缩,如果没安装则按需删除
        run: |
          hexo clean
          hexo generate
          hexo algolia
          gulp
          export TZ='Asia/Shanghai'

      - name: 7. 部署到 github page # Deploy:github.io仓库中保存每次提交日志 其中clean-exclude为hexo-seo-autopush插件配置,如果没安装则按需删除
        uses: JamesIves/github-pages-deploy-action@v4
        with:
          token: ${{ secrets.GITHUBTOKEN }}
          repository-name: ${{ secrets.GITHUBUSERNAME }}/${{ secrets.GITHUBUSERNAME }}.github.io
          branch: main
          folder: public
          clean-exclude: |
            public/.github/
          commit-message: "${{ github.event.head_commit.message }} Updated By Github Actions"

#      - name: 7. 部署到 github page # Deploy:github.io仓库中日志只保留最新
#        run: |
#          cd ./public
#          git init
#          git config --global user.name '${{ secrets.GITHUBUSERNAME }}'
#          git config --global user.email '${{ secrets.GITHUBEMAIL }}'
#          git add .
#          git commit -m "${{ github.event.head_commit.message }} $(date +"%Z %Y-%m-%d %A %H:%M:%S") Updated By Github Actions"
#          git push --force --quiet "https://${{ secrets.GITHUBUSERNAME }}:${{ secrets.GITHUBTOKEN }}@github.com/${{ secrets.GITHUBUSERNAME }}/${{ secrets.GITHUBUSERNAME }}.github.io.git" master:main

      - name: 8. 推送到服务器私有仓库
        uses: easingthemes/ssh-deploy@main
        env:
          SSH_PRIVATE_KEY: ${{ secrets.SERVER_PRIVATE_KEY }} # 服务器生成的私钥,例如 -----BEGIN RSA PRIVATE KEY-----xxxx-----END RSA PRIVATE KEY-----
          ARGS: "-avz --delete" # rsync参数
          SOURCE: "public/"
          REMOTE_HOST: ${{ secrets.SERVER_HOST }} # 服务器ip地址,例如 1.2.3.4
          REMOTE_USER: ${{ secrets.SERVER_USER }} # 登录用户,例如 ubuntu 注意应拥有该文件夹的权限,可以在root下为用户赋权 chown -R ubuntu:755 /www/wwwroot/hexo
          TARGET: ${{ secrets.SERVER_PATH }}    # 服务器目录,例如 /www/wwwroot/hexo
          EXCLUDE: ".git/,.user.ini"            # 排除源路径中.git/ 目标路径中.user.ini 这俩不做同步操作

      - name: 9. 刷新CDN
        run: |
          pip install --upgrade pip
          pip install tencentcloud-sdk-python
          pip install tencentcloud-sdk-python-cdn
          python3 cdn.py

      - name: 10. 备份Gitee  # Sync to Gitee
        uses: wearerequired/git-mirror-action@master
        env:
          # 注意在 Settings->Secrets 配置 GITEE_RSA_PRIVATE_KEY
          SSH_PRIVATE_KEY: ${{ secrets.GITEE_RSA_PRIVATE_KEY }}
        with:
          # 注意替换为你的 GitHub 源仓库地址
          source-repo: git@github.com:GC-ZF/Blog-Backups.git
          # 注意替换为你的 Gitee 目标仓库地址
          destination-repo: git@gitee.com:gc-zhang/blog-backups.git
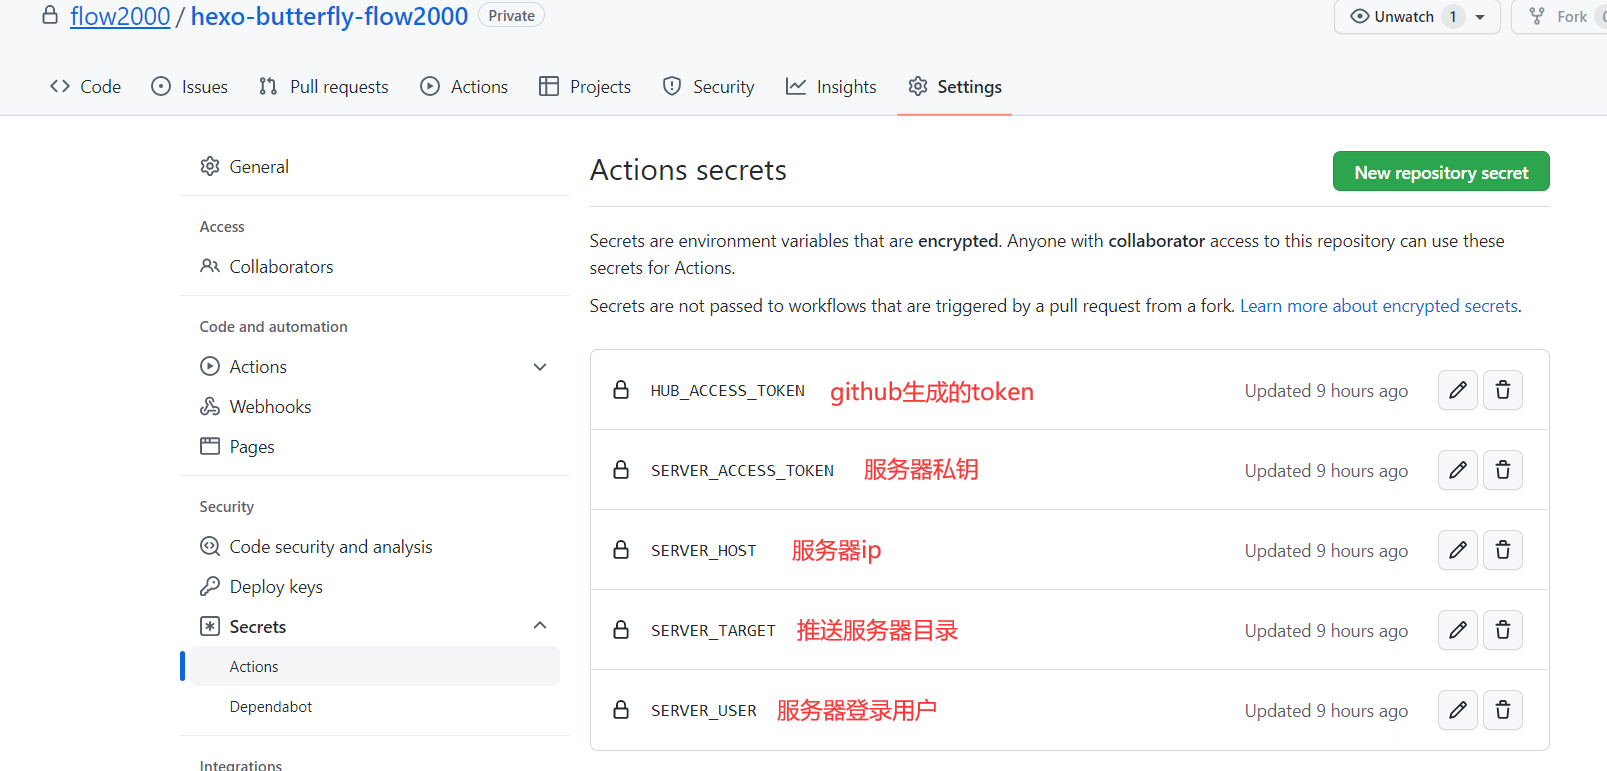
配置Secrets
服务器上执行:
ssh-keygen -t rsa -b 2048则按提示按完回车后
如果是 root 用户执行该命令,则:
将 /root/.ssh/id_rsa.pub 的内容复制到 /root/.ssh/authorized_keys 中
服务器私钥则在 /root/.ssh/id_rsa,将 /root/.ssh/id_rsa 内容复制到仓库的 secrets 环境变量 SERVER_ACCESS_TOKEN 中即可
如果是其他用户执行该命令(例如 git 用户)则:
将 /home/git/.ssh/id_rsa.pub 的内容复制到 /home/git/.ssh/authorized_keys 中
服务器私钥则在 /home/git/.ssh/id_rsa,将 /home/git/.ssh/id_rsa 内容复制到仓库的 secrets 环境变量 SERVER_ACCESS_TOKEN 中即可
在博客根路径执行
git add .
git commit -m "add actions"
git push
嫌麻烦可制作 bat 脚本,在博客根目录下新建 push.bat,复制以下内容即可:
@echo off
git add .
git commit -m "推送私有仓库"
git push origin master
pause
使用时双击脚本即可自动执行命令。
查看 Action 执行情况:
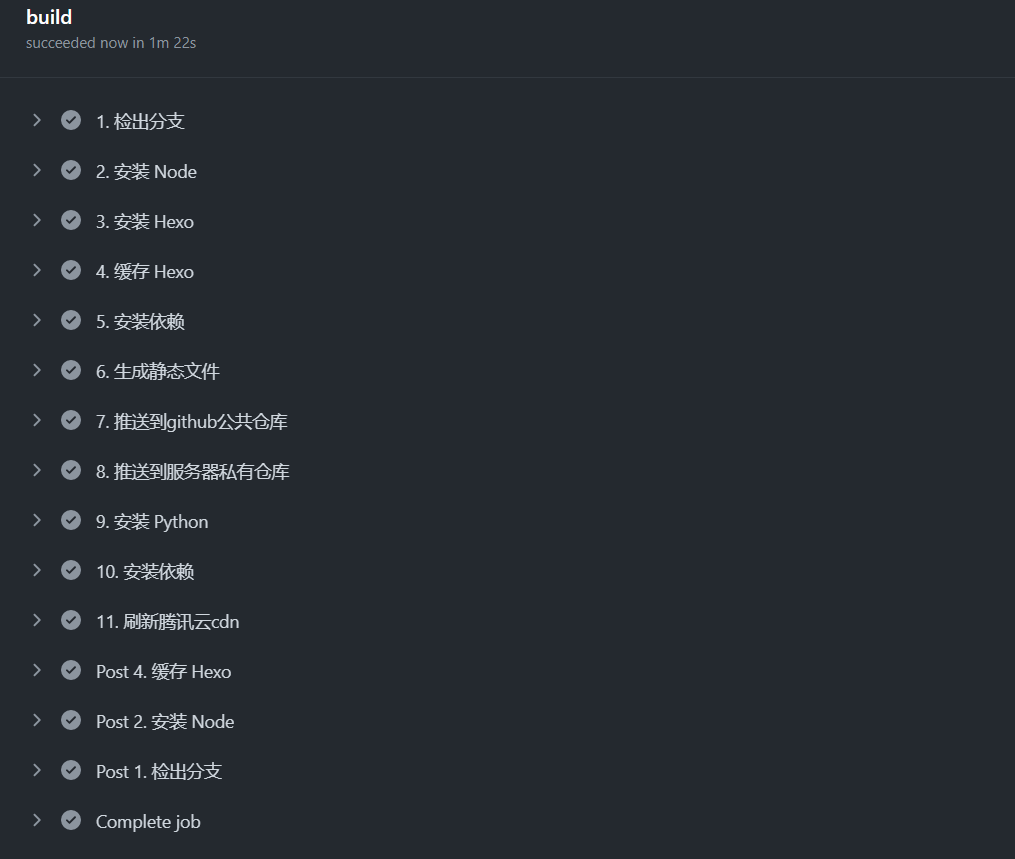
静待片刻,即可看到文章已部署在博客。
四、总结
彩蛋?这样自动化部署的目的还有一个优点,你可以直接在 [SourceRepo] 即 Github 博客源码仓库中直接修改文章提交后自动触发 Github Ations 执行自动化部署到 [GithubBlogRepo]、GiteeBlogRepo、[服务器站点],有点 typecho 那感觉了吧嘿嘿,之后本地同步通过在博客路径下 git pull 同步仓库源码,是不是很方便!
本文参与 腾讯云自媒体同步曝光计划,分享自作者个人站点/博客。
原始发表:2023-03-06,如有侵权请联系 cloudcommunity@tencent.com 删除
评论
登录后参与评论
推荐阅读
目录

