小白白也能学会的 PyQt 教程 —— 自定义组件 Switch Button
原创
小白白也能学会的 PyQt 教程 —— 自定义组件 Switch Button
原创
繁依Fanyi
发布于 2023-05-17 09:06:24
发布于 2023-05-17 09:06:24
前言
最近在搞 Python 课程设计,想要搞一个好看的 UI,惊艳全班所有人。但打开 Qt Creator,Win7 风格的复古的按钮是在让我难以下手。


其次,我因为想要打造一个 Fluent UI 样式的设置页面,需要一个好看的 Switch Button,来用于设置界面部分设置项的转换,于是便决定动手写一个;然而 Qt 中貌似没有原生的 Switch Button 可供使用,因此边决定自己动手写一个 Switch Button。话不多说,先看效果:
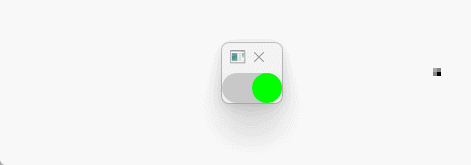
观赏结束,整活开始🐶
思路讲解
接下来简单分析一下 Switch Button 需要实现的部分:
首先,Switch Button 有开关两个状态,可以在初始化时声明一个变量来获取按钮的状态。在代码中,使用了一个布尔类型的变量 _switch_on 来表示按钮的状态,初始状态为 False,表示关闭状态。在点击按钮后,会切换状态并更新按钮的颜色。
接下来,我们需要绘制按钮的外观。在代码中,使用了 paintEvent 方法来实现按钮的绘制。该方法会被 Qt 框架自动调用,我们可以在其中使用 QPainter 对象进行绘制操作。
为了美观,绘制过程中,首先绘制了按钮的背景,使用了一个带圆角的矩形,并填充了浅灰色。然后根据按钮的状态绘制按钮的内部,使用了带圆角的矩形,并填充了相应的颜色。这样就完成了按钮的外观绘制。
当用户点击按钮时,mousePressEvent 方法会被调用。在该方法中,首先检查是否是鼠标左键按下,然后根据当前按钮的状态设置动画的方向,并启动动画。动画会逐渐改变按钮的位置,从而实现平滑的过渡效果。
在动画完成后,会调用 _on_animation_finished 方法。该方法会更新按钮的状态和颜色,并发射 switch_toggled 信号,通知应用程序按钮状态的变化。
最后,在主程序中创建了一个 QApplication 对象,实例化了 SwitchButton 类,并显示了按钮部件。这样就完成了整个 Switch Button 的实现。
代码部分
代码放在最后,大家在需要 Switch Button 的时候可以复制代码并进行简单修改,来打造自己的应用。
import sys
from PyQt5.QtCore import Qt, QPropertyAnimation, QRect, pyqtProperty, pyqtSignal
from PyQt5.QtGui import QPainter, QColor, QPen, QBrush
from PyQt5.QtWidgets import QWidget, QApplication

class SwitchButton(QWidget):
    switch_toggled = pyqtSignal(bool)

    def __init__(self, parent=None):
        super().__init__(parent)
        self.setFixedSize(60, 30)
        self._switch_on = False
        self._switch_color = QColor(0, 255, 0)
        self._switch_rect = QRect(0, 0, 30, 30)
        self._switch_animation = QPropertyAnimation(self, b"switchRect", self)
        self._switch_animation.setDuration(300)
        self._switch_animation.setStartValue(QRect(0, 0, 30, 30))
        self._switch_animation.setEndValue(QRect(30, 0, 30, 30))
        self._switch_animation.finished.connect(self._on_animation_finished)

    def paintEvent(self, event):
        painter = QPainter(self)
        painter.setRenderHint(QPainter.Antialiasing)
        painter.setPen(QPen(Qt.NoPen))
        painter.setBrush(QBrush(QColor(200, 200, 200)))
        painter.drawRoundedRect(self.rect(), 15, 15)

        painter.setBrush(QBrush(self._switch_color))
        painter.drawRoundedRect(self._switch_rect, 15, 15)

    def mousePressEvent(self, event):
        if event.button() == Qt.LeftButton:
            self._switch_animation.setDirection(QPropertyAnimation.Forward if not self._switch_on else QPropertyAnimation.Backward)
            self._switch_animation.start()

    def _on_animation_finished(self):
        self._switch_on = not self._switch_on
        if self._switch_on:
            self._switch_color = QColor(0, 255, 0)  # 红色
        else:
            self._switch_color = QColor(255, 0, 0)  # 绿色
        self.switch_toggled.emit(self._switch_on)

    @pyqtProperty(QRect)
    def switchRect(self):
        return self._switch_rect

    @switchRect.setter
    def switchRect(self, rect):
        self._switch_rect = rect
        self.update()

if __name__ == "__main__":
    app = QApplication(sys.argv)
    switch_button = SwitchButton()
    switch_button.show()
    sys.exit(app.exec_())
最后,如果这篇博客对你有帮助,那就点个赞👍呗!
原创声明:本文系作者授权腾讯云开发者社区发表,未经许可,不得转载。
如有侵权,请联系 cloudcommunity@tencent.com 删除。
原创声明:本文系作者授权腾讯云开发者社区发表,未经许可,不得转载。
如有侵权,请联系 cloudcommunity@tencent.com 删除。
评论
登录后参与评论
推荐阅读
目录
腾讯云开发者

Copyright © 2013 - 2026 Tencent Cloud. All Rights Reserved. 腾讯云 版权所有
深圳市腾讯计算机系统有限公司 ICP备案/许可证号:粤B2-20090059 ![]() 粤公网安备44030502008569号
粤公网安备44030502008569号
腾讯云计算(北京)有限责任公司 京ICP证150476号 | 京ICP备11018762号