如何在 wxPython 中创建多个工具栏
安装
用于GUI原型设计的wxPython库
作为C++库wxWidgets的包装器,wxPython允许Python开发人员利用这个成熟且经过实战测试的框架的强大功能。它具有各种平台的本机外观和感觉,包括Windows,macOS和Linux。使用 wxPython,您可以使用各种小部件(例如按钮、文本控件,当然还有工具栏)设计具有视觉吸引力且响应迅速的桌面应用程序。
pip install wxPython算法
- 导入 wxPython 库。
- 创建从 wx 继承的自定义窗口类。框架。
- 通过调用父类构造函数并将窗口标题作为参数传递来初始化自定义窗口类。
- 在框架内创建一个面板以容纳微件。
- 使用 CreateToolBar() 方法为窗口创建工具栏。
- 使用 AddTool() 方法将三个工具添加到工具栏:
- 带有相应图标“icon_open.bmp”的“打开”。
- “保存”与相应的图标“icon_save.bmp”。
- 带有相应图标“icon_highlight.bmp”(切换按钮)的“突出显示”。
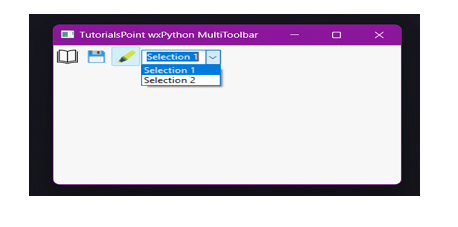
- 使用 AddControl() 方法将组合框(下拉列表)作为工具 4 添加到工具栏中,其中包含“选择 1”和“选择 2”。
- 初始化工具栏以显示它。
- 使用 Centre() 方法将窗口居中显示在屏幕上。
- 使用 Show() 方法显示自定义窗口。
- 使用 wx 创建 wxPython 应用程序。应用()。
- 创建并显示自定义窗口对象。
- 运行主事件循环,以便 GUI 在屏幕上弹出。
例
下载这些图标并将其保存在与脚本相同的文件中,否则您将遇到错误。

icon_save.bmp

icon_open.bmp

icon_highlight.bmp
import wx class CustomWindow(wx.Frame): def __init__(self, title): # Initialize the parent class constructor super().__init__(parent=None, title=title) self.panel = wx.Panel(self) # Toolbar for the window toolbar = self.CreateToolBar() # Tool 1 open_tool_id = wx.ID_ANY open_tool_label = "Open" open_tool_bitmap = wx.Bitmap("icon_open.bmp") toolbar.AddTool(open_tool_id, open_tool_label, open_tool_bitmap) # Tool 2 save_tool_id = wx.ID_ANY save_tool_label = "Save" save_tool_bitmap = wx.Bitmap("icon_save.bmp") toolbar.AddTool(save_tool_id, save_tool_label, save_tool_bitmap) # Tool 3 highlight_tool_id = wx.ID_ANY highlight_tool_label = "Highlight" highlight_tool_bitmap = wx.Bitmap("icon_highlight.bmp") width, height = 24, 24 toolbar.AddCheckTool(highlight_tool_id, highlight_tool_label, highlight_tool_bitmap) # Combo Box (Dropdown) toolbar combo = wx.ComboBox(toolbar, choices=["Selection 1", "Selection 2"]) toolbar.AddControl(combo) toolbar.Realize() self.Centre() self.Show() app = wx.App() # Show the custom window custom_window = CustomWindow("TutorialsPoint wxPython MultiToolbar") app.MainLoop()输出

解释
- 首先,导入wxPython库以使用其功能。
- 定义了一个名为 CustomWindow 的自定义窗口类,该类继承自 wx。帧类。
- 在 CustomWindow 类的 __init__ 构造函数中:
- super().__init__(parent=None, title=title) 行初始化父类构造函数 (wx.框架)与给定的标题,创建主窗口。
- 名为 self 的面板。面板将创建为框架的子级。面板用于保存wxPython应用程序中的小部件(控件)。
- 使用 CreateToolBar() 方法为窗口创建一个工具栏。
- 使用 AddTool() 方法将三个工具添加到工具栏中:
- 工具 1 具有“打开”标签和“图标打开.bmp”图标。
- 第二个工具具有“保存”标签和“图标保存.bmp”图标。
- 工具 3 的“突出显示”标签和“图标突出显示.bmp”图标 它被设计为可审核的工具(切换按钮)。
- 使用 AddControl() 方法,组合框(下拉列表)作为工具 4 添加到菜单栏中。“选择 1”和“选择 2”是组合框中存在的选项。
应用
要构建具有各种功能的复杂应用程序,需要工具栏。有时一个工具栏是不够的。将功能分离到多个工具栏中可简化用户体验。它对后端逻辑进行分区,并使应用易于使用和导航。这同样适用于各种生产力工具(例如文本编辑器、音乐播放器等)。例如。MS Word,Excel,Jira,Music Player等具有多个工具栏。每个都有一个下拉列表,其中包含与该特定工具栏相关的选项。
结论
本教程演示了如何在 wxPython 中构建许多工具栏。使用呈现的代码,您可以增强 GUI 应用程序的可用性。通过遵循安装过程并了解语法,可以将这些工具栏集成到项目中。将不同功能的工具栏分开可增强可用性和用户体验。wxPython 是创建复杂且有吸引力的 GUI 应用程序的可靠伴侣。
本文参与 腾讯云自媒体同步曝光计划,分享自作者个人站点/博客。
如有侵权请联系 cloudcommunity@tencent.com 删除
评论
登录后参与评论
推荐阅读
目录


