DataBinding系列之基础使用

DataBinding系列之基础使用

xuexiangjys
发布于 2023-09-01 11:21:21
发布于 2023-09-01 11:21:21
DataBinding, 又名数据绑定,是Android开发中非常重要的基础技术,它可以将UI组件和数据模型连接起来,使得在数据模型发生变化时,UI组件自动更新,从而节省了大量的代码和时间。
DataBinding的原理是通过编写XML布局文件,在其中使用特定的标签和语法,将UI组件和数据模型连接起来。当布局文件被加载时,DataBinding会自动生成绑定代码,从而将UI组件和数据模型关联起来。
通过学习DataBinding基础知识,可以让你的代码速度翻倍,提高开发效率和代码质量。因此,如果你希望在Android开发中获得更高的成功率和更快的发展速度,那么请务必学习DataBinding技术,掌握其基础知识,让自己成为一名高效率的Android开发者!
那么话不多说,让我们直接直奔主题。接下来我将从实用性的角度,来逐一讲解DataBinding的基础使用,文章末尾会给出示例代码的链接地址,希望能给你带来启发。
2.准备工作
2.1 启用
1.DataBinding启用
android {
    dataBinding {
        enabled = true
    }
}
2.ViewBinding启用
android {
    buildFeatures {
        viewBinding true
    }
}
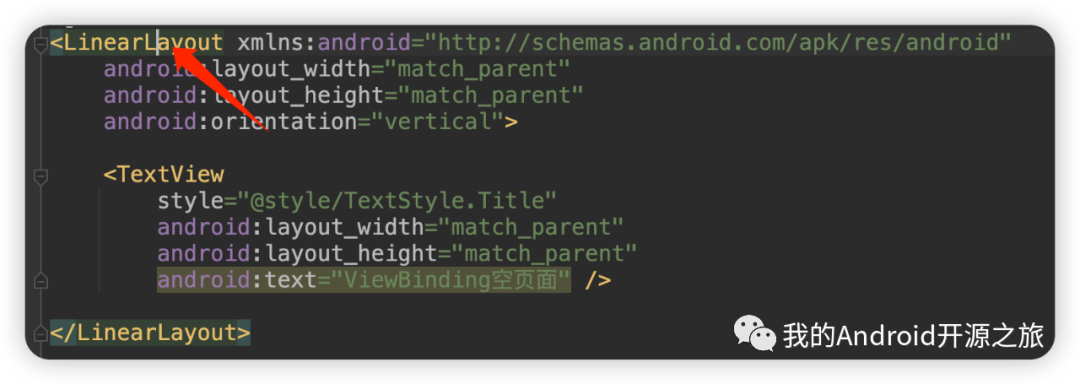
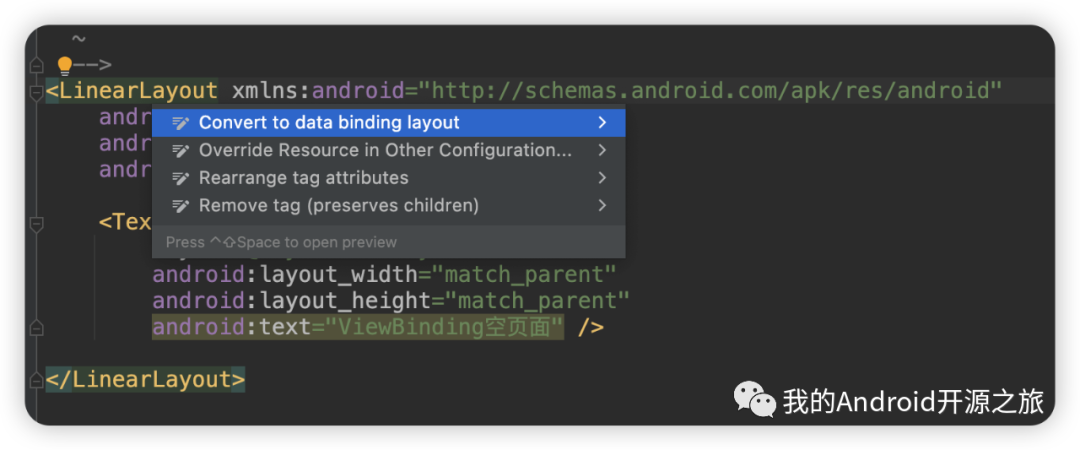
2.2 快捷方式
在你的布局中找到最外层的布局,将光标放在如图位置。
- Windows 请按快捷键
Alt + 回车 - Mac 请按快捷键
option + 回车
3.DataBinding绑定
3.1 数据类型
通常我们在DataBinding中绑定的数据类型是ViewModel或者是AndroidViewModel,它俩都是生命周期可感知的,唯一的区别是AndroidViewModel可以获取到应用的上下文Application。
3.2 数据创建
ViewModel的创建通常是通过ViewModelProvider进行创建和获取。
ViewModelProvider(this).get(Xxx::class.java)
而在ViewModel中,通常使用MutableLiveData作为可变UI响应数据类型。相比较LiveData而言,它开放了修改值的接口,下面是一个ViewModel的简单例子:
class RecyclerViewRefreshState(application: Application) : AndroidViewModel(application) {

    val title = MutableLiveData("RecyclerView的刷新和加载更多演示")
    val isLoading = MutableLiveData(false)
    val sampleData = MutableLiveData<List<SimpleItem>>(arrayListOf())
    val loadState = MutableLiveData(LoadState.DEFAULT)
    val layoutStatus = MutableLiveData(Status.DEFAULT)
}
当然了,如果你有一个LiveData会随着一个或多个LiveData的变化而变化,这个时候你可能就需要使用MediatorLiveData,即合并LiveData。
这里我简单利用MediatorLiveData实现一个组合的LiveData--CombinedLiveData。
open class CombinedLiveData<T>(vararg liveData: LiveData<*>, block: () -> T) :
    MediatorLiveData<T>() {
    init {
        value = block()
        liveData.forEach {
            addSource(it) {
                val newValue = block()
                if (value != newValue) {
                    value = newValue
                }
            }
        }
    }
}

fun <R, T1, T2> combineLiveData(
    liveData1: LiveData<T1>,
    liveData2: LiveData<T2>,
    block: (T1?, T2?) -> R
) = CombinedLiveData(liveData1, liveData2) { block(liveData1.value, liveData2.value) }
这个时候,我们就可以通过combineLiveData方法将两个LiveData组合起来,形成一个新的LiveData。下面我简单给出一个示例代码:
class CombineLiveDataState : DataBindingState() {
    val userName = MutableLiveData("小明")
    val userAge = MutableLiveData(20)
    val userInfo = combineLiveData(userName, userAge) { name, age ->
        "${name}今年${age}岁了!"
    }

    fun onAgeChanged() {
        userAge.value = userAge.value?.plus(1)
    }
}
这里变化了userAge的值后,userInfo也会随着一起变化。
3.3 视图绑定
一般我们使用DataBindingUtil进行视图绑定操作。绑定操作我们可分为:绑定Activity、绑定Fragment和绑定View。
- 绑定Activity
使用DataBindingUtil.setContentView方法进行绑定。
fun <DataBinding : ViewDataBinding> bindActivity(
    activity: ComponentActivity,
    layoutId: Int
): DataBinding = DataBindingUtil.setContentView<DataBinding>(activity, layoutId).apply {
    lifecycleOwner = activity
}
- 绑定Fragment
使用DataBindingUtil.inflate方法进行绑定。
fun <DataBinding : ViewDataBinding> bindFragment(
    fragment: Fragment,
    inflater: LayoutInflater,
    layoutId: Int,
    parent: ViewGroup? = null,
    attachToParent: Boolean = false
): DataBinding = DataBindingUtil.inflate<DataBinding>(inflater, layoutId, parent, attachToParent).apply {
    lifecycleOwner = fragment.viewLifecycleOwner
}
- 绑定View
使用DataBindingUtil.bind方法进行绑定。
fun <DataBinding : ViewDataBinding> bindView(
    view: View,
    viewLifecycleOwner: LifecycleOwner,
): DataBinding = DataBindingUtil.bind<DataBinding>(view).apply {
    lifecycleOwner = viewLifecycleOwner
}
【⚠️特别注意事项⚠️️】
DataBinding绑定的时候,一定要给ViewDataBinding赋值LifecycleOwner, 否则ViewModel中的LiveData发生数据改变后,则不会通知UI组件进行页面更新。
3.4 数据绑定
对ViewModel的绑定有两种写法。
- 直接使用
ViewDataBinding.variableId = xxx直接赋值。
val mainState = ViewModelProvider(this).get(MainState::class.java)
activityMainbinding.state = mainState
- 使用
ViewDataBinding.setVariable(int variableId, @Nullable Object value)进行赋值。
val mainState = ViewModelProvider(this).get(MainState::class.java)
binding.setVariable(BR.state, mainState)
这两者的唯一区别在于,第一种需要知道ViewDataBinding的具体类型,而第二种是ViewDataBinding自身的方法,无需知道ViewDataBinding的具体类型。
一般来说在框架中使用到泛型未知ViewDataBinding具体类型的时候,都会使用第二种方式进行绑定,可以说第二种方式更通用一些。
4.基础使用
4.1 点击事件绑定
1.无参响应函数:
fun onIncrement() {
    // 方法体
}
android:onClick="@{() -> state.onIncrement()}"
2.接口变量响应函数
注意,这里变量的类型应该是View.OnClickListener接口。
val onClickDecrement = View.OnClickListener {
    // 方法体
}
android:onClick="@{state.onClickDecrement}"
3.有参响应函数
fun onReset(view: View) {
    // 方法体
}
// 第一种写法
android:onClick="@{(view) -> state.onReset(view)}"

// 第二种写法
android:onClick="@{state::onReset}"
4.2 @BindingAdapter自定义属性
所有注解的功能都是基于XML属性值为DataBinding表达式才生效(即@{})
使用@BindingAdapter进行控件自定义属性绑定的时候,一定要使用 "@{}" 进行赋值,这一点非常重要!!!
- 顶级函数实现
// Kotlin拓展函数式写法, 推荐使用
@BindingAdapter("customTitle")
fun TextView.setCustomTitle(title: String) {
    text = "标题1: $title"
}

// 第一个参数必须是view的子类
@BindingAdapter("customTitle1")
fun setCustomTitle1(view: TextView, title: String) {
    view.text = "标题2: $title"
}

// 多个参数进行绑定,requireAll=true,代表两个参数都设置了才生效,默认是true.
// 如果requireAll为false, 你没有填写的属性值将为null. 所以需要做非空判断.
@BindingAdapter(value = ["customTitle", "customSize"], requireAll = true)
fun TextView.setTextContent(title: String, size: Int) {
    text = "标题3: $title"
    textSize = size.toFloat()
}
【⚠️特别注意事项⚠️️】
很多时候,很多新手在写DataBinding的时候,经常会漏掉"@{}",尤其是用数字和Boolean类型的值时。就比如我上面设置的customSize属性,类型值是Int型,正确的写法应该是下面这样:
- 正确的写法
<TextView
    style="@style/TextStyle.Title"
    android:layout_marginTop="16dp"
    app:customSize="@{25}"
    app:customTitle="@{state.title}" />
- 常见错误的写法
<TextView
    style="@style/TextStyle.Title"
    android:layout_marginTop="16dp"
    app:customSize="25"
    app:customTitle="@{state.title}" />
上述错误的写法,运行后编译器会报错AAPT: error: attribute customSize (aka com.xuexiang.databindingsample:customSize) not found.。
所以当我们写DataBinding的时候,如果出现AAPT: error: attribute xxx (aka com.aa.bb:xxx) not found.,十有八九是你赋值漏掉了"@{}"。
- 单例类+@JvmStatic注解
object TitleAdapter {
    @JvmStatic
    @BindingAdapter("customTitle2")
    fun setCustomTitle2(view: TextView, title: String) {
        view.text = "标题4: $title"
    }
}
4.3 @BindingConversion自定义类型转换
作用:在使用DataBinding的时候,对属性值进行转换,以匹配对应的属性。定义:方法必须为公共静态(public static)方法,且有且只能有1个参数。
下面我给一个简单的例子:
1.对于User类,age的类型是Int。
data class User(
    val name: String,
    val gender: String? = "男",
    val age: Int = 10,
    val phone: String? = "13124765438",
    val address: String? = null
)
2.使用@BindingAdapter定义了age的类型却是String。
@BindingAdapter(value = ["name", "age"], requireAll = true)
fun TextView.setUserInfo(name: String, age: String) {
    text = "${name}今年${age}岁"
}
3.这时候使用DataBinding的时候,👇的app:age="@{state.user.age}"会编译报错,提示类型不匹配。
<TextView
    style="@style/TextStyle.Title"
    android:layout_marginTop="16dp"
    app:name="@{state.user.name}"
    app:age="@{state.user.age}"/>
4.这个时候,我们就可以使用@BindingConversion自定义类型转换: Int -> String, 这样👆的代码就不会编译出错了。
@BindingConversion
fun int2string(integer: Int) = integer.toString()
4.4 @{}中表达式使用
- 常用运算符
- 算术 + - / * %
- 字符串合并 +
- 逻辑 && ||
- 二元 & | ^
- 一元 + - ! ~
- 移位 >> >>> <<
- 比较 == > < >= <=
- 三元 ?:
- Array 访问 []
<TextView
    android:text="@{@string/app_name +  @string/app_name}"/>
<TextView
    android:visibility="@{!state.user.phone.empty ? View.VISIBLE : View.GONE}"/>
- 常用转义字符
- 空格:
- <小于号: <
- >大于号: >
- &与号: &
<TextView
android:visibility="@{!state.user.phone.empty && state.user.age > 5 ? View.VISIBLE : View.GONE}"/>
- 资源使用
@string @color @drawable @dimen @array
<TextView
    style="@style/TextStyle.Content"
    android:text="@{@string/user_format(state.user.name, state.user.gender)}"
    android:textColor="@{@color/toast_error_color}"
    android:textSize="@{@dimen/xui_config_size_content_text_phone}" />
- 集合
集合不属于java.lang*下, 需要导入全路径。集合使用[]进行访问。
<data>
<import type="java.util.List"/>
<import type="android.util.SparseArray"/>
<import type="java.util.Map"/>
<variable name="list" type="List<String>"/>
<variable name="sparse" type="SparseArray<String>"/>
<variable name="map" type="Map<String, String>"/>
</data>
<TextView
    android:text="@{`key: key1, value:` + map[`key1`]}" />
- 引用类的静态方法
kotlin中定义静态方法,一定要在方法上加上@JvmStatic,否则将无法成功引用。
(1) 定义方法
object AppUtils {

    @JvmStatic
    fun getAppInfo(context: Context?) =
        context?.let {
            "packageName: ${it.packageName}, \nversionName: ${
                it.packageManager.getPackageInfo(
                    it.packageName,
                    0
                ).versionName
            }"
        }
}
(2) 导入方法所在类路径
<import type="com.xuexiang.databindingsample.utils.AppUtils"/>
(3) 引用方法
<TextView
    android:text="@{AppUtils.getAppInfo(context)}"/>
- 空值合并运算符
空值合并运算符 ?? 会取第一个不为 null 的值作为返回值。
<TextView
    android:text="@{`地址:` + (state.user.address ?? `默认地址`)}"/>
等价于
<TextView
    android:text="@{state.user.address != null ?  state.user.address : `默认地址`)}"/>
4.5 include 和 ViewStub
在主布局文件中将相应的变量传递给 include 布局,需使用自定义的 bind 命名空间将变量传递给 (include/ViewStub), 从而使两个布局文件之间共享同一个变量。
例如,在include中定义的变量id是:, 那么就使用 app:user="@{state.user}" 来绑定数据,与variable定义的name保持一致。
- include
<include
    android:id="@+id/include_layout"
    layout="@layout/include_user_info"
    app:user="@{state.user}" />
<layout xmlns:android="http://schemas.android.com/apk/res/android">

    <data>
        <variable
            name="user"
            type="com.xuexiang.databindingsample.fragment.basic.model.User" />

    </data>

    <LinearLayout
        android:layout_width="match_parent"
        android:layout_height="wrap_content"
        android:layout_marginVertical="16dp"
        android:orientation="vertical">

        <TextView
            android:id="@+id/tv_title"
            style="@style/TextStyle.Content"
            android:userInfo="@{user}" />

    </LinearLayout>
</layout>
如果你想在页面中获取include引用布局的某个控件时,你需要给include设置资源id,然后通过它去访问引用布局中的控件,就以👆的例子为例,如果我想访问布局中的TextView,我们可以这样写:
binding?.includeLayout?.tvTitle?.text = "用户信息"
【⚠️特别注意事项⚠️️】
这里需要注意的是,include标签,如果设置了layout_width和layout_height这两个属性,那么布局就是由include外层设置的layout属性生效,内层属性不生效。
如果include标签没有设置layout_width和layout_height这两个属性,那么就是由include引用的布局内层设置的layout属性生效。
举个例子,如果把👆设置的include改成下面这样:
<include
    layout="@layout/include_user_info"
    android:layout_width="match_parent"
    android:layout_height="wrap_content"
    android:layout_marginTop="24dp"
    app:user="@{state.user}" />
那么@layout/include_user_info加载的布局,距离上部的距离就是24dp,而不是16dp。
- ViewStub
<ViewStub
    android:id="@+id/user_info"
    android:layout_width="match_parent"
    android:layout_height="wrap_content"
    android:layout_marginTop="16dp"
    android:layout="@layout/viewstub_user_info"
    app:info="@{state.user}" />
<layout xmlns:android="http://schemas.android.com/apk/res/android">

    <data>
        <variable
            name="info"
            type="com.xuexiang.databindingsample.fragment.basic.model.User" />

    </data>

    <TextView
        style="@style/TextStyle.Content"
        android:userInfo="@{info}" />
</layout>
因为ViewStub功能是延迟加载引用的布局,当我们需要让其进行加载的时候,我们需要通过ViewStub的资源id获取到ViewStub,然后进行inflate,示例代码如下:
binding?.userInfo?.viewStub?.inflate()
以上就是本次DataBinding基础使用的全部内容,后面我还会分享DataBinding的进阶使用教程,感兴趣的小伙伴可以点击头像关注我哦~
本文的全部源码我都放在了github上, 感兴趣的小伙伴可以下下来研究和学习。
项目地址: https://github.com/xuexiangjys/DataBindingSample
我是xuexiangjys,一枚热爱学习,爱好编程,勤于思考,致力于Android架构研究以及开源项目经验分享的技术up主。获取更多资讯,欢迎微信搜索公众号:【我的Android开源之旅】
往期推荐
本文参与 腾讯云自媒体同步曝光计划,分享自微信公众号。
原始发表:2023-06-30,如有侵权请联系 cloudcommunity@tencent.com 删除
本文分享自 我的Android开源之旅 微信公众号,前往查看
如有侵权,请联系 cloudcommunity@tencent.com 删除。
本文参与 腾讯云自媒体同步曝光计划 ,欢迎热爱写作的你一起参与!
评论
登录后参与评论
推荐阅读
目录
腾讯云开发者

Copyright © 2013 - 2026 Tencent Cloud. All Rights Reserved. 腾讯云 版权所有
深圳市腾讯计算机系统有限公司 ICP备案/许可证号:粤B2-20090059 ![]() 粤公网安备44030502008569号
粤公网安备44030502008569号
腾讯云计算(北京)有限责任公司 京ICP证150476号 | 京ICP备11018762号