java之实现图片二值化


闲着没事突然看到一博客实现的图片二值化 觉得intresting 就写了个玩玩,所谓二值化 就是彩色照片变成黑白吧。。 图像的二值化,就是将图像上的像素点的灰度值设置为0或255,也就是将整个图像呈现出明显的只有黑和白的视觉效果 具体代码实现:
import javax.imageio.ImageIO;
import java.awt.*;
import java.awt.image.BufferedImage;
import java.io.File;

public class ImageTest {

    public static void main(String[] args) throws Exception {
        //File.separator 而File.separator是系统默认的文件分割符号,屏蔽了这些系统的区别。
        //用File.separator保证了在任何系统下不会出错。
        String filename="D:"+ File.separator+"binaryzation"+File.separator+"wuyanzu.jpg";
        File file = new File(filename);
        BufferedImage bufferedImage = ImageIO.read(file);
        int height = bufferedImage.getHeight();
        int width = bufferedImage.getWidth();
        int rgb = bufferedImage.getRGB(0,0);
        int arr[][] =new int[width][height];//存放图片每个像素点的灰度值
        //
        for (int i = 0; i < width; i++) {
            for (int j = 0; j < height; j++) {
                arr[i][j] = getImageRgb(bufferedImage.getRGB(i,j));
            }
        }
//        构造一个类型为预定义图像类型之一的 BufferedImage,TYPE_BYTE_BINARY(表示一个不透明的以字节打包的 1、2 或 4 位图像。)
        BufferedImage newBufferedImage = new BufferedImage(width,height,BufferedImage.TYPE_BYTE_BINARY);
        int threshold = 130;//阈值 关于阀值,网上有许多算法,有兴趣的朋友可以自己研究下,这里我随机给出了一个中间数130。
        for (int i = 0; i < width; i++) {
            for (int j = 0; j < height; j++) {
//                大于阀值则设为黑色,小于则为白色
                if (getGray(arr,i,j,width,height)>threshold){
                    int black = new Color(255,255,255).getRGB();
                    newBufferedImage.setRGB(i,j,black);
                }else {
                    int white = new Color(0,0,0).getRGB();
                    newBufferedImage.setRGB(i,j,white);
                }
            }
        }
        ImageIO.write(newBufferedImage,"jpg",new File("D:"+File.separator+"binaryzation"+File.separator+"binaryzation-wuyanzu.jpg"));
        System.out.println("图片二值化成功");
        //下面这段主要是实现加水印的功能 可忽略
        int fontStyle=1;
        int fontSize=20;//字体大小
        File pressFile =new File("D:/QRCodetest/pressText.txt");
        String pressText = ReadFromFile.readFromFile(pressFile);
        String newImg="D:"+File.separator+"newPicWithPressText.jpg";
        String targetImg="D:"+File.separator+"binaryzation"+File.separator+"binaryzation-wuyanzu.jpg";
        QRCodeUtils.pressText(pressText,newImg,targetImg,fontStyle, Color.green,fontSize,width,height);
    }

    /**
     * //自己加周围8个灰度值再除以9,算出其相对灰度值
     * @param gray
     * @param x
     * @param y
     * @param width
     * @param height
     * @return
     */
    private static int getGray(int[][] gray, int x, int y, int width, int height) {
        int rs = gray[x][y]
                    +(x==0 ? 255 : gray[x-1][y])
                    +(x==0 || y==0 ? 255 : gray[x-1][y-1])
                    +(x==0 || y==height-1 ? 255 : gray[x-1][y+1])
                    +(y==0 ? 255 : gray[x][y-1])
                    +(y==height-1 ? 255 : gray[x][y+1])
                    +(x==width-1 ? 255 : gray[x+1][y])
                    +(x==width-1 || y==0 ?255: gray[x+1][y-1])
                    +(x==width-1 || y==height-1 ? 255 : gray[x+1][y+1]);
        return rs/9;
    }

    /**
     * 得到图片灰度值
     * @param rgb
     * @return
     */
    private static int getImageRgb(int rgb) {
        //关于图片的灰度值,这里使用简单的(R+G+B)/3
        String argb = Integer.toHexString(rgb);//十进制转十六进制
        int r = Integer.parseInt(argb.substring(2,4),16);//16代表16进制
        int g = Integer.parseInt(argb.substring(4,6),16);
        int b = Integer.parseInt(argb.substring(6,8),16);
        int result = (int)((r+g+b)/3);
        return result;
    }
}
效果如下: 文件结构:
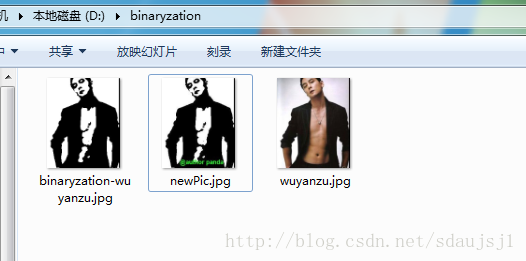
原图:

二值化后:

加水印:

有想玩加水印的参考我这个博客 : http://blog.csdn.net/sdaujsj1/article/details/78784521
本文参与 腾讯云自媒体同步曝光计划,分享自作者个人站点/博客。
原始发表:2023-10-11,如有侵权请联系 cloudcommunity@tencent.com 删除
评论
登录后参与评论
推荐阅读
腾讯云开发者

Copyright © 2013 - 2026 Tencent Cloud. All Rights Reserved. 腾讯云 版权所有
深圳市腾讯计算机系统有限公司 ICP备案/许可证号:粤B2-20090059 ![]() 粤公网安备44030502008569号
粤公网安备44030502008569号
腾讯云计算(北京)有限责任公司 京ICP证150476号 | 京ICP备11018762号