地科Python数据分析案例 | 绘制黄土高原局部区域的沟壑覆盖度分析图
地科Python数据分析案例 | 绘制黄土高原局部区域的沟壑覆盖度分析图

陈南GISer
发布于 2023-11-03 16:13:48
发布于 2023-11-03 16:13:48
黄土高原沟壑覆盖度分析
一、背景介绍
研究区介绍
黄土高原位于中国中部偏北部,为中国四大高原之一。黄土高原是世界上水土流失最严重和生态环境最脆弱的地区之一,除许多石质山地外,大部分区域为厚层黄土覆盖,经流水长期强烈侵蚀,逐渐形成千沟万壑、地形支离破碎的特殊自然景观。
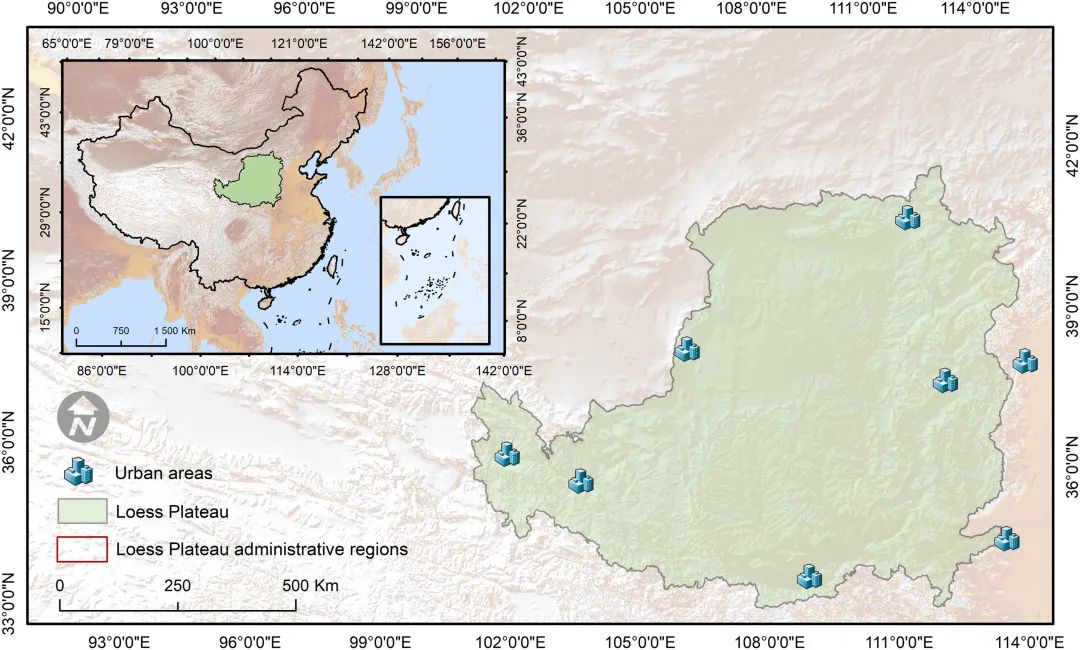
黄土高原(图引用自Yu et al., 2020)
沟壑,作为地表过程中的物质和能量运移的通道,是最活跃的地貌单元,广泛分布于黄土高原地区。沟壑密度是反映地表侵蚀强度的常用指标之一,传统的沟壑密度指标往往基于沟壑线状特征提取,本案例提出了一种以沟谷范围为基础的沟壑覆盖度指标,利用地貌类型单元数据,基于 DEM 的地貌计量学方法,提取黄土沟蚀区域,进而计算沟壑覆盖程度。本案例提出了一种新的沟壑覆盖度计算方法,提升了结果的精确性,而且区分了沟底与沟坡,为进一步提取沟谷长、宽、深度等指标提供了基础,有助于开展沟谷形态与发育演化关系的研究。不同区域大范围的沟壑覆盖度,对了解沟壑形成与演变的机制,揭示黄土高原地貌演化动态过程,防范地质灾害、管理水资源和土地规划提供重要依据。参考该案例,你们可以将相关地形分析方法推广,应用于地理、地质、水文、生态等相关研究。
二、案例介绍
数据
- 全球基本地貌类型数据集:全球基本地貌单元(GBLU)数据集基于 30m 分辨率的数字高程模型(DEM)制作,是描绘全球范围内陆表区域地貌类型边界的矢量数据集。数据精度相当于 1:20 万比例尺。数据集分为两级地貌类型单元:一级地貌单元为平原,丘陵,小起伏山地,中起伏山地,大起伏山地和极大起伏山地 6 类;次级地貌单元是在一级地貌单元基础上进一步划分的不同海拔高程级别的 23 种类型。黄土高原 35°N-36°N,107°E-108°E 的区域 1°×1° 范围的全球基本地貌分类数据(GBLU)。本案例选用的是黄土高原内 1°×1° 大小的数据(35°N-36°N,107°E-108°E),更多数据可以在 DDE-地貌学科平台(https://geomorph.deep-time.org )获取。
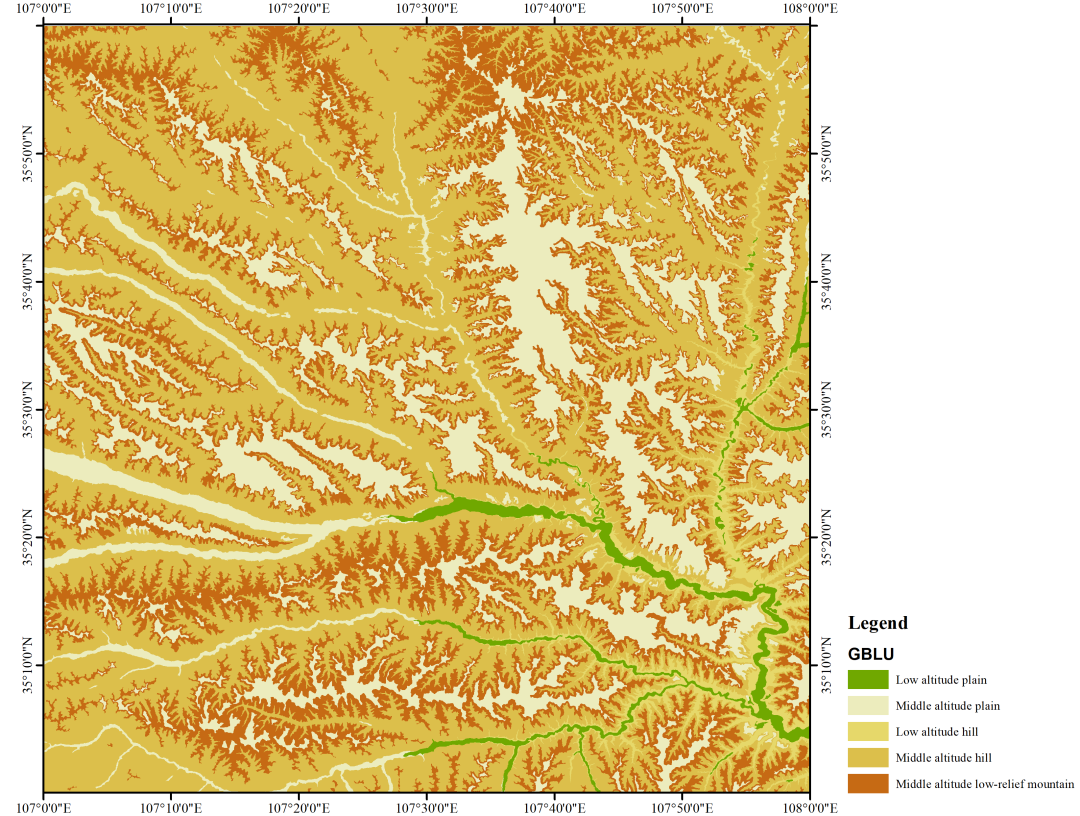
研究区GBLU数据
- FABDEM 数据--FABDEM 数据是从哥白尼数字高程模型中剥离了植被和建筑物的全球开源 DEM 数据集,水平分辨率低至 1 角秒(赤道地区约 30 米)。本案例选用了与基本地貌类型数据空间范围一致的一景数据(35°N-36°N,107°E-108°E),更多数据可以在数据发布方获取。
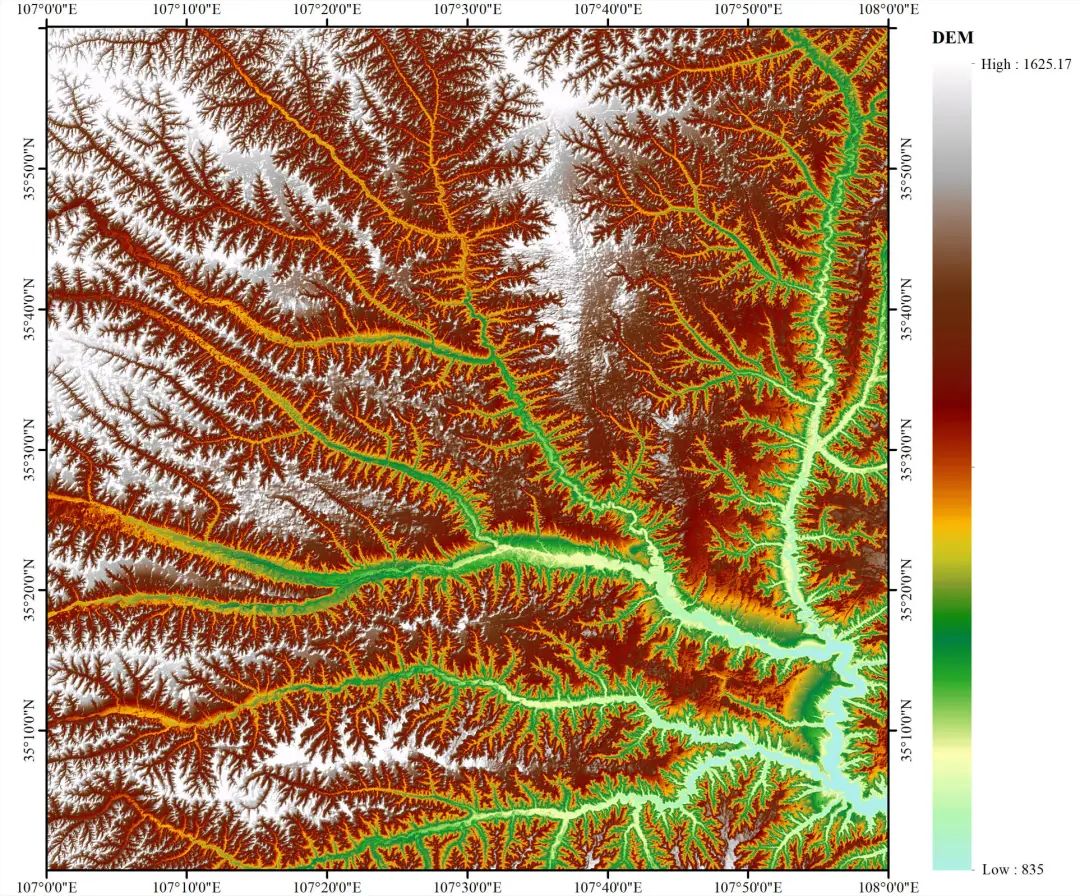
研究区FABDEM数据
方法
简要流程
- 预处理:包括对原始数据进行重投影、制作山地阴影底图等。
- 流域分析:使用水文分析工具,基于 DEM 数据划分研究区子流域。
- 正负地形划分:按照一定的阈值,将地形划分为正地形和负地形,正地形是指地表的凸起、隆起和山丘等形态;负地形是指地表的凹形、凹陷和洼地等形态。
- 沟坡沟底划分:将负地形中的侵蚀稳定区识别为沟底,侵蚀活跃区识别为沟坡。
- 沟坡覆盖度计算:统计每个流域内沟坡占比面积。
流程图
本案例流程较为复杂,可以参考以下流程图掌握分析思路。
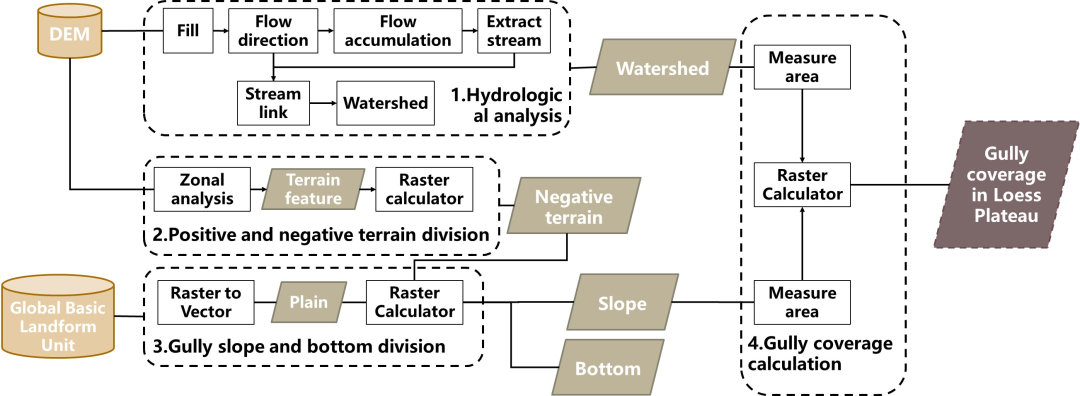
研究流程图
三、案例内容
步骤一 预处理
- DEM 数据重投影
- 地貌分类数据重投影
- 山体阴影
1.1 DEM 数据重投影 Reproject
- 将获取得到的 DEM 栅格投影至 CGCS2000 高斯投影 108E 分带(EPSG:4545);
- 参数说明:
- EPSG code:目标空间坐标系的 EPSG 代码。
# 调用dde模型库中的Project Raster模型
import numpy as np
from rasterio.warp import calculate_default_transform, reproject, Resampling
from rasterio import crs
import rasterio

def pydde_rasterProject_run(src_file, EPSG_Code, tag_file):
    tag_crs = crs.CRS.from_epsg(EPSG_Code)

    with rasterio.open(src_file) as src_ds:
        profile = src_ds.profile

        tag_trans, tag_width, tag_height = calculate_default_transform(
            src_ds.crs, tag_crs, src_ds.width, src_ds.height, *src_ds.bounds)

        profile.update({
            'crs': tag_crs,
            'transform': tag_trans,
            'width': tag_width,
            'height': tag_height,
            'nodata': 0
        })

        with rasterio.open(tag_file, 'w', **profile) as tag_ds:
            for i in range(1, src_ds.count + 1):
                src_array = src_ds.read(i)
                tag_array = np.empty((tag_height, tag_width), dtype=profile['dtype'])

                reproject(
                    source=src_array,
                    src_crs=src_ds.crs,
                    src_transform=src_ds.transform,

                    destination=tag_array,
                    dst_transform=tag_trans,
                    dst_crs=tag_crs,
                    resampling=Resampling.cubic,
                    num_threads=2)

            tag_ds.write(tag_array, i)

    res = "success"
return resinput = input_dir + "N35E107_FABDEM_V1-0.tif"
outDEM = output_dir + "DEM_P.tif"
EPSG_Code = "4545"
pydde_rasterProject_run(input, EPSG_Code, outDEM)1.2 地貌分类数据重投影 Reproject
- 将获取得到的地貌分类矢量数据投影至 CGCS2000 高斯投影 108E 分带(EPSG:4545);
- 参数说明:
- EPSG code:目标空间坐标系的 EPSG 代码。
input = input_dir + "GBLU_v11_N35E107.shp"
outGBLU = output_dir + "GBLU_P.shp"
EPSG_Code = "EPSG:4545"

# 调用gdal的ogr2ogr工具实现矢量数据重投影
command = 'ogr2ogr -f "ESRI Shapefile" -t_srs ' + EPSG_Code + ' ' + outGBLU + ' ' + input
print(command)
os.system(command)
1.3 山体阴影 Hillshade
- 提供更为显著的地形可视化效果。
- 参数说明
- azimuth:太阳光入射方位角;
- altitude:太阳光入射垂直高度角;
- zfactor:z 单位与输入表面的 x,y 单位不同时,转换单位的尺度。
outDEM = output_dir + "DEM_P.tif"
outHS = temp_dir + "Hillshade.tif"

wbt.hillshade(
    outDEM,
    outHS,
    azimuth=315.0,
    altitude=45.0,
    zfactor=None,
    callback=my_callback
)outDEM = output_dir + "DEM_P.tif"
outHS = temp_dir + "Hillshade.tif"
# 读取dem数据
dem = rxr.open_rasterio(outDEM)
dem = dem[0]
dem = dem.where(dem.values!=0) # Ignore nodata
# 读取山地阴影图
hs = rxr.open_rasterio(outHS)
hs = hs[0]
hs = hs.where(hs.values!=0) # Ignore nodata
alpha = 0.7 #将DEM叠加在山地阴影上,需要设置DEM图层透明度
fig, ax = plt.subplots(figsize=(12, 12))
hs.plot(cmap='gray', add_colorbar=False) # 先绘制灰色的山地阴影图作为底图
dem.plot(cmap='terrain', alpha=alpha, cbar_kwargs={'label': 'height'}) # 在山地阴影图上叠加半透明的dem
# 隐藏xy坐标
ax.set_xticks([])
ax.set_yticks([])
# 添加标题
ax.set_title("DEM with hillshade")
plt.show()
# 清除变量,释放内存
del dem
del hs
plt.clf()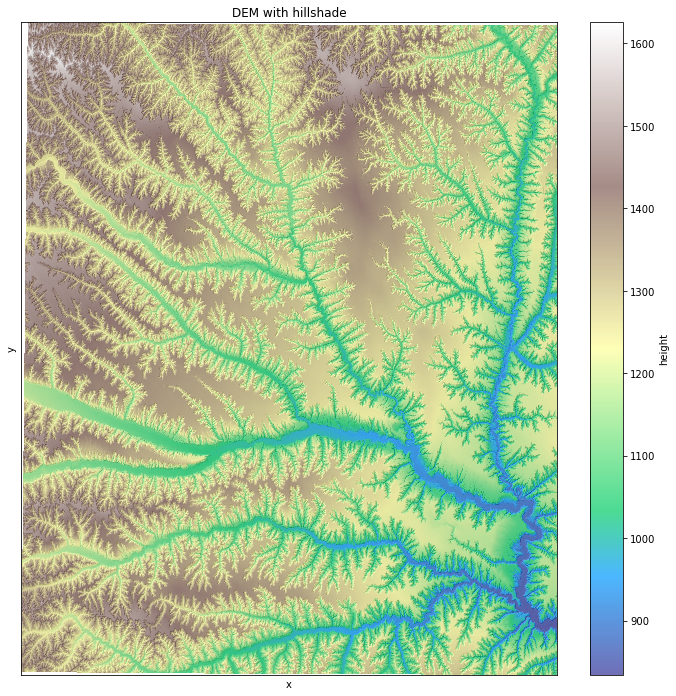
步骤二 流域划分
- 填洼
- 提取流向
- 计算流量
- 提取河网
- 栅格河网矢量化
- 河流链
- 提取集水区
2.1 填洼 Fill Depressions
- 通过填充表面栅格中的汇来移除数据中的小缺陷。对洼地进行填充可以确保盆地和河流正确划界。

填洼原理示意图
- 参数说明
- fix_flats:是否在平原区域添加一定的坡度来进行修复或拟合;
- flat_increment:是否需要修复或拟合高程,需要的话指定增量;
- max_depth:洼地判断深度,大于深度的洼地得以保留。
outDEM = output_dir + "DEM_P.tif"
outFill = temp_dir + "Fill.tif"

wbt.fill_depressions(
    outDEM,
    outFill,
    fix_flats=True,
    flat_increment=None,
    max_depth=None,
    callback=my_callback
)outFill = temp_dir + "Fill.tif"
fill_image = rxr.open_rasterio(outFill)
fill_image = fill_image[0]
fill_image = fill_image.where(fill_image.values!=0) # Ignore nodata
fig, ax = plt.subplots(figsize=(10, 10))
fill_image.plot(cmap='terrain', cbar_kwargs={'label': 'height'})
ax.set_xticks([])
ax.set_yticks([])
ax.set_title('Filled DEM data')
plt.show()
del fill_image
plt.clf()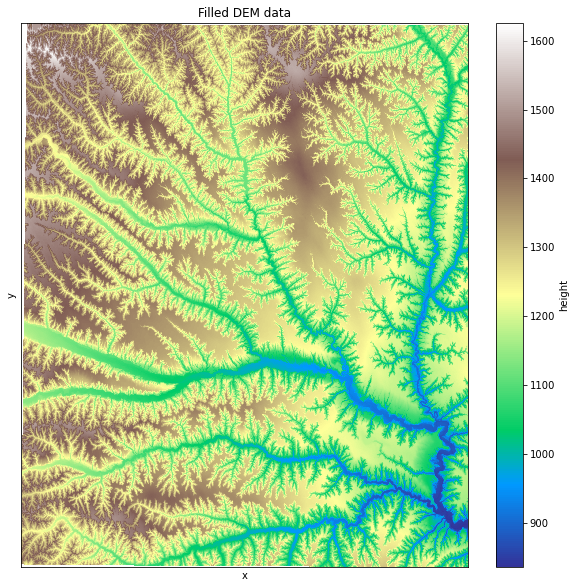
2.2 流向 D8 Pointer
- 使用 D8 流向算法创建从每个像元到其下坡相邻点的流向的栅格。D8 流向算法将高程表面作为输入,根据每个像元的八个相邻像元之间高程的变化率确定一个流出方向,是最常用的一种单流向算法。
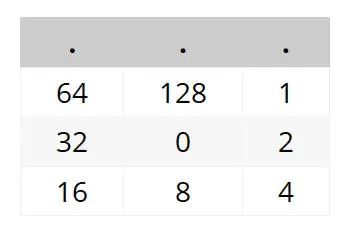
D8流向编码
- 参数说明:
- esri_pntr:是否采用 Esri 的流向编码方式(ArcGIS 和 Whitebox 的 D8 算法在流向方向编码上不同)。
outFill = temp_dir + "Fill.tif"
outFlowD = temp_dir + "FlowDir.tif"

wbt.d8_pointer(
    outFill,
    outFlowD,
    esri_pntr=True,
    callback=my_callback
)outFlowD = temp_dir + "FlowDir.tif"
fd_image = rxr.open_rasterio(outFlowD)
fd_image = fd_image[0]
fd_image = fd_image.where(fd_image.values!=-32768) # Ignore nodata
fig, ax = plt.subplots(figsize=(10, 10))
# plt.imshow(fd_image,cmap='Spectral') # 对于取值范围为0-360°的流向数据,选用Spectral为色带
cmap = plt.cm.get_cmap('Spectral', 9)
direct_cmap = ListedColormap([cmap(i) for i in range(9)])
boundaries = list([0, 1, 2, 4, 8, 16, 32, 64, 128])
norm = BoundaryNorm(boundaries, cmap.N, extend='max')
fd_image.plot(cmap=direct_cmap, levels=boundaries, label='direction', cbar_kwargs={'label': 'direction'})
ax.set_xticks([])
ax.set_yticks([])
ax.set_title('Flow Direction')
plt.show()
del fd_image
plt.clf()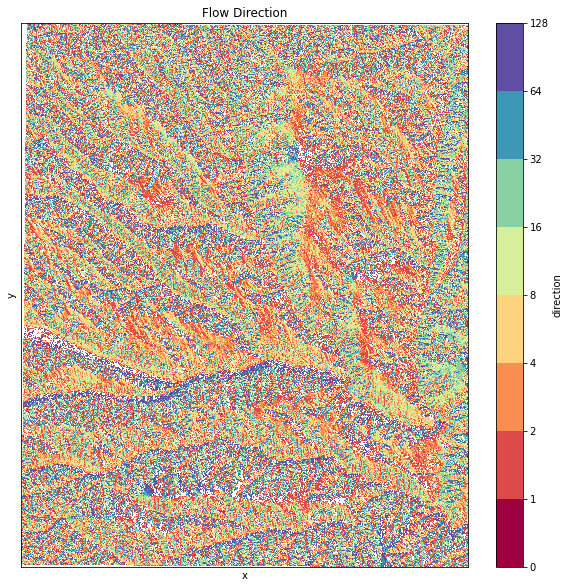
2.3 流量 D8Flow Accumulation
- 创建每个像元累积流量的栅格。高流量的输出像元是集中流动区域,可用于标识河道。
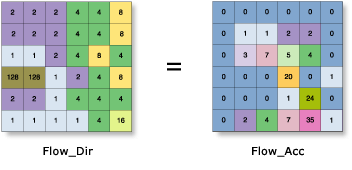
累计流量计算示意图
- 参数说明:
- out_type:指定流量的汇总形式,"cells"为统计流域栅格数量, "cat* chment area"为上游汇水区面积;
- log:可选,是否对结果进行对数变换;
- clip:可选,将显示最大值裁剪 1%;
- pntr:输入是否为 D8 流向栅格,若为否,输入设置为填洼后的 DEM;
- esri_pntr:是否采用 Esri 的流向编码方式(ArcGIS 和 Whitebox 的 D8 算法在流向方向编码上不同)。
outFlowD = temp_dir + "FlowDir.tif"
outFlowAcc = temp_dir + "FlowAcc.tif"

wbt.d8_flow_accumulation(
    outFlowD,
    outFlowAcc,
    out_type="cells",
    log=False,
    clip=False,
    pntr=True,
    esri_pntr=True,
    callback=my_callback
)outFlowAcc = temp_dir + "FlowAcc.tif"
fa_image = rxr.open_rasterio(outFlowAcc)
fa_image = fa_image[0]
fa_image = fa_image.where(fa_image.values!=-32768) # Ignore nodata
fig, ax = plt.subplots(figsize=(10, 10))
# 由于流量的绝对值相差过多,为了优化可视化效果,自定义对数坐标轴色带cbar
norm = colors.LogNorm(vmin=fa_image.min(), vmax=fa_image.max())
im = ax.imshow(fa_image, norm=norm, cmap='Blues')
cbar = plt.colorbar(im, ax=ax, format=ticker.ScalarFormatter(), ticks=[1, 10, 100, 1000, 10000, 100000, 1000000, 10000000, 100000000], label='pixel number')
cbar.ax.set_yticklabels(['1', '10', '100', '1000', '10000', '100000', '1000000', '10000000', '100000000']) # 设置刻度标签
ax.set_xticks([])
ax.set_yticks([])
ax.set_title('Flow Accumulation')
plt.show()
del fa_image
plt.clf()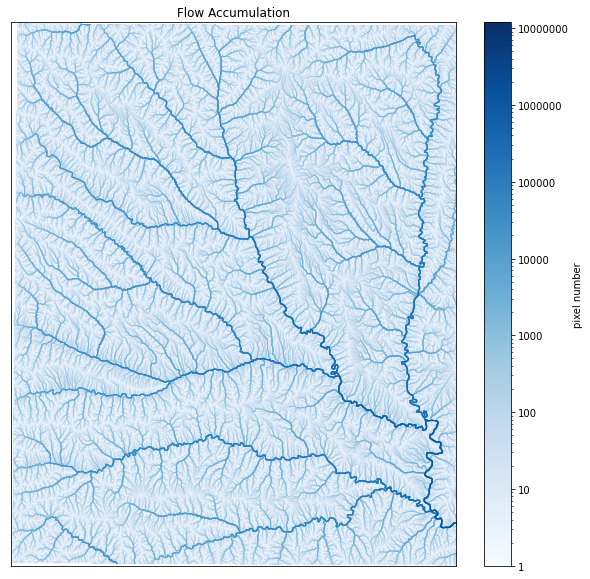
2.4 提取河网 Extract Streams
- 将流量大于设定阈值的区域判定为河流。
- 参数说明:
- threshold:河流流量阈值;
- zero_background:指定结果是否需要二值化处理,如为否,河流以外的区域都是 NoData。
outFlowAcc = temp_dir + "FlowAcc.tif"
threshold = '100000.0'
outStream = temp_dir + "Stream.tif"

wbt.extract_streams(
    outFlowAcc,
    outStream,
    threshold,
    zero_background=False,
    callback=my_callback
)outStream = temp_dir + "Stream.tif"
stream = rxr.open_rasterio(outStream)
stream = stream[0]
stream = stream.where(stream.values!=-32768) # Ignore nodata
fig = plt.figure(figsize=(20, 10))
ax1 = fig.add_subplot(1, 2, 1)
ax2 = fig.add_subplot(1, 2, 2)
# 绘制河网图
stream.plot(ax=ax1, cmap='binary', add_colorbar=False)
# 定义局部放大的窗口大小、位置(右下角)
x_max = stream.coords['x'].max().item()
y_min = stream.coords['y'].min().item()
res = 30
window_size = 1000
# 在全景图中绘制局部放大区域的范围
rect = mpatches.Rectangle(
(x_max-res*window_size, y_min), res*window_size, res*window_size,
linewidth=1, edgecolor='b', facecolor='none'
)
ax1.add_patch(rect)
# 自定义图例:黑色区域为河网,白色区域非河网
patches = [
mpatches.Patch(color='black', label='Is stream'),
mpatches.Patch(color='white', label='Is not stream')
]
ax1.legend(handles=patches, title='Legend')
ax1.set_title('Stream')
ax1.set_xticks([])
ax1.set_yticks([])
# 绘制局部放大的河网图
plt.subplot(1,2,2)
local_image = stream[-1000:,-1000:]
local_image.plot(ax=ax2, cmap='binary', add_colorbar=False)
ax2.legend(handles=patches, title='Legend')
ax2.set_title('Local Stream')
ax2.set_xticks([])
ax2.set_yticks([])
plt.show()
del stream
del local_image
plt.clf()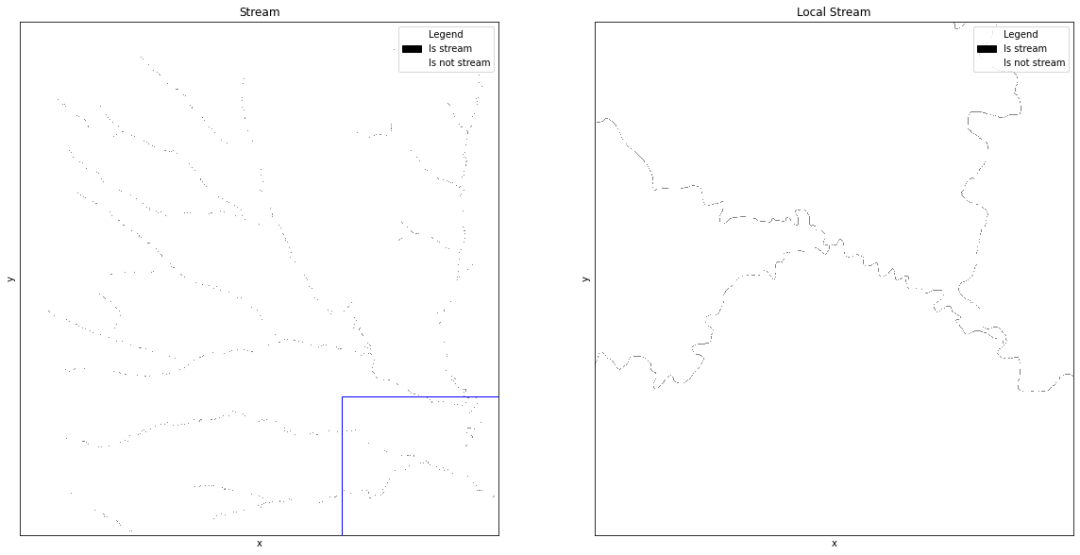
2.5 栅格河网矢量化 Raster To Vector Lines
- 将表示线性网络的栅格转换为表示线性网络的要素,可视化效果更佳。
outStream = temp_dir + "Stream.tif"
outSrmLine = temp_dir + "StreamLine.shp"

wbt.raster_to_vector_lines(
    outStream,
    outSrmLine,
    callback=my_callback
)outHS = temp_dir + "Hillshade.tif"
outSrmLine = temp_dir + "StreamLine.shp"
fig, ax = plt.subplots(figsize=(12,12))
hs = rxr.open_rasterio(outHS)
hs = hs[0]
hs = hs.where(hs.values!=-9999) # Ignore nodata
# 将山地阴影图作为底图
streamL = gpd.read_file(outSrmLine)
hs.plot(ax=ax, cmap='gray', add_colorbar=False)
# 绘制矢量化河网
streamL.plot(ax=ax, legend=True)
ax.set_xticks([])
ax.set_yticks([])
ax.set_title('Streams')
ax.legend(labels=['Streams'], title='Legend')
plt.show()
del hs
del streamL
plt.clf()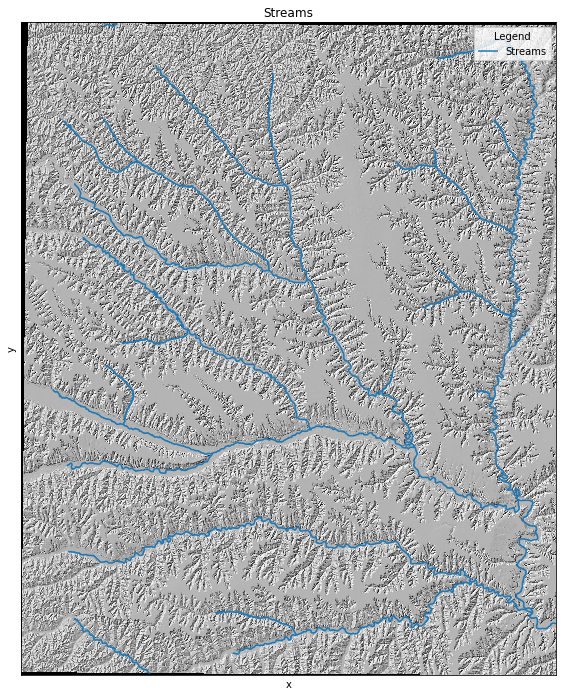
2.6 河流链 Stream Link Identifier
- “链”是指连接两个相邻交汇点、连接一个交汇点和出水口或连接一个交汇点和分水岭的河道的河段。河流链工具向各交点之间的栅格线性网络的各部分分配唯一值。
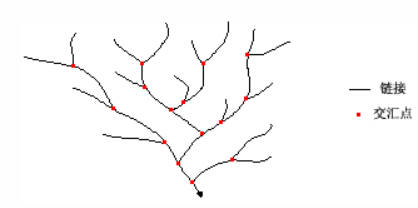
河流链示意图
- 参数说明:
- esri_pntr:是否采用 Esri 的流向编码方式(ArcGIS 和 Whitebox 的 D8 算法在流向方向编码上不同)
- zero_background:指定结果是否需要二值化处理,如为否,河流以外的区域都是 NoData
outFlowD = temp_dir + "FlowDir.tif"
outStream = temp_dir + "Stream.tif"
outSrmLink = temp_dir + "StreamLink.tif"
wbt.stream_link_identifier(
    outFlowD,
    outStream,
    outSrmLink,
    esri_pntr=True,
    zero_background=False,
    callback=my_callback
)outSrmLink = temp_dir + "StreamLink.tif"
link_image = rxr.open_rasterio(outSrmLink)
link_image = link_image[0]
link_image = link_image.where(link_image.values!=-32768) # Ignore nodata
fig = plt.figure(figsize=(20, 10))
ax1 = fig.add_subplot(1, 2, 1)
ax2 = fig.add_subplot(1, 2, 2)
# 绘制河流链图,为不同id的河流链随机分配颜色
link_image.plot(ax=ax1, cmap='Paired', cbar_kwargs={'label': 'ID'})
# 定义局部放大的窗口大小、位置(右下角)
x_max = link_image.coords['x'].max().item()
y_min = link_image.coords['y'].min().item()
res = 30
window_size = 1000
# 在全景图中绘制局部放大区域的范围
rect = mpatches.Rectangle(
(x_max-res*window_size, y_min), res*window_size, res*window_size,
linewidth=1, edgecolor='b', facecolor='none'
)
ax1.add_patch(rect)
ax1.set_title('Stream Link')
ax1.set_xticks([])
ax1.set_yticks([])
plt.subplot(1,2,2)
# 绘制局部放大的河流链图
local_link_image = link_image[-window_size:,-window_size:]
local_link_image.plot(ax=ax2, cmap='Paired', cbar_kwargs={'label': 'ID'})
ax2.set_title('Local Stream Link')
ax2.set_xticks([])
ax2.set_yticks([])
plt.show()
del link_image
del local_link_image
plt.clf()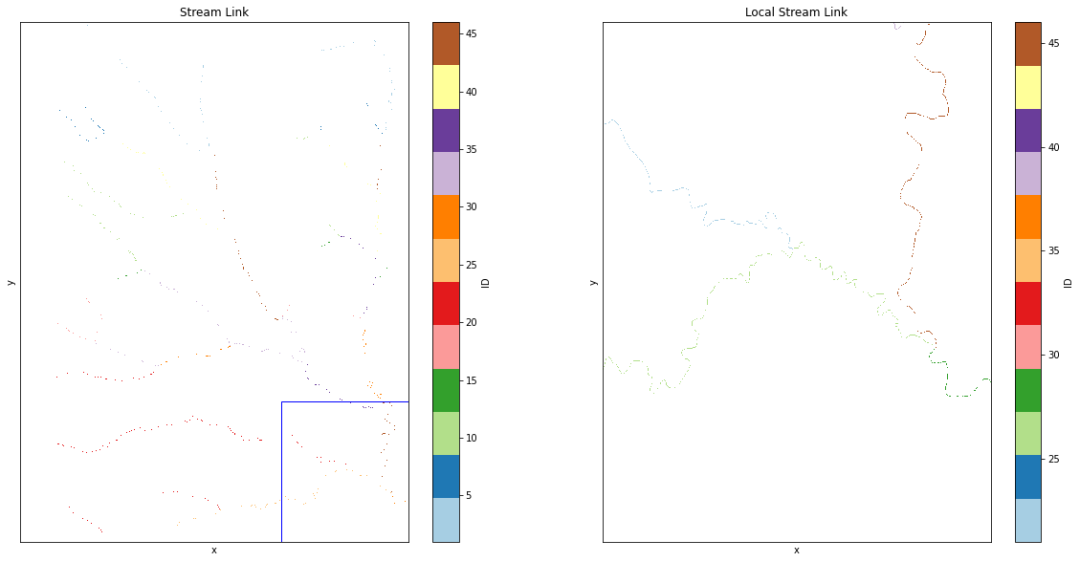
2.7 集水区 Watershed
- 集水区是将流体(通常是水)汇集到公共出水口使其集中排放的上坡区域。集水区提取是基于河流、流向和出水口划分流域空间范围的过程。指定出水口(一般为已有的水坝或流量计,或是河流网络交汇点,也可以由用户标定感兴趣点)后,根据流向,将所有能通过流路连接到出水口的上坡像元标定为一个集水区。
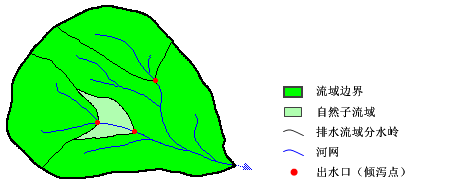
分水岭组成
- 参数说明:
- esri_pntr:是否采用 Esri 的流向编码方式(ArcGIS 和 Whitebox 的 D8 算法在流向方向编码上不同)
outFlowD = temp_dir + "FlowDir.tif"
outSrmLink = temp_dir + "StreamLink.tif"
outWatershed = output_dir + "WaterShed.tif"

wbt.watershed(
    outFlowD,
    outSrmLink,
    outWatershed,
    esri_pntr=True,
    callback=my_callback
)outWatershed = output_dir + "WaterShed.tif"
outSrmLine = temp_dir + "StreamLine.shp"
ws_image = rxr.open_rasterio(outWatershed)
ws_image = ws_image[0]
ws_image = ws_image.where(ws_image.values!=-32768) # Ignore nodata
streamL = gpd.read_file(outSrmLine)
# 自定义色带。绘制对象是不同ID的watershed,因此色带颜色应具备以下特征:不重复、各颜色间差异较大
num_colors = len(np.unique(ws_image.values))
spectral_cmap = plt.cm.get_cmap('YlGnBu', num_colors+2)
fig, ax = plt.subplots(figsize=(10, 10))
ws_image.plot(cmap=spectral_cmap,cbar_kwargs={'label': 'ID'})
streamL.plot(ax=ax)
ax.set_xticks([])
ax.set_yticks([])
ax.set_title('Watershed')
plt.show()
del ws_image
del streamL
plt.clf()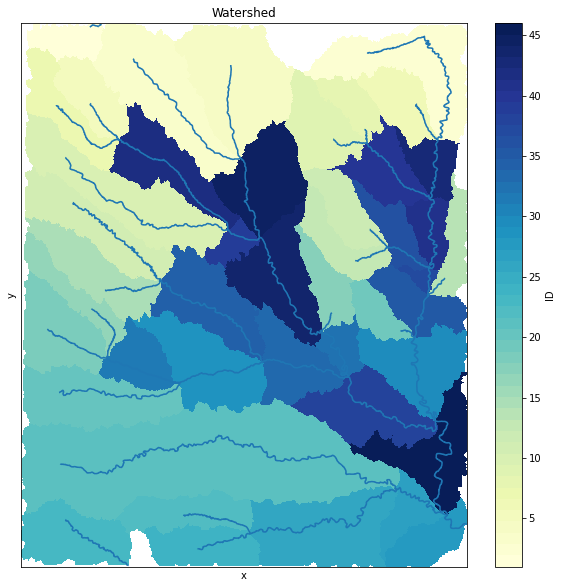
总结
步骤 2 得到了研究区的流域图,可作为后续分析的基本单元。
步骤三 正负地形划分
- 焦点统计
- 计算地形差值
- 划分正负地形
3.1 焦点统计 Mean Filter
- 采用均值滤波方法计算 DEM 均值 。
- 参数说明:
- filterx / filtery:窗口大小
outDEM = output_dir + "DEM_P.tif"
outMean = temp_dir + "DEM_Mean.tif"
windowsize = 200

wbt.mean_filter(
    outDEM,
    outMean,
    filterx=windowsize,
    filtery=windowsize,
    callback=my_callback
)
3.2 地形差值 Raster Calculator
- 计算原高程与高程均值间的差值:

import string
from itertools import cycle
# 直接调用gdal的gdal_calc工具
# expression中的参数为A、B、C......
# input需要按照在expression中与字母一一对应的顺序排列

def rasterCalculator(expression, output, input=[]):
    os.environ['PROJ_LIB'] = "/opt/conda/share/proj"
    abs_path = "/opt/conda/lib/python3.9/site-packages/osgeo_utils/gdal_calc.py"

    if(len(input)==0):
        return 0
    in_str = ""
    letters_iter = cycle(string.ascii_uppercase)
    for i in range(len(input)):
        letter = next(letters_iter)
        in_str = in_str + " -" + letter +" " + input[i]

    command = "python " + abs_path + in_str + " --cal=\'" + expression + "\' --outfile=" + output + " --overwrite --NoDataValue=-9999"
    print(command)
    # os.system(command)
    subprocess.run(command, shell=True, stdout=subprocess.DEVNULL, stderr=subprocess.STDOUT)
return("success")outDEM = output_dir + "DEM_P.tif"
outMean = temp_dir + "DEM_Mean.tif"
expression = "A-B"
outDiff = temp_dir + "DEM_Diff.tif"
rasterCalculator(
expression,
outDiff,
[outDEM,outMean]
)outDiff = temp_dir + "DEM_Diff.tif"
diff_image = rxr.open_rasterio(outDiff)
diff_image = diff_image[0]
diff_image = diff_image.where(diff_image.values!=-9999) # Ignore nodata
fig, ax = plt.subplots(figsize=(10, 10))
diff_image.plot(cmap='gray',cbar_kwargs={'label': 'DEM difference'})
ax.set_xticks([])
ax.set_yticks([])
ax.set_title("DEM Difference")
plt.show()
del diff_image
plt.clf()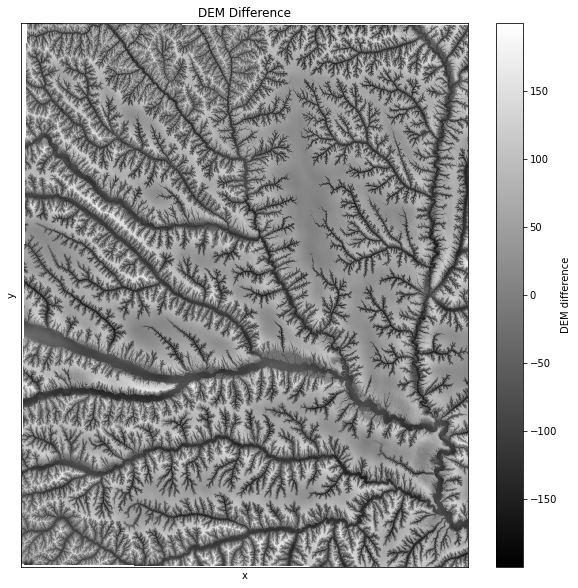
3.3 划分正负地形 Raster Calculator
- 提取地形差值栅格中的负地形,结果为二值化图像:地形差值高于阈值的部分为正地形(0),低于阈值的部分为负地形(1)。
outDiff = temp_dir + "DEM_Diff.tif"
outNeg = output_dir + "Negative.tif"
expression = "A<=0"

rasterCalculator(
    expression,
    outNeg,
    [outDiff]
)outNeg = output_dir + "Negative.tif"
neg_image = rxr.open_rasterio(outNeg)
neg_image = neg_image[0]
neg_image = neg_image.where(neg_image.values!=-9999) # Ignore nodata
fig, ax = plt.subplots(figsize=(10, 10))
neg_image.plot(cmap='binary', add_colorbar=False)
patches = [
mpatches.Patch(color='black', label='Is negative'),
mpatches.Patch(color='white', label='Is not negative')
]
ax.legend(handles=patches, title='Legend')
ax.set_xticks([])
ax.set_yticks([])
ax.set_title("Negative")
plt.show()
del neg_image
plt.clf()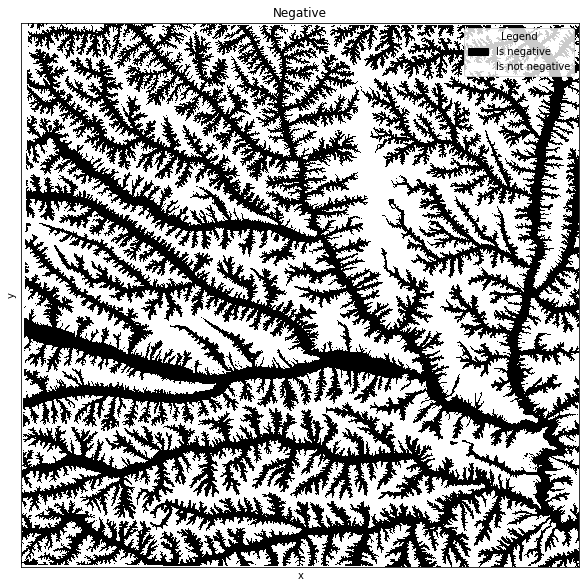
总结
步骤 3 对区域完成了正负地形划分。正负地形可以作为后续识别沟底和沟坡范围的依据。
步骤四 沟坡沟底划分
- 面转栅格
- 提取平原
- 提取沟底
- 提取沟坡
4.1 面转栅格 Vector Polygons To Raster
- 将区域基本地貌分类矢量数据转为栅格,以便后续分析。
- 参数说明:
- field:栅格赋值字段
- pixel_size:像元大小
# 调用大平台模型库中的矢量转栅格工具,修改了部分代码:指定field
def pydde_Vector2Raster(shapefile_path, output_raster_path, pixel_size, field = "class", extent: tuple = None):
    input_shp = ogr.Open(shapefile_path)

    # getting layer information of shapefile.
    shp_layer = input_shp.GetLayer()

    # get extent values to set size of output raster.
    if extent is None:
        x_min, x_max, y_min, y_max = shp_layer.GetExtent()
    else:
        x_min, x_max, y_min, y_max = extent

    # calculate size/resolution of the raster.
    x_res = int((x_max - x_min) / pixel_size)
    y_res = int((y_max - y_min) / pixel_size)
    # print(x_res, y_res)

    # get GeoTiff driver by
    image_type = 'GTiff'
    driver = gdal.GetDriverByName(image_type)

    # passing the filename, x and y direction resolution, no. of bands, new raster.
    new_raster = driver.Create(output_raster_path, x_res, y_res, 1, gdal.GDT_Byte)
    # transforms between pixel raster space to projection coordinate space.
    new_raster.SetGeoTransform((x_min, pixel_size, 0, y_max, 0, -pixel_size))

    # get required raster band.
    band = new_raster.GetRasterBand(1)
    # assign no data value to empty cells.
    no_data_value = -99999
    band.SetNoDataValue(no_data_value)
    band.FlushCache()

    # Core conversion method
    gdal.RasterizeLayer(new_raster, [1], shp_layer, burn_values=[255],options=[f"ATTRIBUTE={field}"])

    # adding a spatial reference
    spatialRef = shp_layer.GetSpatialRef()
    # print(spatialRef)
    if spatialRef is None:
        new_rasterSRS = osr.SpatialReference()
        new_rasterSRS.ImportFromEPSG(4326)
        new_raster.SetProjection(new_rasterSRS.ExportToWkt())
    else:
        new_raster.SetProjection(spatialRef.ExportToWkt())
print("Conversion successful")def getRasterExtent(raster_path):
ds = gdal.Open(raster_path)
width = ds.RasterXSize
height = ds.RasterYSize
trans = ds.GetGeoTransform()
x_min = trans[0]
y_max = trans[3]
x_max = trans[0] + width * trans[1] + height * trans[2]
y_min = trans[3] - abs(width * trans[4]) - abs(height * trans[5])
res = trans[1]
return (x_min, x_max, y_min, y_max)
def getRasterResolution(raster_path):
ds = gdal.Open(raster_path)
trans = ds.GetGeoTransform()
return trans[1]outDEM = output_dir + "DEM_P.tif"
outGBLU = output_dir + "GBLU_P.shp"
outVec2ras = temp_dir + "GBLU_ras_P.tif"
field = "gridcode"
ext = getRasterExtent(outDEM) #面转栅格的范围与DEM保持一致
pixel_size = getRasterResolution(outDEM)
pydde_Vector2Raster(outGBLU, outVec2ras, pixel_size, field, extent=ext)outVec2ras = temp_dir + "GBLU_ras_P.tif"
class_image = rxr.open_rasterio(outVec2ras)
class_image = class_image[0]
class_image = class_image.where(class_image.values!=0) # Ignore nodata
landform_type = {
"Low altitude plain":101,
"Middle altitude plain":102,
"Low altitude hill":211,
"Middle altitude hill":212,
"Middle altitude low-relief mountain":222
} # 每个code对应的地貌类型
fig, ax = plt.subplots(figsize=(10, 10))
# 自定义色带,按照code对地貌类型设色
num_colors = len(landform_type)+1
cmap = plt.cm.get_cmap('YlGn_r', num_colors)
landform_cmap = ListedColormap([cmap(i) for i in range(num_colors)])
boundaries = list(landform_type.values())
norm = BoundaryNorm(boundaries, cmap.N, extend='max')
class_image.plot(cmap=landform_cmap, levels=boundaries+[230], add_colorbar=False)
# 自定义图例
for value in boundaries:
plt.scatter([], [], color=landform_cmap(norm(value)-1))#, label=str(value)
ax.legend(title="Landform Type", loc="upper right", labels=list(landform_type.keys()))
ax.set_title("Basic Landform Unit")
ax.set_xticks([])
ax.set_yticks([])
plt.show()
del class_image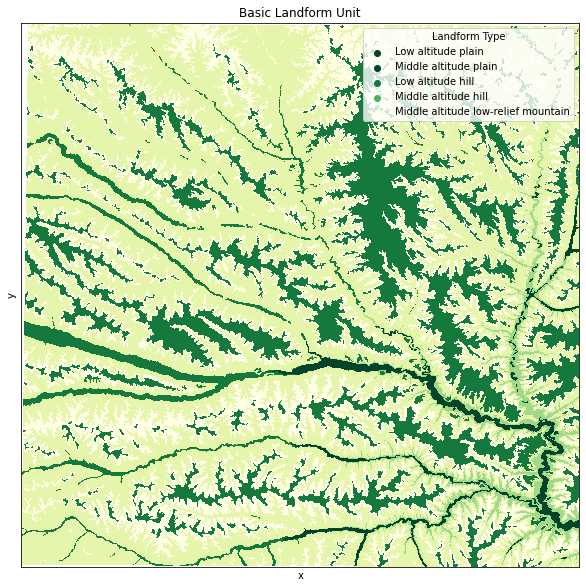
研究区内的基本地貌类型共有五类:
- 低海拔平原(Low altitude plain),对应的代码为 101;
- 中海拔平原,(Middle altitude plain),对应的代码为 102;
- 低海拔丘陵,(Low altitude hill),对应的代码为 211;
- 中海拔丘陵,(Middle altitude hill),对应的代码为 212;
- 中海拔低起伏山地,(Middle altitude low-relief mountain),对应的代码为 222。
4.2 提取平原 Reclass
- 从基本地貌类型中提取平原(对应分类 code 为 101、102、103 和 104,其他类型 code 大于 200,因此以 200 为阈值)。
- 参数说明:
- reclass_vals:重分类表达式,每三个一组,分别代表新赋值,重分类范围最小值和范围最大值,如 1;0;200;代表将 0-200 的值赋值为 1
outVec2ras = temp_dir + "GBLU_ras_P.tif"
outPlain = temp_dir + "Plain_ras.tif"
reclass_vals='1;0;200;0;200;1000' #重分类表达式:0-200->1 ; 200-1000->0

wbt.reclass(
    outVec2ras,
    outPlain,
    reclass_vals,
    assign_mode=False,
    callback=my_callback
)outPlain = temp_dir + "Plain_ras.tif"
plain_image = rxr.open_rasterio(outPlain)
plain_image = plain_image[0]
plain_image = plain_image.where(plain_image.values!=-32768) # Ignore nodata
fig, ax = plt.subplots(figsize=(10, 10))
plain_image.plot(cmap='binary', add_colorbar=False)
# 自定义图例:黑色为平原区域,白色非平原区域
patches = [
mpatches.Patch(color='black', label='Is plain'),
mpatches.Patch(color='white', label='Is not plain')
]
ax.legend(handles=patches, title='Legend')
ax.set_xticks([])
ax.set_yticks([])
ax.set_title("Plain Area")
plt.show()
del plain_image
plt.clf()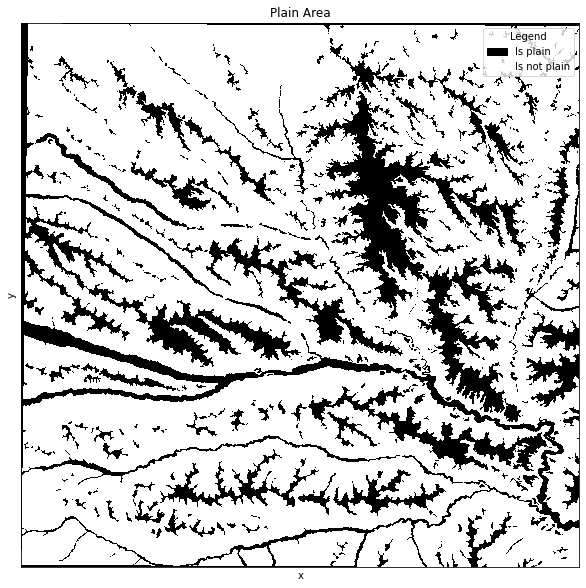
4.3 提取沟底 RasterCalculator
- 将负地形中的平原区域判定为沟谷。
outNeg = output_dir + "Negative.tif"
outPlain = temp_dir + "Plain_ras.tif"
outBottom = output_dir + "Bottom.tif"
expression = "A*B"

rasterCalculator(
    expression,
    outBottom,
    [outNeg,outPlain]
)outBottom = output_dir + "Bottom.tif"
bottom_image = rxr.open_rasterio(outBottom)
bottom_image = bottom_image[0]
bottom_image = bottom_image.where(bottom_image.values!=-9999) # Ignore nodata
fig, ax = plt.subplots(figsize=(10, 10))
bottom_image.plot(cmap='binary', add_colorbar=False)
# 自定义图例:黑色为沟底区域,白色非沟底区域
patches = [
mpatches.Patch(color='black', label='Is bottom'),
mpatches.Patch(color='white', label='Is not bottom')
]
ax.legend(handles=patches, title='Legend')
ax.set_xticks([])
ax.set_yticks([])
ax.set_title("Bottom of Trench")
plt.show()
del bottom_image
plt.clf()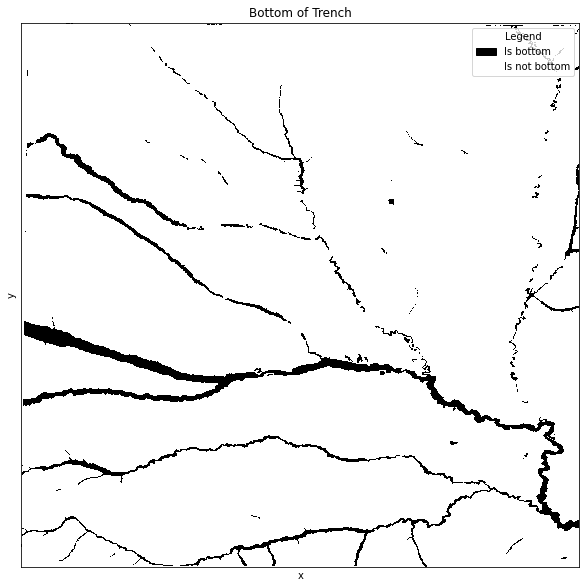
4.4 提取沟坡 RasterCalculator
- 将负地形中非平原的区域判定为沟坡。
outNeg = output_dir + "Negative.tif"
outBottom = output_dir + "Bottom.tif"
outSlope = output_dir +"Slope.tif"
expression = "A-B"

rasterCalculator(
    expression,
    outSlope,
    [outNeg,outBottom]
)outSlope = output_dir +"Slope.tif"
slope_image = rxr.open_rasterio(outSlope)
slope_image = slope_image[0]
slope_image = slope_image.where(slope_image.values!=-9999) # Ignore nodata
fig, ax = plt.subplots(figsize=(10, 10))
slope_image.plot(cmap='binary', add_colorbar=False)
# 自定义图例:黑色为沟坡区域,白色非沟坡区域
patches = [
mpatches.Patch(color='black', label='Is slope'),
mpatches.Patch(color='white', label='Is not slope')
]
ax.legend(handles=patches, title='Legend')
ax.set_xticks([])
ax.set_yticks([])
ax.set_title("Slope of Trench")
plt.show()
del slope_image
plt.clf()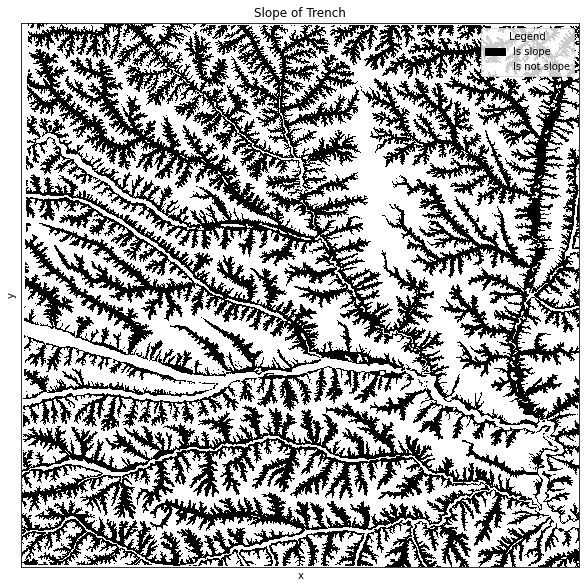
总结
步骤 4 基于正负地形和基本地貌类型,提取到了沟坡和沟底的分布范围。
步骤五 沟坡覆盖度计算
- 统计沟坡面积
- 统计流域面积
- 计算面积比例
5.1 统计沟坡面积
- 基于流域单元,统计每个流域的沟坡面积。
- 参数说明:
- stat:统计方式,包含 Mean、Median、Max、Min 等,其中 Total 为栅格计数
- out_table:是否将结果导出表格。
outSlope = output_dir +"Slope.tif"
features = outWatershed = output_dir + "WaterShed.tif"
outSlopeArea = temp_dir + "SlopeArea.tif"

wbt.zonal_statistics(
    outSlope,
    features,
    outSlopeArea,
    stat="total",
    out_table=None,
    callback=my_callback
)
5.2 统计流域面积
- 统计每个流域的面积。
- 参数说明:
- units:面积单位,分为"grid cells"栅格单元计数和"map units"实际地图面积单位
- zero_back:是否将 0 值判定为背景。
outWatershed = output_dir + "WaterShed.tif"
outWsArea = temp_dir + "WaterShedArea.tif"

wbt.raster_area(
    outWatershed,
    outWsArea,
    out_text=False,
    units="grid cells",
    zero_back=False,
    callback=my_callback
)
5.3 计算沟坡覆盖度
- 沟坡覆盖度由以下方程得出:

outSlopeArea = temp_dir + "SlopeArea.tif"
outWsArea = temp_dir + "WaterShedArea.tif"
outStat = output_dir + "SlopeRatio.tif"
expression = "A/B"

rasterCalculator(
    expression,
    outStat,
    [outSlopeArea,outWsArea]
)outStat = output_dir + "SlopeRatio.tif"
outSrmLine = temp_dir + "StreamLine.shp"
result = rxr.open_rasterio(outStat)
result = result[0]
result = result.where(result.values!=-9999) # Ignore nodata
streamL = gpd.read_file(outSrmLine)
fig, ax = plt.subplots(figsize=(12,12))
cmap = plt.cm.get_cmap('RdYlBu_r')
# boundaries = np.linspace(0, 1, num=6)
# norm = BoundaryNorm(boundaries, cmap.N)
result.plot(cmap=cmap, add_colorbar=True, cbar_kwargs={'label': 'ratio'})
streamL.plot(ax=ax)
ax.set_xticks([])
ax.set_yticks([])
ax.set_title("Slope Ratio")
plt.show()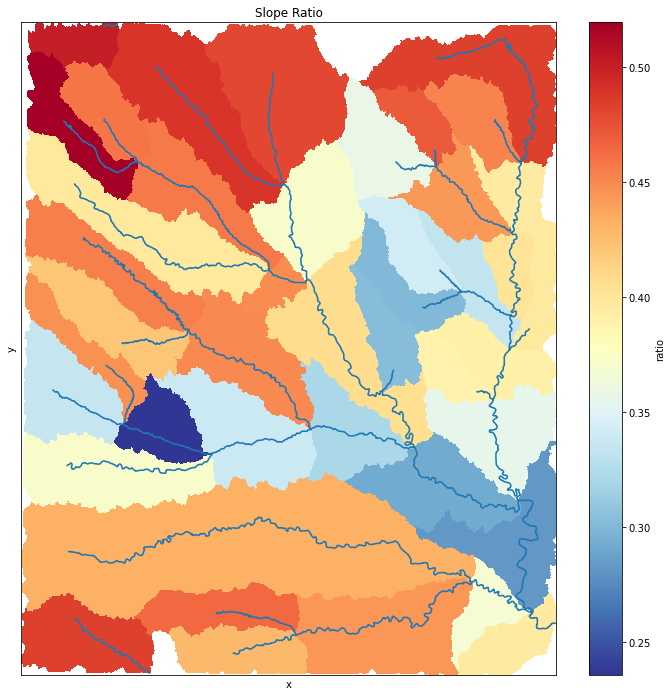
结果
案例得到一份黄土高原局部区域的沟壑覆盖度分析图。沟壑覆盖度越高,代表该流域内沟壑越多,即土壤侵蚀程度越高。根据结果,可以得到区域内西北部及西南部沟壑侵蚀度较高。比对地形地貌特征,得到该区域沟壑覆盖度分异的特征有:
- 地形较高的地区沟壑覆盖度高。研究区西北部和西南部分布着大面积的中等高度低起伏山地和丘陵,作为研究区内主要径流的上游地区,这些地形区的沟壑侵蚀作用比其他地区强烈。
- 较小的集水区内,相应的沟壑覆盖度往往更低。这可能是因为,在降雨期间,较大的集水区有机会收集更多的径流,因此侵蚀强度更高。
后续可结合区域的降水、温度、岩性资料,对区域沟壑覆盖度分异的成因做进一步的分析。
总结
通过学习本案例,你们可以:
- 掌握 GIS 水文分析方法;
- 掌握基于栅格数据的空间分析方法;
- 掌握黄土地貌沟壑识别及提取方法;
- 增加对黄土高原地区黄土地貌沟谷形态与发育演化过程的理解。
参考该案例,你们可以将相关地形分析方法推广,应用于地理、地质、水文、生态等相关研究。
本文参与 腾讯云自媒体同步曝光计划,分享自微信公众号。
原始发表:2023-11-02,如有侵权请联系 cloudcommunity@tencent.com 删除
评论
登录后参与评论
推荐阅读
目录

