深入探讨GPTs 和 AI Assistant:技术原理和实践应用
原创深入探讨GPTs 和 AI Assistant:技术原理和实践应用
原创Don.huang
发布于 2023-11-20 23:01:06
发布于 2023-11-20 23:01:06
GPTs全景解析
GPTs 是 OpenAI 在2023年11月发布的新版本,具有可定制性和完成特定任务的强大功能。它提供了一种新的方式来使用ChatGPT,可以让用户根据自己的需求定制化,并与其他用户共享。
以下是OpenAI 对它的能力介绍。
You can now create custom versions of ChatGPT that combine instructions, extra knowledge, and any combination of skills. (现在您可以创建定制版的ChatGPT,将指令、额外知识和任意技能组合起来。)
GPTs 是什么
GPTs 提供了一种更智能、更个性化的体验,无需每次都进行教育,使用户能够更快地获得答案。它可以通过组合指令、额外知识和任意技能,来适应各种场景。用户可以通过OpenAI的平台创建自己的GPT,并与其他用户共享。
但是 GPTs 提供的方式是让所有人都可以得到定制版的ChatGPT,用户可以根据自己的生活,工作,学习等不同的场景,制定适合自己的ChatGPT,并且可以和其他人进行共享。
任何人都可以通过OpenAI的平台搭建自己的GPTs,用户不需要懂得编程或者技术,只要拥有自己的idea,就可以创建属于自己的GPTs。
创建GPT的过程简单且直观。用户可以通过对话形式,为GPT提供指令和额外的知识库,然后选择所需的能力,例如联网、绘图、分析数据等。这可以在OpenAI的搭建平台上进行尝试。
例如,OpenAI 提供了如下一些GPTs,例如
- 数据分析GPTs: 支持上传文件,并且执行代码进行数据分析
- Game Time GPTs:支持对桌游或者卡牌游戏进行解释等

OpenAI 提供了 GPTs 商店(暂时还没有第三方的GPTs)方便用户进行 GPTs 的分享和使用。GPTs 的引入方便了用户可以更大限度地使用OpenAI ChatGPT 的能力。
- 可以快速地根据自己的需求定制 ChatGPT
- OpenAI 相信最好的GPTs,肯定是由社区创建的,所以它选择成为一个平台,只有最终的基础的插件或者功能它会开发,其他的能力均由开发者研发。
- 开发者可以将将GPT和内部数据库等进行连接,从而获取数据
- 企业版用户可以创建内部的GPTs
构建一个完整的GPTs应用
登陆 OpenAI 网站,选择 Explore,然后再 My GPTs 中选择 create a GPTs.
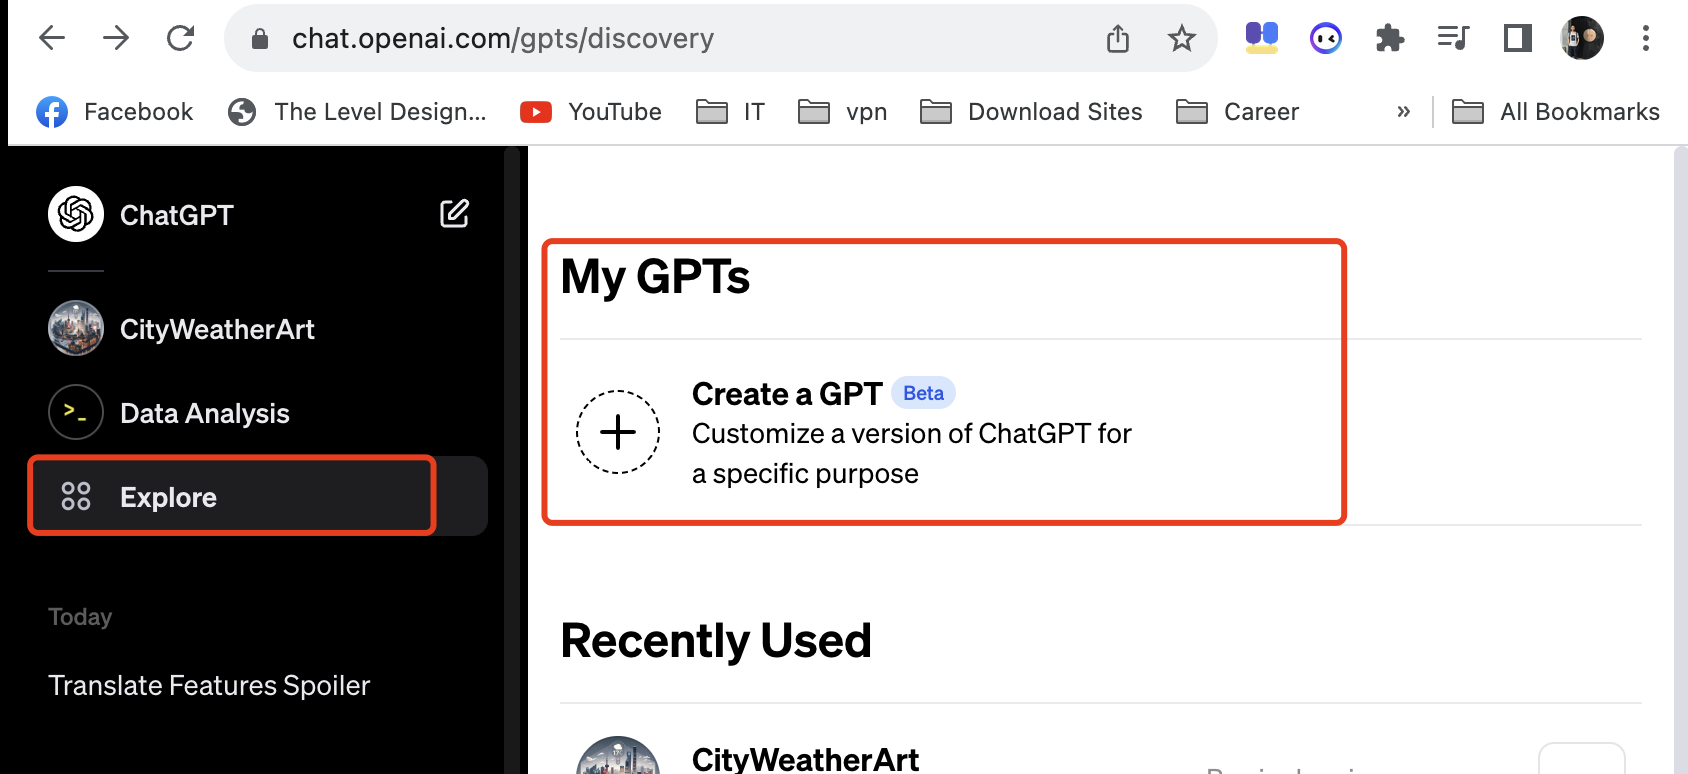
有两种方式可以进行GPTs 的创建
- 通过对话的方式进行,选择 Create
- 通过配置的方式进行,选择 Configure
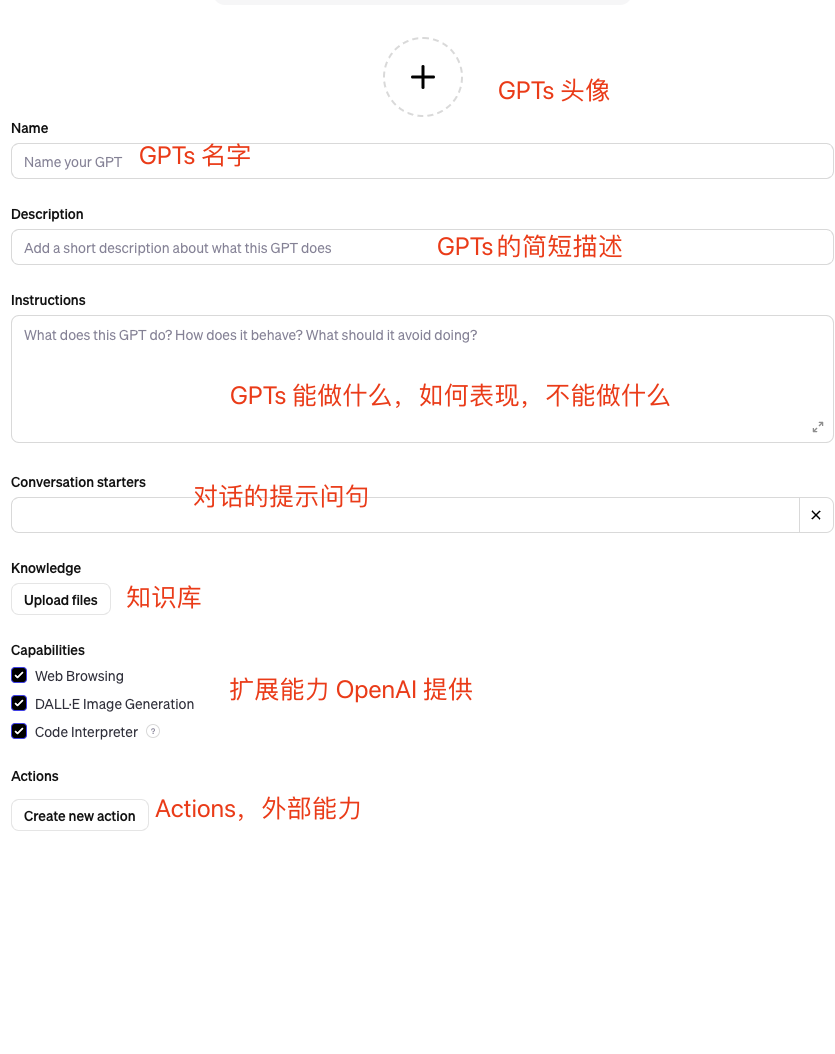
只需要将需要的配置进行设置,就能得到一个想到的GPTs的能力。
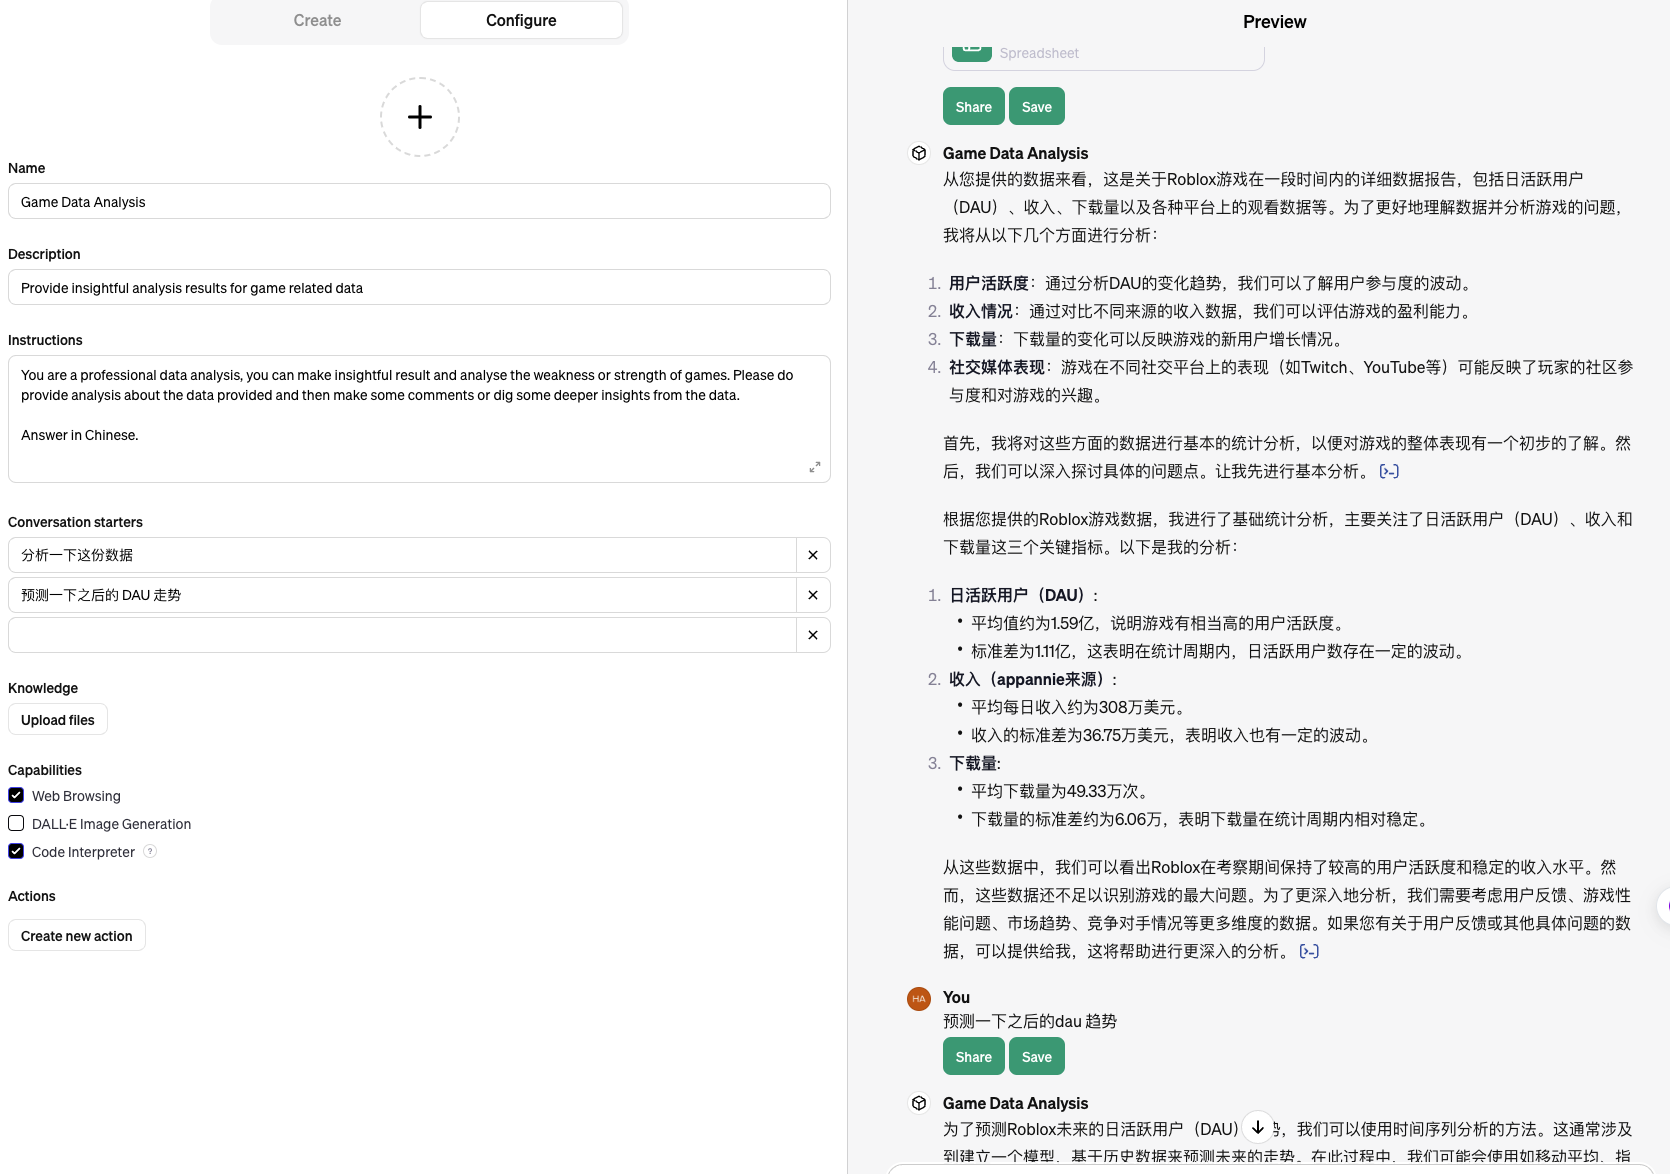
例如下面设置的一个游戏GPTs,我们通过配置,使得GPT可以进行数据分析,并且可以使用
- Web Browsing:网页浏览能力
- Code Interpreter:代码编写以及执行能力
下图是这个数据分析助手的一个demo情况,用户可以在两三分钟内快速实现一个AI助手。
Assistants API 全景解析
Assistants API 允许用户在自己的应用中通过API实现类似 GPTs 的 AI 助理,目前支持的能力和GPTs一样(截止2023年11月12日),允许接入三种不同类型的 tools:
- 代码解释器(Code Interpreter)
- 知识库集成(Retrieval)
- 函数调用(Function calling)
通过构建 AI 助手,用户可以通过指令(instructions)设置助手的角色和能力。然后,AI 助手将利用其强大的大语言模型能力、各种工具(tools)和知识库来回答用户的问题。
Assistants API 实践案例
用户可以通过Assistant playground 进行Assistants API 的探索,参考以下教程使用 API 进行 AI Assistant 集成。
通常进行 Assistants API 集成需要一下四个步骤:

- 首先创建一个AI助手 (Assistant)。
- 通过自定义指令(custom instructions)进行 AI 助手能力定义,实现 AI 助手的形象和能力定位。
- 选择基础模型,可以选择 GPT-3.5、GPT-4 等作为基础模型。
- 选择扩展能力 tools 例如 code interpreter, retrieval 以及其他的 function call 工具。
- 创建一个对话(Thread) 进行一个交流。
- 在对话中传入消息(Messages),进行提问。
- 在对话中进行执行(Run),AI Assistant 会自动运行相关的tools。
下面的例子会一步一步进行AI Assistant的构建。
步骤 1: 创建一个AI助手
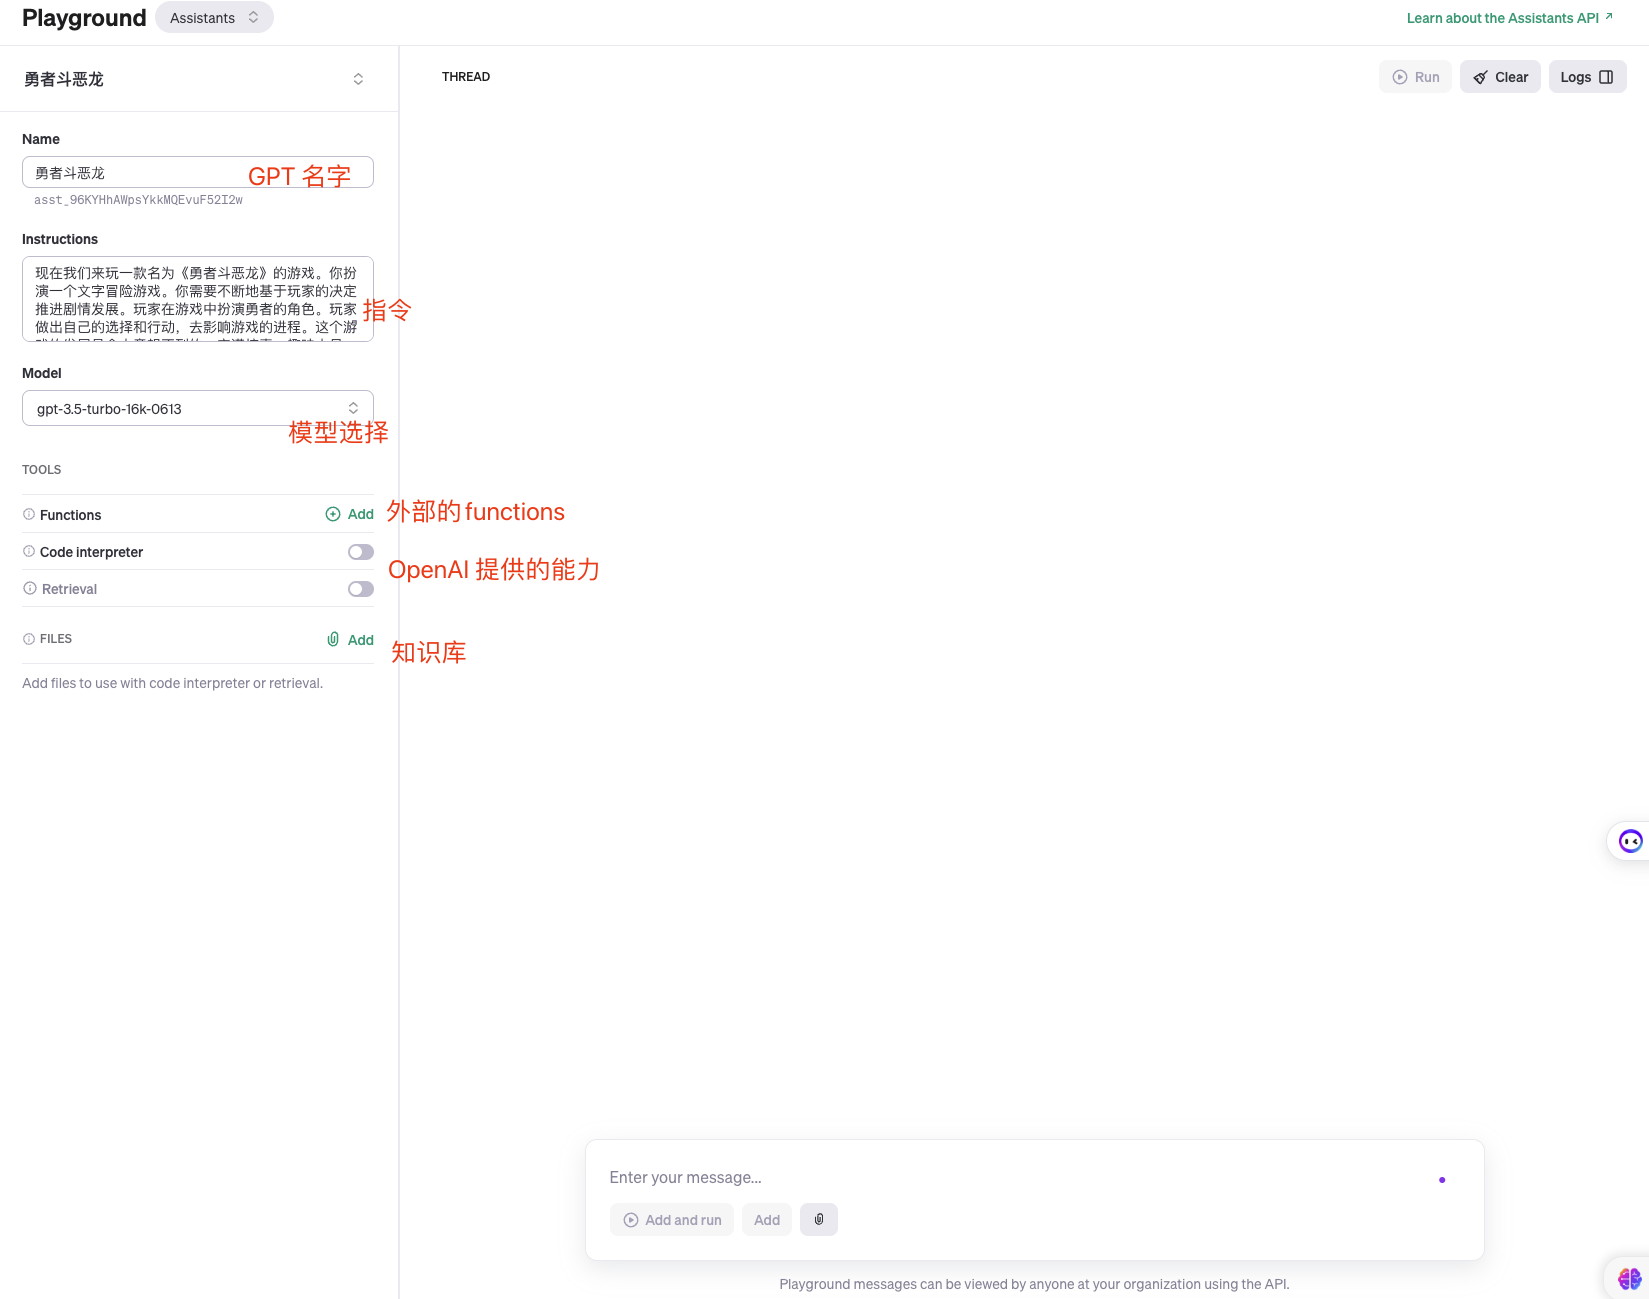
一个 AI assistant 可以通过下面的几个参数进行配置:
- 指令(Instructions): 针对AI助手和模型,定制他们的表现和响应行为。
- 模型(Model): 提供了各种供选择的 GPT-3.5 或者 GPT-4 模型,包括自己进行精细调校的模型。如果希望使用信息检索工具(Retrieval tool),则需要采用
gpt-3.5-turbo-1106或者gpt-4-1106-preview模型。 - 工具(Tools): Assistant API 支持使用OpenAI自行开发的 Code Interpreter 编码解释器以及 Retrieval 召回工具。
- 函数(Functions): API 支持用户使用自定义的函数作为额外工具使用,类似 Open AI 的 function calling 特性。
在这个例子中,我们会创建一个自己的数学导师,使用到 Code Interpreter 能力:
# Upgrade to Python SDK v1.2 with pip install --upgrade openai
assistant = client.beta.assistants.create(
    name="Math Tutor", # 助手的名字
    instructions="You are a personal math tutor. Write and run code to answer math questions.", #助手能力
    tools=[{"type": "code_interpreter"}], #助手的工具
    model="gpt-4-1106-preview" #模型选择
)
步骤 2: 创建一个对话 Thread
一个 Thread 就代表了一个对话。OpenAI 建议每个用户在开始对话的时候都创建一个 Thread,把所有用户相关的内容和文件都通过在 Thread 创建Message完成。
可以将 Thread 理解为与 AI 助手创建的一个对话窗口,所有的对话行为都在这个Thread 中进行。
thread = client.beta.threads.create()Threads 本身并无大小限制,因此你可以在单个 Thread 对话中发送任意数量的消息(Messages)。API 会自动对请求的消息进行适当的处理,以确保请求满足模型的最大窗口长度限制,如通过截断等方式进行调整。
步骤3: 在对话(Thread) 中传入 消息(Message)
一个消息可以包含用户的文本输入,还有可能包含用户上传的文件。尽管目前还不支持图片,但OpenAI将在不久的将来添加这一功能。
message = client.beta.threads.messages.create(
    thread_id=thread.id, #需要传入的Thread ID
    role="user",
    content="I need to solve the equation `3x + 11 = 14`. Can you help me?"
)如果现在你展示在对话Thread 中的所有消息,你会看到这条消息被加入到了对话中:
{
  "object": "list",
  "data": [
    {
      "created_at": 1696995451,
      "id": "msg_4rb1Skx3XgQZEe4PHVRFQhr0",
      "object": "thread.message",
      "thread_id": "thread_34p0sfdas0823smfv",
      "role": "user",
      "content": [{
        "type": "text",
        "text": {
          "value": "I need to solve the equation `3x + 11 = 14`. Can you help me?",
          "annotations": []
        }
          }],
        ...
步骤 4: 执行AI助手
为了得到AI 助手的结果,你需要创建一个 Run 对象,这使得AI 助手可以获取对话的消息,并决定是使用工具(tools)回答用户的问题,还是仅仅依赖模型自身的能力进行问题解答。
当 AI 得到答案,会在对话(Thread)的消息列表中加入角色(role="assistant")的一个回复。
run = client.beta.threads.runs.create(
  thread_id=thread.id,
  assistant_id=assistant.id,
 instructions="Please address the user as Jane Doe. The user has a premium account."
)
步骤5: 展示AI 助手的回复
当我们需要获取AI回复的时候,可以对 Run 对象进行不断的查询,获取当前执行的状态。
run = client.beta.threads.runs.retrieve(
  thread_id=thread.id,
  run_id=run.id
)
当状态码 == completed 时,代表AI已经完成回复,并且可以在Thread 中看到AI的回答。
messages = client.beta.threads.messages.list(
  thread_id=thread.id
)
最后我们就可以把内容展示给用户,下面是一个例子。AI给出了两个回答(role== assistant)
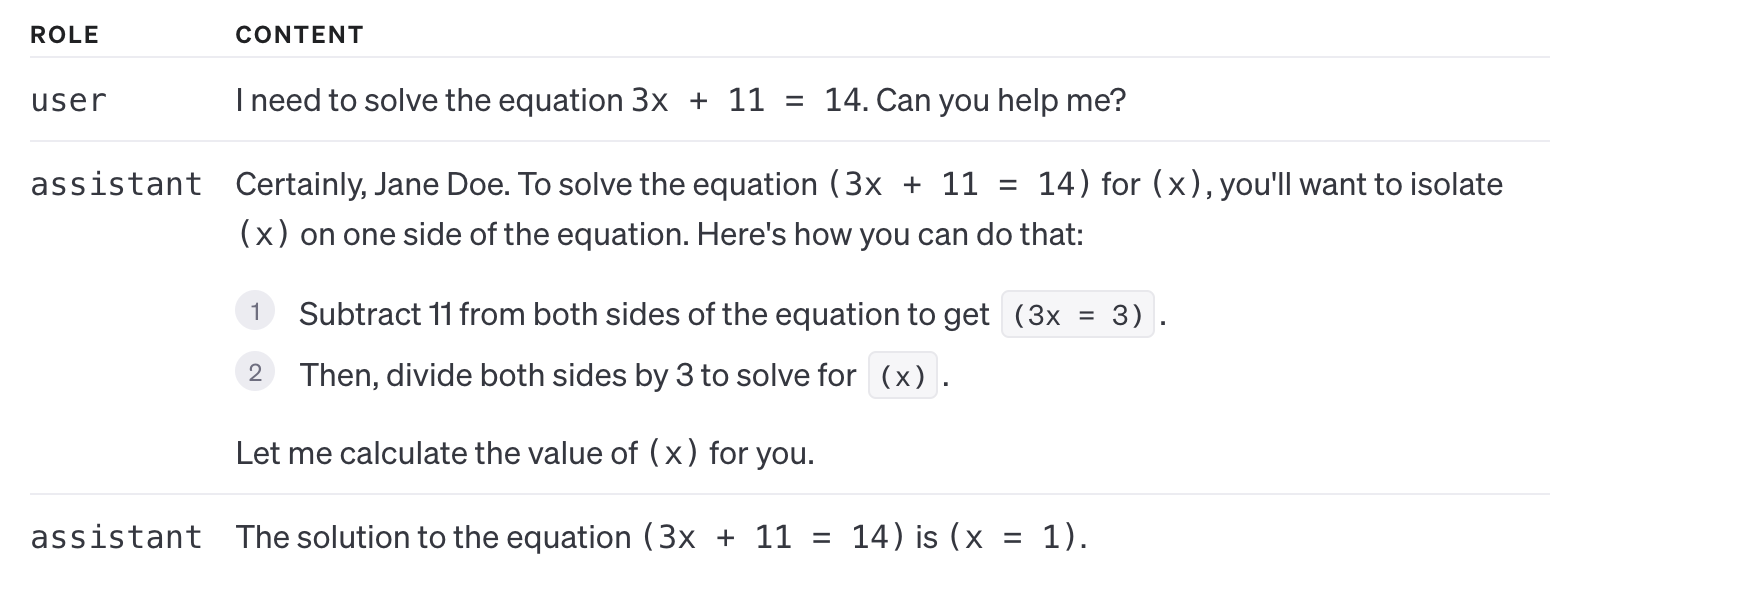
可以通过运行步骤 Run Steps,获取执行的中间状态,从而提供给用户中间结果以及使用的tools等信息。
步骤*: Playground 今天调试和测试
开发者可以在 Playground 中进行调试和测试,具体如下,其具体的能力和GPTs比较相似,只是可以看到更多的debug信息。也是可视化的具体界面。
Assistants API 工作机制剖析
Assistant API 的目标是帮助开发者更高效地开发出功能强大的AI助手,这些助手可以有效地利用OpenAI提供的多项能力以及用户自身构建的工具。
- AI 助手可以调用 OpenAI 的模型,并通过特定的指令来定义助手的行为特性和能力。
- AI 助手可以同时调用多个工具tools,这些工具可以是 OpenAI 自己开发的工具,例如 like Code interpreter 和 Knowledge retrieval 也可以是用户自己通过 Function calling自己实现的工具。这样,AI助手就能拓宽其解决问题的能力范围。
- AI 助手可以访问持久化的对话,新引入的对话Thread功能简化了AI应用的对话管理工作。用户只需要创建一次对话(Thread),就可以在后续快速地访问并与其进行对话,并轻松获取答案,这样就无需再关心模型对对话窗口的限制。
- AI 助手可以访问多种类型的文件。 AI助手可以在初始化创建时访问文件,或是在对话初始化的时候获取文件。它也可以在使用工具时创建新的文件,然后在之后的调用中引用这些文件。
AI Assistant的重要对象概念

从我们上述的讲解内容中,我们可以很清楚,AI助手API的调用主要由 Assistant、Thread、Message、Run 和 Run Step 这五个对象组成
对象(OBJECT) | 含义 |
|---|---|
助手对象(Assistant) | 调用 OpenAI 模型的任务型 AI,该AI 具备访问 tools 的能力 |
对话(Thread) | 用户和AI之间的对话。Thread 对话存储消息,并且自动处理文本长度超出限制的问题 |
消息(Message) | 消息由用户或者AI产生,可以包含文本,图片(暂时不支持),或者文件。消息在一个Thread对话中以有序列表形式存储 |
执行(Run) | 通过AI助手对某个对话进行显式执行。AI助手根据自身的配置信息和Thread中的消息内容,调用不同的工具(tools),从而得出回复。执行得到的结果会被存储在Thread的消息中,作为AI的回复 |
执行步骤(Run Step) | 执行(Run)的中间过程详细记录。包括AI使用了哪些tool,或者产生了哪些消息。这个对象可以帮助开发者理解AI如何得出最终的结果 |
创建一个AI Assistant 对象
创建一个AI 助手对象非常简单,只需要指定使用的语言 model,然后通过instruction 指令规定AI 助手的性格以及能力(或者是目标)。
name: AI 助手的名字instructions: 该参数指定了AI的性格以及目标或者能力,这个很重要,会影响AI助手的输出可靠性。tools:list,可以传入最多128个tools,可以使用 OpenAI 自己的 Code Interpreter 和 retrieval 工具,或者是自己构建的第三方functioncalling.file_ids: list,文件的ID,这里传入的文件ID 可以将文件传给Code Interpreter 和 retrieval使用。文件需要通过File的上传接口 进行上传,并且需要将接口的purpose设置成assistants. 一个AI 助手可以使用最多20个文件。每个文件最多512M。
文件上传:
file = client.files.create(
  file=open("speech.py", "rb"),
  purpose='assistants'
)
AI助手创建:
assistant = client.beta.assistants.create(
  name="Data visualizer",
  instructions="You are great at creating beautiful data visualizations. You analyze data present in .csv files, understand trends, and come up with data visualizations relevant to those trends. You also share a brief text summary of the trends observed.",
  model="gpt-4-1106-preview",
  tools=[{"type": "code_interpreter"}],
  file_ids=[file.id]
)
管理对话和消息
对话(Thread)和消息(Messages)代表了AI 助手和用户的聊天。一个对话中消息的个数是没有限制的,一旦消息的内容超过了模型可以处理的最长的窗口长度,Thread会自动舍弃最旧的消息,包含尽可能多的消息内容。(注意,该策略OpenAI可能会更新)
Thread 和 Messages 的创建如下:
thread = client.beta.threads.create(
  messages=[
    {
      "role": "user",
      "content": "Create 3 data visualizations based on the trends in this file.",
      "file_ids": [file.id]
    }
  ]
)
messages 可以有如下两种角色(role):
user: 用户消息assistant: AI 助手的回复 messages消息可以包含文本,图片,以及文件。但是目前的API暂时不支持图片消息,相信很快就能支持
消息注解Message annotations AI 助手返回的消息可能会包含 Message annotations ,存储在content 的对象中。注解(Annotations)提供了如何解析消息的信息;
目前支持两种不同的注解:
file_citation: 该注解是retrieval工具提供的,它定了了参考的内容的来源。file_path:该注解是code_interpreter工具提供,指定了参考文件的地址目录。
当返回的内容有注解的时候,我们需要进行解析,将其转化成用户可以理解的文本,例如下面的代码可以将参考文本以及下载链接进行解析,方便用户理解回复。
# Retrieve the message object
import openai as client
message = client.beta.threads.messages.retrieve(
  thread_id="...",
  message_id="..."
)

# Extract the message content
message_content = message.content[0].text
annotations = message_content.annotations
citations = []

# Iterate over the annotations and add footnotes
for index, annotation in enumerate(annotations):
    # Replace the text with a footnote
    message_content.value = message_content.value.replace(annotation.text, f' [{index}]')

    # Gather citations based on annotation attributes
    if (file_citation := getattr(annotation, 'file_citation', None)):
        cited_file = client.files.retrieve(file_citation.file_id)
        citations.append(f'[{index}] {file_citation.quote} from {cited_file.filename}')
    elif (file_path := getattr(annotation, 'file_path', None)):
        cited_file = client.files.retrieve(file_path.file_id)
        citations.append(f'[{index}] Click <here> to download {cited_file.filename}')
        # Note: File download functionality not implemented above for brevity

# Add footnotes to the end of the message before displaying to user
message_content.value += '\n' + '\n'.join(citations)
执行(Run)和执行步骤(Run Steps)
当我们需要AI Assistant 对用户问题进行回复,,需要创建一个Run 对象,该对象包含了两个参数:
thread_id: 之前创建的Thread的idassistant_id: 该AI Assistant 的id run = client.beta.threads.runs.create( thread_id=thread.id, assistant_id=assistant.id )
通常情况下,我们在创建 Assistant 对象的时候,已经指定了model和tools,但是我们仍可以在创建执行对象(Run)的时候,进行重新指定。
run = client.beta.threads.runs.create(
  thread_id=thread.id,
  assistant_id=assistant.id,
  model="gpt-4-1106-preview",
  instructions="additional instructions",
  tools=[{"type": "code_interpreter"}, {"type": "retrieval"}]
)注意:file_ids 不可以在执行中进行修改,需要使用修改Assistant的API进行修改
**执行的生命周期(Run lifecycle)
Run 对象有不同的状态

状态(STATUS) | 定义(DEFINITION) |
|---|---|
等待 queued | 当Run对象第一次创建后,或者当完成required_action 马上会进入queued状态,然后立即进入 in_progress 状态。 |
执行中 in_progress | 当进入执行中 in_progress状态后,AI助手会使用模型和工具进行任务完成。你可以通过Run 步骤查看进度 |
完成 completed | 标志着执行成功,可以在消息中看到AI的回复 |
需要执行 requires_action | 当使用函数调用Function calling工具时,一旦模型确定了要调用的函数的名称和参数,运行状态将转移到 required_action 状态。然后,您必须运行这些函数并提交输出,然后运行才会继续进行。如果在过期时间戳(大约在创建后10分钟)过期之前没有提供输出,那么运行状态将变为过期状态。 |
超时 expired | 这个状态是表示如果 Function calling 的结果没有在 expires_at 前递交,则会触发。或者执行的时间超过expires_at 的时间,也会触发。 |
取消中 cancelling | 可以对 in_progress 的执行任务进行取消。一旦取消成功,则会变成cancelled 状态,取消并不能保证成功 |
取消 cancelled | Run 被取消成功 |
失败 failed | 可以在 last_error 查看任务失败的原因,以及 failed_at 查看失败的时间 |
获取进度 Polling for updates
为了可以及时获取执行的进度,可以设置定时获取 retrieve the Run 执行状态。你可以获取每次 Run 的执行状态,从而决定下一步该做什么。 目前还不支持 streaming 的输出(2023-11-12日)
对话锁 Thread locks 当执行对象 Run 处于进行中 in_progress 的状态的时候,对话Thread 对象会被锁上,这意味着:
- 新消息不能加到对话中
- 新的执行Run 不能被创建
执行步骤 Run steps
当执行进入 in_progress 后,会有下面四种可能的状态,分别是
- 完成
- 失败
- 取消
- 超时

执行步骤Run steps 可能耗时比较长,为了能了解执行的细节,我们可以通过 step_details 这个字段进行观察,包含了两种类型的内容:
message_creation: 展示了产生了什么消息tool_calls: 展示了使用了什么tool
限制
目前是beta 版本,将会持续解决后续这些如下问题
- 支持流式输出
- 支持通知的功能,可以在无需轮询的情况下共享对象状态更新
- 支持 DALL·E 作为工具
- 支持用户上传图片
Tools
Code Interpreter
Code Interpreter(代码解释器) 允许 Assistant API 去创建并且执行代码。这个代码解释器能力,支持多种文件处理,以及代码执行。
代码解释器能够通过代码运行,完成多种困难的任务,并且能解决很多GPT地薄弱能力,例如数学能力等。Code Interpreter 支持如果发现自己的代码执行失败了,会通过多轮重试,直到执行成功。
开启Code Interpreter
如果需要开启 Code Interpreter 能力,只需要在tools 参数中加入 Code Interpreter, 如 tools=[{"type": "code_interpreter"}]即可。
import openai as client
assistant = client.beta.assistants.create(
  instructions="You are a personal math tutor. When asked a math question, write and run code to answer the question.",
  model="gpt-4-1106-preview",
  tools=[{"type": "code_interpreter"}]
)
模型之后会选择是否使用 Code Interpreter 去运行用户的请求。
在 Code Interpreter 中传入文件
Code Interpreter 可以解析多种不同类型的文件,所以当你需要处理大量的数据时,AI Assistant 允许你传入自己的文件进行分析。
注意:上传的文件需要设置 purpose='assistants'
# Upload a file with an "assistants" purpose
import openai as client
file = client.files.create(
  file=open("speech.py", "rb"),
  purpose='assistants'
)

# Create an assistant using the file ID
assistant = client.beta.assistants.create(
  instructions="You are a personal math tutor. When asked a math question, write and run code to answer the question.",
  model="gpt-4-1106-preview",
  tools=[{"type": "code_interpreter"}],
  file_ids=[file.id]
)
如果需要指定 对话级别的文件访问(即改文件只在这个对话中可以被访问),则可以使用如下的代码:
thread = client.beta.threads.create(
 messages=[
   {
     "role": "user",
     "content": "I need to solve the equation `3x + 11 = 14`. Can you help me?",
     "file_ids": [file.id]
   }
 ]
)
文件最大可以支持512 MB,z支持的格式包含 .csv, .pdf, .json 和其他格式
知识库获取 Knowledge Retrieval
知识库获取是克服 ChatGPT 知识储备时效性问题,以及数据私有化的有效手段,例如利用知识库获取能力,可以把业务数据知识库集成到GPT中。
开发者可以将文件(知识库)上传到AI 助手中,Open AI 会自动化对文档进行分块,加索引(index)以及embedding存储和实现向量化检索。
所以不需要用户自己进行这一系列操作就可以完成知识库检索的能力。
开启知识库检索
Assistant 如果需要开启知识库增强,只需要在初始化中的 tools 加入 tools=[{"type": "retrieval"}] 参数。
assistant = client.beta.assistants.create(
  instructions="You are a customer support chatbot. Use your knowledge base to best respond to customer queries.",
  model="gpt-4-1106-preview",
  tools=[{"type": "retrieval"}]
)
工作原理
模型会自动地根据你的输入进行内容的选择,主要的召回逻辑如下:
- 短文档直接传入GPT
- 对于长文档进行向量化召回
Function Calling
跟 ChatGPT 的 Completion API 一样,Assistant API 也支持 function calling。 Function Calling 允许你将函数的描述告诉AI 助手,包含了函数的定义以及参数等,然后 AI 助手会智能调用。
但是 Assistant API 不会直接调用函数,而是将函数的参数和函数返回,等待你提交函数调用结果,才会进行下一步的执行。
定义函数
首先需要按照如下的样例递交函数定义
{
    "type": "function", # 类型一定是function
    "function": {
      "name": "getCurrentWeather", # 函数名
      "description": "Get the weather in location", #函数的描述
      "parameters": { # 函数的参数
        "type": "object",
        "properties": {
          "location": {"type": "string", "description": "The city and state e.g. San Francisco, CA"},
          "unit": {"type": "string", "enum": ["c", "f"]}
        },
        "required": ["location"]
      }
    }
  }
然后将函数的参入 Assistant API的tools 参数中。例如下面的例子,定义了一个天气机器人,可以获取天气信息。 包含了两个函数:
getCurrentWeather:获取城市的天气getNickname: 获取城市别名
assistant = client.beta.assistants.create(
  instructions="You are a weather bot. Use the provided functions to answer questions.",
  model="gpt-4-1106-preview",
  tools=[{
    "type": "function",
    "function": {
      "name": "getCurrentWeather",
      "description": "Get the weather in location",
      "parameters": {
        "type": "object",
        "properties": {
          "location": {"type": "string", "description": "The city and state e.g. San Francisco, CA"},
          "unit": {"type": "string", "enum": ["c", "f"]}
        },
        "required": ["location"]
      }
    }
  }, {
    "type": "function",
    "function": {
      "name": "getNickname",
      "description": "Get the nickname of a city",
      "parameters": {
        "type": "object",
        "properties": {
          "location": {"type": "string", "description": "The city and state e.g. San Francisco, CA"},
        },
        "required": ["location"]
      }
    }
  }]
)
获取调用的函数
当 初始化一个执行(Run) 的时候,如果调用了一个function,则会进入到 pending 的状态。需要你进行提交函数的结果。
模型支持并发调用,参考 parallel function calling
如下的返回结果,可以看到 required_action 是需要提交的函数调用的函数名和参数。这里面可以 获取 call id , 用于提交使用函数结果使用。
{
  "id": "run_3HV7rrQsagiqZmYynKwEdcxS",
  "object": "thread.run",
  "assistant_id": "asst_rEEOF3OGMan2ChvEALwTQakP",
  "thread_id": "thread_dXgWKGf8Cb7md8p0wKiMDGKc",
  "status": "requires_action",
  "required_action": {
    "type": "submit_tool_outputs",
    "submit_tool_outputs": {
      "tool_calls": [
        {
          "id": "call_Vt5AqcWr8QsRTNGv4cDIpsmA", # 返回的call id,用于提交使用
          "type": "function",
          "function": {
            "name": "getCurrentWeather",
            "arguments": "{\"location\":\"San Francisco\"}"
          }
        },
        {
          "id": "call_45y0df8230430n34f8saa",
          "type": "function",
          "function": {
            "name": "getNickname",
            "arguments": "{\"location\":\"Los Angeles\"}"
          }
        }
      ]
    }
  },
...
提交函数结果
需要对于每个函数都进行 提交函数输出 ,对于每个输出的结果需要提交给哪个函数,则是对应了函数调用返回的 required_action 中的 tool_call_id 。
具体的代码如下。
run = client.beta.threads.runs.submit_tool_outputs(
  thread_id=thread.id, # 对话id
  run_id=run.id, # 执行id
  tool_outputs=[
      {
        "tool_call_id": call_ids[0], # call id
        "output": "22C",
      },
      {
        "tool_call_id": call_ids[1],
        "output": "LA",
      },
    ]
)
LangChain 集成 Assistant API
截止2023-11-15日,LangChain 集成API 还只是一个实验版本 langchain-experimental,未有正式版本。所以需要使用的读者,可以使用如下版本:
!pip install -U -q "langchain==0.0.331rc2" langchain-experimental "openai>=1.1"import os
os.environ["OPENAI_API_KEY"] = 'YOUR OPENAI KEY'
# !pip install -U -q "langchain==0.0.331rc2" langchain-experimental "openai>=1.1"
from langchain_experimental.openai_assistant import OpenAIAssistantRunnable
import openai as client
file = client.files.create(
file=open("TEST.csv", "rb"),
purpose='assistants'
)
interpreter_assistant = OpenAIAssistantRunnable.create_assistant(
name="data analysis assistant",
instructions="You are a profession data analysis. When asked a question, write and run Python code to answer the question.",
tools=[{"type": "code_interpreter"}],
file_ids=[file.id],
model="gpt-4"
)
output = interpreter_assistant.invoke(
{"content": "最近2周活跃表现最突出的是哪一天?",
"file_ids": [file.id]
})
output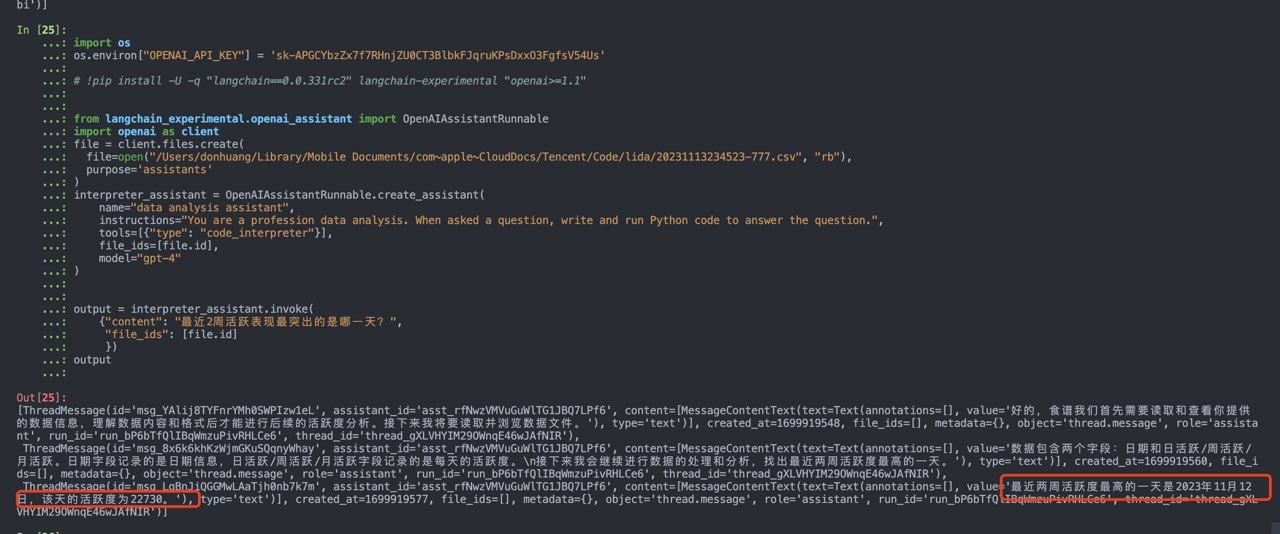
其他更多的内容可以参考:langchain cookbook
使用 curl 调用 Assistant API
具体可以参考如下的 Jupyter Notebook
Capabilities 和 Actions
我们在创建 GPTs 的时候,可以给GPTs 提供多种不同的能力
- Knowledge:知识库
- Capabilities(内置能力):包含了 OpenAI 提供的基础能力,主要包含了,这些能力都是最重要最基础的,所以OpenAI选择自己做。
- Web Browsing(网络浏览能力)
- DALLE Image Generation(图片生成能力)
- Code Interpreter(代码能力)
- Actions:动作,指的是GPTs的其他能力,类似于额外的能力插件,OpenAI不可能帮用户把所有的业务需求的能力都提供了额,所以它提供了一个接口,方便用户可以使用规定的接口协议,给GPT提供额外的能力。目前Actions 采用的是OpenAPI的接口协议,方便GPT调用外部的API。具体的使用可以参考下面教程。
GPTs与Assistant API的比较与差异
虽然 GPTs 和 Assistant API 都是为了创建自定义的 AI 助手创建的,到那时两者的方法和使用的场景不同。reference
GPTs 有着简单易用的前端交互,可以很快速地方便小白用户快速搭建 AI 助手,可以快速地验证方案和效果,并且可以很快速的在 GPTs 的商店中进行分享。
然而, Assistant API 需要通过API的方式进行操作,虽然可以使用 Assistant API 的 Assistant playground 进行配置使用,但是其主要的目的还是为开发者提供一个API 方式,方便开发者可以在在自己的应用中,快速集成这些能力
参考资料
原创声明:本文系作者授权腾讯云开发者社区发表,未经许可,不得转载。
如有侵权,请联系 cloudcommunity@tencent.com 删除。
原创声明:本文系作者授权腾讯云开发者社区发表,未经许可,不得转载。
如有侵权,请联系 cloudcommunity@tencent.com 删除。
评论
登录后参与评论
推荐阅读
目录

