Yolov5 C++ GPU部署方式介绍:ONNX Runtime
原创
Yolov5 C++ GPU部署方式介绍:ONNX Runtime
原创
AI小怪兽
修改于 2023-12-26 14:27:52
修改于 2023-12-26 14:27:52
漫谈C++
摘要:深度学习模型如何在C++下进行调用,
本文详细阐述了YOLOv5在C++ ONNX Runtime GPU&CPU下进行调用
1. ONNX和Tensorrt区别
ONNX Runtime 是将 ONNX 模型部署到生产环境的跨平台高性能运行引擎,主要对模型图应用了大量的图优化,然后基于可用的特定于硬件的加速器将其划分为子图(并行处理)。
ONNX的官方网站:https://onnx.ai/
ONXX的GitHub地址:https://github.com/onnx/onnx
1.2 Tensorrt介绍
C++ 库,用于加速 NVIDIA 的 GPU,可以为深度学习应用提供低延迟、高吞吐率的部署推理,支持 TensorFlow,Pytorch,Caffe2 ,Paddle等框架训练出的神经网络,可以优化网络计算TensorRT官网下载地址:https://developer.nvidia.com/zh-cn/tensorrt
开发者指南:https://docs.nvidia.com/deeplearning/tensorrt/developer-guide/index.html
Github地址:https://github.com/NVIDIA/TensorRT
1.3 Yolov5两种部署方式比较:
Tensorrt 优点:在GPU上推理速度是最快的;缺点:不同显卡cuda版本可能存在不适用情况;
ONNX Runtime优点:通用性好,速度较快,适合各个平台复制;
2.Yolov5 ONNX Runtime部署
源码地址:https://github.com/itsnine/yolov5-onnxruntime
C++ YOLO v5 ONNX Runtime inference code for object detection.
Dependecies:
- OpenCV 4.x
- ONNXRuntime 1.7+
- OS: Tested on Windows 10 and Ubuntu 20.04
- CUDA 11+ [Optional]
2.1 Cmake工程
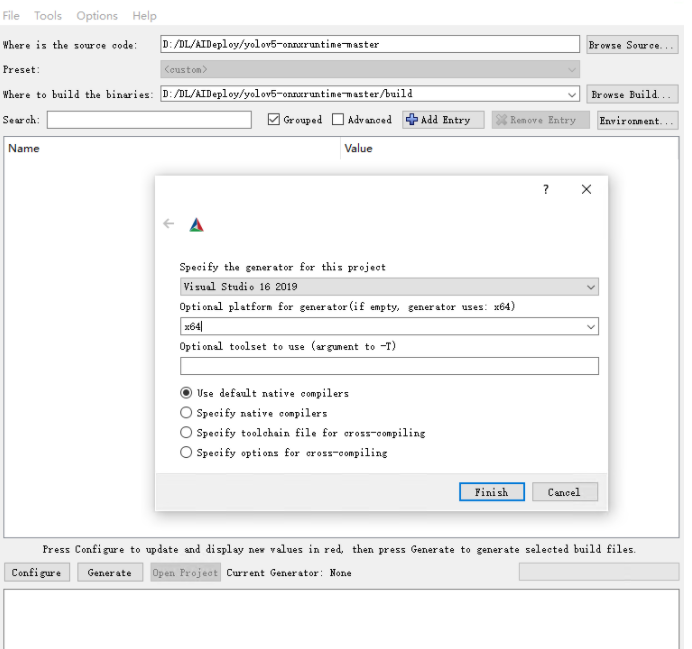
2.2 填写opencv 和对应路径
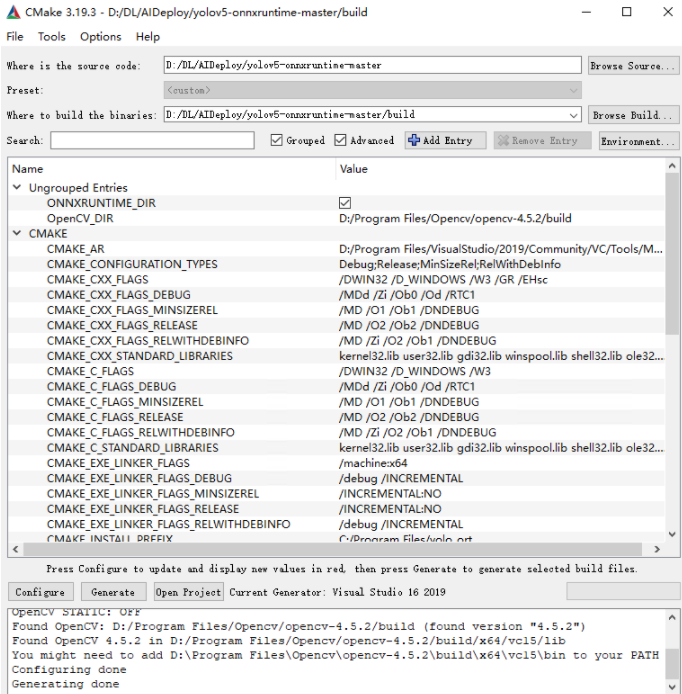
2.3 打开工程 手动配置onnxruntime-win-x64-gpu-1.9.0
包含目录:D:\onnxruntime-win-x64-gpu-1.9.0\include
引用目录:D:\onnxruntime-win-x64-gpu-1.9.0\lib
链接器输入:
onnxruntime.lib onnxruntime_providers_cuda.lib onnxruntime_providers_shared.lib
2.4 如何得到 .onnx
在GitHub - ultralytics/yolov5: YOLOv5 🚀 in PyTorch > ONNX > CoreML > TFLite下:
python export.py --weights weights/yolov5s.pt --include onnx --device 0
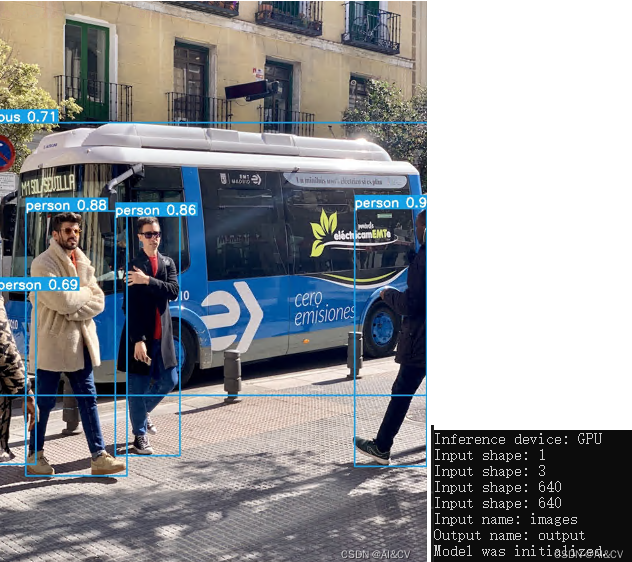
2.5 主函数代码:
#include <iostream>
#include <opencv2/opencv.hpp>
#include "cmdline.h"
#include "utils.h"
#include "detector.h"
int main(int argc, char* argv[])
{
const float confThreshold = 0.3f;
const float iouThreshold = 0.4f;
bool isGPU = true;
const std::string classNamesPath = "coco.names";
const std::vector<std::string> classNames = utils::loadNames(classNamesPath);
const std::string imagePath = "bus.jpg";
const std::string modelPath = "yolov5s.onnx";
if (classNames.empty())
{
std::cerr << "Error: Empty class names file." << std::endl;
return -1;
}
YOLODetector detector {nullptr};
cv::Mat image;
std::vector<Detection> result;
try
{
detector = YOLODetector(modelPath, isGPU, cv::Size(640, 640));
std::cout << "Model was initialized." << std::endl;
image = cv::imread(imagePath);
result = detector.detect(image, confThreshold, iouThreshold);
}
catch(const std::exception& e)
{
std::cerr << e.what() << std::endl;
return -1;
}
utils::visualizeDetection(image, result, classNames);
cv::imshow("result", image);
// cv::imwrite("result.jpg", image);
cv::waitKey(0);
return 0;
}
2.6编译得到结果
by CSDN AI小怪兽 http://cv2023.blog.csdn.net
原创声明:本文系作者授权腾讯云开发者社区发表,未经许可,不得转载。
如有侵权,请联系 cloudcommunity@tencent.com 删除。
原创声明:本文系作者授权腾讯云开发者社区发表,未经许可,不得转载。
如有侵权,请联系 cloudcommunity@tencent.com 删除。
评论
登录后参与评论
推荐阅读
目录
腾讯云开发者

Copyright © 2013 - 2026 Tencent Cloud. All Rights Reserved. 腾讯云 版权所有
深圳市腾讯计算机系统有限公司 ICP备案/许可证号:粤B2-20090059 ![]() 粤公网安备44030502008569号
粤公网安备44030502008569号
腾讯云计算(北京)有限责任公司 京ICP证150476号 | 京ICP备11018762号