不可不知的WPF动画(Animation)


在WPF开发应用中,动画不仅可以引起用户的注意与兴趣,而且还使软件更加便于使用。前面几篇文章讲解了画笔(Brush),形状(Shape),几何图形(Geometry),变换(Transform)等相关内容,今天继续讲解动画相关内容和知识点,仅供学习分享使用,如有不足之处,还请指正。

什么是动画?
动画是快速循环播放一系列图像(其中每个图像与下一个图像略微不同)给人造成的一种幻觉。当图像播放速度超过了人眼识别的速度,就会感觉这些图像形成了一个连贯的变化的场景。在电影中,摄像机每秒钟拍摄许多照片(每一张成为一帧),便可给人造成这种错觉。不同的帧速率会影响视频的流畅度和清晰度。常见的帧速率包括24帧/秒、25帧/秒、30帧/秒等,这些速率各有其适用场景和特点:
- 24帧/秒:这是电影行业标准的帧速率,尤其在拍摄无声电影时期,24帧/秒被广泛采用以节省胶片。尽管如此,24帧/秒在今天仍然被一些艺术家和独立电影制作人使用,以追求特定的视觉效果。
- 25帧/秒:适用于PAL制式,主要在欧洲和一些使用50Hz交流电的地区(如中国)使用。这种帧速率能提供流畅的视频播放,适用于大多数日常视频拍摄。
- 30帧/秒:属于NTSC制式,主要在美国和日本等使用60Hz交流电的地区使用。30帧/秒提供了与25帧/秒相似的流畅度,但在60Hz的地区更为常见。
虽然理论上高帧速率(如100帧/秒甚至更高)能提供更流畅的画面,但在实际拍摄中,高帧速率的采用受到设备能力、存储空间和后期处理成本的限制。因此,在选择帧速率时,需要综合考虑技术可行性、艺术效果和成本等因素。
属性动画
在WPF中,通过对对象的个别属性应用动画,可以使控件产生动画效果。如:若要使UI元素变大缩小,可以对其Width和Height属性进行动画处理;若要使UI对象从视野中消失或出现,可以对Opacity属性进行动画处理。若要使属性具有动画功能,属性必须满足以下三个要求:
- 属性必须是依赖属性。
- 属性必须派生自DependencyObject,并实现IAnimatable接口类。
- 必须存在可兼容的动画类型。
由于UIElement类实现IAnimatable接口,而FramworkElement又派生自UIElement,所以大部分的UI控件都包含IAnimatable属性的对象。如Button,TabControl,Panel和Shape等,且大多数属性都是依赖属性。
如果要实现一个Rectangle元素从视野中逐渐消失,然后再次出现,并循环播放,应该怎么实现呢?
- 创建双精度值动画:首先UI元素从视野中消失的一种方法是对Opacity属性进行动画处理,而Opacity是[0,1]的double类型的值,因此可以创建一个双精度值动画(DoubleAnimation)。双精度值动画主要用户创建两个double类型值之间的转换,可以通过指定DoubleAnimation的起始值(From),终止值(To)。Opacity属性0表示完全不可见,1表示完全可见。若要使UI元素从不透明到透明的完整过渡,可以设置DoubleAnimation的From值为1.0,To设置为0。
- 设置动画时长:动画需要在多长的时间内完成,可以通过设置DoubleAnimation的Duration属性,Duration属性在XAML中设置格式为HH:mm:ss,在C#中Duration接收TimeSpan类型的参数。
- 设置动画反向执行:动画完成后,是否恢复初始状态,可以通过设置AutoReverse属性来完成,其中true表示恢复到初始状态,false表示停留在结束状态。
- 设置重复执行:动画是否重复执行,可以通过设置RepeatBehavior属性来完成。可指定重复执行的次数,或时长,如果设置为Forever,则永久执行。
- 创建故事板:动画创建好以后,需要装填到故事板(Storyboard)并使用TargetName和TargetPropery属性来指定动画应用的目标对象和属性。
- 设置触发事件:通常情况下,可以将开始故事板(BeginStoryboard)与事件触发器(EventTrigger)进行关联。并添加到EventTrigger的Actions中,并指定RoutedEvent属性设置启动Storyboard的路由事件。
属性动画完整示例如下所示:
<StackPanel Margin="10">
    <Rectangle Name="MyRectangle" Width="100" Height="100" Fill="Blue">
        <Rectangle.Triggers>
            <EventTrigger RoutedEvent="Rectangle.Loaded">
                <BeginStoryboard>
                    <Storyboard>
                        <DoubleAnimation Storyboard.TargetName="MyRectangle" Storyboard.TargetProperty="Opacity"
                                         From="1.0" To="0.0" Duration="0:0:5"
                                         AutoReverse="True" RepeatBehavior="Forever" />
                    </Storyboard>
                </BeginStoryboard>
            </EventTrigger>
        </Rectangle.Triggers>
    </Rectangle>
</StackPanel>
上述代码在C#中实现,如下所示:
StackPanel panel = new StackPanel();
panel.Margin = new Thickness(10);

Rectangle rectangle = new Rectangle();
rectangle.Name = "rectangle";
this.RegisterName(rectangle.Name, rectangle);
rectangle.Width = 100;
rectangle.Height = 100;
rectangle.Fill = Brushes.Blue;

DoubleAnimation animation = new DoubleAnimation();
animation.From = 1.0;
animation.To = 0.0;
animation.Duration = new Duration(TimeSpan.FromSeconds(5));
animation.AutoReverse = true;
animation.RepeatBehavior = RepeatBehavior.Forever;

var storyboard = new Storyboard();
storyboard.Children.Add(animation);
Storyboard.SetTargetName(animation, rectangle.Name);
Storyboard.SetTargetProperty(animation, new PropertyPath(Rectangle.OpacityProperty));

rectangle.Loaded += new RoutedEventHandler((sender,e) =>{
    storyboard.Begin(this);
});
panel.Children.Add(rectangle);
this.Content = panel;
动画类型
不同的属性值具有不同的动画类型,如果是double类型的属性(如:width,height,opacity等)进行动画处理,则可以使用双精度动画(DoubleAntmation);如果是Point类似的属性,则可以使用Point动画(PonitAnimation);如果是颜色类型的属性,则可以使用ColorAnitmation。这些类型的动画位于System.Windows.Media.Animation命名空间,且都遵循“<类型>Animation”格式的命名约定。具体如下所示:
- <类型>Animation,这些动画称为“From/To/By”或“基本”动画,它们在起始值和目标值之间进行动画处理,或者通过将偏移量值与其起始值相加来进行动画处理。
- 若要指定起始值,请设置动画的“From”属性。
- 若要指定终止值,请设置动画的“To”属性。
- 若要指定偏移量值,请设置动画的“By”属性。
- <类型>AnimationUsingKeyFrames,关键帧动画的功能比“From/To/By”动画的功能更强大,因为可以指定任意多个目标值,甚至可以控制它们的插值方法。某些类型只能用关键帧动画进行动画处理。 关键帧动画概述中详细描述了关键帧动画。
- <类型>AnimationUsingPath,路径动画支持使用几何路径来生成动画值。
- <类型>AnimationBase,在实现时对 <类型> 值进行动画处理的抽象类。此类用作 <类型>Animation 和 <类型>AnimationUsingKeyFrames 类的基类。只有在想要创建自己的自定义动画时,才需要直接处理这些类。否则,请使用 <类型>Animation 或 KeyFrame<类型>Animation。
下表显示了一些常用动画类型以及一些与这些类型一起使用的属性。

时间线
所有的动画类型均继承自Timeline类。所以所有的动画都是专用类型的时间线。Timeline定义一个时间段,通过Timeline的相关属性,可以指定时间线的计时方式,三个经常使用的计时属性分别为Duration,AutoReverse,和RepeatBehavior。
- Duration表示时间线完成一次迭代需要的时间,默认值为1秒。Duration的赋值格式为“小时:分钟:秒”。
- AutoReverse,表示在执行一次迭代的时间线完成后,是否倒退到初始状态。如果设置为true,则将进行反向播放动画。默认值为false。
- RepeatBehavior,表示事件线的播放次数。默认时间线的迭代次数为1次,即动画播放1次,不进行重复。
关键帧动画
与From/To/By动画类似,关键帧动画对目标类型的属性进行动画处理。它通过Duration值属性在目标值之间创建过渡。但是From/To/By动画可以在两个值之间创建过渡,而单个关键帧动画则可以在任意数量的目标值之间创建过渡。关键帧动画没有设置其目标值所需要的From,To,By属性。关键帧动画的目标值使用关键帧对象进行定义,因此称之为“关键帧动画”。动画启动后,在各个关键帧之间进行过渡。
关键帧动画创建步骤:
- 像From/To/By动画一样声明动画,并指定Duration。
- 将每一个目标值创建一个相应类型的关键帧,并设置值和KeyTime,然后将关键帧添加到KeyFrames集合。
- 将关键帧动画添加到Storyboard,并指定动画对象和属性。
以下示例使用 DoubleAnimationUsingKeyFrames 对 Rectangle 元素进行四个不同位置的动画处理。
<Border Width="400" BorderBrush="Black">
    <Rectangle Fill="Blue" Width="50" Height="50" HorizontalAlignment="Left">
        <Rectangle.RenderTransform>
            <TranslateTransform x:Name="MyAnimatedTranslateTransform" X="0" Y="0" />
        </Rectangle.RenderTransform>
        <Rectangle.Triggers>
            <EventTrigger RoutedEvent="Rectangle.MouseLeftButtonDown">
                <BeginStoryboard>
                    <Storyboard>
                        <DoubleAnimationUsingKeyFrames Storyboard.TargetName="MyAnimatedTranslateTransform" Storyboard.TargetProperty="X" Duration="0:0:10">
                            <LinearDoubleKeyFrame Value="0" KeyTime="0:0:0" />
                            <LinearDoubleKeyFrame Value="350" KeyTime="0:0:2" />
                            <LinearDoubleKeyFrame Value="50" KeyTime="0:0:7" />
                            <LinearDoubleKeyFrame Value="200" KeyTime="0:0:8" />
                        </DoubleAnimationUsingKeyFrames>
                    </Storyboard>
                </BeginStoryboard>
            </EventTrigger>
        </Rectangle.Triggers>
    </Rectangle>
</Border>
关键帧动画类位于System.Windows.Media.Animation命名空间,且都遵循“<类型>AnimationUsingKeyFrames”格式的命名约定。关键帧动画支持三种不同的插值类型,因此关键帧定义格式遵循如下规则“<InterpolationMethod><Type>KeyFrame”,其中 <InterpolationMethod> 是关键帧使用的内插方法,<Type> 是类进行动画处理的值的类型。 例如,可以针对 DoubleAnimationUsingKeyFrames 使用三种关键帧类型:DiscreteDoubleKeyFrame(离散内插关键帧)、LinearDoubleKeyFrame(线性内插关键帧) 和 SplineDoubleKeyFrame(曲线内插关键帧)。
关键帧的主要目的是定义KeyTime和Value值。
- Value 属性指定关键帧的目标值。
- KeyTime 属性指定何时(在动画的 Duration 内)到达关键帧的 Value。
关键帧动画开始后,会按关键帧的 KeyTime 属性定义的顺序来循环访问其关键帧。
- 如果 0 时刻没有关键帧,动画将在目标属性的当前值和第一个关键帧的 Value 之间创建一个过渡;否则,动画的输出值将成为第一个关键帧的值。
- 动画将使用由第二个关键帧指定的内插方法来创建第一个和第二个关键帧的 Value 之间的过渡。过渡起始自第一个关键帧的 KeyTime,在到达第二个关键帧的 KeyTime 时结束。
- 动画将继续,这会创建每个后续关键帧和其前面的关键帧之间的过渡。
- 最后,该动画过渡到具有最大关键时间(等于或小于动画的 Duration)的关键帧的值。
注意:KeyTime指定方式可以是“小时:分钟:秒”的Timespan方式,也可以是百分比方式(该值必须大于或等于 0 并且小于或等于 100%)。
路径动画
路径动画是一种使用PathGeometry作为输入的动画时间线(AnimationTimeline),可以定义一个几何路径并使用它来设置路径动画的PathGeometry属性,而不是使用From,To,By属性或使用关键帧。路径动画运行时,会从路径中读取x,y和角度信息并使用该信息生成其输出。路径动画对沿着复杂路径的对象进行动画处理非常有用。不同的属性值类型,对应不同的路径动画类型。
路径动画类属于 System.Windows.Media.Animation 命名空间,并使用以下命名约定:
<Type>AnimationUsingPath
其中 <Type> 为该类进行动画处理的值的类型。常见的路径动画如下表所示:
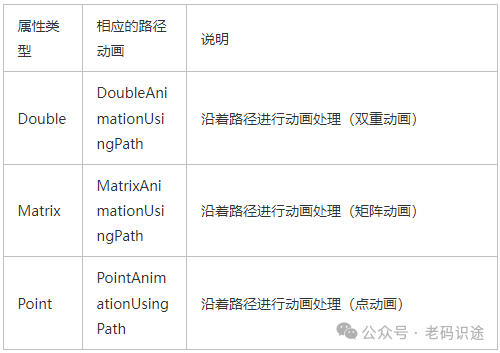
路径动画说明:
- MatrixAnimationUsingPath 从其 PathGeometry 生成 Matrix 值。与 MatrixTransform 一起使用时,MatrixAnimationUsingPath 可以沿路径移动对象。如果将 MatrixAnimationUsingPath 的 DoesRotateWithTangent 属性设置为 true,它还会沿路径曲线旋转对象。
- PointAnimationUsingPath 从其 PathGeometry 的 x 和 y 坐标生成 Point 值。通过使用 PointAnimationUsingPath 对采用 Point 值的属性进行动画处理,可以沿路径移动对象。PointAnimationUsingPath 不能旋转对象。
- DoubleAnimationUsingPath 从其 PathGeometry 生成 Double 值。通过设置 Source 属性,可以指定 DoubleAnimationUsingPath 是使用 x 坐标、y 坐标还是路径的角度作为其输出。可以使用 DoubleAnimationUsingPath 来沿着 x 轴或 y 轴旋转或移动对象。
以下路径动画演示了MatrixAnimationUsingPath 的使用方式:
<Window x:Class="WpfApp5.MainWindow"
        xmlns="http://schemas.microsoft.com/winfx/2006/xaml/presentation"
        xmlns:x="http://schemas.microsoft.com/winfx/2006/xaml"
        xmlns:d="http://schemas.microsoft.com/expression/blend/2008"
        xmlns:mc="http://schemas.openxmlformats.org/markup-compatibility/2006"
        xmlns:local="clr-namespace:WpfApp5"
        xmlns:PresentationOptions="http://schemas.microsoft.com/winfx/2006/xaml/presentation/options"
        mc:Ignorable="d"
        Title="MainWindow" Height="450" Width="800">
    <Canvas Width="400" Height="400">
        <Button MinWidth="100" Content="A Button">
            <Button.RenderTransform>
                <MatrixTransform x:Name="ButtonMatrixTransform">
                    <MatrixTransform.Matrix >
                        <Matrix />
                    </MatrixTransform.Matrix>
                </MatrixTransform>
            </Button.RenderTransform>
            <Button.Triggers>
                <EventTrigger RoutedEvent="Button.Loaded">
                    <BeginStoryboard>
                        <Storyboard>
                            <MatrixAnimationUsingPath Storyboard.TargetName="ButtonMatrixTransform"
                                                      Storyboard.TargetProperty="Matrix"
                                                      DoesRotateWithTangent="True"
                                                      Duration="0:0:5"
                                                      RepeatBehavior="Forever" >
                                <MatrixAnimationUsingPath.PathGeometry>
                                    <PathGeometry Figures="M 10,100 C 35,0 135,0 160,100 180,190 285,200 310,100"
                                                  PresentationOptions:Freeze="True" />
                                </MatrixAnimationUsingPath.PathGeometry>
                            </MatrixAnimationUsingPath>
                        </Storyboard>
                    </BeginStoryboard>
                </EventTrigger>
            </Button.Triggers>
        </Button>
    </Canvas>
</Window>
参考文档
关于动画相关内容,可参考官方文档:
https://learn.microsoft.com/zh-cn/dotnet/desktop/wpf/graphics-multimedia/animation-overview?view=netframeworkdesktop-4.8
以上就是【不可不知的WPF动画(Animation)】的全部内容,关于更多详细内容,可参考官方文档。希望能够一起学习,共同进步。
本文参与 腾讯云自媒体同步曝光计划,分享自微信公众号。
原始发表:2024-09-20,如有侵权请联系 cloudcommunity@tencent.com 删除
评论
登录后参与评论
推荐阅读
目录
腾讯云开发者

Copyright © 2013 - 2026 Tencent Cloud. All Rights Reserved. 腾讯云 版权所有
深圳市腾讯计算机系统有限公司 ICP备案/许可证号:粤B2-20090059 ![]() 粤公网安备44030502008569号
粤公网安备44030502008569号
腾讯云计算(北京)有限责任公司 京ICP证150476号 | 京ICP备11018762号