构建AI智能体:YOLO视觉大模型入门指南:从零开始掌握目标检测
原创
构建AI智能体:YOLO视觉大模型入门指南:从零开始掌握目标检测
原创
未闻花名
发布于 2026-01-23 07:51:29
发布于 2026-01-23 07:51:29
一、视觉大模型介绍
AI大模型蓬勃发展,计算机视觉作为AI领域的重要分支,也正加速在改变着我们的生活。从自动驾驶汽车的环境感知到医疗影像的智能诊断,从智能安防的人脸识别到工业生产的质量检测,计算机视觉技术已经深入到我们生活的方方面面。而在众多视觉技术中,目标检测作为计算机视觉的基础任务之一,更是发挥着至关重要的作用。
视觉大模型是人工智能领域的一个重要分支,它通过深度学习技术让计算机能够看懂和理解图像内容。与传统的计算机视觉方法相比,视觉大模型具有更强的泛化能力和更高的准确性。
简单理解: 一个经过海量图像"训练"的智能大脑
核心能力:
- 目标检测:找出物体在哪里,是什么
- 图像分类:识别整张图片的类别
- 实例分割:精确勾勒出物体轮廓
- 图像生成:根据描述创造新图像
核心特点:
- 端到端学习:直接从原始像素学习到高级语义概念
- 多任务能力:一个模型可以同时完成检测、分类、分割等任务
- 强泛化性:在未见过的数据上也能保持良好的性能
- 大规模预训练:基于海量数据训练,具备丰富的视觉知识
二、YOLO介绍与目标检测
对于初学者来说,YOLO系列模型是最佳入门选择。它将目标检测任务转化为单一的回归问题,直接在图像上预测边界框和类别概率,这种简洁的设计理念使得YOLO在保持高精度的同时具有极快的推理速度。
YOLO的核心优势在于其一眼就能看出的设计理念。它不再需要像传统方法那样先生成候选区域再进行分类,而是将整个图像作为输入,直接在输出层预测边界框和类别概率。这种设计不仅大大简化了检测流程,更重要的是显著提升了检测速度。
理解目标检测:
想象一下,你正在教一个孩子识别图片中的物体:"这是一只猫"、"这是一辆车"、"这是一棵树",我们会对着图片告诉孩子里面都有哪些动物或物体,目标检测就是让计算机学会完成同样的任务,但更加精确和高效。它不仅要识别出物体是什么,还要准确地框出物体的位置。
目标检测技术的核心任务是让计算机能够像人类一样看懂图像中的内容,不仅要识别出图像中有什么物体,还要精确地定位这些物体的位置,早期的目标检测方法主要基于传统计算机视觉技术,在准确性和效率方面都存在明显不足,正是在这样的技术背景下,YOLO横空出世,彻底改变了目标检测的技术范式。与传统的两阶段检测方法(如R-CNN系列)不同,YOLO创新性地将目标检测任务转化为单一的回归问题,实现了端到端的检测流程。
YOLO总结:
- 速度快:看一眼就能识别所有物体
- 精度高:识别准确率很高
- 易上手:对初学者友好,文档完善
三、YOLO模型原理
1. 核心思想
YOLO作为目标检测领域的革命性算法,其核心思想可以用一个简单的比喻来理解:传统的目标检测方法就像一个人在房间里寻找物品时,需要逐个角落仔细查看;而YOLO则像是一个经验丰富的管家,只需扫视一眼就能立即识别出房间里所有重要物品的位置和类别。这种"一眼识别"的能力正是YOLO区别于传统方法的本质特征。
从技术层面深入分析,YOLO的创新主要体现在以下几个方面:首先,它将目标检测任务重新定义为单一的回归问题。在YOLO出现之前,主流的两阶段检测方法(如R-CNN系列)需要先生成大量的候选区域,然后对每个候选区域进行分类和回归。这种方法的计算复杂度很高,难以满足实时性要求。YOLO通过将整个检测流程简化为一个神经网络的前向传播过程,实现了端到端的训练和推理,大大提升了检测效率。
2. 技术原理
网格划分机制:
- YOLO将输入图像划分为S×S的网格(如7×7或13×13)。每个网格单元负责预测固定数量的边界框,通常是2-5个。对于每个边界框,模型需要预测5个值:边界框的中心坐标(x,y)、宽度(w)、高度(h)以及一个置信度分数。
边界框预测:
- 置信度分数反映了模型对框内包含目标的置信程度以及边界框的准确度。数学表达式为:Pr(Object)×IOUᵗʳᵘᵗʰₚᵣₑₔ,其中Pr(Object)表示网格内包含目标的概率,IOU是预测框与真实框的交并比。
类别预测:
- 每个网格单元还要预测C个条件类别概率,即Pr(Classᵢ|Object)。在测试时,将条件类别概率与单个边界框的置信度预测相乘,得到每个边界框的类别置信度分数。
3. 核心概念
3.1 边界框
- 理解边界框坐标:[x1, y1, x2, y2] = [左上角x, 左上角y, 右下角x, 右下角y]
- 实际例子:猫的边界框 = [100, 150, 300, 400] ,在图像中的位置
3.2 置信度
- 置信度0.95 → 模型有95%的把握认为这是猫
- 置信度0.50 → 模型只有50%的把握
3.3 类别概率
- [猫: 0.95, 狗: 0.03, 汽车: 0.02] → 很可能是猫
四、模型选择与下载
YOLO模型系列提供了多种不同规模的模型,从轻量级的纳米模型到大型的超大模型,可以满足不同应用场景的需求。对于初学者来说,了解如何选择合适的模型至关重要。
YOLOv8是目前最流行的版本之一,它提供了5种不同规模的预训练模型:
- YOLOv8n(纳米版):参数量约3.2M,模型大小约6.7MB,推理速度最快,精度相对较低,适合移动端和边缘设备部署。
- YOLOv8s(小型版):参数量约11.2M,模型大小约22MB,在速度和精度之间取得了很好的平衡,是大多数应用的首选。
- YOLOv8m(中型版):参数量约25.9M,模型大小约50MB,精度较高,速度适中,适合服务器端部署。
- YOLOv8l(大型版):参数量约43.7M,模型大小约87MB,精度高,速度较慢,适合对精度要求高的应用。
- YOLOv8x(超大版):参数量约68.2M,模型大小约134MB,精度最高,速度最慢,适合科研和竞赛场景。
对于初学者,建议从YOLOv8n或YOLOv8s开始,这两个模型在保持较好精度的同时具有较快的推理速度,适合学习和实验。在掌握基本用法后,可以根据实际需求升级到更大的模型。
模型下载可以通过Ultralytics库自动完成,当第一次使用YOLO模型时,库会自动从官方仓库下载对应的预训练权重。如果需要手动下载或了解模型详情,可以访问Ultralytics的官方GitHub仓库或文档。
在选择模型时,需要考虑以下几个因素:
- 硬件资源:移动端和边缘设备选择轻量级模型,服务器端可以选择更大的模型。
- 精度要求:对精度要求高的应用(如医疗影像分析)选择大型模型,对实时性要求高的应用(如视频监控)选择轻量级模型。
- 推理速度:需要实时处理的应用要优先考虑推理速度。
- 内存限制:嵌入式设备需要特别考虑模型的内存占用。
五、YOLOv8n详细部署
1. 模型下载与初始化
import cv2
import numpy as np
from PIL import Image
import matplotlib.pyplot as plt
from ultralytics import YOLO
import torch
import os
import time

plt.rcParams['font.sans-serif'] = ['SimHei']  # 用黑体显示中文
plt.rcParams['axes.unicode_minus'] = False    # 正常显示负号

class YOLOv8CPUDetector:
    def __init__(self, model_path=None, model_size='n'):
        """
        初始化YOLOv8检测器

        Args:
            model_path: 自定义模型路径,如果为None则自动下载
            model_size: 模型大小 'n'(nano), 's'(small), 'm'(medium)
        """
        self.device = 'cpu'
        print(f"使用设备: {self.device}")

        if model_path and os.path.exists(model_path):
            # 加载自定义模型
            self.model = YOLO(model_path)
            print(f"加载自定义模型: {model_path}")
        else:
            # 自动下载预训练模型
            model_name = f"yolov8{model_size}.pt"
            print(f"下载模型: {model_name}")
            self.model = YOLO(model_name)

        # 设置模型为评估模式
        self.model.to(self.device)
        self.model.eval()

        # COCO数据集类别名称
        self.class_names = [
            'person', 'bicycle', 'car', 'motorcycle', 'airplane', 'bus', 'train', 'truck',
            'boat', 'traffic light', 'fire hydrant', 'stop sign', 'parking meter', 'bench',
            'bird', 'cat', 'dog', 'horse', 'sheep', 'cow', 'elephant', 'bear', 'zebra',
            'giraffe', 'backpack', 'umbrella', 'handbag', 'tie', 'suitcase', 'frisbee',
            'skis', 'snowboard', 'sports ball', 'kite', 'baseball bat', 'baseball glove',
            'skateboard', 'surfboard', 'tennis racket', 'bottle', 'wine glass', 'cup',
            'fork', 'knife', 'spoon', 'bowl', 'banana', 'apple', 'sandwich', 'orange',
            'broccoli', 'carrot', 'hot dog', 'pizza', 'donut', 'cake', 'chair', 'couch',
            'potted plant', 'bed', 'dining table', 'toilet', 'tv', 'laptop', 'mouse',
            'remote', 'keyboard', 'cell phone', 'microwave', 'oven', 'toaster', 'sink',
            'refrigerator', 'book', 'clock', 'vase', 'scissors', 'teddy bear', 'hair drier',
            'toothbrush'
        ]

        # 颜色映射
        self.colors = self.generate_colors(len(self.class_names))

    def generate_colors(self, n):
        """生成随机颜色"""
        return [tuple(np.random.randint(0, 255, 3).tolist()) for _ in range(n)]

    def preprocess_image(self, image_path):
        """图像预处理"""
        if isinstance(image_path, str):
            image = cv2.imread(image_path)
            image = cv2.cvtColor(image, cv2.COLOR_BGR2RGB)
        else:
            image = image_path

        original_size = image.shape[:2]
        return image, original_size

    def draw_detections(self, image, boxes, scores, class_ids):
        """绘制检测结果"""
        result_image = image.copy()

        for box, score, class_id in zip(boxes, scores, class_ids):
            x1, y1, x2, y2 = box.astype(int)
            class_name = self.class_names[class_id]
            color = self.colors[class_id]

            # 绘制边界框
            cv2.rectangle(result_image, (x1, y1), (x2, y2), color, 2)

            # 绘制标签背景
            label = f"{class_name}: {score:.2f}"
            label_size = cv2.getTextSize(label, cv2.FONT_HERSHEY_SIMPLEX, 0.5, 2)[0]
            cv2.rectangle(result_image, (x1, y1 - label_size[1] - 10),
                         (x1 + label_size[0], y1), color, -1)

            # 绘制标签文本
            cv2.putText(result_image, label, (x1, y1 - 5),
                       cv2.FONT_HERSHEY_SIMPLEX, 0.5, (255, 255, 255), 2)

        return result_image

# 初始化检测器
detector = YOLOv8CPUDetector(model_size='n')
1.1 基础说明:
- cv2 (OpenCV): 计算机视觉库,用于图像读取、颜色空间转换和绘图
- numpy: 数值计算库,处理数组和矩阵运算
- PIL (Pillow): 图像处理库,提供图像操作功能
- matplotlib: 绘图库,用于结果显示和可视化
- ultralytics: YOLOv8的官方Python包,提供模型接口
- torch: PyTorch深度学习框架
- os: 操作系统接口,用于文件路径操作
1.2 初始化方法 __init__
def __init__(self, model_path=None, model_size='n'):
    self.device = 'cpu'
    print(f"使用设备: {self.device}")
参数说明:
- model_path: 自定义模型权重文件路径
- model_size: 预训练模型尺寸规格
- 'n': nano (最轻量)
- 's': small
- 'm': medium
- 'l': large
- 'x': xlarge (最重量)
- 明确设置为CPU模式,确保在无GPU环境下运行
1.3 模型加载逻辑
if model_path and os.path.exists(model_path):
    # 加载自定义模型
    self.model = YOLO(model_path)
    print(f"加载自定义模型: {model_path}")
else:
    # 自动下载预训练模型
    model_name = f"yolov8{model_size}.pt"
    print(f"下载模型: {model_name}")
self.model = YOLO(model_name)- 条件加载机制: 优先使用自定义模型,不存在时下载预训练模型
- 自动下载: Ultralytics库会自动从官方仓库下载对应模型
- 模型命名约定: yolov8n.pt, yolov8s.pt 等遵循统一命名规则
1.4 模型配置
# 设置模型为评估模式
self.model.to(self.device)
self.model.eval()
关键说明:
- .to(device): 将模型移动到指定设备(CPU)
- .eval(): 设置为评估模式,这会:
- 关闭dropout层,避免梯度计算,减少内存占用
- 固定batch normalization的统计量
1.5 COCO数据集类别
self.class_names = [
    'person', 'bicycle', 'car', 'motorcycle', 'airplane', 'bus', 'train', 'truck',
    'boat', 'traffic light', 'fire hydrant', 'stop sign', 'parking meter', 'bench',
    # ... 完整列表
]
数据集说明:
- COCO (Common Objects in Context) 数据集包含80个常见物体类别
- YOLOv8预训练模型基于COCO数据集训练,可以直接识别这些类别
- 类别ID从0开始,对应列表中的索引位置
1.6 颜色生成
def generate_colors(self, n):
    """生成随机颜色"""
return [tuple(np.random.randint(0, 255, 3).tolist()) for _ in range(n)]- 为每个类别生成独特的RGB颜色
- np.random.randint(0, 255, 3) 生成0-255范围内的3个随机整数
- .tolist() 将numpy数组转换为Python列表
- 每个颜色表示为 (R, G, B) 元组
1.7 图像获取和处理
image = cv2.imread(image_path)
image = cv2.cvtColor(image, cv2.COLOR_BGR2RGB)- cv2.imread() 读取图像文件
- 返回numpy数组,形状为 (height, width, channels)
- OpenCV默认使用BGR颜色通道顺序
- cv2.cvtColor() 将BGR转换为RGB格式
- OpenCV使用BGR,但matplotlib和大多数深度学习模型使用RGB
- 不转换会导致颜色显示异常
1.8 尺寸获取
original_size = image.shape[:2]- image.shape 返回 (高度, 宽度, 通道数)
- [:2] 取前两个元素,得到 (height, width)
- 保存原始尺寸用于后续处理参考
1.9 边界框绘制
cv2.rectangle(result_image, (x1, y1), (x2, y2), color, 2)- (x1, y1): 左上角坐标
- (x2, y2): 右下角坐标
- color: 边界框颜色
- 2: 线条粗细(像素)
1.10 标签背景计算
label_size = cv2.getTextSize(label, cv2.FONT_HERSHEY_SIMPLEX, 0.5, 2)[0]- cv2.getTextSize() 计算文本渲染后的尺寸
- 返回 (宽度, 高度) 和基线信息
- [0] 取尺寸元组,忽略基线信息
1.11 标签背景绘制
cv2.rectangle(result_image, (x1, y1 - label_size[1] - 10),
(x1 + label_size[0], y1), color, -1)- -1 参数表示填充矩形(实心)
- 背景位置在边界框上方
- -10 提供额外的间距使标签更美观
1.12 文本绘制
cv2.putText(result_image, label, (x1, y1 - 5),
cv2.FONT_HERSHEY_SIMPLEX, 0.5, (255, 255, 255), 2)- (255, 255, 255): 白色文本
- 0.5: 字体大小
- 2: 文本粗细
初次运行模型下载:
Creating new Ultralytics Settings v0.0.6 file View Ultralytics Settings with 'yolo settings' or at 'C:\Users\du\AppData\Roaming\Ultralytics\settings.json' Update Settings with 'yolo settings key=value', i.e. 'yolo settings runs_dir=path/to/dir'. For help see #ultralytics-settings. 使用设备: cpu 下载模型: yolov8n.pt Downloading /v8.3.0/yolov8n.pt to 'yolov8n.pt': 0% ──────────── 2 Downloading /v8.3.0/yolov8n.pt to 'yolov8n.pt': 1% ──────────── 6 Downloading /v8.3.0/yolov8n.pt to 'yolov8n.pt': 2% ──────────── 1 ...... Downloading /v8.3.0/yolov8n.pt to 'yolov8n.pt': 95% ━━━━━━━━━━━─ Downloading /v8.3.0/yolov8n.pt to 'yolov8n.pt': 96% ━━━━━━━━━━━╸ Downloading /v8.3.0/yolov8n.pt to 'yolov8n.pt': 97% ━━━━━━━━━━━╸ Downloading /v8.3.0/yolov8n.pt to 'yolov8n.pt': 98% ━━━━━━━━━━━╸ Downloading /v8.3.0/yolov8n.pt to 'yolov8n.pt': 99% ━━━━━━━━━━━╸ Downloading /v8.3.0/yolov8n.pt to 'yolov8n.pt': 100% ━━━━━━━━━━━━ 6.2MB 23.9KB/s 4:27
2. 单张图像目标检测
def detect_single_image(image_path, conf_threshold=0.25, iou_threshold=0.7):
"""
单张图像目标检测
Args:
image_path: 图像路径
conf_threshold: 置信度阈值
iou_threshold: IoU阈值
"""
# 预处理图像
image, original_size = detector.preprocess_image(image_path)
print("开始目标检测...")
# 使用YOLO进行推理
results = detector.model(
image,
conf=conf_threshold,
iou=iou_threshold,
device=detector.device,
verbose=False
)
# 解析结果
result = results[0]
boxes = result.boxes.xyxy.cpu().numpy() if result.boxes is not None else np.array([])
scores = result.boxes.conf.cpu().numpy() if result.boxes is not None else np.array([])
class_ids = result.boxes.cls.cpu().numpy().astype(int) if result.boxes is not None else np.array([])
print(f"检测到 {len(boxes)} 个目标")
# 绘制结果
if len(boxes) > 0:
result_image = detector.draw_detections(image, boxes, scores, class_ids)
else:
result_image = image
# 显示结果
plt.figure(figsize=(15, 7))
plt.subplot(1, 2, 1)
plt.imshow(image)
plt.title("原始图像")
plt.axis('off')
plt.subplot(1, 2, 2)
plt.imshow(result_image)
plt.title(f"检测结果 (检测到 {len(boxes)} 个目标)")
plt.axis('off')
plt.tight_layout()
plt.show()
# 保存结果
output_path = "detection_result.jpg"
result_image_bgr = cv2.cvtColor(result_image, cv2.COLOR_RGB2BGR)
cv2.imwrite(output_path, result_image_bgr)
print(f"结果已保存至: {output_path}")
return boxes, scores, class_ids
# 使用示例
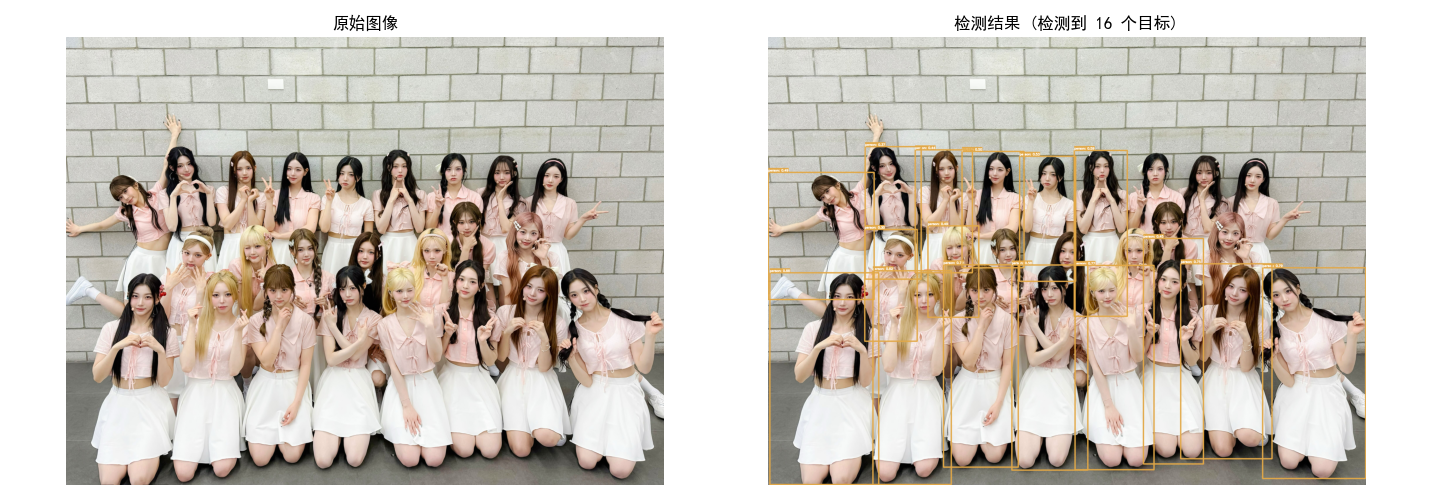
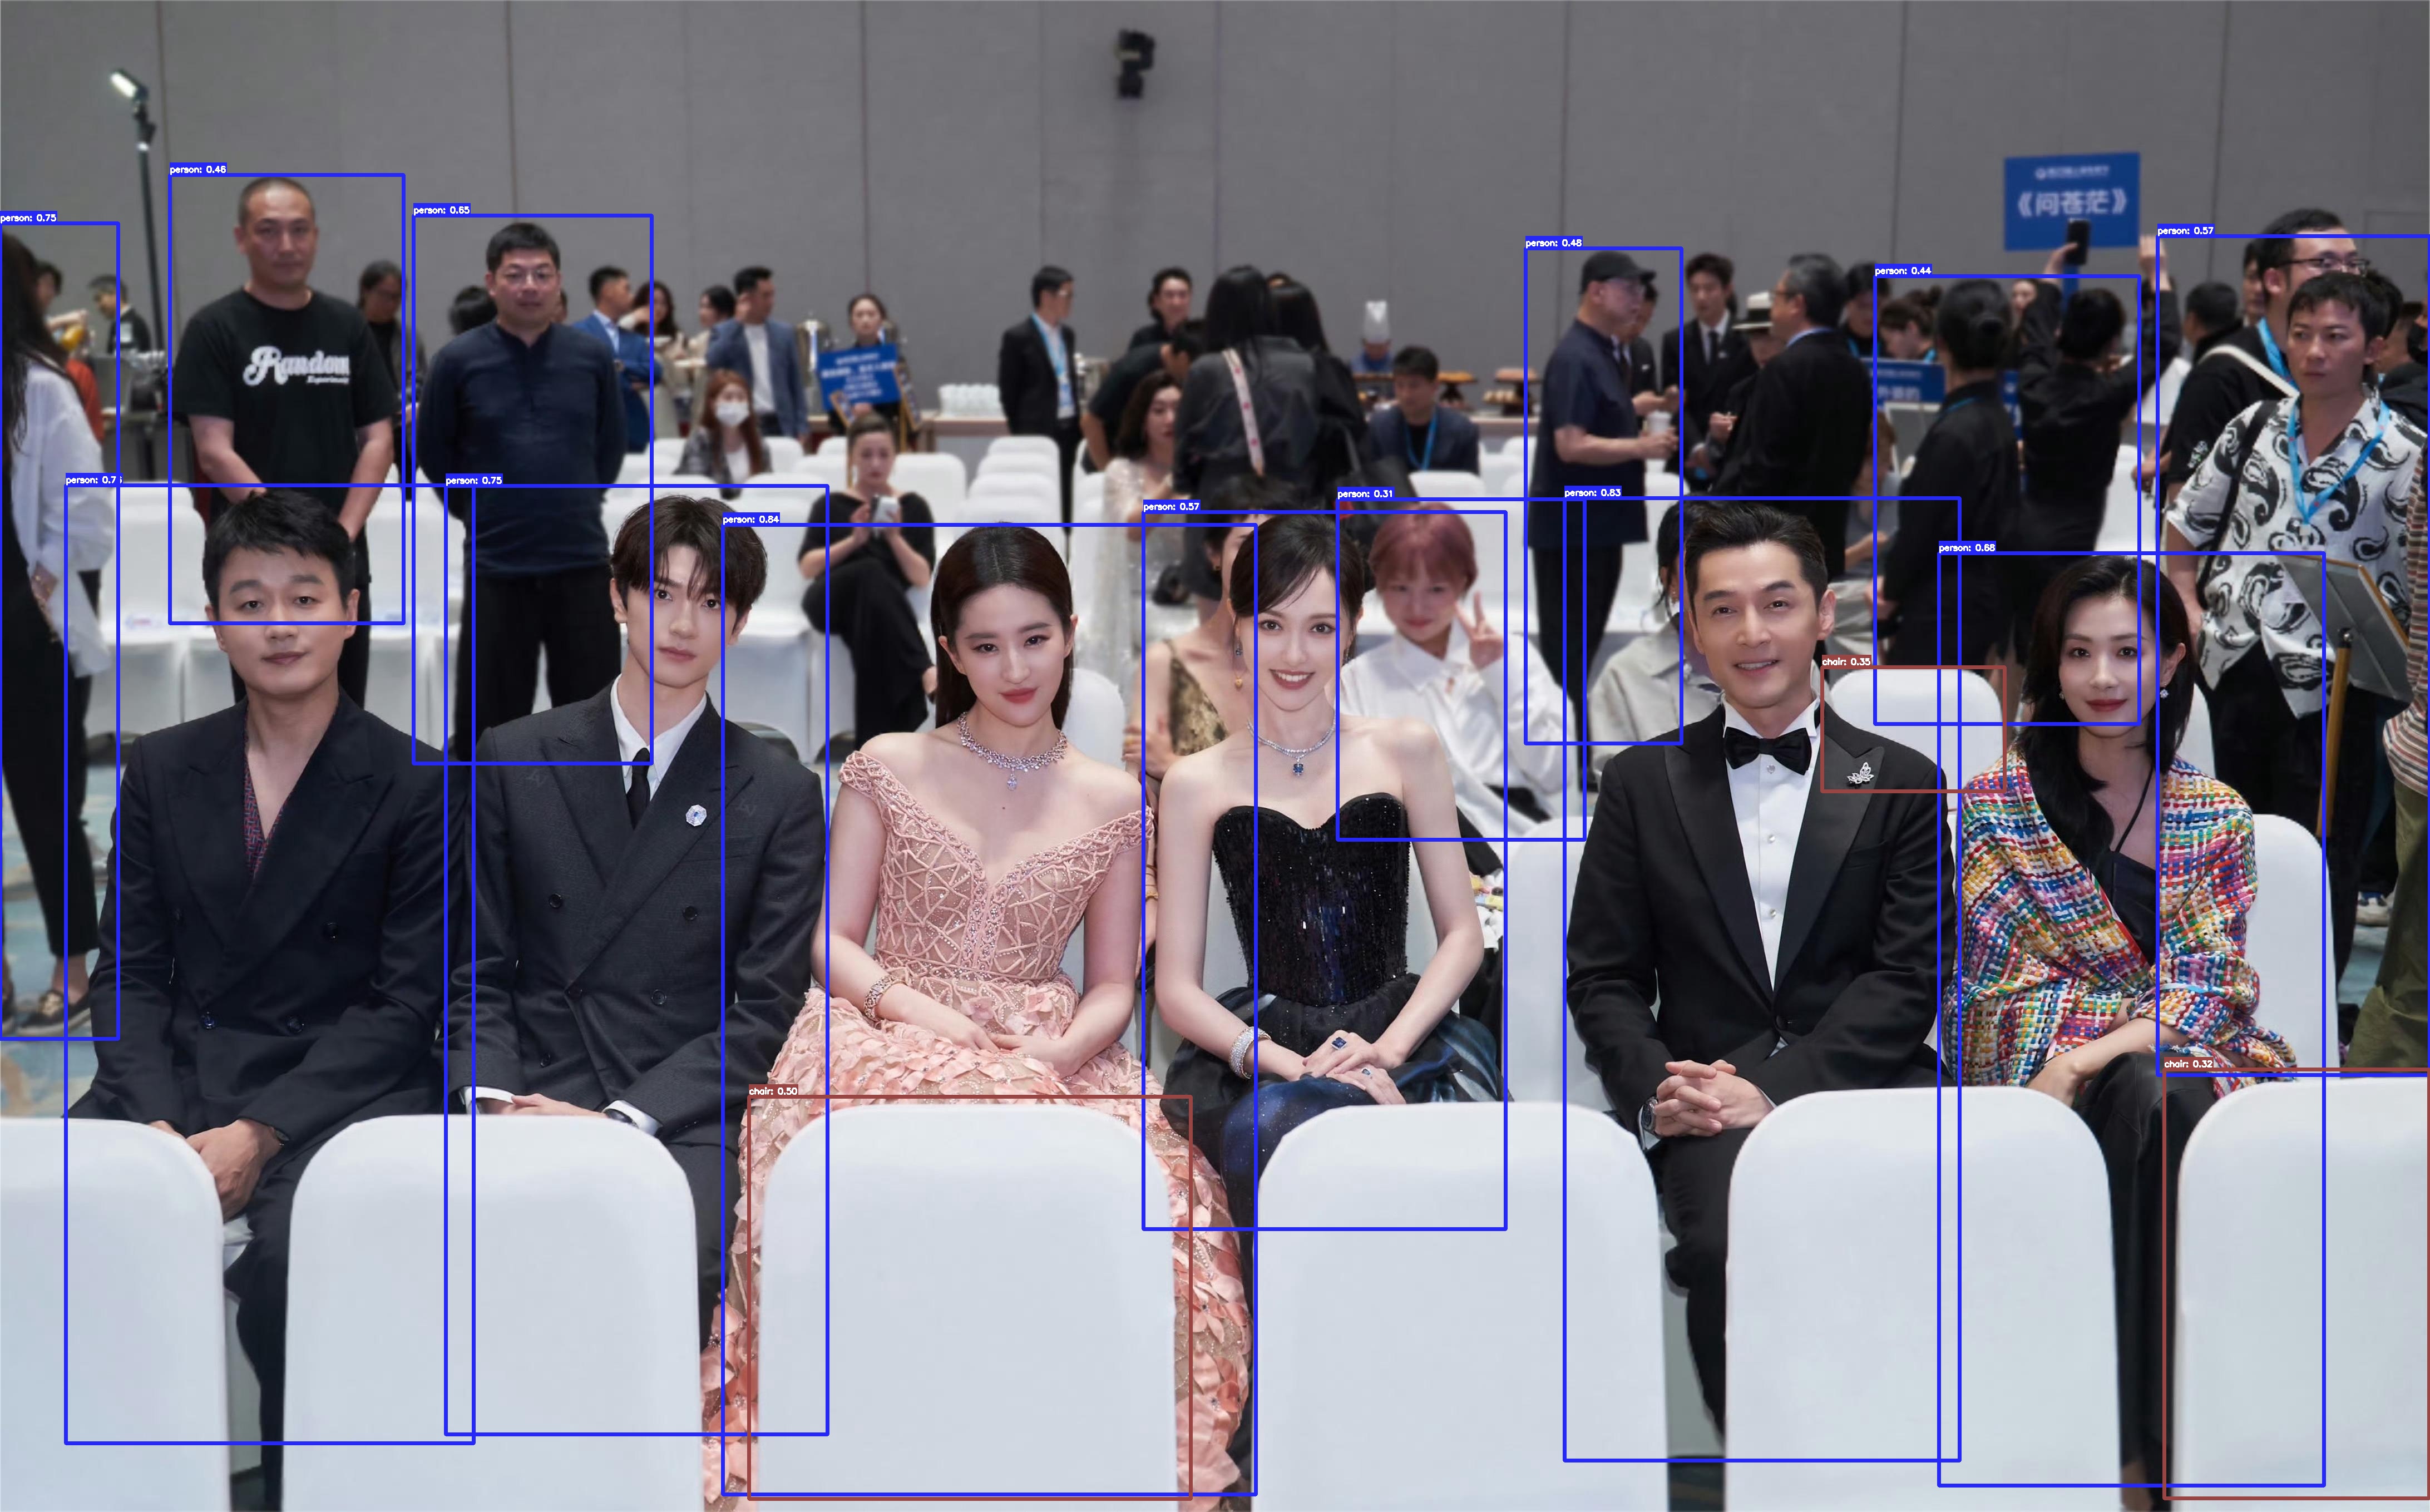
boxes, scores, class_ids = detect_single_image("test_image.jpg", conf_threshold=0.3)输出结果:
使用设备: cpu 下载模型: yolov8n.pt 开始目标检测... 检测到 16 个目标
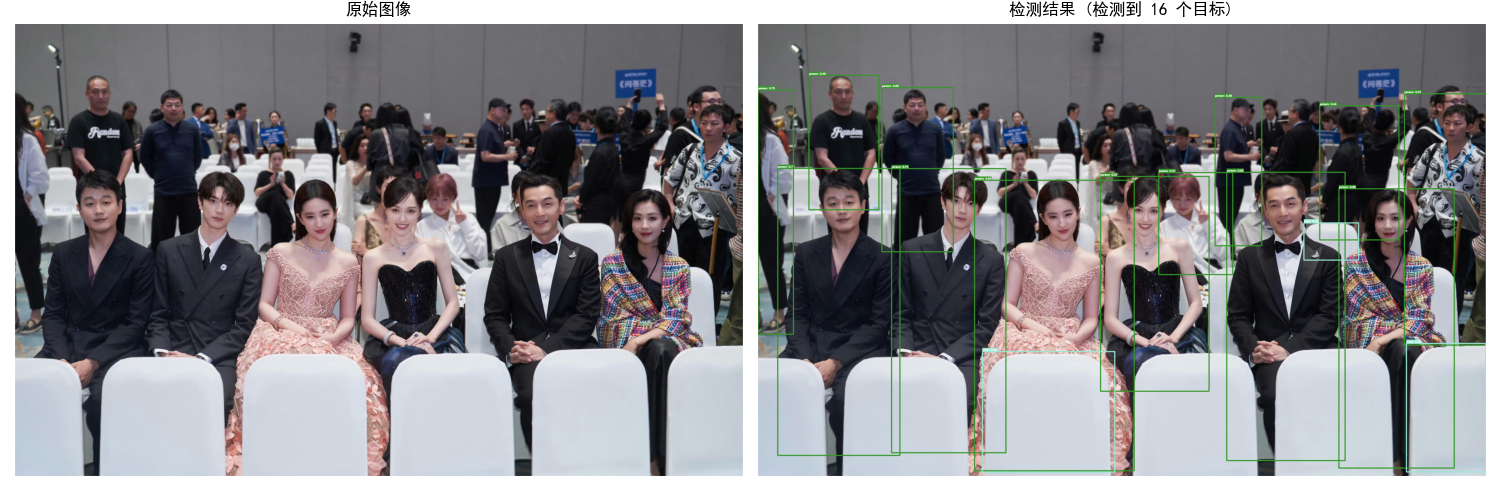
结果图:
3. 实时摄像头检测
def realtime_camera_detection(camera_id=0, conf_threshold=0.25, show_fps=True):
"""
实时摄像头目标检测
Args:
camera_id: 摄像头ID (0=默认摄像头)
conf_threshold: 置信度阈值
show_fps: 是否显示FPS
"""
# 打开摄像头
cap = cv2.VideoCapture(camera_id)
if not cap.isOpened():
print("无法打开摄像头")
return
print("开始实时检测,按 'q' 退出,按 's' 保存当前帧")
fps_counter = 0
fps_time = time.time()
while True:
ret, frame = cap.read()
if not ret:
print("无法读取视频帧")
break
# 转换颜色空间
frame_rgb = cv2.cvtColor(frame, cv2.COLOR_BGR2RGB)
# 进行检测
results = detector.model(
frame_rgb,
conf=conf_threshold,
device=detector.device,
verbose=False
)
# 解析结果
result = results[0]
boxes = result.boxes.xyxy.cpu().numpy() if result.boxes is not None else np.array([])
scores = result.boxes.conf.cpu().numpy() if result.boxes is not None else np.array([])
class_ids = result.boxes.cls.cpu().numpy().astype(int) if result.boxes is not None else np.array([])
# 绘制检测结果
frame_with_detections = detector.draw_detections(frame_rgb, boxes, scores, class_ids)
frame_bgr = cv2.cvtColor(frame_with_detections, cv2.COLOR_RGB2BGR)
# 计算并显示FPS
if show_fps:
fps_counter += 1
if time.time() - fps_time >= 1.0:
fps = fps_counter / (time.time() - fps_time)
fps_text = f"FPS: {fps:.1f}"
cv2.putText(frame_bgr, fps_text, (10, 30),
cv2.FONT_HERSHEY_SIMPLEX, 1, (0, 255, 0), 2)
fps_counter = 0
fps_time = time.time()
# 显示检测数量
count_text = f"Objects: {len(boxes)}"
cv2.putText(frame_bgr, count_text, (10, 70),
cv2.FONT_HERSHEY_SIMPLEX, 1, (0, 255, 0), 2)
# 显示结果
cv2.imshow('YOLOv8 Real-time Detection', frame_bgr)
# 按键处理
key = cv2.waitKey(1) & 0xFF
if key == ord('q'):
break
elif key == ord('s'):
# 保存当前帧
timestamp = int(time.time())
cv2.imwrite(f"capture_{timestamp}.jpg", frame_bgr)
print(f"截图已保存: capture_{timestamp}.jpg")
# 释放资源
cap.release()
cv2.destroyAllWindows()
# 使用示例
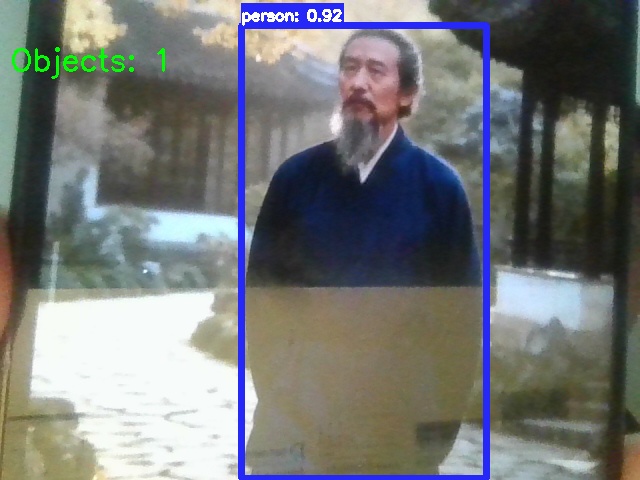
realtime_camera_detection(camera_id=0, conf_threshold=0.3)输出视频截图:
4. 优化总结
4.1 内存不足错误
# 解决方案:减小批处理大小和图像尺寸
def low_memory_detection(image_path):
    image = cv2.imread(image_path)
    # 缩小图像
    image = cv2.resize(image, (0,0), fx=0.5, fy=0.5)
    # 使用较低的置信度阈值
    results = detector.model(image, conf=0.15, device='cpu')
    return results
4.2 推理速度慢
# 解决方案:优化配置
def speed_optimization():
    # 设置线程数
    torch.set_num_threads(1)  # 单线程可能更快
    # 使用较小的模型
    detector = YOLOv8CPUDetector(model_size='n')
    # 缩小输入尺寸
    detector.model.imgsz = 320
4.3 检测精度低
# 解决方案:优化配置
def speed_optimization():
    # 设置线程数
    torch.set_num_threads(1)  # 单线程可能更快
    # 使用较小的模型
    detector = YOLOv8CPUDetector(model_size='n')
    # 缩小输入尺寸
    detector.model.imgsz = 320
六、总结
通过本文的详细指南,已经掌握了在本地CPU上部署和运行YOLO模型的完整流程。YOLOv8n作为推荐的平衡选择,在精度和速度之间提供了最佳权衡。
核心要点总结:
- YOLOv8n适合CPU部署,模型小巧但性能优秀
- 提供了从单张图像到实时视频的完整示例
- 包含性能优化技巧和实际应用场景
原创声明:本文系作者授权腾讯云开发者社区发表,未经许可,不得转载。
如有侵权,请联系 cloudcommunity@tencent.com 删除。
原创声明:本文系作者授权腾讯云开发者社区发表,未经许可,不得转载。
如有侵权,请联系 cloudcommunity@tencent.com 删除。
评论
登录后参与评论
推荐阅读
目录
腾讯云开发者

Copyright © 2013 - 2026 Tencent Cloud. All Rights Reserved. 腾讯云 版权所有
深圳市腾讯计算机系统有限公司 ICP备案/许可证号:粤B2-20090059 ![]() 粤公网安备44030502008569号
粤公网安备44030502008569号
腾讯云计算(北京)有限责任公司 京ICP证150476号 | 京ICP备11018762号