功能概述
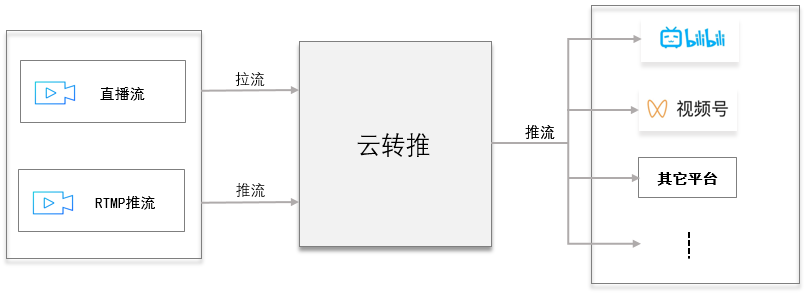
多平台直播是通过云转推将一路视频流转推到视频号、微视、快手等多个第三方厂商同步开播或者转推到同一个直播厂商的多路流同步直播。整个方案的简要技术架构为:


实现步骤概要
使用云转推实现多平台直播功能,只需要按如下几步操作即可完成:


步骤1:准备工作
创建智能创作平台
获取 API 密钥
请求云 API 需要使用到开发者的 API 密钥(即 SecretId 和 SecretKey)。如果还未创建过密钥,请参见 创建密钥文档 生成新的 API 密钥;如果已创建过密钥,请参见 查看密钥文档 获取 API 密钥。
准备直播源
请自行准备需要转推的直播源 URL,文中以测试直播流 URL:
https://play.example.com/cme/src_live.flv为例。注意
实际使用中,请替换直播源 URL 为您需要转推的直播源 URL,并保证已经推流。
如果要实现直接推流模式,可以在创建转推项目完成后拿到推流地址,直接推流即可。
直播源音/视频 DTS 时间戳需要顺序递增,不要出现回退或跳跃。
准备直播推流及播放域名
推流域名1:
rtmp://push.example.myqcloud.com/cme/live1播放域名1:
https://play.example.myqcloud.com/cme/live1.flv推流域名2:
rtmp://push.example.myqcloud.com/cme/live2播放域名2:
https://play.example.myqcloud.com/cme/live2.flv注意
这里推流域名和播放域名仅为示例,不可推流及播放。线上使用时,请换成您系统使用的直播推流域名和播放域名。
步骤2:创建云转推项目
创建项目的云 API 接口为 创建项目 。为了简化操作,建议您使用 API Export 创建项目。本文中使用的直播源以测试直播源 URL:
https://play.example.com/cme/src_live.flv 为例。这里通过一个接口调用示例说明关键参数设置:https://cme.tencentcloudapi.com/?Action=CreateProject&Platform=test&Category=STREAM_CONNECT&Name=stream_connect&Owner.Id=user_id_109993839&Owner.Type=PERSON&StreamConnectProjectInput.MainInput.InputType=LivePull&StreamConnectProjectInput.MainInput.LivePullInputInfo.InputUrl=https://play.example.com/cme/src_live.flv&StreamConnectProjectInput.Outputs.0.Id=1&StreamConnectProjectInput.Outputs.0.Name=推流1&StreamConnectProjectInput.Outputs.0.Type=URL&StreamConnectProjectInput.Outputs.0.PushUrl=rtmp://push.example.com/cme/live1&StreamConnectProjectInput.Outputs.1.Id=2&StreamConnectProjectInput.Outputs.1.Name=推流2&StreamConnectProjectInput.Outputs.1.Type=URL&StreamConnectProjectInput.Outputs.1.PushUrl=rtmp://push.example.com/cme/live2&<公共请求参数>
下面基于智能创作的 Java SDK 提供一个简单的示例:
import com.tencentcloudapi.common.Credential;import com.tencentcloudapi.common.profile.ClientProfile;import com.tencentcloudapi.common.profile.HttpProfile;import com.tencentcloudapi.common.exception.TencentCloudSDKException;import com.tencentcloudapi.cme.v20191029.CmeClient;import com.tencentcloudapi.cme.v20191029.models.*;public class CreateProject{public static void main(String [] args) {try{// 需要传入准备工作中获取的 SecretId,SecretKey,此处还需注意密钥对的保密Credential cred = new Credential("SecretId", "SecretKey");HttpProfile httpProfile = new HttpProfile();httpProfile.setEndpoint("cme.tencentcloudapi.com");ClientProfile clientProfile = new ClientProfile();clientProfile.setHttpProfile(httpProfile);CmeClient client = new CmeClient(cred, "", clientProfile);// 以下为关键参数部分CreateProjectRequest req = new CreateProjectRequest();// 平台,填写准备工作中创建的平台req.setPlatform("test");req.setName("直播多平台分发");// 项目归属,目前仅支持归属个人的项目,请参考注意事项部分Entity entity1 = new Entity();entity1.setType("PERSON");entity1.setId("user_id_109993839");req.setOwner(entity1);// 项目类型,固定为 STREAM_CONNECTreq.setCategory("STREAM_CONNECT");req.setDescription("多平台分发测试");StreamConnectProjectInput streamConnectProjectInput1 = new StreamConnectProjectInput();StreamInputInfo streamInputInfo1 = new StreamInputInfo();// 视频源类型,固定为 LivePullstreamInputInfo1.setInputType("LivePull");LivePullInputInfo livePullInputInfo1 = new LivePullInputInfo();// 直播视频源 URLlivePullInputInfo1.setInputUrl("https://play.example.com/cme/src_live.flv");streamInputInfo1.setLivePullInputInfo(livePullInputInfo1);streamConnectProjectInput1.setMainInput(streamInputInfo1);// 设置输出StreamConnectOutput[] streamConnectOutputs1 = new StreamConnectOutput[2];StreamConnectOutput streamConnectOutput1 = new StreamConnectOutput();streamConnectOutput1.setId("1");streamConnectOutput1.setName("推流1");streamConnectOutput1.setType("URL");streamConnectOutput1.setPushUrl("rtmp://push.example.com/cme/live1");streamConnectOutputs1[0] = streamConnectOutput1;StreamConnectOutput streamConnectOutput2 = new StreamConnectOutput();streamConnectOutput2.setId("2");streamConnectOutput2.setName("推流2");streamConnectOutput2.setType("URL");streamConnectOutput2.setPushUrl("rtmp://push.example.com/cme/live2");streamConnectOutputs1[1] = streamConnectOutput2;streamConnectProjectInput1.setOutputs(streamConnectOutputs1);req.setStreamConnectProjectInput(streamConnectProjectInput1);// 返回的 resp 是一个 CreateProjectResponse 的实例,与请求对象对应CreateProjectResponse resp = client.CreateProject(req);// 输出 json 格式的字符串回包,可拿到创建项目返回的项目 IdSystem.out.println(CreateProjectResponse.toJsonString(resp));} catch (TencentCloudSDKException e) {System.out.println(e.toString());}}}
注意
本示例没有添加备输入源,添加方式与主输入源一致。添加备输入源为防止主输入源出现异常时切换到备输入源进行转推。
创建项目成功后,可拿到云转推的项目 Id,后续步骤以
cmepid_7107a50cd488c00003c1be9p为例。步骤3:发起转推
https://cme.tencentcloudapi.com/?Action=HandleStreamConnectProject&Platform=test&ProjectId=cmepid_7107a50cd488c00003c1be9p&Operation=Start&<公共请求参数>
下面基于智能创作的 Java SDK 提供一个简单的示例:
import com.tencentcloudapi.common.Credential;import com.tencentcloudapi.common.profile.ClientProfile;import com.tencentcloudapi.common.profile.HttpProfile;import com.tencentcloudapi.common.exception.TencentCloudSDKException;import com.tencentcloudapi.cme.v20191029.CmeClient;import com.tencentcloudapi.cme.v20191029.models.*;public class HandleStreamConnectProject{public static void main(String [] args) {try{// 需要传入准备工作中获取的 SecretId,SecretKey,此处还需注意密钥对的保密Credential cred = new Credential("SecretId", "SecretKey");HttpProfile httpProfile = new HttpProfile();httpProfile.setEndpoint("cme.tencentcloudapi.com");ClientProfile clientProfile = new ClientProfile();clientProfile.setHttpProfile(httpProfile);CmeClient client = new CmeClient(cred, "", clientProfile);// 以下为关键参数HandleStreamConnectProjectRequest req = new HandleStreamConnectProjectRequest();// 平台,填写准备工作中创建的平台req.setPlatform("test");// 项目 Id,填步骤2 创建项目时返回的项目 Idreq.setProjectId("cmepid_7107a50cd488c00003c1be9p");// 操作参数,固定为 "Start"req.setOperation("Start");// 返回的 resp 是一个 HandleStreamConnectProjectResponse 的实例,与请求对象对应HandleStreamConnectProjectResponse resp = client.HandleStreamConnectProject(req);// 输出 json 格式的字符串回包System.out.println(HandleStreamConnectProjectResponse.toJsonString(resp));} catch (TencentCloudSDKException e) {System.out.println(e.toString());}}}
步骤4:观看直播
发起转推完成后,可以使用 VLC 等播放器观看直播(测试时播放域名为:
https://play.example.com/cme/live1.flv或者 https://play.example.com/cme/live2.flv),将可看到直播画面。步骤5:停止转推
https://cme.tencentcloudapi.com/?Action=HandleStreamConnectProject&Platform=test&ProjectId=cmepid_7107a50cd488c00003c1be9p&Operation=Stop&<公共请求参数>
下面基于智能创作的 Java SDK 提供一个简单的示例:
import com.tencentcloudapi.common.Credential;import com.tencentcloudapi.common.profile.ClientProfile;import com.tencentcloudapi.common.profile.HttpProfile;import com.tencentcloudapi.common.exception.TencentCloudSDKException;import com.tencentcloudapi.cme.v20191029.CmeClient;import com.tencentcloudapi.cme.v20191029.models.*;public class HandleStreamConnectProject{public static void main(String [] args) {try{// 需要传入准备工作中获取的 SecretId,SecretKey,此处还需注意密钥对的保密Credential cred = new Credential("SecretId", "SecretKey");HttpProfile httpProfile = new HttpProfile();httpProfile.setEndpoint("cme.tencentcloudapi.com");ClientProfile clientProfile = new ClientProfile();clientProfile.setHttpProfile(httpProfile);CmeClient client = new CmeClient(cred, "", clientProfile);// 以下为关键参数HandleStreamConnectProjectRequest req = new HandleStreamConnectProjectRequest();// 平台,填写准备工作中创建的平台req.setPlatform("test");// 项目 Id,填步骤2 创建项目时返回的项目 Idreq.setProjectId("cmepid_7107a50cd488c00003c1be9p");// 操作参数,固定为 "Stop"req.setOperation("Stop");// 返回的 resp 是一个 HandleStreamConnectProjectResponse 的实例,与请求对象对应HandleStreamConnectProjectResponse resp = client.HandleStreamConnectProject(req);// 输出 json 格式的字符串回包System.out.println(HandleStreamConnectProjectResponse.toJsonString(resp));} catch (TencentCloudSDKException e) {System.out.println(e.toString());}}}