我们将在此步骤中,将原始数据同步到数仓中。
新增数据源
原始数据源:MySQL
我们已将数据源绑定到了项目中,此处可忽略。
目标数据源:Hive
在您绑定存算引擎 EMR 后,系统将在10分钟内采集 EMR 集群中的 Hive 数据源。因此不需要您主动绑定 Hive 数据源。
但是我们需要在 Hive 数据源中创建数据库,存储采集后的原始数据。
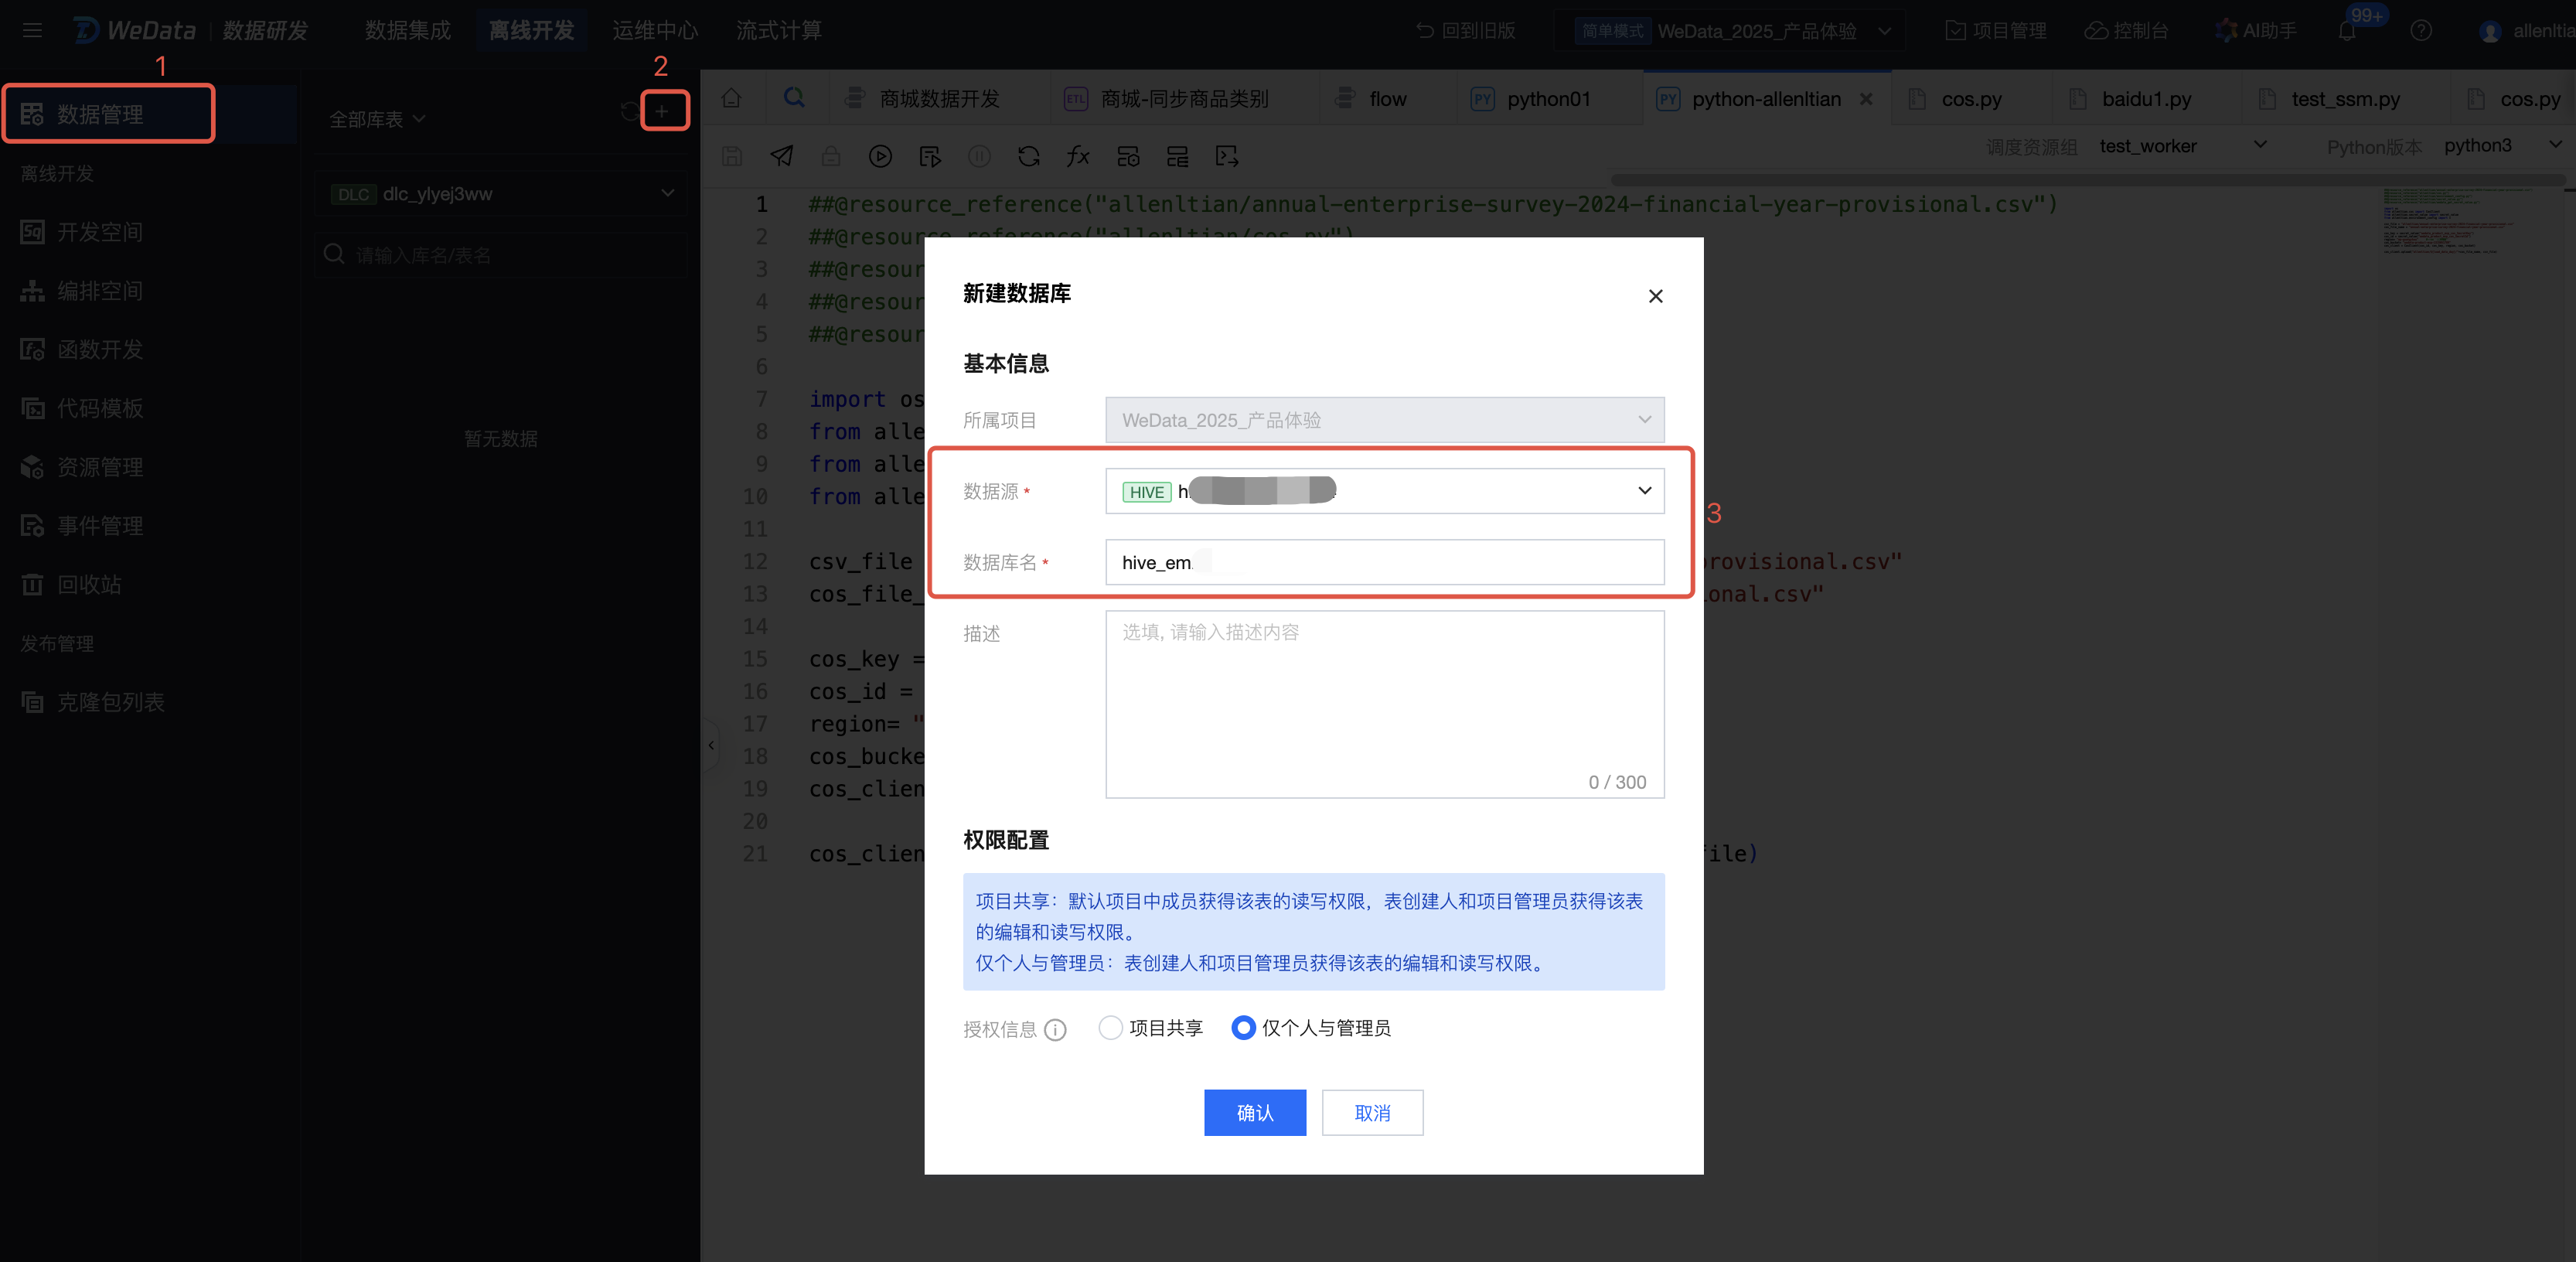
新建数据库
进入离线开发 > 数据管理,单击 + 号新建数据库,选择并填写所需内容,填写完成后,单击确认。
数据源:选择hive_emr-XXX。
数据库名:填写数据库名称。
说明:
在您绑定存算引擎 EMR 后,系统将在10分钟内采集 EMR 集群中的 Hive 数据源。
离线同步任务设计
现在我们将创建离线同步任务,将 MySQL 数据源中的原始数据,同步至 EMR 集群中的 Hive 表中。
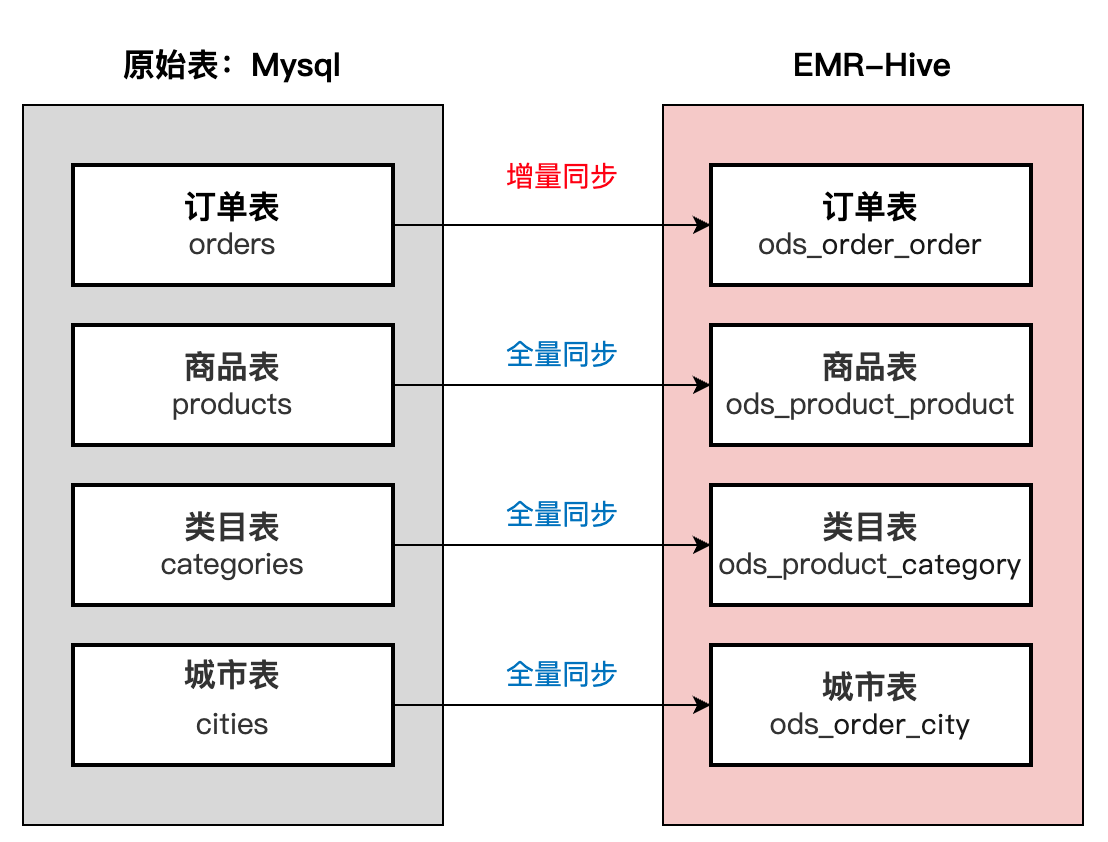
从上面的操作已经知道,我们需要同步4张原始数据表,分别为:
序号 | 表名 | 原始数据源:MySQL | 目标数据源:Hive 表名 |
1 | 订单表 | orders | ods_order_order |
2 | 商品表 | products | ods_product_product |
3 | 类目表 | categories | ods_product_category |
4 | 城市表 | cities | ods_order_city |
任务开发方案设计如下:
补充说明
全量同步与增量同步的区别:
名称 | 说明 |
全量同步 | 定义:全量同步是指在每次同步操作时,系统会传输两个数据库或数据仓库中的所有数据。 |
| 适用场景:全量同步通常适用于数据量不大或者数据变化不频繁的情况,以及在初始同步或数据迁移时。 |
| 优点: 简单易实现:不需要跟踪数据变化,直接复制所有数据。 完整性:确保数据的完整性和一致性,因为所有数据都被重新同步。 |
| 缺点: 时间和资源消耗大:需要传输大量数据,耗时且占用带宽。 成本高:对于大数据量,可能需要更多的存储和计算资源。 |
增量同步 | 定义:增量同步只同步自上次同步以来发生变化的数据,而不是全部数据。 |
| 适用场景:适用于数据量较大或数据频繁更新的环境。 |
| 优点: 效率高:只同步变化的数据,节省时间和带宽。 成本低:减少了存储和计算资源的需求。 实时性:可以更快地反映数据的最新状态。 |
| 缺点: 复杂性高:需要有机制来跟踪和记录数据的变化。 可能存在一致性问题:如果同步过程中出现问题,可能会导致数据不一致。 |
总结:
选择哪种同步方式取决于具体的应用场景和需求。如果数据量不大,变化不频繁,全量同步可能更简单高效。反之,如果数据量大且更新频繁,增量同步可以显著提高效率和降低成本。在实际应用中,有时也会结合使用这两种策略,例如,定期进行全量同步以确保数据的完整性,同时在日常操作中使用增量同步以提高效率。 | |
离线同步任务开发
创建工作流
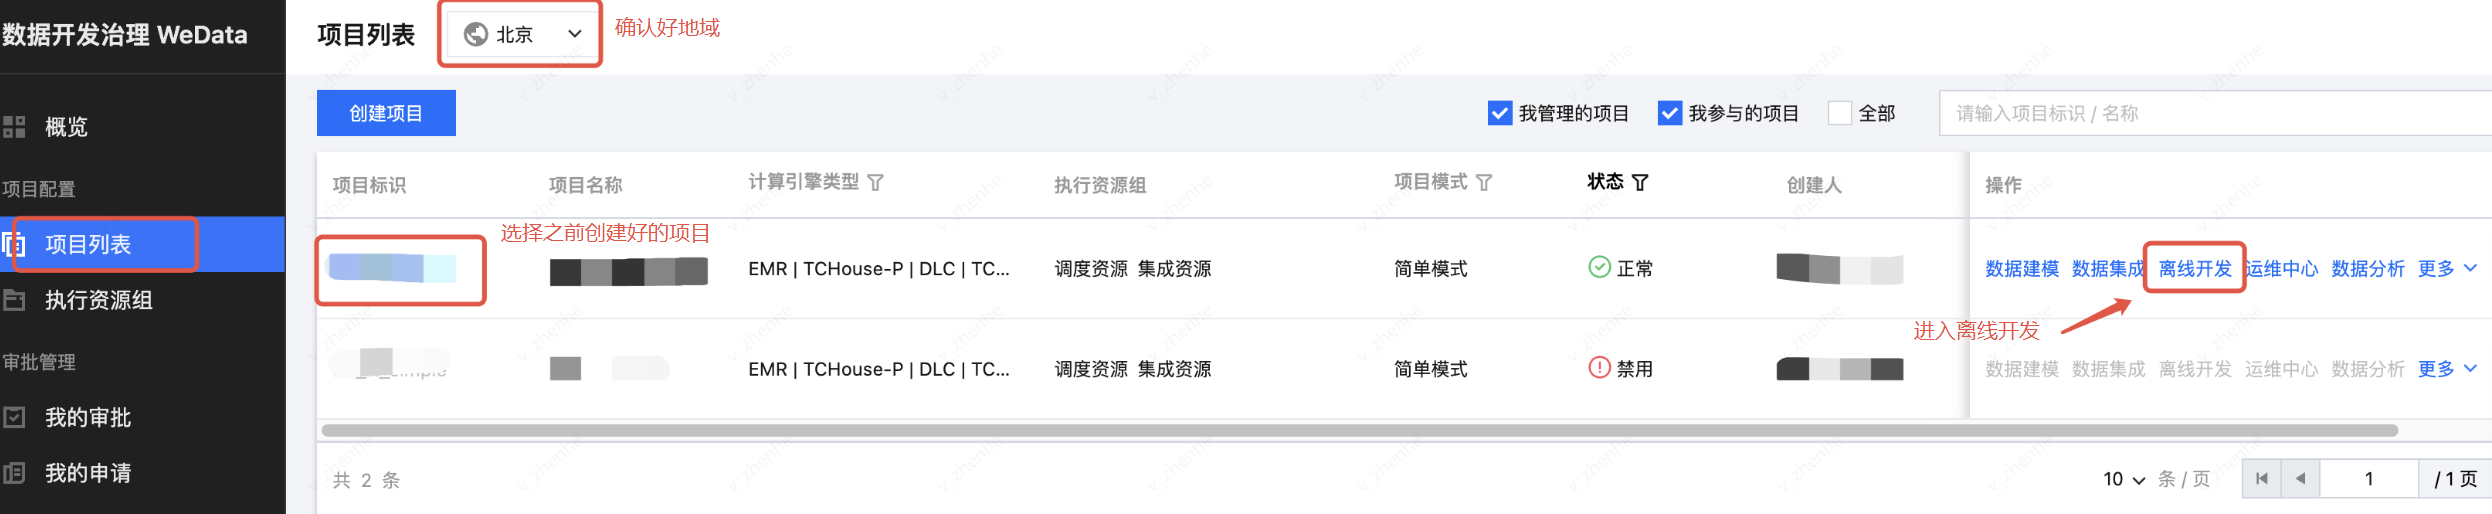
1. 从 项目列表 进入离线开发页面。
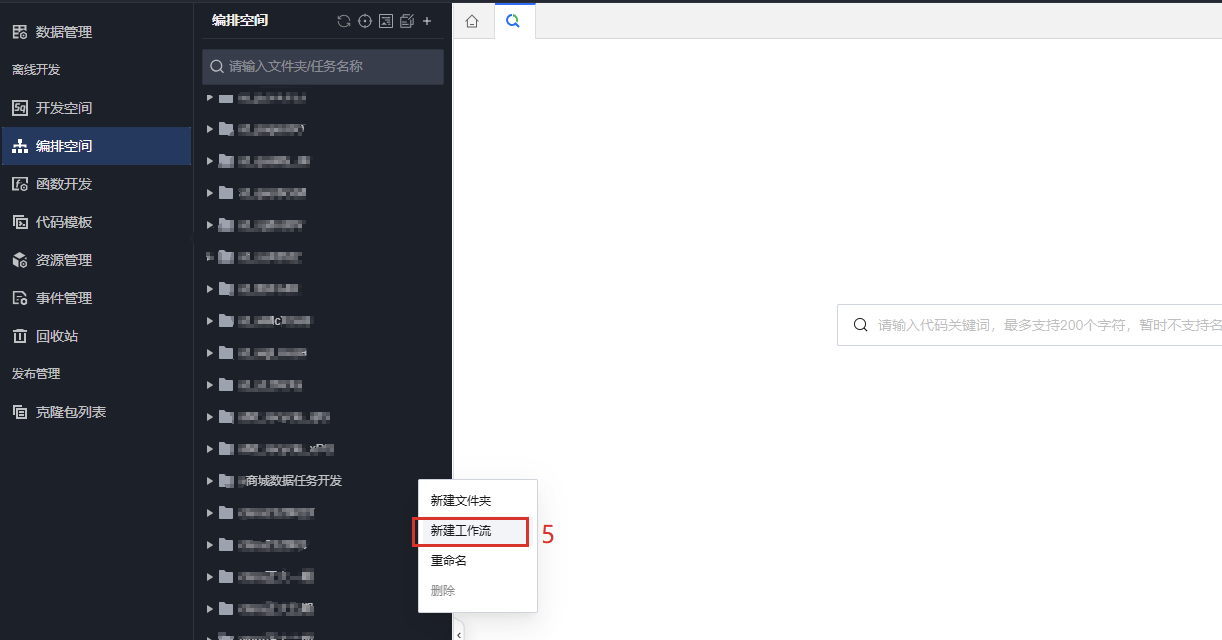
2. 进入离线开发 > 编排空间,单击 + 号新建一个文件夹(命名为:商城数据任务开发),存放后续的开发任务。
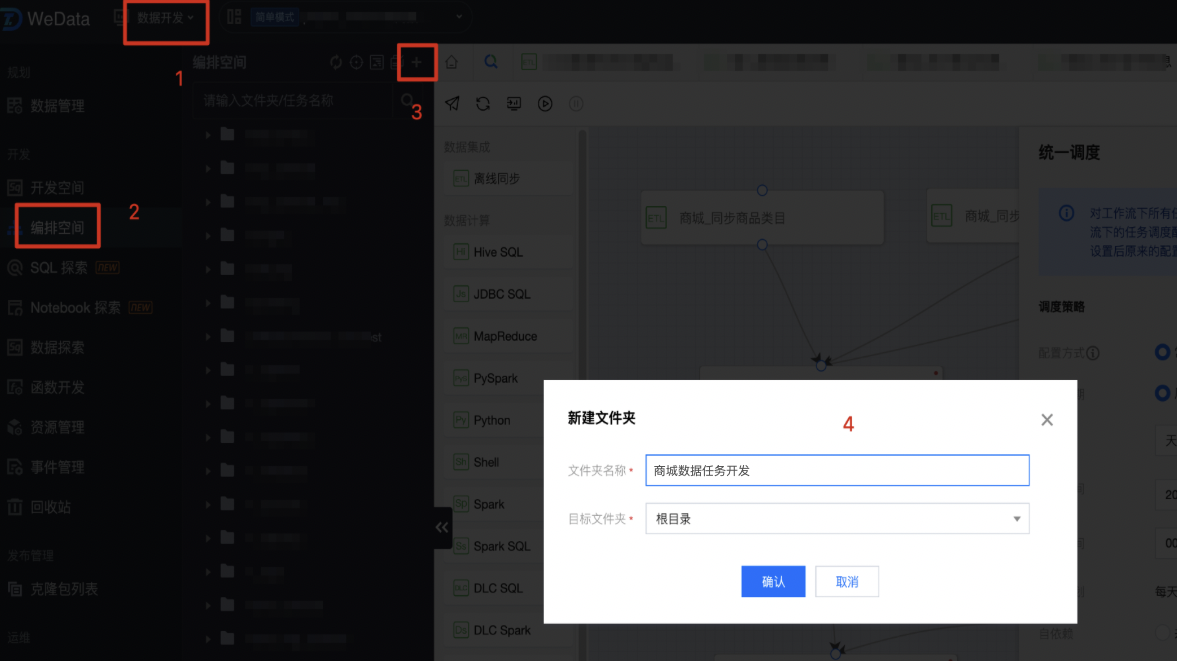
3. 找到新建的文件夹 > 鼠标右键新建工作流。
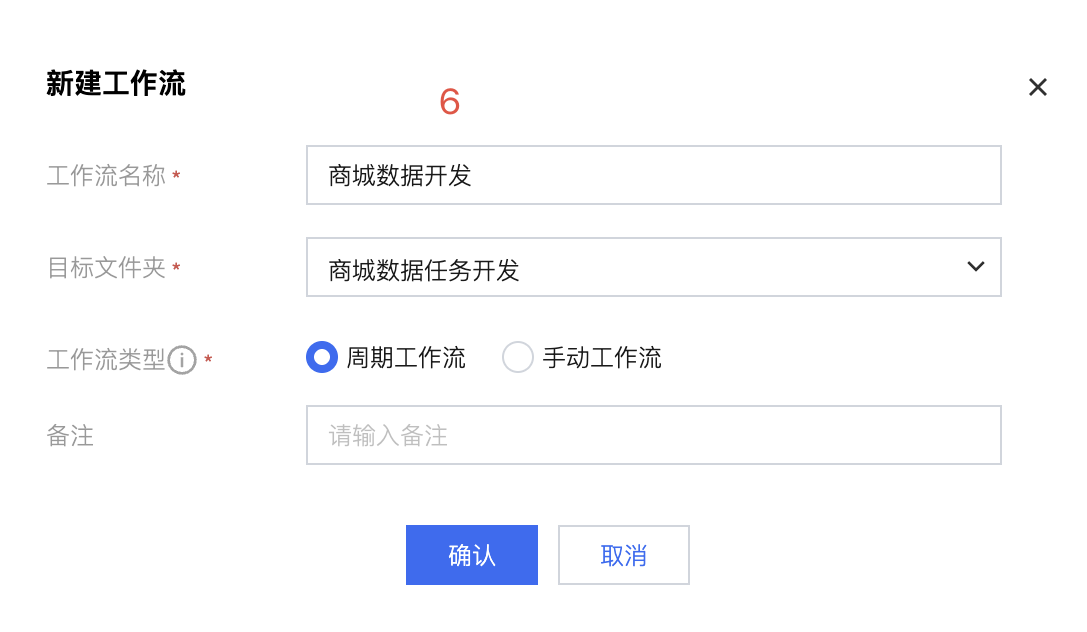
4. 新建工作流命名为:商城数据开发,选择对应的目标文件夹,这里工作流类型选择“周期工作流”作为示例,单击确认。
同步类目表
下面我们先将类目表从 MySQL 同步到 Hive 表中。
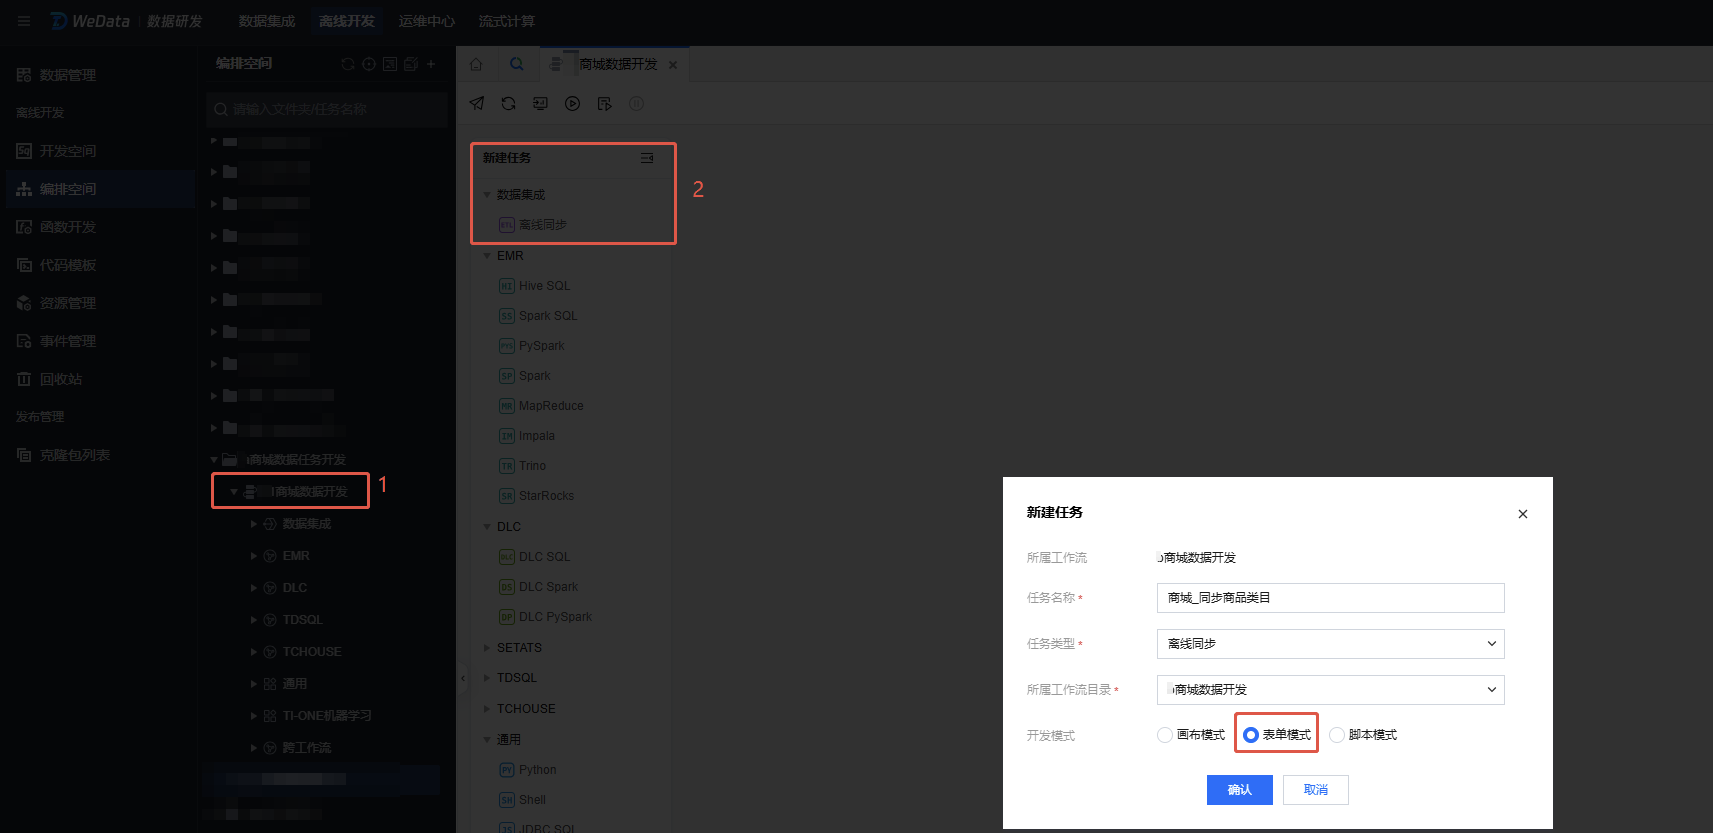
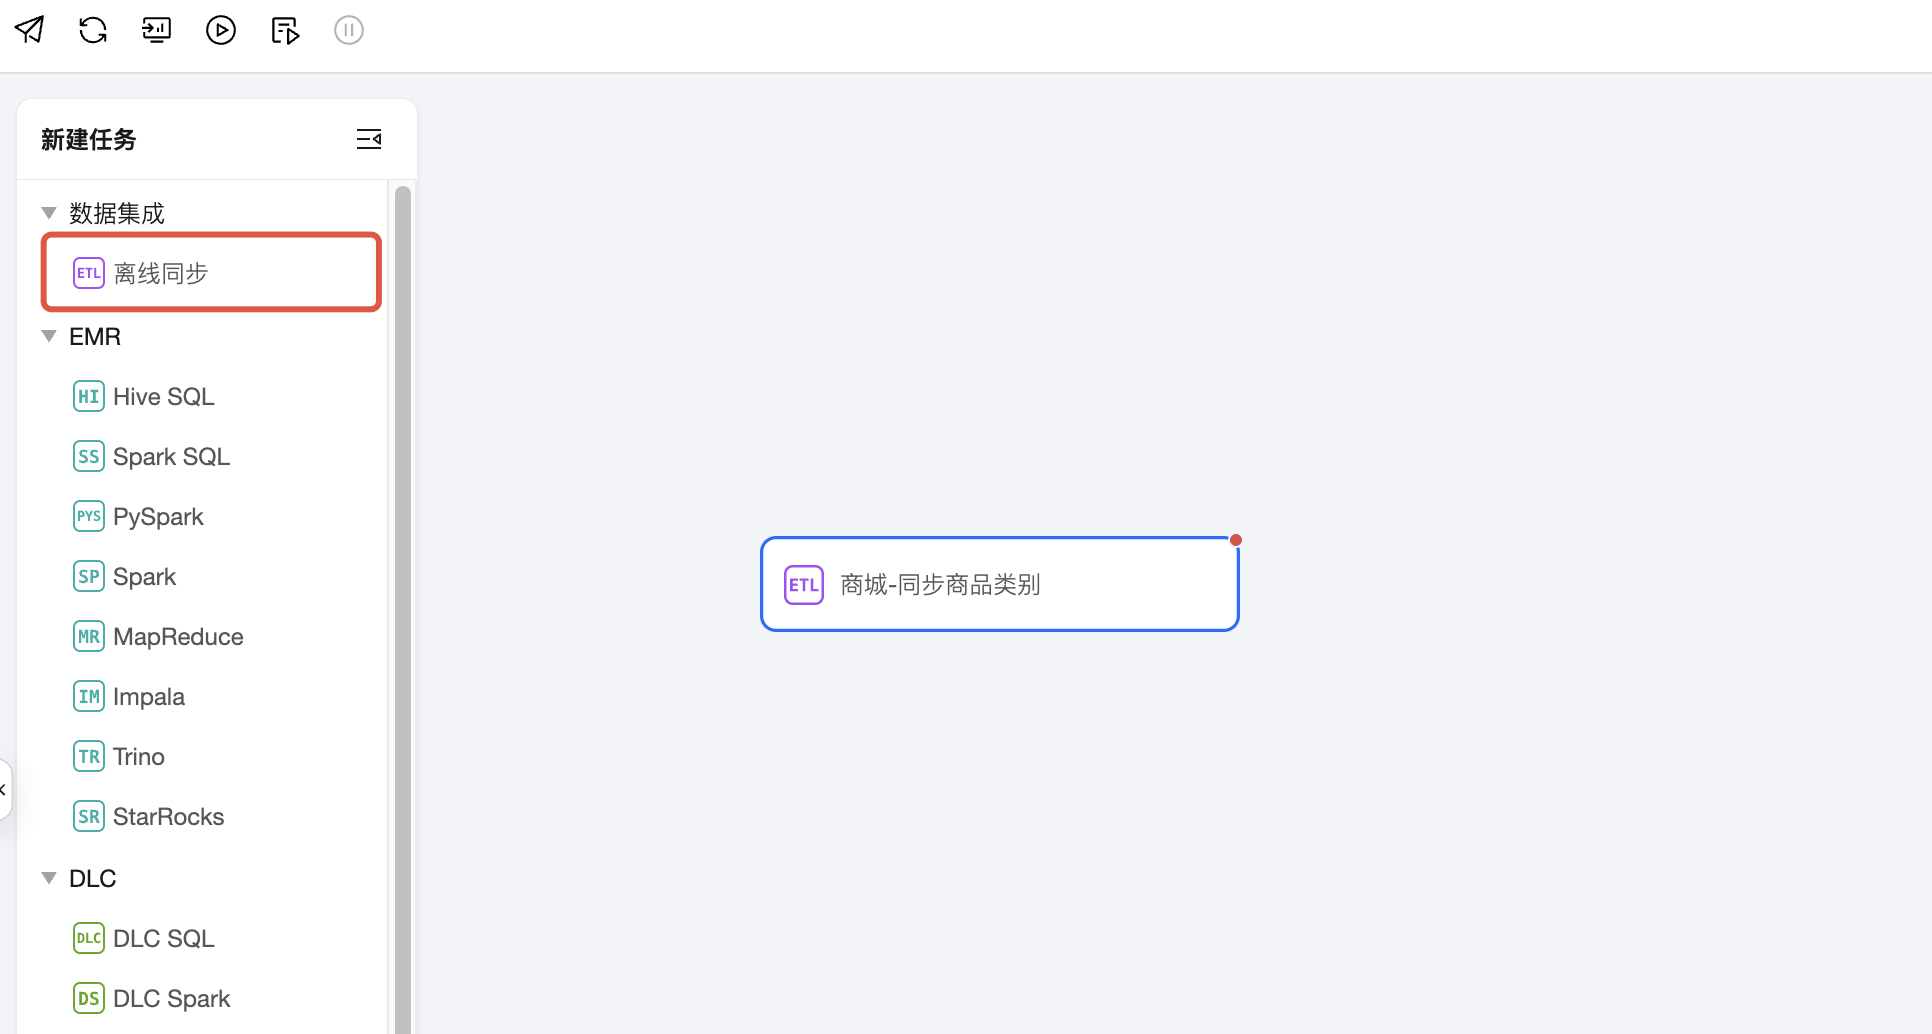
1. 在编排空间找到刚创建的商城数据任务开发 > 商城数据开发 > 单击离线同步。选择配置模式(任务名称:商城_同步商品类目,开发模式:此处选择表单模式),单击确认。
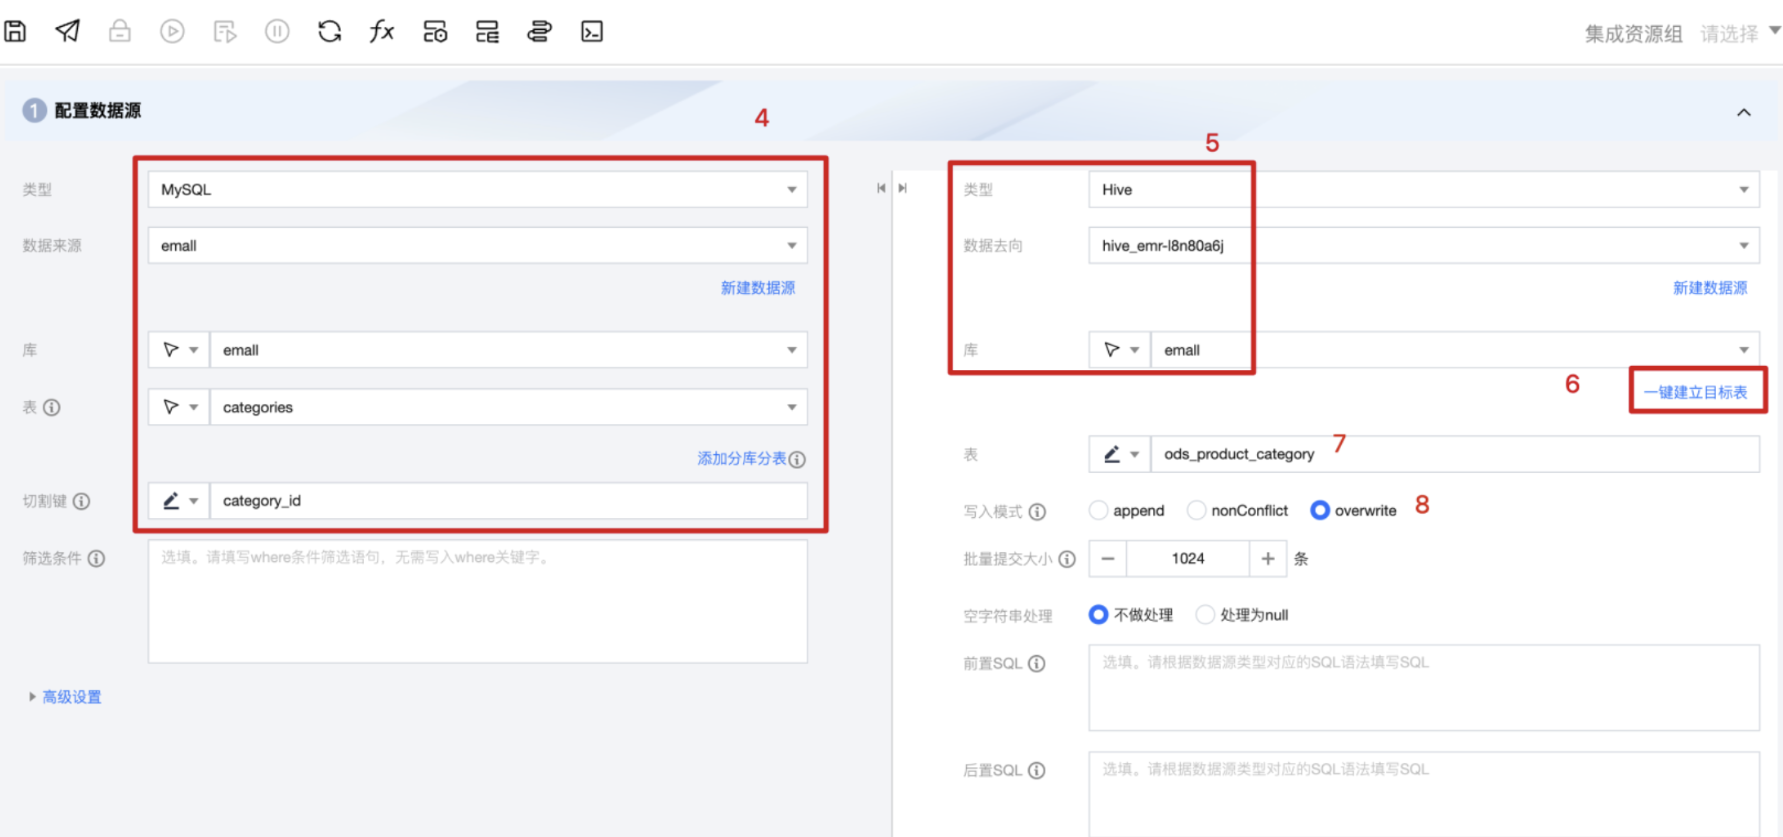
2. 配置原始数据源。
2.1 此处选择原始数据表存放的库表,请选择上个步骤中添加的 MySQL 数据源。下文中,我们在介绍订单表同步时,将介绍通过设置筛选条件,实现增量数据同步。
注意:
由于类目表为基础信息,且一般数据量不大,此处我们不需要设置筛选条件(即 Where 语句)。
2.2 配置目标数据源,此处选择需要存放数据的 Hive 表,请选择上个步骤中添加的 Hive 数据源与数据库。
类型:Hive
数据去向:搜索 hive_emr
库:emall(上个步骤中创建的库,例如命名emall或email,后续产品界面可以选择到对应的库)
2.3 建立目标表,此处使用一键建立目标表,复制 MySQL 表结构。
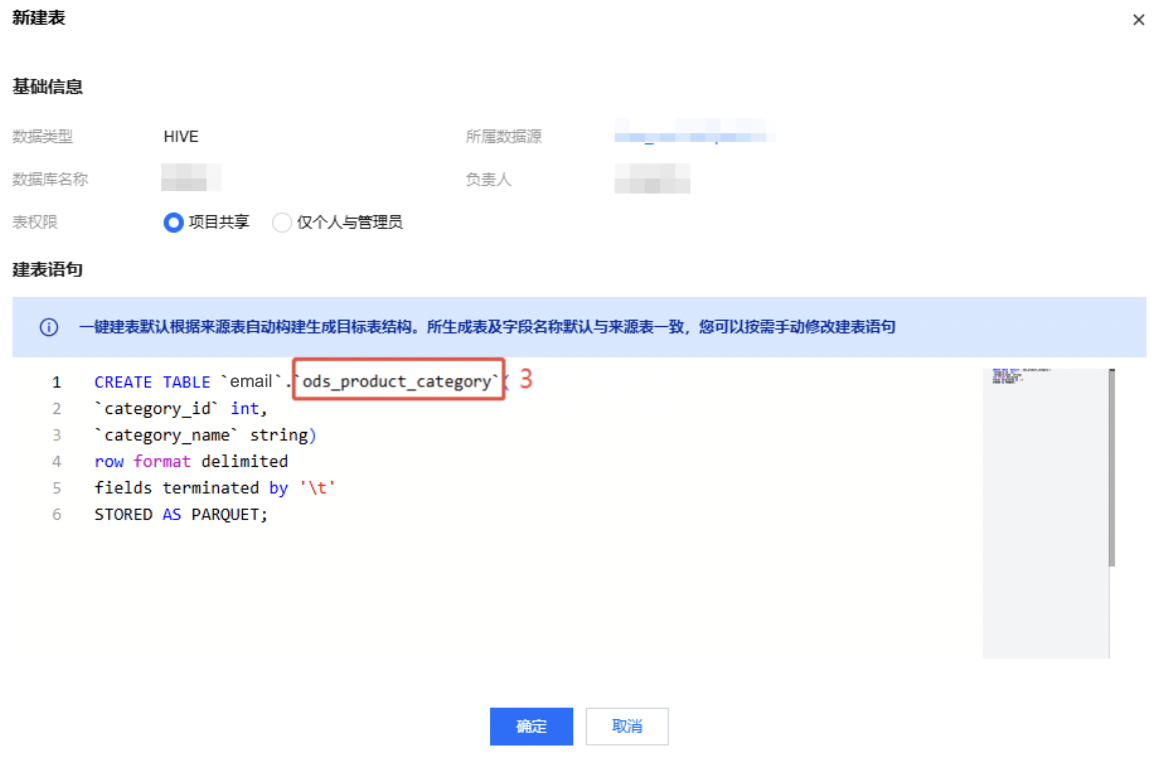
注意:
请在弹框中修改建表语句,修改表名:ods_product_category。
2.4 选择表:ods_product_category
2.5 由于类目表为基础信息,此处我们选择 overwrite,即每次覆盖更新。
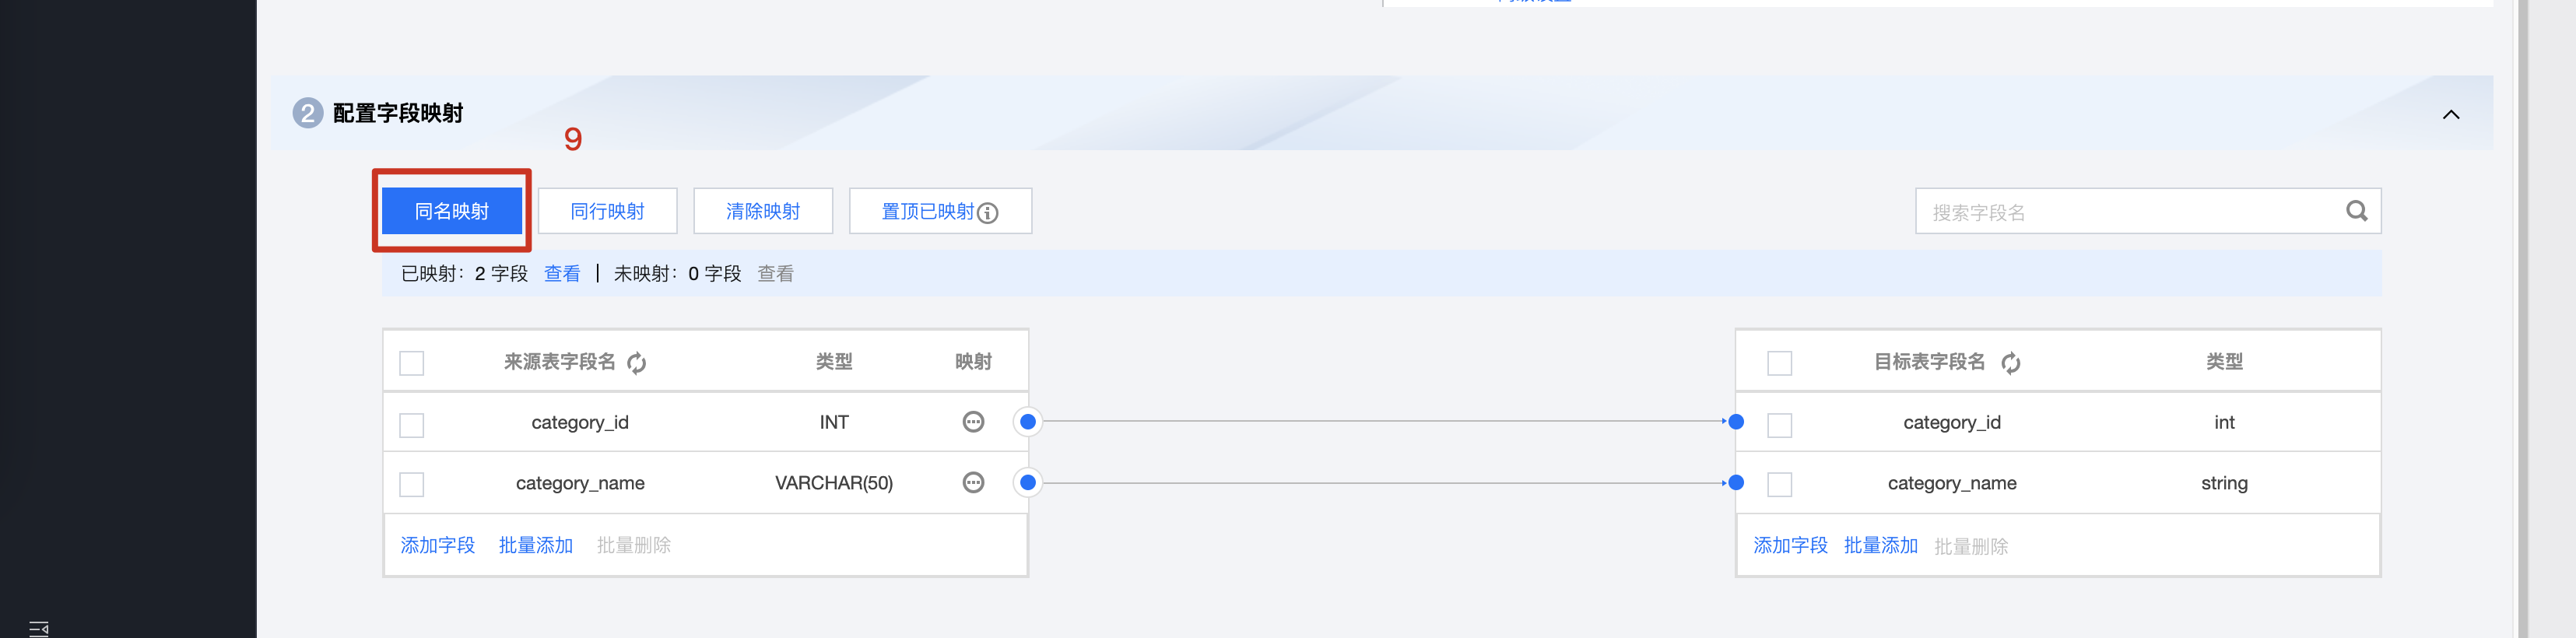
3. 配置字段映射,此处我们需要将源表与目标表的字段一一对应,由于我们的表结构是相同的,因此可以同名映射。
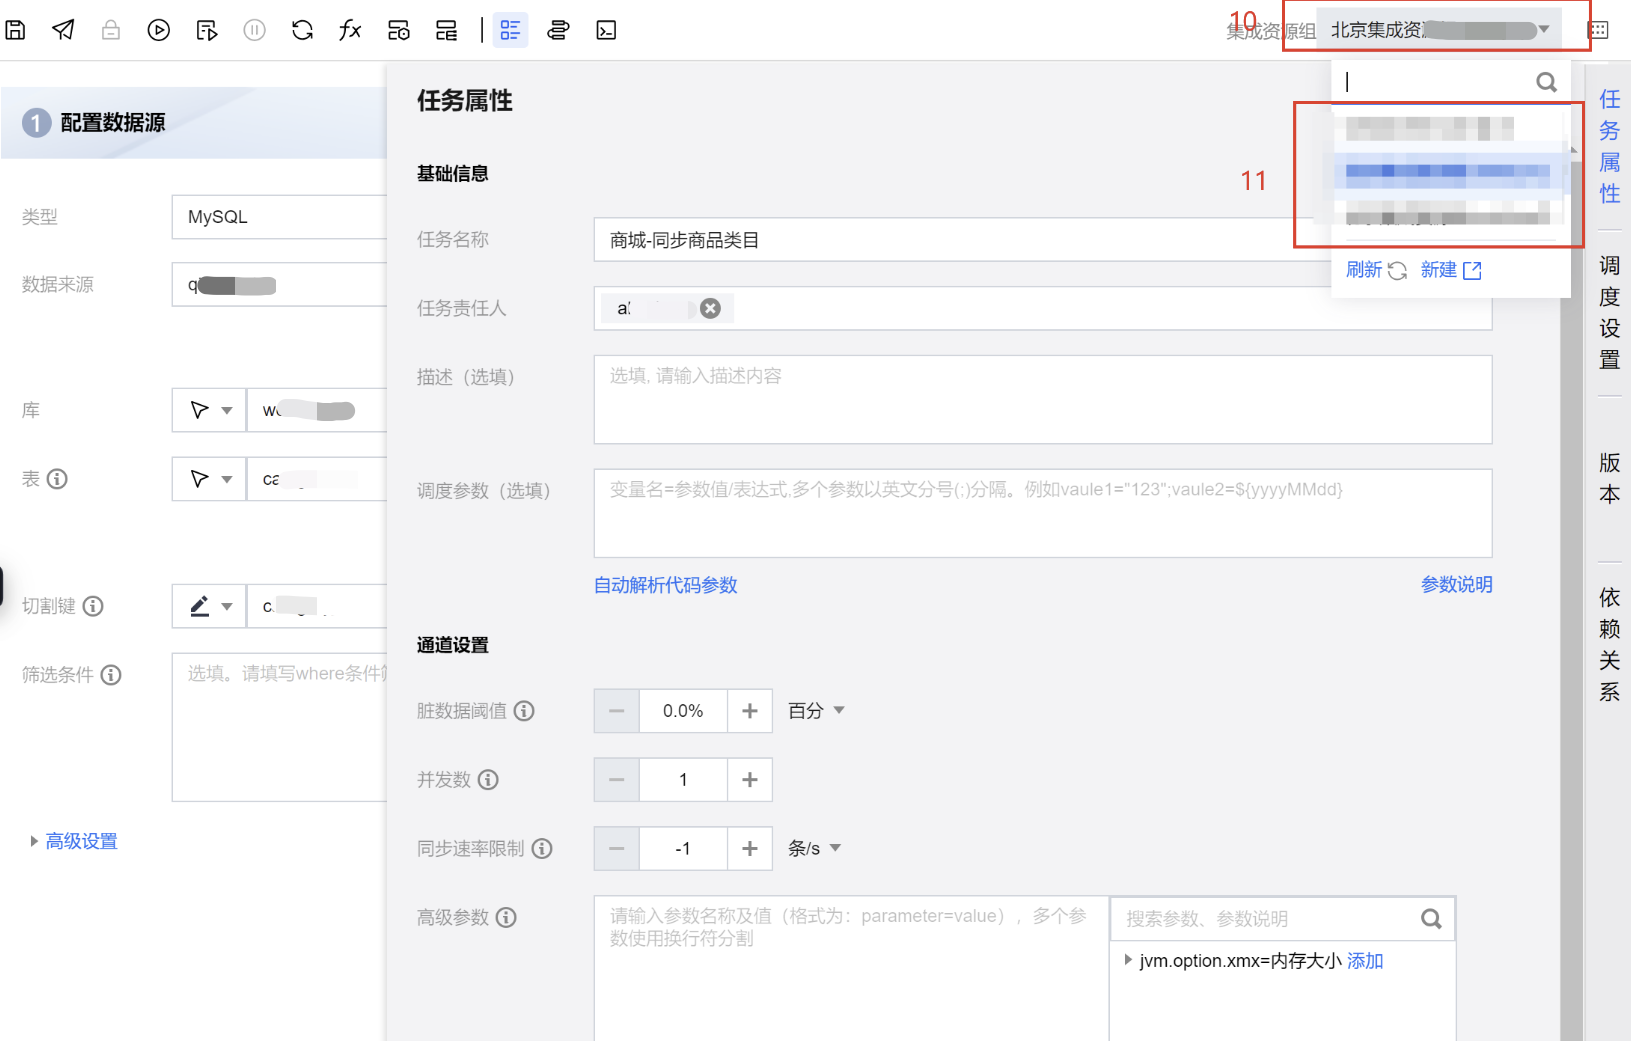
4. 设置任务属性。选择设置运行时需要使用的集成资源组。
注意:
此处务必保证集成资源组、MySQL 实例、EMR 集群的网络连通性,必须购买同一地域的腾讯云资源。
5. 调度设置,此处我们需要设置任务的运行策略。由于类目表变化频率不大,我们设定每天凌晨同步一次。
调度周期:周期调度
调度周期:天
调度时区:按需选择(例如在中国就默认即可)
生效日期:默认
执行时间:00:00
调度周执行时间:00:00

6. 上述步骤完成后,请及时保存数据。
7. 在正式提交之前可以先模拟运行一次,此时也会先检测配置完整性和网络连通性,待检测通过,系统将立即开始运行。页面下方将出现运行日志。
8. 在页面下方可以看到试运行的日志和进度,当出现 Success、Completed 则表示试运行成功。
9. 指将任务提交至调度资源服务器上,待到达设置的运行时间,任务会自动开始运行。至此,数据集成任务配置就完成了。
注意:
提交时,系统将自动检测配置完整性和网络连通性。
如果提示网络连通性问题,不要忽略,请立即检查:集成资源组、MySQL 实例、EMR 集群的网络是否互通。
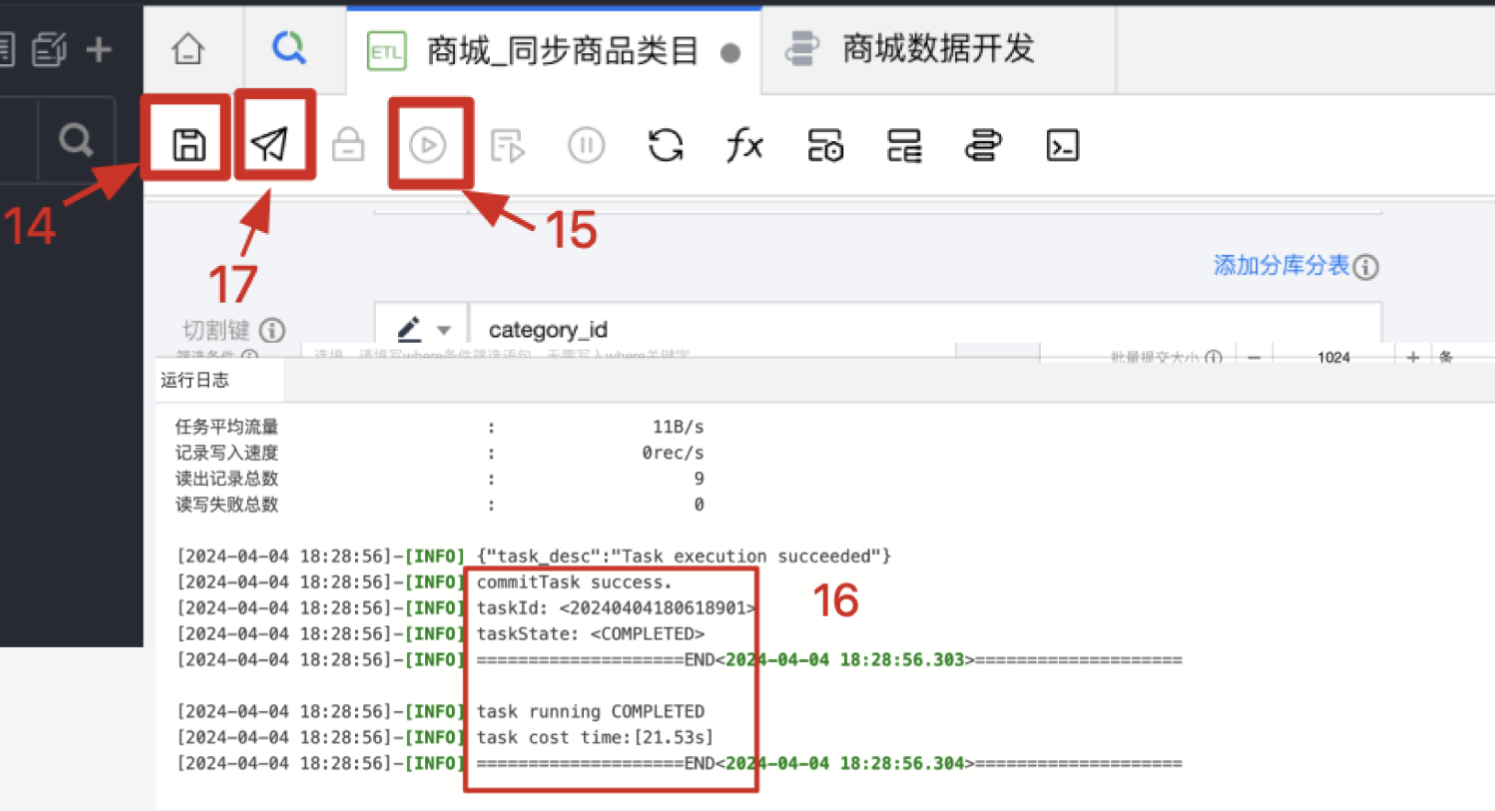
通过完成1 - 17步骤,您已经完成了将类目表从 MySQL 数据库同步到 EMR 集群中,并且每日凌晨,WeData 将自动拉取全量数据覆盖更新。
同步城市表
下面我们创建第2个离线同步任务,将城市表从MySQL同步到Hive表中。
由于您已经完成了一张数据表的同步任务,应该对数据同步有了一定的认识,此处我们增加一个环节:制定同步策略。
同步策略一般包括:
离线同步还是实时同步?
当业务对实时性要求不大时,我们一般选择离线同步。
补充说明
实时同步与离线同步的区别:
方式 | 说明 |
实时同步 | 定义:实时同步指的是数据在源系统产生变化后,几乎立即被传输到目标系统。 |
| 适用场景:需要数据高度实时性的应用,如金融交易、在线协作工具等。 |
| 优点: 实时性:数据变化可以立即反映到目标系统,减少数据不一致的时间窗口。 数据一致性:由于同步速度快,可以减少因数据不一致导致的问题。 |
| 缺点: 系统资源消耗大:需要持续的网络连接和较高的系统资源以维持实时性。 成本高:实时同步可能需要更复杂的技术支持和更高的运维成本。 复杂性:实现实时同步需要更复杂的逻辑来处理数据冲突和同步状态。 |
离线同步 | 定义:离线同步指的是数据在源系统产生变化后,并不立即传输,而是在特定的时间点或条件下进行数据的批量传输。 |
| 适用场景:数据实时性要求不高,或者网络条件不稳定的环境,如移动设备的数据备份、某些企业数据的定期同步等。 |
| 优点: 系统资源消耗低:可以根据网络和系统资源情况安排同步,减少对实时资源的需求。 成本低:相比实时同步,离线同步的运维成本和技术支持要求较低。 灵活性:可以根据实际需要安排同步的时间和频率。 |
| 缺点: 延迟:数据同步存在延迟,可能无法立即反映最新的数据变化。 数据一致性风险:如果同步间隔较长,可能会导致数据不一致的问题。 |
总结:
选择哪种同步方式取决于业务需求、数据的重要性、网络条件以及成本预算。实时同步适用于对数据实时性要求极高的场景,而离线同步则适用于可以容忍一定数据延迟的环境。在某些情况下,也可以结合使用这两种策略,例如,在网络条件不佳时使用离线同步,而在网络条件良好时使用实时同步,以此来平衡实时性和成本。 | |
同步策略选择增量还是全量?
在真实的业务场景中,一般都会选择增量同步。只有在数据表初始化时会选择全量同步。
本次教程中,城市、类目、商品表中未设置日期等切片字段,我们依赖选择全量同步。
下面步骤中,在同步订单表时,我们会介绍如何设置增量同步。
如果是离线同步,那么同步频次选择每天还是每小时?
同步频次需要根据业务需要进行确定。
本次教程中,我们均选择每天凌晨同步一次。
通过上面的思考,城市表与类目表的同步策略完全相同,请参照类目表中的步骤1-17,重复操作一遍,
注意:
以下步骤均为配图里标明的步骤序号
步骤3:任务名称:商城_同步城市信息
步骤4:选择表:cities;
步骤6、7:表名需要修改为:ods_order_city;
步骤10 - 13:这四个步骤比较容易忽略;
步骤15:无论有多熟悉操作,请记得在提交前试运行一次,保证任务运行准确。
同步商品表
下面我们创建第3个离线同步任务,将商品表从 MySQL 同步到 Hive 表中。
依然先思考再操作:
序号 | 问题 | 结论 |
1 | 离线同步还是实时同步? | 离线 |
2 | 同步策略选择增量还是全量? | 全量 说明: 其实应该增量,此处仅为了教学我们选择全量。 |
3 | 如果是离线同步,那么同步频次选择每天还是每小时? | 每天凌晨同步 |
通过上面的思考,商品表与类目表、城市表的同步策略也完全相同,请继续参照类目表中的步骤1-17,重复再操作一遍。
注意:
以下步骤均为配图里标明的步骤序号
步骤3:任务名称:商城_同步商品信息。
步骤4:选择表:products。
步骤6、7:表名需要修改为:ods_product_product。
步骤10 - 13:这四个步骤比较容易忽略。
步骤15:无论有多熟悉操作,请记得在提交前试运行一次,保证任务运行准确。
同步订单表
下面我们创建第4个离线同步任务,将订单表从 MySQL 同步到 Hive 表中。
依然先思考再操作:
序号 | 问题 | 结论 |
1 | 离线同步还是实时同步? | 离线 |
2 | 同步策略选择增量还是全量? | 增量 说明: 由于订单表往往数据量较大,更适合增量同步,即每天同步前一天的订单数据。 |
3 | 如果是离线同步,那么同步频次选择每天还是每小时? | 每天凌晨同步 |
通过上面的思考,订单表与上面三张表的同步策略是有差异的,此处我们选择了增量同步,在此步骤中我们将重点介绍。
增量同步逻辑:
在原始数据订单表中,有个特殊字段:order_time,它是会随着时间推移。
因此我们可以以订单创建时间为分区,根据 order_time 保证每日拉取增量数据。
为了能够在调度中动态比较任务运行时间(使用 ${yyyy-MM-dd} 表示)与 order_time 的大小关系
例如:当运行时间为2024 - 04 - 01 00:10,则 ${yyyy-MM-dd} = 2024-04-01,同时 ${yyyy-MM-dd-1d} = 2024-03-31
因此我们可以用 date(order_time) = '${yyyy-MM-dd-1d} ' 表示昨天的数据。
创建离线同步任务
首先请继续参照类目表中的步骤1-13,重复再操作一遍。
注意:
以下序号均为配图里标明的步骤序号
步骤3:任务名称:商城_同步订单信息
步骤4:选择表:orders;
步骤6、7:表名需要修改为:ods_order_order;
先不要操作步骤14 - 17(不要提交),我们需要修改下面配置。
操作演示截图:
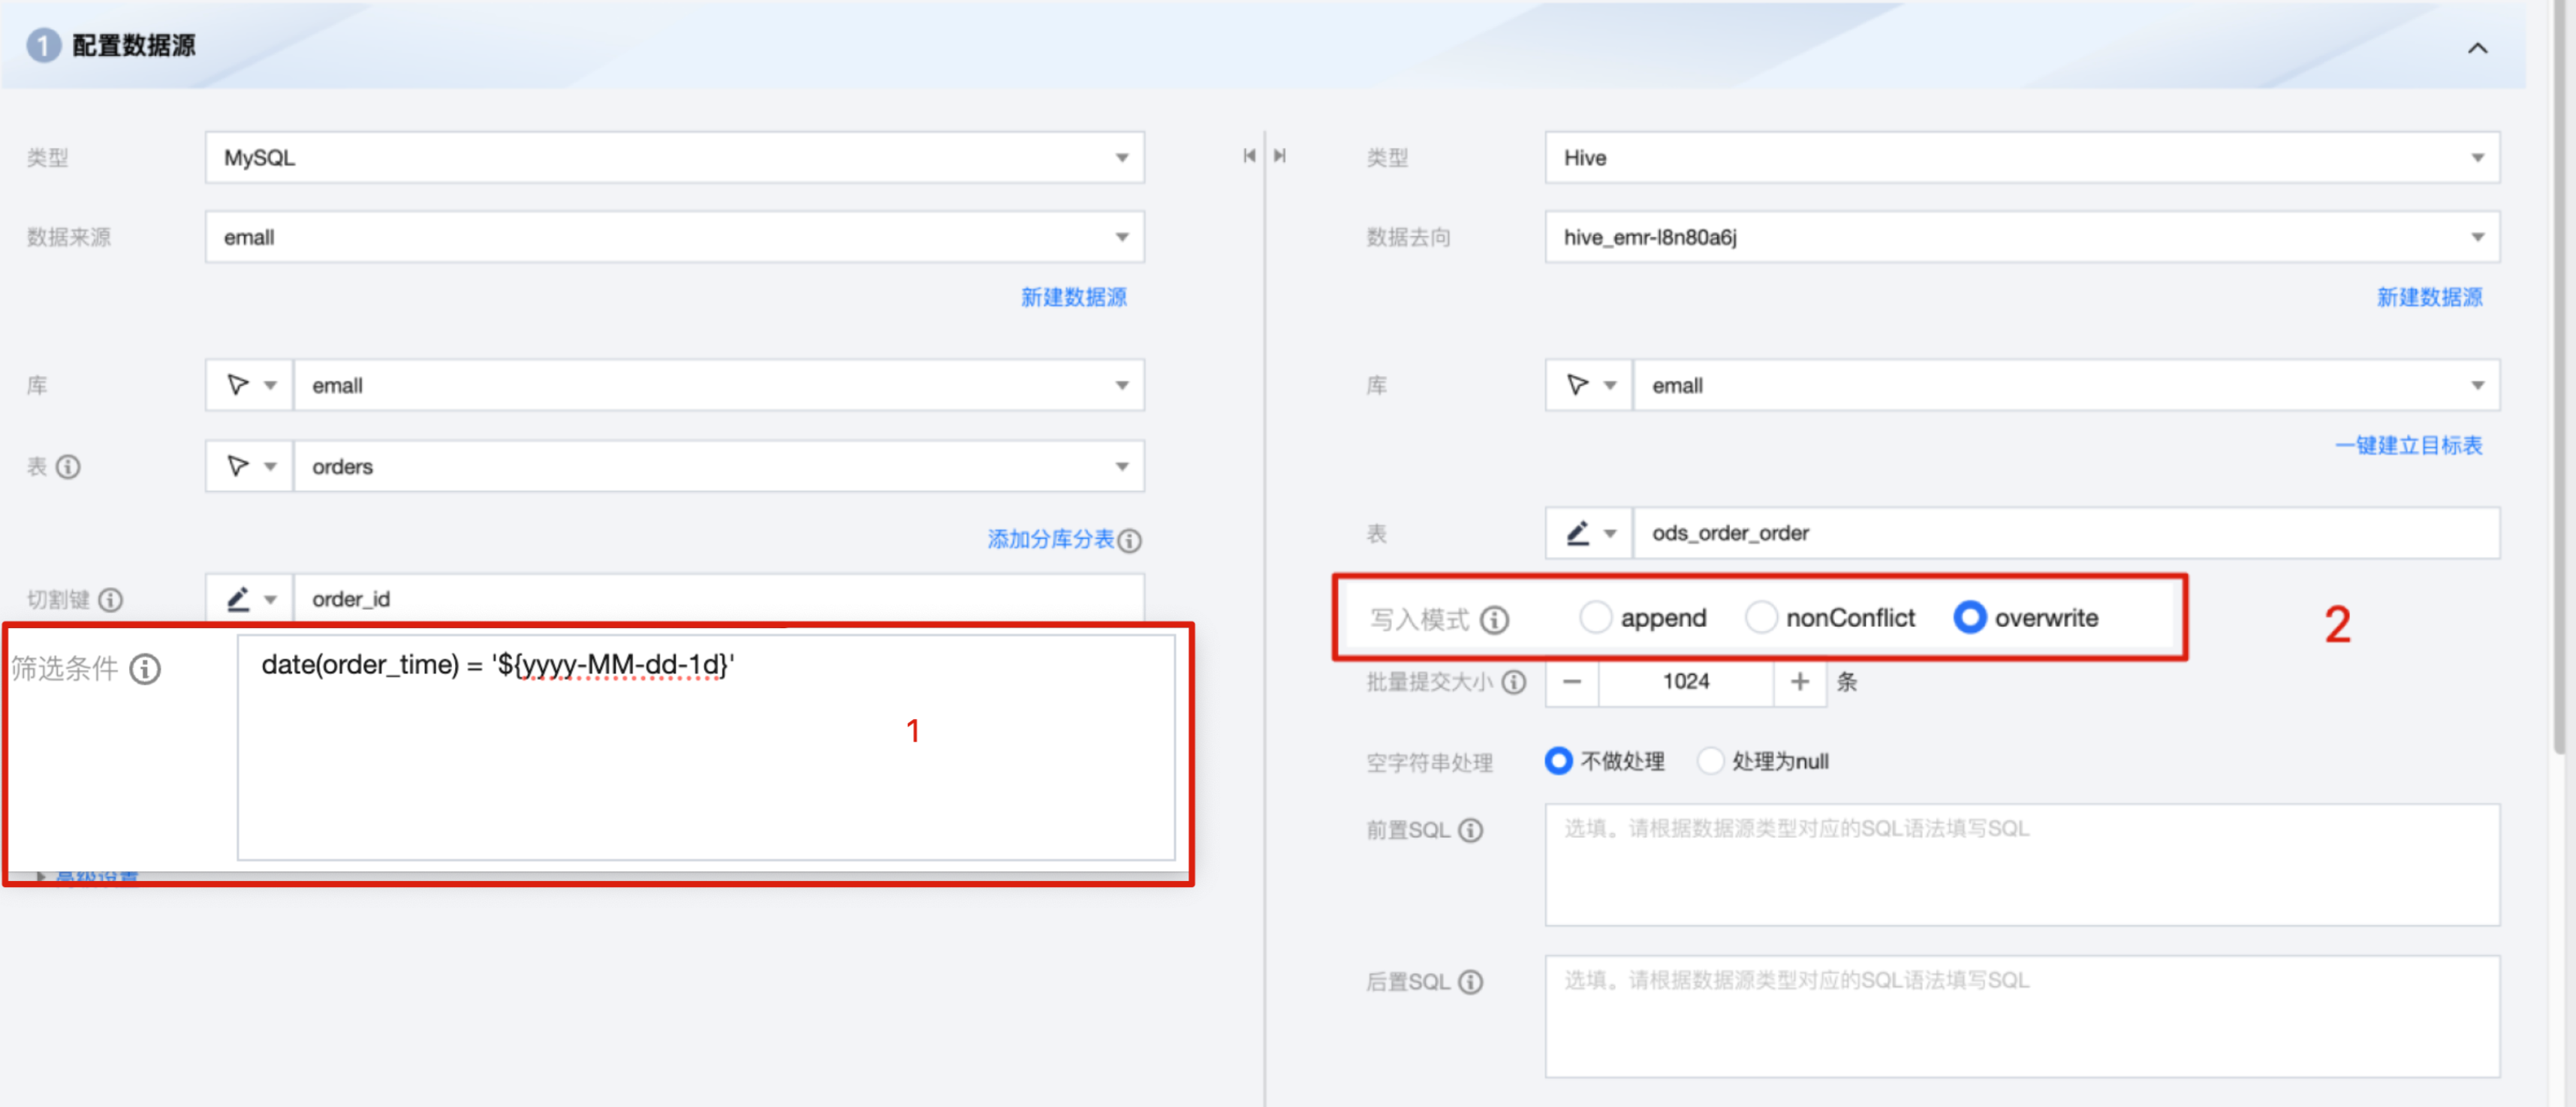
1. 打开配置数据源页面,左侧填写筛选条件,右侧选择写入模式为 overwrite。
筛选条件:根据数据类型填写对应筛选语句,该语句会作为将要同步数据的筛选条件。
写入模式:
1.1 Append:保留原始数据, 新行追加写入。
1.2 nonConflict:数据冲突时报错。
1.3 Overwrite:删除原有数据重新写入。
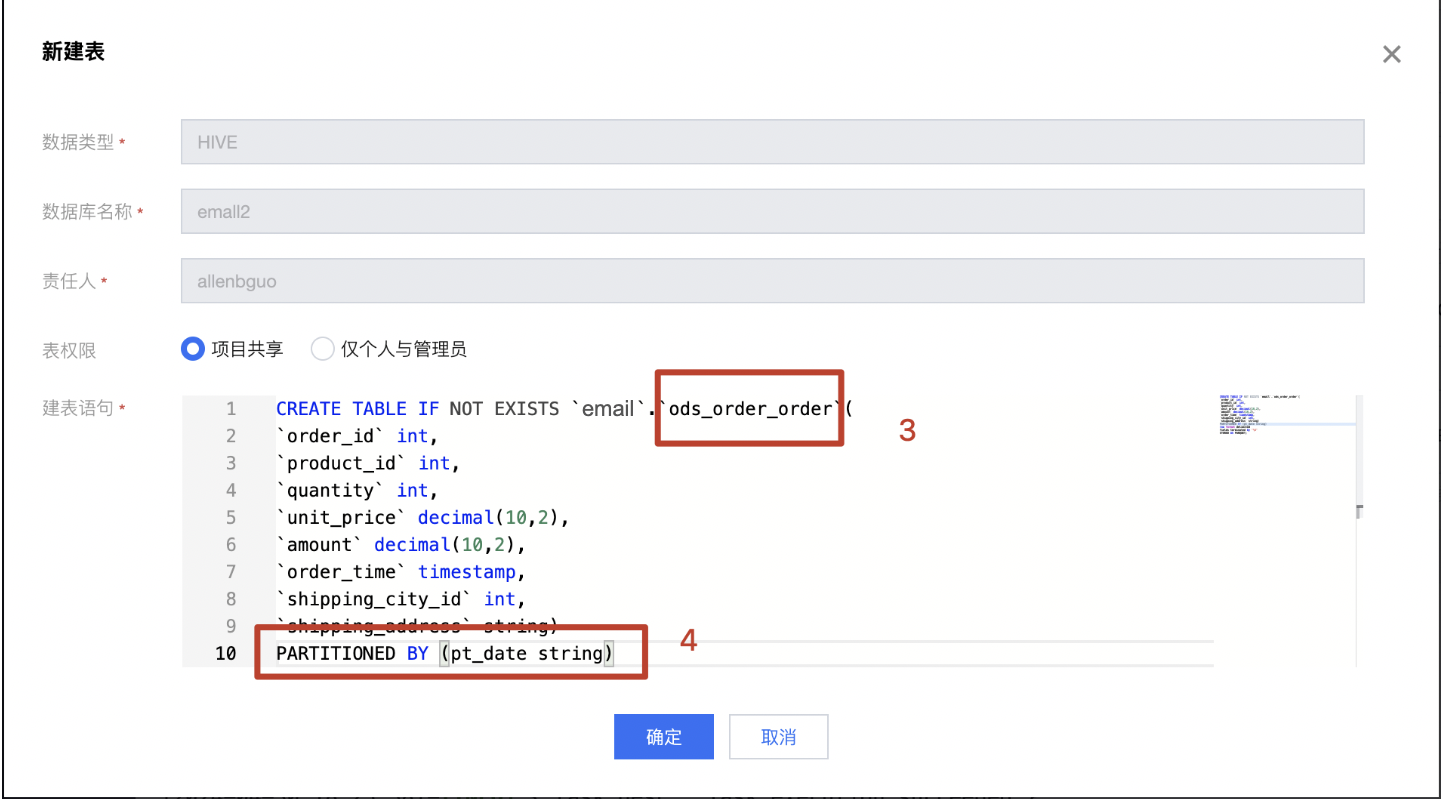
2. 打开新建表页面,修改表名为 ods_order_order,同时增加分区字段 PARTITIONED BY (pt_date date)。
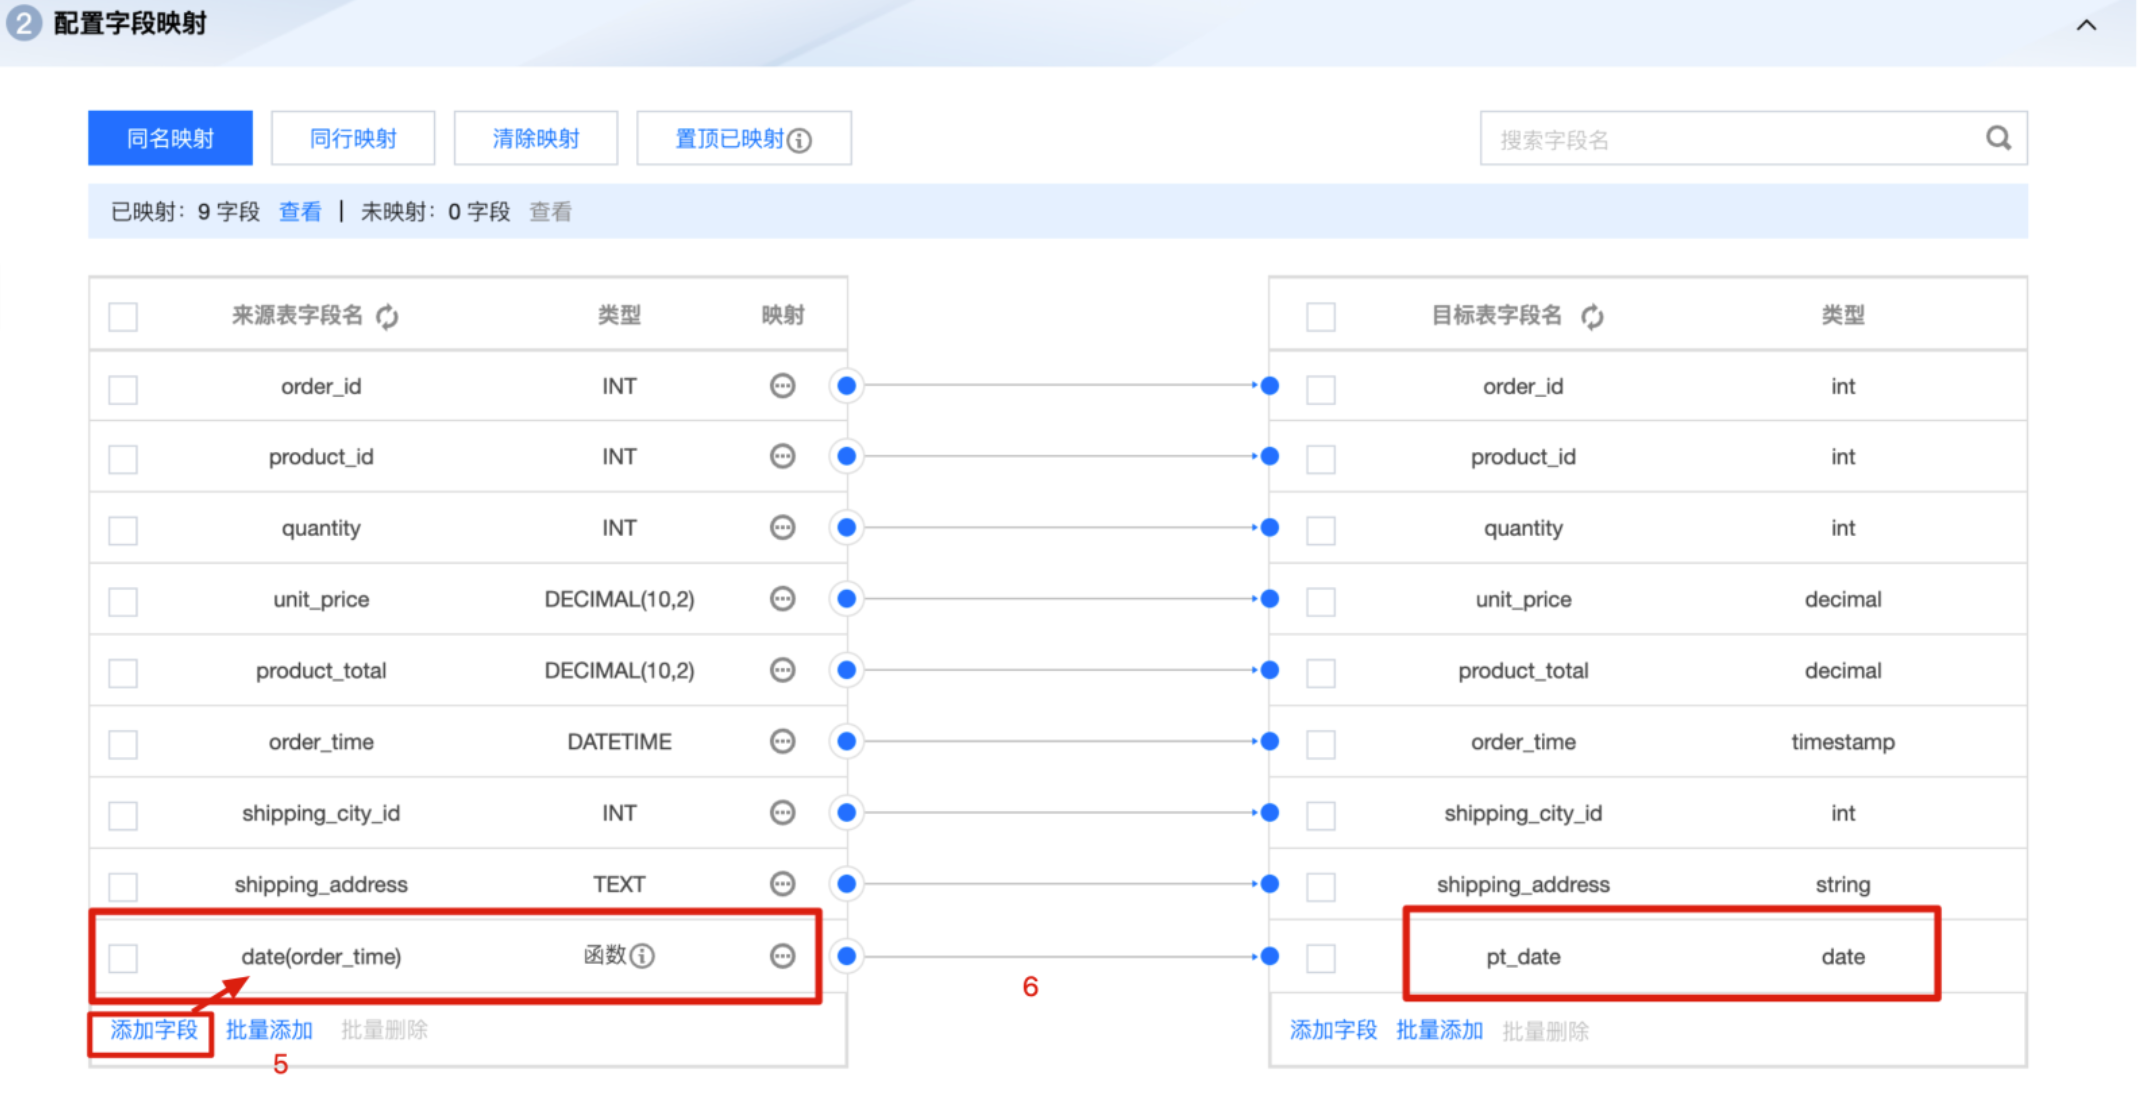
3. 在配置字段映射页面中,点击添加字段,字段名为 date(order_time),类型为函数,单击右侧小圆圈,以鼠标拖拽方式向右侧目标字段 pt_date 建立映射关系。
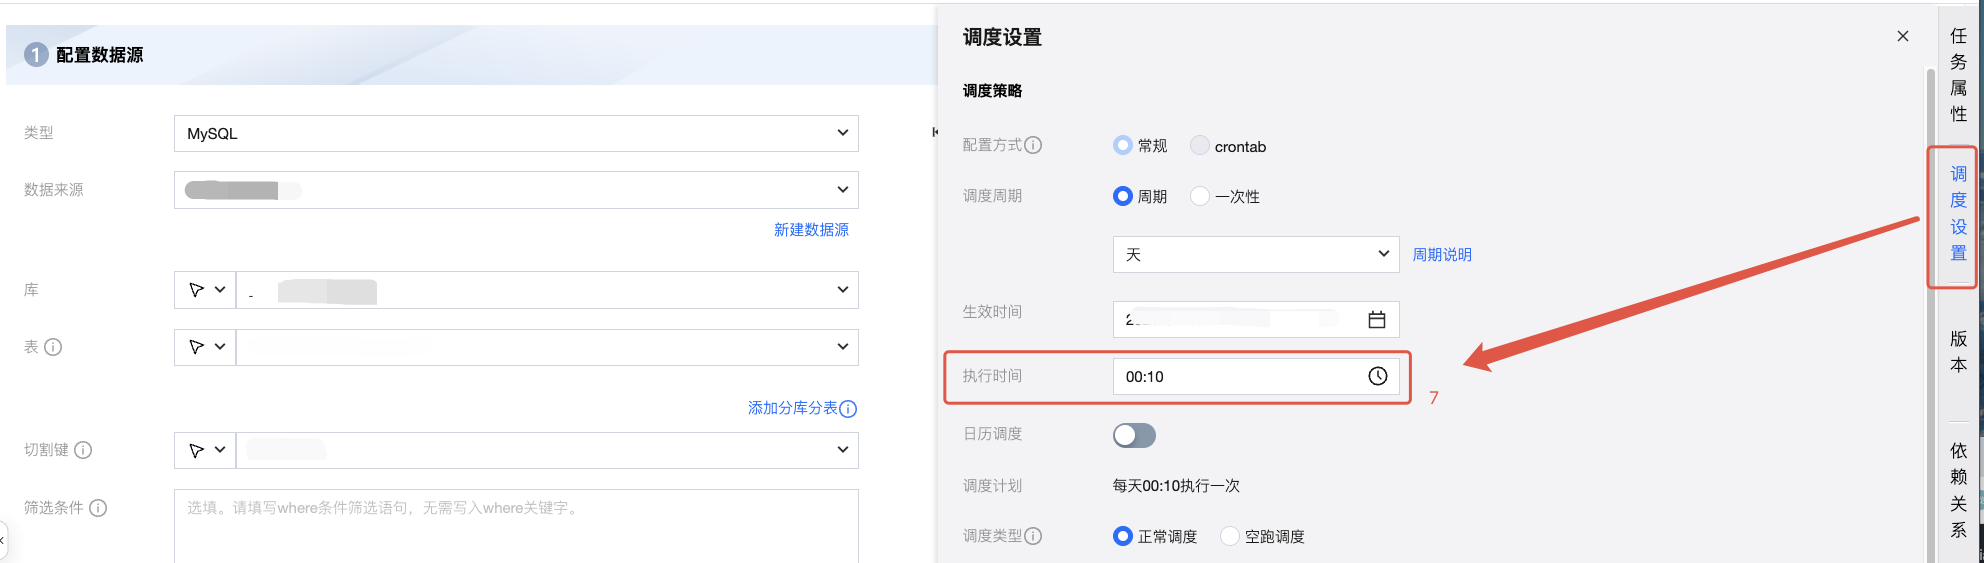
4. 单击右侧任务栏中调度设置按钮,在调度设置页面中找到执行时间,修改执行时间为:00:10。
建立订单表 SQL:
创建数据表时,您可以结合实际业务场景选择行式存储或者列式存储,下述示例中以使用 Parquet 列式存储格式为例创建数据表。
--一键创建订单表CREATE TABLE IF NOT EXISTS `email`.`ods_order_order`(`order_id` int,`product_id` int,`quantity` int,`unit_price` decimal(10,2),`amount` decimal(10,2),`order_time` timestamp,`shipping_city_id` int,`shipping_address` string)PARTITIONED BY (pt_date date)STORED AS PARQUET;
至此,我们已经完成了所有原始数据表到 Hive 表的离线同步任务。并且每日凌晨,WeData 将自动进行全量/增量数据同步。
总结
现在您已经完成了数据集成部分的学习,现在进行总结:
序号 | 步骤名称 |
1 | 确定数据原始表与数据目标表 原始表:读:数据来源 目标表:写:数据目的地 |
2 | 确定离线同步还是实时同步 根据业务需要,如果没有必要,可选择离线同步,减少资源消耗 |
3 | 确定增量同步还是全量同步 一般数据初始化时需要全量同步,周期同步时均为增量同步; 增量同步时,需要设置筛选条件,确保拉取数据不重叠 |
4 | 确定网络环境互通性 同步过程中涉及到三个环境: 1. 原始数据库实例 2. 集成资源组 3. EMR 集群 注意: 必须保证集成资源组可以访问原始数据库实例和 EMR 集群。 |
下面我们将进行离线开发部分的学习,即在 EMR 集群的 Hive 表中进行数据加工。


