Scenario
This document describes how to use open-source SDK to send and receive messages by using the SDK for Spring Boot Starter as an example and helps you better understand the message sending and receiving processes.
Preparations
You have completed the Resource Creation and Preparation.
Download the Demo or visit the GitHub Project
Instructions
Step 1. Add dependencies
Add dependencies to the
pom.xml file.<dependency><groupId>org.apache.rocketmq</groupId><artifactId>rocketmq-spring-boot-starter</artifactId><version>2.2.2</version></dependency>
Step 2. Prepare the configuration
Add configuration information to the configuration file.
server:port: 8082RocketMQ configuration informationrocketmq:# Service Access Address for TDMQ-RocketMQname-server: rocketmq-xxx.rocketmq.ap-bj.public.tencenttdmq.com:9876Producer Configurationsproducer:# Producer Group Namegroup: group111# Role tokenaccess-key: eyJrZXlJZC....# Authorized Role Namesecret-key: admin# Common configurations for the consumerconsumer:# Role tokenaccess-key: eyJrZXlJZC....# Authorized Role Namesecret-key: adminCustom Configuration, tailored to business requirements.namespace: rocketmq-xxx|namespace1producer1:topic: testdev1consumer1:group: group111topic: testdev1subExpression: TAG1consumer2:group: group222topic: testdev1subExpression: TAG2
Category | Note |
name-server | The cluster access address can be obtained from the access address in the operation column of the cluster list on the cluster management page of the console. The access point addresses for the new shared and exclusive clusters can be obtained from the namespace list. |
group | Producer group name, which can be copied under the Group tab in the console. |
secret-key | |
access-key |  |
namespace | Namespace name, which can be copied under the Namespace tab in the console. |
topic | Topic name, which can be copied under the Topic tab in the console. |
subExpression | A parameter used to set the message tag. |
Step 3. Send messages
1. Inject
RcoketMQTemplate into the class that needs to send messages.@Value("${rocketmq.namespace}%${rocketmq.producer1.topic}")private String topic; // Topic name (the full name of the topic is required, hence the topic name is concatenated here)@Autowiredprivate RocketMQTemplate rocketMQTemplate;
2. Send messages. The message body can be a custom object or a message object and is contained in the package
org.springframework.messaging.SendResult sendResult = rocketMQTemplate.syncSend(destination, message);/------------------------------------------------------------------------/rocketMQTemplate.syncSend(destination, MessageBuilder.withPayload(message).build())
3. Below is a complete sample.
/*** Description: Message producer*/@Servicepublic class SendMessage {// Use the full name of the topic, which can be either customized or concatenated in the format of “full namespace name%topic name”.@Value("${rocketmq.namespace}%${rocketmq.producer1.topic}")private String topic;@Autowiredprivate RocketMQTemplate rocketMQTemplate;/*** Sync sending** @param message Message Content* @param tags Subscription tags*/public void syncSend(String message, String tags) {// Spring Boot does not support passing tags by using the header. You must concatenate the topic name and tags in the format oftopicName:tags; otherwise, the topic has no tag for identification.String destination = StringUtils.isBlank(tags) ? topic : topic + ":" + tags;SendResult sendResult = rocketMQTemplate.syncSend(destination,MessageBuilder.withPayload(message).setHeader(MessageConst.PROPERTY_KEYS, "yourKey") // Specify the business key.build());System.out.printf("syncSend1 to topic %s sendResult=%s %n", topic, sendResult);}}
Note
This example demonstrates synchronous sending. For asynchronous sending, one-way sending, and more, please refer to the Demo or visit the GitHub project.
Step 4. Consume messages
@Service@RocketMQMessageListener(consumerGroup = "${rocketmq.namespace}%${rocketmq.consumer1.group}", // Consumer group, formatted as: full namespace name%group name// Use the full name of the topic, which can be either customized or concatenated in the format of “full namespace name%topic name”.topic = "${rocketmq.namespace}%${rocketmq.consumer1.topic}",selectorExpression = "${rocketmq.consumer1.subExpression}" // Subscription expression. If this parameter is not configured, it means subscribing to all messages.)public class MessageConsumer implements RocketMQListener<String> {@Overridepublic void onMessage(String message) {System.out.println("Tag1Consumer receive message:" + message);}}
Multiple consumers can be configured based on business needs. Other consumer configurations can be tailored to specific business requirements.
Note
Step 5. View consumption details
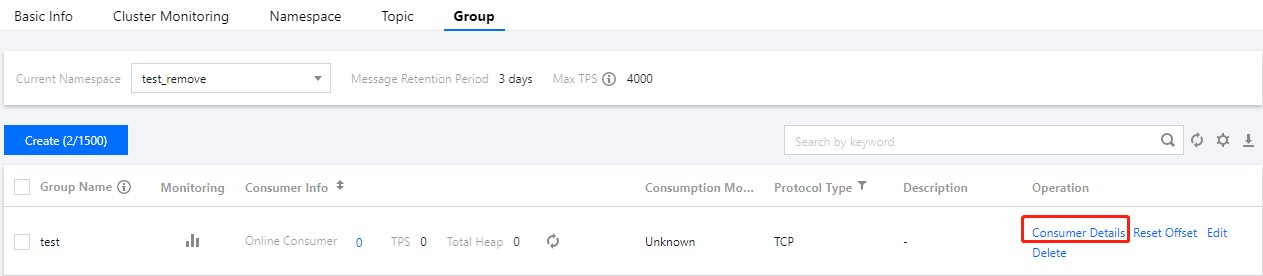
Log in to the TDMQ Console, navigate to Cluster Management > Group page to view the list of clients connected to the Group. Click View Details in the operation column to view consumer details.