The content of this page has been automatically translated by AI. If you encounter any problems while reading, you can view the corresponding content in Chinese.
This document will guide you on how to perform operational processing on Trojan files in the Cloud Workload Protection Platform (CWPP) console.
File Detection and Elimination Settings
1. Log in to the CWPP Console, and select Intrusion Detection > Malicious File Scan from the left sidebar.
2. On the Malicious File Scan page, click the File Scan Settings button in the upper right corner. The File Scan Settings page will pop up on the right, where you can set the scan mode.
Description
This feature is available in the Professional Version/Flagship Edition. Please purchase protection licenses and bind the host to upgrade to the Professional Version/Flagship Edition.
File detection and elimination support Trojan file detection. All machines can cumulatively detect 5 malicious file security events for free. Detection will stop after exceeding the limit. Upgrading to CWPP Pro or CWPP Ultimate removes this limit. Common Trojan file detections include the following two types:
Webshell detection: Provides detection of common web script Trojans and backdoors, covering various script languages such as ASP, PHP, JSP, and Python.
Binary virus and Trojan detection: Detects binary executable viruses and Trojans such as DDoS Trojans, remote control, and mining software on .exe, .ddl, and .bin files, and sends alarms.
3. On the File Scan Settings page, you can set Scheduled Detection, Real-Time Monitoring, and Auto Isolation.
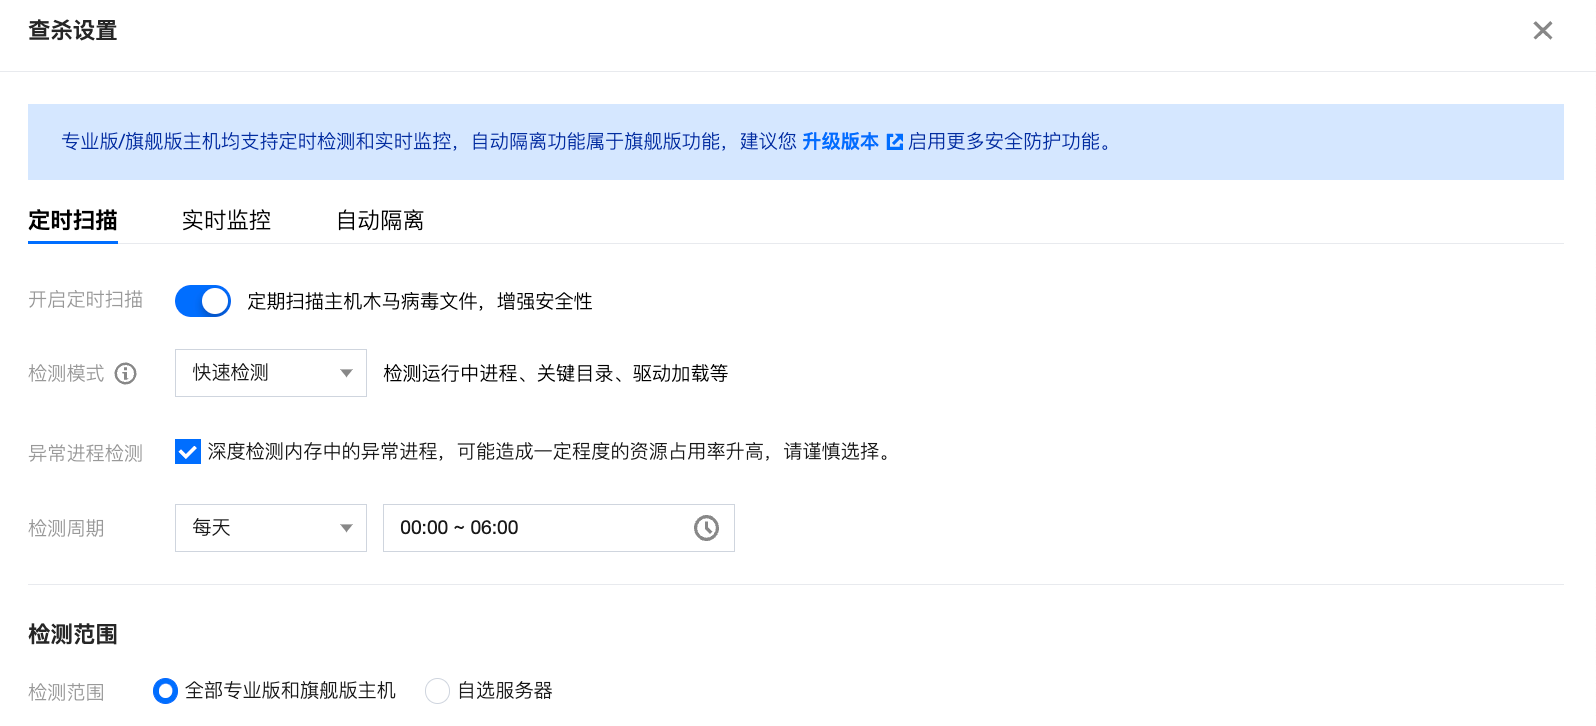
Scheduled Detection: Click Enable Scheduled Check, set the detection mode, cycle, and detection range, then click Save. You can regularly scan Trojan virus files on hosts to enhance security.
Detection Mode: Includes quick detection mode and full-disk detection mode. It can detect running processes, key directories, driver loading, etc. The duration of full-disk detection is related to the number of server disk files. It is recommended to choose a detection cycle of more than 4 hours to avoid incomplete scans or timeouts.
Quick Detection: Linux system will detect running processes, key directories, driver loading, etc.; Windows will scan the C drive.
Full-Disk Detection: In addition to the quick detection range, the Linux system will also detect all partitions; Windows will scan the C, D, E, and F drives.
Abnormal Process Detection: Deeply detects abnormal processes in memory, which may cause a certain degree of increase in resource utilization. Please choose carefully.
Detection cycle: You can choose a detection cycle of daily, every 3 days, or every 7 days.
Detection range: Includes all professional version servers and selected servers.
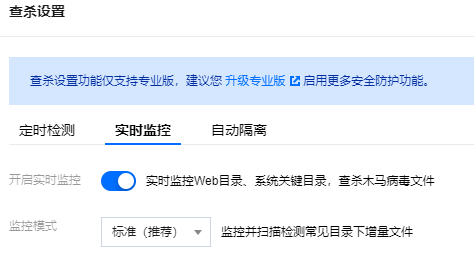
Real-time Monitoring: Click Enable Real-time Monitoring, select the monitoring mode, and then click Save to monitor web directories and key system directories in real time, and scan & remove Trojan virus files.
Note:
Monitoring modes are divided into standard and recommended modes.
Standard: Monitor and scan for incremental files in common directories.
Depth: Monitor and scan for incremental files in all directories.
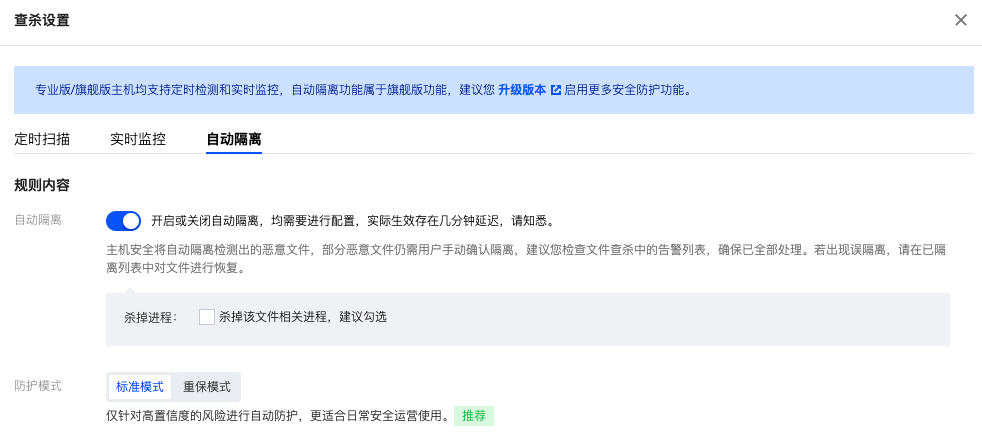
Automatic Isolation: Click Enable Auto Isolation > Save to automatically isolate detected malicious files. Some malicious files still require manual confirmation for isolation by the user. It is recommended to check all security events in the file detection and elimination list to ensure they are all handled. Protection modes include:
Standard Mode: Automatically protects against high-confidence risks, more suitable for daily security operations.
Important Period Mode: Automatically intercepts medium and high-confidence risks based on the results of multiple engines. There may be a risk of false interception, suitable for important period guarantee protection. Please enable with caution.
Note:
If a false positive isolation occurs, restore the file from the isolated list. Enabling or disabling automatic isolation requires configuration, and there may be a delay of several minutes before it takes effect.
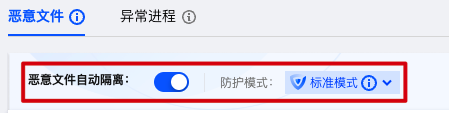
You can also configure it quickly at the top of the malicious file alarm list.
Detection Settings Overview
1. Log in to the CWPP Console, and select Intrusion Detection > Malicious File Scan from the left sidebar.
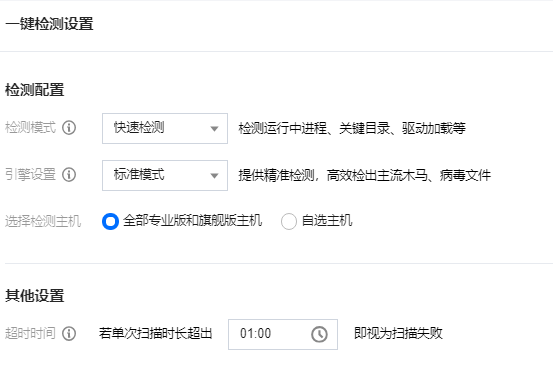
2. On the Malicious File Scan page, click Quick Check to start setting the manual detection mode.
3. On the Quick Check settings page, after setting the target detection mode, host range, and timeout, the detection may take a long time due to a large number of files and directories. You can set the duration for a single scan, and if it times out, the scan will be considered a failure.
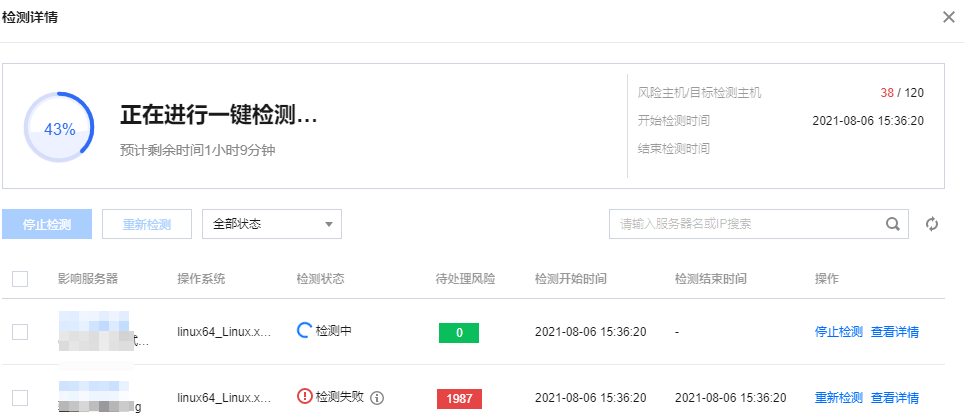
4. After clicking Enable Detection, the detection will proceed according to the settings. You can click View Details to view detailed detection information.
The detection detail list includes the following field descriptions:
Affected Server: The IP and name of the target server.
Operating System: The operating system of the target server.
Detection Status: The detection status of the target server, including completed, in progress, and failed. The failure may be due to a timeout, in which case it is recommended to increase the timeout duration and retry. The failure may also be due to the client being offline, in which case it is recommended to restart or reinstall the client and retry.
Pending Risk: The number of pending risk files detected on the target server.
Detection Start Time: The time when the detection started.
Detection End Time: The time when the detection of the target server ended.
Operations:
Redetection: If you want to recheck the target server with detection status of completed, stopped, or failed, you can click Redetection.
Disable Detection: If you want to stop the detection of the target server with detection status in progress, you can click Disable Detection.
Note
The selected server will not be detected, and potential risks will not trigger an alarm. Please proceed with caution.
Viewing Details: If you want to view the detailed detection results of the target server, you can click Viewing Details.
View the Event List
1. Log in to the CWPP Console, and select Intrusion Detection > Malicious File Scan from the left sidebar.
2. On the Malicious File Scan page, you can view the detection status of Trojan files in the currently protected servers, as shown below:
The event list includes the following field descriptions:
Server IP/Name: The IP and name of the current target server being detected.
Path: The file path of the target risk file. Click
to copy Path information, click
to download the target risk file.
Virus Name/Detection Engine: The name of the virus affecting the target risk file.
First Detected: The time when the target risk file was first detected.
Last Detected: The time when the target risk file was last detected.
Processing Status: The processing status of the target risk file. For events in Pending status, a Note will indicate the existence of the file and process during the last detection.
Operations:
Isolation: If a file is confirmed to be malicious, you can isolate a single file or select multiple files for one-click isolation. Once successfully isolated, the original malicious file will be encrypted and isolated. You can later filter Isolated files for recovery.
Trust: If a file is non-malicious, you can select Trust. Once trusted, the CWPP will no longer scan the file. You can filter and manage trusted files.
Delete Record: This action only deletes log records, rather than the file. Once deleted, the log information cannot be recovered. It is recommended to select "Isolate" or "Trust" first, or locate the file in the path and delete it manually.
Details: If you want to view the detailed detection results of the target risk file, you can click Viewing Details.
FAQs
Why did the isolation of the trojan file fail?
Trojan file isolation failure is generally caused by the Trojan file resisting security software. It is recommended to manually delete the alarm file from the server first. If the issue persists, please submit a ticket to contact us for handling. Windows systems can also try using Tencent PC Manager for scanning.