The content of this page has been automatically translated by AI. If you encounter any problems while reading, you can view the corresponding content in Chinese.
This document describes how to bind a custom domain name to a bucket. You can then use this custom domain name to access files within the bucket.
Note:
You can add up to 20 custom domain names through the COS Console. If you want to increase this limit, please contact us.
After you enable a custom domain name, you must also configure CNAME resolution for it to take effect. For details, see Configure Domain Name Resolution.
2. In the left sidebar, click Bucket List to go to the bucket list page.
3. Click the bucket whose domain name you want to configure to go to the bucket configuration page.
4. In the left sidebar, choose Domain and Transfer Management > Custom Origin Domain.
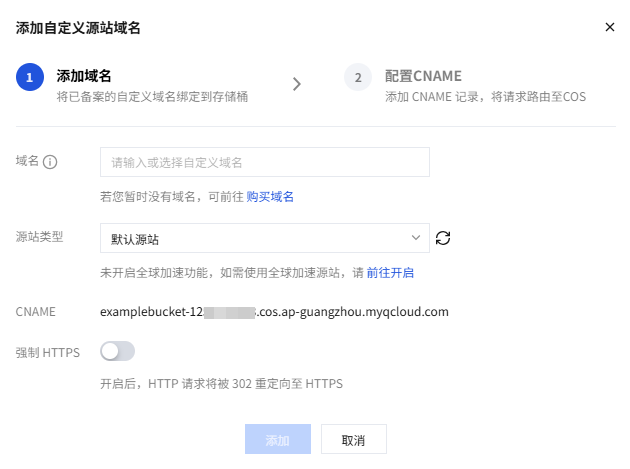
5. On the Custom Origin Domain page, click Add Domain. The configuration items are described as follows.
Add Domain
Domain: Enter the custom domain name you want to bind (for example, www.example.com). Ensure that the entered domain name has been registered. Also, add a resolution record at your DNS service provider (for example, the DNS Console). For detailed instructions, see Quickly Add Domain Name Resolution.
Note:
If you do not have an available domain name (or need to add a new one), click Register New Domain to quickly go to the Domains console and complete the registration.
After a new domain name is successfully registered, you can select "Tencent Cloud Domain" from the dropdown list and then proceed to the next step.
Tencent Cloud supports filing through the PC client and Mini Program. The PC client supports website/domain name or App filing. However, COS domain name access checks the website filing result. If only App filing has been completed, the domain name cannot be accessed.
Origin Type: It is categorized into the following types.
Default Origin: Select Default Origin if you want to use the custom domain name as the default origin.
Static Website Origin: If you want to use the custom domain name as a static website, first enable the static website feature for the bucket, and then select Static Website Origin.
Global Acceleration Origin: If you want to use the custom domain name for global acceleration, first enable the Global Acceleration feature for the bucket, and then select Global Acceleration Origin.
CNAME: It defaults to the default domain name of the current bucket.
Force HTTPS: After you enable it, HTTP requests are redirected to HTTPS with a 302 status code.
Configure CNAME
Configure the corresponding CNAME record with your DNS provider to route requests to COS. For details, see CNAME Configuration.
6. After completing the configuration, click Add. The configured custom origin domain will then appear on the list page.
Attention:
Operations such as adding, enabling, or disabling a domain name do not take effect immediately. The actual configuration requires some time and generally takes effect after about 30 minutes. The actual access status of your domain name is the final determinant.
If a domain name is already bound to a certificate, modifying it from Default Origin or Static Website Origin to Global Acceleration Origin is not currently supported. Please submit a ticket for assistance.
7. To configure a certificate, click
Bind Certificate
. After binding, it typically takes effect within 30 minutes. The certificate source supports selecting a newly uploaded certificate or a hosted certificate. Details are as follows.
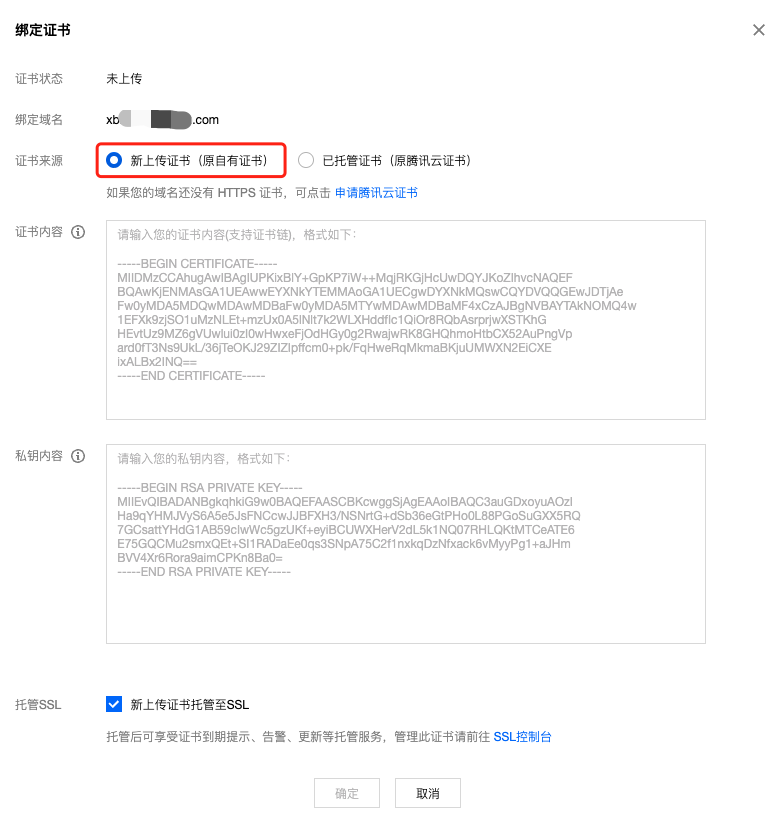
Newly Uploaded Certificate: This refers to your original self-owned certificate. If you want to use your own certificate, select this option.
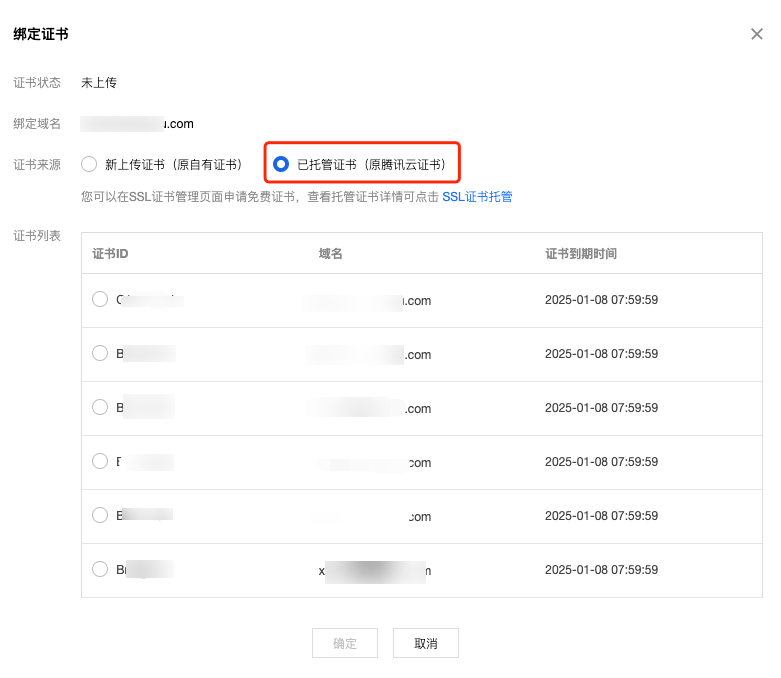
Hosted Certificate: This refers to the original Tencent Cloud certificate. If you want to use a certificate applied for through Tencent Cloud, select this option.
8. Based on the selected certificate source, configure the following information.
Note:
All COS regions now support hosting HTTPS certificates for custom origin domains. If your domain name does not have an HTTPS certificate, you can click Apply for a Tencent Cloud Certificate.
Certificates are typically files with extensions such as .crt or .pem (for example, imgsc.aa.com_bundle.crt). Use a suitable text editor to open the certificate file.
The certificate format begins with "-----BEGIN CERTIFICATE-----" and ends with "-----END CERTIFICATE-----".
Please ensure the certificate content includes the complete certificate chain.
Private Key Content:
Private keys are typically files with extensions such as .key or .pem (for example, imgsc.aa.com.key). Use a suitable text editor to open the private key file.
The private key format begins with "-----BEGIN (RSA) PRIVATE KEY-----" and ends with "-----END (RSA) PRIVATE KEY-----".
Hosted SSL:
The system supports hosting newly uploaded certificates to SSL, and this option is selected by default. We recommend that you host your certificate to SSL. After hosting, you can manage the certificate in the SSL Console and enjoy managed services such as certificate expiration reminders, alarms, and updates.
Private keys are typically files with extensions such as .key or .pem (for example, imgsc.aa.com.key). Use a suitable text editor to open the private key file.
The private key format begins with "-----BEGIN (RSA) PRIVATE KEY-----" and ends with "-----END (RSA) PRIVATE KEY-----".
Certificate List: This section displays the list of hosted certificates. The list includes the certificate ID, domain name, and certificate expiration time.
9. After a successful binding, you can view the certificate ID and expiration time of the current certificate on the Custom Origin List page.
10. If you want to rebind a certificate, click Bind Certificate. If you do not want to bind the current certificate, click Unbind Certificate.
Appendix: Configuring Domain Name Resolution
Tencent Cloud Domain Names
If your domain name's DNS provider is Tencent Cloud, you can go to the DNS Console to configure a CNAME record. The main steps are as follows:
1. Add Domain: Enter the custom origin domain name to be resolved, for example, www.example.com. For details, see Add Resolution Domain.
2. Add Record: Add a resolution record with a record type of CNAME for the custom origin domain name. The record value is the default origin domain name of the bucket to which the CNAME points, for example, bucket-1250000000.cos.ap-beijing.myqcloud.com. For other configuration instructions, see CNAME Record.
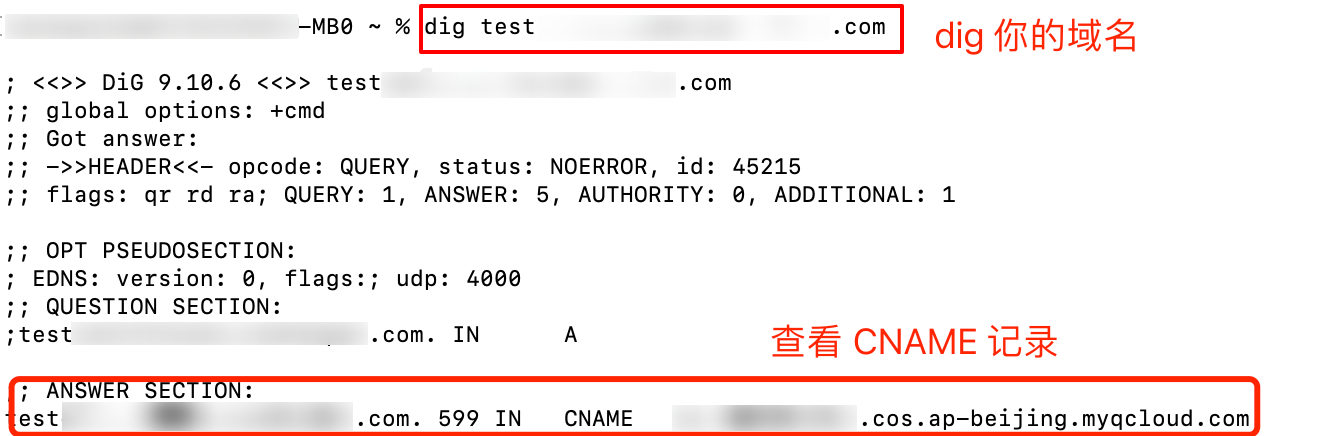
3. Verify Resolution: Resolution records take some time to propagate. You can use the dig command or the COS Console to check whether the resolution has taken effect successfully. The verification methods are as follows:
Enter the command dig mydomain.com in the command-line window to check whether the CNAME record has taken effect correctly. (When using it, replace mydomain.com with your custom domain name.)
Log in to the COS Console and check the custom domain name of the bucket. If the CNAME of the domain name does not take effect successfully, a corresponding prompt will be displayed.
Domain Names from Other Vendors
If your domain name's DNS provider is not Tencent Cloud, you need to go to the corresponding DNS service provider to configure a CNAME record.
Differences Between the Old and New Console Versions
Currently, the bucket domain names differ between the new and old console editions. Taking the Guangzhou region as an example, the bucket region abbreviation in the new console edition is ap-guangzhou, while for the old edition it is cosgz. For details about domain names, see Regions and Access Domain Names.
Due to differences in domain names, you need to pay attention to the CNAME configuration when using a custom origin domain name. We recommend that you use the new bucket domain name edition as the CNAME. When the new domain name edition is compared to the old bucket domain name edition, using it as the CNAME enables richer operations.
You can go to your DNS provider to modify the CNAME information:
If your DNS provider is Tencent Cloud, you can go to the DNS Console to configure it.
If your DNS provider is Alibaba Cloud, you can go to the Alibaba Cloud DNS console to configure it.
If your DNS provider is Amazon Web Services, you can go to the Amazon Route 53 console to configure it.
Attention:
In addition to domain name differences, the APIs invoked by the new and old console editions also differ. We recommend that you use the new console edition along with the new API, tools, and SDK, as this enables you to experience richer and more stable features. The API invoked by the COS new console edition for operating objects or buckets is the XML API, while the one invoked by the old console edition is the JSON API. For differences between the two API editions, see API FAQs.