Kafka Version | spark-streaming-kafka-0.8 | spark-streaming-kafka-0.10 |
Broker Version | 0.8.2.1 or higher | 0.10.0 or higher |
Api Maturity | Deprecated | Stable |
Language Support | Scala、Java、Python | Scala、Java |
Receiver DStream | Yes | No |
Direct DStream | Yes | Yes |
SSL / TLS Support | No | Yes |
Offset Commit Api | No | Yes |
Dynamic Topic Subscription | No | Yes |
操作步骤
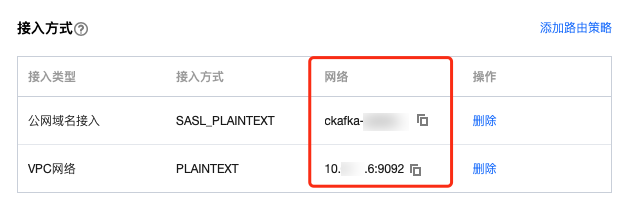
步骤1:获取 CKafka 实例接入地址
步骤2:创建 Topic

步骤3:准备云服务器环境
package | version |
sbt | 0.13.16 |
Hadoop | 2.7.3 |
Spark | 2.1.0 |
protobuf | 2.5.0 |
ssh | CentOS 默认安装 |
Java | 1.8 |
步骤4:对接 CKafka
build.sbt 添加依赖:name := "Producer Example"version := "1.0"scalaVersion := "2.11.8"libraryDependencies += "org.apache.kafka" % "kafka-clients" % "0.10.2.1"
producer_example.scala:import java.util.Propertiesimport org.apache.kafka.clients.producer._object ProducerExample extends App {val props = new Properties()props.put("bootstrap.servers", "172.16.16.12:9092") //实例信息中的内网 IP 与端口props.put("key.serializer", "org.apache.kafka.common.serialization.StringSerializer")props.put("value.serializer", "org.apache.kafka.common.serialization.StringSerializer")val producer = new KafkaProducer[String, String](props)val TOPIC="test" //指定要生产的 Topicfor(i<- 1 to 50){val record = new ProducerRecord(TOPIC, "key", s"hello $i") //生产 key 是"key",value 是 hello i 的消息producer.send(record)}val record = new ProducerRecord(TOPIC, "key", "the end "+new java.util.Date)producer.send(record)producer.close() //最后要断开}
DirectStream
build.sbt 添加依赖:name := "Consumer Example"version := "1.0"scalaVersion := "2.11.8"libraryDependencies += "org.apache.spark" %% "spark-core" % "2.1.0"libraryDependencies += "org.apache.spark" %% "spark-streaming" % "2.1.0"libraryDependencies += "org.apache.spark" %% "spark-streaming-kafka-0-10" % "2.1.0"
DirectStream_example.scala:import org.apache.kafka.clients.consumer.ConsumerRecordimport org.apache.kafka.common.serialization.StringDeserializerimport org.apache.kafka.common.TopicPartitionimport org.apache.spark.streaming.kafka010._import org.apache.spark.streaming.kafka010.LocationStrategies.PreferConsistentimport org.apache.spark.streaming.kafka010.ConsumerStrategies.Subscribeimport org.apache.spark.streaming.kafka010.KafkaUtilsimport org.apache.spark.streaming.kafka010.OffsetRangeimport org.apache.spark.streaming.{Seconds, StreamingContext}import org.apache.spark.SparkConfimport org.apache.spark.SparkContextimport collection.JavaConversions._import Array._object Kafka {def main(args: Array[String]) {val kafkaParams = Map[String, Object]("bootstrap.servers" -> "172.16.16.12:9092","key.deserializer" -> classOf[StringDeserializer],"value.deserializer" -> classOf[StringDeserializer],"group.id" -> "spark_stream_test1","auto.offset.reset" -> "earliest","enable.auto.commit" -> "false")val sparkConf = new SparkConf()sparkConf.setMaster("local")sparkConf.setAppName("Kafka")val ssc = new StreamingContext(sparkConf, Seconds(5))val topics = Array("spark_test")val offsets : Map[TopicPartition, Long] = Map()for (i <- 0 until 3){val tp = new TopicPartition("spark_test", i)offsets.updated(tp , 0L)}val stream = KafkaUtils.createDirectStream[String, String](ssc,PreferConsistent,Subscribe[String, String](topics, kafkaParams))println("directStream")stream.foreachRDD{ rdd=>//输出获得的消息rdd.foreach{iter =>val i = iter.valueprintln(s"${i}")}//获得offsetval offsetRanges = rdd.asInstanceOf[HasOffsetRanges].offsetRangesrdd.foreachPartition { iter =>val o: OffsetRange = offsetRanges(TaskContext.get.partitionId)println(s"${o.topic} ${o.partition} ${o.fromOffset} ${o.untilOffset}")}}// Start the computationssc.start()ssc.awaitTermination()}}
RDD
build.sbt(配置同上,单击查看)。RDD_example:import org.apache.kafka.clients.consumer.ConsumerRecordimport org.apache.kafka.common.serialization.StringDeserializerimport org.apache.spark.streaming.kafka010._import org.apache.spark.streaming.kafka010.LocationStrategies.PreferConsistentimport org.apache.spark.streaming.kafka010.ConsumerStrategies.Subscribeimport org.apache.spark.streaming.kafka010.KafkaUtilsimport org.apache.spark.streaming.kafka010.OffsetRangeimport org.apache.spark.streaming.{Seconds, StreamingContext}import org.apache.spark.SparkConfimport org.apache.spark.SparkContextimport collection.JavaConversions._import Array._object Kafka {def main(args: Array[String]) {val kafkaParams = Map[String, Object]("bootstrap.servers" -> "172.16.16.12:9092","key.deserializer" -> classOf[StringDeserializer],"value.deserializer" -> classOf[StringDeserializer],"group.id" -> "spark_stream","auto.offset.reset" -> "earliest","enable.auto.commit" -> (false: java.lang.Boolean))val sc = new SparkContext("local", "Kafka", new SparkConf())val java_kafkaParams : java.util.Map[String, Object] = kafkaParams//按顺序向 partition 拉取相应 offset 范围的消息,如果拉取不到则阻塞直到超过等待时间或者新生产消息达到拉取的数量val offsetRanges = Array[OffsetRange](OffsetRange("spark_test", 0, 0, 5),OffsetRange("spark_test", 1, 0, 5),OffsetRange("spark_test", 2, 0, 5))val range = KafkaUtils.createRDD[String, String](sc,java_kafkaParams,offsetRanges,PreferConsistent)range.foreach(rdd=>println(rdd.value))sc.stop()}}
配置环境
安装 sbt
#!/bin/bashSBT_OPTS="-Xms512M -Xmx1536M -Xss1M -XX:+CMSClassUnloadingEnabled -XX:MaxPermSize=256M"java $SBT_OPTS -jar `dirname $0`/bin/sbt-launch.jar "$@"
chmod u+x ./sbt_run.sh
./sbt-run.sh sbt-version
安装 protobuf
./configuremake && make install
protoc --version
安装 Hadoop
useradd -m hadoop -s /bin/bash
Running Environment
Operating System: Ubuntu 24.04.3 LTS / x86_64
Runtime Version: GNU bash, version 5.2.21(1)-release (x86_64-pc-linux-gnu)
visudo
Running Environment
Operating System: Ubuntu 24.04.3 LTS / x86_64
Runtime Version: GNU bash, version 5.2.21(1)-release (x86_64-pc-linux-gnu)
root ALL=(ALL) ALL下增加一行。hadoop ALL=(ALL) ALL保存退出。su hadoop
cd ~/.ssh/ # 若没有该目录,请先执行一次ssh localhostssh-keygen -t rsa # 会有提示,都按回车就可以cat id_rsa.pub >> authorized_keys # 加入授权chmod 600 ./authorized_keys # 修改文件权限
Running Environment
Operating System: Ubuntu 24.04.3 LTS / x86_64
Runtime Version: GNU bash, version 5.2.21(1)-release (x86_64-pc-linux-gnu)
sudo yum install java-1.8.0-openjdk java-1.8.0-openjdk-devel
vim /etc/profile
export JAVA_HOME=/usr/lib/jvm/java-1.8.0-openjdk-1.8.0.121-0.b13.el6_8.x86_64/jreexport PATH=$PATH:$JAVA_HOME
Running Environment
Operating System: Ubuntu 24.04.3 LTS / x86_64
Runtime Version: GNU bash, version 5.2.21(1)-release (x86_64-pc-linux-gnu)
./bin/hadoop version
vim /etc/profile
export HADOOP_HOME=/usr/local/hadoopexport PATH=$HADOOP_HOME/bin:$PATH
Running Environment
Operating System: Ubuntu 24.04.3 LTS / x86_64
Runtime Version: GNU bash, version 5.2.21(1)-release (x86_64-pc-linux-gnu)
/etc/hadoop/core-site.xml。<configuration><property><name>hadoop.tmp.dir</name><value>file:/usr/local/hadoop/tmp</value><description>Abase for other temporary directories.</description></property><property><name>fs.defaultFS</name><value>hdfs://localhost:9000</value></property></configuration>
/etc/hadoop/hdfs-site.xml。<configuration><property><name>dfs.replication</name><value>1</value></property><property><name>dfs.namenode.name.dir</name><value>file:/usr/local/hadoop/tmp/dfs/name</value></property><property><name>dfs.datanode.data.dir</name><value>file:/usr/local/hadoop/tmp/dfs/data</value></property></configuration>
/etc/hadoop/hadoop-env.sh 中的 JAVA_HOME 为 Java 的路径。export JAVA_HOME=/usr/lib/jvm/java-1.8.0-openjdk-1.8.0.121-0.b13.el6_8.x86_64/jre
Running Environment
Operating System: Ubuntu 24.04.3 LTS / x86_64
Runtime Version: GNU bash, version 5.2.21(1)-release (x86_64-pc-linux-gnu)
./bin/hdfs namenode -format
Exiting with status 0则表示成功。./sbin/start-dfs.sh
NameNode 进程,DataNode 进程,SecondaryNameNode 进程。安装 Spark
Hadoop 用户进行操作。cp ./conf/spark-env.sh.template ./conf/spark-env.shvim ./conf/spark-env.sh
export SPARK_DIST_CLASSPATH=$(/usr/local/hadoop/bin/hadoop classpath)
Running Environment
Operating System: Ubuntu 24.04.3 LTS / x86_64
Runtime Version: GNU bash, version 5.2.21(1)-release (x86_64-pc-linux-gnu)
bin/run-example SparkPi


