总览
本文以【Qwen2-7B-Instruct】模型为例,介绍如何将自定义大模型导入到 TI-ONE 平台,并使用平台内置推理镜像部署大模型推理服务。
前置要求
申请 CFS 或 GooseFSx
在部署自定义 LLM 大模型之前,您需要提前将大模型文件存储到腾讯云 CFS 或 GooseFSx ,所以请提前申请 CFS 或 GooseFSx,详情请查看 文件存储-创建文件系统及挂载点 或者 数据加速器 GooseFS。
操作步骤
1. 上传模型文件到 CFS 或 GooseFSx
登录 TI-ONE 平台 训练工坊 > 开发机,单击新建,其中各字段的填写说明如下:
镜像:选择任意内置镜像即可。
计费模式:选择按量计费或包年包月均可,平台支持的计费规则请您查看 计费概述。
存储配置:选择 CFS 或 GooseFSx 文件系统,路径默认为根目录 /,用于指定保存用户自定义大模型位置。
其它设置:默认不需要填写。
说明:
本开发机实例仅用于上传或下载大模型文件,所以算力规格选择 CPU 算力即可。
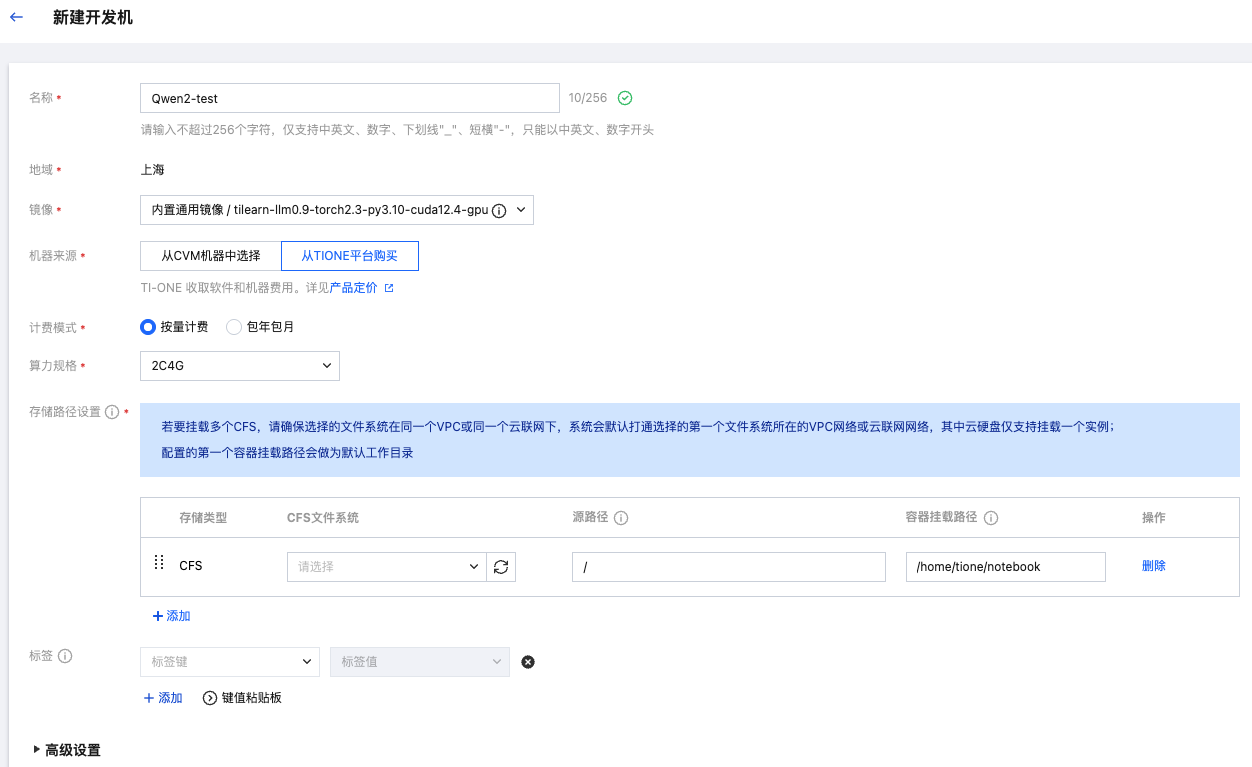
新建完成,待开发机处于“运行中”状态后,单击 打开 > Python3(ipykernel) 通过脚本下载所需模型文件。
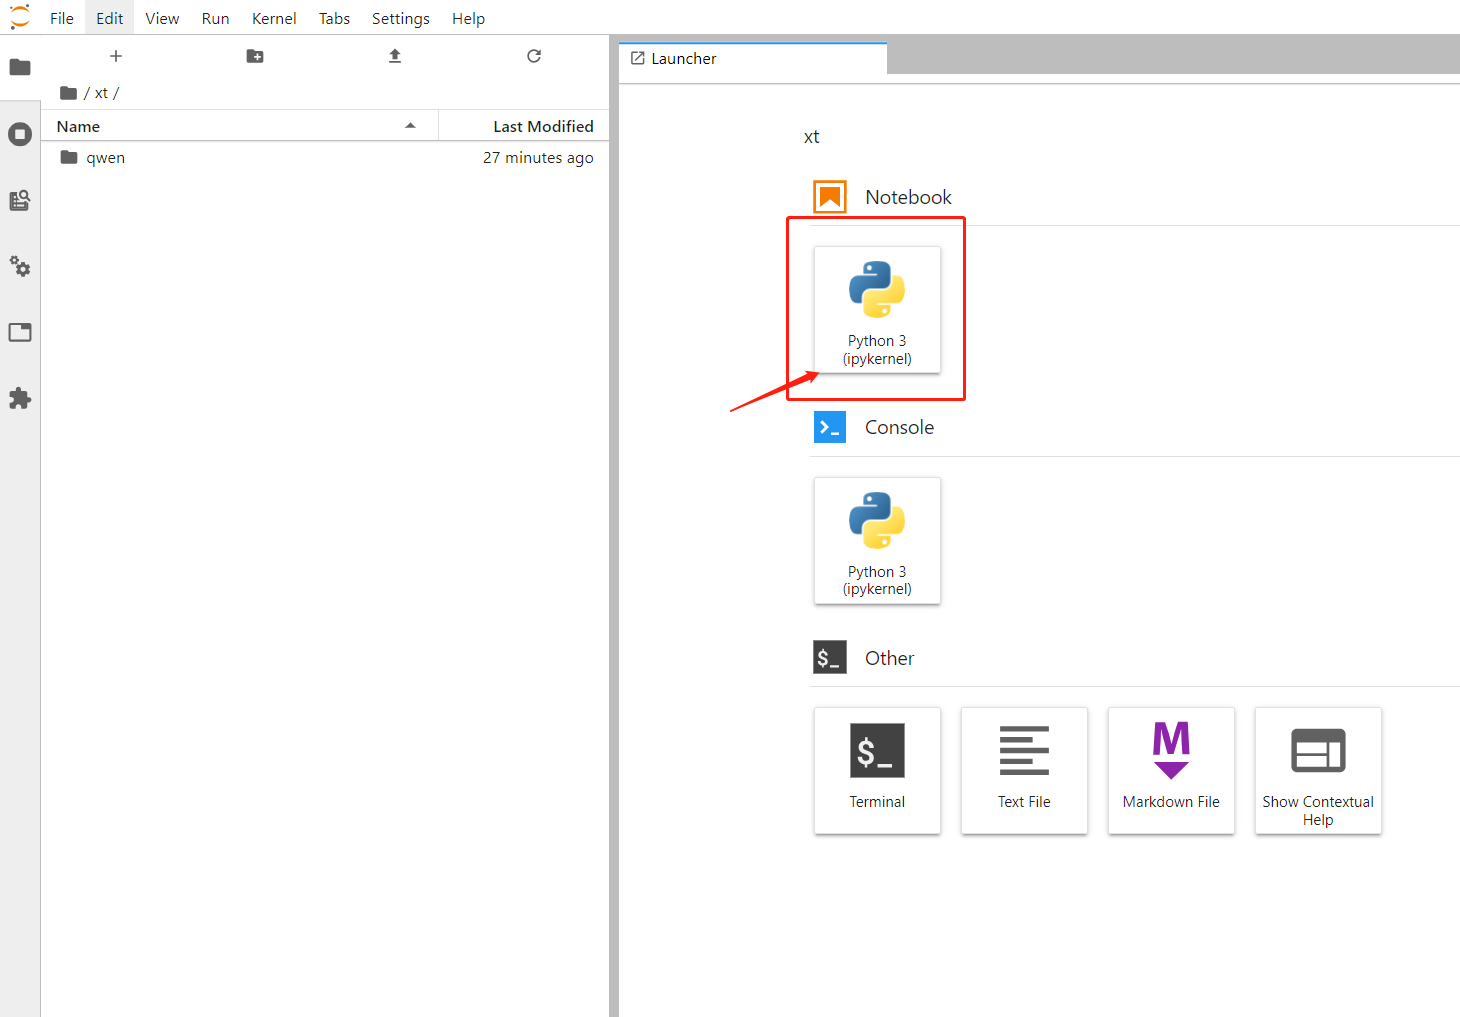
您可在魔搭社区或 Hugging Face 检索需要用到的大模型,通过社区中 Python 脚本自行下载模型并保存到 CFS 中,本文以【Qwen2-7B-Instruct】模型为例,下载代码如下:
!pip install modelscopefrom modelscope import snapshot_download#qwen/Qwen2-7B-Instruct为需要下载的模型名称,cache_dir为下载模型保存的地址,这里'./'表示将下载模型保存在CFS的根目录中model_dir = snapshot_download('qwen/Qwen2-7B-Instruct', cache_dir='./')
说明:
指定下载模型的地址 cache_dir(例如 path/to/local/dir)后,后续在线服务 CFS 中指定模型地址为 /path/to/local/dir/qwen/Qwen2-7B-Instruct。
复制上述下载脚本并更换需要下载的模型后,粘贴到新建的 ipynb 文件中,点击运行按钮即可开始下载模型;
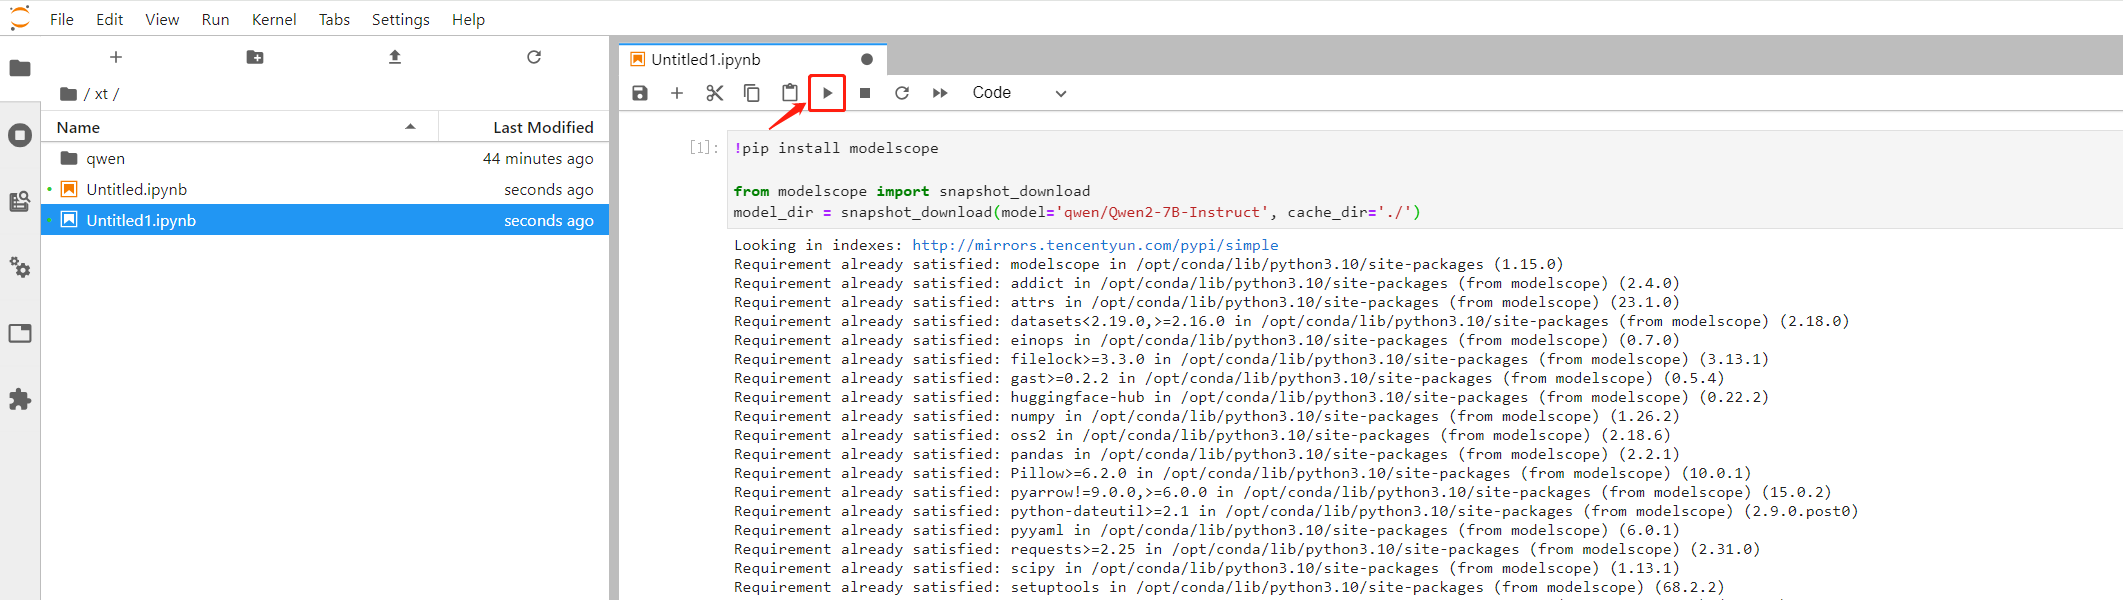
此外您也可以在本地下载或微调后,通过开发机的上传通道将模型文件保存至 CFS 中,上传接口如图所示:
2. 创建在线服务
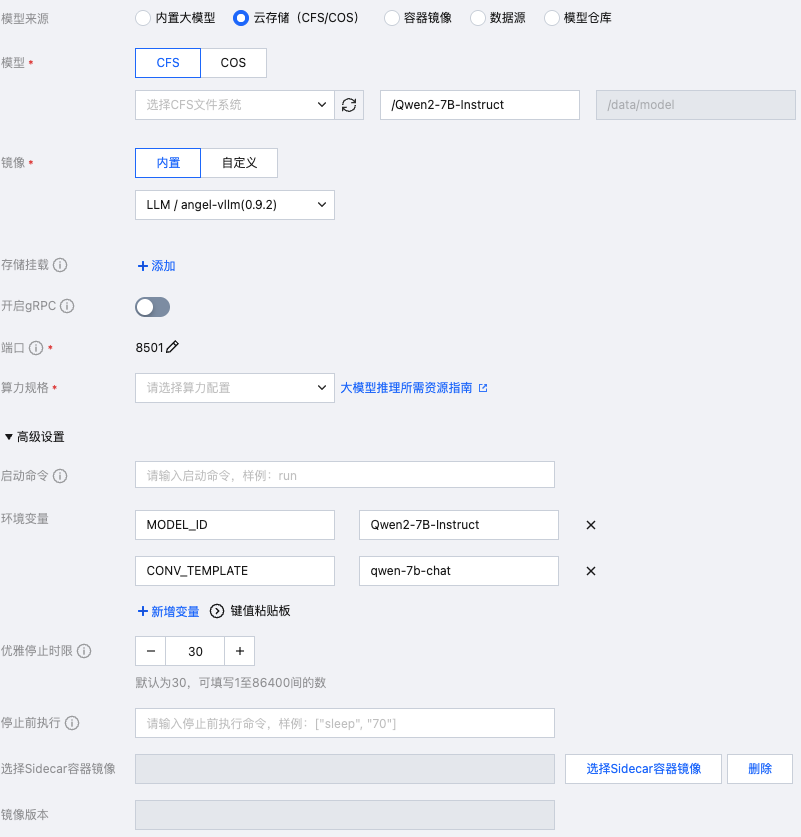
通过 TI-ONE 平台的模型服务 > 在线服务,单击新建服务来启动推理服务,以下是服务实例配置的指引。
模型来源:选择 云存储>CFS。
模型:选择 CFS 文件系统中存储的模型文件路径,此处为【/qwen/Qwen2-7B-Instruct】。
镜像:选择【内置 / LLM / angel-vllm】。
算力规格:根据实际的模型大小或拥有的资源情况选择,大模型推理时需要的机器资源与模型的参数量相关,推荐按如下规则配置推理服务资源。
模型参数量 | GPU 卡类型和数量 |
6 ~ 8B | L20 * 1 / A10 * 1 / A100 * 1 / V100 * 1 |
12 ~ 14B | L20 * 1 / A10 * 2 / A100 * 1 / V100 * 2 |
65 ~ 72B | L20 * 8 / A100 * 8 |
【高级设置 > 环境变量】:需要设置模型名称 MODEL_ID(魔搭社区或 Hugging Face 上开源模型 ID),以及对话模板名称 CONV_TEMPLATE (若 MODEL_ID 与开源模型相同,可以不添加 CONV_TEMPLATE 参数),常用的对话模板名称如下表所示,本文使用 qwen-chat 系列,故设置为 qwen-7b-chat。
对话模板名称 CONV_TEMPLATE | 支持的模型系列 MODEL_ID |
generate | 非对话模型(直接生成,无对话模板) |
llama-3 | llama-3-8b-instruct、llama-3-70b-instruct 模型 |
llama-2 | llama-2-chat 系列模型 |
qwen-7b-chat | qwen-chat 系列模型(chatml 格式) |
baichuan2-chat | baichuan2-chat 系列模型 |
baichuan-chat | baichuan-13b-chat 模型 |
chatglm3 | chatglm3-6b 模型 |
chatglm2 | chatglm2-6b 模型 |
在线服务创建实例配置如下:
注意:
如果对推理速度有较高要求,推荐您开启量化加速,通过环境变量 QUANTIZATION 设置,可选值有"none", "ifq", "smoothquant", "auto"。
none:表示关闭量化加速
ifq:表示开启在线 Int8 Weight-Only 量化,可以在效果基本不损失的情况下加速推理,并减少模型权重的显存占用。
smoothquant:表示开启 LayerwiseSearchSMQ 量化 ,可以在效果略微损失的情况下进一步加速推理(依赖提前准备量化后的模型文件,当前仅部分模型支持)
auto:表示自动判断量化模式,其中:
若机型的显卡不支持量化,自动关闭量化。
若模型目录中包含 smoothq_model-8bit-auto.safetensors 文件,会自动开启 LayerwiseSearchSMQ 量化加速。
其他情况下,默认开启在线 Int8 Weight-Only 量化加速(ifq)。
若开启服务后日志报错 CUDA out of memory,此处由于模型 max-model-len 参数默认值32k较大(推理服务支持的最大上下文 token 数,默认为自动读取模型配置信息的上下文长度,若模型加载默认的上下文长度较大会导致显存不足),可通过环境变量 MAX_MODEL_LEN 来设置较小的数值(例如16k或8k),也可以通过开启量化加速减少模型权重所占用的显存。
3. 前端在线体验
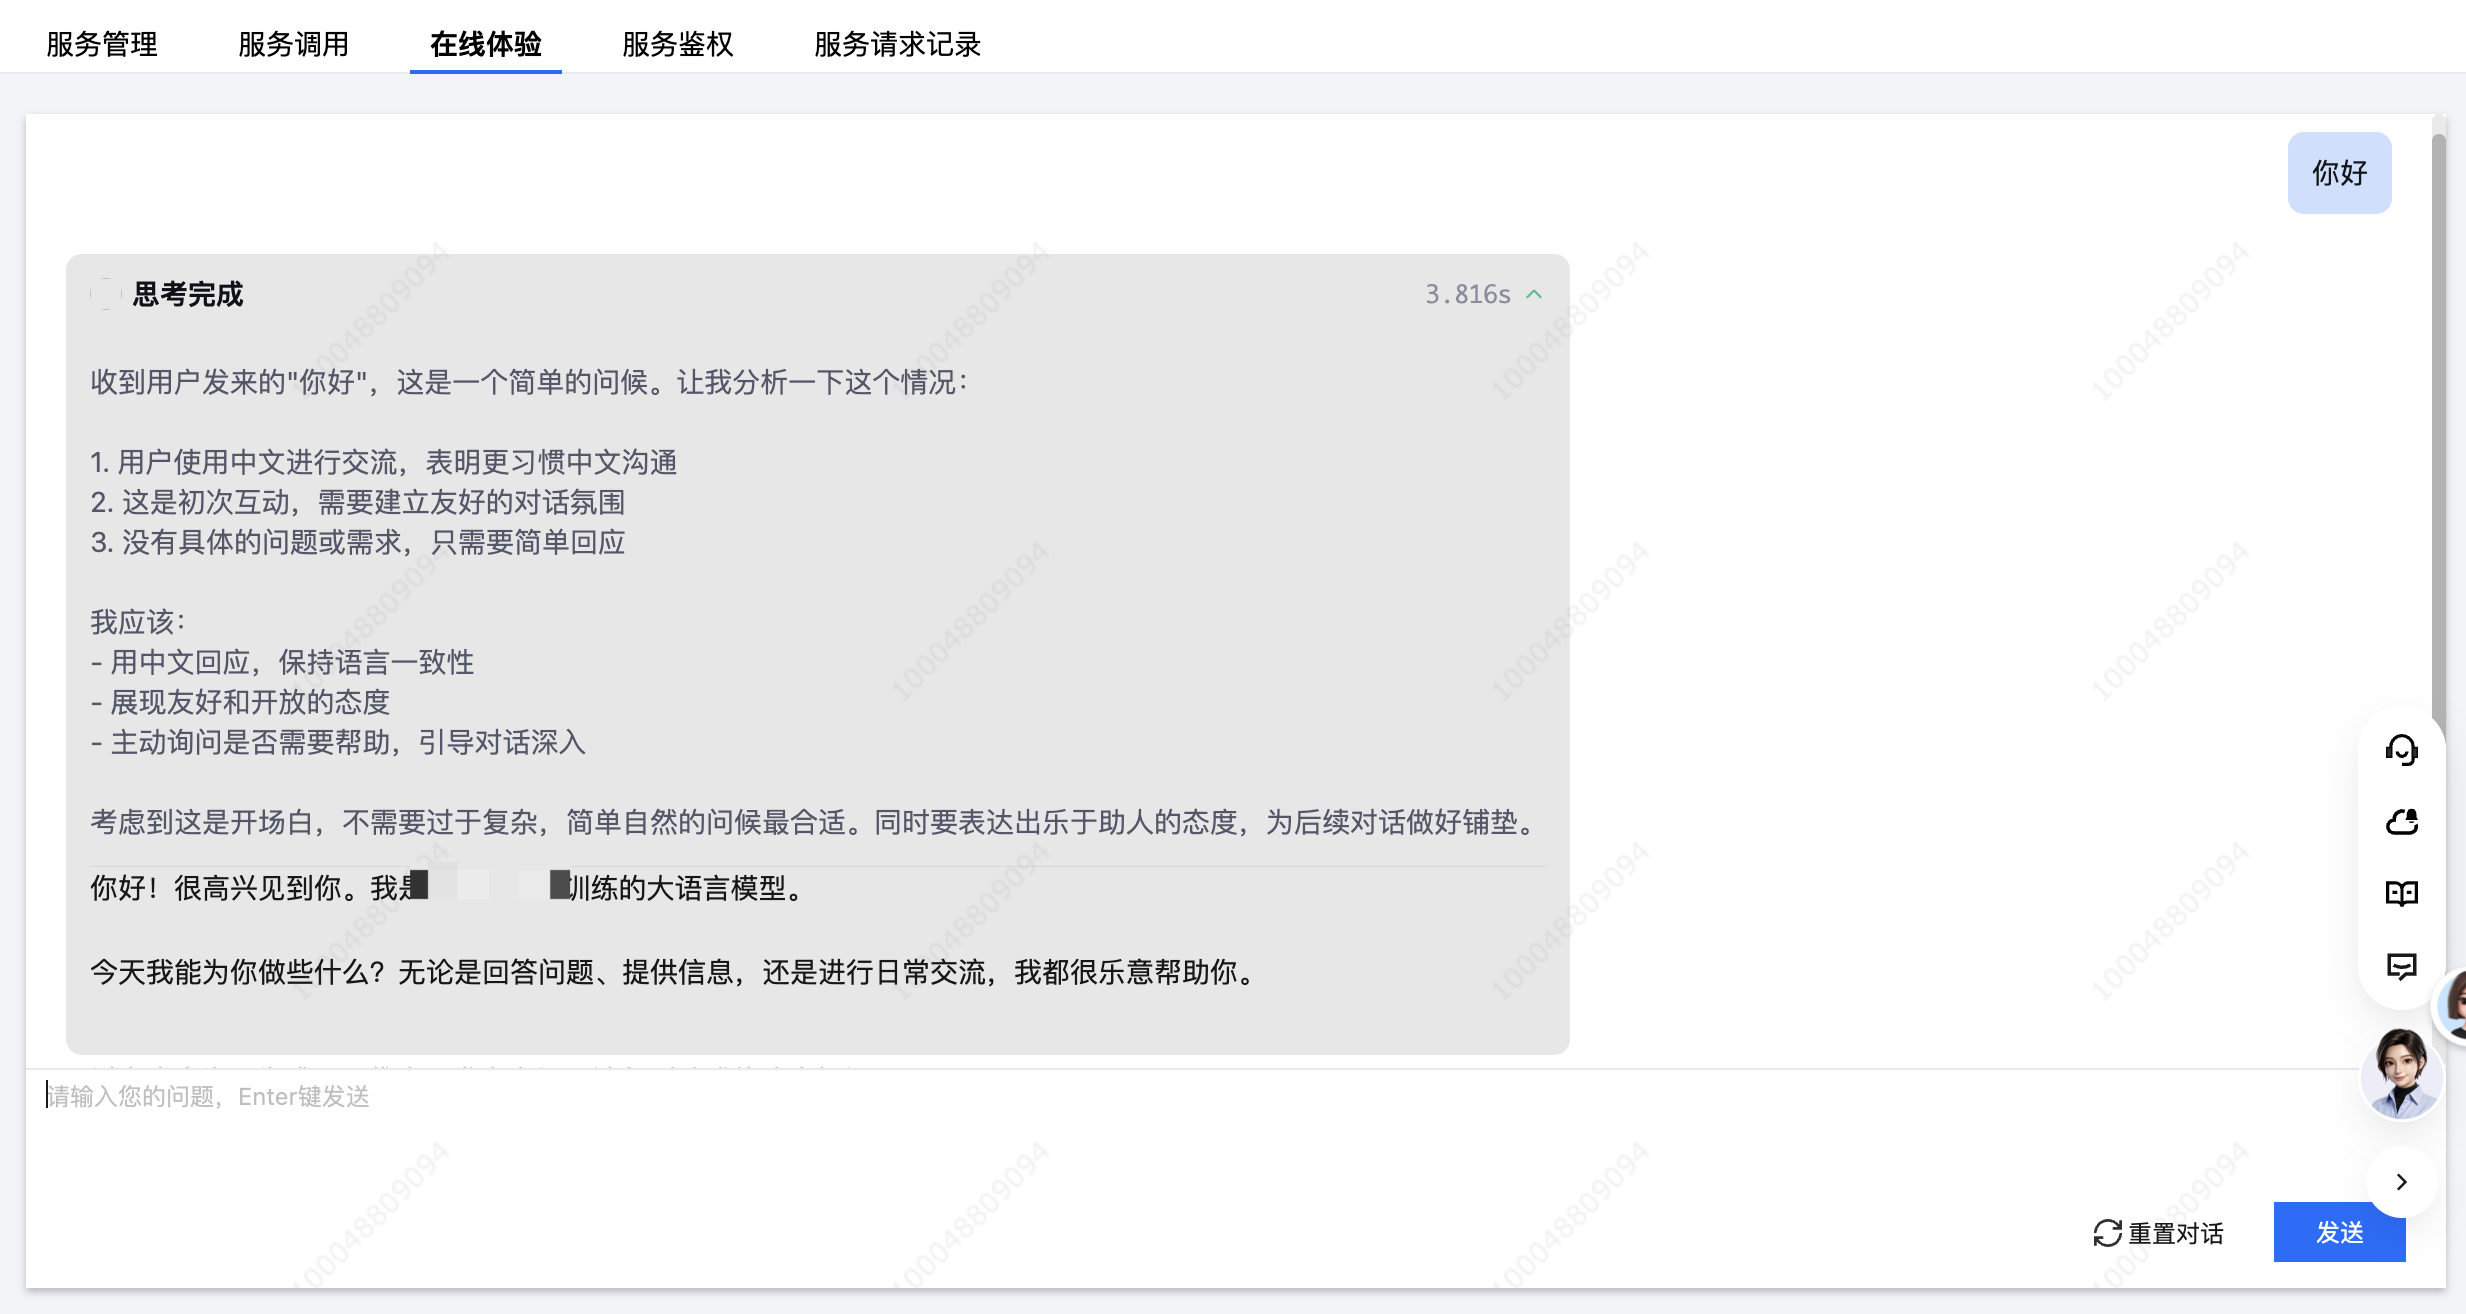
进入创建的在线服务详情页,通过点击 在线体验 Tab 页即可与部署成功的大模型进行对话体验。
4. 接口服务调用
可通过服务调用 Tab 页中的接口信息 > 调用方式(在线测试)进行访问,接口的调用地址为 ${SERVER_URL}/v1/chat/completions,请求体的格式:
{"messages":[{"role": "user", "content": "你是谁"}]}
字段 content 为具体的消息内容。
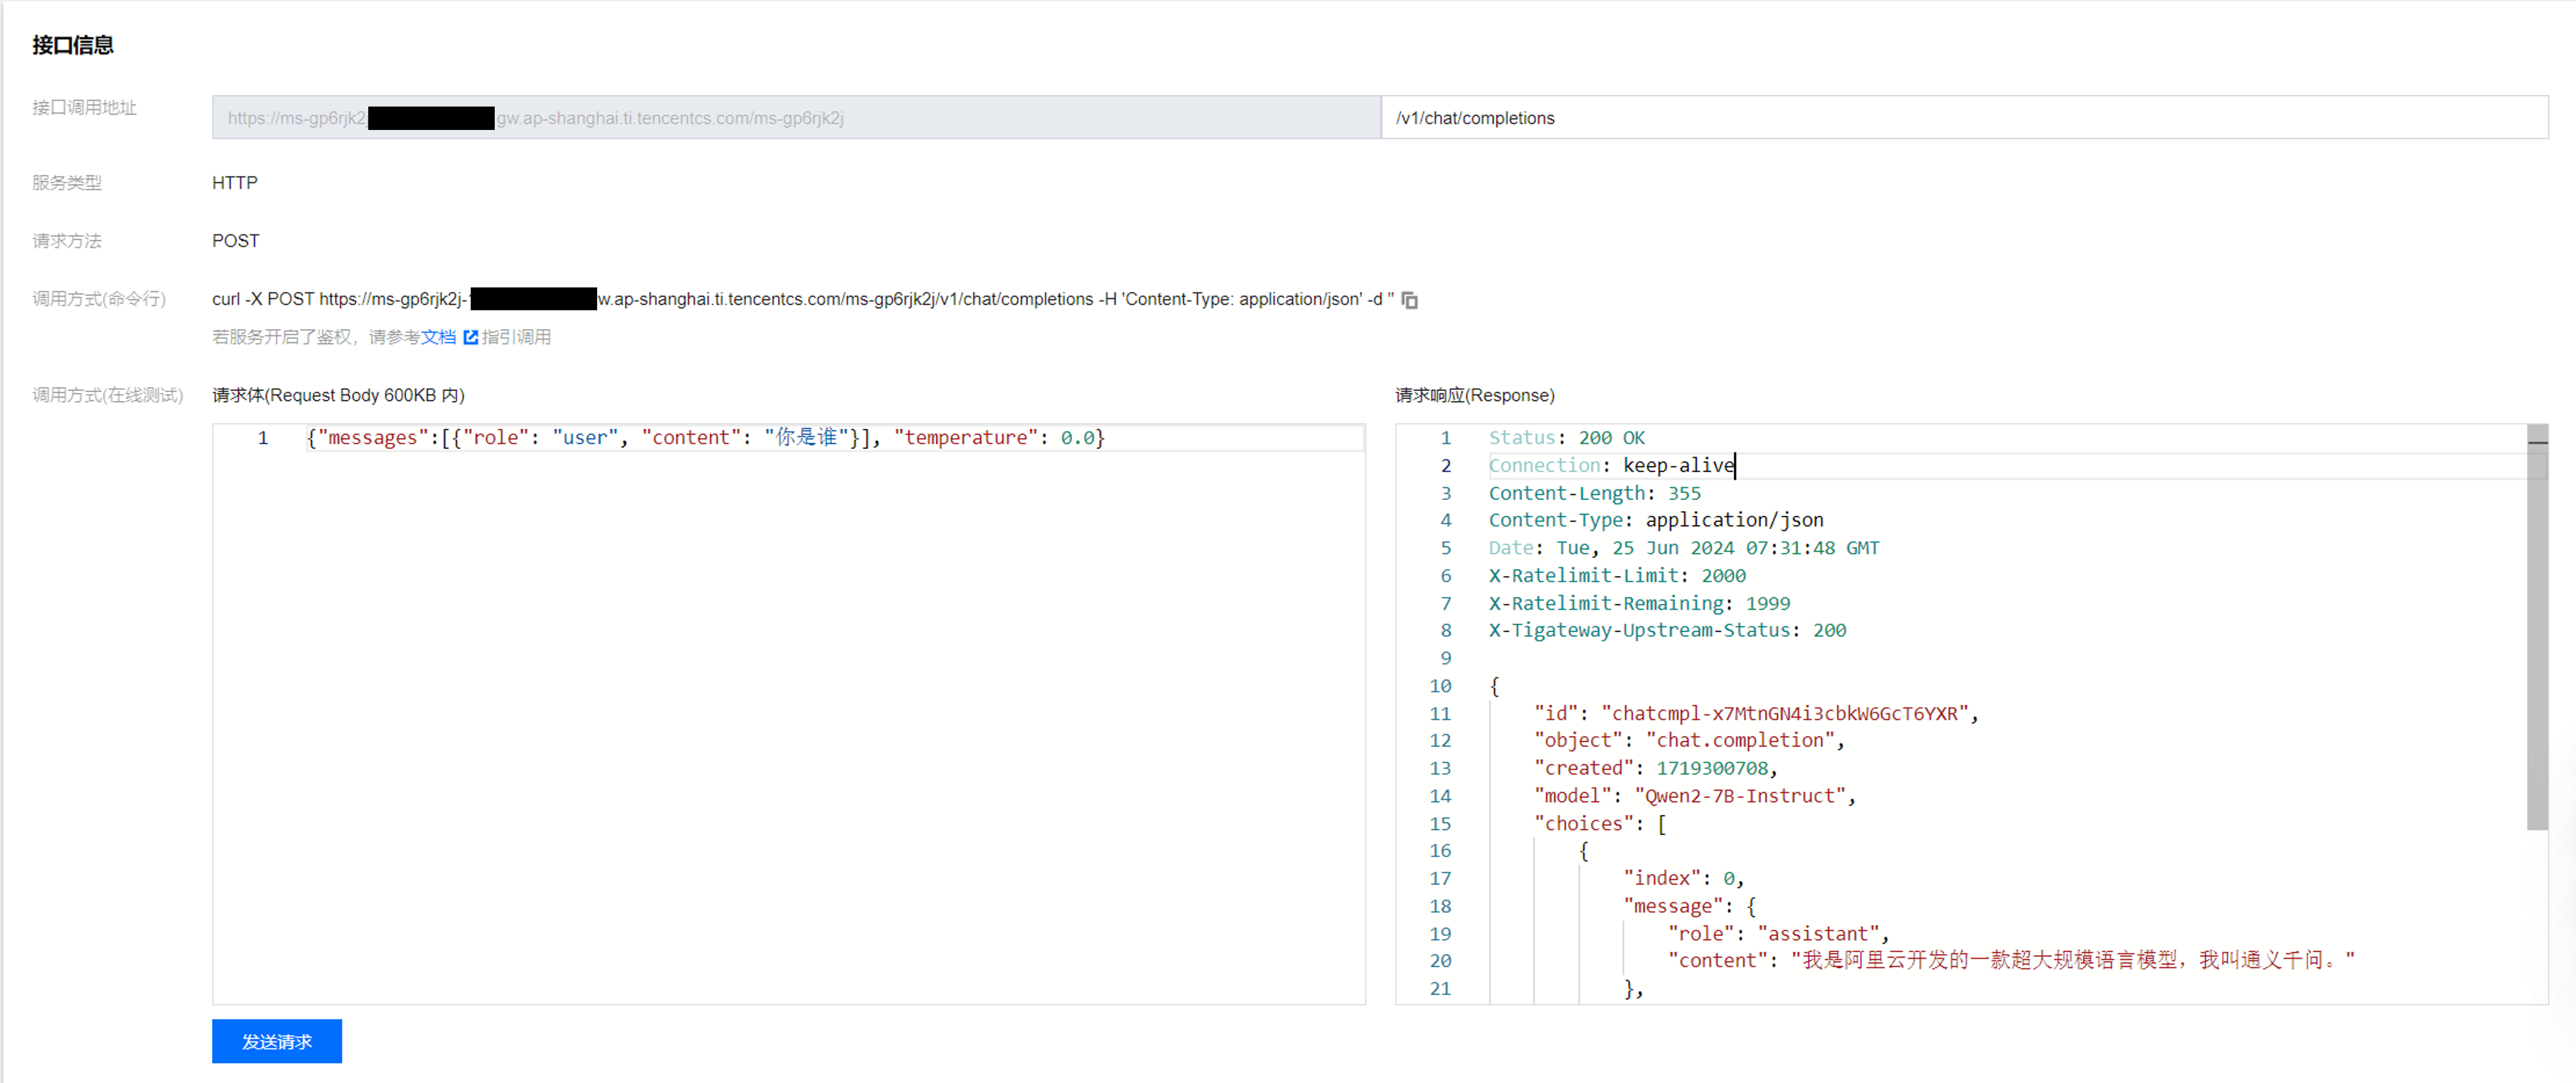
公网访问地址可从在线服务实例服务调用中获取,API 调用示例如下:
# 公网访问地址SERVER_URL = https://ms-gp6rjk2jj-**********.gw.ap-shanghai.ti.tencentcs.com/ms-gp6rjk2j# 非流式调用curl -H "content-type: application/json" ${SERVER_URL}/v1/chat/completions -d '{"messages":[{"role": "user", "content": "你好"}], "temperature": 0.0}'# 流式调用curl -H "content-type: application/json" ${SERVER_URL}/v1/chat/completions -d '{"messages":[{"role": "user", "content": "你好"}], "temperature": 0.0, "stream": true}'
非流式返回结果:
{"id":"chatcmpl-4aeRgYwnaYe4RzmmcyKtYs","object":"chat.completion","created":1698291242,"model":"baichuan-13b-chat","choices":[{"index":0,"message":{"role":"assistant","content":"你好!有什么我能帮到你的吗?"},"finish_reason":"stop"}],"usage":{"prompt_tokens":4,"total_tokens":16,"completion_tokens":12}}
流式返回结果:
data: {"id": "chatcmpl-hn5mCVt4szVVZBa4fVFZWF", "model": "baichuan-13b-chat", "choices": [{"index": 0, "delta": {"role": "assistant"}, "finish_reason": null}]}data: {"id": "chatcmpl-hn5mCVt4szVVZBa4fVFZWF", "model": "baichuan-13b-chat", "choices": [{"index": 0, "delta": {"content": " 你"}, "finish_reason": null}], "usage": {"prompt_tokens": 4, "total_tokens": 5, "completion_tokens": 1}}data: {"id": "chatcmpl-hn5mCVt4szVVZBa4fVFZWF", "model": "baichuan-13b-chat", "choices": [{"index": 0, "delta": {"content": "好"}, "finish_reason": null}], "usage": {"prompt_tokens": 4, "total_tokens": 6, "completion_tokens": 2}}..........此处省略中间结果..............data: {"id": "chatcmpl-hn5mCVt4szVVZBa4fVFZWF", "model": "baichuan-13b-chat", "choices": [{"index": 0, "delta": {"content": "?"}, "finish_reason": null}], "usage": {"prompt_tokens": 4, "total_tokens": 15, "completion_tokens": 11}}data: {"id": "chatcmpl-hn5mCVt4szVVZBa4fVFZWF", "object": "chat.completion.chunk", "created": 1714120317, "model": "baichuan-13b-chat", "choices": [{"index": 0, "delta": {}, "finish_reason": "stop"}], "usage": {"prompt_tokens": 4, "total_tokens": 16, "completion_tokens": 12}}data: [DONE]
另外也可以通过 Python 常用的 requests 库来使用服务,下面是一个命令行与 Qwen2-7B-Instruct 大模型推理服务进行对话交互的 Demo 示例:
import argparseimport requestsimport jsondef chat(messages):data = {"messages": messages,"temperature": args.temperature,"max_tokens": args.max_tokens,"top_p": args.top_p,"stream": True, # 开启流式输出}header = {"Content-Type": "application/json",}if args.token:header["Authorization"] = f"Bearer {args.token}"response = requests.post(f"{args.server}/v1/chat/completions", json=data, headers=header, stream=True) # 设置 stream=True 参数获取实时数据流if response.status_code != 200:print(response.json())exit()result = ""print("Assistant: ", end = "", flush = True)for part in response.iter_lines():if part:if "content" in part.decode("utf-8"):content = json.loads(part.decode("utf-8")[5:])["choices"][0]["delta"]["content"] # 字符串过滤 data: 之后转成 json 格式再取文本result += contentprint(content, end = "", flush = True)print("\\n")return resultif __name__ == "__main__":parser = argparse.ArgumentParser(description="Chat CLI Demo.")# --server替换为实际的调用地址parser.add_argument("--server", type=str, default="https://ms-gp6rjk2j-*******.gw.ap-shanghai.ti.tencentcs.com/ms-gp6rjk2j")parser.add_argument("--max-tokens", type=int, default=512)parser.add_argument("--temperature", type=float, default=0.7)parser.add_argument("--top_p", type=float, default=1.0)parser.add_argument("--system", type=str, default=None)parser.add_argument("--token", type=str, default=None)args = parser.parse_args()messages = []if args.system:messages.append({"role": "system", "content": args.system})while True:user_input = input("User: ")messages.append({"role": "user", "content": user_input})response = chat(messages)messages.append({"role": "assistant", "content": response})


