概述
本文以 qwen2-7b-instruct 为例,展示如何使用 TI-ONE 平台部署并推理加速自定义大模型,最后通过测试脚本给出加速量化性能测试使用方法;您也可以基于本文相关脚本,测试通过 TI-ONE 平台内置推理镜像 Angel-vLLM 推理加速的效果。
Angel-vLLM 是腾讯云 AI 加速团队基于开源 vLLM 深度优化的大模型推理加速框架。在保持和社区 vLLM 相同使用接口和完全兼容社区 vLLM 功能的同时,具备如下特点:
1. 功能更丰富。相比 vLLM 社区开源版本,Angel-vLLM 提供了 INT8,NF4,FP8 在线量化,lookahead 并行解码等功能。
2. 性能更强大。相比 vLLM 社区开源版本,Angel-vLLM 量化不仅节省显存,也可以降低延迟,提升吞吐。lookahead 并行解码经过实际业务打磨,在 RAG 场景提升明显。
3. 精度更对齐。Angel-vLLM 生成结果经过大量上线业务检验,可以做到和 HuggingFace 生成结果完全对齐或精度保持基本不变。
TI-ONE 平台内置了已集成好 Angel-vLLM 推理加速框架的推理镜像,方便您一键部署兼容 openai 接口协议的 LLM 推理服务。
本文将介绍如何在 TI-ONE 平台使用内置的 Angel-vLLM 镜像来部署 LLM 推理服务,开启 Angel-vLLM 加速能力,并进行接口调用。
前置要求
用户通过 TI-ONE 平台部署并通过内置推理加速镜像 Angel-vLLM 使用自有模型,首先需要准备如下资源(包含存储模型等文件的 CFS 以及推理模型使用的算力资源 GPU 等)。
文件存储
申请 CFS:在自定义大模型部署推理过程中模型文件使用到的存储为 CFS,所以需要您首先申请 CFS,CFS 实例区别详见文件存储-存储类型及性能规格。请保证购买的 CFS 实例与上述算力资源机器的网络互通。CFS 使用详情请查看 文件存储-创建文件系统及挂载点。
说明:若您的基础存储服务是 GooseFSx,整体操作和本文介绍的 CFS 类似也可直接参考。
算力资源
自行购买算力:若您首次使用 TI-ONE 平台,请参考 资源组管理 指引,根据推理的模型参数购买合理的算力资源。
根据实际的模型大小或拥有的资源情况选择,大模型推理时需要的机器资源与模型的参数量及上下文长度相关,推荐按如下表格快速预估推理服务资源,详细的显存占用大小请参考 推理资源要求。
模型参数量 | GPU 卡类型和数量 |
6 ~ 8B | PNV5b * 1 / A10 * 1 / A100 * 1 / V100 * 1 |
12 ~ 14B | PNV5b * 1 / A10 * 2 / A100 * 1 / V100 * 2 |
65 ~ 72B | PNV5b * 8 / A100 * 8 |
操作步骤
模型准备
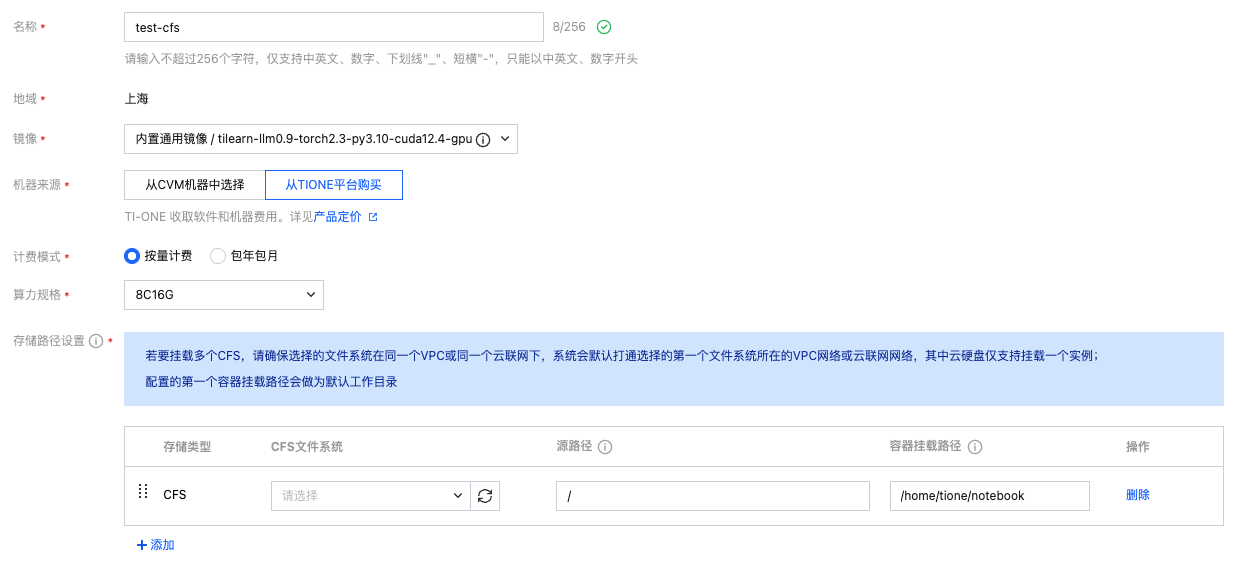
选择训练工坊 > 开发机 > 新建,创建开发机:
镜像:选择任意内置镜像即可,本开发机实例仅用于下载模型文件。
机器来源:若您先前没有购买任何算力资源,可选择从 TIONE 平台购买按量计费模式,若您需要从 CVM 机器中选择或包年包月,请参考前置条件中算力资源自行购买。
计费模式:选择按量计费或包年包月均可,平台支持的计费规则请您查看 计费概述。
存储配置:选择 CFS 文件系统,名称为上文前置要求中申请配置好的 CFS,路径默认为根目录,用于指定保存用户自定义大模型位置。
其它设置:默认不需要填写。
说明:这里我们通过开发机下载或上传所需的模型文件,示例使用的资源为 CPU 8 核内存 16 GiB(只用于开发机实例,与后续推理服务无关,可适当减少资源)。
最终配置如下图:
模型文件
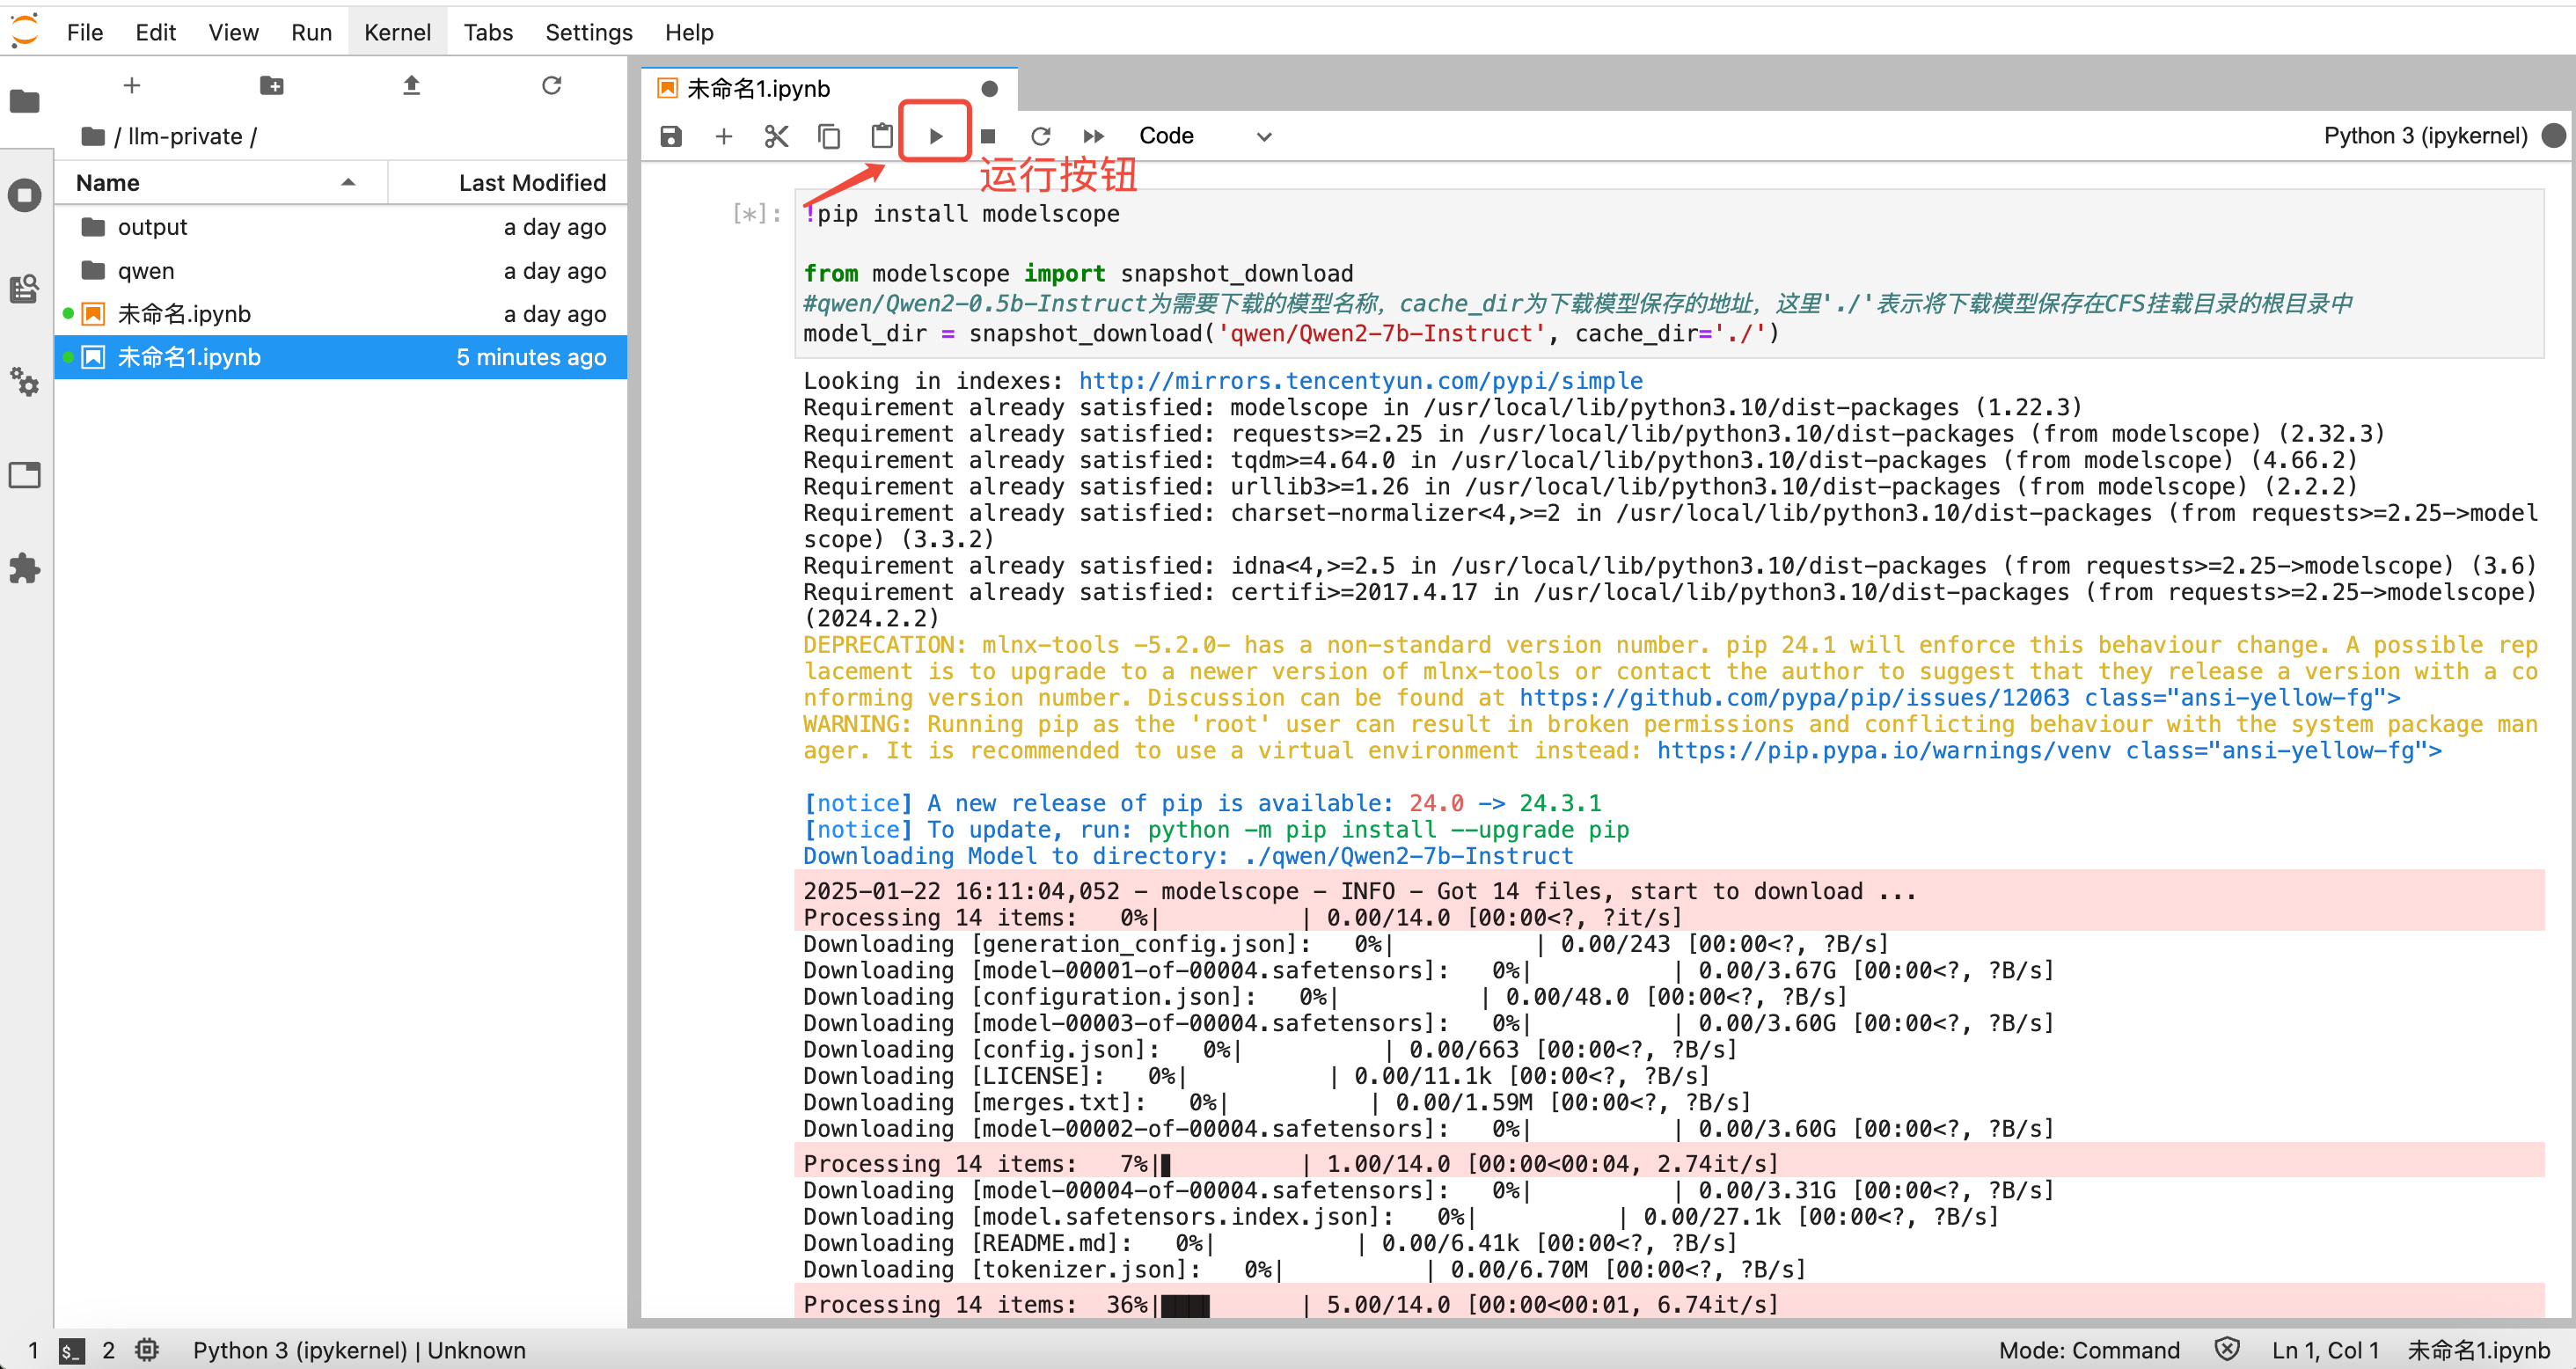
新建成功后启动开发机,单击开发机下 python3 的 kernel 来新建一个 ipynb 页面通过脚本下载所需模型;您可在 魔搭社区 或 Hugging Face 检索需要用到的大模型,通过社区中 Python 脚本自行下载模型并保存到 CFS 中,本文以【Qwen2-7b-Instruct】模型为例,下载代码如下:
!pip install modelscopefrom modelscope import snapshot_download#qwen/Qwen2-7b-Instruct为需要下载的模型名称,cache_dir为下载模型保存的地址,这里'/home/tione/notebook'表示将下载模型保存在CFS挂载目录的根目录中model_dir = snapshot_download('qwen/Qwen2-7b-Instruct', cache_dir='/home/tione/notebook')
注意:这里路径映射的关系如下,以 CFS 挂载时容器挂载路径为 "/home/tione/notebook" 为例,若 CFS 源路径为 "/",cache_dir 为 "/home/tione/notebook",则模型实际保存在 CFS 的根路径下;若 CFS 路径为 "/dir",cache_dir 为 "/home/tione/notebook/model",则模型实际保存在 CFS 的 "/dir/model" 目录下。
复制上述下载脚本并替换 "qwen/Qwen2-7b-Instruct" 为您需要下载的模型后,粘贴到新建的 ipynb 文件中,单击运行(或单击 cell 格后,键入"enter+shift")即可开始下载模型。
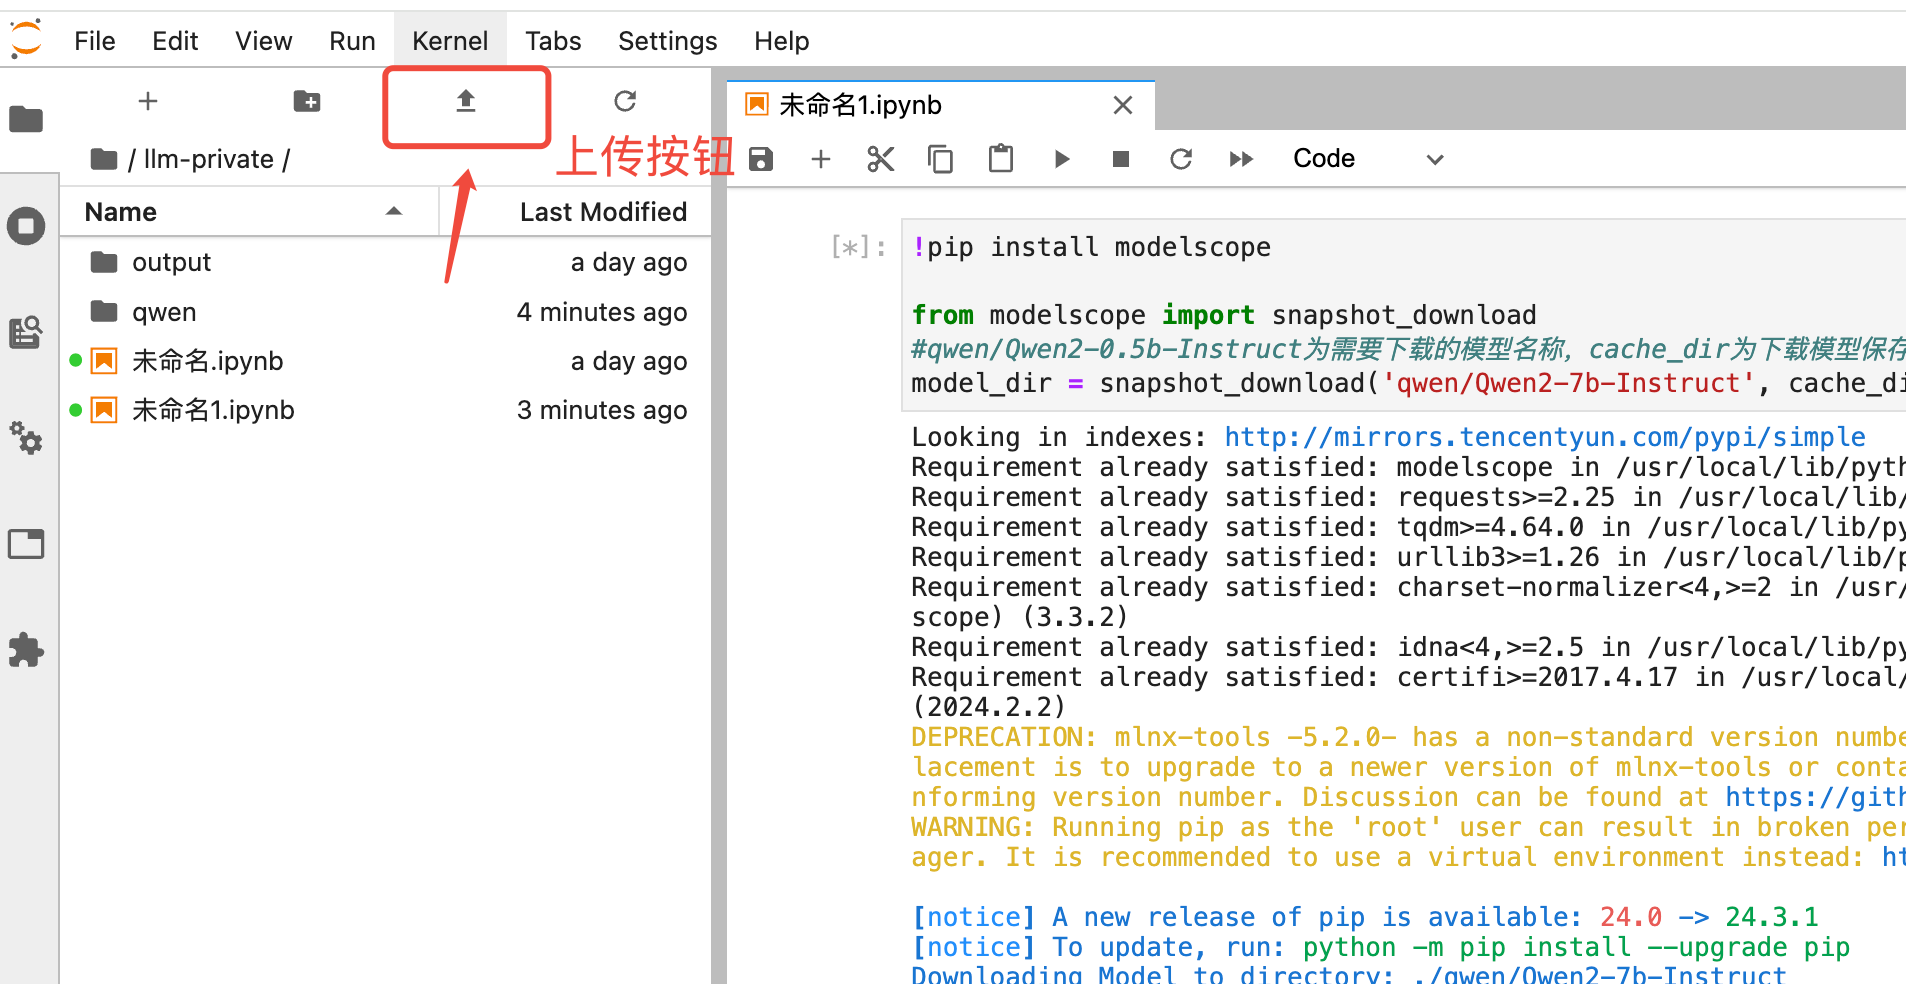
此外,您也可将本地已有大模型文件,通过本地上传,如下图:
注意:这种上传方式带宽有限,建议只传 10MB 以内的文件,若您的模型较大,建议通过腾讯云 COS 中转上传(推荐上传到与 CFS 相同地域的 COS 存储桶中)。桌面端使用 COS 可以参考 对象存储-桌面端使用说明,命令行使用 COS 可以参考 对象存储-COSCMD 工具 或 对象存储-COSCLI 简介,然后在开发机中安装 coscmd 或 coscli 工具来下载文件到 CFS 中。
部署流程
服务名称:自定义填写;
机器来源:按需选择从 CVM 机器中选择或从 TIONE 平台购买,然后选择对应的资源组或使用按量计费模式按需选择算力规格;
部署方式:若单机资源足够部署模型,推荐选择标准部署;若需要部署超大模型,单机资源不足,可以选择多机分布式部署;
副本设置:
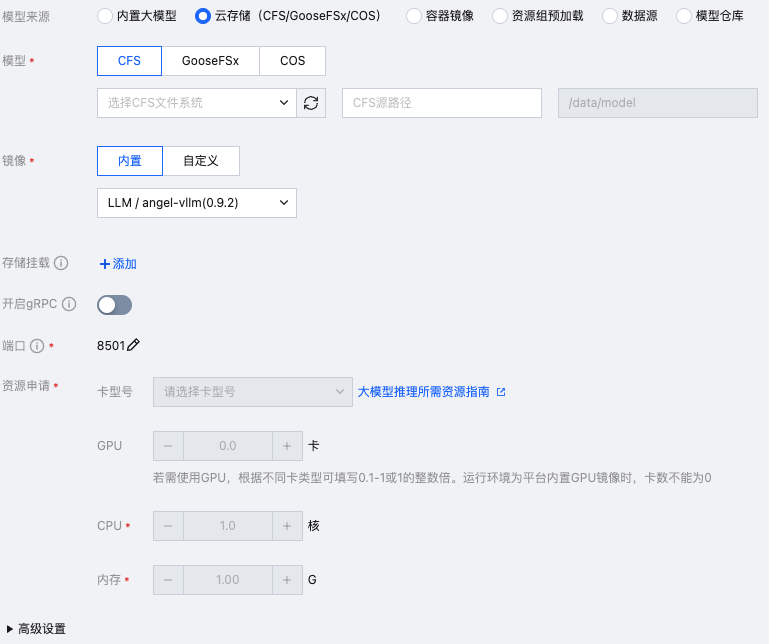
模型来源:选择 云存储>CFS;
模型:选择模型所在的 CFS 实例,然后填写模型文件在 CFS 上的源路径;若需要选择训练产出的某一个 checkpoint,则路径按实际训练输出路径填写且注意填写到 checkpoint 这一级目录;
镜像:选择 内置 / LLM / angel-vllm(2.1);
资源申请 / 算力规格:按需选择模型需要的算力资源,资源要求可参考附录 推理资源要求;
高级设置:启动命令和环境变量请参考 服务部署参数。
单击启动服务,服务会进入创建流程。此时服务的状态可能会在就绪中状态维持一段时间,表示服务还没有启动完成,您可以通过单击具体服务的事件或日志标签页来查看服务的具体启动进程。
服务部署参数
启动命令说明
镜像的默认启动命令(即不填写启动命令的默认值)为
run,整体功能基本等价于 vLLM 自带的启动命令 vllm serve 或 python3 -m vllm.entrypoints.openai.api_server默认启动命令相比 vLLM 自带的启动命令的主要区别是:
新增部分参数通过环境变量设置功能,详见下面的启动命令参数和环境变量说明;
调整了部分参数的默认值,支持部分参数自动配置,详见下面的启动命令参数和环境变量说明;
当使用多机分布式部署方式时,自动建立多机 Ray 通信环境;
支持 TI-ONE 平台内置大模型训练的 LoRA 模型快速启动模型服务(自动开启 multi-lora 或做 LoRA 权重合并);
对 CFS Turbo 存储介质上的模型的内存预读加载速度优化。
以下所有启动命令参数对于
run、vllm serve、python3 -m vllm.entrypoints.openai.api_server三种启动命令均兼容,环境变量仅默认的run启动命令支持。启动命令参数和环境变量说明
参数详解
Angel-vLLM 核心加速功能参数:
启动命令参数 | 环境变量 | 含义 |
--quantization | QUANTIZATION | 量化方式,默认未设置,相比开源 vLLM 0.6.2 版本新增以下量化方式: fp8:W8A8 FP8 精度量化,支持 NVIDIA 计算能力 >= 8.9 的显卡系列(Ada Lovelace、Hopper),模型权重的显存占用降低 50%,提升推理速度,精度几乎无损;ifq_nf4:W4A16 NF4 精度量化,支持 NVIDIA 计算能力 >= 8.0 的显卡系列(Ampere、Ada Lovelace、Hopper),模型权重的显存占用降低 75%,提升推理速度,相比 INT4 量化精度更好(该量化方式仅支持基于 float16 精度量化,即 --dtype float16);ifq:W8A16 INT8 精度量化,支持 NVIDIA 计算能力 >= 7.0 的显卡系列(Volta、Turing、Ampere、Ada Lovelace、Hopper),模型权重的显存占用降低 50%,提升推理速度,精度几乎无损;这 3 种量化方式都支持一键在线量化,无需提前对模型做转换或离线校准。 显存占用:ifq_nf4 < fp8 = ifq < 非量化 推理速度:fp8 >= ifq_nf4 > ifq > 非量化 模型精度:非量化 >= fp8 >= ifq > ifq_nf4 |
--use-lookahead | USE_LOOKAHEAD | 默认为"0",设置为"1"表示开启 Lookahead 并行解码,很多场景下可以显著加快解码速度;相比开源实现,Lookahead 并行解码无需额外的小模型或模型头,可以做到并行解码的结果和非并行解码的结果一致,对于输出文本中有大部分在输入文本中都出现过(例如 RAG 场景),或是大量请求中有相似的请求或答案的情况下有明显的加速效果(加速效果请参见 附录)。 |
--num-speculative-tokens | NUM_SPECULATIVE_TOKENS | 默认为"6",表示 Lookahead 并行解码一次解码长度,若实际需要支持的并发数较大,可以调小此值,并发数小,可以调大此值。 |
为了兼容更多场景,平台内置镜像调整了部分启动参数默认值,以下启动参数与 vLLM 的默认启动参数不同:
启动命令参数 | 环境变量 | 含义 |
--max-model-len | MAX_MODEL_LEN | 模型最大上下文长度,为兼容显存较小的机型,平台默认为上下文长度大于 8K 的模型调小此参数为 8192,若您实际需要支持更长上下文,您可以手动配置此参数来调整。 |
--dtype | DTYPE | 默认为 float16,若您希望使用 bfloat16 精度推理,请手动修改为 bfloat16。 |
--enable-prefix-caching | ENABLE_PREFIX_CACHING | 默认为 true,开启 prefix caching 功能,针对包含重复前缀的长文本输入或者连续多轮对话的首字延迟有显著加速效果。您可以设置环境变量 ENABLE_PREFIX_CACHING=false 来手动关闭。(V100 显卡由于暂不支持此功能,默认为 false)。 |
--tensor-parallel-size | TP | 默认为创建在线服务时指定的卡数,表示模型并行大小。 |
--trust-remote-code | TRUST_REMOTE_CODE | 默认为 true,以兼容需要开启此选项的模型,您可以设置环境变量 TRUST_REMOTE_CODE=false 来手动关闭。 |
--model | MODEL | 模型名称或路径,默认为 /data/model,对应平台默认容器内模型挂载路径。 |
--port | - | 服务端口,默认为 8501,对应平台默认推理服务端口。 |
--use-v2-block-manager | - | 默认为 true,使用 v2 block manager。 |
--chat-template | - | HuggingFace 对话模板, .jinja 对话模板文件路径或模板字符串(若您未设置此参数,但是指定了 MODEL_ID 或 CONV_TEMPLATE 环境变量,或模型目录中包含 ti_model_config.json 文件,平台会尝试做自动匹配设置,详见 对话模板)。 |
--tool-call-parser | - | 工具调用解析器,可选值 ["llama3_json", "hermes", "mistral", "internlm"] (若您未设置此参数,但是指定了 MODEL_ID 或 CONV_TEMPLATE 环境变量,或模型目录中包含 ti_model_config.json 文件,平台会尝试做自动匹配设置,详见 对话模板)。 |
--enable-auto-tool-choice | - | 开启自动工具调用能力,需和 --tool-call-parser 配合使用(若您未设置此参数,但是指定了 MODEL_ID 或 CONV_TEMPLATE 环境变量,或模型目录中包含 ti_model_config.json 文件,平台会尝试做自动匹配设置,详见 对话模板)。 |
其他平台镜像额外支持环境变量配置的参数:
启动命令参数 | 环境变量 | 含义 |
--gpu-memory-utilization | GPU_MEMORY_UTILIZATION | 显存使用率,默认 0.9。 |
--enforce-eager | ENFORCE_EAGER | 是否强制开启 PyTorch 的 eager 模式,默认 false ,此时会额外使用 CUDA graph 做进一步加速,但会占用额外显存,并增加一些服务启动耗时。 |
- | MODEL_ID | |
- | CONV_TEMPLATE | |
- | DISABLE_MEM_CACHE | 禁用内存缓存预读,默认 false。 |
使用说明
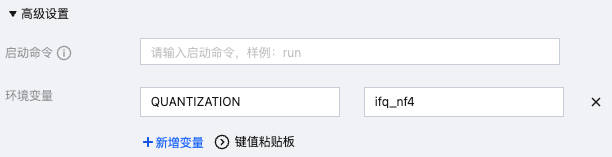
启动命令指定:高级设置 > 启动命令用法,例如使用 ifq_nf4 的量化,示例如下(若需要调整其他参数,请参考下文服务部署参数):

环境变量指定:高级设置 > 环境变量用法如下,例如使用 ifq_nf4 的量化,示例如下(其他参数的环境变量用法一致,注意环境变量需大写):
各个场景的推荐参数
在大多数情况下,您可以不填写任何启动命令及环境变量直接启动推理服务,针对部分典型场景,我们在这里提供一些启动参数的配置指引。
案例 - 模型体验 - 最小资源需求
场景:推理算力资源较少,默认参数部署需要的模型报显存不足,仅作模型快速体验用,对模型精度和推理速度没有特定要求。
推荐启动命令:
run --quantization ifq_nf4 --enforce-eager --gpu-memory-utilization 0.95 --max-model-len 2048解释:
--quantization ifq_nf4:开启 4bit 量化,模型权重占用的显存降低 75%(此功能需要 Ampere、Ada Lovelace、Hopper 系列显卡型号,若您使用的是 V100 或 T4 显卡,可以开启ifq量化模式)。--enforce-eager:关闭 CUDA Graph,减少额外显存占用,从而可以设置更大的 --gpu-memory-utilization。--gpu-memory-utilization 0.95:调大显存使用率到 95%,增加显存利用率。--max-model-len 2048:调小上下文长度到 2048,减少 KV Cache 所需显存大小。案例 - 生产环境部署 - 简历解析
场景:对模型精度和推理速度均有较高的要求。简历解析场景输入文本较长,生成内容在输入中出现过的概率较高,较适合开启并行解码加速。
推荐启动命令:
run --dtype auto --quantization fp8 --use-lookahead --num-speculative-tokens 4 --max-model-len 32768 --enable-prefix-caching --disable-log-requests --api-keys mock_api_key --served-model-name model_123 解释:
--dtype auto:模型计算精度自动,即采用模型 config.json 中配置的精度(部分模型 fp16 和 bf16 效果有一些差异,可以根据实际测试情况调整)。--quantization fp8:采用 FP8 W8A8 量化,在保证精度的同时极大加速推理,并减少 50% 的模型权重显存占用(此功能需要 Ada Lovelace、Hopper 系列显卡型号,若您使用的其他显卡,可以开启 ifq 量化模式)。--use-lookahead:开启并行解码,加速该场景下生成速度,提高吞吐。--num-speculative-tokens 4:并行解码参数,当需要支持多并发时推荐设置稍微小一些,可按实际调整测试吞吐。--max-model-len 32768:按需设置需要支持的最大上下文长度。--enable-prefix-caching:开启 prefix caching 能力,该选项在 run 启动命令中默认已开启,也可以不填。--disable-log-requests:禁用日志记录请求详情,避免日志中包含太多太长的请求信息。--api-keys mock_api_key:设置兼容 openai API 调用的鉴权 Token,避免公网接口被随意调用。--served-model-name model_123:设置模型名称,方便客户端区分推理结果是哪个模型返回的。案例 - 使用 vllm 原生启动命令 - 吞吐优化
场景:希望使用 vllm 原生的启动命令部署服务,并尽可能地优化服务吞吐。
推荐启动命令:
vllm serve /data/model --port 8501 -tp 2 --quantization fp8 --max-model-len 32768 --enable-prefix-caching --disable-log-requests --served-model-name model_123 --num-scheduler-steps 8。解释:
/data/model:设置模型路径为默认的容器挂载路径。--port 8501:设置服务端口为平台默认的8501端口。-tp 2:设置模型 TP 并行数为2,这里需要根据实际服务使用的卡数调整,单卡推理可以不设置。--quantization fp8:采用 FP8 W8A8 量化,在保证精度的同时极大加速推理,并减少 50% 的模型权重显存占用(此功能需要 Ada Lovelace、Hopper 系列显卡型号,若您使用的其他显卡,可以开启 ifq 量化模式)。--max-model-len 32768:按需设置需要支持的最大上下文长度。--enable-prefix-caching:开启 prefix caching 能力,优化首字延迟。--disable-log-requests:禁用日志记录请求详情,避免日志中包含太多太长的请求信息。--served-model-name model_123:设置模型名称,方便客户端区分推理结果是哪个模型返回的。--num-scheduler-steps 8:开启多步调度能力,优化 GPU 利用率,提高服务吞吐(此选项与并行解码有冲突,建议根据实际业务情况与并行解码二选一来开启)。对话体验
服务就绪后,可以看到“对话体验”的标签页,单击进入页面可以进行在线对话体验。
对话 API 调用
服务也支持通过 http/https 协议直接请求,单击“服务调用”页面,在接口调用地址一栏后输入对话 API 接口
/v1/chat/completions,接口格式可以参考 OpenAI Chat Completions 接口。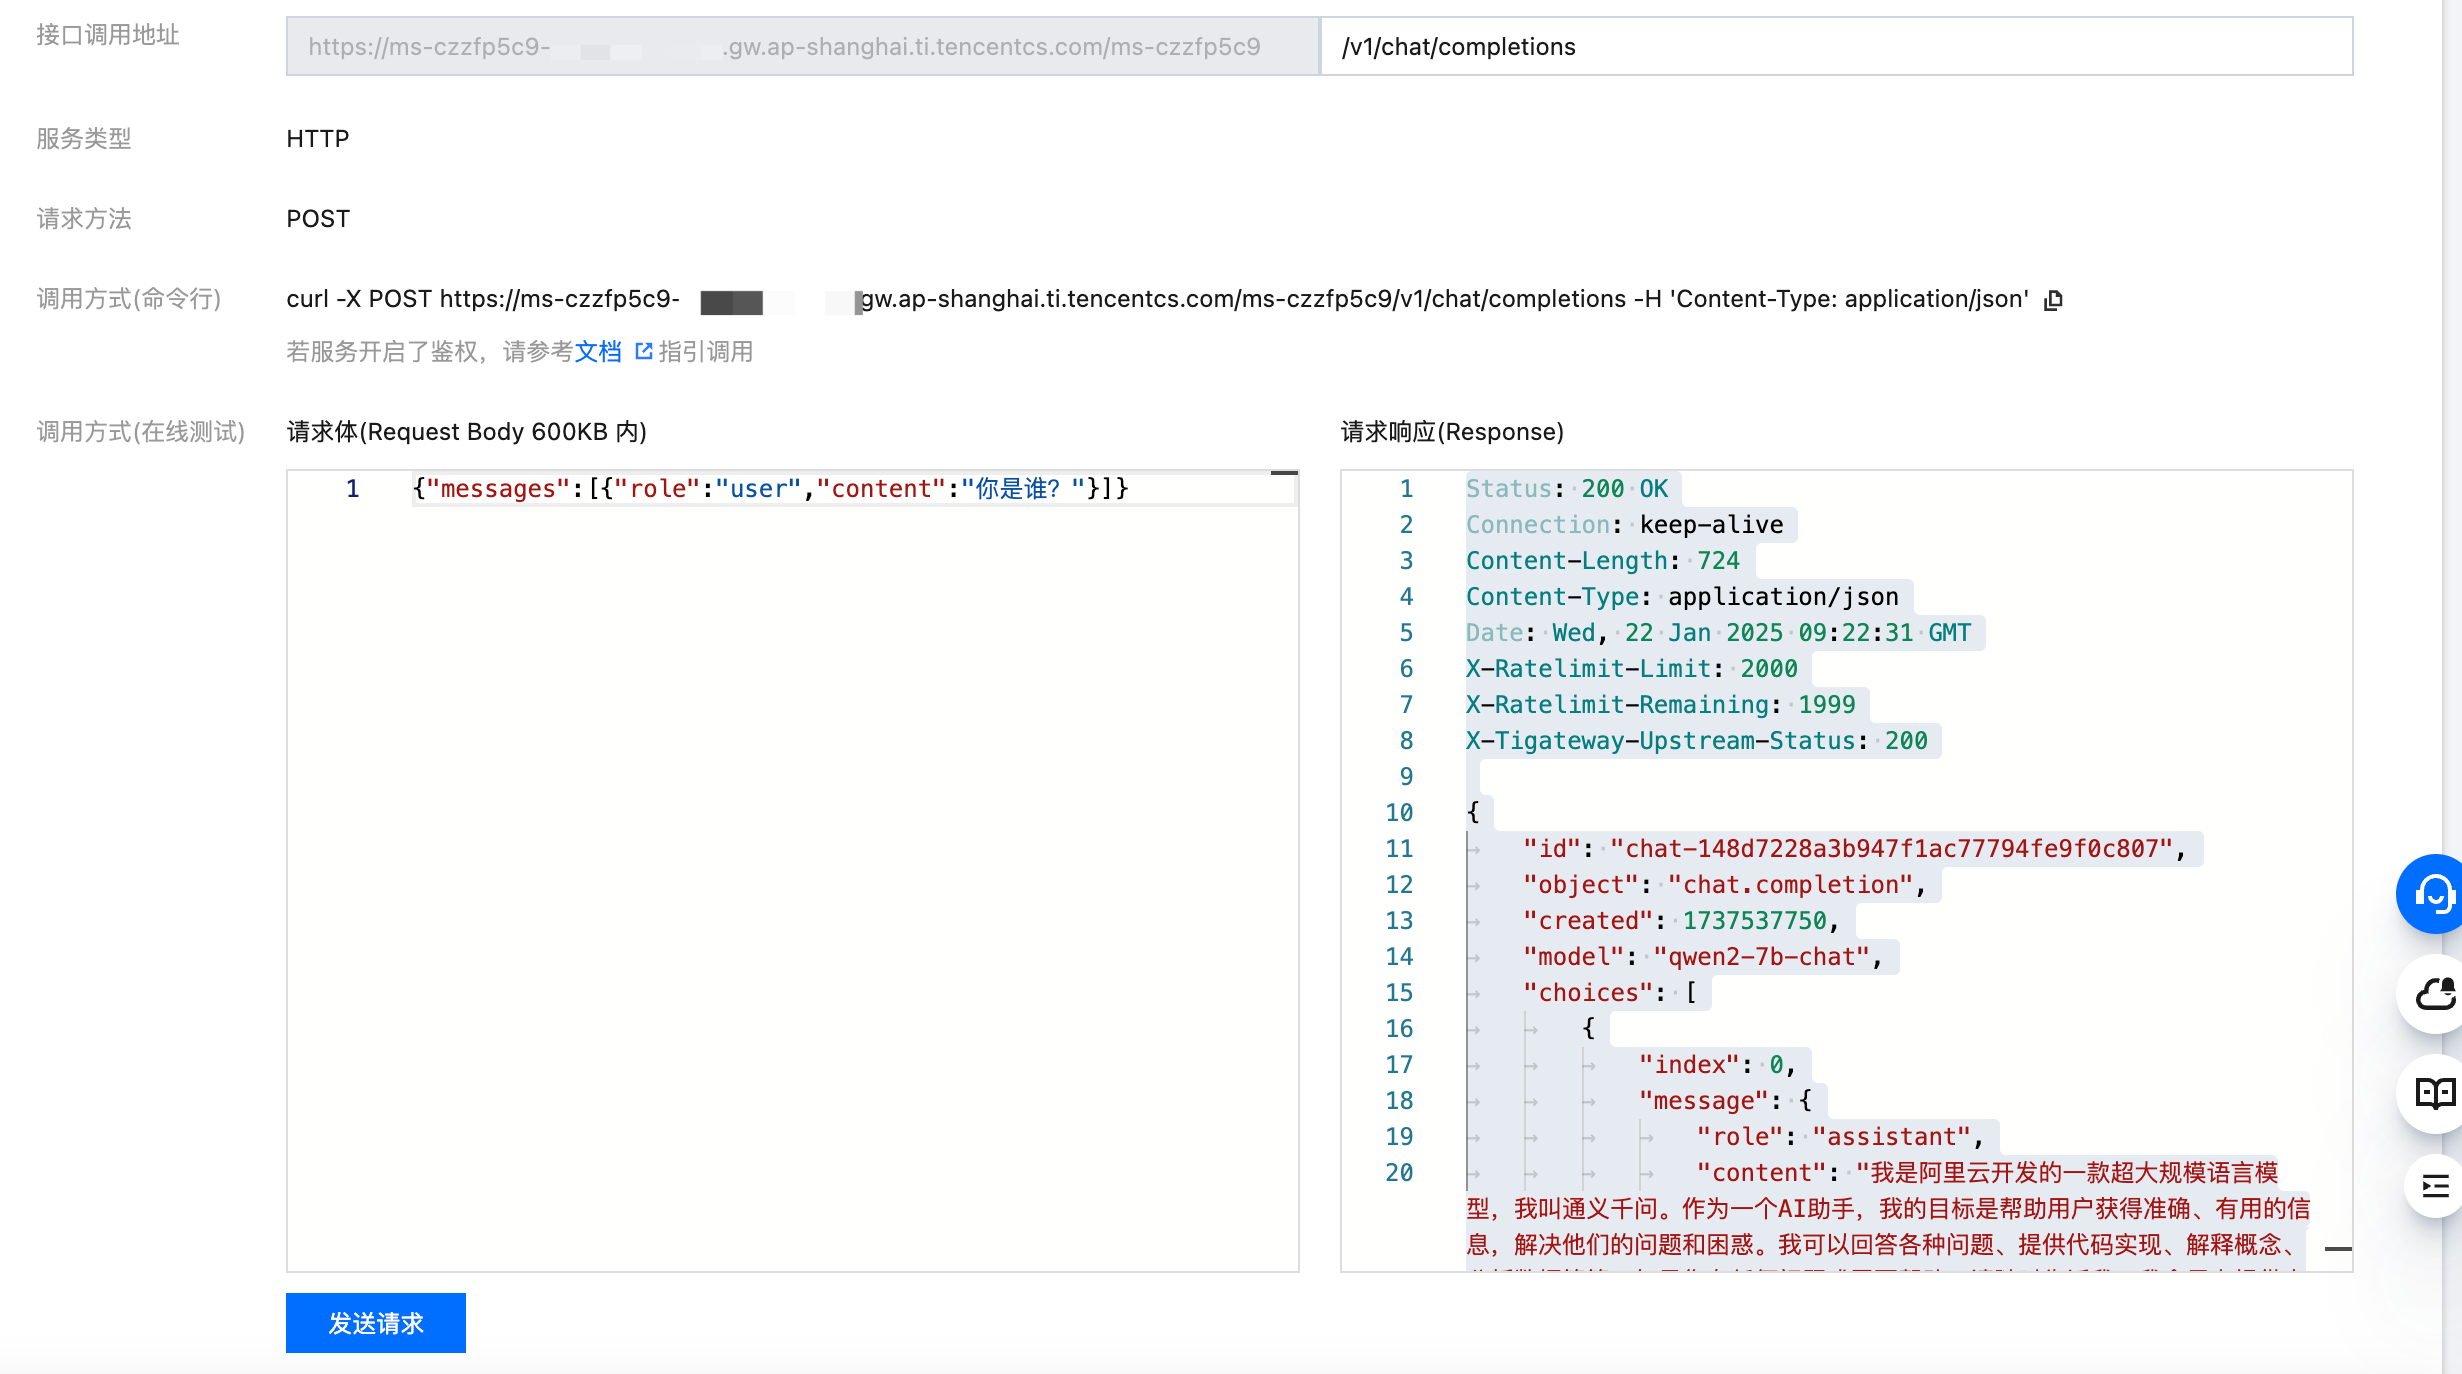
下面为几个常见的调用场景:
纯文本对话
示例请求:
{"messages":[{"role":"user","content":"你好"}],"max_tokens":128}
工具调用
示例请求:
{"tools": [{"type": "function","function": {"name": "get_current_weather","description": "Get the current weather in a given location","parameters": {"type": "object","properties": {"city": {"type": "string","description": "The city to find the weather for, e.g. 'Beijing'"}},"required": ["city"]}}}],"messages": [{"role": "user", "content": "what's the weather of Shanghai today?"}],"max_tokens": 512}
多模态
仅模型本身支持多模态能力时才支持,例如
Qwen/Qwen2-VL-7B-Instruct,meta-llama/Llama-3.2-11B-Vision-Instruct 模型。示例请求:
{"messages": [{"role": "user","content": [{"type": "text","text": "What's in this image?"},{"type": "image_url","image_url": {"url": "https://tione-public-cos-1308945662.cos.ap-shanghai.myqcloud.com/test/cat.jpg"}}]}],"max_tokens": 512}
第三方 LLM 应用接入
以 Dify 为例,可以添加类型为 OpenAI-API-compatible 的模型,然后 API endpoint URL 填写服务的在线调用地址,后加
/v1即可。服务性能测试
说明:以下测试使用随机数据,若需要测试并行解码加速能力,建议使用真实业务数据测试。
启动上述模型准备中的开发机实例(确保有挂载大模型的 CFS),在 vllm 官方项目中 vllm/benchmarks at main · vllm-project/vllm · GitHub 下载测试脚本(包括
benchmark_serving.py 以及backend_request_func.py),在开发机中新建工作目录;新建启动脚本如下(可根据自身需求修改相应参数)。#!/bin/bashRESULTS_FOLDER="results"HOST="https://ms-cxxxxxxx.ti.tencentcs.com/ms-czzfp5c9/"MODEL="../Qwen2-7B-Instruct"QPS="inf"INPUT_LEN=128OUTPUT_LEN=128NUM_PROMPTS=20CONCURRENCY=16mkdir -p $RESULTS_FOLDERclient_command="python3 benchmark_serving.py \\--port 8501 \\--base-url $HOST \\--endpoint /v1/chat/completions \\--backend openai-chat \\--model $MODEL \\--dataset-name random \\--random-input-len $INPUT_LEN \\--random-output-len $OUTPUT_LEN \\--ignore-eos \\--request-rate $QPS \\--num-prompts $NUM_PROMPTS \\--save-result \\--result-dir $RESULTS_FOLDER \\--metadata input_len=$INPUT_LEN output_len=$OUTPUT_LEN qps=$QPS concurrency=$CONCURRENCY"eval $client_command
各参数含义说明如下:
参数名称 | 参数含义 |
MODEL | CFS 中挂载的模型路径 |
RESULTS_FOLDER | 最终结果的保存路径 |
INPUT_LEN | 模型输入的 token 数 |
OUTPUT_LEN | 模型输出的最大 token 数 |
NUM_PROMPTS | 请求总数 |
CONCURRENCY | 并发数量 |
HOST | 调用地址 |
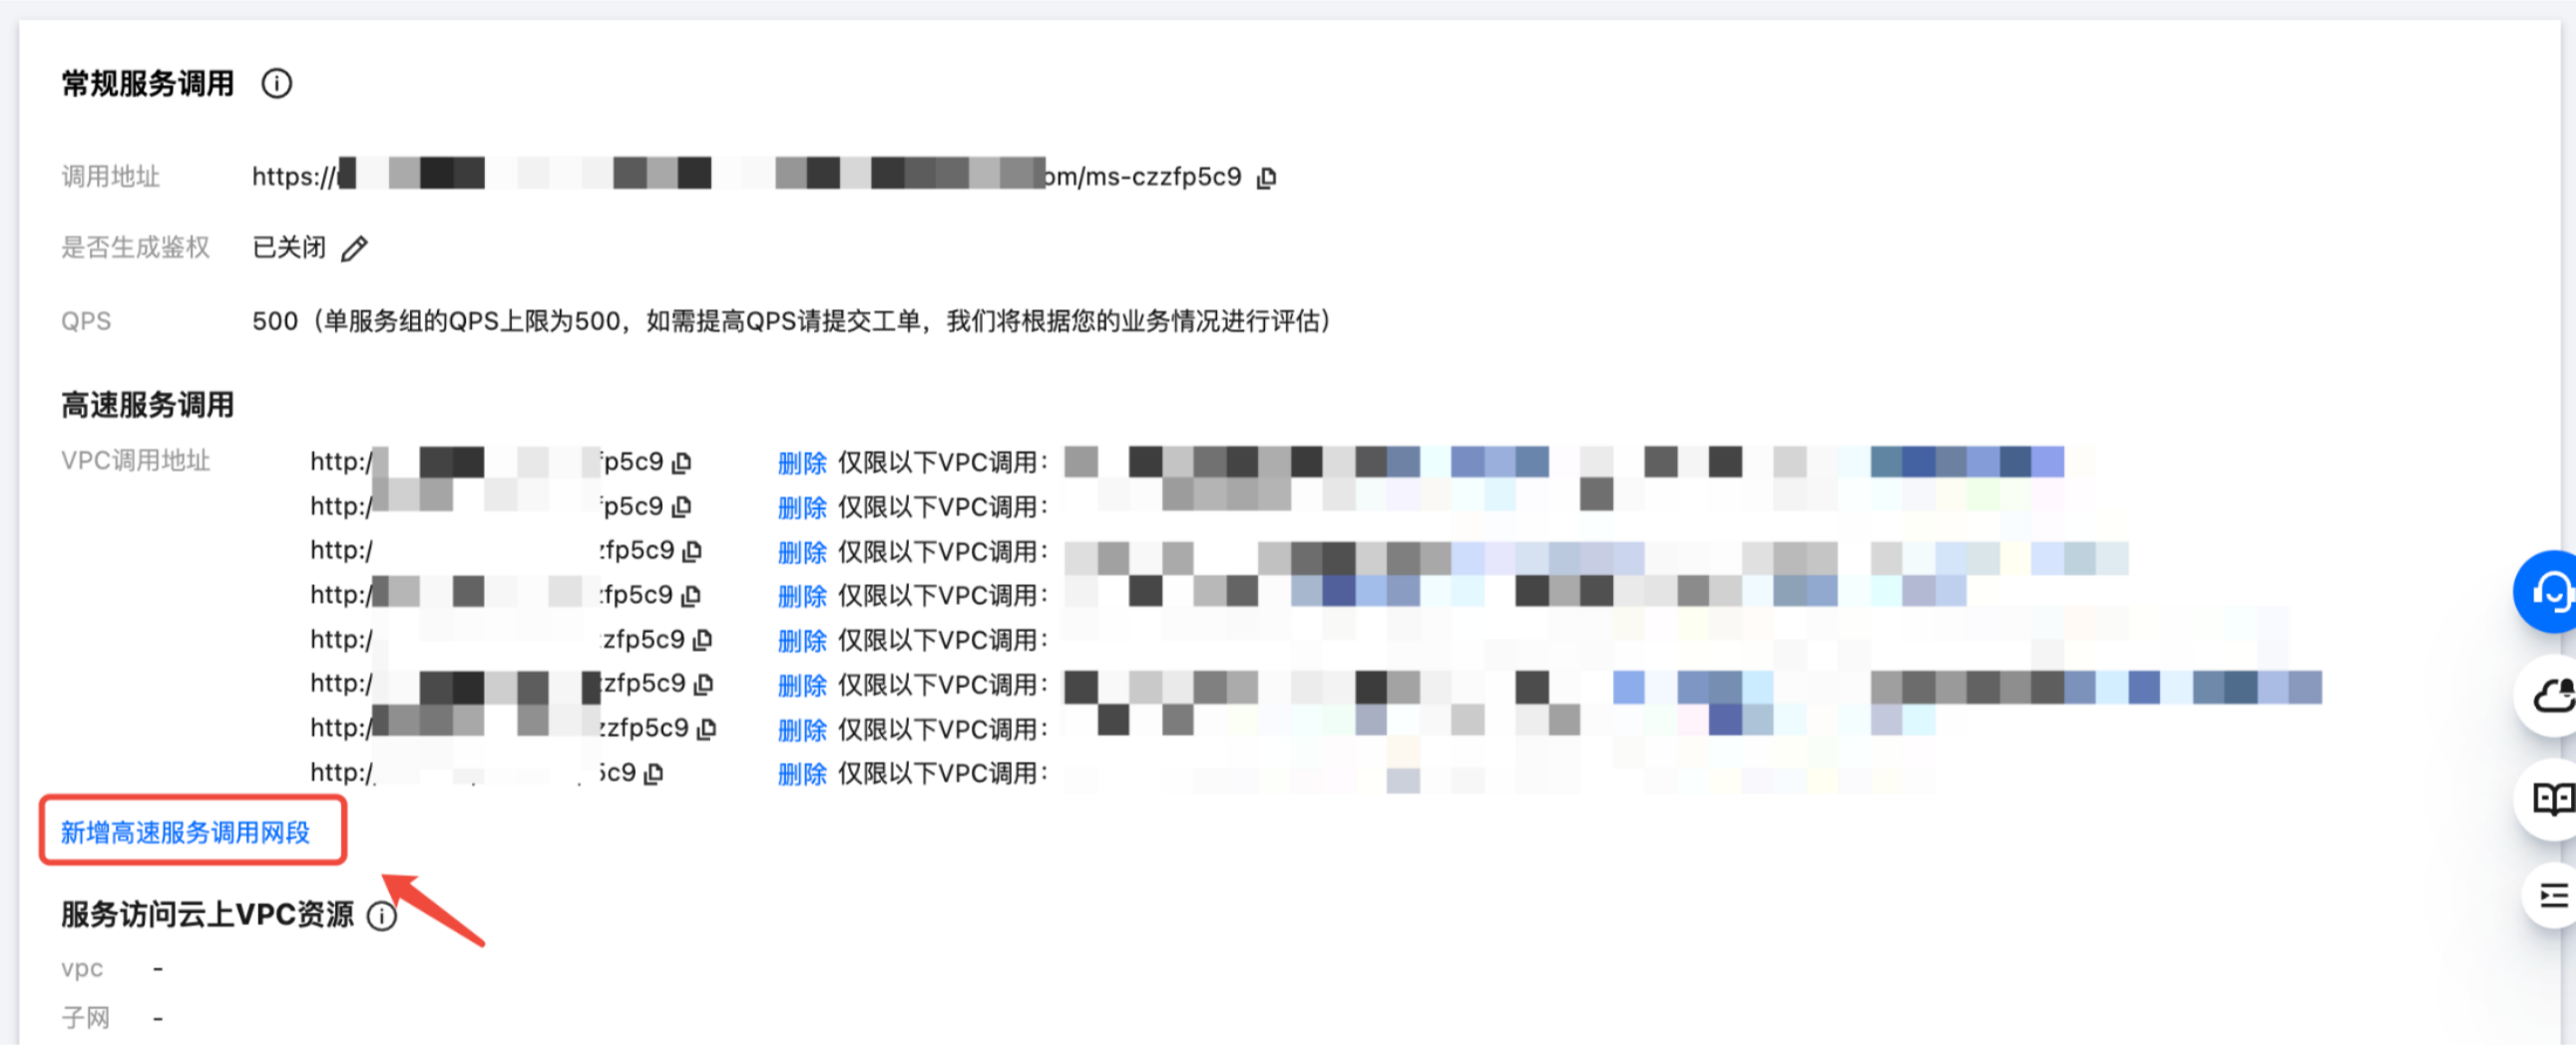
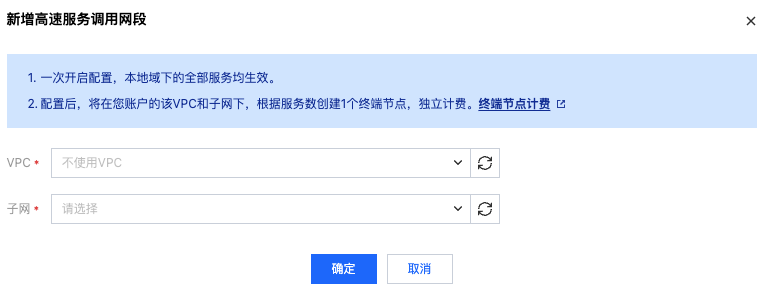
注意:常规服务调用地址由于调用链路耗时可能受到 WAF 防火墙等影响产生波动,建议您使用高速服务调用地址来压测服务性能。即将 HOST 配置成高速服务调用地址。您可将开发机实例所在的 VPC 网络新增到在线服务的高速服务调用网段,操作说明如下示例。
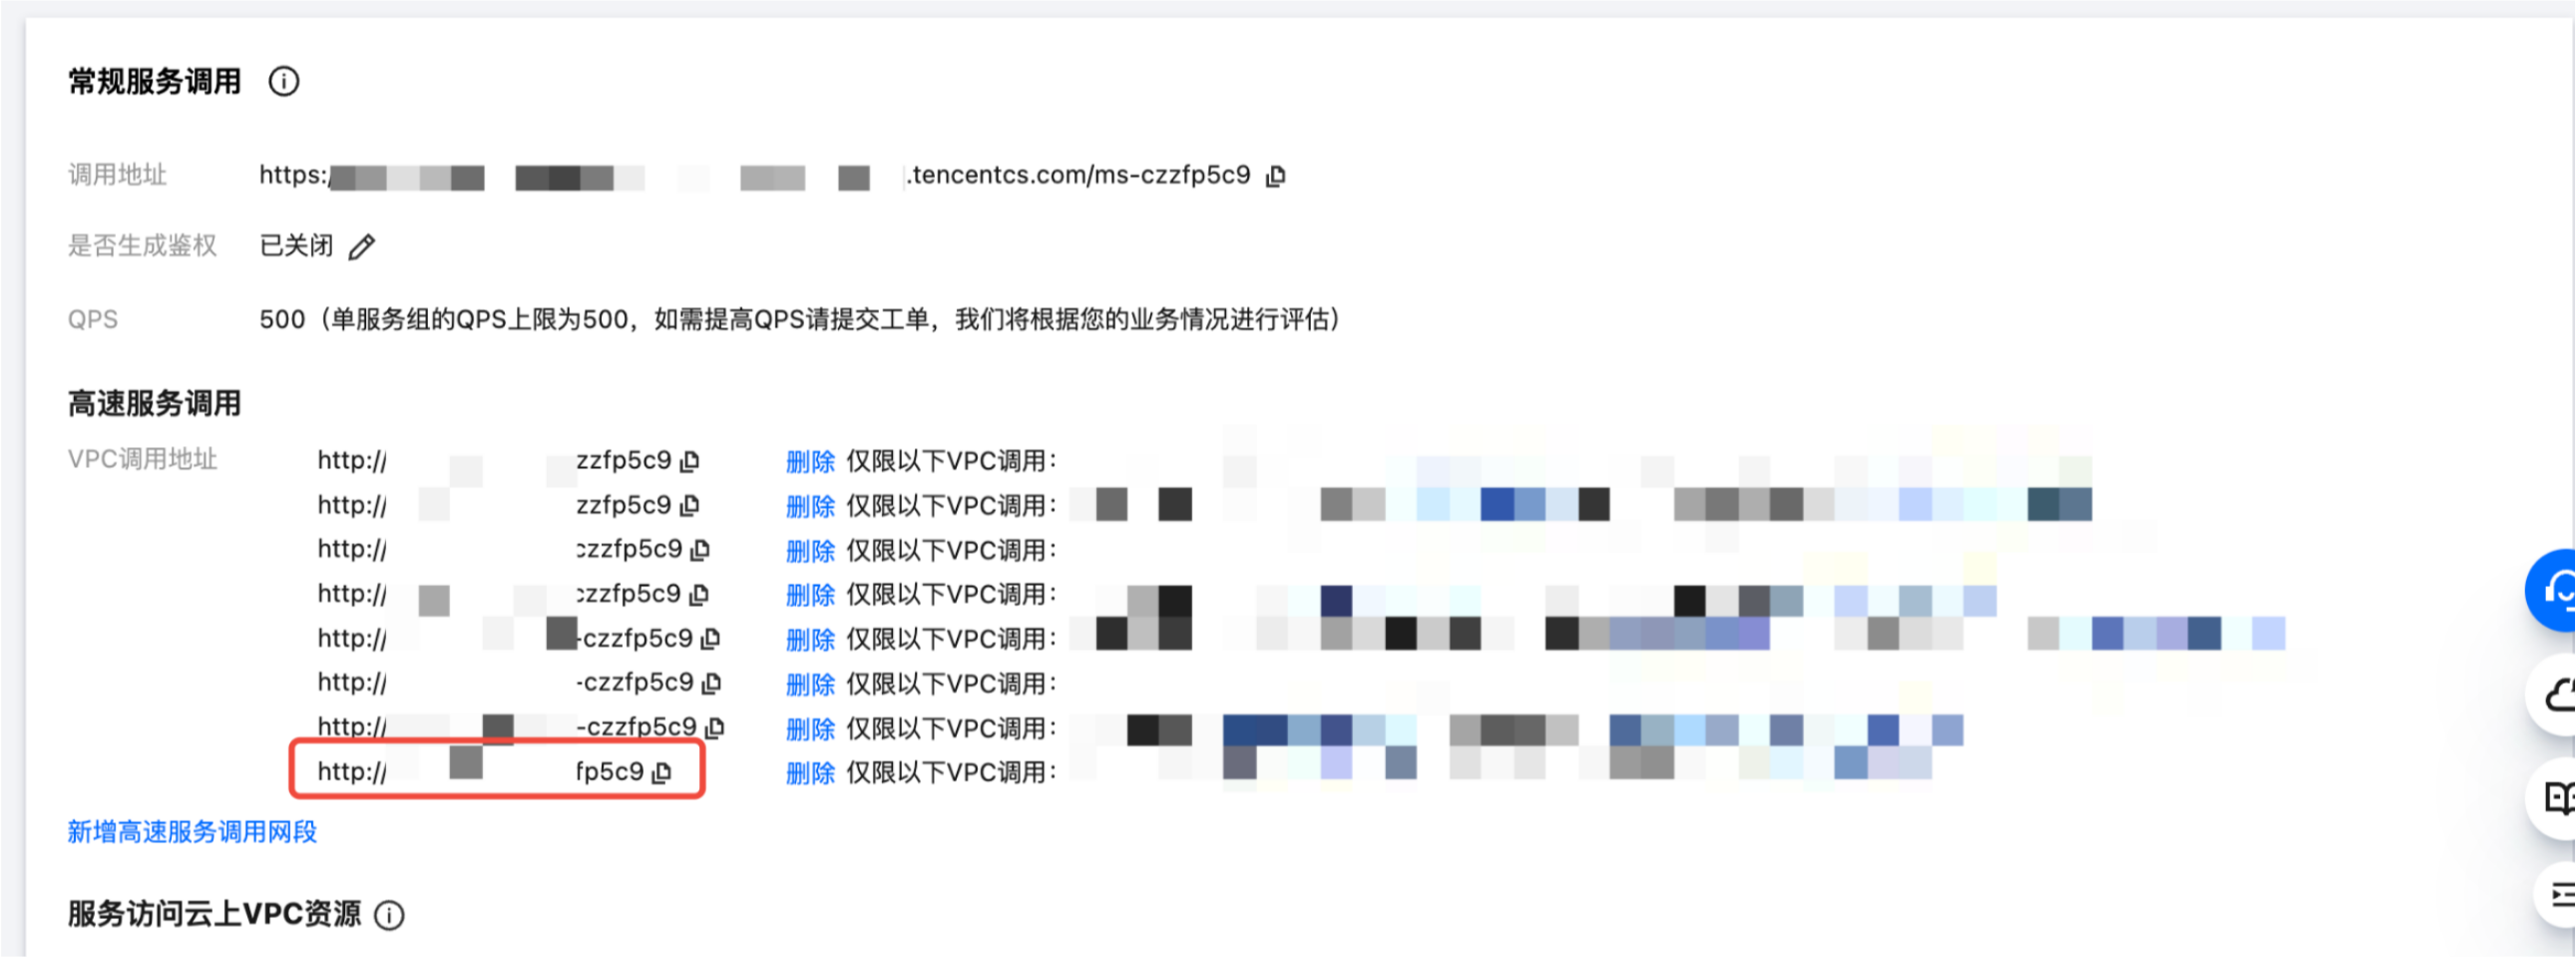
首先在服务调用处单击新增高速服务调用网段:
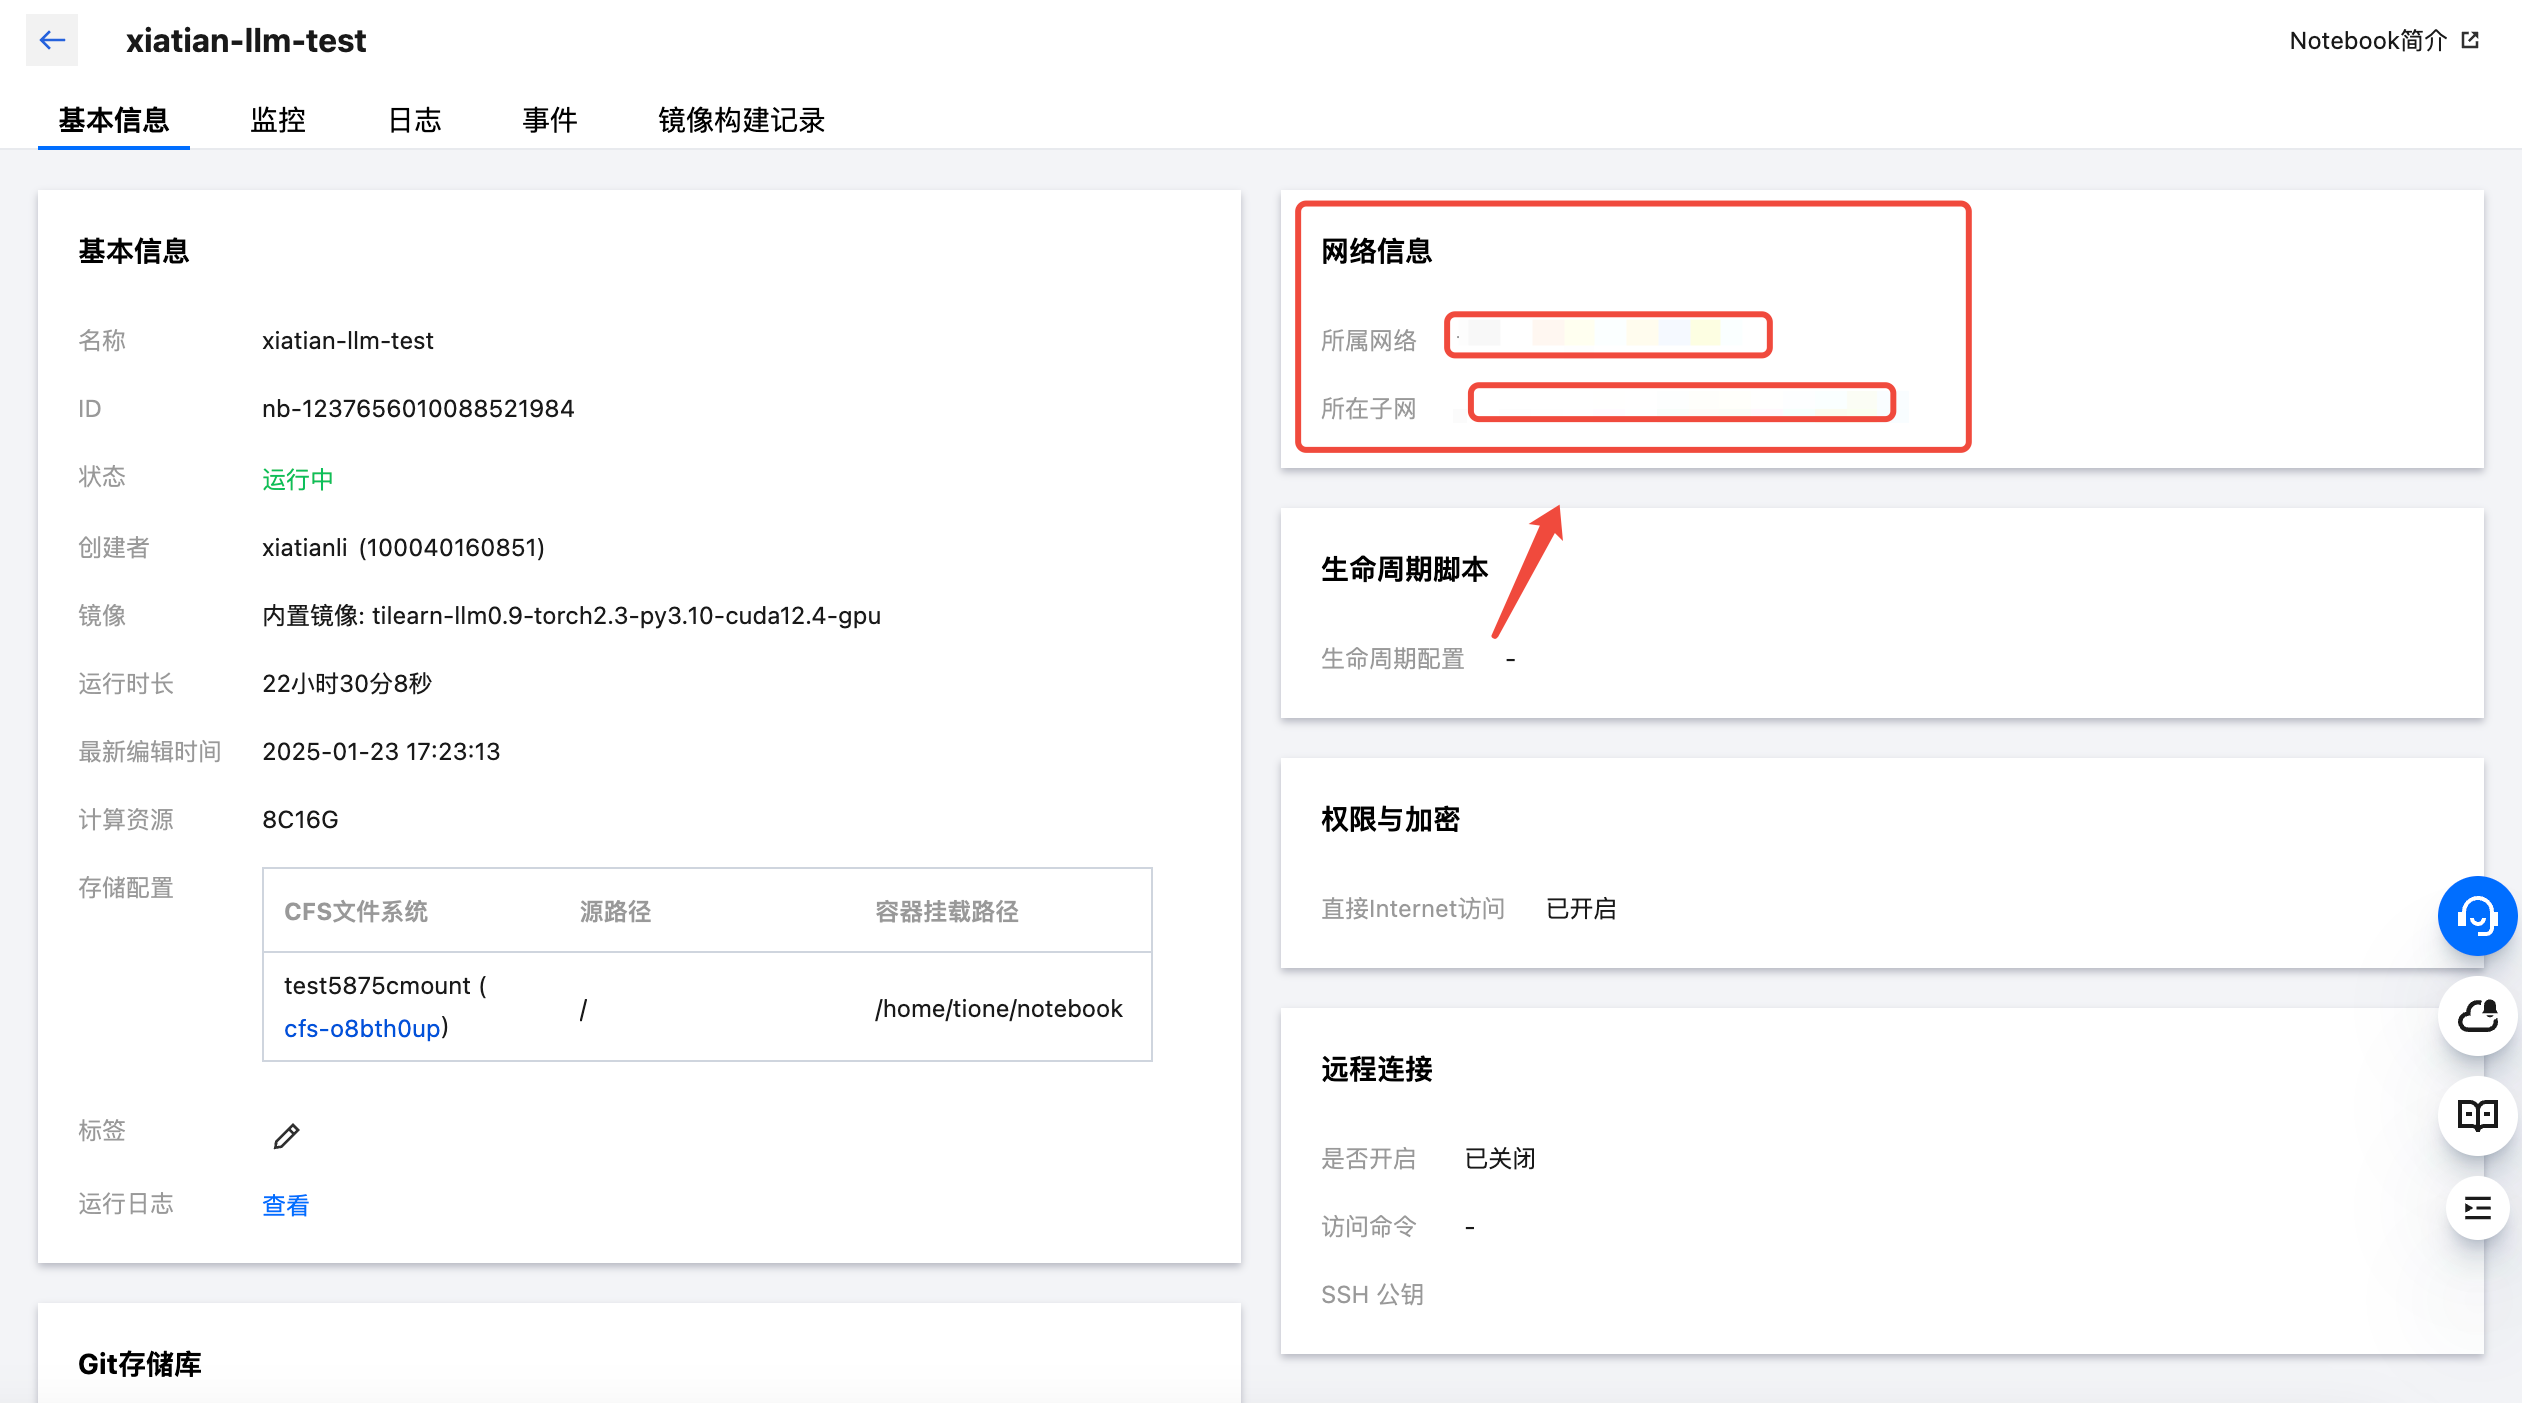
再将开发机的网络信息(所属网络以及所在子网)复制如下:
对应填写并确认添加:
最终的调用地址如下:
最终的测试文件目录组织如下:
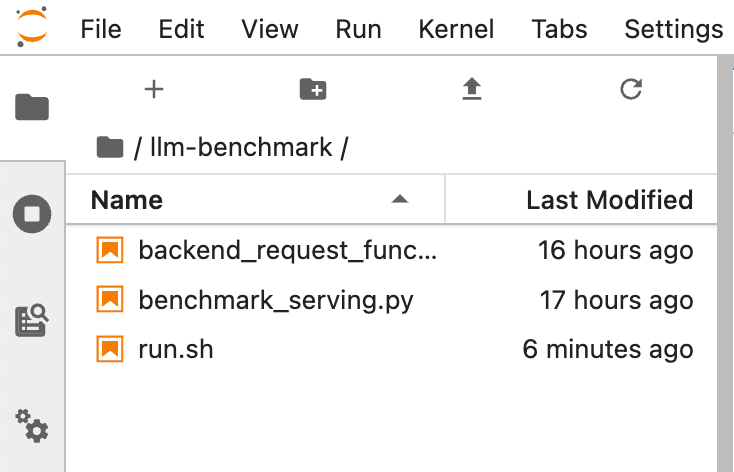
新建终端 Terminal,执行 bash run.sh 即可开始执行测试脚本,可通过终端上的输出内容查看性能测试结果:
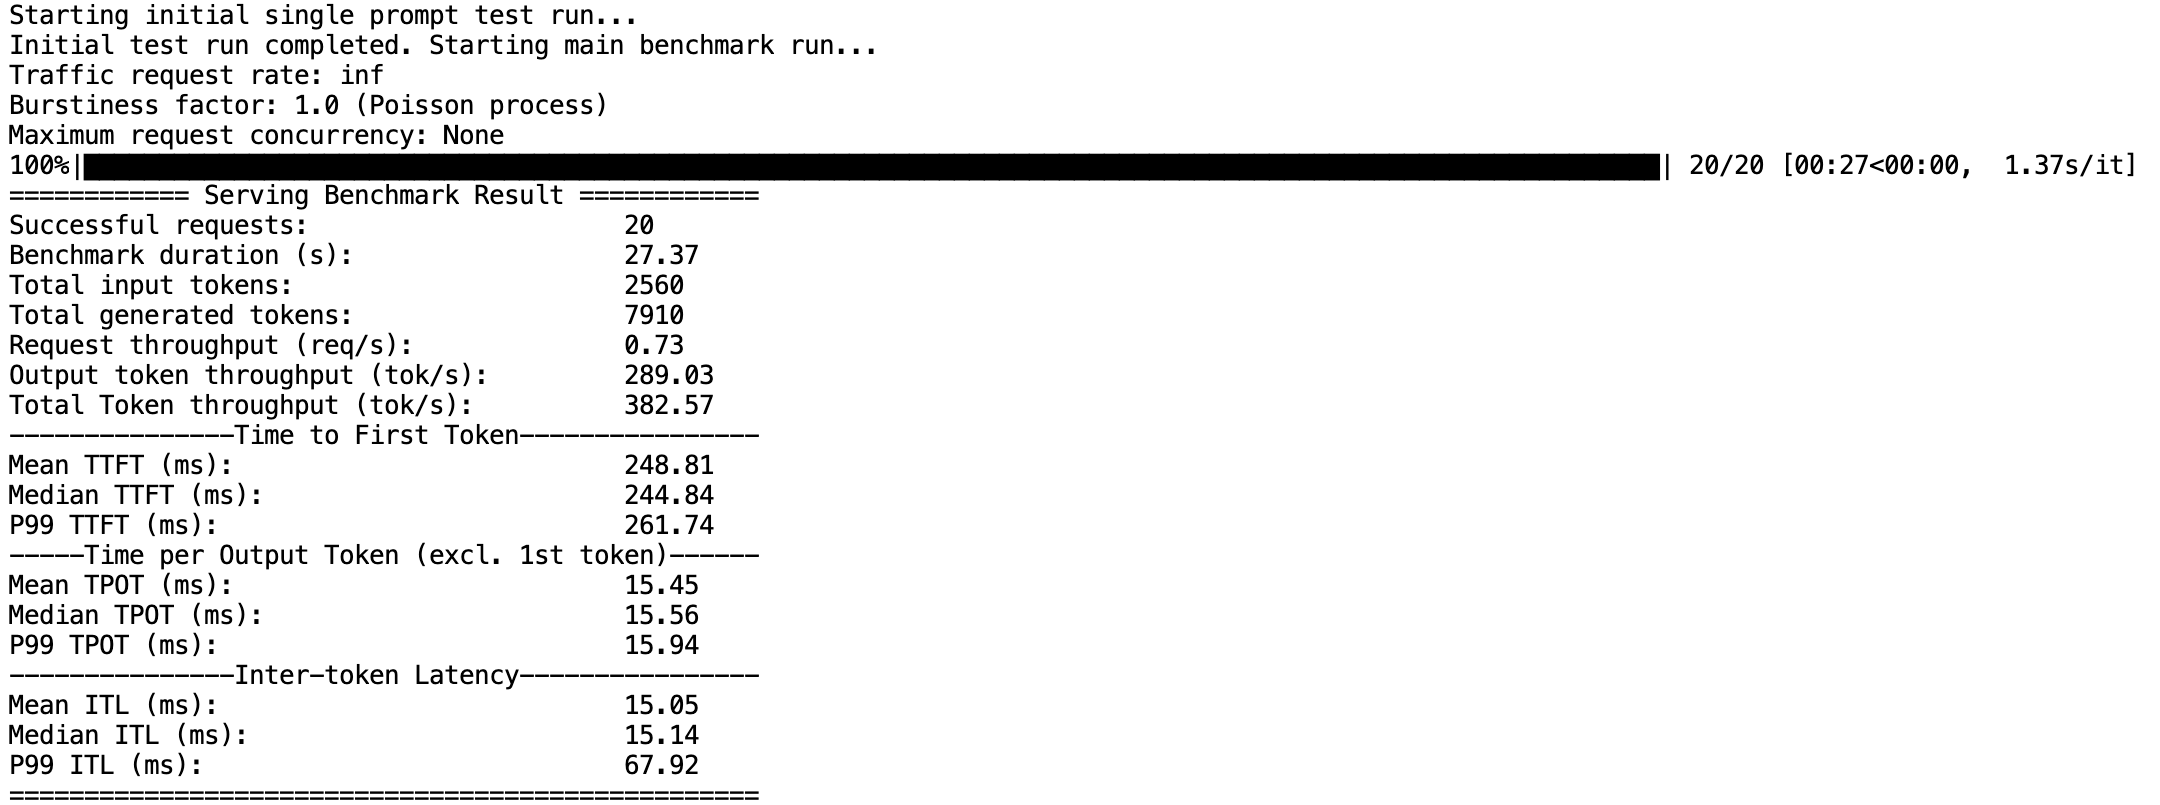
各指标含义如下:
指标名称 | 指标含义 |
Successful requests | 完成总请求数 |
Benchmark duration (s) | 所有请求完成时间 |
Total input tokens | 所有请求输入的 token 数 |
Total generated tokens | 所有请求输出的 token 数 |
Request throughput (req/s) | 请求吞吐量 |
Output token throughput (tok/s) | 生成结果吞吐量 |
Time to First Token(ms) | 首 token 时延 |
Time per Output Token(ms) | 每 token 时延 |
Inter-token Latency(ms) | token 间时延 |
常见问题(FAQ)
问:Angel-vLLM 的并行解码能力使用有什么限制?
答:并行解码与 vLLM 的 --enable-chunked-prefill 功能有冲突,vLLM 默认会在 --max-model-len 超过 32K 时自动打开 --enable-chunked-prefill 功能,若此时需要使用 Lookahead 并行解码加速,请在启动命令中添加
--enable-chunked-prefill false来手动关闭;此外,若启动 vLLM 时配置了 --num-scheduler-steps 参数大于1,也与并行解码不兼容。问:Angel-vLLM 的量化能力和开源的 GPTQ 及 AWQ 量化有什么区别?
答:Angel-vLLM 的 INT8、NF4、FP8 量化,都支持一键在线量化,不需要用数据集做离线校准,且相比其他开源实现速度更快,其中 INT8 与 FP8 精度几乎无损,NF4 量化实验结果比 INT4 精度更好。开源的 GPTQ 和 AWQ 都是离线校准算法,这两个算法主要用于 INT4 和 INT8 居多。Angel-vLLM 不支持已经经过 GPTQ 或 AWQ 校准后的模型使用 ifq、ifq_nf4、fp8 量化部署,这些模型请使用 vllm 原生的 gptq、gptq_marlin、awq、awq_marlin 量化方式部署。
注意:
若需要推理 qwen2 或 qwen2.5 的 GPTQ 或 AWQ 量化模型,请添加环境变量 VLLM_ALLOW_QUANT_LM_HEAD=0。
问:为什么我显卡有 40G 显存,部署 7B 的模型,显存占用率也会到 90%?
答:vLLM 框架会对显存进行预分配,具体会使用
显卡显存 * gpu_memory_utilization - 单次推理的峰值显存占用(包括模型权重 + KV Cache)剩余的显存用于分配 GPU KV Cache blocks,以提高服务支持的批处理大小。要想估算模型对应的权重及 KV Cache 的最少显存占用,可以参考 推理资源要求。问:如何开启 function call 工具调用能力?
答:开启工具调用需要添加
--enable-auto-tool-choice和--tool-call-parser <parser_name>参数,用法可以参考 vLLM 官方文档。您也可以直接设置 MODEL_ID 为对应模型在 HuggingFace 上的名称,我们默认为部分支持工具调用的模型开启这些参数,详见 对话模板。附录
推理加速性能测试结果
FP8 量化加速测试
测试环境:
配置项 | 配置内容 |
GPU 类型 | PNV5b |
测试模型名称 | Qwen2-7B-Instruct |
测试数据集 | ShareGPT_V3_unfiltered_cleaned_split.json |
测试代码 | vllm/benchmark |
测试项目 | 对比不开加速与 fp8 加速 |
测试脚本:
python benchmark_serving.py \\--port xxxx \\--base-url http://xxxxxxxx/ms-rpbpr92c/ \\--backend openai-chat \\--model ../Qwen2-7B-Instruct \\--dataset-name sharegpt \\--endpoint /v1/chat/completions \\--tokenizer ../Qwen2-7B-Instruct \\--max-concurrency 10 \\--save-result \\--result-dir results \\--dataset-path /path/to/ShareGPT_V3_unfiltered_cleaned_split.json
基于 Angel-vLLM 推理加速测试结果如下(concurrency=10,其他测试环境均一致):
监控指标 | 无 Angel-vLLM 特性 | FP8 量化 | 效果提升 |
Successful requests | 1000 | 1000 | - |
Total input tokens | 217393 | 217393 | - |
Request throughput (req/s) | 0.68 | 1.08 | +58.82% |
Output token throughput (tok/s) | 383.75 | 597.04 | +55.58% |
Total Token throughput (tok/s) | 531.74 | 832.25 | +56.51% |
Mean TTFT (ms) | 113.27 | 86.90 | +23.28% |
Median TTFT (ms) | 76.52 | 55.64 | +27.29% |
P99 TTFT (ms) | 874.30 | 708.10 | +19.01% |
Mean TPOT (ms) | 24.33 | 16.56 | +31.94% |
Median TPOT (ms) | 24.17 | 16.46 | +31.90% |
P99 TPOT (ms) | 27.34 | 18.68 | +31.68% |
Mean ITL (ms) | 24.22 | 16.52 | +31.79% |
Median ITL (ms) | 23.45 | 15.83 | +32.49% |
P99 ITL (ms) | 69.92 | 50.20 | +28.20% |
Lookahead 并行解码加速效果
由于 Lookahead 并行解码的加速原理是服务见过的 token 会有加速效果,一般情况下加速效果会随着会话次数增多越来越好,下图为默认参数与开启 lookahead 并行解码后相同请求第二次请求时的生成速度直观对比。
对话模板
对话模板用于将用户输入的对话转换为输入给大模型的
prompt文本,可以参考 HuggingFace 上的介绍。对话模板一般采用 Jinja 模板来描述,对于比较新的开源对话模型(一般带 Instruct 或 Chat 后缀),您一般可以在模型目录的
tokenizer_config.json文件或chat_template.json件中找到chat_template字段,即为该模型的对话模板,若未做特殊设置我们默认会使用此对话模板。
为了便于一些未自带
chat_template字段的模型部署,及便于一些支持 function call 工具调用的模型开启工具调用能力,若您指定了 MODEL_ID 或 CONV_TEMPLATE 环境变量,或模型目录中包含 ti_model_config.json 文件,并使用了默认启动命令启动的镜像,推理框架会按以下规则和顺序依次自动匹配模型的对话模板(其中 CONV_TEMPLATE 和 MODEL_ID 匹配规则是“或”的关系)。模型系列 | CONV_TEMPLATE | MODEL_ID (忽略大小写) | 默认增加的启动命令 | 默认额外配置的 stop_token_ids |
非对话模型 | generate | - | --chat-template examples/template_generate.jinja | - |
混元 Large | hunyuan | 包含 hunyuan-large | --chat-template examples/template_hunyuan.jinja | [127960, 127967] |
腾讯行业大模型 | shennong_chat | 包含 shennong 或 sn- | --chat-template examples/template_shennong.jinja | - |
Llama-3.2 Vision Instruct 模型 | llama-3.2-vision | 包含 llama-3.2 且含 vision 且含 instruct 或 chat | --chat-template examples/tool_chat_template_llama3.2_vision.jinja --enable-auto-tool-choice --tool-call-parser llama3_json --enforce-eager --max-num-seqs 8 | - |
Llama-3.2 Instruct 模型 | llama-3.2 | 包含 llama-3.2 不含 vision 且含 instruct 或 chat | --chat-template examples/tool_chat_template_llama3.2_json.jinja --enable-auto-tool-choice --tool-call-parser llama3_json | - |
Llama-3.1 Instruct 模型 | llama-3.1 | 包含 llama-3.1 且含 instruct 或 chat | --chat-template examples/tool_chat_template_llama3.1_json.jinja --enable-auto-tool-choice --tool-call-parser llama3_json | |
Qwen2.5 Instruct 模型 | qwen2.5 | 包含 qwen2.5 且含 instruct 或 chat | --enable-auto-tool-choice --tool-call-parser hermes | - |
Baichuan2 Chat 模型 | baichuan2-chat | 包含 baichuan2 且含 instruct 或 chat | --chat-template examples/template_baichuan.jinja | - |
Llama2 Chat 模型 | llama-2 | 包含 llama-2 且含 instruct 或 chat | --chat-template examples/template_llama2.jinja | - |
Llama3 Chat 模型 | llama-3 | 包含 llama-3- 且含 instruct 或 chat | --chat-template examples/template_llama3.jinja | [128001, 128009] |
Qwen Chat 模型 | qwen 或 qwen-7b-chat | 包含 qwen 且不含 vl 且含 instruct 或 chat | --chat-template examples/template_qwen.jinja | [151643, 151644, 151645] |
推理资源要求
推理资源要求主要包括 CPU、内存、GPU,我们主要根据 GPU 显存计算需要的算力资源,CPU、内存简易按机型和卡数等比例分配,其中内存建议大于模型权重所占存储空间。
大模型推理对 GPU 显存要求较高,我们可以通过以下方式计算使用本镜像推理大模型所需要的显存大小及最少显卡数量:
模型权重所需显存 (GiB) ≈ 模型权重参数量(B) * 模型权重精度(Byte)KV Cache所需显存 (GiB) = 模型层大小(hidden_size) * 模型层数(num_hidden_layers) * 模型KV头数(num_key_value_heads) / 模型attention头数(num_attention_heads) * 模型上下文长度(max_position_embeddings) * 模型KV-Cache精度(Byte) * 2 / 1024 / 1024 / 1024所需显卡显存 > (模型权重所需显存 + KV Cache所需显存) / 显存使用率(gpu_memory_utilization)----所需最少显卡数量 = ceil(所需显卡显存 / 单卡显存大小)其中要求 num_attention_heads % 显卡数量 == 0
其中,模型权重精度和 KV Cache 精度在未做量化前一般是 float16 或 bfloat16,即 2 字节;若进行了 int8 或 fp8 量化,则为 1 字节;若进行了 int4 或 nf4 量化,则为 0.5 字节;其他关键参数可以在模型目录的
config.json 文件中找到。示例:
开源模型名称 | Meta-Llama-3.1-8B-Instruct | Qwen2-72B-Instruct |
模型权重参数量 (Billion) | 8 | 72 |
模型权重精度 (Byte) (可通过开启 --quantization 量化调整) | 2 | 2 |
合计模型权重占用 (GiB) | 16 | 144 |
模型层大小 (hidden_size) | 4096 | 8192 |
模型层数 (num_hidden_layers) | 32 | 80 |
模型 KV 头数 (num_key_value_heads) | 8 | 8 |
模型 attention 头数 (num_attention_heads) | 32 | 64 |
模型上下文长度 (max_position_embeddings)(可通过 --max-model-len 参数调整) | 131072 | 32768 |
模型 KV-Cache 精度 (Byte) | 2 | 2 |
合计模型 KV-Cache 占用 (GiB) | 16 | 10 |
显存使用率 (可通过 --gpu-memory-utilization 参数调整) | 0.9 | 0.9 |
所需最少显卡显存 (GiB) | 35.56 | 171.11 |
24G显存显卡最少数量 | 2 | 8 |
40G显存显卡最少数量 | 1 | 8 |
48G显存显卡最少数量 | 1 | 4 |


