概述
任务式建模通过向导式的方式提交训练任务,您可以直接基于平台内置镜像快速提交训练任务,也可通过自定义训练镜像启动任务;平台也内置多种开源大模型,您可以仅需配置自定义数据进行一键精调。
前置条件
创建任务需要提前准备计算资源用于训练任务的算力调度,准备存储资源用于存储训练物料,例如数据集、代码、模型 CheckPoints 文件等。
计算资源准备
存储资源准备
模型训练过程中的训练数据、模型、代码等建议存储到 CFS 或者 GooseFSx 等文件系统中 ,所以在创建训练任务前需要您首先申请 CFS 或者 GooseFSx,详细操作请查看 文件存储-创建文件系统及挂载点 或 数据加速器 GooseFS。
创建步骤
填写基本信息
1. 登录 TI-ONE 控制台,进入训练工坊 > 任务式建模,单击新建,开始创建训练任务。
2. 在基本信息配置页,填写如下信息:
任务名称:仅支持中英文、数字、下划线"_"、短横"-",只能以中英文、数字开头。
地域:训练任务所在的地域,默认为当前列表页所在的地域。
训练镜像:可选择平台内置训练镜像、自定义镜像和内置大模型,其中内置训练镜像请查看 内置训练镜像列表;自定义镜像支持选择容器镜像服务的镜像或者填写外部镜像地址(若为私有镜像,需要输入用户名和密码),自定义镜像规范请查看 自定义训练镜像规范;内置大模型训练使用方式请查看 精调内置开源大模型。
训练模式:不同训练框架支持的训练模式请查看 内置训练镜像列表。
机器来源和资源申请:可选择从 CVM 机器中选择和从 TIONE 平台购买,若选择从 TIONE 平台购买,则需要选择算力规格和节点数量;若选择从 CVM 机器中选择,则需要先创建资源组,购买节点,相关操作请查看 资源组管理,选择完资源组后选择对应的计算资源。平台支持的计费规格请查看 计费概述。
使用 RDMA:若配置整卡 GPU 且选择的节点数大于 1 时,可配置是否开启 RDMA(配置整机8卡的多节点任务默认开启 RDMA)。当开启 RDMA 后,任务会优先调度到支持 RDMA 的节点;当单节点 RDMA 网卡 IP 不足时,可能会调度到多节点。
说明:
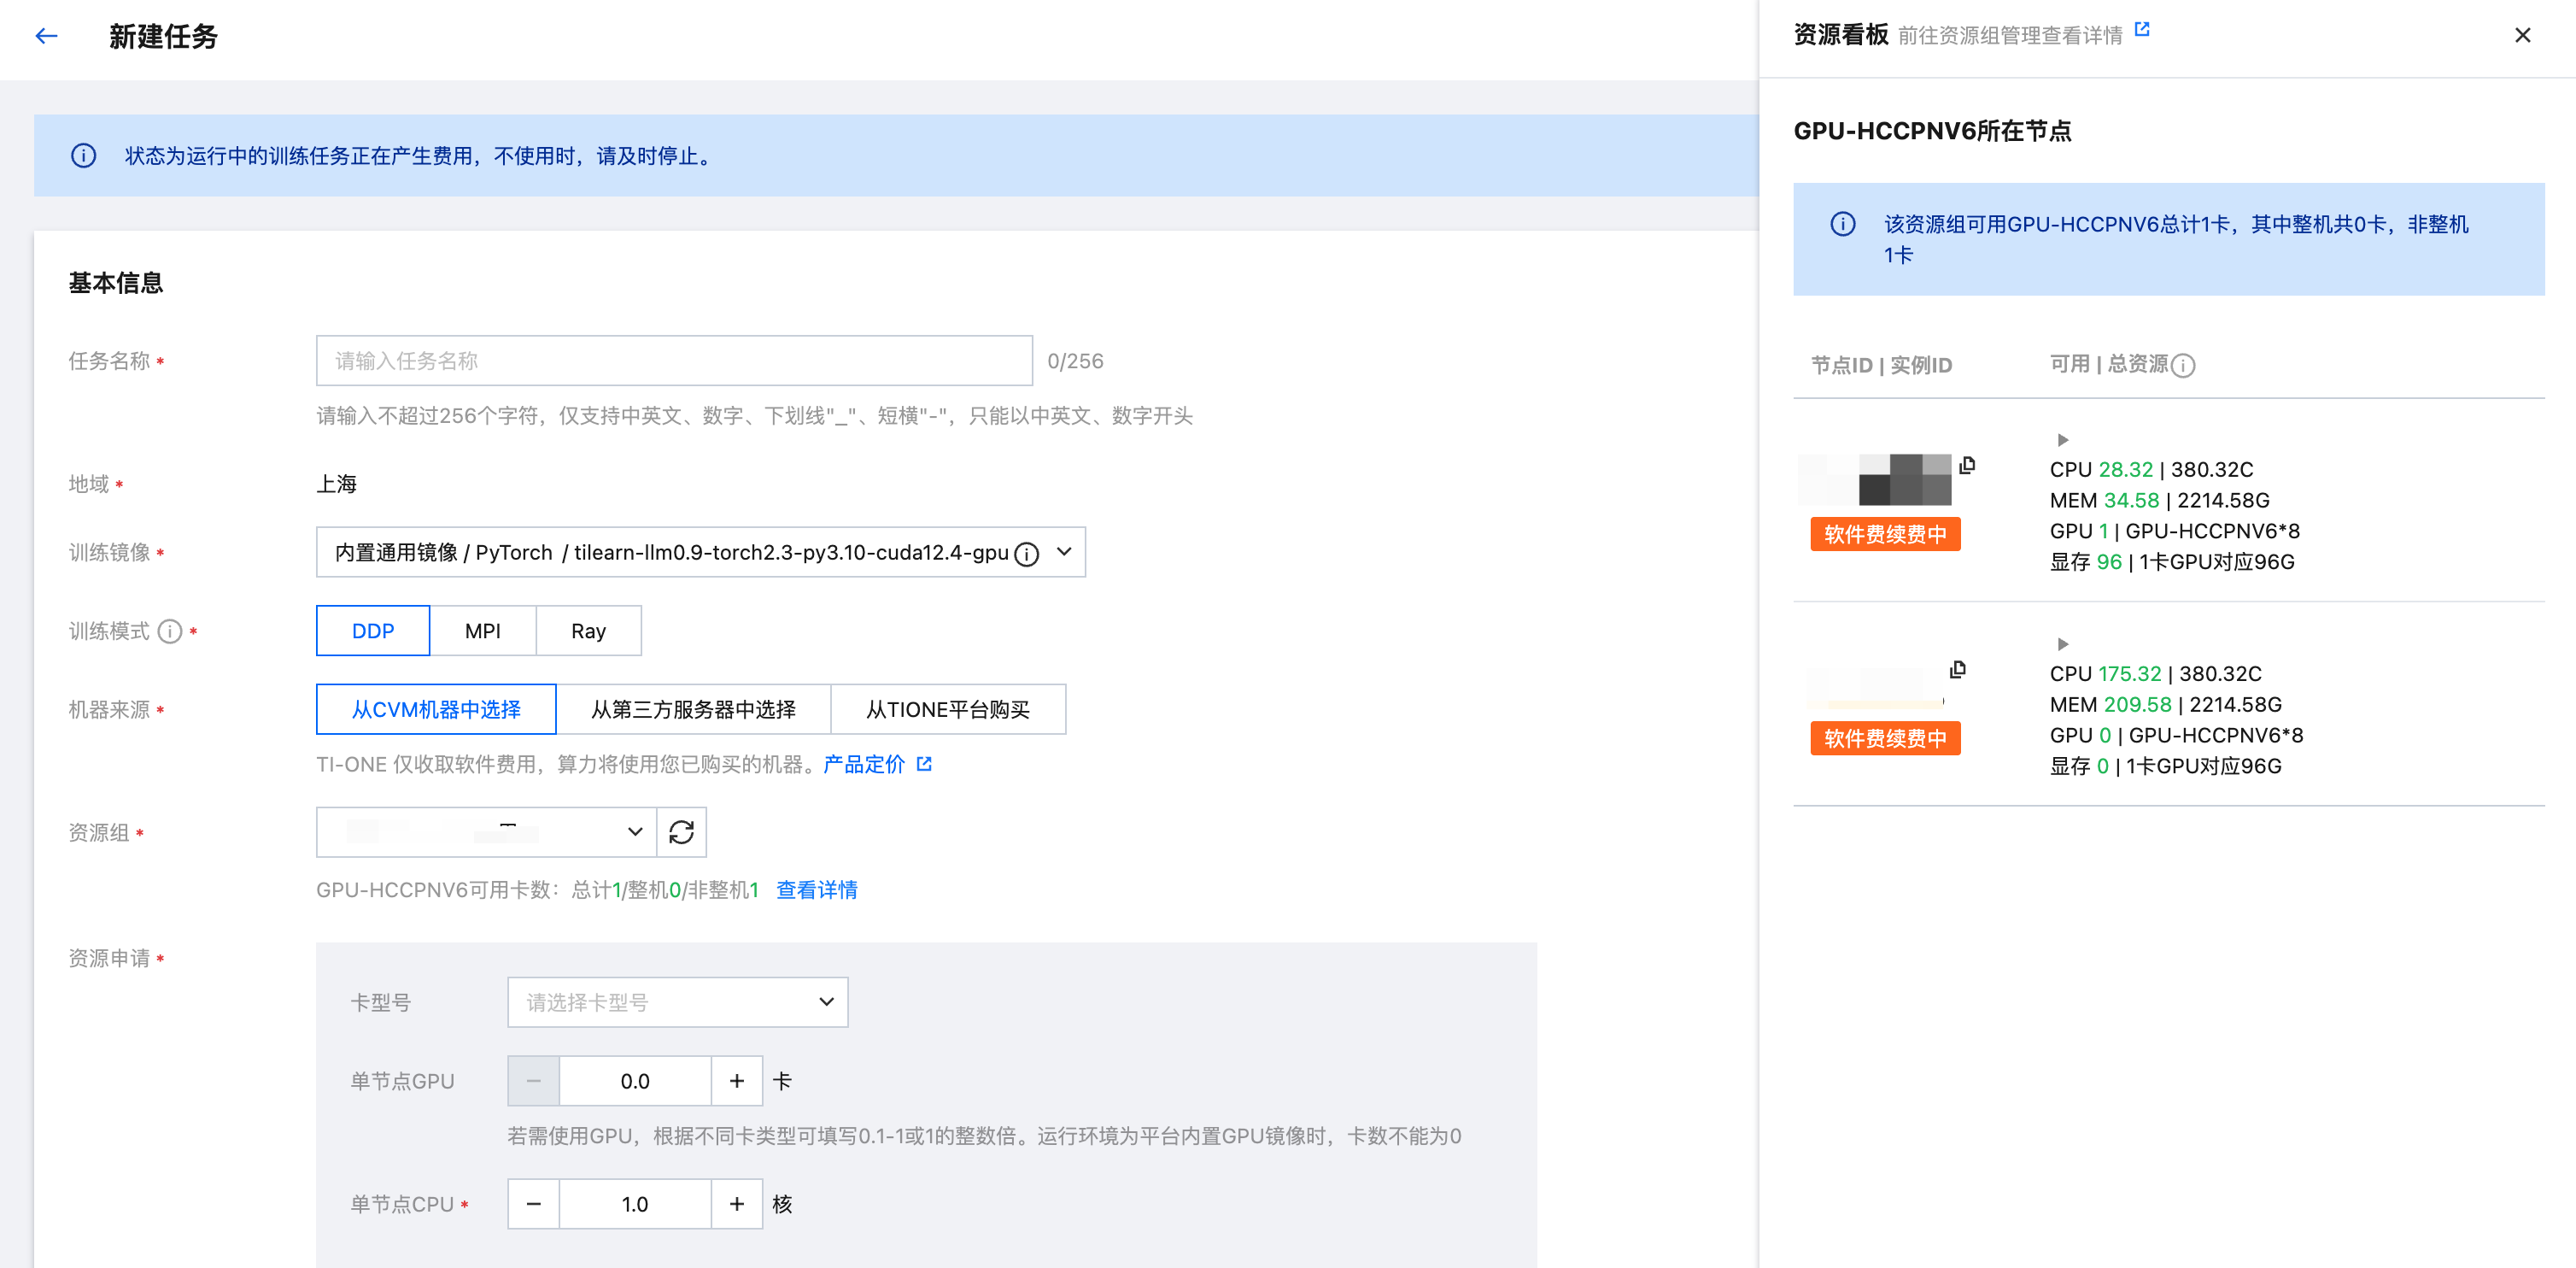
1. 选择资源组后会立即展示该资源组所剩的 GPU 概览信息,包括各卡型号的 GPU 总卡数,整机卡数和非整机卡数(碎卡数),可帮助用户快速了解选中资源组的 GPU 分布情况,根据当前任务场景选择使用整机资源还是非整机(碎卡)资源,可有效降低整体资源的碎片化情况,提升 GPU 总体利用率。
2. 单击查看详情即会在当前页面右侧展示详细资源看板,看板中展示了各个卡类型的节点剩余可用和总资源;单击下拉后可展示当前节点正在运行的所有任务/服务,可帮助用户快速了解节点资源的占用情况,以便团队间进行资源使用协商。
标签:可为任务创建标签,一个任务可添加多个标签。
描述:可添加最多500字的备注描述。
CLS 日志投递:CLS 日志投递默认关闭,TI-ONE 控制台会默认展示15天的日志,若您期望持久化存储日志,获得日志检索等服务,可以开启 CLS 日志投递,打开 CLS 后可以将日志投递至 CLS 服务(需要确保 CLS 服务已完成开通),CLS 产品介绍和收费指南请查看 CLS 介绍。
自动重启:您可以对任务配置自动重启策略,您需要配置最大重启次数,最高为10次,超过最大重启次数后,会将任务直接标记为异常;当前任务自动重启的触发条件为 任务异常 和 节点故障。其中任务异常指的是任务状态转为"异常"后触发自动重启,不区分异常原因;节点故障指的是任务由于节点故障而导致异常退出。同时可开启重启保留资源,即在任务发生自动重启后,可继续保留原有资源等待重试,直到最长保留时长(从前一次任务停止开始计算)后资源释放。任务自动重启的事件信息可在任务详情 > 事件页面中查看。
健康检测:
可以选择为任务启用健康检测,启用后将会占用一定时间对任务所调度的节点进行健康检测;检测时机为任务运行前,包含手动启动和自动重启;健康检测失败或超时后任务会结束,释放已占用资源。当前支持的检测项为 NCCL 网络检测、慢节点检测、All-to-All 网络检测和一致性检测。
同时可以为健康检测配置最长检测时长,当检测时间超过该时长后检测任务仍未正常结束,则训练任务会结束并且释放占用资源。健康检测过程中可进入任务详情 > 日志页面筛选日志类型为平台日志(健康检测)查看检测日志和数据。
填写任务配置信息
任务配置页面需要配置本次训练任务的算法、数据、输入输出等信息,具体配置项说明如下:
1. 存储路径设置:存储类型支持数据集、 数据源、COS、CFS(包含 CFS Turbo 类型)、GooseFSx 、GooseFS、平台数据,每设置一个存储路径,均支持选择该路径的用途,包含用户自有模型,用户自有代码,用户自有数据,训练数据及其他(其中当选择存储类型为 CFS 时,用途还支持选择平台内置模型,可将 TIONE 平台内置 CFS 中的模型直接挂载到训练容器):
若选择数据集,则需要首先在平台 数据中心 > 数据集管理 创建数据集。
若选择数据源,则需要首先在 平台管理 > 数据源管理 创建数据源(注意:数据源挂载权限分为只读挂载和读写挂载,需要输出训练结果数据的数据源请配置为读写挂载)。
若选择 COS,则需要选择数据所在的 COS 路径。
若选择 CFS、GooseFSx、GooseFS,则需要下拉选择 CFS 文件系统、GooseFSx 实例、GooseFS 集群,同时填写需要平台挂载的数据源目录。
若选择平台内置的数据集,您需要提单或联系产品经理进行申请,当前平台提供面向出行行业的内置数据集,该数据集仅在部分地域可使用。
以上几种数据来源在配置的时候均可定义数据在训练容器内的挂载路径,您的代码中需要填写该路径以获取数据。创建任务时可选择多个数据集或者多个数据路径,分别设置不同的容器挂载路径,挂载到容器中,供训练算法读取。
2. Git 存储:可以选择 Git 存储库,并且配置容器内存储路径,任务启动时会将该存储库下的文件下载到指定的存储路径中。您需要首先在训练工坊-Git 存储库中创建好存储库。
3. 启动命令:您需要填写程序入口命令,支持填写多行。
4. 环境变量:可以添加多个环境变量。
5. 训练输出:选择您需要保存训练输出的 COS 路径,平台会默认将 /opt/ml/output 路径下的数据定期上传至输出 COS 路径;若您需要将训练输出的模型一键发布至模型仓库,则需要将模型输出保存至 /opt/ml/model 路径下,平台会在训练结束后将该路径下的数据上传至 COS 路径;若您选择的是 CFS 等文件系统作为训练存储,您也可以不配置训练输出,直接将训练输出写到挂载的 CFS 文件路径中。
6. 调优参数:填写的超参数 JSON 会保存为 /opt/ml/input/config/hyperparameters.json 文件,您的代码需自行解析。
7. SSH 连接:您可以选择是否启用 SSH 连接(当前仅支持当机器来源选择从 CVM 机器中选择),启用后您可以在其他机器上访问本实例。您需要填写发起 SSH 登录机器上的 ~/.ssh/id_rsa.pub 文件内容。若该文件不存在,可用 ssh-keygen 命令生成。发起 SSH 登录时,请注意检查私钥是否配对。如需从多台机器发起 SSH 登录需要填写多个公钥,您可以添加多个(按回车键可输入多个)。
8. 添加端口:若需要在外部访问开发机中启动的服务,可以启用自定义端口配置功能(当前仅支持当机器来源选择从 CVM 机器中选择):
注意:请尽量确保资源组和负载均衡实例所关联的 VPC 网络一致。
服务名称:填写名称,用于区分在开发机中启动的不同自定义服务。
访问协议:可配置访问协议,支持 TCP 和 UDP。
监听端口:在开发机中运行的自定义服务进程所监听的容器端口,用于接收外部发送的网络请求,仅支持添加1 - 65535端口。
服务访问方式:
针对 SSH 连接,默认支持 VPC 内 Pod IP 访问(可在实例创建后到详情页查看访问地址),可选择通过 CLB 访问方式进行端口映射。
针对其他自定义服务,默认选择 CLB 访问方式进行端口映射
访问端口:若选择 CLB 访问,则需要添加映射端口。填写后将在用户选择的负载均衡实例下创建一个监听器并且分配端口,请注意不要填写已被监听器占用的端口,支持添加1 - 65535端口。
选择 CLB:选择 CLB 访问后需要选择账号下的负载均衡实例,若当前账号下暂无实例,可前往负载均衡控制台创建。
创建完成后可在开发机实例详情页查看自定义端口信息和访问地址。
另外,在您配置任务的过程中,底部会实时显示您当前任务配置的价格,请注意关注。所有信息配置完成后,即完成了任务创建。
内置大模型预置流程说明
预置存储路径设置
第一行 “平台 CFS”:系统默认为您配置了精调该大模型的配套训练代码。
第二行 “平台 CFS”:系统默认为您配置了一份精调该大模型的示例数据;若您希望使用自定义业务数据精调该大模型,可删除此行,并在底部添加其他存储来源。
第三行 “平台 CFS”:系统默认为您配置了平台内置模型。
第四行 “用户 CFS”:此处需选择您的 CFS 文件系统和源路径,“容器挂载路径”为系统默认填充您无需修改。若您需要使用其他 CFS 文件系统 作为训练输出,则您可以删除本行再添加。
注意:

预置启动命令
平台默认填充了启动命令,一般情况下您无需修改。
预置调优参数
平台提供多个预置参数,您可以直接修改超参 JSON 迭代模型。以下是超参释义:
超参 | 默认值 | 解释 |
Stage | sft | 表示训练模式,可选 sft、pt、dpo,默认值为 sft,当前仅 qwen3 系列模型支持 Stage 参数 |
Epoch | 2 | 训练过程中的迭代轮次。 |
BatchSize | 1 | 每轮训练迭代中的样本数。BatchSize 越大,训练速度越快同时内存占用越高。 |
LearningRate | 1e-5 | 梯度下降过程中更新权重的超参,过高导致模型难以收敛,过低导致模型收敛速度过慢。 |
Step | 750 | 每跑多少个 Step 保存一次模型的 checkpoint,保存 checkpoint 越多需要的存储空间越大。 |
UseTilearn | True | 是否要开启腾讯自研加速,"true/false",设置为"true"会默认启用腾讯自研加速框架训练,其中 3D 并行加速需8卡以上,需要进行 PP 和 TP 参数设置,可参考 angel-tilearn 文档;设置为"false"会默认使用开源加速框架进行训练。仅部分模型开放。 |
FinetuningType | Lora | 当 Stage 参数为 sft 时,用户可自定义选择精调训练模式“LoRA/Full”,LoRA 在固定预训练大模型本身参数的基础上,对权重矩阵进行低秩分解,训练过程中只更新低秩部分参数;Full 在精调过程中会全量更新模型参数,需要的训练资源更多。 |
MaxSequenceLength | 2048 | 最大文本序列长度,可根据您的业务数据长度进行合理设置。例如,如果大部分业务数据长度都在2048以下,则可设置 MaxSequenceLength 为 2048,大于2048的数据都会被截断为2048,可降低 GPU 显存压力。 |
GradientAccumulationSteps | 1 | Hugging Face trainer 参数,默认为1,提升 BatchSize。 |
GradientCheckPointing | True | Hugging Face trainer 参数,默认 True ,时间换显存的策略,开启后优化显存但训练速度变慢。 |
DeepSpeedZeroStage | z3 | DeepSpeed ZeRO 阶段配置,可选值["z0", "z2", "z2_offload", "z3", "z3_offload"],默认值 z3;仅部分模型开放。 |
ResumeFromCheckpoint | True | 是否自动从已有的 checkpoint 文件恢复训练,默认值为 True,表示若输出目录存在 checkpoint 文件,从最新的 checkpoint 恢复继续训练;设置为 False 表示将重新训练。设置为 False 且输出目录非空,则会报错,建议训练输出路径使用空目录,若需要开启强制覆盖需要手动增加一条"overwrite_output_dir": true 参数开启覆盖文件。 |
TilearnHybridTPSize | 1 | Tilearn 3D 并行参数,TP 并行的维度,默认为1;仅部分模型开放。 |
TilearnHybridPPSize | 1 | Tilearn 3D 并行参数,PP 并行的维度,默认为1;仅部分模型开放。 |


