属性型指令
属性型指令用于改变一个 DOM 元素的外观或行为。
指令概览
在 Angular 中有三种类型的指令:
- 组件 — 拥有模板的指令
- 结构型指令 — 通过添加和移除 DOM 元素改变 DOM 布局的指令
- 属性型指令 — 改变元素、组件或其它指令的外观和行为的指令。
组件是这三种指令中最常用的。 你在快速上手例子中第一次见到组件。
属性型指令改变一个元素的外观或行为。例如,内置的 NgStyle 指令可以同时修改元素的多个样式。
创建一个简单的属性型指令
属性型指令至少需要一个带有 @Directive 装饰器的控制器类。该装饰器指定了一个用于标识属性的选择器。 控制器类实现了指令需要的指令行为。
本章展示了如何创建一个简单的属性型指令 myHighlight ,当用户把鼠标悬停在一个元素上时,改变它的背景色。你可以这样用它:
src/app/app.component.html (applied)
content_copy<p appHighlight>Highlight me!</p>编写指令代码
在命令行窗口下用 CLI 命令创建指令类文件。
content_copyng generate directive highlightCLI 会创建 src/app/highlight.directive.ts 及相应的测试文件(.../spec.ts),并且在根模块 AppModule 中声明这个指令类。
和组件一样,这些指令也必须在Angular 模块中进行声明。
生成的 src/app/highlight.directive.ts 文件如下:
src/app/highlight.directive.ts
content_copyimport { Directive } from '@angular/core';

@Directive({
  selector: '[appHighlight]'
})
export class HighlightDirective {
  constructor() { }
}@Directive 装饰器的配置属性中指定了该指令的 CSS 属性型选择器[appHighlight]
这里的方括号([])表示它的属性型选择器。 Angular 会在模板中定位每个名叫 appHighlight 的元素,并且为这些元素加上本指令的逻辑。
正因如此,这类指令被称为 属性选择器 。
为什么不直接叫做 "highlight"?
尽管 highlight 是一个比 myHighlight 更简洁的名字,而且它确实也能工作。 但是最佳实践是在选择器名字前面添加前缀,以确保它们不会与标准 HTML 属性冲突。 它同时减少了与第三方指令名字发生冲突的危险。
确认你没有给 highlight 指令添加ng前缀。 那个前缀属于 Angular,使用它可能导致难以诊断的 bug。例如,这个简短的前缀 my 可以帮助你区分自定义指令。
紧跟在 @Directive 元数据之后的就是该指令的控制器类,名叫 HighlightDirective,它包含了该指令的逻辑(目前为空逻辑)。然后导出 HighlightDirective,以便它能在别处访问到。
现在,把刚才生成的 src/app/highlight.directive.ts 编辑成这样:
src/app/highlight.directive.ts
content_copyimport { Directive, ElementRef } from '@angular/core';

@Directive({
  selector: '[appHighlight]'
})
export class HighlightDirective {
    constructor(el: ElementRef) {
       el.nativeElement.style.backgroundColor = 'yellow';
    }
}
import 语句还从 Angular 的 core 库中导入了一个 ElementRef 符号。
你可以在指令的构造函数中注入 ElementRef,来引用宿主 DOM 元素,
ElementRef 通过其 nativeElement 属性给你了直接访问宿主 DOM 元素的能力。
这里的第一个实现把宿主元素的背景色设置为了黄色。
使用属性型指令
要想使用这个新的 HighlightDirective,就往根组件 AppComponent 的模板中添加一个 <p> 元素,并把该指令作为一个属性使用。
src/app/app.component.html
content_copy<p appHighlight>Highlight me!</p>运行这个应用以查看 HighlightDirective 的实际效果。
content_copyng serve总结:Angular 在宿主元素 <p> 上发现了一个 appHighlight 属性。 然后它创建了一个 HighlightDirective 类的实例,并把所在元素的引用注入到了指令的构造函数中。 在构造函数中,该指令把 <p> 元素的背景设置为了黄色。
响应用户引发的事件
当前,appHighlight 只是简单的设置元素的颜色。 这个指令应该在用户鼠标悬浮一个元素时,设置它的颜色。
先把 HostListener 加进导入列表中。
src/app/highlight.directive.ts (imports)
content_copyimport { Directive, ElementRef, HostListener } from '@angular/core';然后使用 HostListener 装饰器添加两个事件处理器,它们会在鼠标进入或离开时进行响应。
src/app/highlight.directive.ts (mouse-methods)
content_copy@HostListener('mouseenter') onMouseEnter() {
  this.highlight('yellow');
}

@HostListener('mouseleave') onMouseLeave() {
  this.highlight(null);
}

private highlight(color: string) {
  this.el.nativeElement.style.backgroundColor = color;
}@HostListener 装饰器引用属性型指令的宿主元素,在这个例子中就是 <p>。
当然,你可以通过标准的 JavaScript 方式手动给宿主 DOM 元素附加一个事件监听器。 但这种方法至少有三个问题:
- 必须正确的书写事件监听器。
- 当指令被销毁的时候,必须拆卸事件监听器,否则会导致内存泄露。
- 必须直接和 DOM API 打交道,应该避免这样做。
这些处理器委托了一个辅助方法来为 DOM 元素(el)设置颜色。
这个辅助方法(highlight)被从构造函数中提取了出来。 修改后的构造函数只负责声明要注入的元素 el: ElementRef。
src/app/highlight.directive.ts (constructor)
content_copyconstructor(private el: ElementRef) { }下面是修改后的指令代码:
src/app/highlight.directive.ts
content_copyimport { Directive, ElementRef, HostListener } from '@angular/core'; @Directive({ selector: '[appHighlight]'})export class HighlightDirective { constructor(private el: ElementRef) { } @HostListener('mouseenter') onMouseEnter() { this.highlight('yellow'); } @HostListener('mouseleave') onMouseLeave() { this.highlight(null); } private highlight(color: string) { this.el.nativeElement.style.backgroundColor = color; }}运行本应用并确认:当把鼠标移到 p 上的时候,背景色就出现了,而移开的时候,它消失了。

使用 @Input 数据绑定向指令传递值
高亮的颜色目前是硬编码在指令中的,这不够灵活。 在这一节中,你应该让指令的使用者可以指定要用哪种颜色进行高亮。
先从 @angular/core 中导入 Input。
src/app/highlight.directive.ts (imports)
content_copyimport { Directive, ElementRef, HostListener, Input } from '@angular/core';然后把 highlightColor 属性添加到指令类中,就像这样:
src/app/highlight.directive.ts (highlightColor)
content_copy@Input() highlightColor: string;绑定到 @Input 属性
注意看 @Input 装饰器。它往类上添加了一些元数据,从而让该指令的 highlightColor 能用于绑定。
它之所以称为输入属性,是因为数据流是从绑定表达式流向指令内部的。 如果没有这个元数据,Angular 就会拒绝绑定,参见稍后了解更多。
试试把下列指令绑定变量添加到 AppComponent 的模板中:
src/app/app.component.html (excerpt)
content_copy<p appHighlight highlightColor="yellow">Highlighted in yellow</p>
<p appHighlight [highlightColor]="'orange'">Highlighted in orange</p>
把 color 属性添加到 AppComponent 中:
src/app/app.component.ts (class)
content_copyexport class AppComponent {
  color = 'yellow';
}
让它通过属性绑定来控制高亮颜色。
src/app/app.component.html (excerpt)
content_copy<p appHighlight [highlightColor]="color">Highlighted with parent component's color</p>很不错,但如果可以在应用该指令时在同一个属性中设置颜色就更好了,就像这样:
src/app/app.component.html (color)
content_copy<p [appHighlight]="color">Highlight me!</p>[appHighlight] 属性同时做了两件事:把这个高亮指令应用到了 <p> 元素上,并且通过属性绑定设置了该指令的高亮颜色。 你复用了该指令的属性选择器 [appHighlight] 来同时完成它们。 这是清爽、简约的语法。
你还要把该指令的 highlightColor 改名为 myHighlight,因为它是颜色属性目前的绑定名。
src/app/highlight.directive.ts (renamed to match directive selector)
content_copy@Input() appHighlight: string;这可不好。因为 appHighlight 是一个糟糕的属性名,而且不能反映该属性的意图。
绑定到 @Input 别名
幸运的是,你可以随意命名该指令的属性,并且给它指定一个用于绑定的别名。
恢复原始属性名,并在 @Input 的参数中把选择器 myHighlight 指定为别名。
src/app/highlight.directive.ts (color property with alias)
content_copy@Input('appHighlight') highlightColor: string;在指令内部,该属性叫 highlightColor,在外部,你绑定到它地方,它叫 appHighlight。
这是最好的结果:理想的内部属性名,理想的绑定语法:
src/app/app.component.html (color)
content_copy<p [appHighlight]="color">Highlight me!</p>现在,你通过别名绑定到了 highlightColor 属性,并修改 onMouseEnter()方法来使用它。 如果有人忘了绑定到 appHighlightColor,那就用红色进行高亮。
src/app/highlight.directive.ts (mouse enter)
content_copy@HostListener('mouseenter') onMouseEnter() {
  this.highlight(this.highlightColor || 'red');
}
这是最终版本的指令类。
src/app/highlight.directive.ts (excerpt)
content_copyimport { Directive, ElementRef, HostListener, Input } from '@angular/core';

@Directive({
  selector: '[appHighlight]'
})
export class HighlightDirective {

  constructor(private el: ElementRef) { }

  @Input('appHighlight') highlightColor: string;

  @HostListener('mouseenter') onMouseEnter() {
    this.highlight(this.highlightColor || 'red');
  }

  @HostListener('mouseleave') onMouseLeave() {
    this.highlight(null);
  }

  private highlight(color: string) {
    this.el.nativeElement.style.backgroundColor = color;
  }
}
写个测试程序试验下
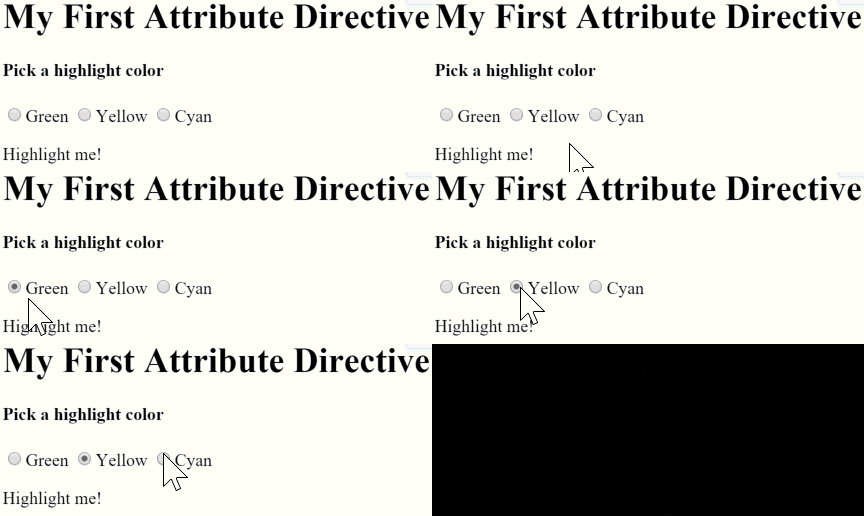
凭空想象该指令如何工作可不容易。 在本节,你将把 AppComponent 改成一个测试程序,它让你可以通过单选按钮来选取高亮颜色,并且把你选取的颜色绑定到指令中。
把 app.component.html 修改成这样:
src/app/app.component.html (v2)
content_copy<h1>My First Attribute Directive</h1>

<h4>Pick a highlight color</h4>
<div>
  <input type="radio" name="colors" (click)="color='lightgreen'">Green
  <input type="radio" name="colors" (click)="color='yellow'">Yellow
  <input type="radio" name="colors" (click)="color='cyan'">Cyan
</div>
<p [appHighlight]="color">Highlight me!</p>
修改 AppComponent.color,让它不再有初始值。
src/app/app.component.ts (class)
content_copyexport class AppComponent {
  color: string;
}
下面是测试程序和指令的动图。

绑定到第二个属性
本例的指令只有一个可定制属性,真实的应用通常需要更多。
目前,默认颜色(它在用户选取了高亮颜色之前一直有效)被硬编码为红色。应该允许模板的开发者设置默认颜色。
把第二个名叫 defaultColor 的输入属性添加到 HighlightDirective 中:
src/app/highlight.directive.ts (defaultColor)
content_copy@Input() defaultColor: string;修改该指令的 onMouseEnter,让它首先尝试使用 highlightColor 进行高亮,然后用 defaultColor,如果它们都没有指定,那就用红色作为后备。
src/app/highlight.directive.ts (mouse-enter)
content_copy@HostListener('mouseenter') onMouseEnter() {
  this.highlight(this.highlightColor || this.defaultColor || 'red');
}
当已经绑定过 appHighlight 属性时,要如何绑定到第二个属性呢?
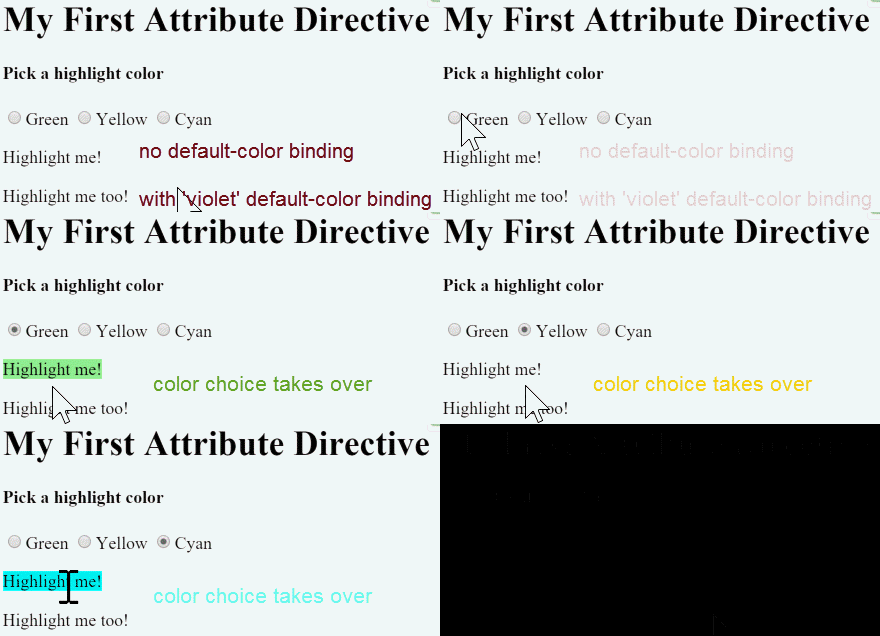
像组件一样,你也可以绑定到指令的很多属性,只要把它们依次写在模板中就行了。 开发者可以绑定到 AppComponent.color,并且用紫罗兰色作为默认颜色,代码如下:
src/app/app.component.html (defaultColor)
content_copy<p [appHighlight]="color" defaultColor="violet">
  Highlight me too!
</p>
Angular 之所以知道 defaultColor 绑定属于 HighlightDirective,是因为你已经通过 @Input 装饰器把它设置成了公共属性。
当这些代码完成时,测试程序工作时的动图如下:

小结
本章介绍了如何:
最终的源码如下:
app/app.component.ts
app/app.component.html
app/highlight.directive.ts
app/app.module.ts
main.ts
index.html
content_copyimport { Component } from '@angular/core';

@Component({
  selector: 'app-root',
  templateUrl: './app.component.html'
})
export class AppComponent {
  color: string;
}附录:为什么要加@Input?
在这个例子中 hightlightColor 是 HighlightDirective 的一个输入型属性。你见过它没有用别名时的代码:
src/app/highlight.directive.ts (color)
content_copy@Input() highlightColor: string;也见过用别名时的代码:
src/app/highlight.directive.ts (color)
content_copy@Input('appHighlight') highlightColor: string;但你以前也曾经把模板 HTML 绑定到组件的属性,而且从来没有用过 @Input。 差异何在?
差异在于信任度不同。 Angular 把组件的模板看做从属于该组件的。 组件和它的模板默认会相互信任。 这也就是意味着,组件自己的模板可以绑定到组件的任意属性,无论是否使用了 @Input 装饰器。
但组件或指令不应该盲目的信任其它组件或指令。 因此组件或指令的属性默认是不能被绑定的。 从 Angular 绑定机制的角度来看,它们是私有的,而当添加了 @Input 时,它们变成了公共的 只有这样,它们才能被其它组件或属性绑定。
你可以根据属性名在绑定中出现的位置来判定是否要加 @Input。
试用此原理分析下列范例:
src/app/app.component.html (color)
content_copy<p [appHighlight]="color">Highlight me!</p>本文档系腾讯云开发者社区成员共同维护,如有问题请联系 cloudcommunity@tencent.com

