🔥【Angular教程】路由入门
🔥【Angular教程】路由入门
前言
路由的概念在前端的框架中得到了广泛的应用,对于路由的感念不做阐述,路由的应用无外乎就是嵌套、传参,高级一些的功能如懒加载、预加载,再高级一些的如:路由守卫等。本篇我们就一起来看一看在Angular中如何使用路由。
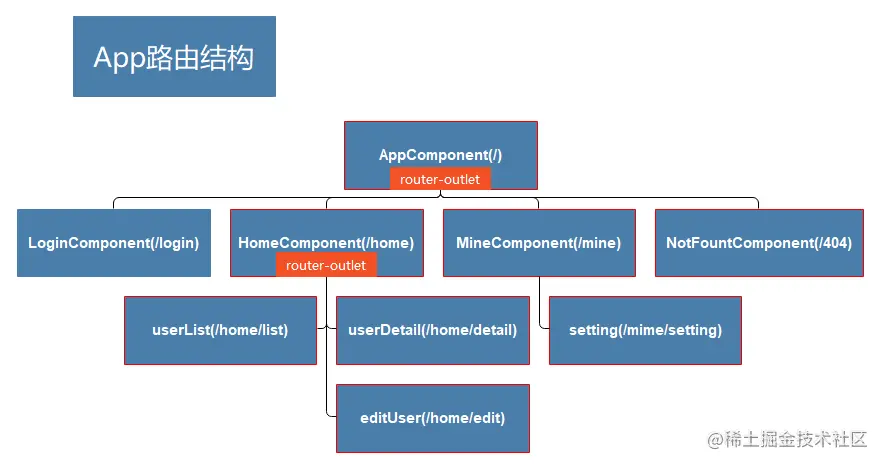
请按照图中结构来创建我们的项目

创建项目&一级模块:
ng new angular-router-sampleng g c pages/loginng g c pages/homeng g c pages/mine
注:通过cli创建的组件会进行自动注册。
起步
1. 在App的html模板中配置
配置路由跳转&路由出口(
router-outlet)
<div>
  <a [routerLink]="['/login']">登陆</a>|
  <a [routerLink]="['/home']">首页</a>|
  <a [routerLink]="['/mine']">我的</a>
</div>
<!-- 配置路由出口 -->
<router-outlet></router-outlet>
2. 在App的app-routing中配置路由器
- 一个最简单的组件路由必备一个path(路由的Url)属性和一个component(Url对应加载的组件)属性:
const routes: Routes = [
  {
    path: 'login',
    component: LoginComponent,
  },
  {
    path: 'home',
    component: HomeComponent,
  },
  {
    path: 'mine',
    component: MineComponent,
  },
];
- 当我们意外访问了一个不存在的Url的时候我们的404页面怎么配置?
path支持一个特殊的通配符来支持“**”,当在路由表中没有成功匹配的情况下会最后指向通配符对应的组件
const routes: Routes = [
  ...
  {
    path: '**',
    component: NotFountComponent,
  },
];
注意:路由器匹配策略为先到先得,故不具体的路由配置靠后配置。
3. 设置有效的默认路由
由于我们项目默认启动后无具体路由匹配这样并不友好,我们需要设置一个有效的默认路由来展示给用户。
- 配置的默认路由应该在通配路由之上。
const routes: Routes = [
  ...
  { path: '', redirectTo: '/home', pathMatch: 'full' },
  ...
];
配置子模块&子路由
此时我们的路由配置全部
app-routing,这样对于简单的应用当然是可行的,但是随着应用的迭代、模块的增加显然配置在一起对于管理和扩展都是一项挑战,模块的拆分就成来必然。
1. 为Home组件增加带路由的模块配置
通过cli为Home组件创建带路由的模块配置:
ng generate module pages/home/home --module app --flat --routing
imports: [
    BrowserModule,
    HomeRoutingModule,
    AppRoutingModule,
]
注:用cli创建的模块会自动配置到根模块,但我们手动的调整一下顺序将AppRoutingModule移动到最后,满足先到先得的策略。
2. 将Home组件的路由配置转移到home-routing
const routes: Routes = [{
  path: 'home',
  component: HomeComponent,
}];
注:配置好后就可以把app-routing 中的Home组件配置移除了。
3. 补充Home组模块的子组件并配置子路由
- 执行一下命令创建子组件
ng g c pages/home/children/user-listng g c pages/home/children/user-detailng g c pages/home/children/edit-user
- 为Home路由器配置增加
children属性来配置子组件路由
const routes: Routes = [{
  ...
  children: [
    {
      path: 'list',
      component: UserListComponent,
    },
    {
      path: 'detail',
      component: UserDetailComponent,
    },
    {
      path: 'edit',
      component: EditUserComponent,
    },
    {
      path: '',
      redirectTo: '/home/list',
      pathMatch: 'full'
    }
  ]
}];
- 同根组件一样配置子模块路由出口
<div>
  <a [routerLink]="['/home/list']">列表</a>|
  <a [routerLink]="['/home/edit']">编辑</a>|
  <a [routerLink]="['/home/detail']">详情</a>
</div>
<!-- 配置路由出口 -->
<router-outlet></router-outlet>
路由传参
1. 在路由定义时配置需要携带的参数令牌
- 格式: 在路由配置的path后补充格式为
/:key的令牌占位
{
  path: 'detail/:id',
  component: UserDetailComponent
}
注:这种将令牌插入到路由path中进行占位的方式中id是必须携带的参数。
- 通过
routerLink携带参数
<a [routerLink]="['/hero', hero.id]">
复制代码- 在Angular获取路由参数需要用到ActivatedRoute:
使用
ActivatedRoute前要在目标组件进行注入
- 方式1: 获取参数(路由参数变化可以被监听,适用于同一组件实例多次复用的情况)
this.route.paramMap.subscribe(
  (params: ParamMap) => {
    console.log('id :>> ', params.get('id'));
  }
)
- 方式2: 获取参数(只获取到初始值)
const id = this.route.snapshot.paramMap.get('id')!;
ParamMap API:
如果参数名位于参数列表中,就返回 true。2. 通过Router的navigate跳转页面
当前组件注入Router对象
- 无参数携带跳转:
this.router.navigate(['/home/list']);
- 携带参数跳转:
this.router.navigate(['/home/list', { id: this.userId, name: this.userName }]);
注:矩阵URL标记法:;id=101;name=bom
懒加载
懒加载的目的是将模块的挂载延迟到我们使用的时候,避免首次打开页面就进行整体加载导致页面长时间不可用。
1. 配置无组件路由(空路由)
对路由进行分组而不增加额外的路径片段
{
    path: 'home',
    loadChildren: () =>
      import('./pages/home/home.module').then((m) => m.HomeModule),
}
2. 移除根模块中关于Home模块的导入,使得模块完整分离
微调
home-routing中home组件的path配置为""
const routes: Routes = [{
  path: '',
  component: HomeComponent,
  children: [
    ...
  ]
}];
3. 与懒加载相对的预加载
angular中配置懒加载后模块的加载被延迟到来使用时,但是有一些组件是需要优先加载并在使用的时候可以及时运行。
angular中的Router模块提供来两种预加载的策略:
- 完全不预加载,这是默认值。惰性加载的特性区仍然会按需加载。
- 预加载所有惰性加载的特性区。
- 修改方式:RouterModule.forRoot()的参数二的对象支持设置加载模式的属性
preloadingStrategy,- PreloadAllModules: 预加载有所模块
- NoPreloading: 默认,不进行预加载
- 这么鸡肋的属性必须要支持自定义,我们来看一下:
- 在需要预加载的路由配置对象中添加data对象并增加
preload属性,值设置为true表示开启预加载。 - 通过cli来生成一个服务用来完成我们的预加载策略:
ng generate service selective-preloading-strategy - 将我们创建的服务实现接口
PreloadingStrategy - 自定义的策略和默认支持的两种策略使用方法一致。
- 在需要预加载的路由配置对象中添加data对象并增加
import { Injectable } from '@angular/core';
import { PreloadingStrategy, Route } from '@angular/router';
import { Observable, of } from 'rxjs';

@Injectable({
  providedIn: 'root',
})
export class SelectivePreloadingStrategyService implements PreloadingStrategy {
  preloadedModules: string[] = [];

  preload(route: Route, fn: () => Observable<any>): Observable<any> {
    // 通过检查路由配置来决定是否做预加载
    if (route.data && route.data.preload && route.path != null) {
      // 参数1: 要加载的路由
      this.preloadedModules.push(route.path);
      // 参数2: 加载器
      return fn();
    } else {
      return of(null);
    }
  }
}
结语
以上就是最近对Angular路由的学习整理,对于路由还有一块守卫没有提到,我们抽时间再来整理一下。

