axios笔记(二) 深入了解axios

axios笔记(二) 深入了解axios

axios 笔记(二) 深入了解 axios
1. 介绍
- 前端最流行的 ajax 请求库
- react / vue 官方推荐使用 axios 发送 ajax 请求
- axios 仓库
2. axios 特点
- 基于 promise 的异步 ajax 请求库
- 浏览器端 / node 端都可以使用
- 支持请求 / 响应拦截器
- 支持请求取消
- 请求 / 响应数据转换
- 批量发送多个请求
3. axios 常用语法
- axios(config):最本质的能发任何类型请求的方式
- axios.get(url, config):发 get 请求
- axios.put(url, config):发 put 请求
- axios.defaults.xxx:请求的默认全局配置,如 baseURL
- axios.interceptors.request.use():添加请求拦截器
- axios.interceptors.response.use():添加响应拦截器
- axios.create(config):新建一个 axios 实例(没有以下的功能)
- axios.Cancel():用于创建取消请求的错误对象
- axios.CancelToken():用于创建取消请求的 token 对象
- axios.isCancel():判断是否是一个取消请求的错误
- axios.all(promises):用于批量执行多个异步错误
3.1 axios 简单使用
<!DOCTYPE html>
<html lang="en">
  <head>
    <meta charset="UTF-8" />
    <meta http-equiv="X-UA-Compatible" content="IE=edge" />
    <meta name="viewport" content="width=device-width, initial-scale=1.0" />
    <title>Document</title>
  </head>

  <body>
    <button onclick="testGet()">GET请求</button>
    <button onclick="testPost()">POST请求</button>

    <script src="./node_modules/axios/dist/axios.min.js"></script>

    <script>
      axios.defaults.baseURL = "http://localhost:3000"; // 设置请求的基址,后面就不需要写完整的路径了

      // GET请求: 服务端获取数据
      const testGet = () => {
        axios({
          url: "/posts",
          method: "GET",
          params: {
            id: 1,
          },
        }).then(
          (response) => {
            console.log(response);
          },
          (error) => {
            alert(error.message);
          }
        );
      };

      // POST请求: 服务端增加数据
      const testPost = () => {
        axios({
          url: "/posts",
          method: "POST",
          data: {
            title: "axios",
            author: "clz",
          },
        }).then(
          (response) => {
            console.log(response);
          },
          (error) => {
            alert(error.message);
          }
        );
      };
    </script>
  </body>
</html>
3.2 axios.create(config)
简单使用
const instance1 = axios.create({
  baseURL: "http://localhost:3000",
});

// 使用instance发送请求
instance1({
  url: "/posts",
});
可以发现用法和 axios()很像,和下面一样效果
axios.defaults.baseURL = "http://localhost:3000";
axios({
  url: "/posts",
});
那么,axios.create(config)肯定得有它的过人之处,否则,早就会被淘汰掉了。
先来一个情景:我们要向端口 3000 发送 get 请求,要向端口 4000 发送 post 请求
通过 axios.create(config)实现:
const instance1 = axios.create({
  baseURL: "http://localhost:3000",
});

// 使用instance发送请求
instance1({
  url: "/posts",
});

const instance2 = axios.create({
  baseURL: "http://localhost:4000",
});

// 使用instance发送请求
instance2({
  url: "/posts",
  method: "POST",
});
直接通过 axios()实现:
axios.defaults.baseURL = "http://localhost:3000";
axios({
  url: "/posts",
});

axios.defaults.baseURL = "http://localhost:4000";
axios({
  url: "/posts",
  method: "POST",
});
可能有人会提出疑问:不是一样都能实现吗?但是,如果我需要最后在向端口 3000 再发送一次 GET 请求的话。
让我们再看一下代码:
通过 axios.create(config)实现:
const instance1 = axios.create({
  baseURL: "http://localhost:3000",
});

instance1({
  url: "/posts",
});

const instance2 = axios.create({
  baseURL: "http://localhost:4000",
});

instance2({
  url: "/posts",
  method: "POST",
});

instance1({
  url: "/posts",
});
直接通过 axios()实现:
axios.defaults.baseURL = "http://localhost:3000";
axios({
  url: "/posts",
});

axios.defaults.baseURL = "http://localhost:4000";
axios({
  url: "/posts",
  method: "POST",
});

axios.defaults.baseURL = "http://localhost:3000";
axios({
  url: "/posts",
});
比较上面的两种情况,就能发现**axios.create(config)的好处了。因为是新建 axios 实例,所以 3000 和 4000 两个端口分别使用的是不同的 axios 实例。所以能够很好地各司其责。而 axios()则不能,仅仅只是简单地修改 baseURL,都需要每次发送请求前重新修改,还是未考虑异步的情况。这么一看,在这种情况下,axios.create()**新建 axios 实例还是很香的。
3.3 拦截器及运行流程
3.3.1 添加请求拦截器
axios.interceptors.request.use(
  function (config) {
    // Do something before request is sent
    return config; // 用于把任务串联起来
  },
  function (error) {
    // Do something with request error
    return Promise.reject(error); // 一定要返回错误,不让之后能进入成功的流程
  }
);
3.3.2 添加响应拦截器
axios.interceptors.response.use(
  function (response) {
    // Any status code that lie within the range of 2xx cause this function to trigger
    // Do something with response data
    return response;
  },
  function (error) {
    // Any status codes that falls outside the range of 2xx cause this function to trigger
    // Do something with response error
    return Promise.reject(error);
  }
);
3.3.3 拦截器简单使用
<!DOCTYPE html>
<html lang="en">
  <head>
    <meta charset="UTF-8" />
    <meta http-equiv="X-UA-Compatible" content="IE=edge" />
    <meta name="viewport" content="width=device-width, initial-scale=1.0" />
    <title>拦截器简单使用</title>
  </head>

  <body>
    <script src="./node_modules/axios/dist/axios.min.js"></script>
    <script>
      // 添加请求拦截器(回调函数,成功的必须返回config:用于把任务串联起来)
      axios.interceptors.request.use(
        (config) => {
          console.log("request interceptor1 onResolved()");
          return config;
        },
        (error) => {
          console.log("request interceptor1 onRejected()");
          return Promise.reject(error); // 一定要返回错误,不让之后能进入成功的流程
        }
      );
      axios.interceptors.request.use(
        (config) => {
          console.log("request interceptor2 onResolved()");
          return config;
        },
        (error) => {
          console.log("request interceptor2 onRejected()");
          return Promise.reject(error);
        }
      );

      // 添加响应拦截器(回调函数,成功的必须返回response:用于把任务串联起来)
      axios.interceptors.response.use(
        (response) => {
          console.log("response interceptor1 onResolved()");
          return response;
        },
        (error) => {
          console.log("response interceptor1 onRejected()");
          return Promise.reject(error);
        }
      );
      axios.interceptors.response.use(
        (response) => {
          console.log("response interceptor2 onResolved()");
          return response;
        },
        (error) => {
          console.log("response interceptor2 onRejected()");
          return Promise.reject(error);
        }
      );

      axios
        .get("http://localhost:3000/posts")
        .then((response) => {
          console.log("data: ", response.data);
        })
        .catch((error) => {
          console.log("error: ", error.message);
        });
    </script>
  </body>
</html>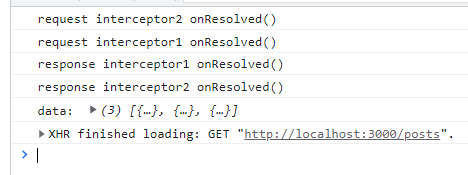
先发送请求,再接收响应。所以会先触发请求拦截器,再触发响应拦截器,经过响应拦截器后才能得到数据
3.3.4 取消请求
express 知识:Express 笔记: clz
先搭建一个服务器:
const express = require("express");
const cors = require("cors");

const app = express();

app.use(cors()); // 使用cors,允许跨域

app.use(express.json()); // 解析Content-Type为 application/json格式的请求体

app.get("/product1", (req, res) => {
  setTimeout(() => {
    res.send([
      {
        id: 1,
        name: "product1",
      },
    ]);
  }, 2000);
});

app.listen(3000, () => {
  console.log("http://localhost:3000");
});
开启服务器, node server.js或 nodemon server.js(支持热更新)
取消请求的简单使用:
先定义一个变量 cancel,用于保存取消请求的函数
设置请求路径、请求方法时,还要设置属性 cancelToken,值为一个 CancelToken对象,CancelToken 类的构造函数的参数是用于请求的函数
cancelToken: new axios.CancelToken((c) => {
  // c是用于取消当前请求的函数
  cancel = c; // 保存取消请求函数,用于之后取消请求
});
在需要请求的地方,调用保存的取消请求的函数
<!DOCTYPE html>
<html lang="en">
<head>
<meta charset="UTF-8" />
<meta http-equiv="X-UA-Compatible" content="IE=edge" />
<meta name="viewport" content="width=device-width, initial-scale=1.0" />
<title>取消请求</title>
</head>
<body>
<button onclick="getProducts1()">获取商品列表1</button><br />
<button onclick="cancelReq()">取消请求</button>
<script src="./node_modules/axios/dist/axios.js"></script>
<script>
let cancel; // 用于保存取消请求的函数
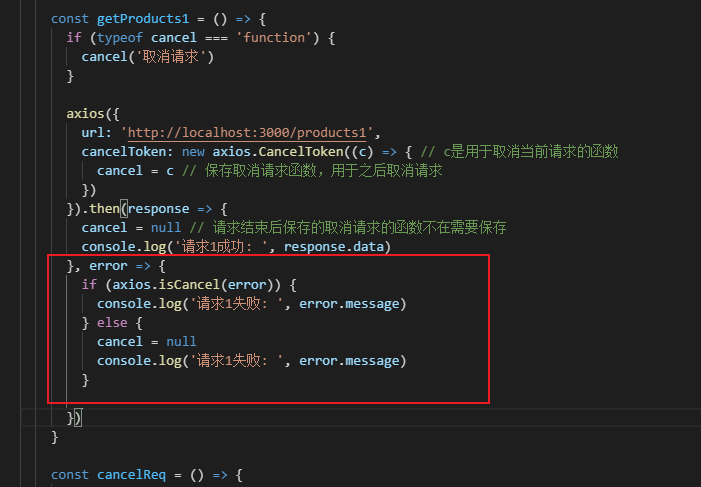
const getProducts1 = () => {
axios({
url: "http://localhost:3000/products1",
cancelToken: new axios.CancelToken((c) => {
// c是用于取消当前请求的函数
cancel = c; // 保存取消请求函数,用于之后取消请求
}),
}).then(
(response) => {
cancel = null; // 请求结束后保存的取消请求的函数不在需要保存
console.log("请求1成功: ", response.data);
},
(error) => {
cancel = null;
console.log("请求1失败: ", error.message, error);
}
);
};
const cancelReq = () => {
if (typeof cancel === "function") {
cancel("强制取消请求1");
} else {
console.log("没有可以取消的请求");
}
};
</script>
</body>
</html>
另外,取消请求的函数可以传参,传的参数将变成请求失败时,Cancel 对象的 message(这个时候并不是 Error 对象)
取消请求优化:发送请求前取消掉未完成的请求
在点击事件最前面添加判断
if (typeof cancel === "function") {
  cancel("取消请求");
}
这里会出现一个问题,如果连续发送三个请求(在收到响应之前),会发现,第三个请求没有取消掉前一个未完成的请求
为什么会这样呢?看下下面的流程图就可能可以迎刃而解了(有错可评论指出)
为了解决上面的问题,这时候就需要使用 axios.isCancel(error)判断是不是取消请求导致的请求失败,如果是,则此时不需要把 cancel变为null
<!DOCTYPE html>
<html lang="en">

<head>
  <meta charset="UTF-8">
  <meta http-equiv="X-UA-Compatible" content="IE=edge">
  <meta name="viewport" content="width=device-width, initial-scale=1.0">
  <title>取消请求</title>
</head>

<body>
  <button onclick="getProducts1()">获取商品列表1</button><br>

  <button onclick="cancelReq()">取消请求</button>

  <script src="./node_modules/axios/dist/axios.js"></script>
  <script>
    let cancel // 用于保存取消请求的函数

    const getProducts1 = () => {
      if (typeof cancel === 'function') {
        cancel('取消请求')
      }

      axios({
        url: 'http://localhost:3000/products1',
        cancelToken: new axios.CancelToken((c) => { // c是用于取消当前请求的函数
          cancel = c // 保存取消请求函数,用于之后取消请求
        })
      }).then(response => {
        cancel = null // 请求结束后保存的取消请求的函数不在需要保存
        console.log('请求1成功: ', response.data)
      }, error => {
        if (axios.isCancel(error)) {
          console.log('请求1失败: ', error.message)
        } else {
          cancel = null
          console.log('请求1失败: ', error.message)
        }

      })
    }

    const cancelReq = () => {
      if (typeof cancel === 'function') {
        cancel('强制取消请求1')
      } else {
        console.log('没有可以取消的请求')
      }
    }
  </script>
</body>

</html>
通过拦截器再优化:增加代码可复用性
// 请求拦截器
axios.interceptors.request.use((config) => {
  if (typeof cancel === "function") {
    cancel("取消请求");
  }
  config.cancelToken = new axios.CancelToken((c) => {
    // c是用于取消当前请求的函数
    cancel = c; // 保存取消请求函数,用于之后取消请求
  });

  return config;
});

// 响应拦截器
axios.interceptors.response.use(
  (response) => {
    cancel = null;
    return response;
  },
  (error) => {
    if (axios.isCancel(error)) {
      console.log("请求取消: ", error.message);

      return new Promise(() => {}); // 中断Promise链。因为返回一个pending状态的对象时,后续的回调就不能执行了。
      // 因为后面的回调函数只有在状态发生变化时才能执行。
    } else {
      cancel = null;
      return Promise.reject(error); // 将错误向下传递
    }
  }
);
完整代码:
<!DOCTYPE html>
<html lang="en">
  <head>
    <meta charset="UTF-8" />
    <meta http-equiv="X-UA-Compatible" content="IE=edge" />
    <meta name="viewport" content="width=device-width, initial-scale=1.0" />
    <title>取消请求</title>
  </head>

  <body>
    <button onclick="getProducts1()">获取商品列表1</button><br />
    <button onclick="getProducts2()">获取商品列表2</button><br />

    <button onclick="cancelReq()">取消请求</button>

    <script src="./node_modules/axios/dist/axios.js"></script>
    <script>
      // 请求拦截器
      axios.interceptors.request.use((config) => {
        if (typeof cancel === "function") {
          cancel("取消请求");
        }
        config.cancelToken = new axios.CancelToken((c) => {
          // c是用于取消当前请求的函数
          cancel = c; // 保存取消请求函数,用于之后取消请求
        });

        return config;
      });

      // 响应拦截器
      axios.interceptors.response.use(
        (response) => {
          cancel = null;
          return response;
        },
        (error) => {
          if (axios.isCancel(error)) {
            console.log("请求取消: ", error.message);

            return new Promise(() => {}); // 中断Promise链。因为返回一个pending状态的对象时,后续的回调就不能执行了。
            // 因为后面的回调函数只有在状态发生变化时才能执行。
          } else {
            cancel = null;
            return Promise.reject(error); // 将错误向下传递
          }
        }
      );

      let cancel; // 用于保存取消请求的函数

      const getProducts1 = () => {
        axios({
          url: "http://localhost:3000/products1",
        }).then(
          (response) => {
            console.log("请求1成功: ", response.data);
          },
          (error) => {
            console.log("请求1失败: ", error.message);
          }
        );
      };

      const getProducts2 = () => {
        axios({
          url: "http://localhost:3000/products1",
        }).then(
          (response) => {
            console.log("请求2成功: ", response.data);
          },
          (error) => {
            console.log("请求2失败: ", error.message);
          }
        );
      };

      const cancelReq = () => {
        if (typeof cancel === "function") {
          cancel("强制取消请求1");
        } else {
          console.log("没有可以取消的请求");
        }
      };
    </script>
  </body>
</html>腾讯云开发者
