使用HSB而不是RGB来定义颜色

有多种方法可以在代码中定义颜色。最常用的方法是指定三种基色的值 - 红色、绿色和蓝色 (RGB)。本文通过指定色调、饱和度和亮度 (HSB) 的值来探索替代机制的使用。可以以更直观的方式使用 HSB 属性来创建颜色搭配良好的调色板。
网上有很多关于颜色的资源,我发现 Jonathan 的 Learn about Hue, Saturation and Brightness colours 以及 Erik Kennedy 的 The HSB Color System: A Practitioner's Primer 特别有用。
RGB 颜色 (红色、绿色 & 蓝色)
定义颜色的最常见方法是指定颜色的红色、绿色和蓝色属性。每个属性可以是 0 到 255 之间的十进制值,但通常以十六进制格式给出,因此颜色可以用 6 个字符表示。 Mac 上的 数码测色计 可用于检查屏幕上的任何区域并给出所选颜色的 RGB 值。可以在 SwiftUI 中创建一个调色板以显示可能的颜色。
struct RgbColorPaletteView: View {
    var body: some View {
        VStack(spacing:5) {
            VStack {
                HStack {
                    Text("Red")
                        .frame(width: cellWidth)
                    Text("Green")
                        .frame(width: cellWidth * 11.0)
                    Text("Blue")
                        .frame(width: cellWidth)
                    Spacer()
                }
                HStack(spacing:1) {
                    Spacer()
                        .frame(width:cellWidth)
                    ForEach([0.0, 0.1, 0.2, 0.3, 0.4, 0.5, 0.6, 0.7, 0.8, 0.9, 1.0], id: \.self) { myGreen in
                        Text("\(myGreen, specifier: "%0.1F")")
                            .font(.footnote)
                            .multilineTextAlignment(.center)
                            .frame(width:cellWidth)
                    }
                    Spacer()
                }
            }

            ForEach([0.0, 0.1, 0.2, 0.3, 0.4, 0.5, 0.6, 0.7, 0.8, 0.9, 1.0], id: \.self) { myRed in
                HStack(spacing:1) {
                    Text("\(myRed, specifier: "%0.1F")")
                        .frame(width:cellWidth)
                    ForEach([0.0, 0.1, 0.2, 0.3, 0.4, 0.5, 0.6, 0.7, 0.8, 0.9, 1.0], id: \.self) { myGreen in
                        HStack {
                            VStack(spacing:1) {
                                ForEach([0.0, 0.1, 0.2, 0.3, 0.4, 0.5, 0.6, 0.7, 0.8, 0.9, 1.0], id: \.self) { myBlue in
                                    Color(red: myRed, green: myGreen, blue: myBlue)
                                }
                                .frame(width:cellWidth)
                            }
                        }
                    }
                    VStack(spacing:13) {
                        Text(myRed == 0.0 ? "0.0" : "")
                        Image(systemName: "arrow.down")
                            .foregroundColor(myRed == 0.0 ? Color.black : .clear)
                        Text(myRed == 0.0 ? "1.0" : "")
                    }
                    .font(.footnote)
                    .frame(width:cellWidth * 0.7)

                    Spacer()
                }
            }
            Spacer()
        }
        .padding()
    }

    let cellWidth: CGFloat = 100
}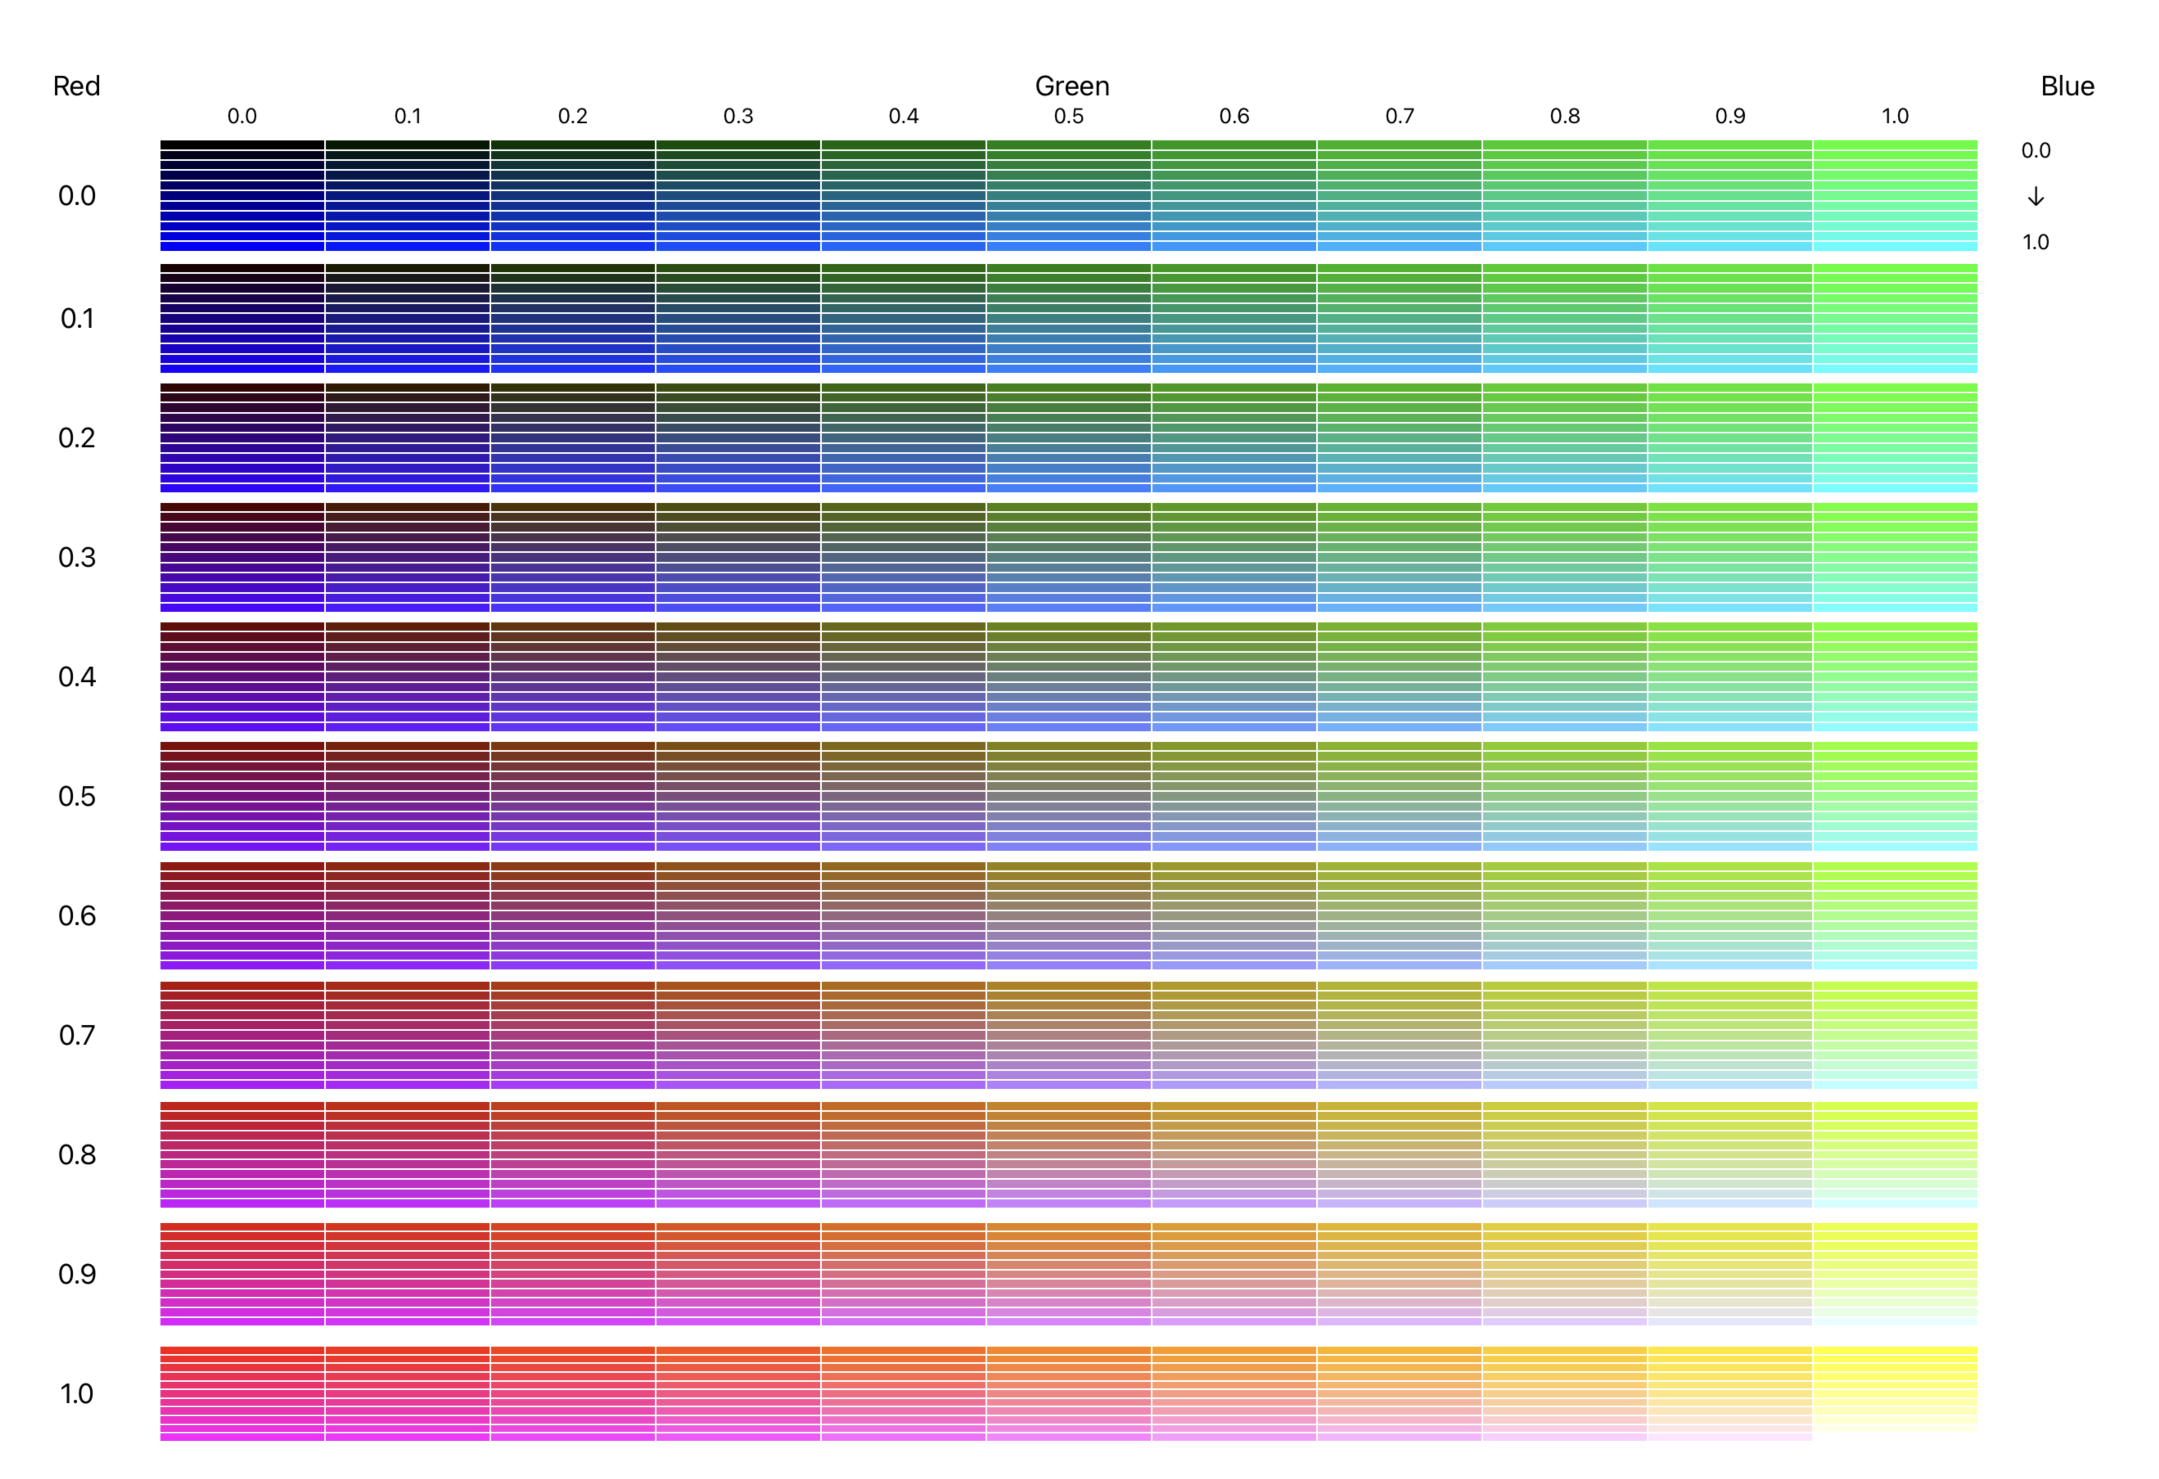
具有不同 RGB 值的调色板(红色、绿色和蓝色)
HSB 颜色(色调、饱和度 & 亮度)
HSB 颜色模型被认为更符合我们对颜色的看法。下面是通过改变色调、饱和度和亮度的值来显示调色板的代码。请注意,色相(Hue) 通常被赋予一个以角度为单位的值,表示色环周围的角度,值在 0 到 360 之间,SwiftUI 使用 0.0 到 1.0 之间的值,其中 1.0 表示 360 度。
struct HsbColorPaletteView: View {
    var body: some View {
        VStack(spacing:5) {
            VStack {
                HStack {
                    Text("Hue")
                        .frame(width: cellWidth)
                    Text("Saturation")
                        .frame(width: cellWidth * 11.0)
                    Text("Brightness")
                        .frame(width: cellWidth)
                    Spacer()
                }
                HStack(spacing:1) {
                    Spacer()
                        .frame(width:cellWidth)
                    ForEach([0.0, 0.1, 0.2, 0.3, 0.4, 0.5, 0.6, 0.7, 0.8, 0.9, 1.0], id: \.self) { mySat in
                        Text("\(mySat, specifier: "%0.1F")")
                            .font(.footnote)
                            .multilineTextAlignment(.center)
                            .frame(width:cellWidth)
                    }
                    Spacer()
                }
            }

            ForEach([0.0, 0.1, 0.2, 0.3, 0.4, 0.5, 0.6, 0.7, 0.8, 0.9, 1.0], id: \.self) { myHue in
                HStack(spacing:1) {
                    Text("\(myHue, specifier: "%0.1F")")
                        .frame(width:cellWidth)
                    ForEach([0.0, 0.1, 0.2, 0.3, 0.4, 0.5, 0.6, 0.7, 0.8, 0.9, 1.0], id: \.self) { mySat in
                        HStack {
                            VStack(spacing:1) {
                                //ForEach([1.0, 0.9, 0.8, 0.7, 0.6, 0.5, 0.4, 0.3, 0.2, 0.1, 0.0], id: \.self) { myBright in
                                ForEach([1.0, 0.9, 0.8, 0.7, 0.6, 0.5], id: \.self) { myBright in
                                    Color(hue: myHue,
                                          saturation: mySat,
                                          brightness: myBright)
                                }
                                .frame(width:cellWidth)
                            }
                        }
                    }
                    VStack(spacing:13) {
                        Text(myHue == 0.0 ? "1.0" : "")
                        Image(systemName: "arrow.down")
                            .foregroundColor(myHue == 0.0 ? Color.black : .clear)
                        Text(myHue == 0.0 ? "0.5" : "")
                    }
                    .font(.footnote)
                    .frame(width:cellWidth * 0.5)

                    Spacer()
                }
            }
            Spacer()
        }
        .padding()
    }

    let cellWidth: CGFloat = 100
}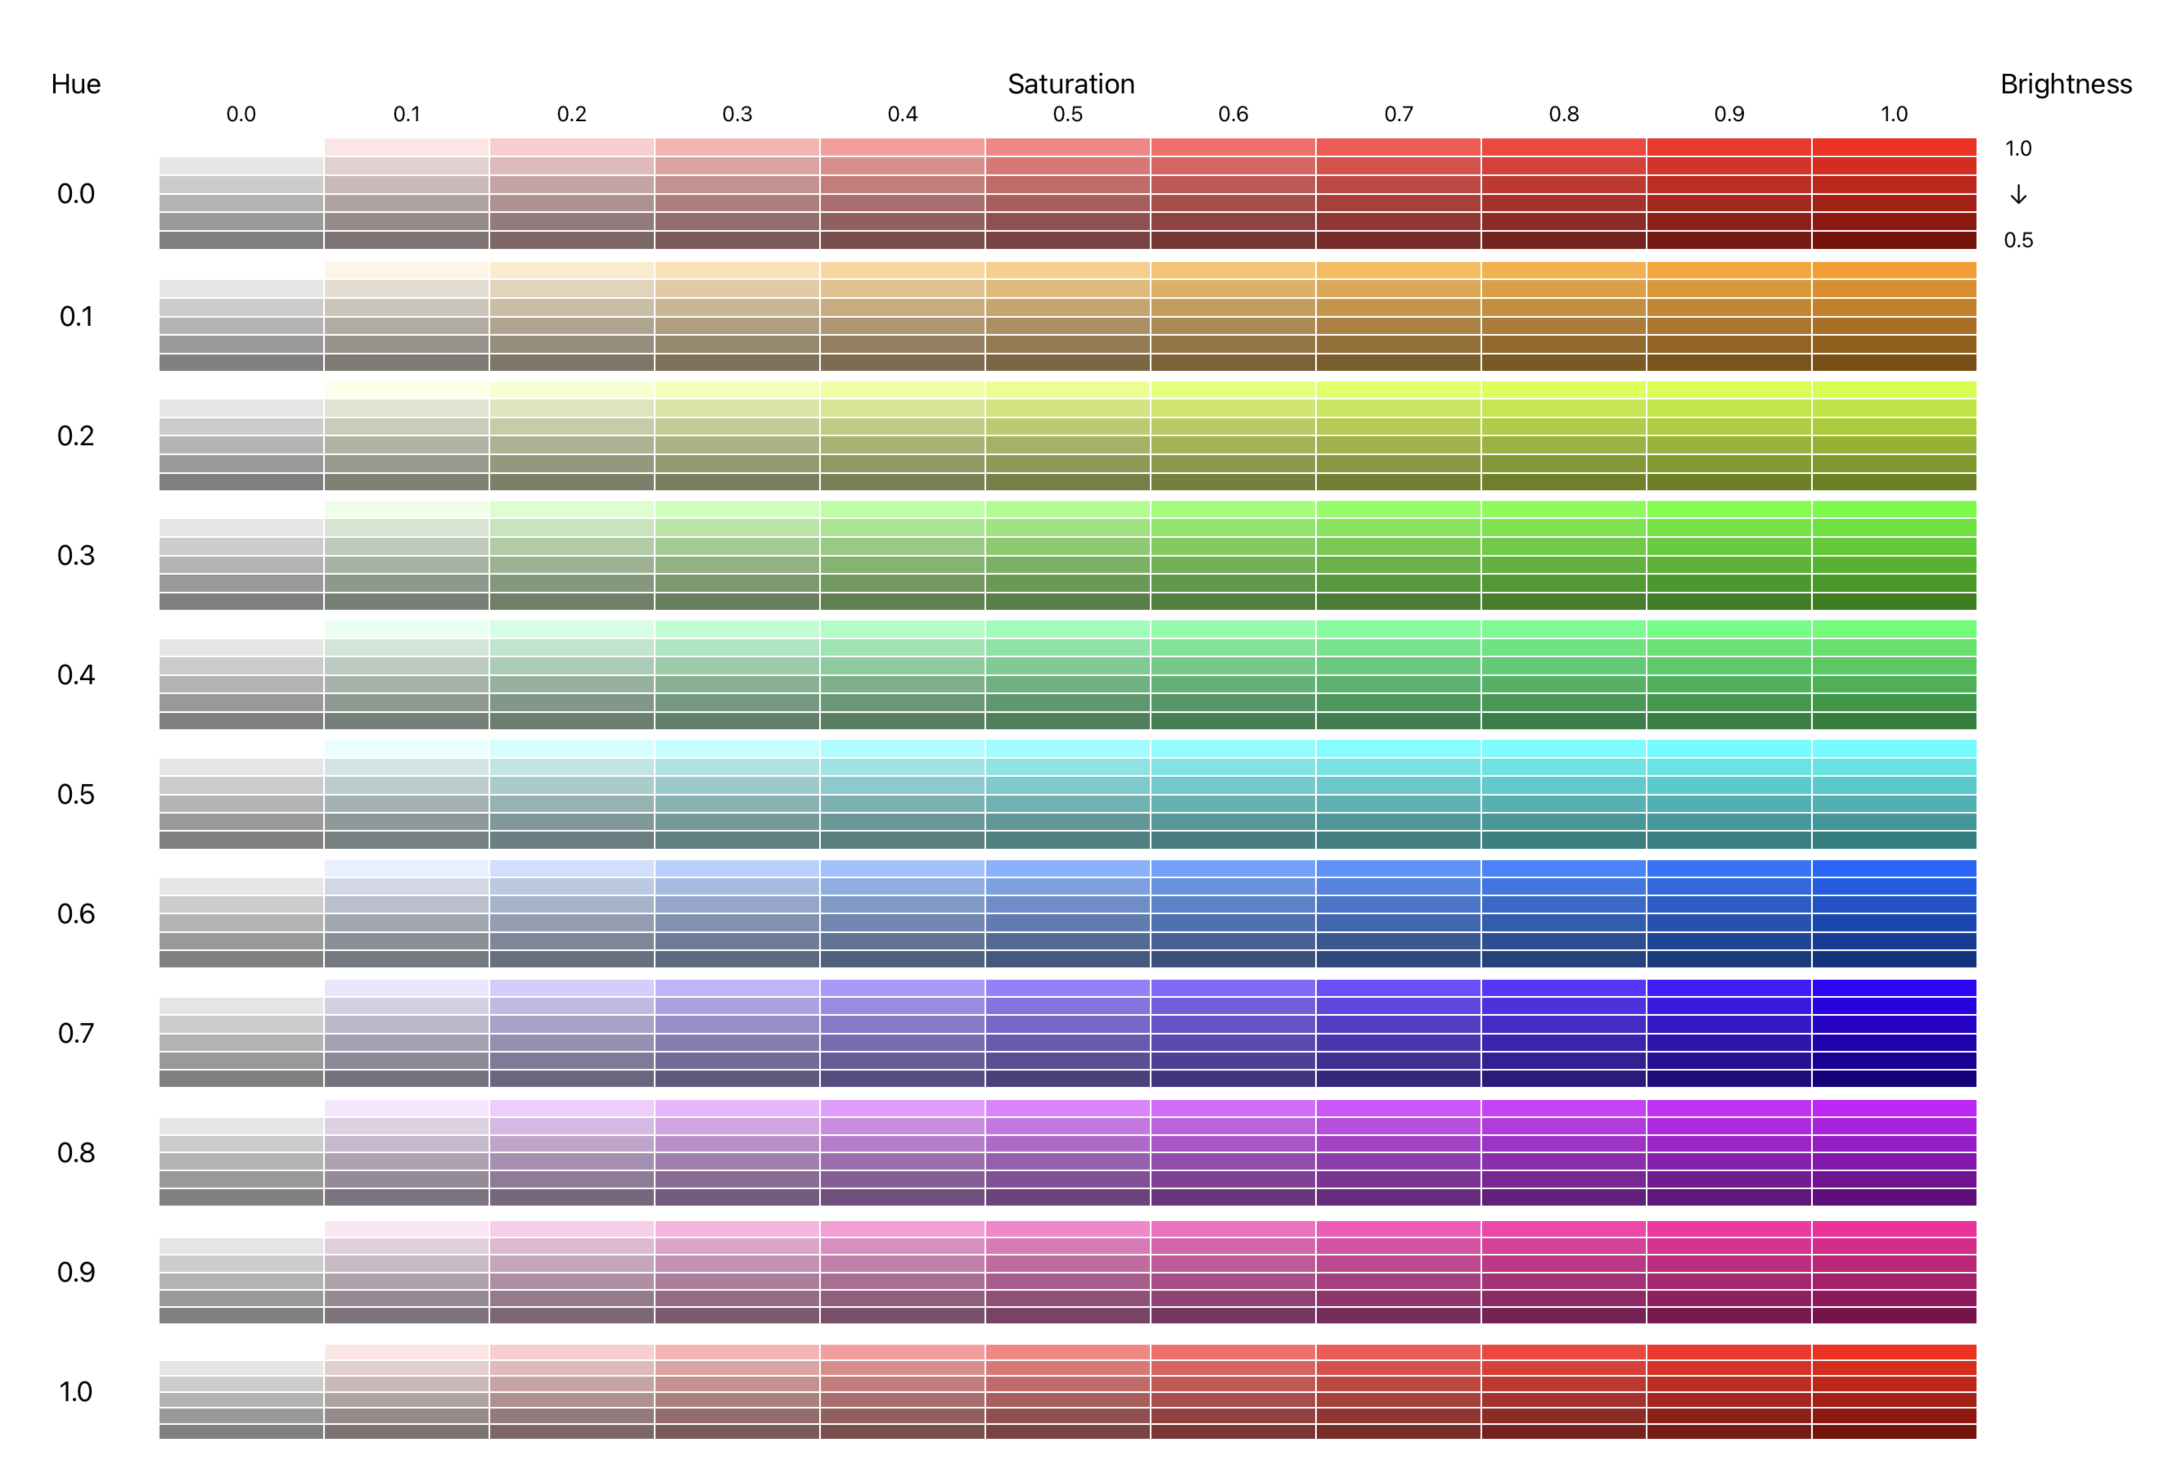
具有低至 0.5 亮度的 HSB(色调、饱和度和亮度)不同值的调色板
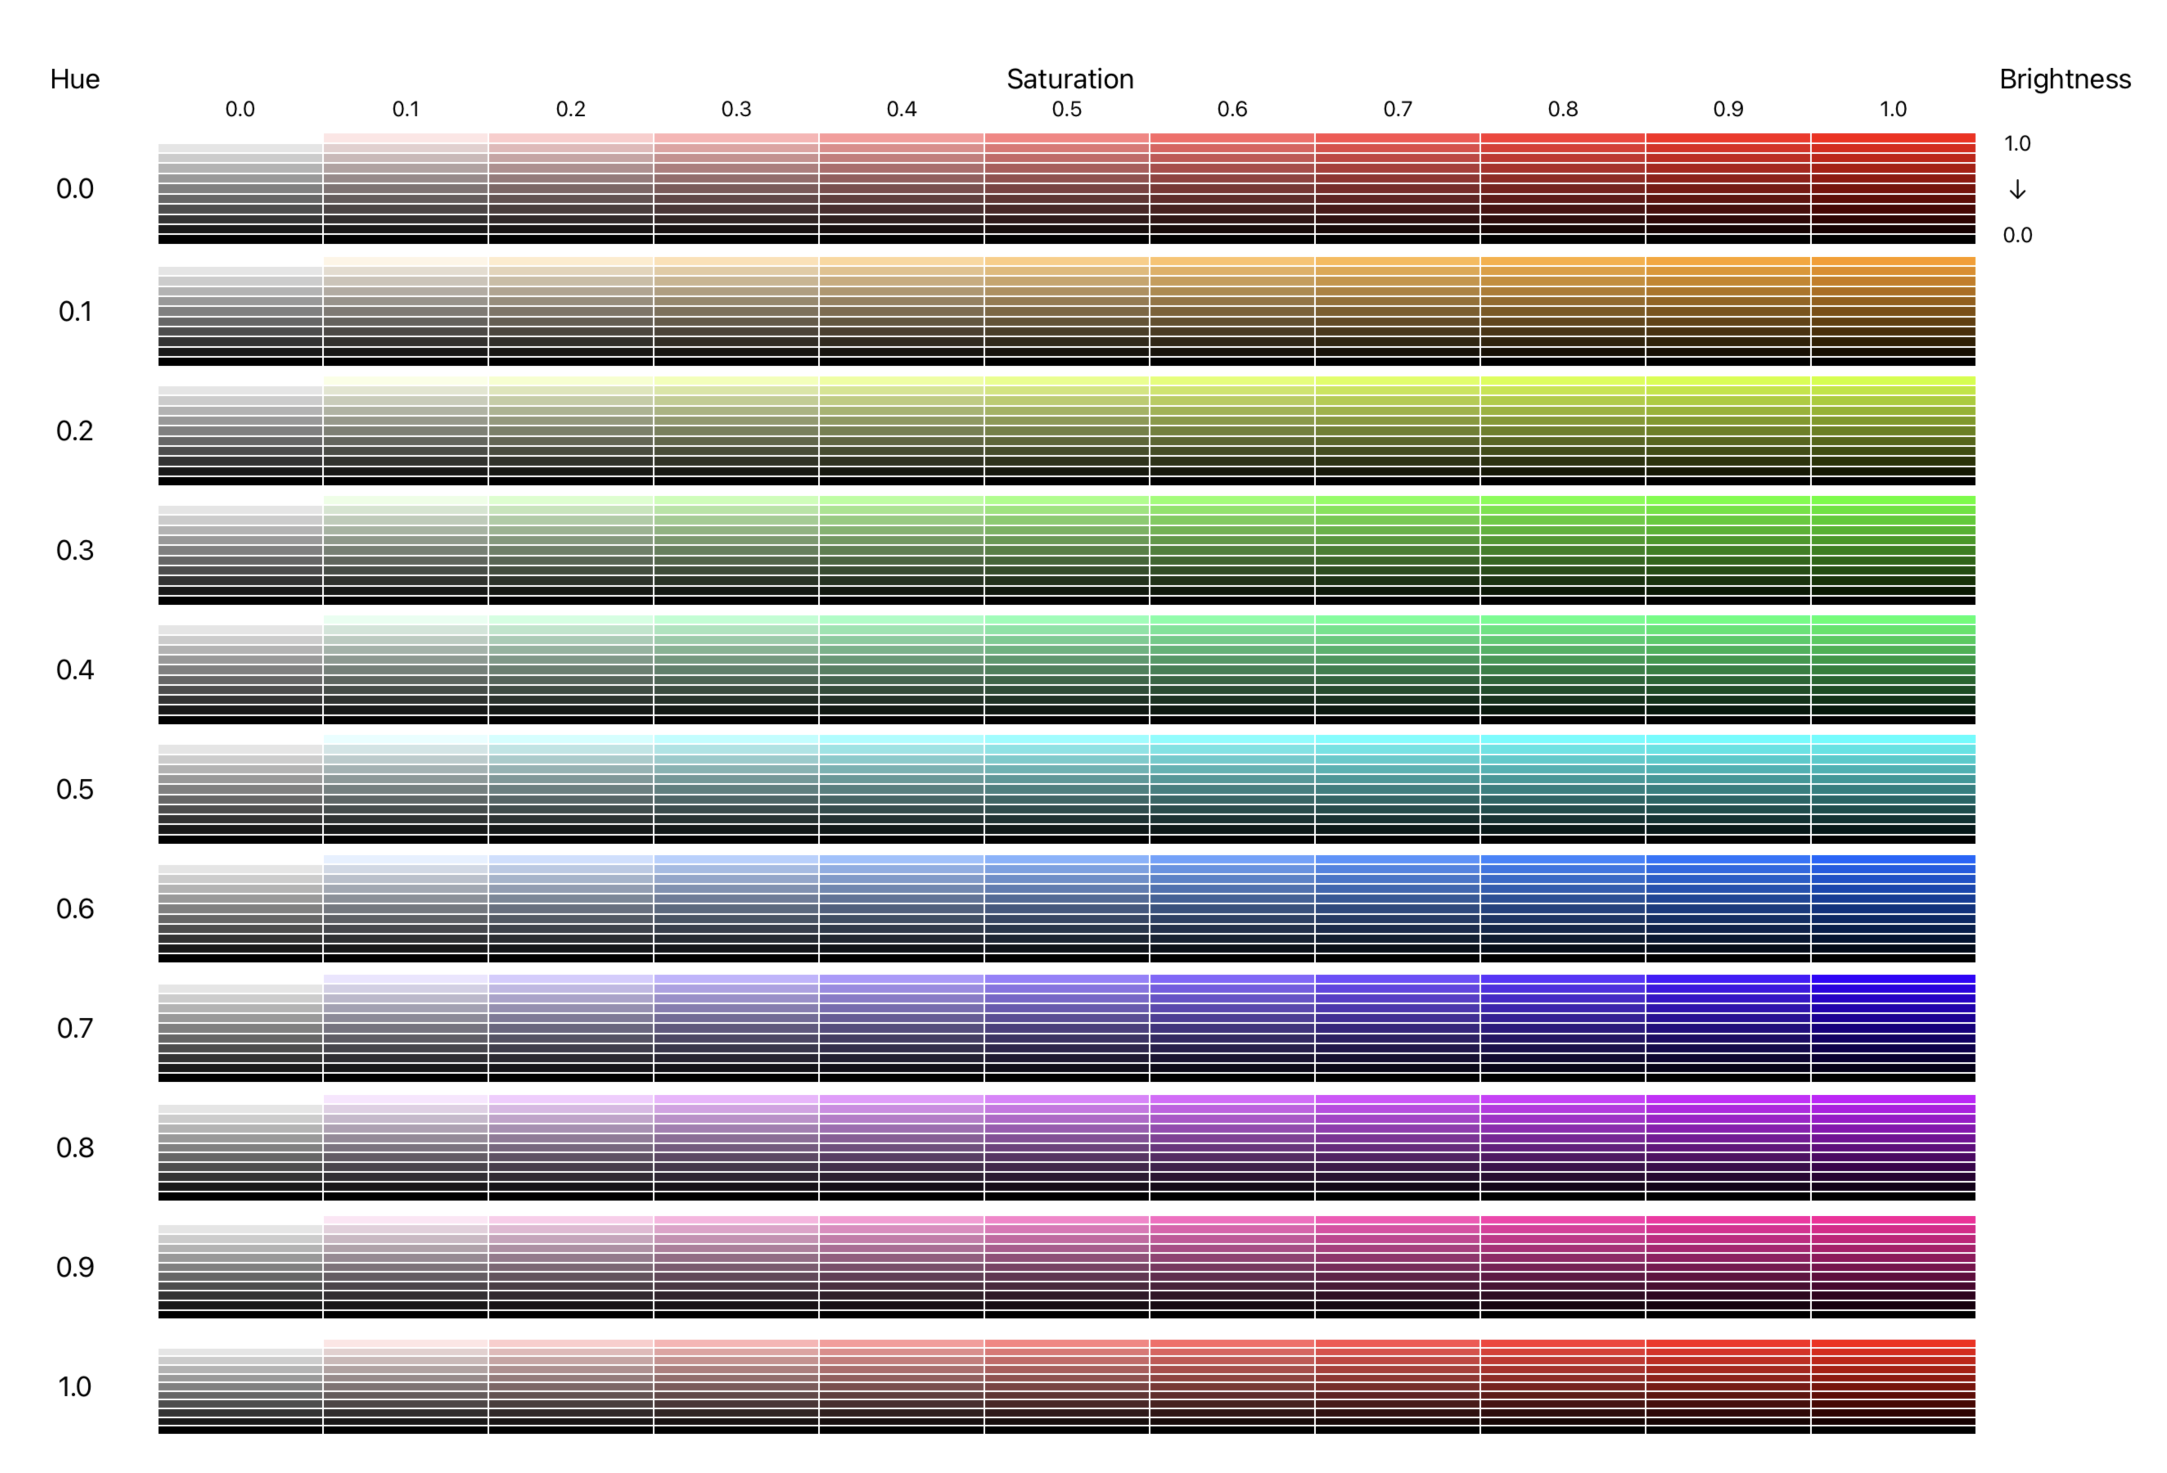
具有不同 HSB(色相、饱和度和亮度)值的调色板 - 较低的亮度往往很暗
色调、饱和度和亮度
- 色调:通过彩虹的颜色代表从红色到紫色的基色。
- 饱和度:表示颜色的强度。当亮度为 1.0 时,无论指定的色调如何,饱和度值为 0 都将是白色。
- 亮度:表示颜色的亮度或明度。无论指定的色调如何,亮度为 0 都将是黑色。
下图显示了一个个第一行基于色调增加的不同颜色,第二行和第三行具有相同的色调,分别显示增加饱和度和亮度的效果。可以通过将饱和度保持为 0 并调整亮度来定义灰度颜色。
struct ChangeHsbView: View {
    var body: some View {
        ZStack {
            Color(hue: 0.58, saturation: 0.17, brightness: 1.0)
                .edgesIgnoringSafeArea(.all)

            VStack() {
                VStack {
                    Text("Colors defined with")
                    Text("Hue, Saturation & Brightness")
                }
                .font(.title)
                .fontWeight(.bold)

                HueView()
                    .frame(height:200)

                SatView()
                    .frame(height:200)

                BrightView()
                    .frame(height:200)


                Spacer()
            }
            .padding(.horizontal, 150)
        }
    }
}struct HueView: View {
var body: some View {
VStack(alignment: .leading) {
Text("1. Hue changes the Color")
.font(.title2)
HStack {
ForEach([0.0, 0.2, 0.4, 0.6, 0.8, 1.0], id: \.self) { myHue in
VStack {
RoundedRectangle(cornerRadius: 20)
.fill(Color(hue: myHue, saturation: 1.0, brightness: 1.0))
.shadow(radius: 3, x:5, y:5)
Text("H: \(myHue, specifier: "%0.2F")")
.foregroundColor(.red)
Text("S: 1.00")
Text("B: 1.00")
}
}
}
}
.padding(.vertical, 20)
}
}struct SatView: View {
var body: some View {
VStack(alignment: .leading) {
Text("2. Saturation changes color Intensity")
.font(.title2)
HStack {
ForEach([0.0, 0.2, 0.4, 0.6, 0.8, 1.0], id: \.self) { mySat in
VStack {
RoundedRectangle(cornerRadius: 20)
.fill(Color(hue: 0.75, saturation: mySat, brightness: 1.0))
.shadow(radius: 3, x:5, y:5)
Text("H: 0.75")
Text("S: \(mySat, specifier: "%0.2F")")
.foregroundColor(.red)
Text("B: 1.00")
}
}
}
}
.padding(.vertical, 20)
}
}struct BrightView: View {
var body: some View {
VStack(alignment: .leading) {
Text("3. Brightness changes whiteness")
.font(.title2)
HStack {
ForEach([0.0, 0.2, 0.4, 0.6, 0.8, 1.0], id: \.self) { myBright in
VStack {
RoundedRectangle(cornerRadius: 20)
.fill(Color(hue: 0.75, saturation: 1.00, brightness: myBright))
.shadow(radius: 3, x:5, y:5)
Text("H: 0.75")
Text("S: 1.00")
Text("B: \(myBright, specifier: "%0.2F")")
.foregroundColor(.red)
}
}
}
}
.padding(.vertical, 20)
}
}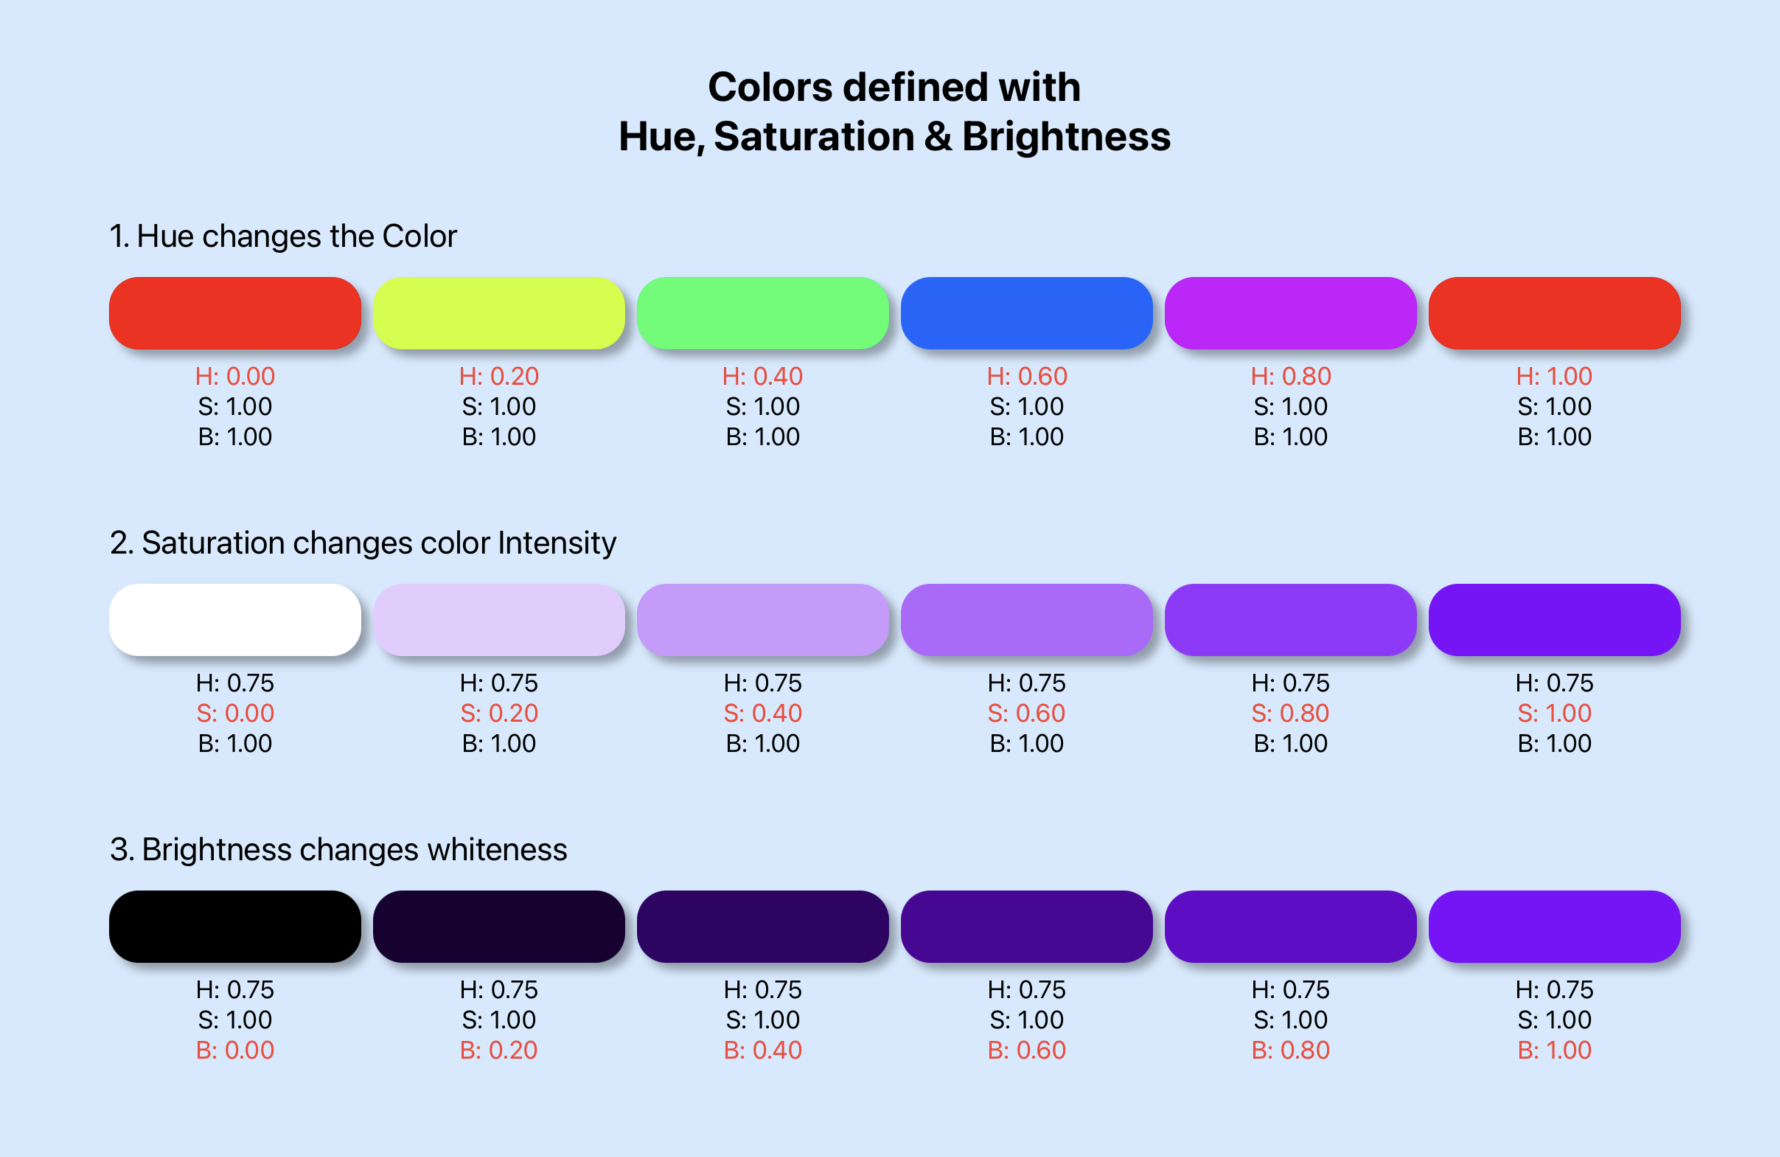
颜色根据色调、饱和度和亮度属性的变化而变化
色轮
在 HSB 颜色模型中,色调表示基色,可以通过围绕色环的角度(以度为单位)来指定,其中红色位于顶部,颜色沿顺时针方向跟随彩虹的颜色。 SwiftUI 使用 0 到 1 之间的值来表示从 0 到 360 度的色调值。以下代码在类似于在在 SwiftUI 中创建一个环形 Slider中的环形Slider用于显示色调选项。移动滑块可选择色调,所选色调会显示不同的饱和度和亮度值。
struct ColorWheelView: View {
    @State private var hue: Double = 180.0

    var body: some View {
        ZStack {
            Color(hue: 0.58, saturation: 0.17, brightness: 1.0)
                    .edgesIgnoringSafeArea(.all)

            VStack(spacing: 40) {
                VStack(spacing: 5) {
                    Text("Select Hue")
                        .font(.system(size: 40, weight: .bold, design:.rounded))
                    HStack {
                        CircularSliderView(value: $hue, in: 0...360)
                            .frame(width: 300, height: 300)
                    }
                }

                VStack(spacing: 5) {
                    Text("Selected Hue with decreasing Saturation")
                        .font(.system(size: 40, weight: .bold, design:.rounded))
                    HStack() {
                        ForEach([1.0, 0.9, 0.8, 0.7, 0.6, 0.5, 0.4, 0.3, 0.2, 0.1, 0.0], id: \.self) { mySat in
                            VStack {
                                RoundedRectangle(cornerRadius: 10)
                                    .fill(Color(hue: hue/360,
                                                saturation: mySat,
                                                brightness: 1.0))
                                    .frame(height:100)
                                    .overlay {
                                        Text("\(mySat, specifier: "%0.1F")")
                                            .font(.system(size: 30))
                                }
                                Text("H: \(hue/360, specifier: "%0.2F")")
                                Text("S: \(mySat, specifier: "%0.2F")")
                                Text("B: 1.00")
                            }
                        }
                    }
                    .padding(.horizontal, 100)
                }

                VStack(spacing: 5) {
                    Text("Selected Hue with decreasing Brightness")
                        .font(.system(size: 40, weight: .bold, design:.rounded))
                    HStack() {
                        ForEach([1.0, 0.9, 0.8, 0.7, 0.6, 0.5, 0.4, 0.3, 0.2, 0.1, 0.0], id: \.self) { myBright in
                            VStack {
                                RoundedRectangle(cornerRadius: 10)
                                    .fill(Color(hue: hue/360,
                                                saturation: 1.0,
                                                brightness: myBright))
                                    .frame(height:100)
                                    .overlay {
                                        Text("\(myBright, specifier: "%0.1F")")
                                            .font(.system(size: 30))
                                            .foregroundColor(myBright > 0.5 ? Color.black : .white)
                                }
                                Text("H: \(hue/360, specifier: "%0.2F")")
                                Text("S: 1.00")
                                Text("B: \(myBright, specifier: "%0.2F")")
                            }
                        }
                    }
                    .padding(.horizontal, 100)
                }

                Spacer()
            }
        }
    }
}struct CircularSliderView: View {
@Binding var progress: Double
@State private var rotationAngle = Angle(degrees: 0)
private var minValue = 0.0
private var maxValue = 1.0
init(value progress: Binding<Double>, in bounds: ClosedRange<Int> = 0...1) {
self._progress = progress
self.minValue = Double(bounds.first ?? 0)
self.maxValue = Double(bounds.last ?? 1)
self.rotationAngle = Angle(degrees: progressFraction * 360.0)
}
var body: some View {
GeometryReader { gr in
let radius = (min(gr.size.width, gr.size.height) / 2.0) * 0.9
let sliderWidth = radius * 0.3
VStack(spacing:0) {
ZStack {
Circle()
.strokeBorder(hueAngularGradient,
style: StrokeStyle(lineWidth: sliderWidth))
.rotationEffect(Angle(degrees: -90))
.overlay() {
Text("\(progress, specifier: "%.0f")")
.font(.system(size: radius * 0.5, weight: .bold, design:.rounded))
}
Circle()
.fill(Color.white)
.shadow(radius: (sliderWidth * 0.3))
.frame(width: sliderWidth, height: sliderWidth)
.offset(y: -(radius - (sliderWidth * 0.5)))
.rotationEffect(rotationAngle)
.gesture(
DragGesture(minimumDistance: 0.0)
.onChanged() { value in
changeAngle(location: value.location)
}
)
}
.frame(width: radius * 2.0, height: radius * 2.0, alignment: .center)
.padding(radius * 0.1)
}
.onAppear {
self.rotationAngle = Angle(degrees: progressFraction * 360.0)
}
}
}
private var progressFraction: Double {
return ((progress - minValue) / (maxValue - minValue))
}
private func changeAngle(location: CGPoint) {
// Create a Vector for the location (reversing the y-coordinate system on iOS)
let vector = CGVector(dx: location.x, dy: -location.y)
// Calculate the angle of the vector
let angleRadians = atan2(vector.dx, vector.dy)
// Convert the angle to a range from 0 to 360 (rather than having negative angles)
let positiveAngle = angleRadians < 0.0 ? angleRadians + (2.0 * .pi) : angleRadians
// Update slider progress value based on angle
progress = ((positiveAngle / (2.0 * .pi)) * (maxValue - minValue)) + minValue
rotationAngle = Angle(radians: positiveAngle)
}
let hueAngularGradient = AngularGradient(
gradient: Gradient(colors: [
Color(hue: 0.0, saturation: 1.0, brightness: 1.0),
Color(hue: 0.1, saturation: 1.0, brightness: 1.0),
Color(hue: 0.2, saturation: 1.0, brightness: 1.0),
Color(hue: 0.3, saturation: 1.0, brightness: 1.0),
Color(hue: 0.4, saturation: 1.0, brightness: 1.0),
Color(hue: 0.5, saturation: 1.0, brightness: 1.0),
Color(hue: 0.6, saturation: 1.0, brightness: 1.0),
Color(hue: 0.7, saturation: 1.0, brightness: 1.0),
Color(hue: 0.8, saturation: 1.0, brightness: 1.0),
Color(hue: 0.9, saturation: 1.0, brightness: 1.0),
Color(hue: 1.0, saturation: 1.0, brightness: 1.0),
]),
center: .center,
startAngle: .degrees(0),
endAngle: .degrees(360.0))
}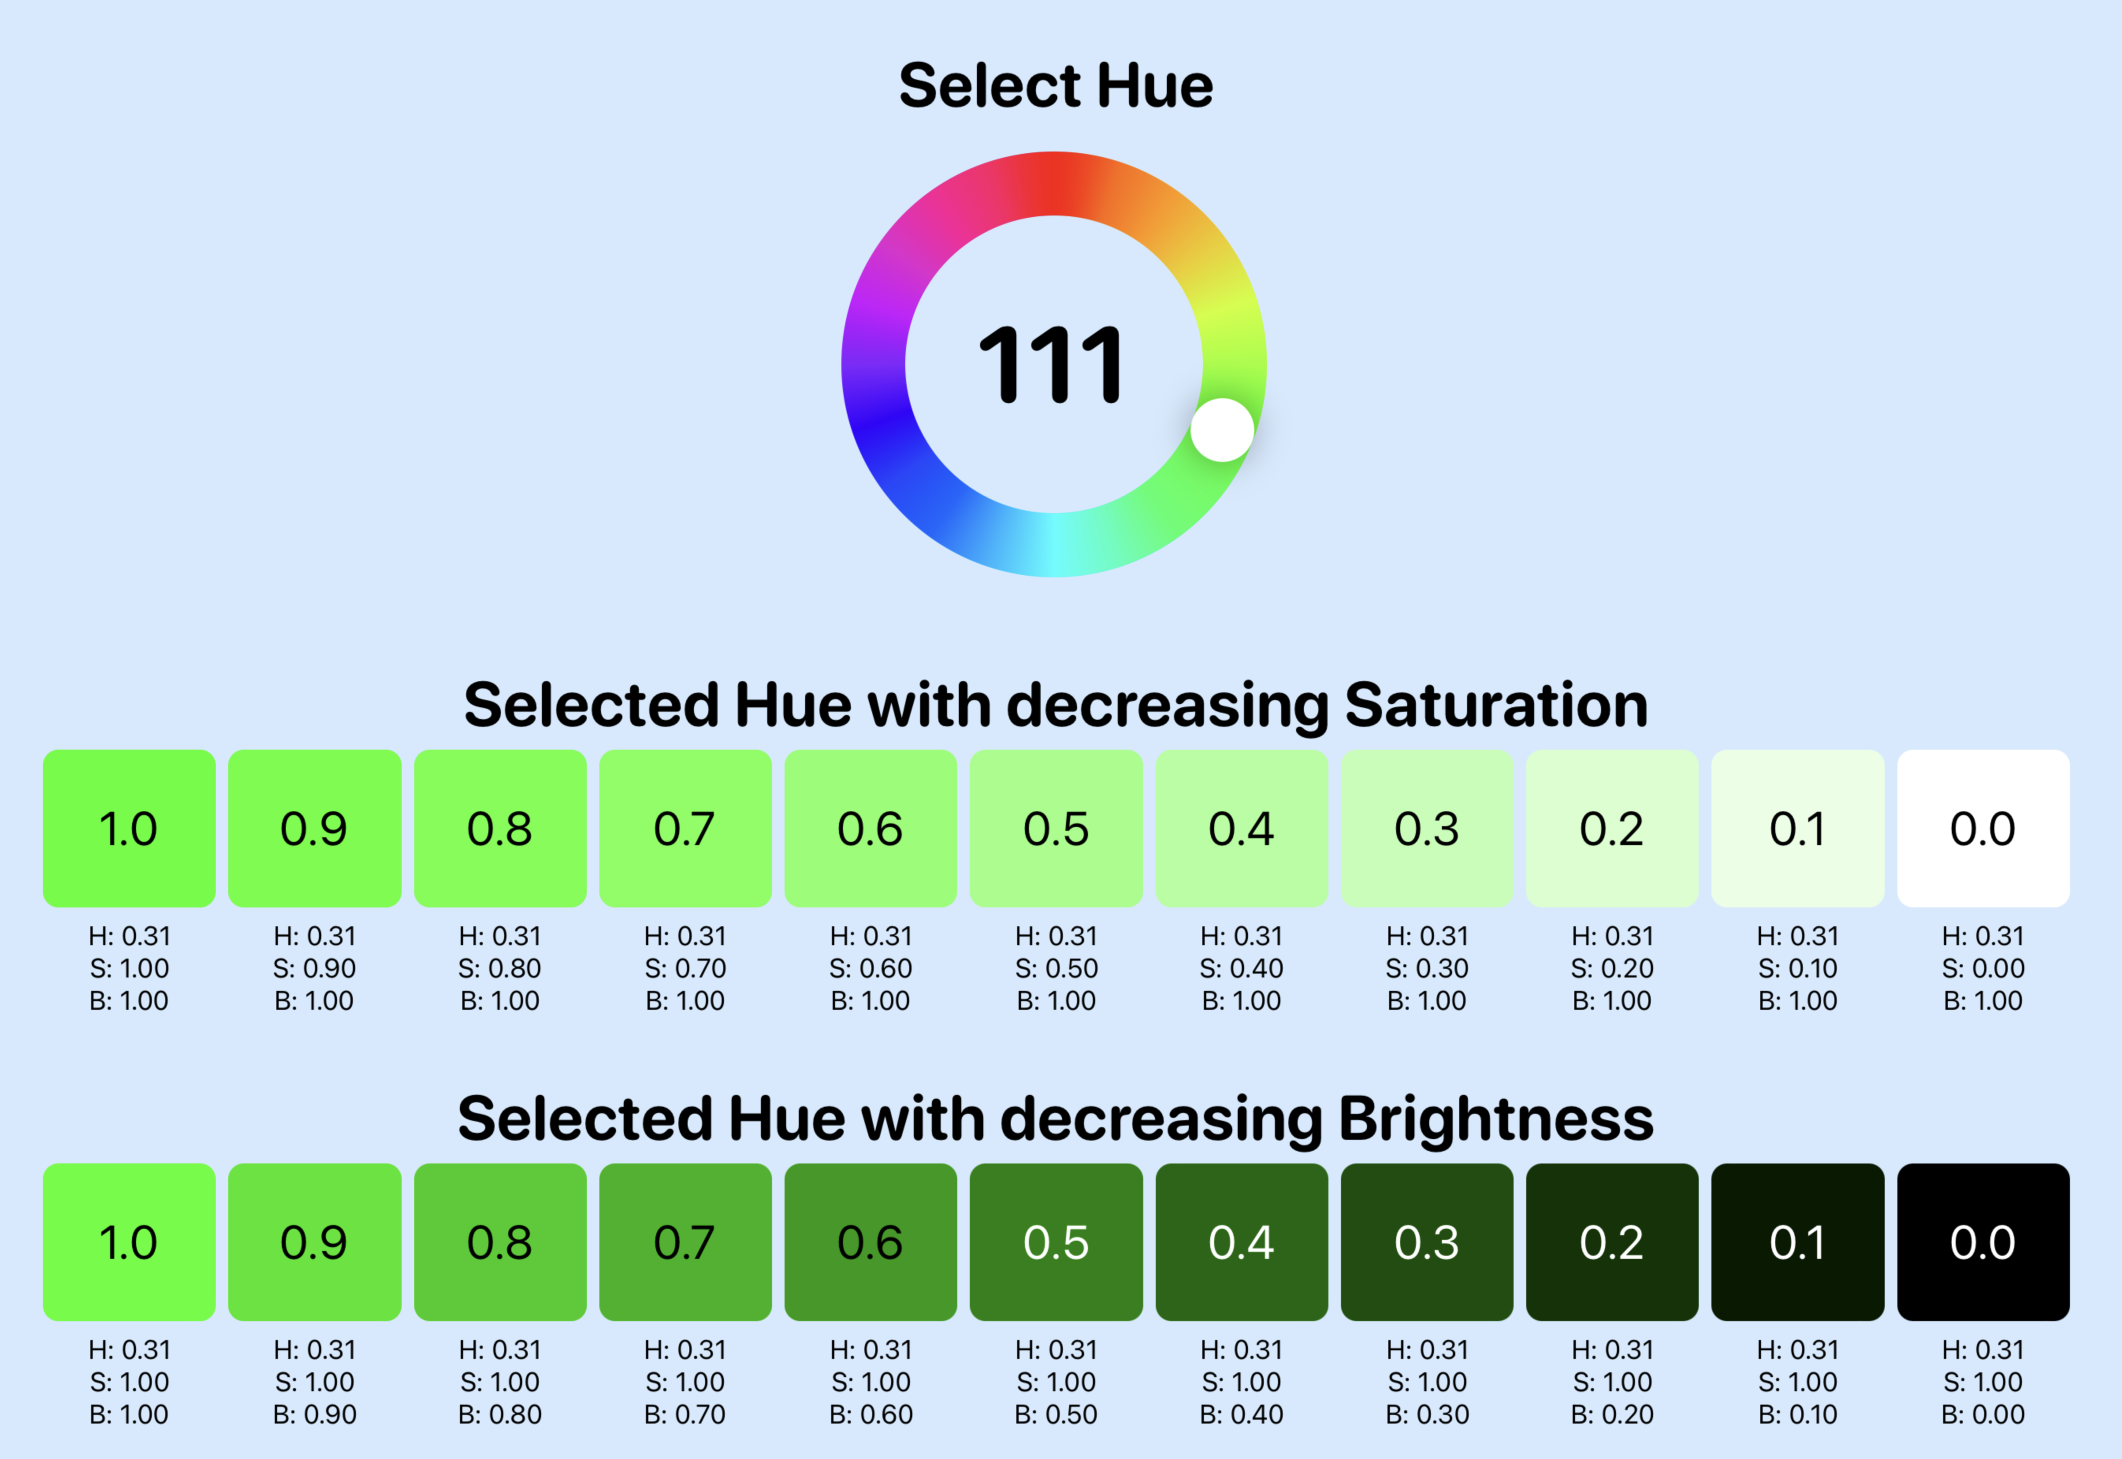
用于选择色调并查看饱和度和亮度变化的色轮
显示每种色调的饱和度和亮度变化的色轮
配色
将 HSB 用于颜色的优势之一是可以轻松找到可以很好地协同工作的合适颜色。第一个选项可能是使用相同的色调并更改饱和度或亮度。这对于从较低饱和度到较高饱和度的渐变或使用相同色调的较暗边框或框架非常有效。下一个选项是通过将色调改变几度来使用相邻或相似的颜色。
互补色是色轮上彼此相对的颜色。即使在考虑饱和度和亮度的使用之前,这些颜色也提供了很好的对比度并且可以很好地协同工作。还有一种三色配色方案,其中三种颜色均匀分布在色轮周围。这三种颜色可以很好地搭配使用,但需要注意不要让视图显得过于拥挤。通常最好使用一种主色。
定义 ColorModel 以在更改所选色调时创建各种配色方案。 MatchingColorView 在使用圆环滑块更改色调时显示不同的匹配颜色集。
model
struct ColorModel {
    var hueDegrees: Double
    private var sat: Double
    private var bright: Double

    let totalDegrees = 360.0

    init(hueDegrees: Double, sat: Double, bright: Double) {
        self.hueDegrees = hueDegrees
        self.sat = sat
        self.bright = bright
    }

    init() {
        self.init(hueDegrees: 0, sat: 1.0, bright: 1.0)
    }

    var hueDouble: Double {
        return Double(self.hueDegrees) / totalDegrees
    }

    var color: Color {
        return Color(hue: hueDouble, saturation: sat, brightness: bright)
    }

    // Monochromatic
    var monochromaticColors: [Color] {
        return [
            Color(hue: hueDouble, saturation: sat, brightness: bright),
            Color(hue: hueDouble, saturation: (sat * 0.8), brightness: bright),
            Color(hue: hueDouble, saturation: (sat * 0.6), brightness: bright),
            Color(hue: hueDouble, saturation: (sat * 0.4), brightness: bright)
        ]
    }

    private func adjustHue(_ value: Double, percent adjustment: Double) -> Double {
        return Double((Int((value * 100) + adjustment)) % 100) / 100.0
    }

    // Analogous
    var analogousColors: [Color] {
        let hue1 = adjustHue(hueDouble, percent: 4)
        let hue2 = adjustHue(hueDouble, percent: -4)
        return [
            Color(hue: hueDouble, saturation: sat, brightness: bright),
            Color(hue: hue1, saturation: sat, brightness: bright),
            Color(hue: hue2, saturation: sat, brightness: bright)
        ]
    }

    // Complementary
    var complementaryColors: [Color] {
        let hue1 = adjustHue(hueDouble, percent: 50)
        return [
            Color(hue: hueDouble, saturation: sat, brightness: bright),
            Color(hue: hue1, saturation: sat, brightness: bright)
        ]
    }

    // Triadic
    var triadicColors: [Color] {
        let hue1 = adjustHue(hueDouble, percent: 33.33)
        let hue2 = adjustHue(hueDouble, percent: 66.66)
        return [
            Color(hue: hueDouble, saturation: sat, brightness: bright),
            Color(hue: hue1, saturation: sat, brightness: bright),
            Color(hue: hue2, saturation: sat, brightness: bright)
        ]
    }
}
viewmodel
class ColorViewModel: ObservableObject {
    @Published var colorModel: ColorModel

    init() {
        self.colorModel = ColorModel()
    }

    var selectedColor: Color {
        colorModel.color
    }

    var monochromaticColors: [Color] {
        return colorModel.monochromaticColors
    }

    var analogousColors: [Color] {
        return colorModel.analogousColors
    }

    var complementaryColors: [Color] {
        return colorModel.complementaryColors
    }

    var triadicColors: [Color] {
        return colorModel.triadicColors
    }
}
view
struct MatchingColorView: View {
    @ObservedObject private var colorVm = ColorViewModel()

    var body: some View {
        ZStack {
            Color(hue: 0.58, saturation: 0.17, brightness: 1.0)
                .edgesIgnoringSafeArea(.all)

            VStack(spacing:30) {
                HStack {
                    VStack(spacing: 5) {
                        Text("Select Hue")
                            .font(.system(size: 40, weight: .bold, design:.rounded))
                        HStack {
                            CircularSliderView(value: $colorVm.colorModel.hueDegrees, in: 0...360)
                                .frame(width: 300, height: 300)
                        }
                    }

                    Spacer().frame(width: 200)

                    VStack {
                        RoundedRectangle(cornerRadius: 20)
                            .fill(colorVm.selectedColor)
                            .frame(width: 300, height: 250, alignment: .center)
                        Text("Selected Color")
                            .font(.system(size: 30, weight: .bold, design:.rounded))
                    }
                }

                VStack(spacing:20) {
                    HStack {
                        Text("Monochromatic")
                            .frame(width: 300, alignment: .trailing)
                        ForEach(colorVm.monochromaticColors, id: \.self) { col in
                            RoundedRectangle(cornerRadius: 20)
                                .fill(col)
                        }
                    }
                    HStack {
                        Text("Analogous")
                            .frame(width: 300, alignment: .trailing)
                        ForEach(colorVm.analogousColors, id: \.self) { col in
                            RoundedRectangle(cornerRadius: 20)
                                .fill(col)
                        }
                    }
                    HStack {
                        Text("Complementary")
                            .frame(width: 300, alignment: .trailing)
                        ForEach(colorVm.complementaryColors, id: \.self) { col in
                            RoundedRectangle(cornerRadius: 20)
                                .fill(col)
                        }
                    }
                    HStack {
                        Text("Triadic")
                            .frame(width: 300, alignment: .trailing)
                        ForEach(colorVm.triadicColors, id: \.self) { col in
                            RoundedRectangle(cornerRadius: 20)
                                .fill(col)
                        }
                    }
                }
                .padding(.horizontal, 100)
                .font(.system(size: 30, weight: .bold, design:.rounded))
            }
            .padding(50)
        }
    }
}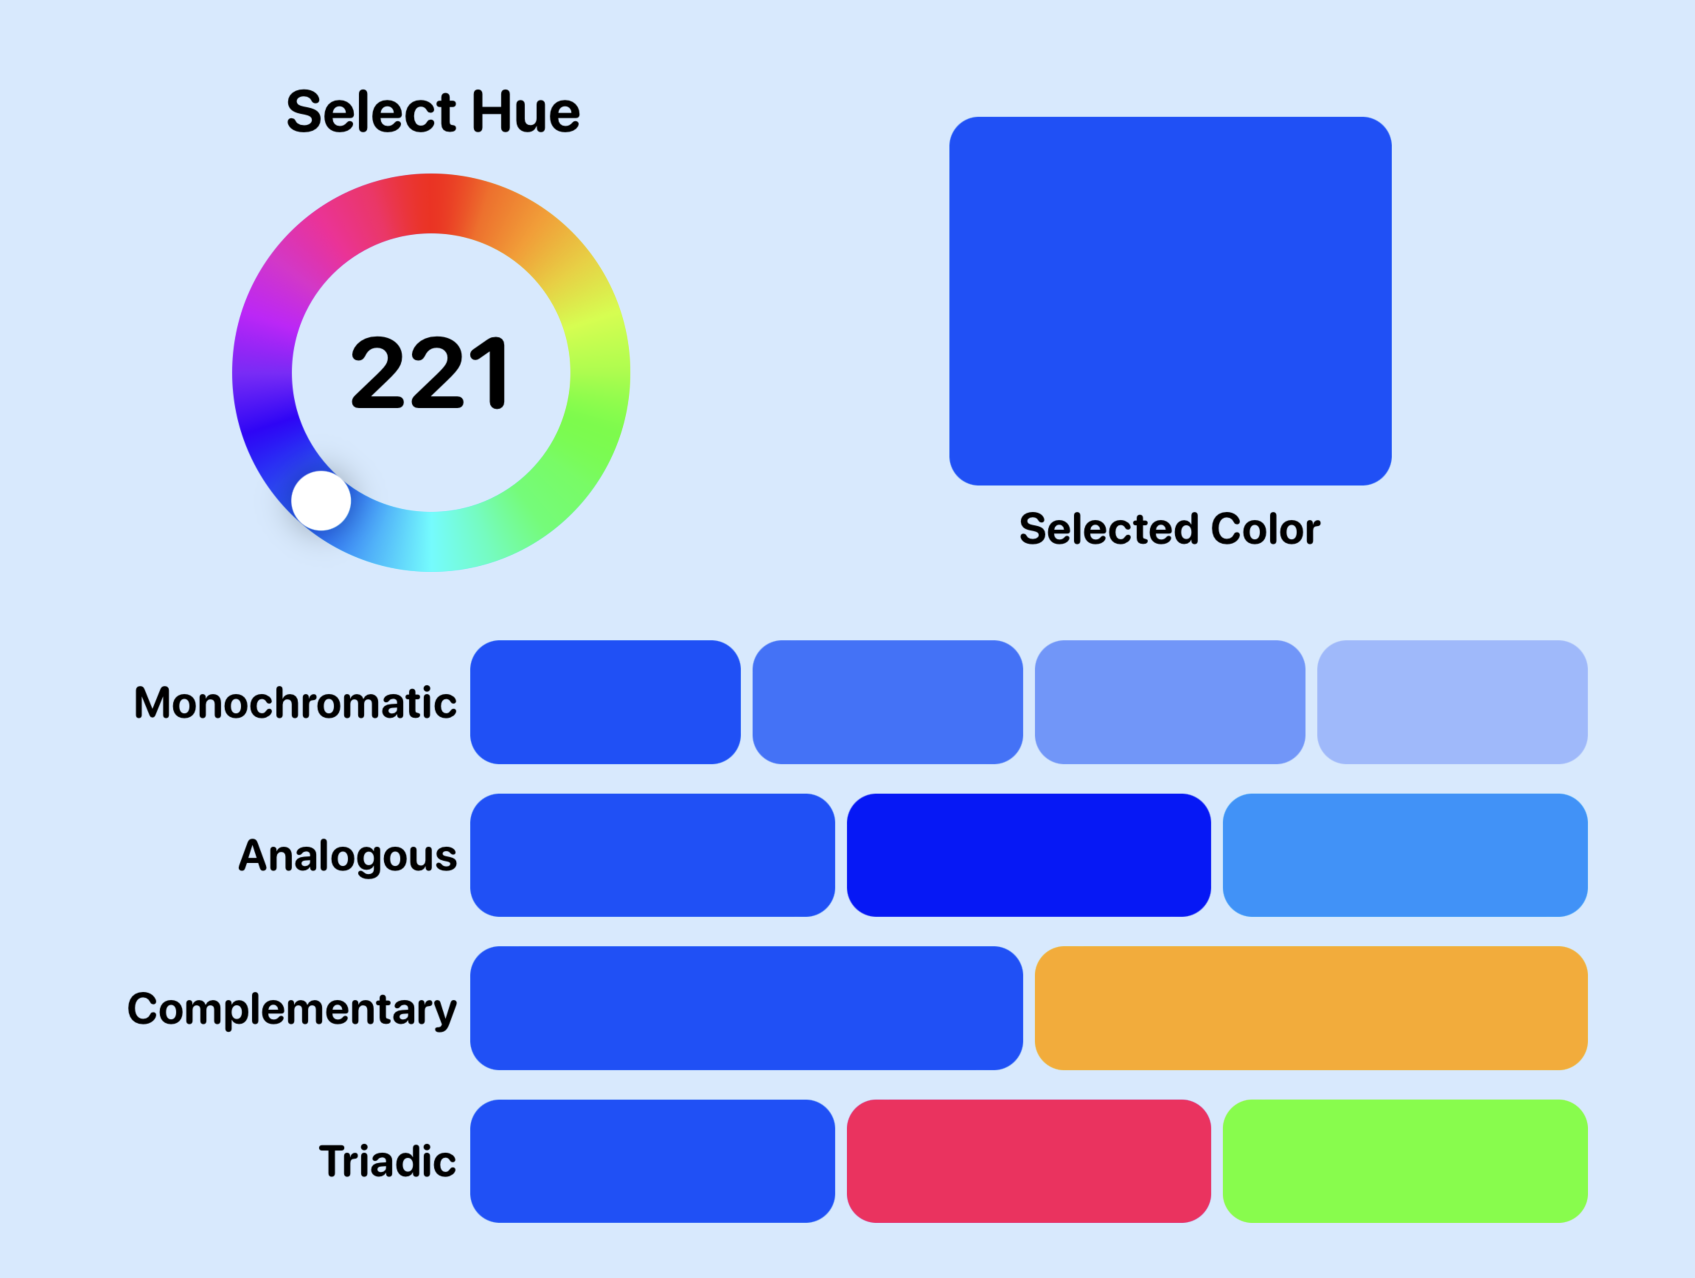
选择一种颜色然后在 SwiftUI 中查看匹配的颜色
色轮显示每种色调的匹配颜色
总结
我发现使用 HSB 定义颜色是一种更直观的颜色定义方式。使用 RGB 颜色模型没有错,如果您有 RGB 值,则使用它们。但是,当从 RGB 值开始时,有时很难识别搭配得很好的颜色。坚持使用相同的色调并调整饱和度或亮度以在不改变颜色的情况下为屏幕布局添加一些变化会更容易。 HSB 比 RGB 更容易识别相邻色或互补色。
译自Define colors with Hue, Saturation and Brightness rather than Red, Green and Blue properties