百度前端一面高频vue面试题汇总_2023-02-28
原创百度前端一面高频vue面试题汇总_2023-02-28
原创什么是递归组件?举个例子说明下?
分析
递归组件我们用的比较少,但是在Tree、Menu这类组件中会被用到。
体验
组件通过组件名称引用它自己,这种情况就是递归组件
<template>
  <li>
    <div> {{ model.name }}</div>
    <ul v-show="isOpen" v-if="isFolder">
      <!-- 注意这里:组件递归渲染了它自己 -->
      <TreeItem
        class="item"
        v-for="model in model.children"
        :model="model">
      </TreeItem>
    </ul>
  </li>
<script>
export default {
  name: 'TreeItem',
  // ...
}
</script>
回答范例
- 如果某个组件通过组件名称引用它自己,这种情况就是递归组件。
- 实际开发中类似
Tree、Menu这类组件,它们的节点往往包含子节点,子节点结构和父节点往往是相同的。这类组件的数据往往也是树形结构,这种都是使用递归组件的典型场景。 - 使用递归组件时,由于我们并未也不能在组件内部导入它自己,所以设置组件
name属性,用来查找组件定义,如果使用SFC,则可以通过SFC文件名推断。组件内部通常也要有递归结束条件,比如model.children这样的判断。 - 查看生成渲染函数可知,递归组件查找时会传递一个布尔值给
resolveComponent,这样实际获取的组件就是当前组件本身
原理
递归组件编译结果中,获取组件时会传递一个标识符 _resolveComponent("Comp", true)
const _component_Comp = _resolveComponent("Comp", true)就是在传递maybeSelfReference
export function resolveComponent(
  name: string,
  maybeSelfReference?: boolean
): ConcreteComponent | string {
  return resolveAsset(COMPONENTS, name, true, maybeSelfReference) || name
}resolveAsset中最终返回的是组件自身:
if (!res && maybeSelfReference) {
    // fallback to implicit self-reference
    return Component
}
说说你对slot的理解?slot使用场景有哪些
一、slot是什么
在HTML中 slot 元素 ,作为 Web Components 技术套件的一部分,是Web组件内的一个占位符
该占位符可以在后期使用自己的标记语言填充
举个栗子
<template id="element-details-template">
  <slot name="element-name">Slot template</slot>
</template>
<element-details>
  <span slot="element-name">1</span>
</element-details>
<element-details>
  <span slot="element-name">2</span>
</element-details>template不会展示到页面中,需要用先获取它的引用,然后添加到DOM中,
customElements.define('element-details',
  class extends HTMLElement {
    constructor() {
      super();
      const template = document
        .getElementById('element-details-template')
        .content;
      const shadowRoot = this.attachShadow({mode: 'open'})
        .appendChild(template.cloneNode(true));
  }
})在Vue中的概念也是如此
Slot 艺名插槽,花名“占坑”,我们可以理解为solt在组件模板中占好了位置,当使用该组件标签时候,组件标签里面的内容就会自动填坑(替换组件模板中slot位置),作为承载分发内容的出口
二、使用场景
通过插槽可以让用户可以拓展组件,去更好地复用组件和对其做定制化处理
如果父组件在使用到一个复用组件的时候,获取这个组件在不同的地方有少量的更改,如果去重写组件是一件不明智的事情
通过slot插槽向组件内部指定位置传递内容,完成这个复用组件在不同场景的应用
比如布局组件、表格列、下拉选、弹框显示内容等
ref和reactive异同
这是Vue3数据响应式中非常重要的两个概念,跟我们写代码关系也很大
const count = ref(0)
console.log(count.value) // 0

count.value++
console.log(count.value) // 1

const obj = reactive({ count: 0 })
obj.count++ref接收内部值(inner value)返回响应式Ref对象,reactive返回响应式代理对象- 从定义上看
ref通常用于处理单值的响应式,reactive用于处理对象类型的数据响应式 - 两者均是用于构造响应式数据,但是
ref主要解决原始值的响应式问题 ref返回的响应式数据在JS中使用需要加上.value才能访问其值,在视图中使用会自动脱ref,不需要.value;ref可以接收对象或数组等非原始值,但内部依然是reactive实现响应式;reactive内部如果接收Ref对象会自动脱ref;使用展开运算符(...)展开reactive返回的响应式对象会使其失去响应性,可以结合toRefs()将值转换为Ref对象之后再展开。reactive内部使用Proxy代理传入对象并拦截该对象各种操作,从而实现响应式。ref内部封装一个RefImpl类,并设置get value/set value,拦截用户对值的访问,从而实现响应式
为什么要使用异步组件
- 节省打包出的结果,异步组件分开打包,采用
jsonp的方式进行加载,有效解决文件过大的问题。 - 核心就是包组件定义变成一个函数,依赖
import()语法,可以实现文件的分割加载。
components:{
  AddCustomerSchedule:(resolve)=>import("../components/AddCustomer") // require([])
}
原理
export function ( Ctor: Class<Component> | Function | Object | void, data: ?VNodeData, context: Component, children: ?Array<VNode>, tag?: string ): VNode | Array<VNode> | void {
    // async component
    let asyncFactory
    if (isUndef(Ctor.cid)) {
        asyncFactory = Ctor
        Ctor = resolveAsyncComponent(asyncFactory, baseCtor) // 默认调用此函数时返回 undefiend
        // 第二次渲染时Ctor不为undefined
        if (Ctor === undefined) {
            return createAsyncPlaceholder( // 渲染占位符 空虚拟节点
                asyncFactory,
                data,
                context,
                children,
                tag
            )
        }
    }
}
function resolveAsyncComponent ( factory: Function, baseCtor: Class<Component> ): Class<Component> | void {
    if (isDef(factory.resolved)) {
        // 3.在次渲染时可以拿到获取的最新组件
        return factory.resolved
    }
    const resolve = once((res: Object | Class<Component>) => {
        factory.resolved = ensureCtor(res, baseCtor)
        if (!sync) {
            forceRender(true) //2. 强制更新视图重新渲染
        } else {
            owners.length = 0
        }
    })
    const reject = once(reason => {
        if (isDef(factory.errorComp)) {
            factory.error = true forceRender(true)
        }
    })
    const res = factory(resolve, reject)// 1.将resolve方法和reject方法传入,用户调用 resolve方法后
    sync = false
    return factory.resolved
}
Watch中的deep:true是如何实现的
当用户指定了
watch中的deep属性为true时,如果当前监控的值是数组类型。会对对象中的每一项进行求值,此时会将当前watcher存入到对应属性的依赖中,这样数组中对象发生变化时也会通知数据更新
源码相关
get () {
    pushTarget(this) // 先将当前依赖放到 Dep.target上
    let value
    const vm = this.vm
    try {
        value = this.getter.call(vm, vm)
    } catch (e) {
        if (this.user) {
            handleError(e, vm, `getter for watcher "${this.expression}"`)
        } else {
            throw e
        }
    } finally {
        if (this.deep) { // 如果需要深度监控
        traverse(value) // 会对对象中的每一项取值,取值时会执行对应的get方法
    }popTarget()
}
Vue-router 除了 router-link 怎么实现跳转
声明式导航
<router-link to="/about">Go to About</router-link>编程式导航
// literal string path
router.push('/users/1')

// object with path
router.push({ path: '/users/1' })

// named route with params to let the router build the url
router.push({ name: 'user', params: { username: 'test' } })
回答范例
vue-router导航有两种方式:声明式导航和编程方式导航- 声明式导航方式使用
router-link组件,添加to属性导航;编程方式导航更加灵活,可传递调用router.push(),并传递path字符串或者RouteLocationRaw对象,指定path、name、params等信息 - 如果页面中简单表示跳转链接,使用
router-link最快捷,会渲染一个a标签;如果页面是个复杂的内容,比如商品信息,可以添加点击事件,使用编程式导航 - 实际上内部两者调用的导航函数是一样的
怎么实现路由懒加载呢
这是一道应用题。当打包应用时,JavaScript 包会变得非常大,影响页面加载。如果我们能把不同路由对应的组件分割成不同的代码块,然后当路由被访问时才加载对应组件,这样就会更加高效
// 将
// import UserDetails from './views/UserDetails'
// 替换为
const UserDetails = () => import('./views/UserDetails')

const router = createRouter({
  // ...
  routes: [{ path: '/users/:id', component: UserDetails }],
})
回答范例
- 当打包构建应用时,JavaScript 包会变得非常大,影响页面加载。利用路由懒加载我们能把不同路由对应的组件分割成不同的代码块,然后当路由被访问的时候才加载对应组件,这样会更加高效,是一种优化手段
- 一般来说,对所有的路由都使用动态导入是个好主意
- 给
component选项配置一个返回Promise组件的函数就可以定义懒加载路由。例如:{ path: '/users/:id', component: () => import('./views/UserDetails') } - 结合注释
() => import(/* webpackChunkName: "group-user" */ './UserDetails.vue')可以做webpack代码分块
组件中写name属性的好处
可以标识组件的具体名称方便调试和查找对应属性
// 源码位置 src/core/global-api/extend.js

// enable recursive self-lookup
if (name) {
    Sub.options.components[name] = Sub // 记录自己 在组件中递归自己  -> jsx
}
Vue组件为什么只能有一个根元素
vue3中没有问题
Vue.createApp({
  components: {
    comp: {
      template: `
        <div>root1</div>
        <div>root2</div>
      `
    }
  }
}).mount('#app')vue2中组件确实只能有一个根,但vue3中组件已经可以多根节点了。- 之所以需要这样是因为
vdom是一颗单根树形结构,patch方法在遍历的时候从根节点开始遍历,它要求只有一个根节点。组件也会转换为一个vdom vue3中之所以可以写多个根节点,是因为引入了Fragment的概念,这是一个抽象的节点,如果发现组件是多根的,就创建一个Fragment节点,把多个根节点作为它的children。将来patch的时候,如果发现是一个Fragment节点,则直接遍历children创建或更新
Vue 修饰符有哪些
vue中修饰符分为以下五种
- 表单修饰符
- 事件修饰符
- 鼠标按键修饰符
- 键值修饰符
v-bind修饰符
1. 表单修饰符
在我们填写表单的时候用得最多的是input标签,指令用得最多的是v-model
关于表单的修饰符有如下:
lazy
在我们填完信息,光标离开标签的时候,才会将值赋予给value,也就是在change事件之后再进行信息同步
<input type="text" v-model.lazy="value">
<p>{{value}}</p>
trim
自动过滤用户输入的首空格字符,而中间的空格不会过滤
<input type="text" v-model.trim="value">number
自动将用户的输入值转为数值类型,但如果这个值无法被parseFloat解析,则会返回原来的值
<input v-model.number="age" type="number">2. 事件修饰符
事件修饰符是对事件捕获以及目标进行了处理,有如下修饰符
.stop阻止了事件冒泡,相当于调用了event.stopPropagation方法
<div @click="shout(2)">
  <button @click.stop="shout(1)">ok</button>
</div>
//只输出1.prevent阻止了事件的默认行为,相当于调用了event.preventDefault方法
<form v-on:submit.prevent="onSubmit"></form>.capture使用事件捕获模式,使事件触发从包含这个元素的顶层开始往下触发
<div @click.capture="shout(1)">
    obj1
<div @click.capture="shout(2)">
    obj2
<div @click="shout(3)">
    obj3
<div @click="shout(4)">
    obj4
</div>
</div>
</div>
</div>
// 输出结构: 1 2 4 3 .self只当在event.target是当前元素自身时触发处理函数
<div v-on:click.self="doThat">...</div>使用修饰符时,顺序很重要;相应的代码会以同样的顺序产生。因此,用
v-on:click.prevent.self会阻止所有的点击,而v-on:click.self.prevent只会阻止对元素自身的点击
.once绑定了事件以后只能触发一次,第二次就不会触发
<button @click.once="shout(1)">ok</button>.passive告诉浏览器你不想阻止事件的默认行为
在移动端,当我们在监听元素滚动事件的时候,会一直触发onscroll事件会让我们的网页变卡,因此我们使用这个修饰符的时候,相当于给onscroll事件整了一个.lazy修饰符
<!-- 滚动事件的默认行为 (即滚动行为) 将会立即触发 -->
<!-- 而不会等待 `onScroll` 完成  -->
<!-- 这其中包含 `event.preventDefault()` 的情况 -->
<div v-on:scroll.passive="onScroll">...</div>
不要把
.passive和.prevent一起使用,因为.prevent将会被忽略,同时浏览器可能会向你展示一个警告。passive会告诉浏览器你不想阻止事件的默认行为
native让组件变成像html内置标签那样监听根元素的原生事件,否则组件上使用v-on只会监听自定义事件
<my-component v-on:click.native="doSomething"></my-component>

<!-- 使用.native修饰符来操作普通HTML标签是会令事件失效的 -->
3. 鼠标按钮修饰符
鼠标按钮修饰符针对的就是左键、右键、中键点击,有如下:
.left左键点击.right右键点击.middle中键点击
<button @click.left="shout(1)">ok</button>
<button @click.right="shout(1)">ok</button>
<button @click.middle="shout(1)">ok</button>
4. 键盘事件的修饰符
键盘修饰符是用来修饰键盘事件(onkeyup,onkeydown)的,有如下:
keyCode存在很多,但vue为我们提供了别名,分为以下两种:
- 普通键 (
enter、tab、delete、space、esc、up、down、left、right...) - 系统修饰键 (
ctrl、alt、meta、shift...)
<!-- 只有按键为keyCode的时候才触发 -->
<input type="text" @keyup.keyCode="shout()">
还可以通过以下方式自定义一些全局的键盘码别名
Vue.config.keyCodes.f2 = 1135. v-bind修饰符
v-bind修饰符主要是为属性进行操作,用来分别有如下:
- async 能对
props进行一个双向绑定
//父组件
<comp :myMessage.sync="bar"></comp>
//子组件
this.$emit('update:myMessage',params);
以上这种方法相当于以下的简写
//父亲组件
<comp :myMessage="bar" @update:myMessage="func"></comp>
func(e){
 this.bar = e;
}

//子组件js
func2(){
  this.$emit('update:myMessage',params);
}使用async需要注意以下两点:
- 使用
sync的时候,子组件传递的事件名格式必须为update:value,其中value必须与子组件中props中声明的名称完全一致 - 注意带有
.sync修饰符的v-bind不能和表达式一起使用 - prop 设置自定义标签属性,避免暴露数据,防止污染HTML结构
<input id="uid" title="title1" value="1" :index.prop="index">- camel 将命名变为驼峰命名法,如将
view-Box属性名转换为viewBox
<svg :viewBox="viewBox"></svg>应用场景
根据每一个修饰符的功能,我们可以得到以下修饰符的应用场景:
.stop:阻止事件冒泡.native:绑定原生事件.once:事件只执行一次.self:将事件绑定在自身身上,相当于阻止事件冒泡.prevent:阻止默认事件.caption:用于事件捕获.once:只触发一次.keyCode:监听特定键盘按下.right:右键
Vue组件之间通信方式有哪些
Vue 组件间通信是面试常考的知识点之一,这题有点类似于开放题,你回答出越多方法当然越加分,表明你对 Vue 掌握的越熟练。 Vue 组件间通信只要指以下 3 类通信 :
父子组件通信、隔代组件通信、兄弟组件通信,下面我们分别介绍每种通信方式且会说明此种方法可适用于哪类组件间通信
组件传参的各种方式
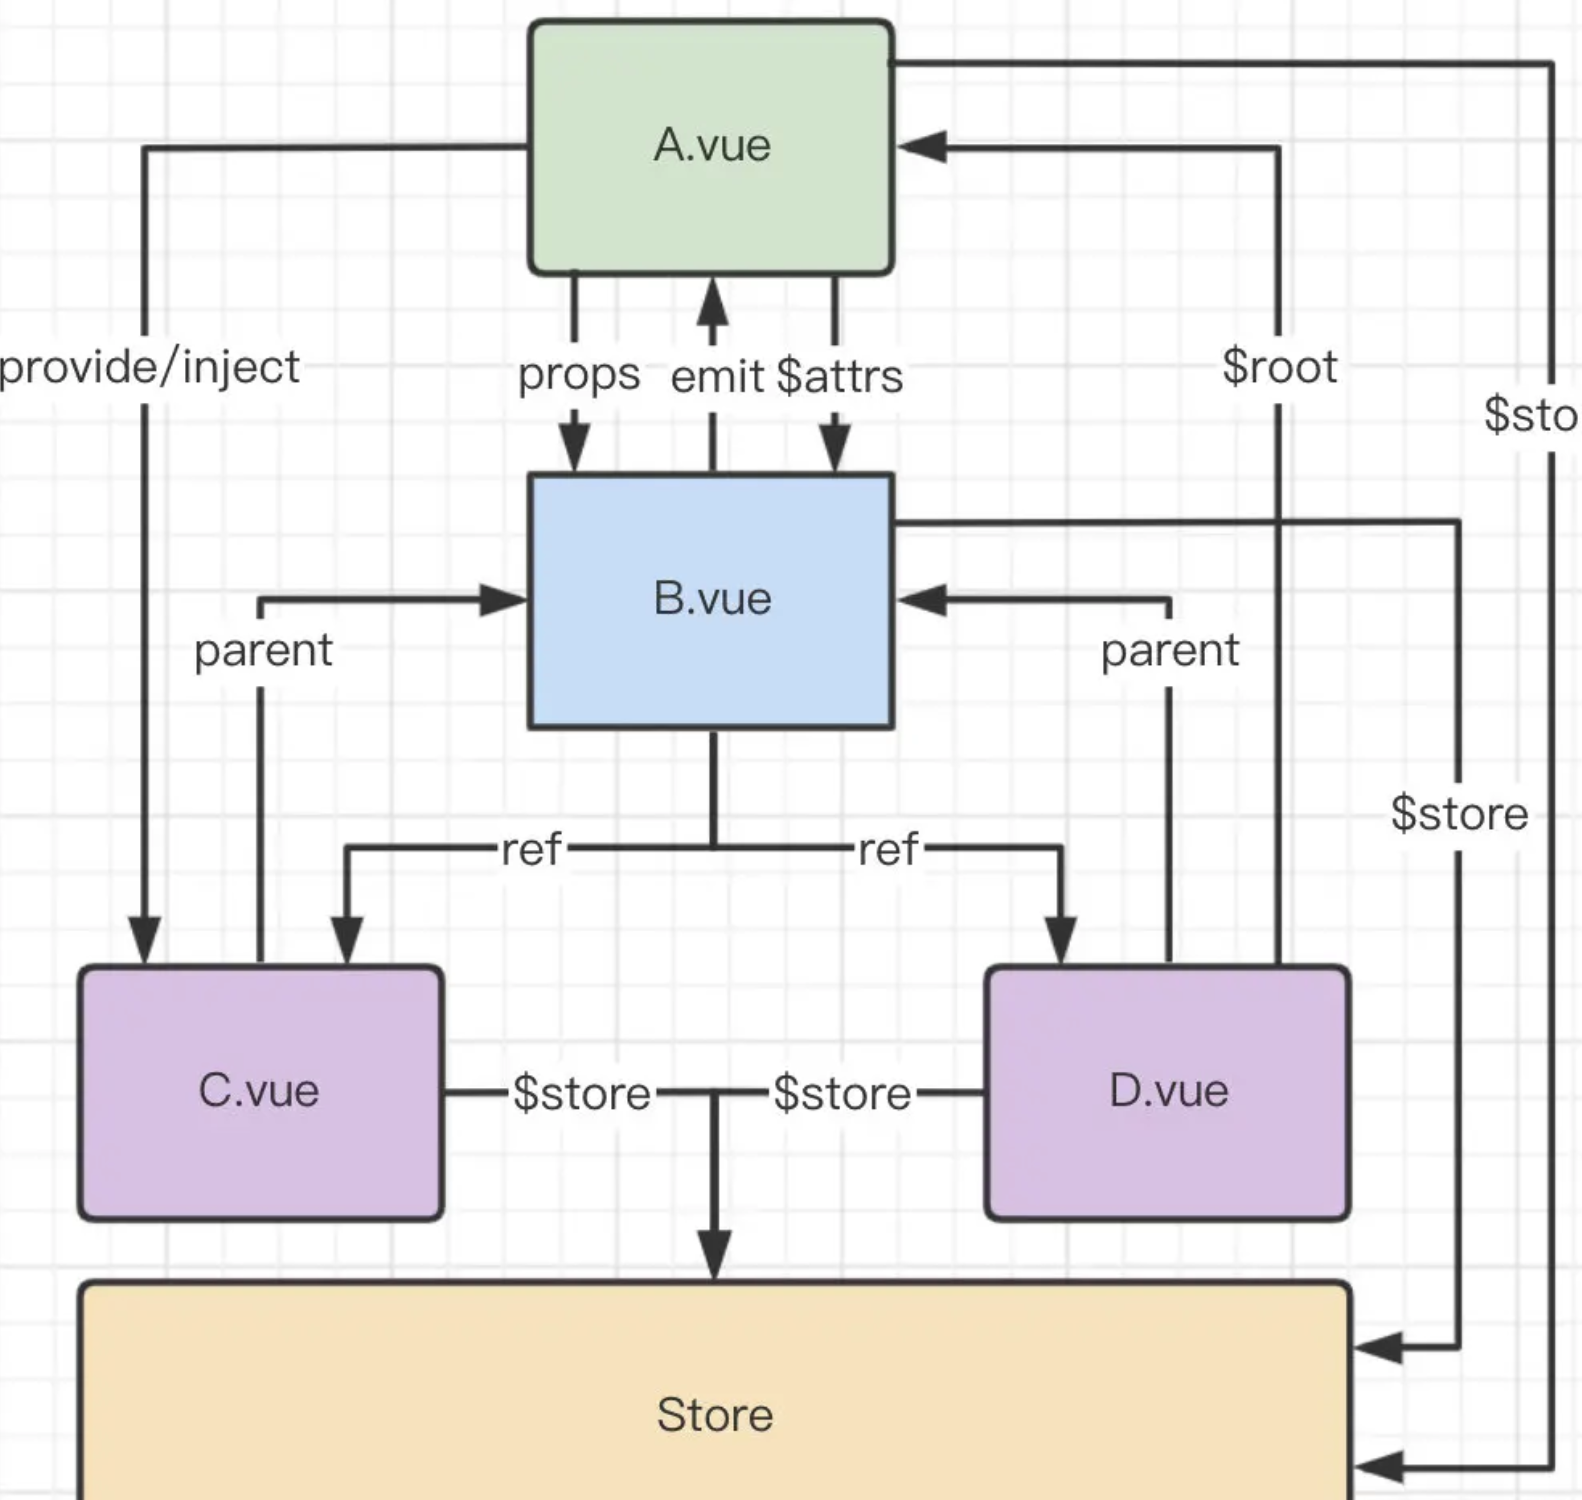
组件通信常用方式有以下几种
props / $emit适用 父子组件通信- 父组件向子组件传递数据是通过
prop传递的,子组件传递数据给父组件是通过$emit触发事件来做到的
- 父组件向子组件传递数据是通过
ref与$parent / $children(vue3废弃)适用 父子组件通信ref:如果在普通的DOM元素上使用,引用指向的就是DOM元素;如果用在子组件上,引用就指向组件实例$parent / $children:访问访问父组件的属性或方法 / 访问子组件的属性或方法
EventBus ($emit / $on)适用于 父子、隔代、兄弟组件通信- 这种方法通过一个空的
Vue实例作为中央事件总线(事件中心),用它来触发事件和监听事件,从而实现任何组件间的通信,包括父子、隔代、兄弟组件
- 这种方法通过一个空的
$attrs / $listeners(vue3废弃)适用于 隔代组件通信$attrs:包含了父作用域中不被prop所识别 (且获取) 的特性绑定 (class和style除外 )。当一个组件没有声明任何prop时,这里会包含所有父作用域的绑定 (class和style除外 ),并且可以通过v-bind="$attrs"传入内部组件。通常配合inheritAttrs选项一起使用$listeners:包含了父作用域中的 (不含.native修饰器的)v-on事件监听器。它可以通过v-on="$listeners"传入内部组件
provide / inject适用于 隔代组件通信- 祖先组件中通过
provider来提供变量,然后在子孙组件中通过inject来注入变量。provide / injectAPI 主要解决了跨级组件间的通信问题, 不过它的使用场景,主要是子组件获取上级组件的状态 ,跨级组件间建立了一种主动提供与依赖注入的关系
- 祖先组件中通过
$root适用于 隔代组件通信 访问根组件中的属性或方法,是根组件,不是父组件。$root只对根组件有用Vuex适用于 父子、隔代、兄弟组件通信Vuex是一个专为Vue.js应用程序开发的状态管理模式。每一个Vuex应用的核心就是store(仓库)。“store” 基本上就是一个容器,它包含着你的应用中大部分的状态 (state)Vuex的状态存储是响应式的。当Vue组件从store中读取状态的时候,若store中的状态发生变化,那么相应的组件也会相应地得到高效更新。- 改变
store中的状态的唯一途径就是显式地提交 (commit)mutation。这样使得我们可以方便地跟踪每一个状态的变化。
根据组件之间关系讨论组件通信最为清晰有效
- 父子组件:
props/$emit/$parent/ref - 兄弟组件:
$parent/eventbus/vuex - 跨层级关系:
eventbus/vuex/provide+inject/$attrs + $listeners/$root
下面演示组件之间通讯三种情况: 父传子、子传父、兄弟组件之间的通讯
1. 父子组件通信
使用
props,父组件可以使用props向子组件传递数据。
父组件vue模板father.vue:
<template>
  <child :msg="message"></child>
</template>

<script>
import child from './child.vue';
export default {
  components: {
    child
  },
  data () {
    return {
      message: 'father message';
    }
  }
}
</script>子组件vue模板child.vue:
<template>
    <div>{{msg}}</div>
</template>

<script>
export default {
  props: {
    msg: {
      type: String,
      required: true
    }
  }
}
</script>
回调函数(callBack)
父传子:将父组件里定义的method作为props传入子组件
// 父组件Parent.vue:
<Child :changeMsgFn="changeMessage">
methods: {
    changeMessage(){
        this.message = 'test'
    }
}// 子组件Child.vue:
<button @click="changeMsgFn">
props:['changeMsgFn']子组件向父组件通信
父组件向子组件传递事件方法,子组件通过
$emit触发事件,回调给父组件
父组件vue模板father.vue:
<template>
    <child @msgFunc="func"></child>
</template>

<script>
import child from './child.vue';
export default {
    components: {
        child
    },
    methods: {
        func (msg) {
            console.log(msg);
        }
    }
}
</script>子组件vue模板child.vue:
<template>
    <button @click="handleClick">点我</button>
</template>

<script>
export default {
    props: {
        msg: {
            type: String,
            required: true
        }
    },
    methods () {
        handleClick () {
          //........
          this.$emit('msgFunc');
        }
    }
}
</script>
2. provide / inject 跨级访问祖先组件的数据
父组件通过使用provide(){return{}}提供需要传递的数据
export default {
  data() {
    return {
      title: '我是父组件',
      name: 'poetry'
    }
  },
  methods: {
    say() {
      alert(1)
    }
  },
  // provide属性 能够为后面的后代组件/嵌套的组件提供所需要的变量和方法
  provide() {
    return {
      message: '我是祖先组件提供的数据',
      name: this.name, // 传递属性
      say: this.say
    }
  }
}子组件通过使用inject:[“参数1”,”参数2”,…]接收父组件传递的参数
<template>
  <p>曾孙组件</p>
  <p>{{message}}</p>
</template>
<script>
export default {
  // inject 注入/接收祖先组件传递的所需要的数据即可
  //接收到的数据 变量 跟data里面的变量一样 可以直接绑定到页面 {{}}
  inject: [ "message","say"],
  mounted() {
    this.say();
  },
};
</script>
3. $parent + $children 获取父组件实例和子组件实例的集合
this.$parent可以直接访问该组件的父实例或组件- 父组件也可以通过
this.$children访问它所有的子组件;需要注意$children并不保证顺序,也不是响应式的
<!-- parent.vue -->
<template>
<div>
  <child1></child1>
  <child2></child2>
  <button @click="clickChild">$children方式获取子组件值</button>
</div>
</template>
<script>
import child1 from './child1'
import child2 from './child2'
export default {
  data(){
    return {
      total: 108
    }
  },
  components: {
    child1,
    child2
  },
  methods: {
    funa(e){
      console.log("index",e)
    },
    clickChild(){
      console.log(this.$children[0].msg);
      console.log(this.$children[1].msg);
    }
  }
}
</script><!-- child1.vue -->
<template>
<div>
<button @click="parentClick">点击访问父组件</button>
</div>
</template>
<script>
export default {
data(){
return {
msg:"child1"
}
},
methods: {
// 访问父组件数据
parentClick(){
this.$parent.funa("xx")
console.log(this.$parent.total);
}
}
}
</script><!-- child2.vue -->
<template>
<div>
child2
</div>
</template>
<script>
export default {
data(){
return {
msg: 'child2'
}
}
}
</script>4. $attrs + $listeners多级组件通信
$attrs包含了从父组件传过来的所有props属性
// 父组件Parent.vue:
<Child :name="name" :age="age"/>

// 子组件Child.vue:
<GrandChild v-bind="$attrs" />

// 孙子组件GrandChild
<p>姓名:{{$attrs.name}}</p>
<p>年龄:{{$attrs.age}}</p>
$listeners包含了父组件监听的所有事件
// 父组件Parent.vue:
<Child :name="name" :age="age" @changeNameFn="changeName"/>

// 子组件Child.vue:
<button @click="$listeners.changeNameFn"></button>
5. ref 父子组件通信
// 父组件Parent.vue:
<Child ref="childComp"/>
<button @click="changeName"></button>
changeName(){
    console.log(this.$refs.childComp.age);
    this.$refs.childComp.changeAge()
}

// 子组件Child.vue:
data(){
    return{
        age:20
    }
},
methods(){
    changeAge(){
        this.age=15
  }
}
6. 非父子, 兄弟组件之间通信
vue2中废弃了broadcast广播和分发事件的方法。父子组件中可以用props和$emit()。如何实现非父子组件间的通信,可以通过实例一个vue实例Bus作为媒介,要相互通信的兄弟组件之中,都引入Bus,然后通过分别调用Bus事件触发和监听来实现通信和参数传递。Bus.js可以是这样:
// Bus.js

// 创建一个中央时间总线类
class Bus {
  constructor() {
    this.callbacks = {};   // 存放事件的名字
  }
  $on(name, fn) {
    this.callbacks[name] = this.callbacks[name] || [];
    this.callbacks[name].push(fn);
  }
  $emit(name, args) {
    if (this.callbacks[name]) {
      this.callbacks[name].forEach((cb) => cb(args));
    }
  }
}

// main.js
Vue.prototype.$bus = new Bus() // 将$bus挂载到vue实例的原型上
// 另一种方式
Vue.prototype.$bus = new Vue() // Vue已经实现了Bus的功能 <template>
<button @click="toBus">子组件传给兄弟组件</button>
</template>
<script>
export default{
methods: {
toBus () {
this.$bus.$emit('foo', '来自兄弟组件')
}
}
}
</script>另一个组件也在钩子函数中监听on事件
export default {
  data() {
    return {
      message: ''
    }
  },
  mounted() {
    this.$bus.$on('foo', (msg) => {
      this.message = msg
    })
  }
}
7. $root 访问根组件中的属性或方法
- 作用:访问根组件中的属性或方法
- 注意:是根组件,不是父组件。
$root只对根组件有用
var vm = new Vue({
  el: "#app",
  data() {
    return {
      rootInfo:"我是根元素的属性"
    }
  },
  methods: {
    alerts() {
      alert(111)
    }
  },
  components: {
    com1: {
      data() {
        return {
          info: "组件1"
        }
      },
      template: "<p>{{ info }} <com2></com2></p>",
      components: {
        com2: {
          template: "<p>我是组件1的子组件</p>",
          created() {
            this.$root.alerts()// 根组件方法
            console.log(this.$root.rootInfo)// 我是根元素的属性
          }
        }
      }
    }
  }
});
8. vuex
- 适用场景: 复杂关系的组件数据传递
- Vuex作用相当于一个用来存储共享变量的容器

state用来存放共享变量的地方getter,可以增加一个getter派生状态,(相当于store中的计算属性),用来获得共享变量的值mutations用来存放修改state的方法。actions也是用来存放修改state的方法,不过action是在mutations的基础上进行。常用来做一些异步操作
小结
- 父子关系的组件数据传递选择
props与$emit进行传递,也可选择ref - 兄弟关系的组件数据传递可选择
$bus,其次可以选择$parent进行传递 - 祖先与后代组件数据传递可选择
attrs与listeners或者Provide与Inject - 复杂关系的组件数据传递可以通过
vuex存放共享的变量
双向绑定的原理是什么
我们都知道 Vue 是数据双向绑定的框架,双向绑定由三个重要部分构成
- 数据层(Model):应用的数据及业务逻辑
- 视图层(View):应用的展示效果,各类UI组件
- 业务逻辑层(ViewModel):框架封装的核心,它负责将数据与视图关联起来
而上面的这个分层的架构方案,可以用一个专业术语进行称呼:MVVM这里的控制层的核心功能便是 “数据双向绑定” 。自然,我们只需弄懂它是什么,便可以进一步了解数据绑定的原理
理解ViewModel
它的主要职责就是:
- 数据变化后更新视图
- 视图变化后更新数据
当然,它还有两个主要部分组成
- 监听器(
Observer):对所有数据的属性进行监听 - 解析器(
Compiler):对每个元素节点的指令进行扫描跟解析,根据指令模板替换数据,以及绑定相应的更新函数
写过自定义指令吗?原理是什么
回答范例
Vue有一组默认指令,比如v-model或v-for,同时Vue也允许用户注册自定义指令来扩展Vue能力- 自定义指令主要完成一些可复用低层级
DOM操作 - 使用自定义指令分为定义、注册和使用三步:
- 定义自定义指令有两种方式:对象和函数形式,前者类似组件定义,有各种生命周期;后者只会在
mounted和updated时执行
- 注册自定义指令类似组件,可以使用
app.directive()全局注册,使用{directives:{xxx}}局部注册 - 使用时在注册名称前加上
v-即可,比如v-focus - 我在项目中常用到一些自定义指令,例如:
- 复制粘贴
v-copy - 长按
v-longpress - 防抖
v-debounce - 图片懒加载
v-lazy - 按钮权限
v-premission - 页面水印
v-waterMarker - 拖拽指令
v-draggable vue3中指令定义发生了比较大的变化,主要是钩子的名称保持和组件一致,这样开发人员容易记忆,不易犯错。另外在v3.2之后,可以在setup中以一个小写v开头方便的定义自定义指令,更简单了
基本使用
当Vue中的核心内置指令不能够满足我们的需求时,我们可以定制自定义的指令用来满足开发的需求
我们看到的v-开头的行内属性,都是指令,不同的指令可以完成或实现不同的功能,对普通 DOM元素进行底层操作,这时候就会用到自定义指令。除了核心功能默认内置的指令 (v-model 和 v-show),Vue 也允许注册自定义指令
// 指令使用的几种方式:
//会实例化一个指令,但这个指令没有参数
`v-xxx`

// -- 将值传到指令中
`v-xxx="value"`

// -- 将字符串传入到指令中,如`v-html="'<p>内容</p>'"`
`v-xxx="'string'"`

// -- 传参数(`arg`),如`v-bind:class="className"`
`v-xxx:arg="value"`

// -- 使用修饰符(`modifier`)
`v-xxx:arg.modifier="value"`
注册一个自定义指令有全局注册与局部注册
// 全局注册注册主要是用过Vue.directive方法进行注册
// Vue.directive第一个参数是指令的名字(不需要写上v-前缀),第二个参数可以是对象数据,也可以是一个指令函数
// 注册一个全局自定义指令 `v-focus`
Vue.directive('focus', {
  // 当被绑定的元素插入到 DOM 中时……
  inserted: function (el) {
    // 聚焦元素
    el.focus()  // 页面加载完成之后自动让输入框获取到焦点的小功能
  }
})

// 局部注册通过在组件options选项中设置directive属性
directives: {
  focus: {
    // 指令的定义
    inserted: function (el) {
      el.focus() // 页面加载完成之后自动让输入框获取到焦点的小功能
    }
  }
}

// 然后你可以在模板中任何元素上使用新的 v-focus property,如下:

<input v-focus />
钩子函数
bind:只调用一次,指令第一次绑定到元素时调用。在这里可以进行一次性的初始化设置。inserted:被绑定元素插入父节点时调用 (仅保证父节点存在,但不一定已被插入文档中)。update:被绑定于元素所在的模板更新时调用,而无论绑定值是否变化。通过比较更新前后的绑定值,可以忽略不必要的模板更新。componentUpdated:被绑定元素所在模板完成一次更新周期时调用。unbind:只调用一次,指令与元素解绑时调用。
所有的钩子函数的参数都有以下:
el:指令所绑定的元素,可以用来直接操作 DOMbinding:一个对象,包含以下property:name:指令名,不包括v-前缀。value:指令的绑定值,例如:v-my-directive="1 + 1"中,绑定值为2。oldValue:指令绑定的前一个值,仅在update和componentUpdated钩子中可用。无论值是否改变都可用。expression:字符串形式的指令表达式。例如v-my-directive="1 + 1"中,表达式为"1 + 1"。arg:传给指令的参数,可选。例如v-my-directive:foo中,参数为"foo"。modifiers:一个包含修饰符的对象。例如:v-my-directive.foo.bar中,修饰符对象为{ foo: true, bar: true }vnode:Vue编译生成的虚拟节点oldVnode:上一个虚拟节点,仅在update和componentUpdated钩子中可用
除了 el 之外,其它参数都应该是只读的,切勿进行修改。如果需要在钩子之间共享数据,建议通过元素的 dataset 来进行
<div v-demo="{ color: 'white', text: 'hello!' }"></div>
<script>
    Vue.directive('demo', function (el, binding) {
    console.log(binding.value.color) // "white"
    console.log(binding.value.text)  // "hello!"
    })
</script>
应用场景
使用自定义组件组件可以满足我们日常一些场景,这里给出几个自定义组件的案例:
- 防抖
// 1.设置v-throttle自定义指令
Vue.directive('throttle', {
  bind: (el, binding) => {
    let throttleTime = binding.value; // 防抖时间
    if (!throttleTime) { // 用户若不设置防抖时间,则默认2s
      throttleTime = 2000;
    }
    let cbFun;
    el.addEventListener('click', event => {
      if (!cbFun) { // 第一次执行
        cbFun = setTimeout(() => {
          cbFun = null;
        }, throttleTime);
      } else {
        event && event.stopImmediatePropagation();
      }
    }, true);
  },
});
// 2.为button标签设置v-throttle自定义指令
<button @click="sayHello" v-throttle>提交</button>- 图片懒加载
设置一个v-lazy自定义组件完成图片懒加载
const LazyLoad = {
    // install方法
    install(Vue,options){
       // 代替图片的loading图
        let defaultSrc = options.default;
        Vue.directive('lazy',{
            bind(el,binding){
                LazyLoad.init(el,binding.value,defaultSrc);
            },
            inserted(el){
                // 兼容处理
                if('InterpObserver' in window){
                    LazyLoad.observe(el);
                }else{
                    LazyLoad.listenerScroll(el);
                }

            },
        })
    },
    // 初始化
    init(el,val,def){
        // src 储存真实src
        el.setAttribute('src',val);
        // 设置src为loading图
        el.setAttribute('src',def);
    },
    // 利用InterpObserver监听el
    observe(el){
        let io = new InterpObserver(entries => {
            let realSrc = el.dataset.src;
            if(entries[0].isIntersecting){
                if(realSrc){
                    el.src = realSrc;
                    el.removeAttribute('src');
                }
            }
        });
        io.observe(el);
    },
    // 监听scroll事件
    listenerScroll(el){
        let handler = LazyLoad.throttle(LazyLoad.load,300);
        LazyLoad.load(el);
        window.addEventListener('scroll',() => {
            handler(el);
        });
    },
    // 加载真实图片
    load(el){
        let windowHeight = document.documentElement.clientHeight
        let elTop = el.getBoundingClientRect().top;
        let elBtm = el.getBoundingClientRect().bottom;
        let realSrc = el.dataset.src;
        if(elTop - windowHeight<0&&elBtm > 0){
            if(realSrc){
                el.src = realSrc;
                el.removeAttribute('src');
            }
        }
    },
    // 节流
    throttle(fn,delay){
        let timer;
        let prevTime;
        return function(...args){
            let currTime = Date.now();
            let context = this;
            if(!prevTime) prevTime = currTime;
            clearTimeout(timer);

            if(currTime - prevTime > delay){
                prevTime = currTime;
                fn.apply(context,args);
                clearTimeout(timer);
                return;
            }

            timer = setTimeout(function(){
                prevTime = Date.now();
                timer = null;
                fn.apply(context,args);
            },delay);
        }
    }

}
export default LazyLoad;- 一键 Copy的功能
import { Message } from 'ant-design-vue';

const vCopy = { //
  /*
    bind 钩子函数,第一次绑定时调用,可以在这里做初始化设置
    el: 作用的 dom 对象
    value: 传给指令的值,也就是我们要 copy 的值
  */
  bind(el, { value }) {
    el.$value = value; // 用一个全局属性来存传进来的值,因为这个值在别的钩子函数里还会用到
    el.handler = () => {
      if (!el.$value) {
      // 值为空的时候,给出提示,我这里的提示是用的 ant-design-vue 的提示,你们随意
        Message.warning('无复制内容');
        return;
      }
      // 动态创建 textarea 标签
      const textarea = document.createElement('textarea');
      // 将该 textarea 设为 readonly 防止 iOS 下自动唤起键盘,同时将 textarea 移出可视区域
      textarea.readOnly = 'readonly';
      textarea.style.position = 'absolute';
      textarea.style.left = '-9999px';
      // 将要 copy 的值赋给 textarea 标签的 value 属性
      textarea.value = el.$value;
      // 将 textarea 插入到 body 中
      document.body.appendChild(textarea);
      // 选中值并复制
      textarea.select();
      // textarea.setSelectionRange(0, textarea.value.length);
      const result = document.execCommand('Copy');
      if (result) {
        Message.success('复制成功');
      }
      document.body.removeChild(textarea);
    };
    // 绑定点击事件,就是所谓的一键 copy 啦
    el.addEventListener('click', el.handler);
  },
  // 当传进来的值更新的时候触发
  componentUpdated(el, { value }) {
    el.$value = value;
  },
  // 指令与元素解绑的时候,移除事件绑定
  unbind(el) {
    el.removeEventListener('click', el.handler);
  },
};

export default vCopy;- 拖拽
<div ref="a" id="bg" v-drag></div>

  directives: {
    drag: {
      bind() {},
      inserted(el) {
        el.onmousedown = (e) => {
          let x = e.clientX - el.offsetLeft;
          let y = e.clientY - el.offsetTop;
          document.onmousemove = (e) => {
            let xx = e.clientX - x + "px";
            let yy = e.clientY - y + "px";
            el.style.left = xx;
            el.style.top = yy;
          };
          el.onmouseup = (e) => {
            document.onmousemove = null;
          };
        };
      },
    },
  }
原理
- 指令本质上是装饰器,是
vue对HTML元素的扩展,给HTML元素增加自定义功能。vue编译DOM时,会找到指令对象,执行指令的相关方法。 - 自定义指令有五个生命周期(也叫钩子函数),分别是
bind、inserted、update、componentUpdated、unbind
原理
- 在生成
ast语法树时,遇到指令会给当前元素添加directives属性 - 通过
genDirectives生成指令代码 - 在
patch前将指令的钩子提取到cbs中,在patch过程中调用对应的钩子 - 当执行指令对应钩子函数时,调用对应指令定义的方法
为什么Vue采用异步渲染
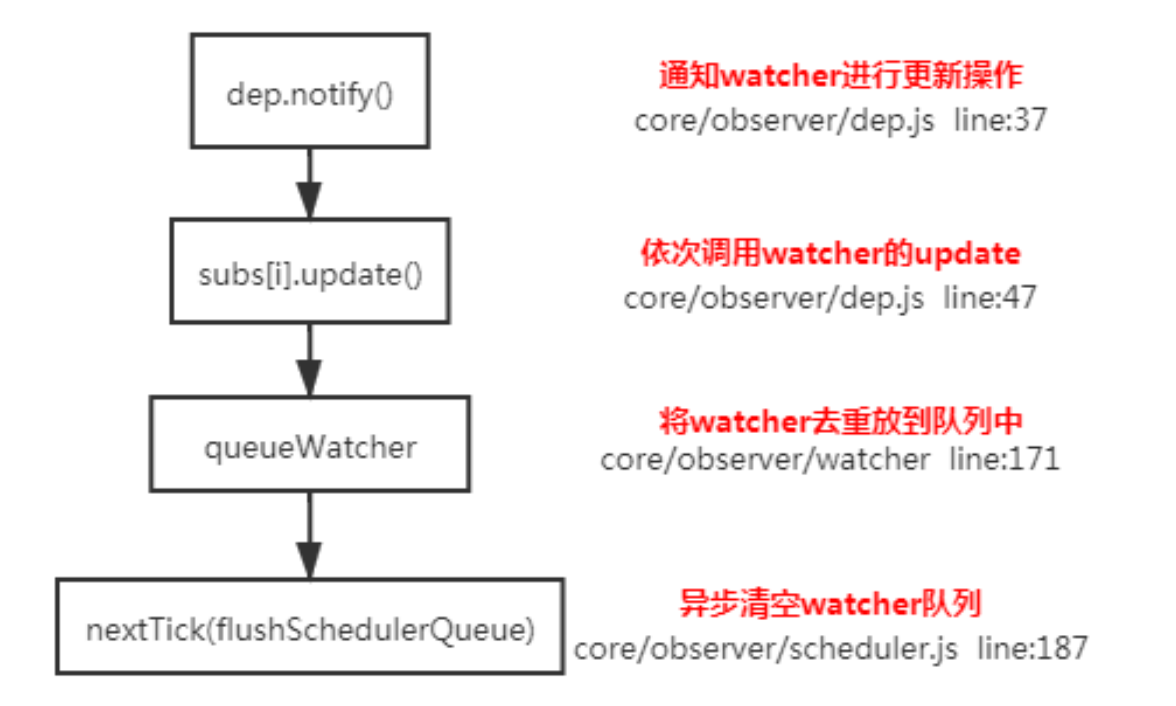
Vue 是组件级更新,如果不采用异步更新,那么每次更新数据都会对当前组件进行重新渲染,所以为了性能, Vue 会在本轮数据更新后,在异步更新视图。核心思想
nextTick
源码相关
dep.notify()通知watcher进行更新,subs[i].update依次调用watcher的update,queueWatcher将watcher去重放入队列,nextTick(flushSchedulerQueue)在下一tick中刷新watcher队列(异步)
update () { /* istanbul ignore else */
    if (this.lazy) {
        this.dirty = true
    }
    else if (this.sync) {
        this.run()
    }
    else {
        queueWatcher(this); // 当数据发生变化时会将watcher放到一个队列中批量更新
    }
}

export function queueWatcher (watcher: Watcher) {
    const id = watcher.id // 会对相同的watcher进行过滤
    if (has[id] == null) {
        has[id] = true
        if (!flushing) {
            queue.push(watcher)
        } else {
            let i = queue.length - 1
            while (i > index && queue[i].id > watcher.id) {
                i--
            }
            queue.splice(i + 1, 0, watcher)
        }
        // queue the flush
        if (!waiting) {
            waiting = true
            if (process.env.NODE_ENV !== 'production' && !config.async) {
                flushSchedulerQueue()
                return
            }
            nextTick(flushSchedulerQueue) // 调用nextTick方法 批量的进行更新
        }
    }
}
vue-router 路由钩子函数是什么 执行顺序是什么
路由钩子的执行流程, 钩子函数种类有:
全局守卫、路由守卫、组件守卫
- 导航被触发。
- 在失活的组件里调用
beforeRouteLeave守卫。 - 调用全局的
beforeEach守卫。 - 在重用的组件里调用
beforeRouteUpdate守卫 (2.2+)。 - 在路由配置里调用
beforeEnter。 - 解析异步路由组件。
- 在被激活的组件里调用
beforeRouteEnter。 - 调用全局的
beforeResolve守卫 (2.5+)。 - 导航被确认。
- 调用全局的
afterEach钩子。 - 触发
DOM更新。 - 调用
beforeRouteEnter守卫中传给next的回调函数,创建好的组件实例会作为回调函数的参数传入
子组件可以直接改变父组件的数据吗?
子组件不可以直接改变父组件的数据。这样做主要是为了维护父子组件的单向数据流。每次父级组件发生更新时,子组件中所有的 prop 都将会刷新为最新的值。如果这样做了,Vue 会在浏览器的控制台中发出警告。
Vue提倡单向数据流,即父级 props 的更新会流向子组件,但是反过来则不行。这是为了防止意外的改变父组件状态,使得应用的数据流变得难以理解,导致数据流混乱。如果破坏了单向数据流,当应用复杂时,debug 的成本会非常高。
只能通过 $emit 派发一个自定义事件,父组件接收到后,由父组件修改。
Vue.extend 作用和原理
官方解释:
Vue.extend使用基础Vue构造器,创建一个“子类”。参数是一个包含组件选项的对象。
其实就是一个子类构造器 是 Vue 组件的核心 api 实现思路就是使用原型继承的方法返回了 Vue 的子类 并且利用 mergeOptions 把传入组件的 options 和父类的 options 进行了合并
extend是构造一个组件的语法器。然后这个组件你可以作用到Vue.component这个全局注册方法里还可以在任意vue模板里使用组件。 也可以作用到vue实例或者某个组件中的components属性中并在内部使用apple组件。Vue.component你可以创建 ,也可以取组件。
相关代码如下
export default function initExtend(Vue) {
  let cid = 0; //组件的唯一标识
  // 创建子类继承Vue父类 便于属性扩展
  Vue.extend = function (extendOptions) {
    // 创建子类的构造函数 并且调用初始化方法
    const Sub = function VueComponent(options) {
      this._init(options); //调用Vue初始化方法
    };
    Sub.cid = cid++;
    Sub.prototype = Object.create(this.prototype); // 子类原型指向父类
    Sub.prototype.constructor = Sub; //constructor指向自己
    Sub.options = mergeOptions(this.options, extendOptions); //合并自己的options和父类的options
    return Sub;
  };
}
谈一谈对Vue组件化的理解
- 组件化开发能大幅提高开发效率、测试性、复用性等
- 常用的组件化技术:属性、自定义事件、插槽
- 降低更新频率,只重新渲染变化的组件
- 组件的特点:高内聚、低耦合、单向数据流
Composition API 与 Options API 有什么不同
分析
Vue3最重要更新之一就是Composition API,它具有一些列优点,其中不少是针对Options API暴露的一些问题量身打造。是Vue3推荐的写法,因此掌握好Composition API应用对掌握好Vue3至关重要
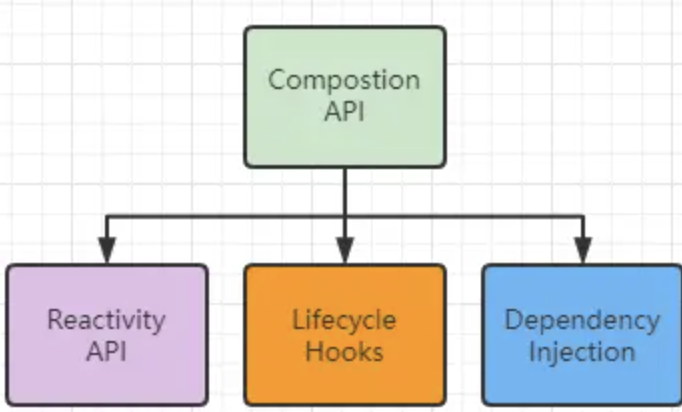
What is Composition API?(opens new window)
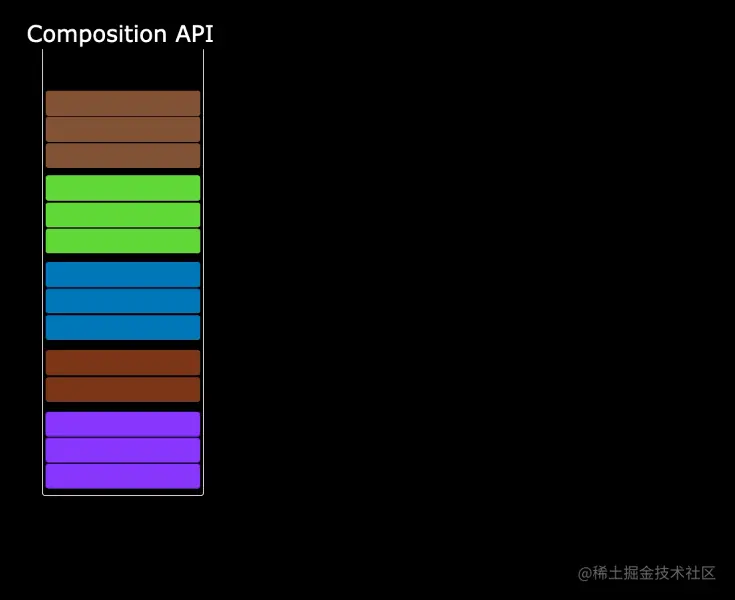
Composition API出现就是为了解决Options API导致相同功能代码分散的现象
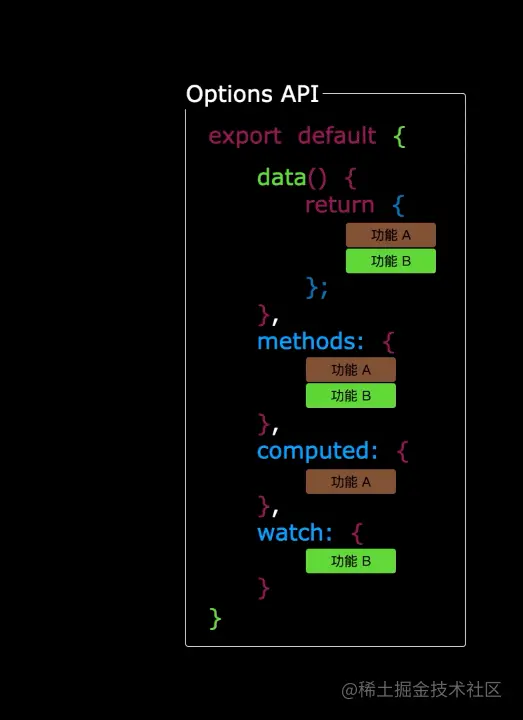
体验
Composition API能更好的组织代码,下面用composition api可以提取为useCount(),用于组合、复用

compositon api提供了以下几个函数:
setuprefreactivewatchEffectwatchcomputedtoRefs- 生命周期的
hooks
回答范例
Composition API是一组API,包括:Reactivity API、生命周期钩子、依赖注入,使用户可以通过导入函数方式编写vue组件。而Options API则通过声明组件选项的对象形式编写组件Composition API最主要作用是能够简洁、高效复用逻辑。解决了过去Options API中mixins的各种缺点;另外Composition API具有更加敏捷的代码组织能力,很多用户喜欢Options API,认为所有东西都有固定位置的选项放置代码,但是单个组件增长过大之后这反而成为限制,一个逻辑关注点分散在组件各处,形成代码碎片,维护时需要反复横跳,Composition API则可以将它们有效组织在一起。最后Composition API拥有更好的类型推断,对ts支持更友好,Options API在设计之初并未考虑类型推断因素,虽然官方为此做了很多复杂的类型体操,确保用户可以在使用Options API时获得类型推断,然而还是没办法用在mixins和provide/inject上Vue3首推Composition API,但是这会让我们在代码组织上多花点心思,因此在选择上,如果我们项目属于中低复杂度的场景,Options API仍是一个好选择。对于那些大型,高扩展,强维护的项目上,Composition API会获得更大收益
可能的追问
Composition API能否和Options API一起使用?
可以在同一个组件中使用两个script标签,一个使用vue3,一个使用vue2写法,一起使用没有问题
<!-- vue3 -->
<script setup>
  // vue3写法
</script>

<!-- 降级vue2 -->
<script>
  export default {
    data() {},
    methods: {}
  }
</script>
vue-router中如何保护路由
分析
路由保护在应用开发过程中非常重要,几乎每个应用都要做各种路由权限管理,因此相当考察使用者基本功。
体验
全局守卫:
const router = createRouter({ ... })

router.beforeEach((to, from) => {
  // ...
  // 返回 false 以取消导航
  return false
})
路由独享守卫:
const routes = [
  {
    path: '/users/:id',
    component: UserDetails,
    beforeEnter: (to, from) => {
      // reject the navigation
      return false
    },
  },
]
组件内的守卫:
const UserDetails = {
  template: `...`,
  beforeRouteEnter(to, from) {
    // 在渲染该组件的对应路由被验证前调用
  },
  beforeRouteUpdate(to, from) {
    // 在当前路由改变,但是该组件被复用时调用
  },
  beforeRouteLeave(to, from) {
    // 在导航离开渲染该组件的对应路由时调用
  },
}
回答
vue-router中保护路由的方法叫做路由守卫,主要用来通过跳转或取消的方式守卫导航。- 路由守卫有三个级别:
全局、路由独享、组件级。影响范围由大到小,例如全局的router.beforeEach(),可以注册一个全局前置守卫,每次路由导航都会经过这个守卫,因此在其内部可以加入控制逻辑决定用户是否可以导航到目标路由;在路由注册的时候可以加入单路由独享的守卫,例如beforeEnter,守卫只在进入路由时触发,因此只会影响这个路由,控制更精确;我们还可以为路由组件添加守卫配置,例如beforeRouteEnter,会在渲染该组件的对应路由被验证前调用,控制的范围更精确了。 - 用户的任何导航行为都会走
navigate方法,内部有个guards队列按顺序执行用户注册的守卫钩子函数,如果没有通过验证逻辑则会取消原有的导航。
原理
runGuardQueue(guards)链式的执行用户在各级别注册的守卫钩子函数,通过则继续下一个级别的守卫,不通过进入catch流程取消原本导航
// 源码
runGuardQueue(guards)
  .then(() => {
    // check global guards beforeEach
    guards = []
    for (const guard of beforeGuards.list()) {
      guards.push(guardToPromiseFn(guard, to, from))
    }
    guards.push(canceledNavigationCheck)

    return runGuardQueue(guards)
  })
  .then(() => {
    // check in components beforeRouteUpdate
    guards = extractComponentsGuards(
      updatingRecords,
      'beforeRouteUpdate',
      to,
      from
    )

    for (const record of updatingRecords) {
      record.updateGuards.forEach(guard => {
        guards.push(guardToPromiseFn(guard, to, from))
      })
    }
    guards.push(canceledNavigationCheck)

    // run the queue of per route beforeEnter guards
    return runGuardQueue(guards)
  })
  .then(() => {
    // check the route beforeEnter
    guards = []
    for (const record of to.matched) {
      // do not trigger beforeEnter on reused views
      if (record.beforeEnter && !from.matched.includes(record)) {
        if (isArray(record.beforeEnter)) {
          for (const beforeEnter of record.beforeEnter)
            guards.push(guardToPromiseFn(beforeEnter, to, from))
        } else {
          guards.push(guardToPromiseFn(record.beforeEnter, to, from))
        }
      }
    }
    guards.push(canceledNavigationCheck)

    // run the queue of per route beforeEnter guards
    return runGuardQueue(guards)
  })
  .then(() => {
    // NOTE: at this point to.matched is normalized and does not contain any () => Promise<Component>

    // clear existing enterCallbacks, these are added by extractComponentsGuards
    to.matched.forEach(record => (record.enterCallbacks = {}))

    // check in-component beforeRouteEnter
    guards = extractComponentsGuards(
      enteringRecords,
      'beforeRouteEnter',
      to,
      from
    )
    guards.push(canceledNavigationCheck)

    // run the queue of per route beforeEnter guards
    return runGuardQueue(guards)
  })
  .then(() => {
    // check global guards beforeResolve
    guards = []
    for (const guard of beforeResolveGuards.list()) {
      guards.push(guardToPromiseFn(guard, to, from))
    }
    guards.push(canceledNavigationCheck)

    return runGuardQueue(guards)
  })
  // catch any navigation canceled
  .catch(err =>
    isNavigationFailure(err, ErrorTypes.NAVIGATION_CANCELLED)
      ? err
      : Promise.reject(err)
)原创声明:本文系作者授权腾讯云开发者社区发表,未经许可,不得转载。
如有侵权,请联系 cloudcommunity@tencent.com 删除。
原创声明:本文系作者授权腾讯云开发者社区发表,未经许可,不得转载。
如有侵权,请联系 cloudcommunity@tencent.com 删除。

