Spring事件机制详解
今天我们来聊一聊 Spring 中的事件机制,从用法到源码分析,我们挨个过一遍。
1. Spring 事件机制
有的小伙伴可能会觉得 Spring 中的事件机制很神奇,一个地方发消息,另一个地方收消息,跟 MQ 一样。其实,Spring 中的事件本质上就是观察者模式的应用。事件有其便利的一面,但是用多了也容易导致混乱,所以在实际项目中,我们还是要谨慎选择是否使用 Spring 事件。
2. 简单实践
先用一个简单的案例,小伙伴们先了解一下 Spring 中事件的应用。
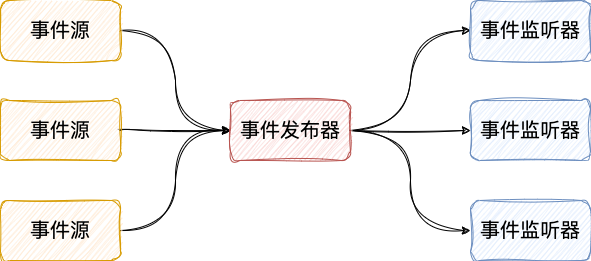
事件发布流程中,有三个核心概念,他们之间的关系如下图:

- 事件源(ApplicationEvent):这个就是你要发布的事件对象。
- 事件发布器(ApplicationEventPublisher):这是事件的发布工具。
- 事件监听器(ApplicationListener):这个相当于是事件的消费者。
以上三个要素,事件源和事件监听器都可以有多个,事件发布器(通常是由容器来扮演)一般来说只有一个。
接下来松哥通过一个简单的案例来和小伙伴们演示一下 Spring 中事件的用法。
首先,我们需要自定义一个事件对象,自定义的事件继承自 ApplicationEvent 类,如下:
public class MyEvent extends ApplicationEvent {
    private String name;
    public MyEvent(Object source, String name) {
        super(source);
        this.name = name;
    }

    @Override
    public String toString() {
        return "MyEvent{" +
                "name='" + name + '\'' +
                "} " + super.toString();
    }
}
这里我只是额外定义了一个 name 属性,如果大家在事件发送的时候需要传递的数据比较多,那么就可以在这里定义更多的属性。
在具体实践中,事件源并非一定要继承自 ApplicationEvent,事件源也可以是一个普通的 Java 类,如果是普通的 Java 类,系统会自动将之封装为一个 PayloadApplicationEvent 对象去发送。
接下来通过事件发布器将事件发布出去。Spring 中事件发布器有专门的接口 ApplicationEventPublisher:
@FunctionalInterface
public interface ApplicationEventPublisher {
 default void publishEvent(ApplicationEvent event) {
  publishEvent((Object) event);
 }
 void publishEvent(Object event);
}
这里就两个方法,上面方法调用了下面方法,从这两个方法的参数中也可以看出来,发送时候的消息类型可以分为两种,一种是继承自 ApplicationEvent 类,另一种则是普通的 Java 对象。
AbstractApplicationContext 实现了该接口并重写了接口中的方法,所以我们平时使用的 AnnotationConfigApplicationContext 或者 ClassPathXmlApplicationContext,里边都是可以直接调用事件发布方法的。
事件发布方式如下:
AnnotationConfigApplicationContext ctx = new AnnotationConfigApplicationContext(JavaConfig.class);
ctx.publishEvent(new MyEvent(new Demo(), "javaboy"));
事件发布之后,我们还需要一个事件消费者去消费这个事件,或者也可以称之为事件监听器。
事件监听器有两种定义方式,第一种是自定义类实现 ApplicationListener 接口:
@Component
public class MyEventListener implements ApplicationListener<MyEvent> {
    @Override
    public void onApplicationEvent(MyEvent event) {
        System.out.println("event = " + event);
    }
}
第二种方式则是通过注解去标记事件消费方法:
@Component
public class MyEventListener02 {
    @EventListener(value = MyEvent.class)
    public void hello(MyEvent event) {
        System.out.println("event02 = " + event);
    }
}
这样,我们一个简单的事件发布订阅就完成了,现在我们去发布事件,事件监听器中就可以接收到事件。
3. 原理分析
Spring 事件单纯从用法上来说是非常容易的,上面松哥也都给大家演示了,原理即使我们不去看源码,大概也能猜出来个七七八八:当我们去发布一个事件的时候,系统就会去找到所有合适的事件消费者,然后去调用这些事件消费者,就是这么简单。
3.1 ApplicationEventMulticaster
事件的这一切,我们得从 ApplicationEventMulticaster 开始说起,这是一个接口,从名字上可以看出来,这个叫做事件广播器。
public interface ApplicationEventMulticaster {
 void addApplicationListener(ApplicationListener<?> listener);
 void addApplicationListenerBean(String listenerBeanName);
 void removeApplicationListener(ApplicationListener<?> listener);
 void removeApplicationListenerBean(String listenerBeanName);
 void removeApplicationListeners(Predicate<ApplicationListener<?>> predicate);
 void removeApplicationListenerBeans(Predicate<String> predicate);
 void removeAllListeners();
 void multicastEvent(ApplicationEvent event);
 void multicastEvent(ApplicationEvent event, @Nullable ResolvableType eventType);
}
- addApplicationListener:这个方法是添加一个事件消费者进来,这个方法参数就是一个 ApplicationListener,无论我们通过何种方式注册的事件消费者(继承类或者注解的方式),最终都是调用这个方法把事件消费者添加进来的。
- addApplicationListenerBean:这个方法是添加事件消费者的 bean 进来,这个专门处理继承自 ApplicationListener 类的消费者,继承自 ApplicationListener 类的消费者也是要注册到 Spring 容器中去的,将来会通过这个方法记录这些 bean 的名字。
- removeApplicationListener:移除一个 ApplicationListener 监听器。
- removeApplicationListenerBean:根据 beanName 移除一个 ApplicationListener 监听器。
- removeApplicationListeners:根据条件移除 ApplicationListener 监听器。
- removeApplicationListenerBeans:根据条件移除 ApplicationListener 监听器。
- removeAllListeners:移除所有 ApplicationListener。
- multicastEvent:这个方法有两个重载的方法,这就是事件广播方法了,其中一个重载方法多了一个 ResolvableType,这个是描述泛型信息的。
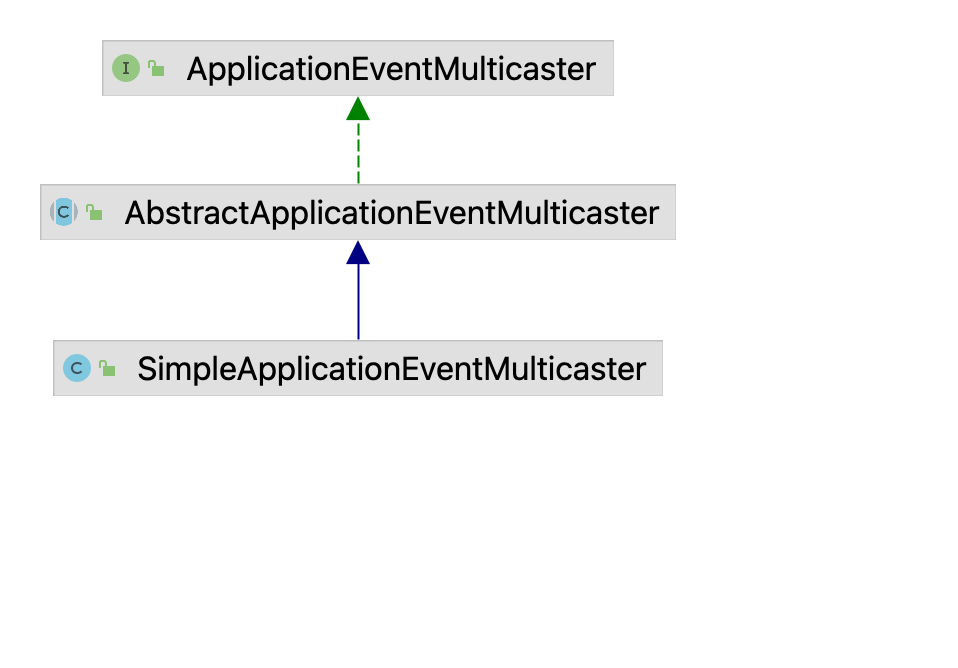
ApplicationEventMulticaster 的继承关系比较简单,它也只有一个实现类,所以分析起来相对要容易一些:

接下来我们的分析基本上都集中在 AbstractApplicationEventMulticaster 和 SimpleApplicationEventMulticaster 两个类中。
3.2 收集监听器
前面松哥和大家说了,监听器的定义有两种方式,要么直接继承自 ApplicationListener,要么通过添加 @EventListener 注解,那么接下来我们就来看下这两种监听器是如何加载到 Spring 容器中的。
3.2.1 类监听器
类监听器相对来说好处理一些,直接去 Spring 容器中查找相关类型的 Bean 即可。
在初始化容器的 refresh 方法中,系统会调用到 registerListeners 方法,这个方法就是用来处理所有的类监听器的,如下:
protected void registerListeners() {
 // Register statically specified listeners first.
 for (ApplicationListener<?> listener : getApplicationListeners()) {
  getApplicationEventMulticaster().addApplicationListener(listener);
 }
 // Do not initialize FactoryBeans here: We need to leave all regular beans
 // uninitialized to let post-processors apply to them!
 String[] listenerBeanNames = getBeanNamesForType(ApplicationListener.class, true, false);
 for (String listenerBeanName : listenerBeanNames) {
  getApplicationEventMulticaster().addApplicationListenerBean(listenerBeanName);
 }
 // Publish early application events now that we finally have a multicaster...
 Set<ApplicationEvent> earlyEventsToProcess = this.earlyApplicationEvents;
 this.earlyApplicationEvents = null;
 if (!CollectionUtils.isEmpty(earlyEventsToProcess)) {
  for (ApplicationEvent earlyEvent : earlyEventsToProcess) {
   getApplicationEventMulticaster().multicastEvent(earlyEvent);
  }
 }
}
这个方法里边干了三件事。
首先就是先处理所有的静态监听器,即不存在于 Spring 容器中的监听器,可以直接调用 getApplicationListeners() 方法去获取,对应的调用代码如下:
public class Demo {
    public static void main(String[] args) {
        AnnotationConfigApplicationContext ctx = new AnnotationConfigApplicationContext();
        ctx.addApplicationListener(new MyEventListener());
        ctx.register(JavaConfig.class);
        ctx.refresh();
        ctx.publishEvent(new MyEvent(new Demo(), "javaboy"));
    }
}
小伙伴们看到,这里我手动调用容器的 addApplicationListener 方法添加了一个监听器,这个手动加进来的监听器可以不必存在于 Spring 容器中。
这种写法大家作为了解即可,因为一般我们不会这样做,比较麻烦且无必要。
registerListeners 方法干的第二件事就是从 Spring 容器中查找所有的 ApplicationListener 类型的 beanName,并将查找的结果先存起来,将来广播事件的时候使用。有小伙伴可能会说为什么不直接到找到 ApplicationListener 对象存起来,一步到位多省事!注意,这个地方还拿不到对象,现在还是 Spring 容器的初始化阶段,此时对象都还没有初始化,要在 refresh 方法的倒数第二步进行 Bean 的初始化,所以现在只能先拿到 beanName 存起来。
registerListeners 方法干的第三件事是检查是否有需要提前发布的事件,如果有就先将之广播出去。
在具体的 addApplicationListener 方法中,会先检查当前对象是否是代理对象,如果是,则先把代理对象提取出来,然后从监听器集合中先移除再重新添加,防止一个监听器以代理对象的方式被添加一次,又以被代理对象被添加一次;addApplicationListenerBean 方法则没有这么麻烦,直接添加到 Set 集合中即可,可以自动去重。
对于第二件事,由于这里存的是 beanName,那么这个 beanName 什么时候会成为 bean 对象呢?有一个后置处理器 ApplicationListenerDetector,在该后置处理器的 postProcessAfterInitialization 方法中,会去挨个检查创建出来的 bean 是否为一个 ApplicationListener,如果是,则将之添加到事件监听器集合中:
@Override
public Object postProcessAfterInitialization(Object bean, String beanName) {
 if (bean instanceof ApplicationListener<?> applicationListener) {
  Boolean flag = this.singletonNames.get(beanName);
  if (Boolean.TRUE.equals(flag)) {
   this.applicationContext.addApplicationListener(applicationListener);
  }
  else if (Boolean.FALSE.equals(flag)) {
   this.singletonNames.remove(beanName);
  }
 }
 return bean;
}
以上就是监听器类的收集过程。
3.2.2 注解监听器
通过注解定义的事件监听器则会比较特殊,因为注解标记的是方法,这些方法最终会被封装为 ApplicationListenerMethodAdapter,ApplicationListenerMethodAdapter 也是 ApplicationListener 的一种,将来在执行的时候,无论是通过类定义的事件监听器还是通过注解定义的事件监听器,都可以统一对待处理。
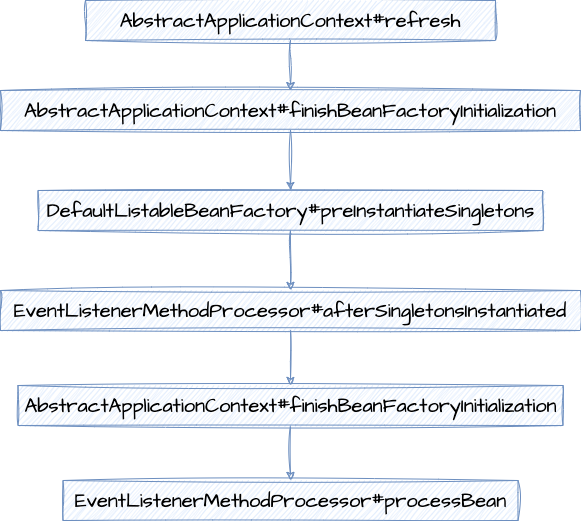
对于这一类监听器的处理是在 Spring 容器初始化的最后一步,即初始化各个 Bean,初始化完成之后,就会去处理这一类的 Bean,方法执行流程如下:

所以最终就是在 EventListenerMethodProcessor#processBean 方法中处理通过注解配置的监听器的:
private void processBean(final String beanName, final Class<?> targetType) {
 if (!this.nonAnnotatedClasses.contains(targetType) &&
   AnnotationUtils.isCandidateClass(targetType, EventListener.class) &&
   !isSpringContainerClass(targetType)) {
  Map<Method, EventListener> annotatedMethods = null;
  try {
   annotatedMethods = MethodIntrospector.selectMethods(targetType,
     (MethodIntrospector.MetadataLookup<EventListener>) method ->
       AnnotatedElementUtils.findMergedAnnotation(method, EventListener.class));
  }
  catch (Throwable ex) {
  }
  if (CollectionUtils.isEmpty(annotatedMethods)) {
   this.nonAnnotatedClasses.add(targetType);
  }
  else {
   // Non-empty set of methods
   ConfigurableApplicationContext context = this.applicationContext;
   List<EventListenerFactory> factories = this.eventListenerFactories;
   for (Method method : annotatedMethods.keySet()) {
    for (EventListenerFactory factory : factories) {
     if (factory.supportsMethod(method)) {
      Method methodToUse = AopUtils.selectInvocableMethod(method, context.getType(beanName));
      ApplicationListener<?> applicationListener =
        factory.createApplicationListener(beanName, targetType, methodToUse);
      if (applicationListener instanceof ApplicationListenerMethodAdapter alma) {
       alma.init(context, this.evaluator);
      }
      context.addApplicationListener(applicationListener);
      break;
     }
    }
   }
  }
 }
}
这段源码很好懂,首先调用 MethodIntrospector.selectMethods 方法,这个方法就是去查询当前 Class 中所有被 @EventListener 注解标记的方法,将查询的结果存入到 annotatedMethods 集合中。如果这个集合为空,那就意味着当前 Class 是没有注解标记的 Class。否则就去遍历 annotatedMethods 集合。
遍历的时候,通过 EventListenerFactory 来创建 ApplicationListener 对象,EventListenerFactory 是一个接口,这里说是在遍历 factories 集合,但是这个集合中只有一个有效对象 DefaultEventListenerFactory,所以实际上就是由 DefaultEventListenerFactory 来创建 ApplicationListener,创建出来的就是我们前面所说的 ApplicationListenerMethodAdapter,最后将创建结果调用 addApplicationListener 方法添加到事件监听器集合中(最后的 context 其实跟前面松哥案例中的 ctx 就是一个东西)。
对于监听器的收集,主要就是如上两种方式。
3.3 事件发布
Spring 中的事件发布接口是 ApplicationEventMulticaster,这个接口只有一个干活的类就是 SimpleApplicationEventMulticaster,在 Spring 容器初始化的 refresh 方法中,会调用到 initApplicationEventMulticaster 方法,这个方法就是用来初始化事件广播器的:
protected void initApplicationEventMulticaster() {
 ConfigurableListableBeanFactory beanFactory = getBeanFactory();
 if (beanFactory.containsLocalBean(APPLICATION_EVENT_MULTICASTER_BEAN_NAME)) {
  this.applicationEventMulticaster =
    beanFactory.getBean(APPLICATION_EVENT_MULTICASTER_BEAN_NAME, ApplicationEventMulticaster.class);
 }
 else {
  this.applicationEventMulticaster = new SimpleApplicationEventMulticaster(beanFactory);
  beanFactory.registerSingleton(APPLICATION_EVENT_MULTICASTER_BEAN_NAME, this.applicationEventMulticaster);
 }
}
这里 APPLICATION_EVENT_MULTICASTER_BEAN_NAME 变量的名称是 applicationEventMulticaster,如果容器中存在名为 applicationEventMulticaster 的 bean,则直接获取,如果不存在,则直接 new 一个 SimpleApplicationEventMulticaster 并注册到 Spring 容器中。
这段代码给我们的启示是,如果想要自定义 ApplicationEventMulticaster,则自定义的 beanName 必须是 applicationEventMulticaster,否则自定义的 bean 不会生效。
接下来就是事件发布了,事件发布我们就从 publishEvent 方法开始看起。
@Override
public void publishEvent(ApplicationEvent event) {
 publishEvent(event, null);
}
protected void publishEvent(Object event, @Nullable ResolvableType typeHint) {
 ResolvableType eventType = null;
 // Decorate event as an ApplicationEvent if necessary
 ApplicationEvent applicationEvent;
 if (event instanceof ApplicationEvent applEvent) {
  applicationEvent = applEvent;
  eventType = typeHint;
 }
 else {
  ResolvableType payloadType = null;
  if (typeHint != null && ApplicationEvent.class.isAssignableFrom(typeHint.toClass())) {
   eventType = typeHint;
  }
  else {
   payloadType = typeHint;
  }
  applicationEvent = new PayloadApplicationEvent<>(this, event, payloadType);
 }
 // Determine event type only once (for multicast and parent publish)
 if (eventType == null) {
  eventType = ResolvableType.forInstance(applicationEvent);
  if (typeHint == null) {
   typeHint = eventType;
  }
 }
 // Multicast right now if possible - or lazily once the multicaster is initialized
 if (this.earlyApplicationEvents != null) {
  this.earlyApplicationEvents.add(applicationEvent);
 }
 else {
  getApplicationEventMulticaster().multicastEvent(applicationEvent, eventType);
 }
 // Publish event via parent context as well...
 if (this.parent != null) {
  if (this.parent instanceof AbstractApplicationContext abstractApplicationContext) {
   abstractApplicationContext.publishEvent(event, typeHint);
  }
  else {
   this.parent.publishEvent(event);
  }
 }
}
这个方法的逻辑我们来看下:
- 首先,如果传入的事件类型就是 ApplicationEvent 类型,则直接赋值给 applicationEvent。
- 否则就说明这个事件可能是一个普通的 Java 对象,那么就将这个 Java 对象封装成一个 PayloadApplicationEvent 对象并赋值给 applicationEvent。
- 如果 eventType 为 null(默认情况下,此时 eventType 就是 null),那么就从 applicationEvent 中提取出来要处理的事件对象:如果事件类型本身就是 ApplicationEvent,那么 eventType 就是具体的事件对象;如果事件类型本身是普通的 Java 对象,那么这里提取到的 eventType 就是一个 ResolvableType,这个 ResolvableType 中标记了具体的事件对象。
- 接下来就是调用广播器去广播事件了,即 multicastEvent,这也是核心步骤。
- 最后还会再去判断一下当前容器是否存在 parent,如果存在 parent,则在 parent 容器中也将当前事件广播出去,这就会导致凡是注册到 parent 容器中的监听器,也会收到子容器发布的事件。
这段代码逻辑并不难,接下来我们来看下 multicastEvent 方法:
@Override
public void multicastEvent(ApplicationEvent event, @Nullable ResolvableType eventType) {
 ResolvableType type = (eventType != null ? eventType : ResolvableType.forInstance(event));
 Executor executor = getTaskExecutor();
 for (ApplicationListener<?> listener : getApplicationListeners(event, type)) {
  if (executor != null) {
   executor.execute(() -> invokeListener(listener, event));
  }
  else {
   invokeListener(listener, event);
  }
 }
}
我们这里看到的就是 SimpleApplicationEventMulticaster 的 multicastEvent 方法。
这个方法首先去分析出来事件的类型 type,然后获取一个异步处理器,接下来就根据事件 event 和 type 去找到合适的事件监听器,然后遍历事件监听器,遍历的时候,如果异步处理器 executor 不为空,那么就在这里异步处理器中调用事件监听器,否则就直接在当前线程中调用事件监听器。
从这里大家可以看出来,如果我们提供了异步处理器,那么可以实现 Spring 事件的异步处理,即非阻塞的效果,否则事件是阻塞的,即发布者将事件发布之后,必须等消费者将事件处理了,发布者的代码才会继续往下走。
如果我们想在 Spring 实现非阻塞的事件,那么可以配置如下 Bean:
@Bean
SimpleApplicationEventMulticaster applicationEventMulticaster() {
    SimpleApplicationEventMulticaster multicaster = new SimpleApplicationEventMulticaster();
    ThreadPoolTaskExecutor executor = new ThreadPoolTaskExecutor();
    //核心线程池数量
    executor.setCorePoolSize(Runtime.getRuntime().availableProcessors());
    //最大线程数量
    executor.setMaxPoolSize(Runtime.getRuntime().availableProcessors() * 5);
    //线程池的队列容量
    executor.setQueueCapacity(Runtime.getRuntime().availableProcessors() * 2);
    //线程名称的前缀
    executor.setThreadNamePrefix("javaboy-async-executor-");
    executor.initialize();
    multicaster.setTaskExecutor(executor);
    return multicaster;
}
配置这个 Bean 的时候,注意 beanName 必须是 applicationEventMulticaster。
接下来再来看看 getApplicationListeners 方法是如何根据当前事件类型找到对应的事件处理器的:
protected Collection<ApplicationListener<?>> getApplicationListeners(
  ApplicationEvent event, ResolvableType eventType) {
 Object source = event.getSource();
 Class<?> sourceType = (source != null ? source.getClass() : null);
 ListenerCacheKey cacheKey = new ListenerCacheKey(eventType, sourceType);
 // Potential new retriever to populate
 CachedListenerRetriever newRetriever = null;
 // Quick check for existing entry on ConcurrentHashMap
 CachedListenerRetriever existingRetriever = this.retrieverCache.get(cacheKey);
 if (existingRetriever == null) {
  // Caching a new ListenerRetriever if possible
  if (this.beanClassLoader == null ||
    (ClassUtils.isCacheSafe(event.getClass(), this.beanClassLoader) &&
      (sourceType == null || ClassUtils.isCacheSafe(sourceType, this.beanClassLoader)))) {
   newRetriever = new CachedListenerRetriever();
   existingRetriever = this.retrieverCache.putIfAbsent(cacheKey, newRetriever);
   if (existingRetriever != null) {
    newRetriever = null;  // no need to populate it in retrieveApplicationListeners
   }
  }
 }
 if (existingRetriever != null) {
  Collection<ApplicationListener<?>> result = existingRetriever.getApplicationListeners();
  if (result != null) {
   return result;
  }
  // If result is null, the existing retriever is not fully populated yet by another thread.
  // Proceed like caching wasn't possible for this current local attempt.
 }
 return retrieveApplicationListeners(eventType, sourceType, newRetriever);
}
从这个方法中我们可以看到,这里根据 eventType 和 sourceType 构建了一个缓存的 key,也就是根据事件的类型和其所属的 source,将与其对应的事件监听器缓存起来,缓存的对象就是 CachedListenerRetriever,如果根据缓存 key 能找到缓存 value,那么就从缓存的 value 中提取出来监听器,否则就调用 retrieveApplicationListeners 方法去查找监听器:
private Collection<ApplicationListener<?>> retrieveApplicationListeners(
  ResolvableType eventType, @Nullable Class<?> sourceType, @Nullable CachedListenerRetriever retriever) {
 List<ApplicationListener<?>> allListeners = new ArrayList<>();
 Set<ApplicationListener<?>> filteredListeners = (retriever != null ? new LinkedHashSet<>() : null);
 Set<String> filteredListenerBeans = (retriever != null ? new LinkedHashSet<>() : null);
 Set<ApplicationListener<?>> listeners;
 Set<String> listenerBeans;
 synchronized (this.defaultRetriever) {
  listeners = new LinkedHashSet<>(this.defaultRetriever.applicationListeners);
  listenerBeans = new LinkedHashSet<>(this.defaultRetriever.applicationListenerBeans);
 }
 // Add programmatically registered listeners, including ones coming
 // from ApplicationListenerDetector (singleton beans and inner beans).
 for (ApplicationListener<?> listener : listeners) {
  if (supportsEvent(listener, eventType, sourceType)) {
   if (retriever != null) {
    filteredListeners.add(listener);
   }
   allListeners.add(listener);
  }
 }
 // Add listeners by bean name, potentially overlapping with programmatically
 // registered listeners above - but here potentially with additional metadata.
 if (!listenerBeans.isEmpty()) {
  ConfigurableBeanFactory beanFactory = getBeanFactory();
  for (String listenerBeanName : listenerBeans) {
   try {
    if (supportsEvent(beanFactory, listenerBeanName, eventType)) {
     ApplicationListener<?> listener =
       beanFactory.getBean(listenerBeanName, ApplicationListener.class);
     if (!allListeners.contains(listener) && supportsEvent(listener, eventType, sourceType)) {
      if (retriever != null) {
       if (beanFactory.isSingleton(listenerBeanName)) {
        filteredListeners.add(listener);
       }
       else {
        filteredListenerBeans.add(listenerBeanName);
       }
      }
      allListeners.add(listener);
     }
    }
    else {
     // Remove non-matching listeners that originally came from
     // ApplicationListenerDetector, possibly ruled out by additional
     // BeanDefinition metadata (e.g. factory method generics) above.
     Object listener = beanFactory.getSingleton(listenerBeanName);
     if (retriever != null) {
      filteredListeners.remove(listener);
     }
     allListeners.remove(listener);
    }
   }
   catch (NoSuchBeanDefinitionException ex) {
    // Singleton listener instance (without backing bean definition) disappeared -
    // probably in the middle of the destruction phase
   }
  }
 }
 AnnotationAwareOrderComparator.sort(allListeners);
 if (retriever != null) {
  if (filteredListenerBeans.isEmpty()) {
   retriever.applicationListeners = new LinkedHashSet<>(allListeners);
   retriever.applicationListenerBeans = filteredListenerBeans;
  }
  else {
   retriever.applicationListeners = filteredListeners;
   retriever.applicationListenerBeans = filteredListenerBeans;
  }
 }
 return allListeners;
}
这段代码比较长,但是逻辑比较简单。
首先遍历之前收集到的所有 listener,调用 supportsEvent 方法去判断该 listener 是否支持当前事件,如果支持,则将之存入到 allListeners 集合中,同时,如果缓存对象 retriever 不为空,则往 filteredListeners 中也存一份监听器。
接下来遍历 listenerBeans,遍历的时候根据 supportsEvent 方法去判断该 listener 是否支持当前事件,如果支持,那么就获取到对应的 bean,如果这个 bean 是单例的,并且在存在缓存对象的的情况下,那么就将之存入到 filteredListeners 集合中,如果这个 bean 不是单例的,那么就把 beanName 存入到 filteredListenerBeans 集合中。当然,最终拿到的监听器对象也要存入到 allListeners 集合中。
最后还会做一个判断,如果缓存的 value 不为空,那么当 filteredListenerBeans 为空就表示不存在非单例的监听器,所有的监听器都是单例的,即 allListeners 中不存在重复的 Bean,那么直接将 allListeners 转为 hashset 即可,否则说明有多例的监听器,那么就意味着 allListeners 集合中存在重复的 bean,此时就把 filteredListeners 集合赋值给缓存对象的 applicationListeners 属性即可。
这就是查找匹配的监听器的大致过程。这里还涉及到一个比较重要的方法 supportsEvent,这个是判断监听器是否匹配的具体方法,这有三个重载的方法,前两个重载方法都属于初步校验,如果校验通过,第三个重载方法做最终校验。
- supportsEvent(ConfigurableBeanFactory, String, ResolvableType):这个方法是根据 beanName 判断某一个 bean 是否满足条件,这只是一个初步判断,并不是最终的判断,判断的逻辑就是如果当前 bean 是 GenericApplicationListener 或者 SmartApplicationListener 类型,就算是匹配的,否则就去判断当前的事件类型和事件处理器上的泛型是否匹配。
- supportsEvent(Class<?>, ResolvableType):这个方法是判断当前事件监听器类型是否和事件类型相匹配。
- supportsEvent(ApplicationListener, ResolvableType, Class):这个是做最终的评估,这里会把事件监听器转为 GenericApplicationListener 类型,然后分别判断事件类型和 source 类型,满足条件就是目标事件监听器了。
一般来说,通过继承类的方式开发的事件监听器,要走前两个方法,如果是通过注解定义的事件监听器,直接走第三个方法。
好啦,这就是 Spring 中事件的玩法啦,感兴趣的小伙伴可以自行 DEBUG 看下哦~
