11-微信小程序授权登录
原创1. 微信小程序授权登录
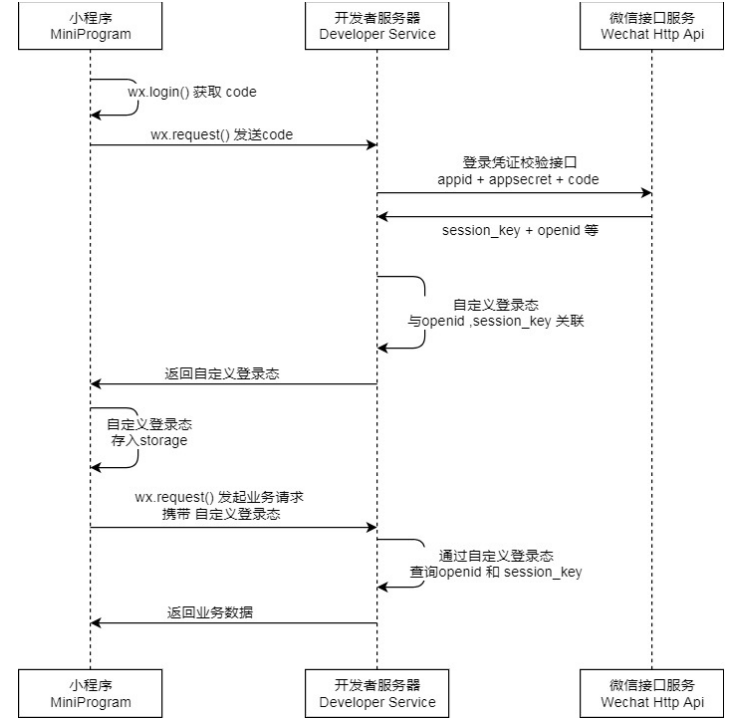
小程序可以通过微信官方提供的登录能力方便地获取微信提供的用户身份标识,快速建立小程序内的用户体系。 登录流程:
说明:
调用 wx.login()获取 临时登录凭证code ,并回传到开发者服务器。 调用 code2Session 接口,换取 用户唯一标识 OpenID 和 会话密钥 session_key。
之后开发者服务器可以根据用户标识来生成自定义登录态,用于后续业务逻辑中前后端交互时识别用户身份。
注意:
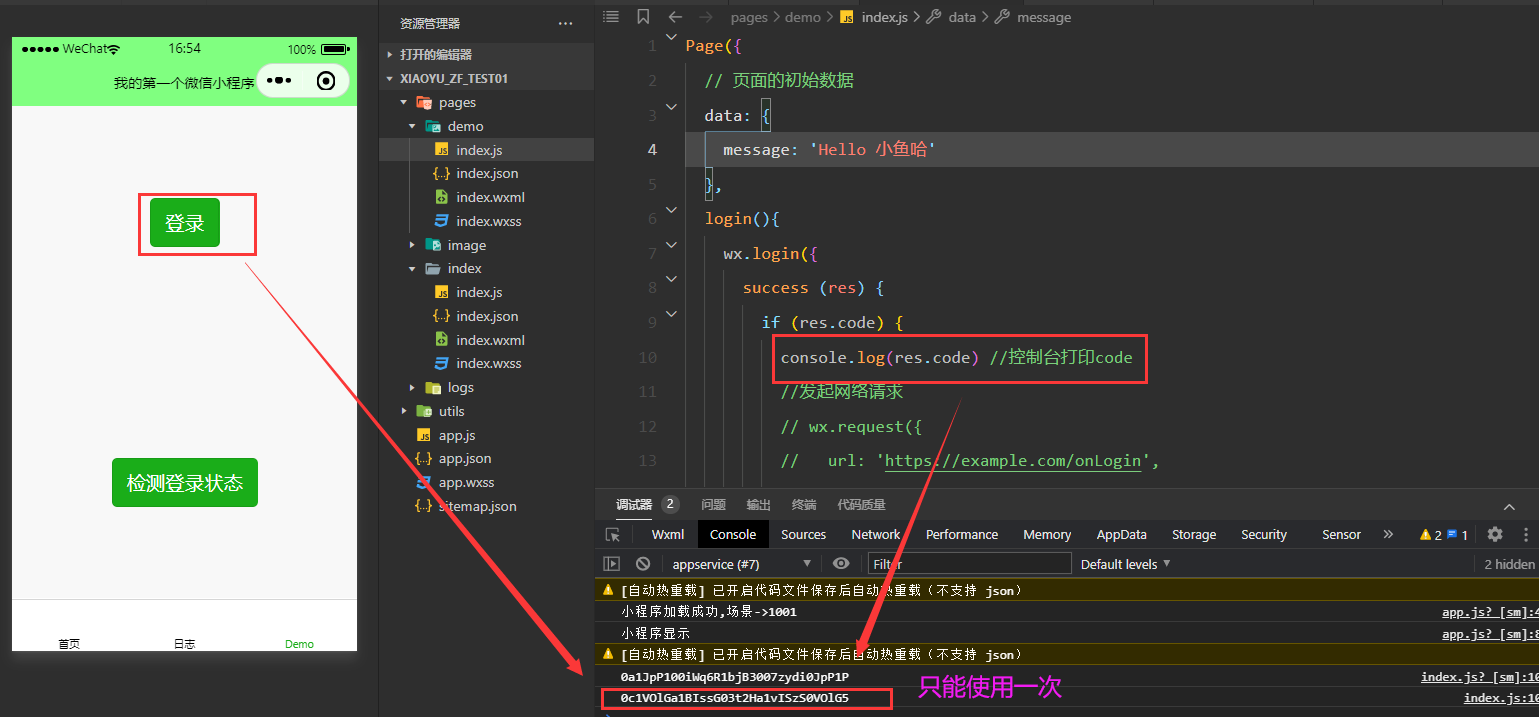
会话密钥 session_key 是对用户数据进行 加密签名的密钥。为了应用自身的数据安全,开发者服务 器不应该把会话密钥下发到小程序,也不应该对外提供这个密钥。 <font color=red>临时登录凭证 code 只能使用一次</font>
wx.login(Object object)
以 Promise 风格 调用:不支持
小程序插件:支持,需要小程序基础库版本不低于 2.3.1
在小程序插件中使用时,需要在用户信息功能页中获得用户授权或满足一定条件后调用。否则将返回 fail。详见 用户信息功能页
微信 Windows 版:支持
微信 Mac 版:支持
相关文档: 小程序登录、UnionID 机制说明、接口调用频率规范
功能描述
调用接口获取登录凭证(code)。通过凭证进而换取用户登录态信息,包括用户在当前小程序的唯一标识(openid)、微信开放平台账号下的唯一标识(unionid,若当前小程序已绑定到微信开放平台账号)及本次登录的会话密钥(session_key)等。用户数据的加解密通讯需要依赖会话密钥完成。
参数
Object object
属性 | 类型 | 默认值 | 必填 | 说明 | 最低版本 |
|---|---|---|---|---|---|
timeout | number | 否 | 超时时间,单位ms | ||
success | function | 否 | 接口调用成功的回调函数 | ||
fail | function | 否 | 接口调用失败的回调函数 | ||
complete | function | 否 | 接口调用结束的回调函数(调用成功、失败都会执行) |
object.success 回调函数
参数
Object res
属性 | 类型 | 说明 |
|---|---|---|
code | string | 用户登录凭证(有效期五分钟)。开发者需要在开发者服务器后台调用 code2Session,使用 code 换取 openid、unionid、session_key 等信息 |
object.fail 回调函数
参数
Object err
示例代码
wx.login({
  success (res) {
    if (res.code) {
      //发起网络请求
      wx.request({
        url: 'https://example.com/onLogin',
        data: {
          code: res.code
        }
      })
    } else {
      console.log('登录失败!' + res.errMsg)
    }
  }
})
请求服务器地址

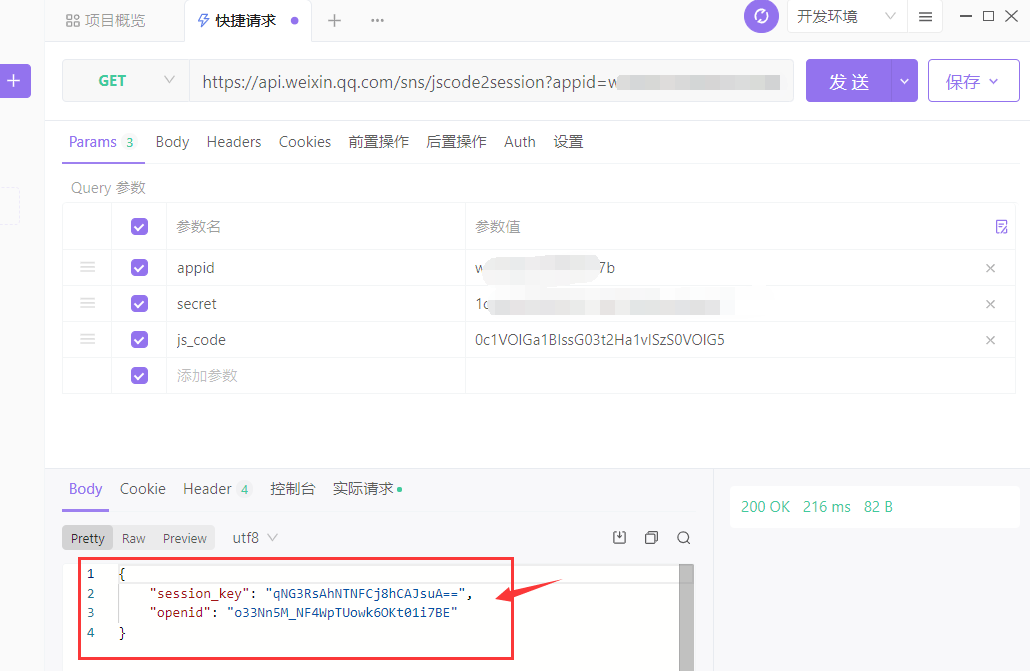
GET https://api.weixin.qq.com/sns/jscode2session?appid=APPID&secret=SECRET&js_code=JSCODE&grant_type=authorization_code - appid
- secret
- js_code
编写小程序端代码
<!--index.wxml-->
<view class="container">
  <button type="primary" bindtap="login">登录</button>
  <button type="primary" bindtap="checkLogin">检测登录状态</button>
</view>
index.js 打印code
Page({
  // 页面的初始数据
  data: {
    message: 'Hello 小鱼'
  },
  login(){
    wx.login({
      success (res) {
        if (res.code) {
          console.log(res.code) //控制台打印code
          //发起网络请求
          // wx.request({
          //   url: 'https://example.com/onLogin',
          //   data: {
          //     code: res.code
          //   }
          // })
        } else {
          console.log('登录失败!' + res.errMsg)
        }
      }
    })
  }
})
拷贝代码 点击 【登录】控制台打印输出 jscode
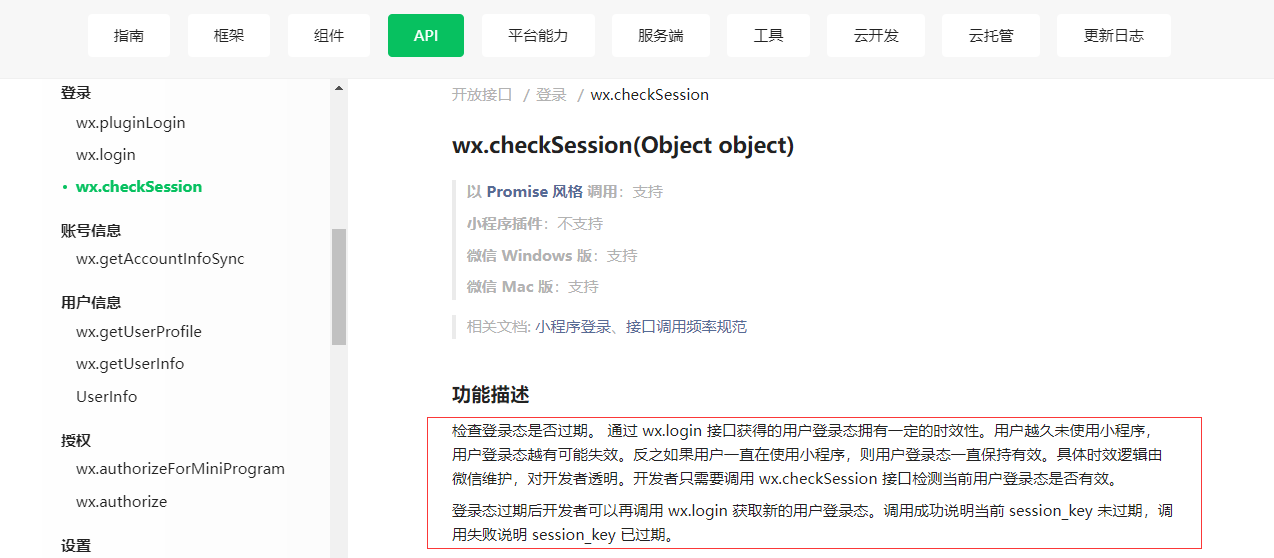
通过jscode 做校验
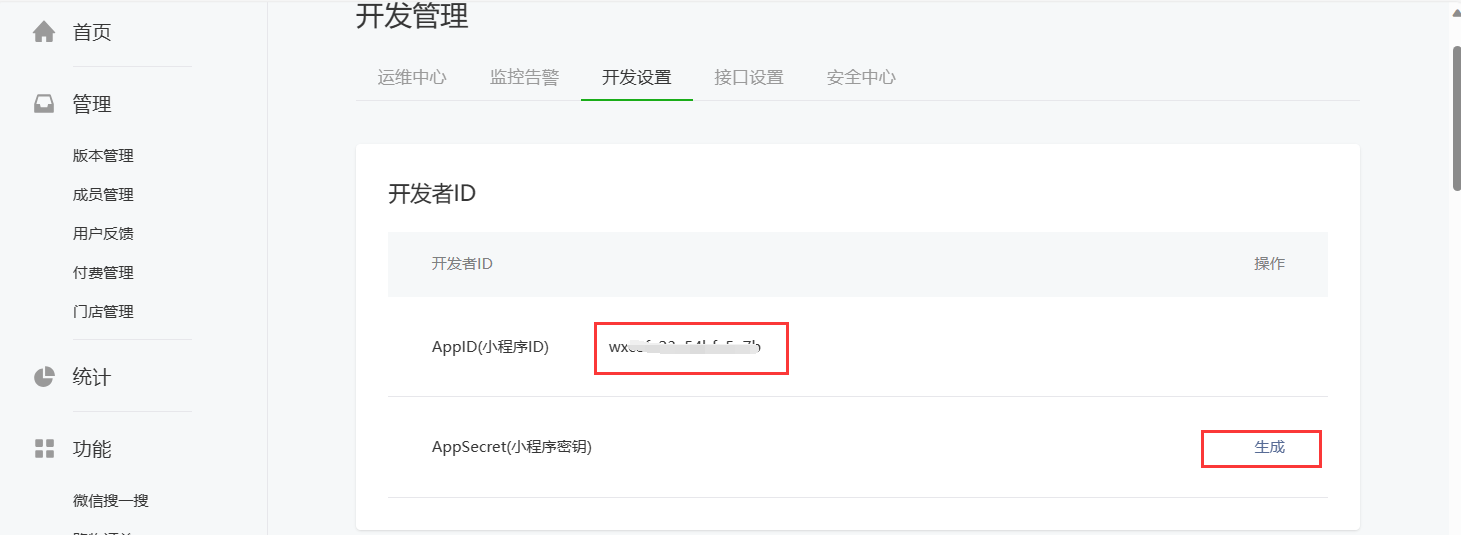
在【开发者管理】-【开发设置】下找到 appid
做一下测试

编写登录服务代码
编写Controller:
package cn.itcast.haoke.dubbo.api.controller;
import com.fasterxml.jackson.databind.JsonNode;
import org.apache.commons.codec.digest.DigestUtils;
import org.apache.commons.lang3.StringUtils;
import org.springframework.beans.factory.annotation.Autowired;
import org.springframework.data.redis.core.RedisTemplate;
import org.springframework.http.ResponseEntity;
import org.springframework.web.bind.annotation.PostMapping;
import org.springframework.web.bind.annotation.RequestMapping;
import org.springframework.web.bind.annotation.RequestParam;
import org.springframework.web.bind.annotation.RestController;
import org.springframework.web.client.RestTemplate;
import java.time.Duration;
import java.util.HashMap;
import java.util.Map;
@RequestMapping("wx")
@RestController
public class WeiXinLoginController {
	@Autowired
	private RestTemplate restTemplate;
	@Autowired
	private RedisTemplate<String, String> redisTemplate;
	@PostMapping("login")
	public Map<String, Object> wxLogin(@RequestParam("code") String code) {
		Map<String, Object> result = new HashMap<>();
		result.put("status", 200);
		String appid = "wx4f50f6f7bfa******";
		String secret = "e5ac614ec01c3429fee7c6f*******";
		String url = "https://api.weixin.qq.com/sns/jscode2session?appid="
		             + appid
		             + "&secret=" + secret
		             + "&js_code=" + code
		             + "&grant_type=authorization_code";
		String resData = this.restTemplate.getForObject(url, String.class);
		if (StringUtils.contains(resData, "errcode")) {
// 登录失败
			result.put("status", 500);
			result.put("msg", "登录失败");
			return result;
		}
		String ticket = "HAOKE_" + DigestUtils.md5Hex(resData);
		String redisKey = "WX_LOGIN_" + ticket;
		this.redisTemplate.opsForValue().set(redisKey, resData,
		                                     Duration.ofDays(7));
		result.put("data", ticket);
		return result;
	}
}
配置RestTemplate:
package cn.itcast.haoke.dubbo.api.config;
import org.springframework.context.annotation.Bean;
import org.springframework.context.annotation.Configuration;
import org.springframework.web.client.RestTemplate;
@Configuration
public class HaoKeConfig {
	@Bean
	public RestTemplate restTemplate() {
		return new RestTemplate();
	}
}
index.js 完整代码
Page({
  // 页面的初始数据
  data: {
    message: 'Hello 小鱼哈'
  },
  checkLogin() {
    const _this = this;
    wx.checkSession({
      success() {
        // session_key 未过期,并且在本生命周期一直有效
        wx.showToast({
          title: '处于登录状态',
          icon: 'success',
          duration: 2000
        });
      },
      fail() {
        wx.showToast({
          title: '登录已失效!',
          icon: 'none',
          duration: 2000
        });
        _this.login() // 重新登录
      }
    })
  },
  login() {
    wx.login({
      success(res) {
        console.log(res);
        if (res.code) {
          // 发起网络请求
          wx.request({
            url: 'http://127.0.0.1:18080/wx/login',
            method: "POST",
            header: {
              "content-type": "application/x-www-form-urlencoded"
            },
            data: {
              code: res.code
            },
            success: function (data) {
              if (data.data.status == 200) {
                wx.setStorage({
                  key: 'TICKET',
                  data: data.data.data
                });
                wx.showToast({
                  title: '登录成功',
                  icon: 'success',
                  duration: 2000
                });
              } else {
                wx.removeStorage({
                  key: 'TICKET'
                });
                wx.showToast({
                  title: '登录失败!',
                  icon: 'none',
                  duration: 2000
                })
              }
            }
          })
        } else {
          console.log('登录失败!' + res.errMsg)
        }
      }
    })
  },
})
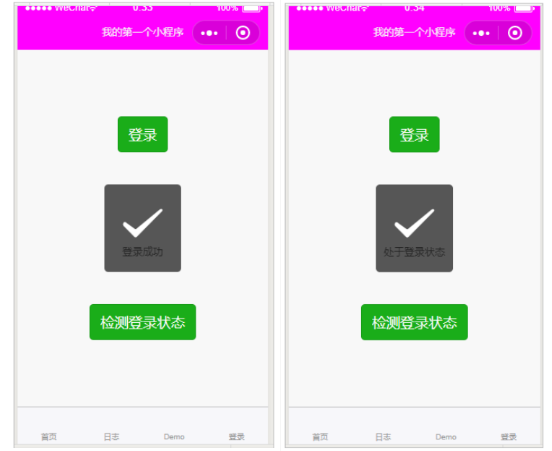
效果
2. 实现租房项目首页
实现方案
关于使用小程序开发项目,往往会有2种方案,
- 一种是使用小程序原生api进行开发,
- 另外一种是在小程序中嵌入 htm5页面进行开发。 在小程序中嵌入html5功能是通过web-view实现的。
在小程序中嵌入html5功能是通过web-view实现的。
web-view 组件是一个可以用来承载网页的容器,会自动铺满整个小程序页面。个人类型与海外类型的小程序 暂不支持使用。 文档:https://developers.weixin.qq.com/miniprogram/dev/component/web-view.html
优缺点对比:
- 小程序api开发
- 优点
- 显示、体验效果好
- 可使用的微信资源、接口丰富
- 响应速度快
- 缺点
- 开发方面,需要多开发一套项目
- 小程序自成一派,如有缺陷,解决起来费时费力
- 优点
- 嵌入html5
- 优点
- 无需专门开发一套小程序版本项目
- 更新同步
- 开发速度快
- 缺点
- 能够使用的微信资源受限
- 体验比原生略差
- 优点
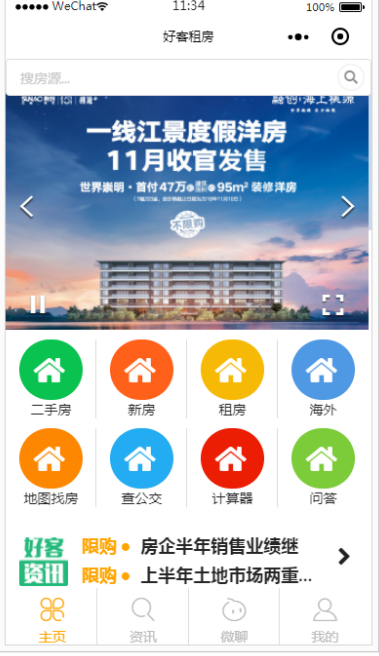
采用web-view实现
<!--index.wxml-->
<web-view src="http://127.0.0.1:9000/"></web-view>
效果
原创声明:本文系作者授权腾讯云开发者社区发表,未经许可,不得转载。
如有侵权,请联系 cloudcommunity@tencent.com 删除。
原创声明:本文系作者授权腾讯云开发者社区发表,未经许可,不得转载。
如有侵权,请联系 cloudcommunity@tencent.com 删除。


