CloudStudio之ComfyUI上使用Wan2.1输出高质量视频
CloudStudio之ComfyUI上使用Wan2.1输出高质量视频

CloudStudio
发布于 2025-03-13 20:05:13
发布于 2025-03-13 20:05:13
原文链接:https://itq5.com/posts/comfyui_wan
就在2月25日,阿里开源了Wan2.1模型的模型文件和代码以及权重。今天咋们就使用CloudStudio是一个免费提供10000分钟的开箱及用的一个AI应用平台,可免费运行T4显卡,滴滴滴,快上车。
1 环境准备
- 浏览器打开Cloud Studio的官网Cloud Studio
- 使用微信等账号登录网站后,点击“高性能工作空间”

- 点击右侧“新建”按钮。

- 选择“基础型”或“HAI进阶型”。基础性每个月10000分钟免费时长。
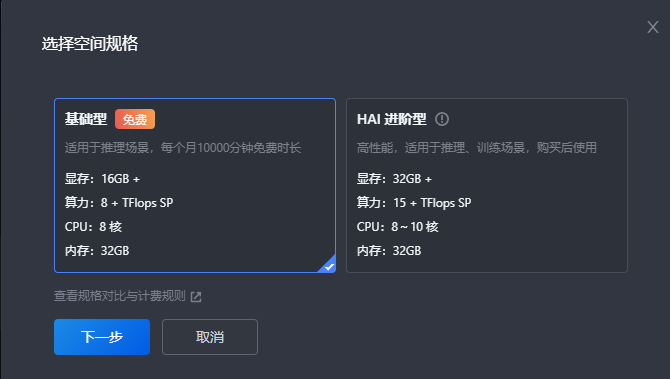
- 输入“空间名称”以及选择“应用模版”为
Pytorch2.0.0后点击“新建”。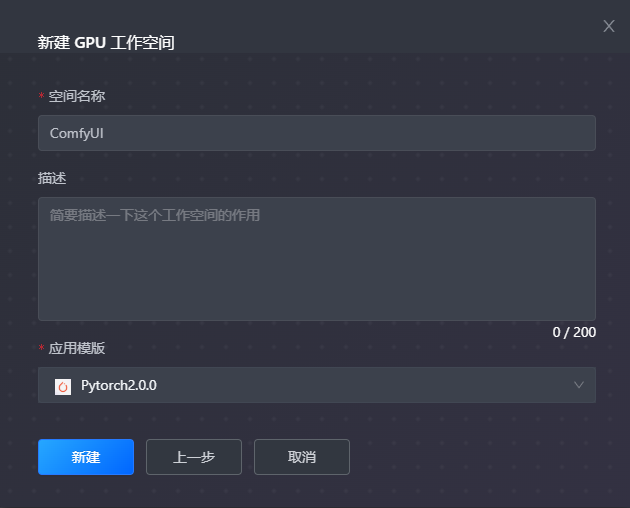
- 待新建的空间显示“运行中”后点击名称,跳转IDE环境。

2 部署前环境检查
- 点击IDE环境顶部“终端”>“新建终端”。
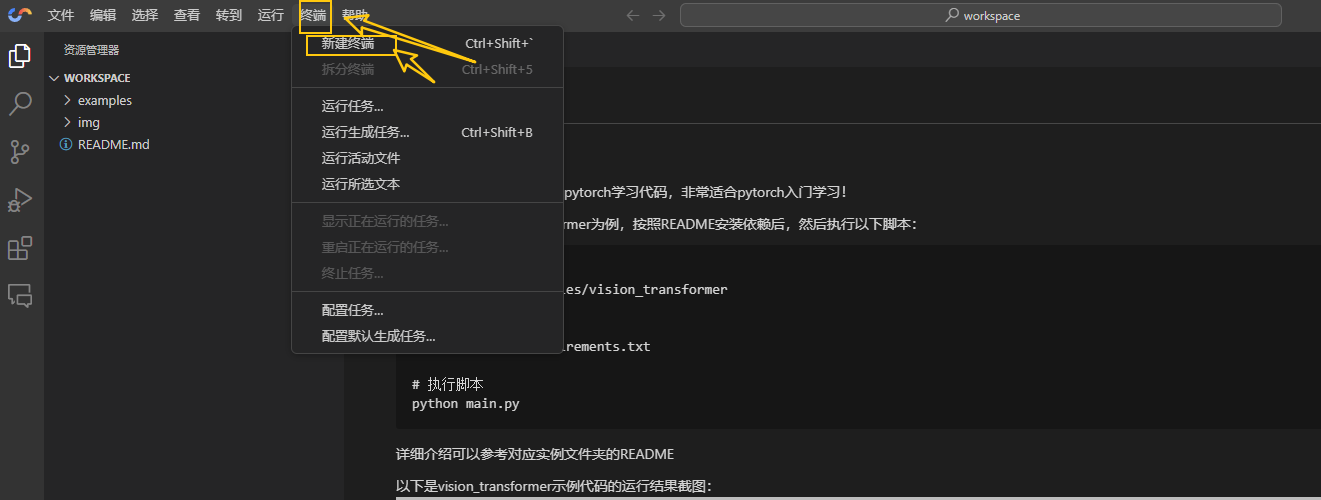
- 在弹出的终端界面,输入
nvidia-smi检查显卡型号、CUDA版本等信息。(base) root@VM-0-224-ubuntu:/workspace# nvidia-smi Sun Mar 2 15:09:23 2025 +-----------------------------------------------------------------------------+ | NVIDIA-SMI 525.105.17 Driver Version: 525.105.17 CUDA Version: 12.0 | |-------------------------------+----------------------+----------------------+ | GPU Name Persistence-M| Bus-Id Disp.A | Volatile Uncorr. ECC | | Fan Temp Perf Pwr:Usage/Cap| Memory-Usage | GPU-Util Compute M. | | | | MIG M. | |===============================+======================+======================| | 0 Tesla T4 On | 00000000:00:09.0 Off | Off | | N/A 45C P0 26W / 70W | 12987MiB / 16384MiB | 0% Default | | | | N/A | +-------------------------------+----------------------+----------------------+ +-----------------------------------------------------------------------------+ | Processes: | | GPU GI CI PID Type Process name GPU Memory | | ID ID Usage | |=============================================================================| +-----------------------------------------------------------------------------+3 部署ComfyUI项目
3.1 配置环境
本案例依赖Python3.11.11及以上环境,因此我们首先创建虚拟环境:
conda clean -i

conda create -n python-3.11.11 python=3.11.11 -y --override-channels --channel https://mirrors.tuna.tsinghua.edu.cn/anaconda/pkgs/main
3.2 安装基础依赖库
/root/miniforge3/envs/python-3.11.11/bin/pip install --upgrade pip

/root/miniforge3/envs/python-3.11.11/bin/pip install torch==2.0.1 torchvision==0.15.2 torchaudio==2.0.2

/root/miniforge3/envs/python-3.11.11/bin/pip install diffusers==0.30.0 transformers==4.44.0 accelerate==0.33.0 peft==0.12.0 gradio==3.41.2 safetensors==0.4.2 controlnet-aux==0.0.9 mediapipe==0.10.14 xformers==0.0.21 sentencepiece==0.2.0

/root/miniforge3/envs/python-3.11.11/bin/pip install python-multipart==0.0.13 ipywidgets==7.7.1
3.3 配置加速
git config --global http.proxy http://proxy.cloudstudio.work:8081
git config --global https.proxy http://proxy.cloudstudio.work:8081
export http_proxy=http://proxy.cloudstudio.work:8081
export HTTP_PROXY=http://proxy.cloudstudio.work:8081
export https_proxy=http://proxy.cloudstudio.work:8081
export HTTPS_PROXY=http://proxy.cloudstudio.work:8081
3.4 拉取ComfyUI软件包
cd /workspace/ && git clone https://github.com/comfyanonymous/ComfyUI.git3.5 安装ComfyUI依赖库
cd /workspace/ComfyUI
/root/miniforge3/envs/python-3.11.11/bin/pip install -r requirements.txt
/root/miniforge3/envs/python-3.11.11/bin/pip install sentencepiece
3.6 拉取工作流模板
mkdir -p /workspace/ComfyUI/user/default/workflows
cd /workspace/ComfyUI/user/default/workflows
git clone https://github.com/yolain/ComfyUI-Yolain-Workflows.git
git clone https://github.com/ZHO-ZHO-ZHO/ComfyUI-Workflows-ZHO.git
3.7 安装插件
cd /workspace/ComfyUI/custom_nodes

git clone https://github.com/AIGODLIKE/AIGODLIKE-COMFYUI-TRANSLATION.git

git clone https://github.com/talesofai/comfyui-browser.git

git clone https://github.com/AlekPet/ComfyUI_Custom_Nodes_AlekPet.git

git clone https://github.com/ltdrdata/ComfyUI-Manager.git

git clone https://github.com/11cafe/comfyui-workspace-manager.git

git clone https://github.com/siliconflow/BizyAir.git

git clone https://github.com/crystian/ComfyUI-Crystools.git

git clone https://github.com/pythongosssss/ComfyUI-Custom-Scripts.git

git clone https://github.com/city96/ComfyUI-GGUF.git

git clone https://github.com/Kosinkadink/ComfyUI-VideoHelperSuite.git

git clone https://github.com/kijai/ComfyUI-WanVideoWrapper.git

cd /workspace/ComfyUI/custom_nodes/ComfyUI-Custom-Scripts/user && wget https://raw.githubusercontent.com/byzod/a1111-sd-webui-tagcomplete-CN/main/tags/Tags-zh-full-pack.csv && mv Tags-zh-full-pack.csv autocomplete.txt && wget https://gist.githubusercontent.com/pythongosssss/1d3efa6050356a08cea975183088159a/raw/a18fb2f94f9156cf4476b0c24a09544d6c0baec6/danbooru-tags.txt && cat danbooru-tags.txt >>  autocomplete.txt && rm -rf danbooru-tags.txt

cd /workspace/ComfyUI/custom_nodes/comfyui-workspace-manager/ && find . -type f -exec sed -i 's|https://civitai.com/api|https://civitai.work/api|g' {} +

cd /workspace/ComfyUI/custom_nodes/ComfyUI-GGUF && /root/miniforge3/envs/python-3.11.11/bin/pip install -r requirements.txt

cd /workspace/ComfyUI/custom_nodes/ComfyUI-Crystools && /root/miniforge3/envs/python-3.11.11/bin/pip install -r requirements.txt

cd /workspace/ComfyUI/custom_nodes/ComfyUI-VideoHelperSuite && /root/miniforge3/envs/python-3.11.11/bin/pip install -r requirements.txt

cd /workspace/ComfyUI/custom_nodes/ComfyUI-WanVideoWrapper && /root/miniforge3/envs/python-3.11.11/bin/pip install -r requirements.txt
3.8 启动服务
/root/miniforge3/envs/python-3.11.11/bin/python3 /workspace/ComfyUI/main.py4 打开ComfyUI面板
启动后默认监听8188端口,直接在空间地址例如https://xxx.ap-singapore.cloudstudio.work/修改成https://xxx--8188.ap-singapore.cloudstudio.work/即可打开项目网站。
5 加载Wan 2.1工作流
- 浏览器打开ComfyUI-WanVideoWrapper/example_workflows at main · kijai/ComfyUI-WanVideoWrapper可以看到有4个工作流。
wanvideo_480p_I2V_example_01.json图片到视频wanvideo_T2V_example_01.json文字到视频wanvideo_long_T2V_example_01.json长文字到视频wanvideo_vid2vid_example_01.json视频到视频 - 这里我们先演示
wanvideo_T2V_example_01.json文字到视频,先下载这个工作流到本地。
- 工作流拖入ComfyUI面板中加载。
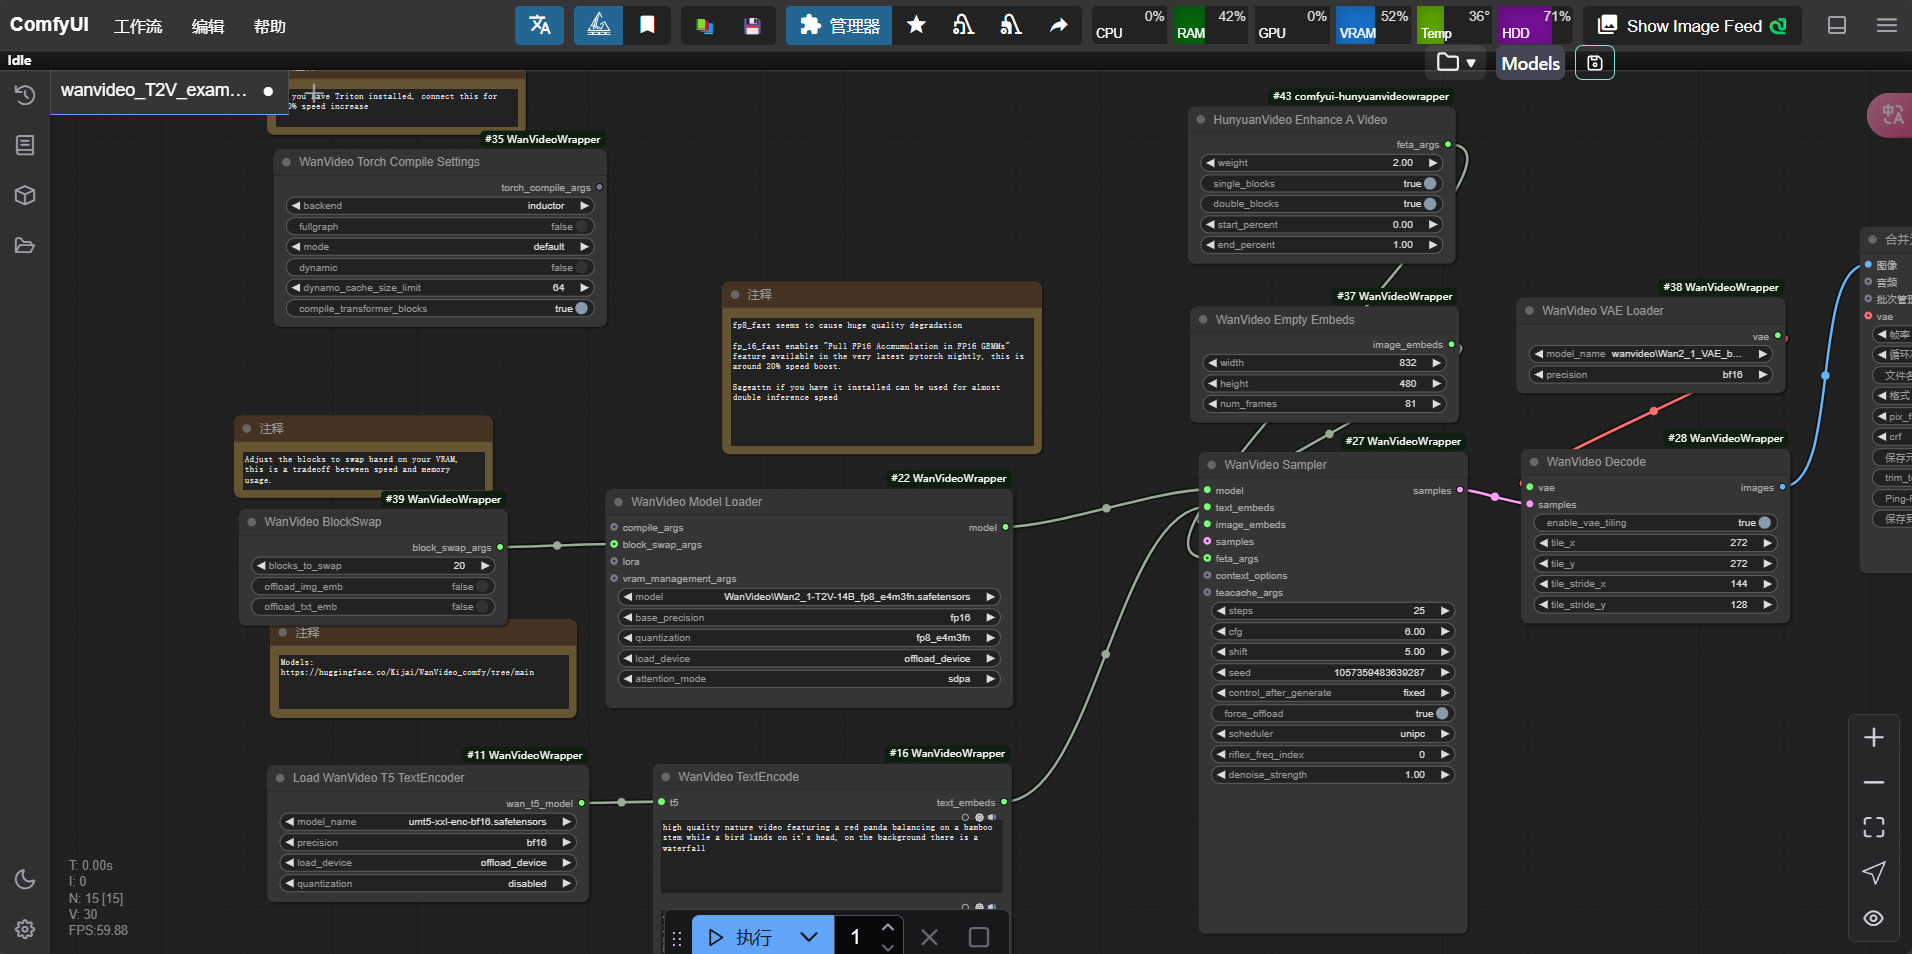
6 下载Wan2.1模型
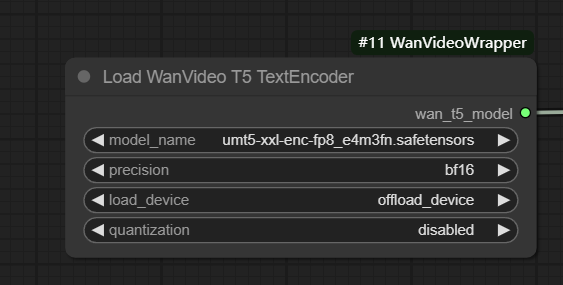
- 执行如下命令,下载clip模型文件
aria2c -x 16 -s 16 "https://huggingface.co/Kijai/WanVideo_comfy/resolve/main/umt5-xxl-enc-fp8_e4m3fn.safetensors" -o umt5-xxl-enc-fp8_e4m3fn.safetensors -d /workspace/ComfyUI/models/clip/ - 执行如下命令,下载diffusion_models模型文件
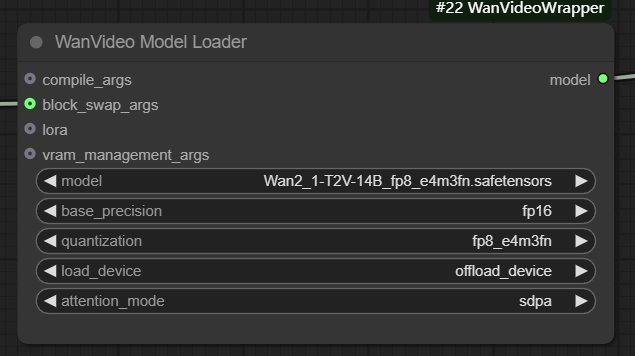
aria2c -x 16 -s 16 "https://huggingface.co/Kijai/WanVideo_comfy/resolve/main/Wan2_1-T2V-14B_fp8_e4m3fn.safetensors" -o Wan2_1-T2V-14B_fp8_e4m3fn.safetensors -d /workspace/ComfyUI/models/diffusion_models - 执行如下命令,下载vae模型文件
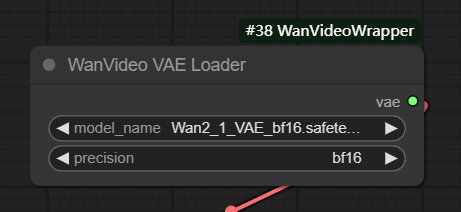
aria2c -x 16 -s 16 "https://huggingface.co/Kijai/WanVideo_comfy/resolve/main/Wan2_1_VAE_bf16.safetensors" -o Wan2_1_VAE_bf16.safetensors -d /workspace/ComfyUI/models/vae - 如果是I2V则还需要导入clip_vision模型文件
aria2c -x 16 -s 16 "https://huggingface.co/Kijai/WanVideo_comfy/resolve/main/open-clip-xlm-roberta-large-vit-huge-14_visual_fp16.safetensors" -o open-clip-xlm-roberta-large-vit-huge-14_visual_fp16.safetensors -d /workspace/ComfyUI/models/clip_vision
7 工作流中模型确认
当模型都下载完成后,切换到工作流界面,将模型文件进行一一选择。
- clip模型选择
 notion image
 - diffusion_models模型选择
 notion image
 - vae模型选择
 notion image
8 执行

notion image
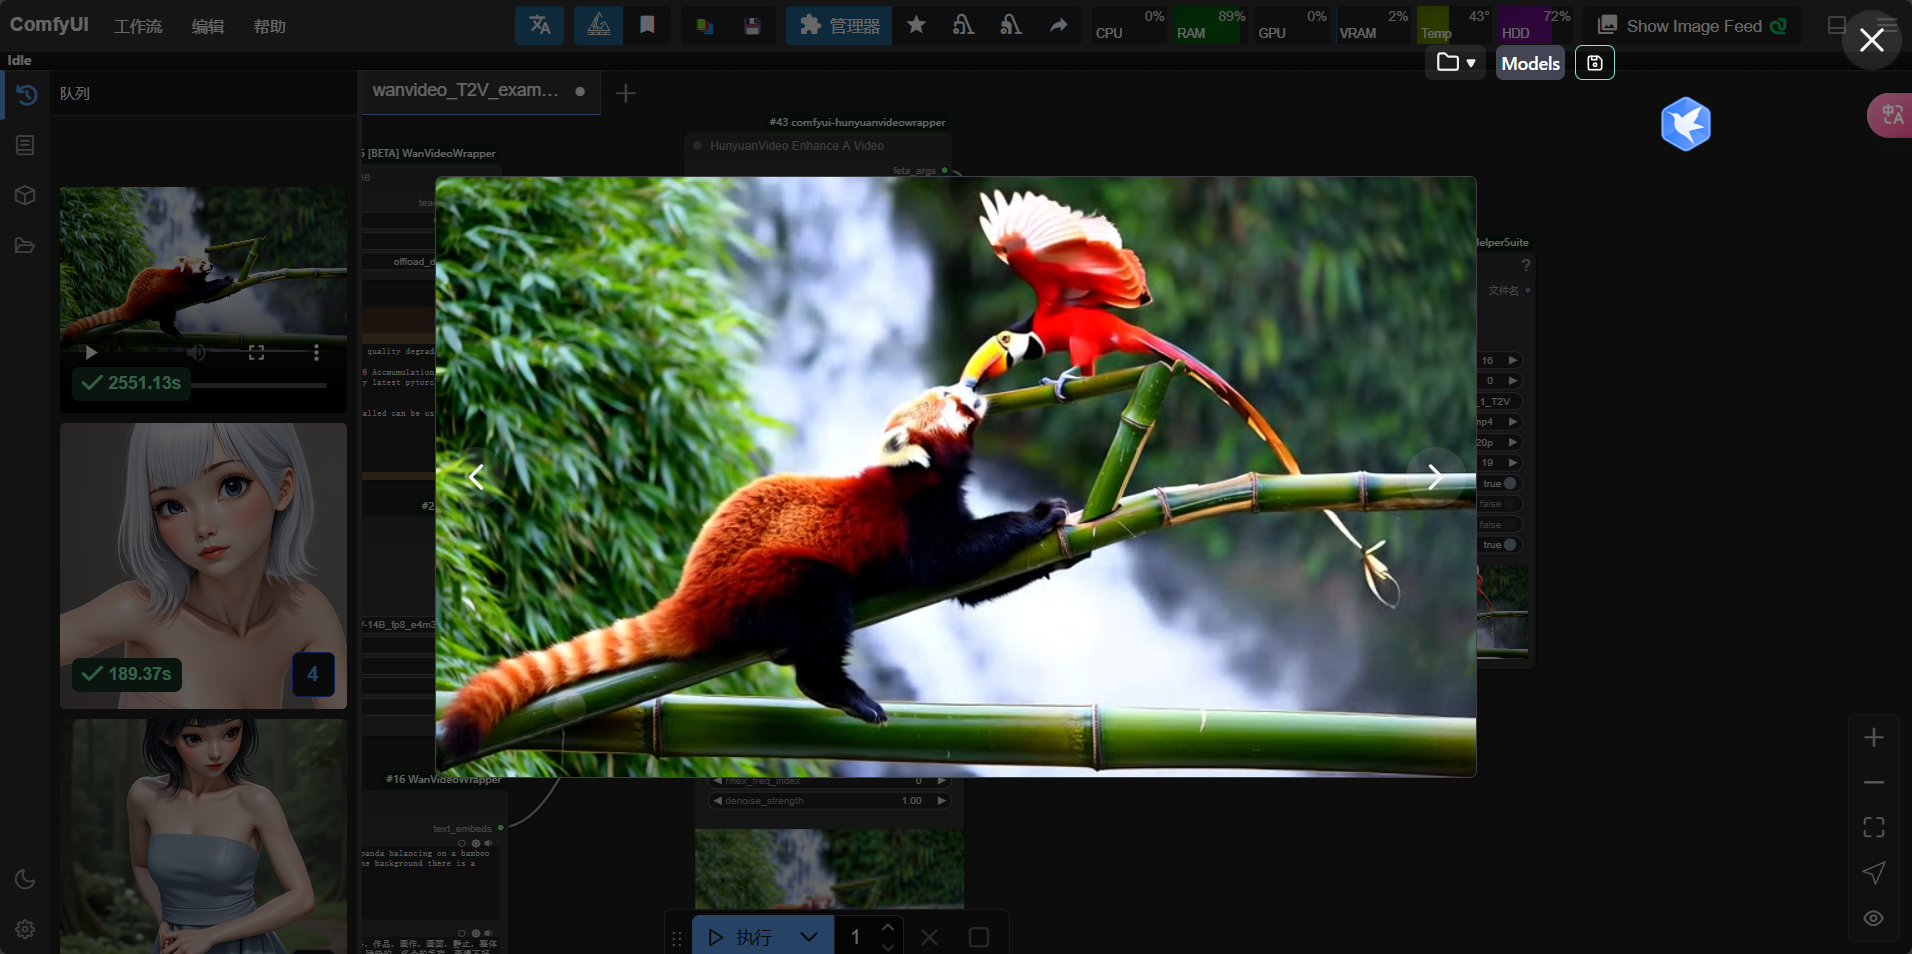
9 预览视频
notion image
END
免责声明:
- 笔者水平有限,尽管经过多次验证和检查,尽力确保内容的准确性,但仍可能存在疏漏之处。敬请业界专家大佬不吝指教。
- 本文所述内容仅通过实战环境验证测试,读者可学习、借鉴,但严禁直接用于生产环境。由此引发的任何问题,作者概不负责!
本文系转载,前往查看
如有侵权,请联系 cloudcommunity@tencent.com 删除。
本文系转载,前往查看
如有侵权,请联系 cloudcommunity@tencent.com 删除。
评论
登录后参与评论
推荐阅读
目录

