【批量办公技巧】一键对多个Excel文件盖章(覆盖图片)
原创【批量办公技巧】一键对多个Excel文件盖章(覆盖图片)
原创
家庭Q秋-3993387644
修改于 2025-11-27 18:14:06
修改于 2025-11-27 18:14:06
视频演示
前言
大家好,我是老罗软件,最近公司有一批Excel文件,需要对每个excel都盖一个印章。单个excel是很容易操作的,但多个文件就相当耗费人力,今天老罗就是帮大家来解决这个问题的。
需求描述
对应有一批excel,里面是表格,需要在这个表格下部盖一个印章,我找了一个excel打开如下:
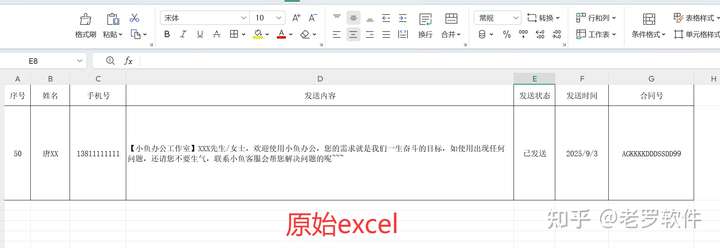
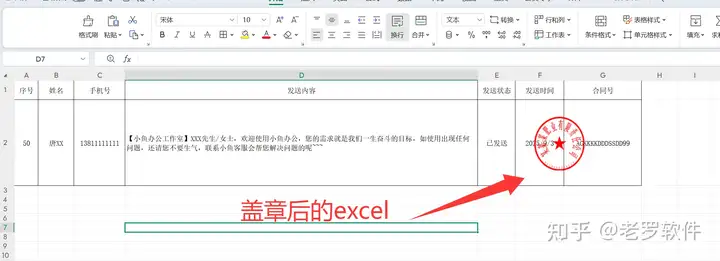
如果只有一个excel,我想人工操作还是很简单的,但是我有一批excel都需要这样操作:
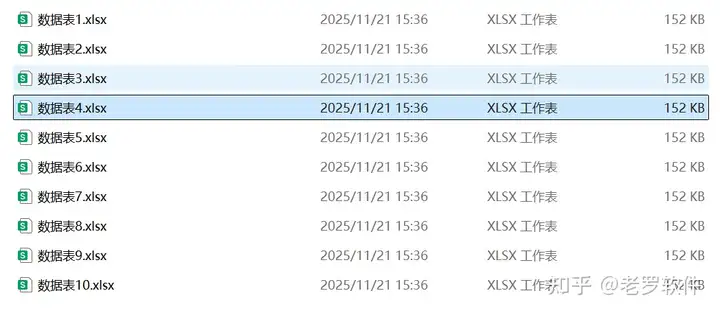
如果你想早点下班,抛开这些重复的繁琐步骤,节省更多时间充实自己,就请往下看。
解决方案
关注公众号:”老罗软件“ , 可以获取到解决方案软件下载。
这是一个专业解决excel多文件处理的方案, 找到 Excel功能大全, 然后在弹出的框里点击 ”盖章/覆盖图片“。

软件打开后, 我们设置好界面的参数:

下面我来详细介绍下参数意思。 Excel目录: 就是你要盖章的excel位置。 图片文件: 就是你的印章图片。 定位模式: 手动定位和单元格定位。 手动定位
自定通过预览的图片,然后手动放大缩小印章,以及指定印章位置, 但是这个有一个弊端,当excel的列宽都不一致时,会导致某些excel盖章的位置不是你想要的。这时我们就要用到“单元格定位”。 单元格定位
可以直接设置覆盖到哪个单元格,以及微调 距离顶部,左边的位置, 还可以微调印章图片大小。 设置好之后,点击开始处理, 程序会一条一条处理, 执行完,打开结果文件,随便选取一个结果excel,如下图:

所有的excel都被覆盖了印章了。
如果您有疑问可以一起来探讨,功能就介绍到 这里 ,希望能帮助大家,感谢!!!
技术实现
非技术人员不需要观看!! 这里设计到的技术复杂, 我也就就简单讲解实现原理。 软件是基于Python开发的现代化办公自动化软件,主要使用了如下技术架构: 1. PySide6 (Qt6) - 现代化GUI界面框架: 2. springboot: excel的数据脱敏是通过后端java实现的。 3. 文件处理:os.walk() - 递归遍历目录结构。 4. http请求: requests框架。 部分代码解析
项目的 开始 按钮,会开启一个QThread线程去处理,首先是获取excel目录, 然后通过os.walk遍历目录获取到所有文件,然后一个一个进行处理,处理的业务代码如下:
import base64
import os
import logging
from openpyxl import load_workbook
from openpyxl.drawing.image import Image
from PIL import Image as PILImage
import io

from api.excel_api import ExcelAPI
from utils.pdfs import PDFUtils


class ExcelZhangService:
    """Excel盖章服务类"""

    def __init__(self):
        self.logger = logging.getLogger(__name__)

        self.excel_api = ExcelAPI()


    @staticmethod
    def mk_out_dir(root_directory):
        # 创建输出目录 out
        out_directory = os.path.join(root_directory, "out")
        if not os.path.exists(out_directory):
            os.makedirs(out_directory)
        # 创建错误目录 error
        error_directory = os.path.join(root_directory, "error")
        if not os.path.exists(out_directory):
            os.makedirs(out_directory)

        return out_directory,error_directory

    def add_stamp_to_excel(self, output_format, excel_path, stamp_image_path, output_path=None, position=None, stamp_size_dic=None):
        """
        为Excel文件添加印章

        Args:
            output_format (str): 输出格式 ('Excel', '图片', 'PDF')
            excel_path (str): Excel文件路径
            stamp_image_path (str): 印章图片路径
            output_path (str): 输出路径
            position (dict): 位置信息,格式为:
                - 坐标模式: {'mode': 'coordinate', 'x': 100, 'y': 100}
                - 单元格模式: {'mode': 'cell', 'cell': 'D2', 'x_offset': 0, 'y_offset': 0}
            stamp_size (dict): 印章尺寸信息
        """
        stamp_size = (  stamp_size_dic.get('width') ,  stamp_size_dic.get('height'))
        cell_address = None
        pixel_x = None
        pixel_y = None
        x_offset = 0
        y_offset = 0

        # 处理位置参数兼容性
        if position.get('mode') == 'coordinate':
            # 坐标模式,直接返回像素坐标
            pixel_x = position.get('x')
            pixel_y = position.get('y')

        elif position.get('mode') == 'cell':
            # 单元格模式,需要转换为像素坐标
            cell_address = position.get('cell')
            # 获取偏移量
            x_offset = position.get('x_offset', 0)
            y_offset = position.get('y_offset', 0)
            cell_address = cell_address + "&("+str(x_offset) +","+str(y_offset)+")"

        if output_format == '图片':
            res = self.excel_api.add_img(excel_path, stamp_image_path, stamp_size, pixel_x, pixel_y, cell_address, x_offset, y_offset)
            if res.get('code') != 0:
                raise RuntimeError(res.get('msg'))
            ## 成功
            base64_str = res['data']
            imgdata = base64.b64decode(base64_str)
            base_name = os.path.basename(excel_path)  # 获取文件名(含扩展名)
            filename_without_ext = os.path.splitext(base_name)[0] + ".png"
            img_path = os.path.join(output_path, filename_without_ext)
            with open(img_path, 'wb') as f:
                f.write(imgdata)
            return

        if output_format == 'PDF':
            res = self.excel_api.add_img(excel_path, stamp_image_path, stamp_size, pixel_x, pixel_y, cell_address, x_offset, y_offset)
            if res.get('code') != 0:
                raise RuntimeError(res.get('msg'))
            ## 成功
            base64_str = res['data']
            imgdata = base64.b64decode(base64_str)
            base_name = os.path.basename(excel_path)  # 获取文件名(含扩展名)
            filename_without_ext = os.path.splitext(base_name)[0] + ".pdf"
            pdf_path = os.path.join(output_path, filename_without_ext)
            PDFUtils.images_to_pdf(imgdata, pdf_path)
            return

        # 转换成 excel
        base_name = os.path.basename(excel_path)  # 获取文件名(含扩展名)
        excel_save_path = os.path.join(output_path, base_name)
        self.excel_api.add_img_to_excel(excel_path, stamp_image_path, stamp_size, pixel_x, pixel_y, excel_save_path, cell_address, x_offset, y_offset)


    def _process_stamp_image(self, image_path, stamp_size=None):
        """
        处理印章图片,确保格式兼容

        Args:
            image_path (str): 图片路径
            stamp_size (tuple): 印章尺寸 (width, height),如果为None则使用原始尺寸

        Returns:
            io.BytesIO: 处理后的图片数据流
        """
        try:
            # 使用PIL打开图片
            pil_image = PILImage.open(image_path)

            # 转换为RGBA模式以支持透明度
            if pil_image.mode != 'RGBA':
                pil_image = pil_image.convert('RGBA')

            # 调整图片尺寸
            if stamp_size:
                pil_image = pil_image.resize(stamp_size, PILImage.Resampling.LANCZOS)

            # 将图片保存到内存中
            img_buffer = io.BytesIO()
            pil_image.save(img_buffer, format='PNG')
            img_buffer.seek(0)

            return img_buffer

        except Exception as e:
            self.logger.error(f"处理印章图片失败: {str(e)}")
            return None

    def _get_column_letter(self, col_num):
        """
        将列号转换为Excel列字母

        Args:
            col_num (int): 列号(从1开始)

        Returns:
            str: 列字母
        """
        result = ""
        while col_num > 0:
            col_num -= 1
            result = chr(col_num % 26 + ord('A')) + result
            col_num //= 26
        return result

    def batch_add_stamp(self, excel_files, stamp_image_path, output_dir=None, position=(100, 100)):
        """
        批量为Excel文件添加印章

        Args:
            excel_files (list): Excel文件路径列表
            stamp_image_path (str): 印章图片路径
            output_dir (str): 输出目录,如果为None则覆盖原文件
            position (tuple): 印章位置 (x像素, y像素)

        Returns:
            dict: 处理结果统计
        """
        results = {'success': 0, 'failed': 0, 'errors': []}

        for excel_file in excel_files:
            try:
                output_path = None
                if output_dir:
                    filename = os.path.basename(excel_file)
                    output_path = os.path.join(output_dir, filename)

                if self.add_stamp_to_excel(excel_file, stamp_image_path, output_path, position):
                    results['success'] += 1
                else:
                    results['failed'] += 1
                    results['errors'].append(f"处理失败: {excel_file}")

            except Exception as e:
                results['failed'] += 1
                results['errors'].append(f"处理异常 {excel_file}: {str(e)}")
                self.logger.error(f"批量处理异常: {str(e)}")

        return results

    def validate_excel_file(self, file_path):
        """
        验证Excel文件是否有效

        Args:
            file_path (str): 文件路径

        Returns:
            bool: 文件是否有效
        """
        try:
            if not os.path.exists(file_path):
                return False

            # 检查文件扩展名
            _, ext = os.path.splitext(file_path)
            if ext.lower() not in ['.xlsx', '.xlsm']:
                return False

            # 尝试加载工作簿
            workbook = load_workbook(file_path)
            workbook.close()
            return True

        except Exception:
            return False

    def validate_image_file(self, file_path):
        """
        验证图片文件是否有效

        Args:
            file_path (str): 文件路径

        Returns:
            bool: 文件是否有效
        """
        try:
            if not os.path.exists(file_path):
                return False

            # 检查文件扩展名
            _, ext = os.path.splitext(file_path)
            if ext.lower() not in ['.png', '.jpg', '.jpeg', '.bmp', '.gif']:
                return False

            # 尝试打开图片
            with PILImage.open(file_path) as img:
                img.verify()
            return True

        except Exception:
return False代码没有开源噢。如果您有技术合作意向,还请联系本人。今天就介绍到 这里 ,希望能帮助大家,感谢!!!
结尾语
单个excel覆盖图片,我们用wps这些有名的工具就可以了, 但是针对多文件批量一键处理还可以尝试我文章中的介绍方法,可以为你提高很大的工作效率,让你有时间充实自己,而不是像机器人一样做重复的工作,没有任何新的收获。 就说到这里了, 如帮助到你了,还请点个赞,感谢!!
原创声明:本文系作者授权腾讯云开发者社区发表,未经许可,不得转载。
如有侵权,请联系 cloudcommunity@tencent.com 删除。
原创声明:本文系作者授权腾讯云开发者社区发表,未经许可,不得转载。
如有侵权,请联系 cloudcommunity@tencent.com 删除。
评论
登录后参与评论
推荐阅读
目录

