QT常用控件(一)

QT常用控件(一)

夜雨声烦1413
发布于 2026-01-12 15:19:24
发布于 2026-01-12 15:19:24
1:控件概述
- Widget 是 Qt 中的核⼼概念. 英文原意是 "小部件", 我们此处也把它翻译为 "控件" . 控件是构成⼀个图形化界⾯的基本要素.
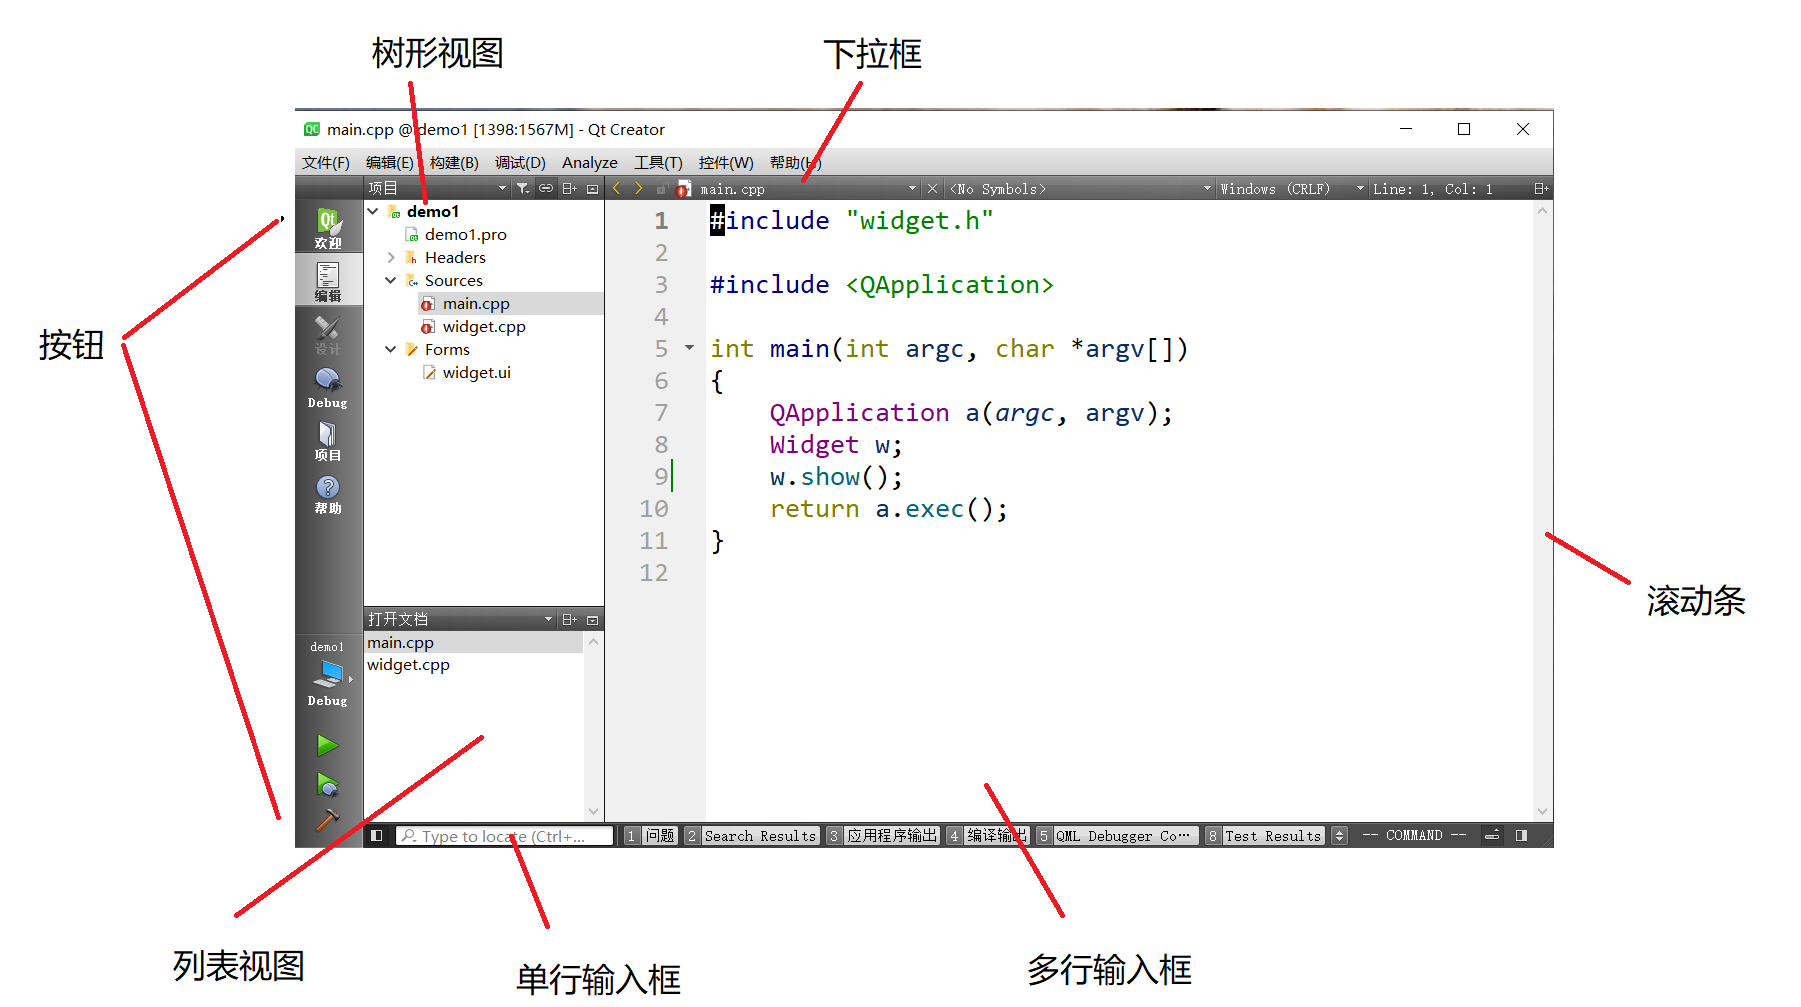
- 像上述示例中的, 按钮, 列表视图, 树形视图, 单行输入框, 多行输入框, 滚动条, 下拉框等, 都可以称为 "控件"
- Qt 作为⼀个成熟的 GUI 开发框架, 内置了大量的常⽤控件. 这⼀点在 Qt Designer 中就可以看到端倪.并且 Qt 也提供了 "⾃定义控件" 的能⼒, 可以让程序猿在现有控件不能满⾜需求的时候, 对现有控件做出扩展, 或者⼿搓出新的控件
综上, 学习 Qt, 其中⼀个很重要的任务就是熟悉并掌握 Qt 内置的常用控件. 这些控件对于我们快速开发出符合需求的界面, 是至关重要的.
1.1:控件体系的发展
控件是 GUI 开发中的通⽤概念. 不仅仅局限在 Qt 中.
第⼀阶段:
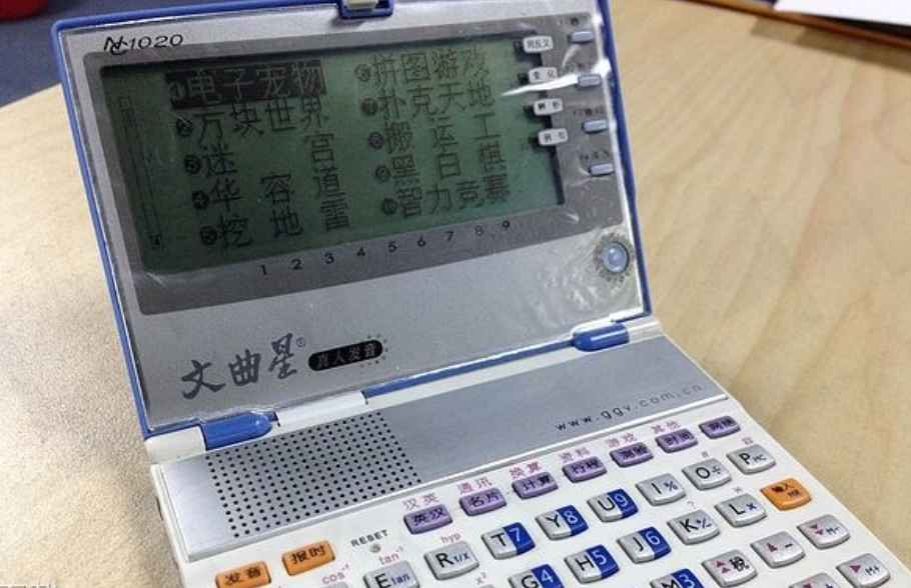
- 完全没有控件. 此时需要通过⼀些绘图 API 手动的绘制出按钮或者输⼊框等内容, 代码编写繁琐. 例如⽂曲星的 Lava 平台开发.
第⼆阶段:
- 只包含粗略的控件. 只是提供了按钮, 输⼊框, 单选框, 复选框等最常⽤的控件. 例如 html 的原⽣控件.
第三阶段:
- 更完整的控件体系, 基本可以覆盖到 GUI 开发中的大部分场景. 例如早期的 MFC, VB, C++ Builder, Qt, Delphi, 后来的 Android SDK, Java FX, 前端的各种 UI 库等.
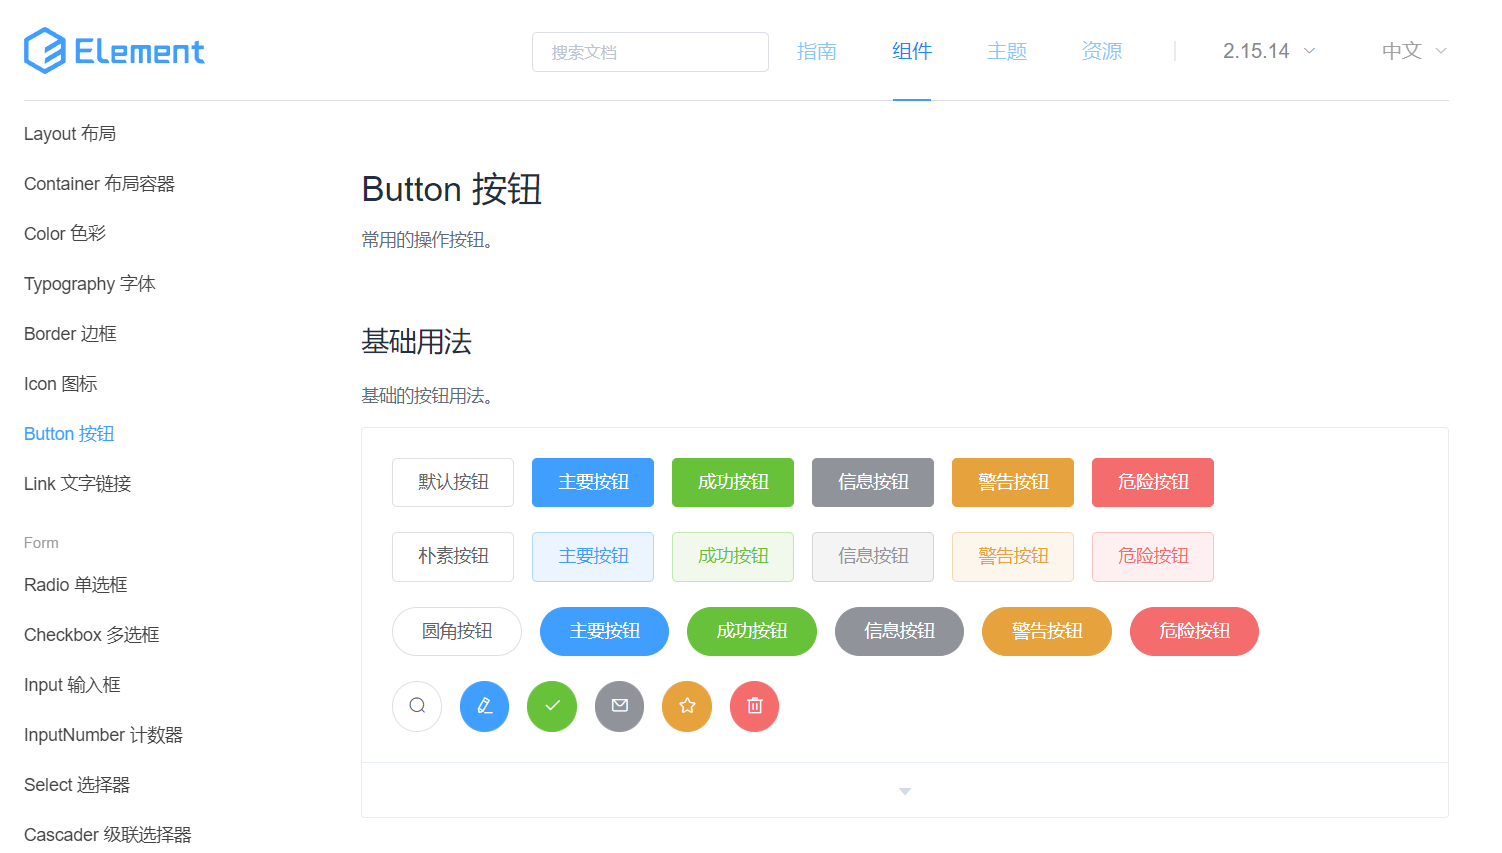
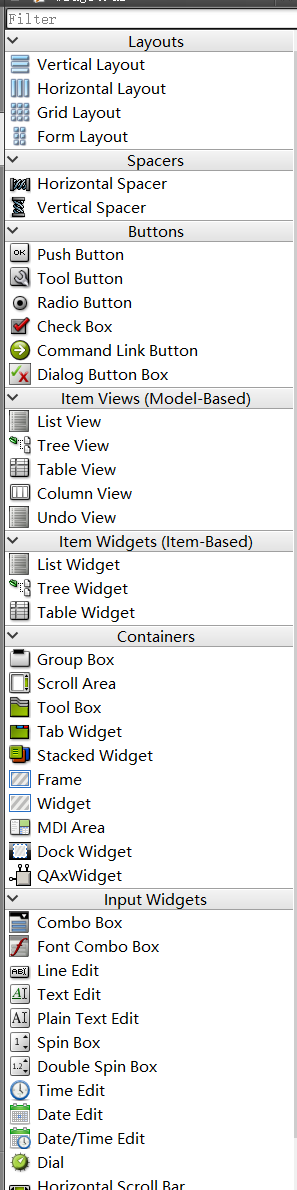
上图是前端中的 Element-ui 中的控件概览, ⽆论是丰富程度还是颜值, 都比Qt ⾃带的控件更胜⼀筹.
2:QWidget核心属性
- 在 Qt 中, 使⽤ QWidget 类表示 "控件". 像按钮, 视图, 输入框, 滚动条等具体的控件类, 都是继承自QWidget.可以说, QWidget 中就包含了 Qt 整个控件体系中, 通⽤的部分.
- 在 Qt Designer 中, 随便拖⼀个控件过来, 选中该控件, 即可在右下⽅看到 QWidget 中的属性
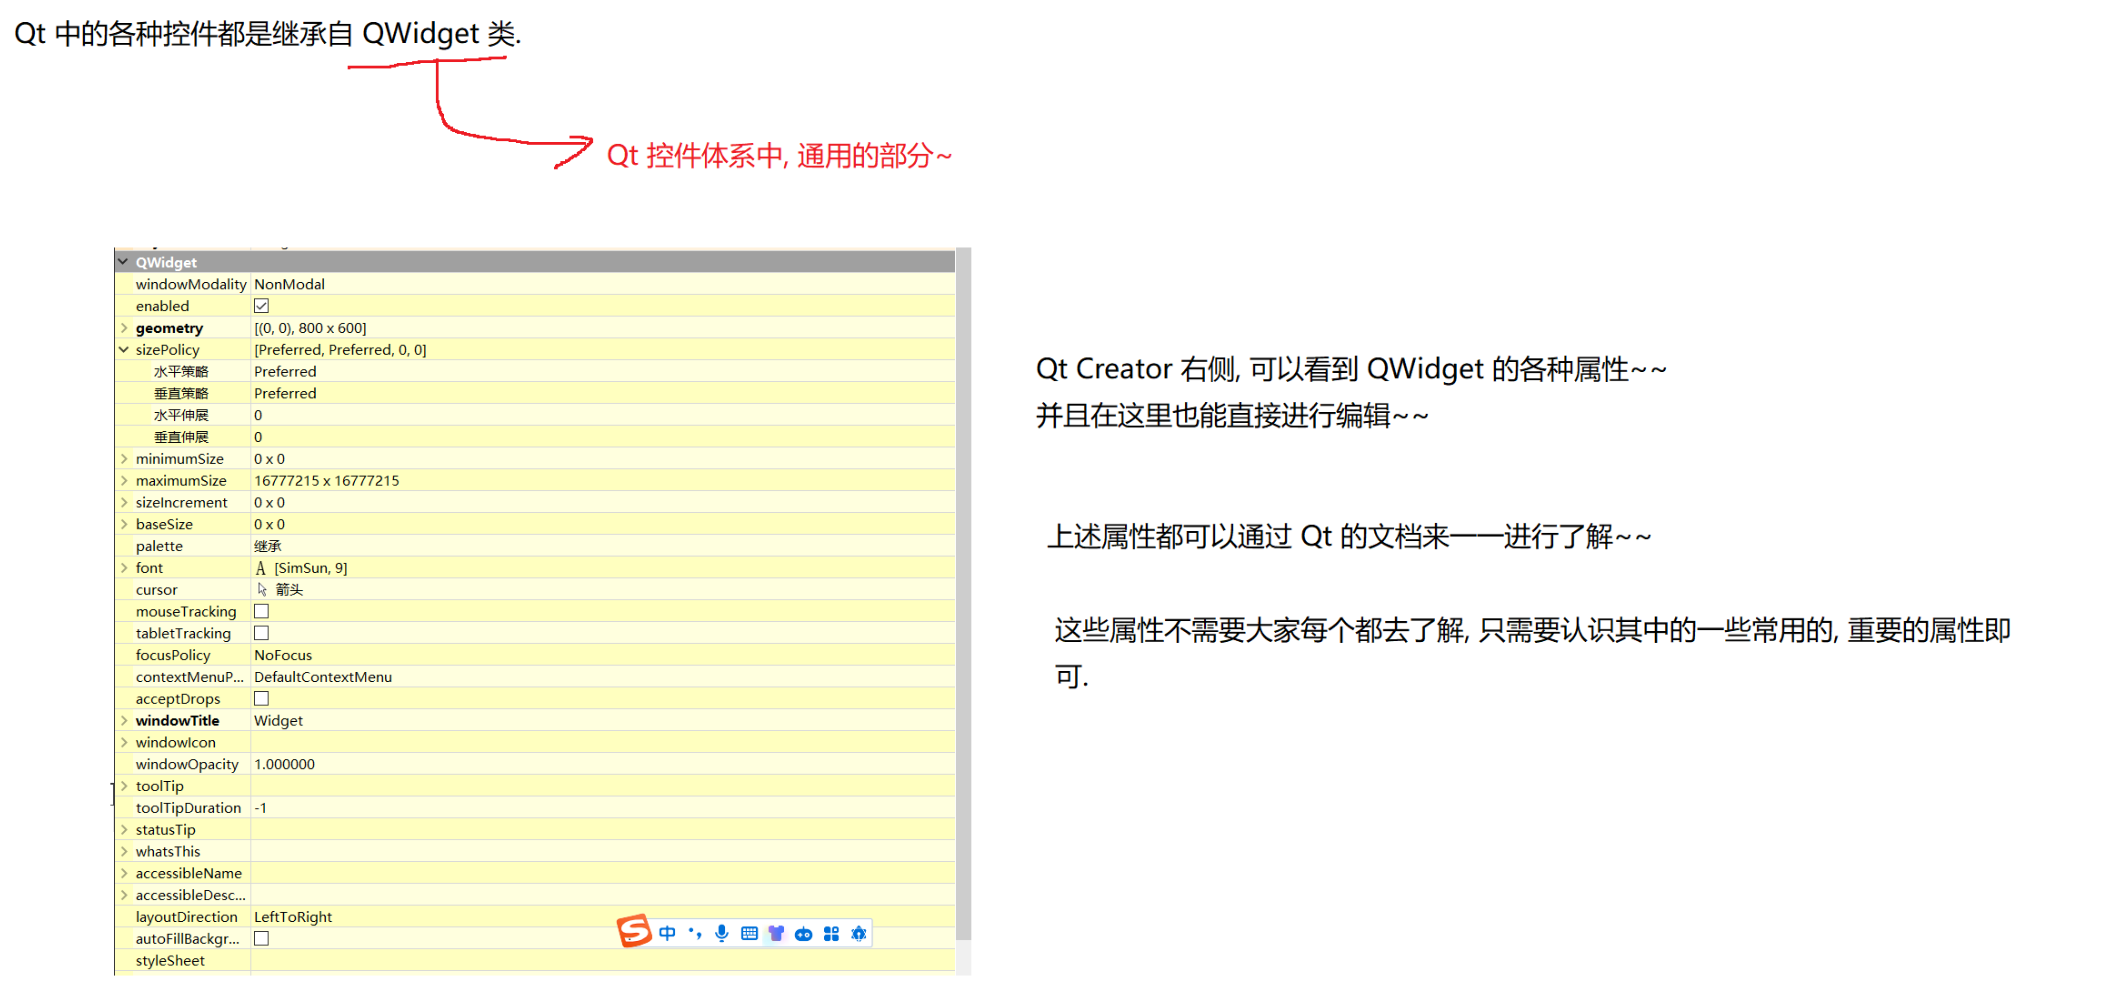
2.1:核心属性预览
下列表格列出了 QWidget 中的属性及其作⽤.
属性 | 作⽤ |
|---|---|
enabled | 设置控件是否可使⽤. true 表⽰可⽤, false 表⽰禁⽤. |
geometry | 位置和尺⼨. 包含 x, y, width, height 四个部分. 其中坐标是以⽗元素为参考进行设置的. |
windowTitle | 设置 widget 标题. |
windowIcon | 设置 widget 图标. |
windowOpacity | 设置 widget 透明度. |
cursor | ⿏标悬停时显示的图标形状. 是普通箭头, 还是沙漏, 还是⼗字等形状. 在 Qt Designer 界⾯中可以清楚看到可选项. |
font | 字体相关属性. 涉及到字体家族, 字体大小, 粗体, 斜体, 下划线等等样式. |
toolTip | ⿏标悬停在 widget 上会在状态栏中显示的提示信息. |
toolTipDuring | toolTip 显示的持续时间. |
statusTip | Widget 状态发⽣改变时显⽰的提⽰信息(⽐如按钮被按下等). |
- 所谓 "禁用" 指的是该控件不能接收任何用户的输入事件, 并且外观上往往是灰色的.
- 如果⼀个 widget 被禁用, 则该 widget 的⼦元素也被禁用.
2.2.1:代码1
widget.cpp
#include "widget.h" #include "ui_widget.h" #include <QPushButton> Widget::Widget(QWidget *parent) : QWidget(parent) , ui(new Ui::Widget) { ui->setupUi(this); QPushButton * MyBtn = new QPushButton(this); MyBtn->setText("按钮被禁用"); MyBtn->setEnabled(false); } Widget::~Widget() { delete ui; }
运⾏程序, 可以看到按钮处于灰⾊状态, ⽆法被点击.
2.2.2:代码2
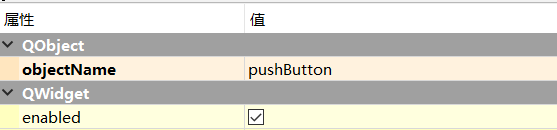
QObject的objectName属性介绍
- QObject是QWidget的父类,里面最主要的属性是objectName.
- 在⼀个 Qt 程序中, objectName 相当于对象的身份标识, 彼此之间不能重复.
- 在使用Qt Designer 时, 尤其是界面上存在多个 widget 的时候, 可以通过 objectName 获 取到指定的 widget对象.
- Qt Designer 生成的 ui ⽂件, 本身是 xml 格式的. qmake 会把这个 xml 文件转换成 C++ 的 .h文件(这个⽂件生成在 build 目录中), 构成⼀个 ui_widget 类.
- 每个 widget 的 objectName 最终就会成为 ui_widget 类的属性名字.
- 最终这个类的实例, 就是 Ui::Widget *ui , 因此就可以通过形如 ui->pushButton 或 者 ui->pushButton_2 这样的代码获取到界⾯上的 widget 对象了.
当前自动生成的objectname有些小规律,这个名字就是根据控件的类型 + 下划线 + 数字来生成的.很明显,以数字的方式命名,不是一个好的编程习惯,我们也可以自行修改objectname,在这里由于就两个控件,博主就不修改啦.
widget.h
#ifndef WIDGET_H
#define WIDGET_H

#include <QWidget>

QT_BEGIN_NAMESPACE
namespace Ui {
class Widget;
}
QT_END_NAMESPACE

class Widget : public QWidget
{
    Q_OBJECT

public:
    Widget(QWidget *parent = nullptr);
    ~Widget();

private slots:
    void on_pushButton_clicked();

    void on_pushButton_2_clicked();

private:
    Ui::Widget *ui;
};
#endif // WIDGET_H
widget.cpp
#include "widget.h"
#include "ui_widget.h"

Widget::Widget(QWidget *parent)
    : QWidget(parent)
    , ui(new Ui::Widget)
{
    ui->setupUi(this);
}

Widget::~Widget()
{
    delete ui;
}

void Widget::on_pushButton_clicked()
{
    qDebug() << "按下按钮";
}


void Widget::on_pushButton_2_clicked()
{
    //获取第一个按钮的可用状态
    bool enable = ui->pushButton->isEnabled();
    if(enable)
    {
        ui->pushButton->setEnabled(false);
    }
    else
    {
        ui->pushButton->setEnabled(true);
    }
}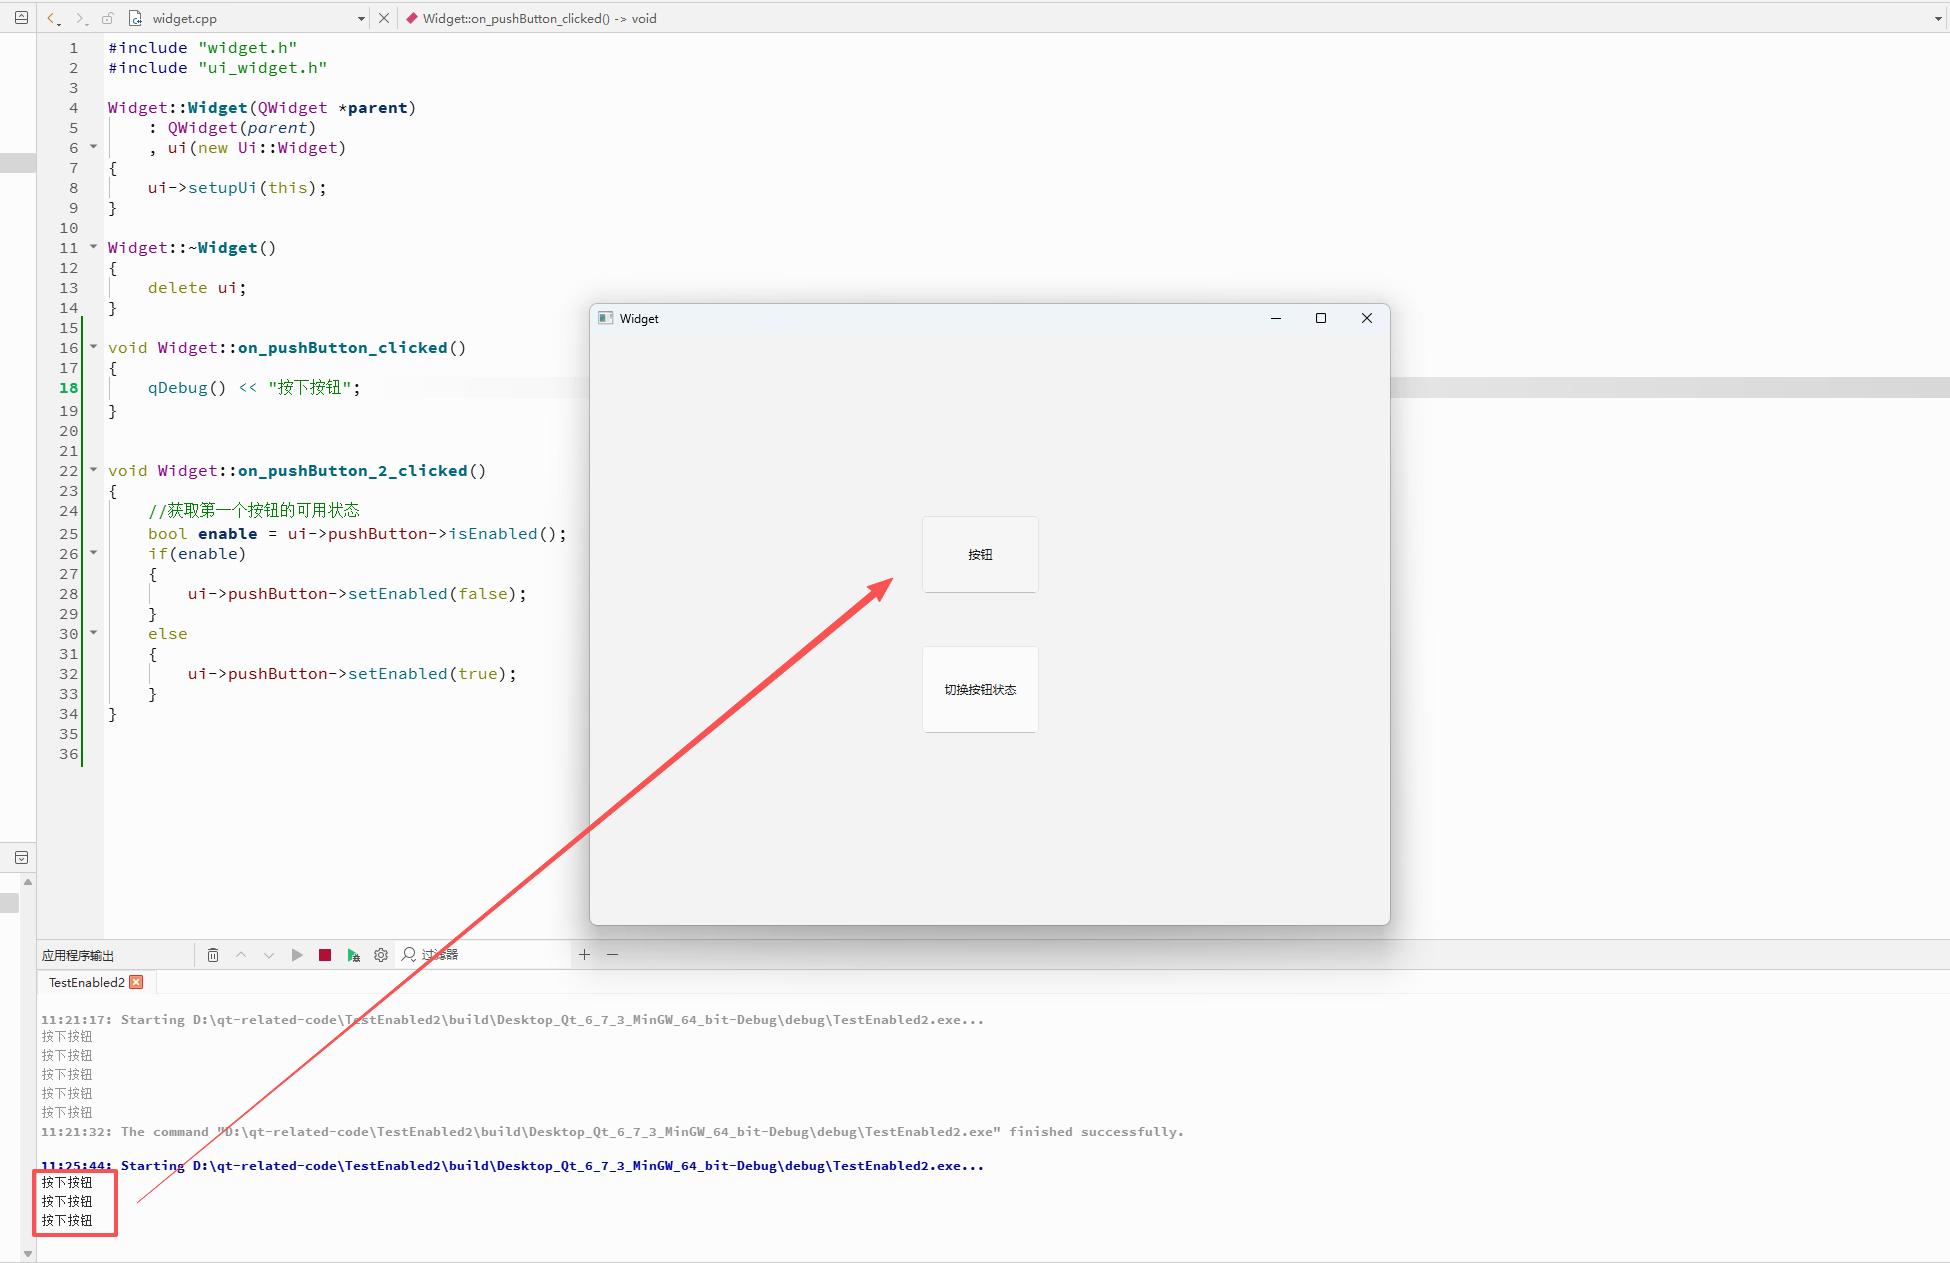
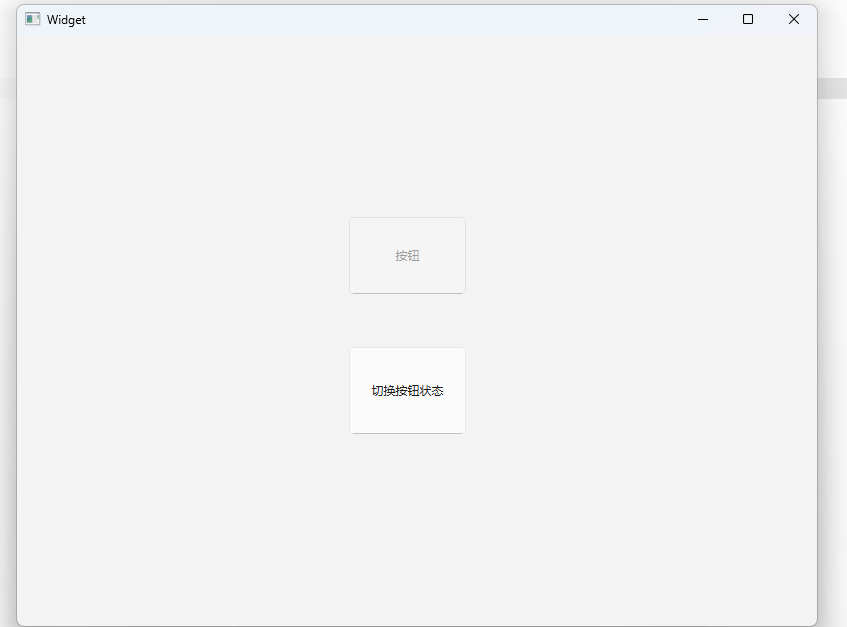
- 运⾏程序, 可以看到, 初始情况下, 上⾯的按钮是可用状态.
- 点击下方按钮, 即可使上方按钮被禁⽤; 再次点击下⽅按钮, 上方按钮就会解除禁用. (禁用状态的按钮为灰⾊, 且不可点击).
- 在 Qt Designer 中创建按钮的时候, 可以设置按钮的初始状态是 "可⽤" 还是 "禁⽤" .
- 如果把 enabled 这⼀列的对钩去掉, 则按钮的初始状态就是 "禁⽤" 状态.
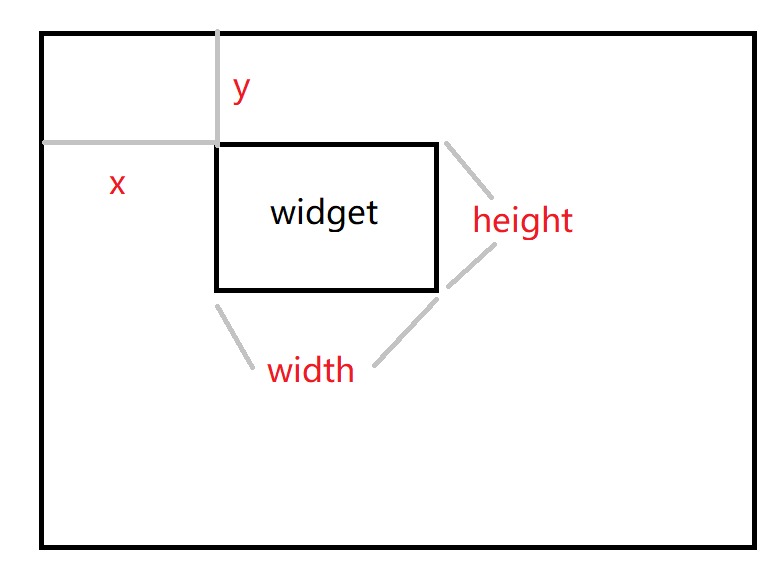
2.3:geometry
位置和尺⼨. 其实是四个属性的统称:
- x:横坐标
- y:纵坐标
- width:宽度
- height:高度
- x与y表示左上角的位置.
- 而width和height表示当前控件的位置和尺寸.
但是实际开发中, 我们并不会直接使⽤这⼏个属性, ⽽是通过⼀系列封装的⽅法来获取/修改.
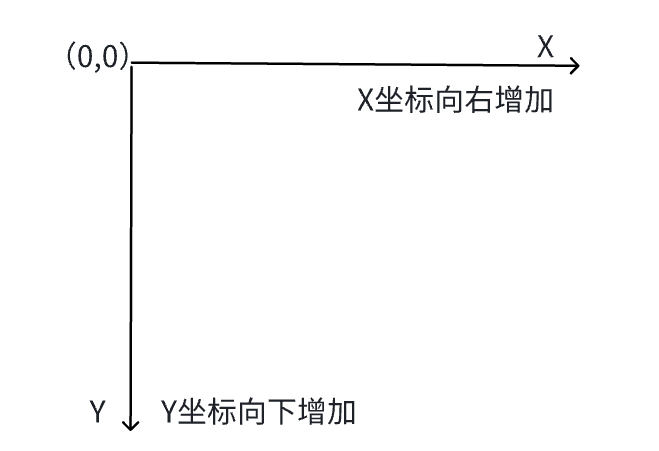
对于 Qt 的坐标系, 不要忘记是⼀个 "左⼿坐标系". 其中坐标系的原点是当前元素的⽗元素的左上⻆.
API | 说明 |
|---|---|
geometry | 获取到控件的位置和尺寸. 返回结果是⼀个 QRect, 包含了 x, y, width, height. 其中 x, y 是左上⻆的坐标. |
setGeometry(QRect) setGeometry(int x, int y, int width, int height) | 设置控件的位置和尺寸. 可以直接设置⼀个 QRect, 也可以分四个属性单独设置 |
QRect是一个矩形,QPoint表示一个点,这两个属于是小对象,里面的属性非常少,占用空间也小 在C++中使用上面对象,通常就会按照值传递的方式来传递参数了.
2.3.1:代码1
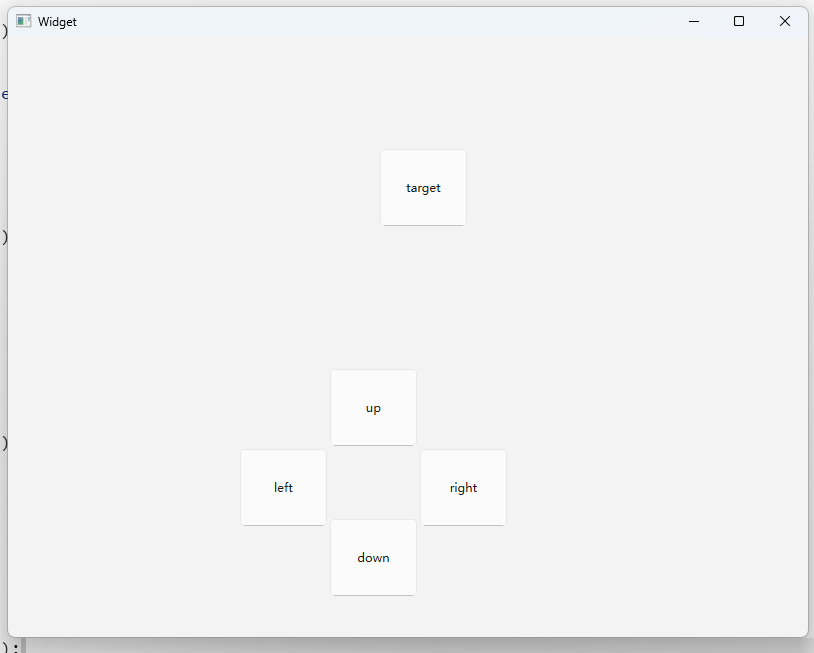
控制按钮的位置
- 在界⾯中拖五个按钮.
- 五个按钮的 objectName 分别为 pushButton_target , pushButton_up ,pushButton_down , pushButton_left , pushButton_right
- 五个按钮的初始位置和大小都随意.
widget.h
#ifndef WIDGET_H
#define WIDGET_H

#include <QWidget>

QT_BEGIN_NAMESPACE
namespace Ui {
class Widget;
}
QT_END_NAMESPACE

class Widget : public QWidget
{
    Q_OBJECT

public:
    Widget(QWidget *parent = nullptr);
    ~Widget();

private slots:
    void on_pushButton_up_clicked();

    void on_pushButton_left_clicked();

    void on_pushButton_right_clicked();

    void on_pushButton_down_clicked();

private:
    Ui::Widget *ui;
};
#endif // WIDGET_H
widget.cpp
#include "widget.h"
#include "ui_widget.h"
#include <QRect>
Widget::Widget(QWidget *parent)
    : QWidget(parent)
    , ui(new Ui::Widget)
{
    ui->setupUi(this);
}

Widget::~Widget()
{
    delete ui;
}

void Widget::on_pushButton_up_clicked()
{
    //获取控件的位置
    QRect rect = ui->pushButton_target->geometry();
    rect.setY(rect.y() - 10);
    //设置控件的位置
    ui->pushButton_target->setGeometry(rect);
}


void Widget::on_pushButton_left_clicked()
{
    //获取控件的位置
    QRect rect = ui->pushButton_target->geometry();
    rect.setX(rect.x() - 10);
    //设置控件的位置
    ui->pushButton_target->setGeometry(rect);
}


void Widget::on_pushButton_right_clicked()
{
    //获取控件的位置
    QRect rect = ui->pushButton_target->geometry();
    rect.setX(rect.x() + 10);
    //设置控件的位置
    ui->pushButton_target->setGeometry(rect);
}


void Widget::on_pushButton_down_clicked()
{
    //获取控件的位置
    QRect rect = ui->pushButton_target->geometry();
    rect.setY(rect.y() + 10);
    //设置控件的位置
    ui->pushButton_target->setGeometry(rect);
}
运⾏程序, 可以看到, 按下下方的四个按钮, 就会控制 target 的左上⻆的位置. 对应的按钮整个尺寸也会发生改变.
- 上述代码中我们是直接设置的 QRect 中的 x, y . 实际上 QRect 内部是存储了左上和右下两个点的坐标, 再通过这两个点的坐标差值计算长宽. 单纯修改左上坐标就会引起整个矩形的长宽发生改变.
- 如果需要实现平移的效果(宽度和高度不变,整个按钮的位置都发生改变),那么就不再修改QRect,而是通过QRect基于setGeometry第二个版本的函数重新设置位置即可.
如果想让整个按钮都移动, 可以改成下列代码:
#include "widget.h"
#include "ui_widget.h"
#include <QRect>
Widget::Widget(QWidget *parent)
    : QWidget(parent)
    , ui(new Ui::Widget)
{
    ui->setupUi(this);
}

Widget::~Widget()
{
    delete ui;
}

void Widget::on_pushButton_up_clicked()
{
    //获取控件的位置
    QRect rect = ui->pushButton_target->geometry();
    //rect.setY(rect.y() - 10);
    //设置控件的位置
    ui->pushButton_target->setGeometry(rect.x(),rect.y() - 10,rect.width(),rect.height());
}


void Widget::on_pushButton_left_clicked()
{
    //获取控件的位置
    QRect rect = ui->pushButton_target->geometry();
    //rect.setX(rect.x() - 10);
    //设置控件的位置
    ui->pushButton_target->setGeometry(rect.x() - 10,rect.y(),rect.width(),rect.height());
}


void Widget::on_pushButton_right_clicked()
{
    //获取控件的位置
    QRect rect = ui->pushButton_target->geometry();
    //rect.setX(rect.x() + 10);
    //设置控件的位置
    ui->pushButton_target->setGeometry(rect.x() + 10,rect.y(),rect.width(),rect.height());
}


void Widget::on_pushButton_down_clicked()
{
    //获取控件的位置
    QRect rect = ui->pushButton_target->geometry();
    //rect.setY(rect.y() + 10);
    //设置控件的位置
     ui->pushButton_target->setGeometry(rect.x(),rect.y() + 10,rect.width(),rect.height());

}
2.3.2:代码2
往界面上拖拽两个按钮和⼀个 Label. Label 的 objectName 为 pushButton_accept 和 pushButton_reject , label 的 objectName 为 label
widget.h
#ifndef WIDGET_H
#define WIDGET_H

#include <QWidget>

QT_BEGIN_NAMESPACE
namespace Ui {
class Widget;
}
QT_END_NAMESPACE

class Widget : public QWidget
{
    Q_OBJECT

public:
    Widget(QWidget *parent = nullptr);
    ~Widget();

private slots:
    void on_pushButton_accept_clicked();

    void on_pushButton_reject_pressed();

private:
    Ui::Widget *ui;
};
#endif // WIDGET_H
widget.cpp
#include "widget.h"
#include "ui_widget.h"

Widget::Widget(QWidget *parent)
    : QWidget(parent)
    , ui(new Ui::Widget)
{
    ui->setupUi(this);
     // 设置随机种子. 使用时间戳作为随机种子.
    srand(time(0));
}

Widget::~Widget()
{
    delete ui;
}

void Widget::on_pushButton_accept_clicked()
{
      ui->label->setText("女神女神, 快来嘴儿一个~, mua~");
}


void Widget::on_pushButton_reject_pressed()
{

    // 如果女神点击了这个按钮, 就把这个按钮给挪走.
    // 可以通过生成随机数的方式, 来确定按钮的新的位置.

    //获取当前程序窗口的尺寸
    int width = this->geometry().width();
    int height = this->geometry().height();
    // 重新生成按钮的位置.
    /*
    rand()是C标准库的函数,能够生成一个随机的数,这个数字范围很大
    rand() % 100 + 1------>[1,100]
    */
    int x = rand() % width;
    int y = rand() % height;
    ui->pushButton_reject->move(x,y);
}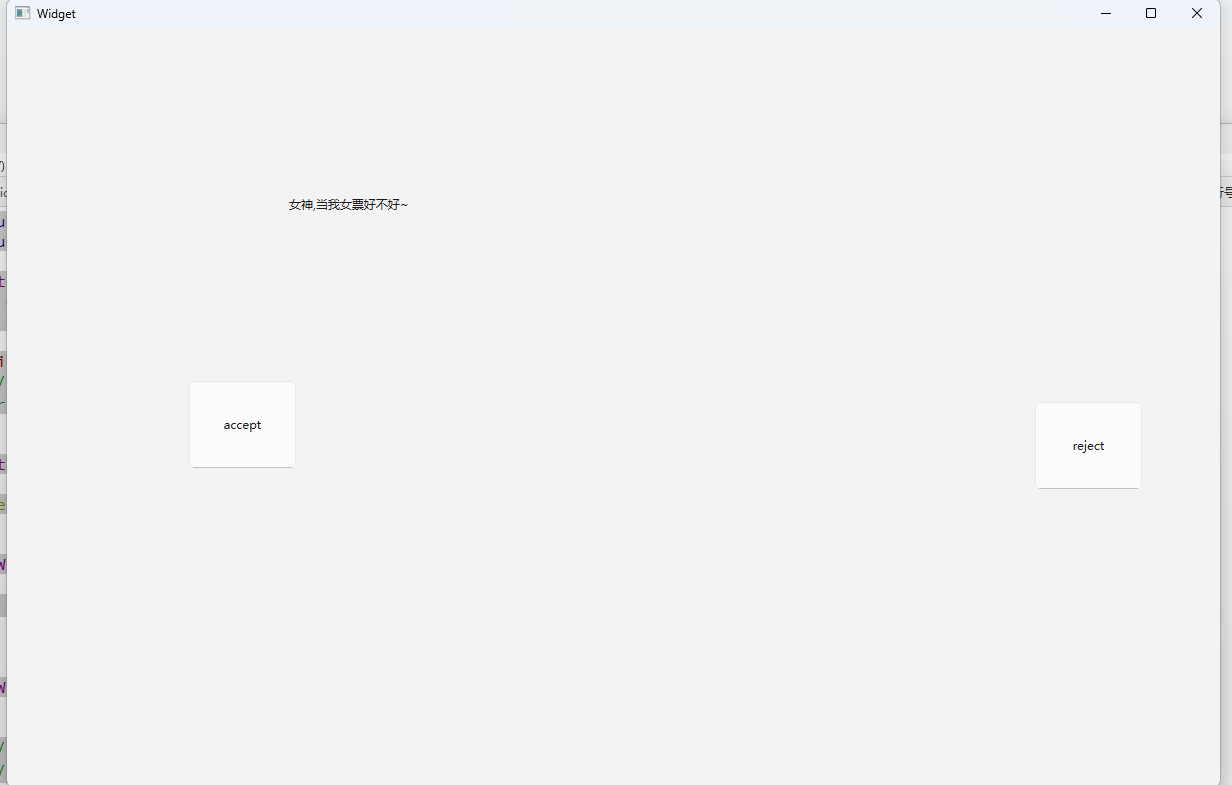
运⾏程序, 可以看到, 当点击 "残忍拒绝" 时, 按钮就跑了.
- 上述代码使用的是 pressed,鼠标按下事件. 如果使用 mouseMoveEvent, 会更狠⼀些, 只要鼠标移动过来, 按钮就跑了.
- 对应的代码更麻烦⼀些 (需要⾃定义类继承⾃ QPushButton, 重写 mouseMoveEvent ⽅法). 此处暂时不展开.
2.4:window frame的影响
- 如果 widget 作为⼀个窗口 (带有标题栏, 最小化, 最大化, 关闭按钮), 那么在计算尺寸和坐标的时候就有两种算法. 包含 window frame 和 不包含 window frame.
- 其中 x(), y(), frameGeometry(), pos(), move() 都是按照包含 window frame 的⽅式来计算的
- 其中 geometry(), width(), height(), rect(), size() 则是按照不包含 window frame 的⽅式来计算的.
- 当然, 如果⼀个不是作为窗⼝的 widget , 上述两类⽅式得到的结果是⼀致的.
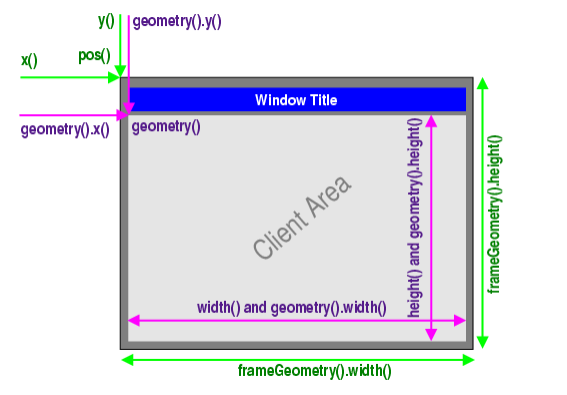
相关 API
API | 说明 |
|---|---|
x() | 获取横坐标 计算时包含 window frame |
y() | 获取纵坐标 计算时包含 window frame |
pos() | 返回 QPoint 对象, ⾥⾯包含 x(), y(), setX(), setY() 等方法. 计算时包含 window frame |
frameSize() | 返回 QSize 对象, ⾥⾯包含 width(), height(), setWidth(), setHeight() 等方法.计算时包含 window frame |
frameGeometry() | 返回 QRect 对象. QRect 相当于 QPoint 和 QSize 的结合体. 可以获取 x, y, width, size. 计算时包含 window frame 对象. |
width() | 获取宽度 计算时 不包含 window frame |
height() | 获取⾼度 计算时 不包含 window frame |
size() | 返回 QSize 对象, ⾥⾯包含 width(), height(), setWidth(), setHeight() 等⽅法.计算时 不包含 window frame |
rect() | 返回 QRect 对象. QRect 相当于 QPoint 和 QSize 的结合体. 可以获取并设置 x, y, width, size.计算时 不包含window frame 对象. |
geometry() | 返回 QRect 对象. QRect 相当于 QPoint 和 QSize 的结合体. 可以获取 x, y, width, size. 计算时 不包含windowframe 对象. |
setGeometry() | 直接设置窗口的位置和尺寸. 可以设置 x, y, width, height, 或者 QRect 对象. 计算时 不包含windowframe 对象. |
- 在构造⽅法中, Widget 刚刚创建出来, 还没有加入到对象树中. 此时也就不具备 Window frame,因此也看不到Window frame的影响.
- 在按钮的 slot 函数中, 由于用户点击的时候, 对象树已经构造好了, 此时 Widget 已经具备了Window frame, 因此在位置和尺寸上均出现了差异.
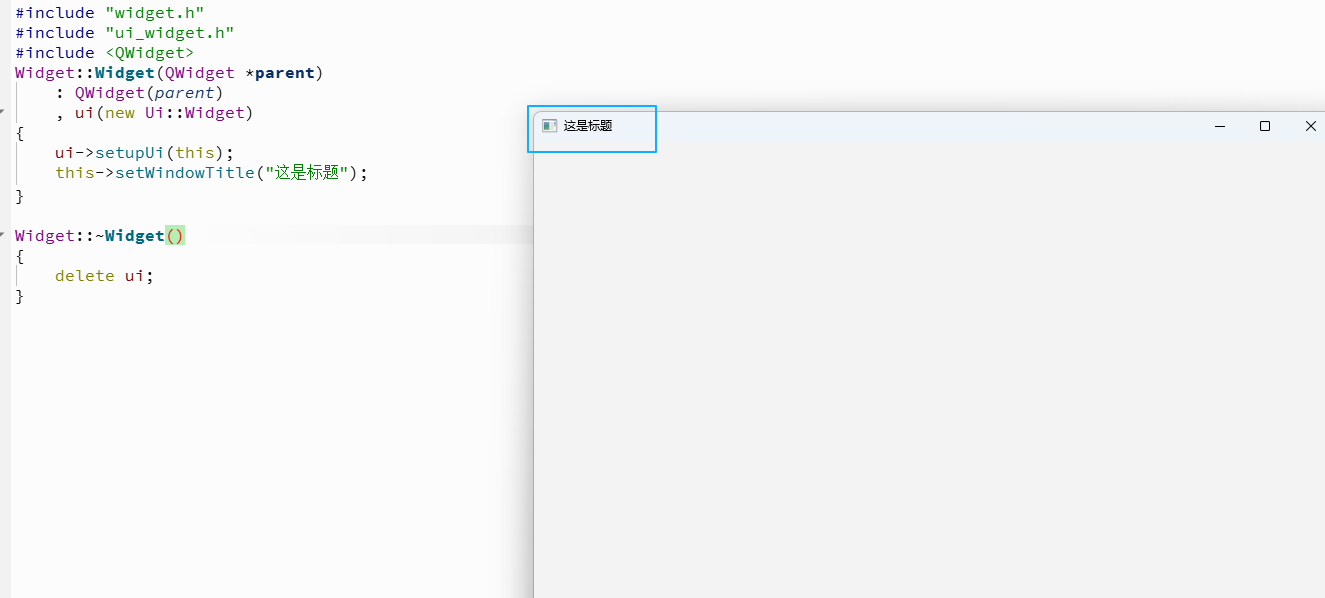
如果把上述代码修改成打印 pushButton 的 geometry 和 frameGeometry , 结果就是完全相 同的. 因为 pushButton 并非是⼀个窗口. 2.5:windowTitle
API | 说明 |
|---|---|
windowTitle() | 获取到控件的窗口标题 |
setWindowTitle(const QString& title) | 设置控件的窗口标题. |
- 当前的windowsTitle属性,是从属于QWidget.
- windowTitle属性,只能针对顶层窗口这样的QWidget才有效.
- 如果是子widget, 这个操作⽆任何效果.
代码示例
widget.cpp
#include "widget.h"
#include "ui_widget.h"
#include <QWidget>
Widget::Widget(QWidget *parent)
    : QWidget(parent)
    , ui(new Ui::Widget)
{
    ui->setupUi(this);
    this->setWindowTitle("这是标题");
}

Widget::~Widget()
{
    delete ui;
}
2.6:windowIcon
API | 说明 |
|---|---|
windowIcon() | 获取到控件的窗⼝图标. 返回 QIcon 对象. |
setWindowIcon(const QIcon& icon | 设置控件的窗⼝图标. |
- windowIcon我们一般使用的很少,主要使用setWindowIcon.
- 这两api类似于windowTitle,只能针对于顶层窗口使用.
代码1
设置窗⼝图标
先在 D 盘中放⼀个图⽚, 名字为cat.png

修改 widget.cpp
widget.cpp
#include "widget.h"
#include "ui_widget.h"
#include <QIcon>
Widget::Widget(QWidget *parent)
    : QWidget(parent)
    , ui(new Ui::Widget)
{
    ui->setupUi(this);

    QIcon icon("D:/cat.png");
    this->setWindowIcon(icon);
}

Widget::~Widget()
{
    delete ui;
}- 之前推荐使用堆来创建对象,主要是因为要确保当前控件的生命周期是足够的,要通过Qt对象树来释放对象.
- Qicon自身是一个比较小的对象,创建出来之后,就是要设置到某个QWidget里面,QIcon对象本身释放不释放,不影响图标最终的显示,Qicon本身也不支持对象树,无法给他执行父对象.
运行程序, 可以看到窗口图标已经成为上述图片

- 实际开发中, 我们⼀般不会在代码中通过绝对路径引入图片. 因为我们⽆法保证程序发布后, 用户的电脑上也有同样的路径
- 如果使用相对路径, 则需要确保代码中的相对路径写法和图⽚实际所在的路径匹配 (比如代码中写作 "./image/cat.png", 就需要在当前⼯作⽬录中创建 image ⽬录, 并把 cat.png 放进去).
- 相对路径: 以 . (表⽰当前路径) 或者 以 .. (表⽰当前路径上级路径) 开头的路径. 其中 . 经常也会省略. 相对路径的前提是需要明确 "当前工作目录".
- 绝对路径: 以盘符(windows)或者以 / (Linux) 开头的路径.
对于 Qt 程序来说, 当前⼯作⽬录可能是变化的. ⽐如通过 Qt Creator 运⾏的程序, 当前⼯作⽬录是项目的构建目录; 直接双击 exe 运⾏, 工作目录则是 exe 所在目录.所谓构建⽬录, 是和 Qt 项⽬并列的, 专门⽤来放⽣成的临时⽂件和最终 exe 的目录.

代码2
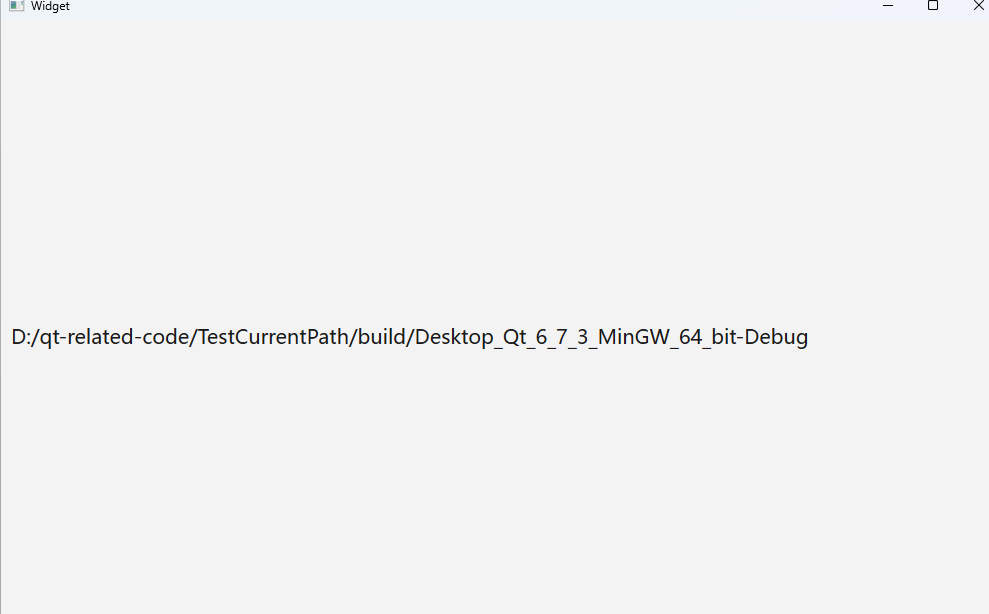
获取当前的⼯作⽬录
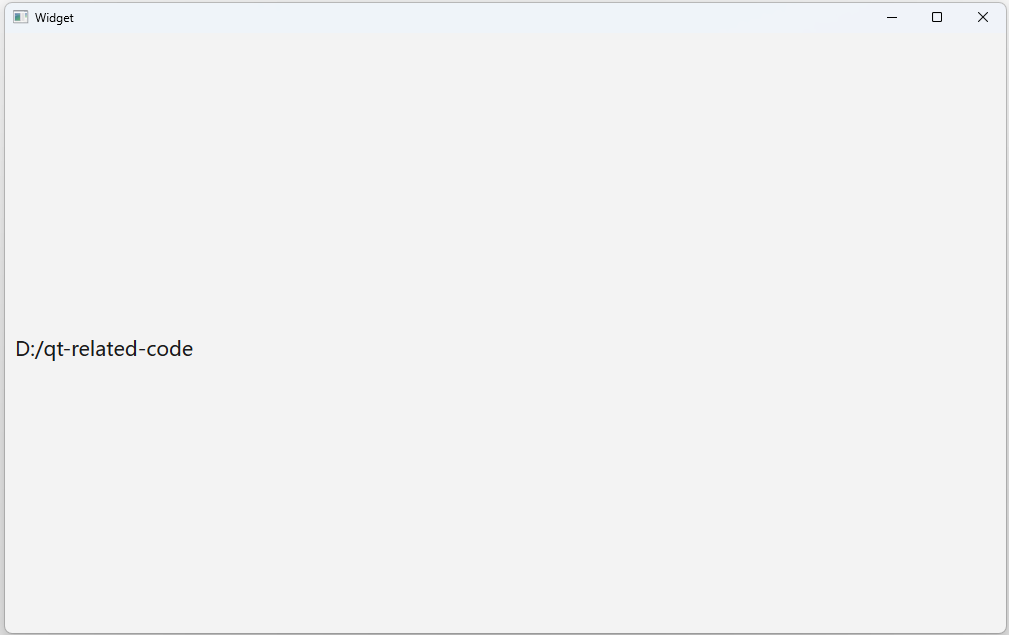
在界⾯上创建⼀个⽐较大的 label, 确保能把路径显示完整. objectName 使⽤默认的 label 即可.
widget.cpp
#include "widget.h"
#include "ui_widget.h"
#include <QDir>
Widget::Widget(QWidget *parent)
    : QWidget(parent)
    , ui(new Ui::Widget)
{
    ui->setupUi(this);
    QString CurrentPath = QDir::currentPath();
    ui->label->setText(CurrentPath);
}

Widget::~Widget()
{
    delete ui;
}
直接在 Qt Creator 中执⾏程序, 可以看到当前⼯作⽬录是项⽬的构建⽬录.
进入上述构建目录, 把⾥⾯的 exe 拷⻉到其他目录中, 比如 D: 中. 再次执行程序, 可以看到当前⼯作目录已经发⽣改变.
要想直接能双击 exe 运⾏, 需要先把 Qt 的路径添加到 path 环境变量中, 否则会提⽰找不到动态库.在最开始搭建开发环境的时候已经操作过, 此处不再赘述.
注意, 上述 构建目录, 是随时可删除的. 比如点击菜单栏中的 "构建" -> "清理项目" , 就会把这个目录中的内容清空掉. 因此如果我们把图片文件放到构建⽬录中, 可能在不小心删除后就丢失了. 我们还是希望能够把图片和源代码放到⼀起, 并且使我们的程序无论到任何位置中都能正确使用图片.
Qt 使用qrc 机制帮我们自动完成了上述工作, 更⽅便的来管理项目依赖的静态资源.
2.7:Qt中的qrc机制
- qrc文件是⼀种XML格式的资源配置⽂件, 它用XML记录硬盘上的⽂件和对应的随意指定的资源名称. 应用程序通过资源名称来访问这些资源.
- 在Qt开发中, 可以通过将资源文件添加到项目中来方便地访问和管理这些资源. 这些资源文件可以位于qrc文件所在目录的同级或其子目录下.
- 在构建程序的过程中, Qt 会把资源⽂件的⼆进制数据转成 cpp 代码, 编译到 exe 中. 从⽽使依赖的资源变得 "路径无关".
- 这种资源管理机制并非Qt 独有, 很多开发框架都有类似的机制. 例如 Android 的 Resources和 AssetManager 也是类似的效果.
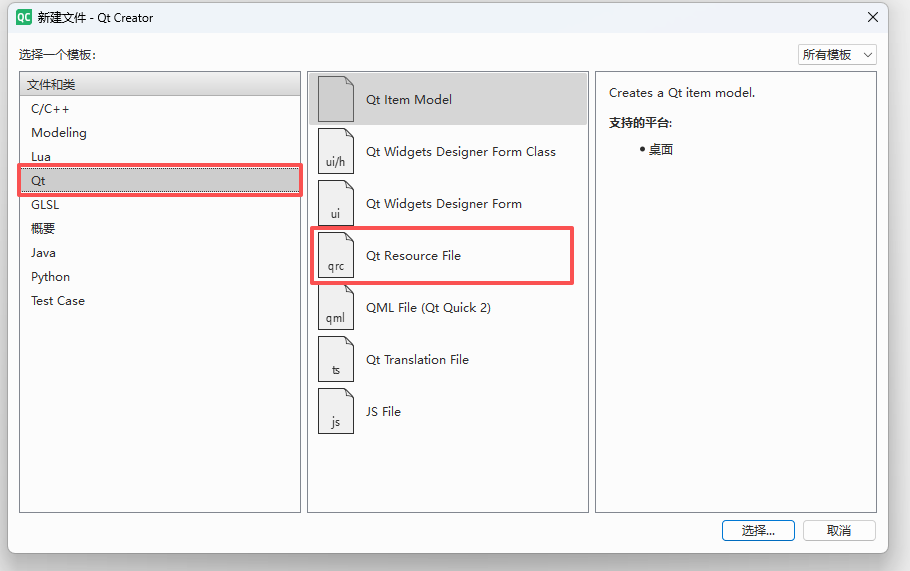
2.7.1:使用方式
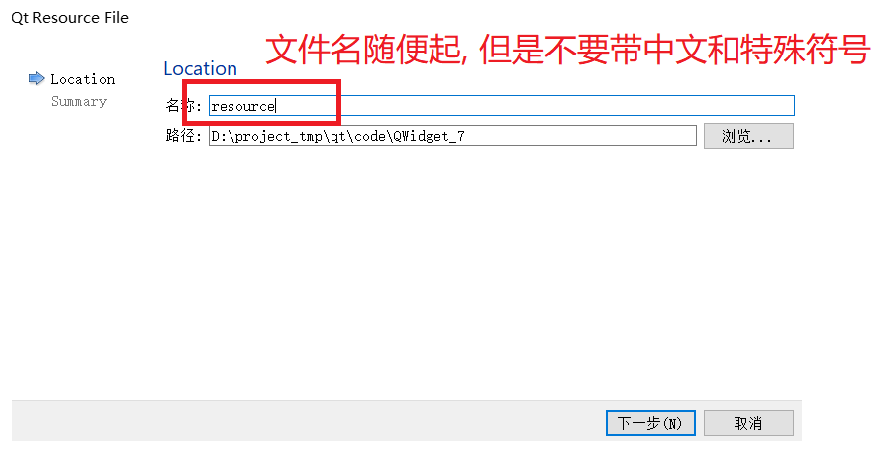
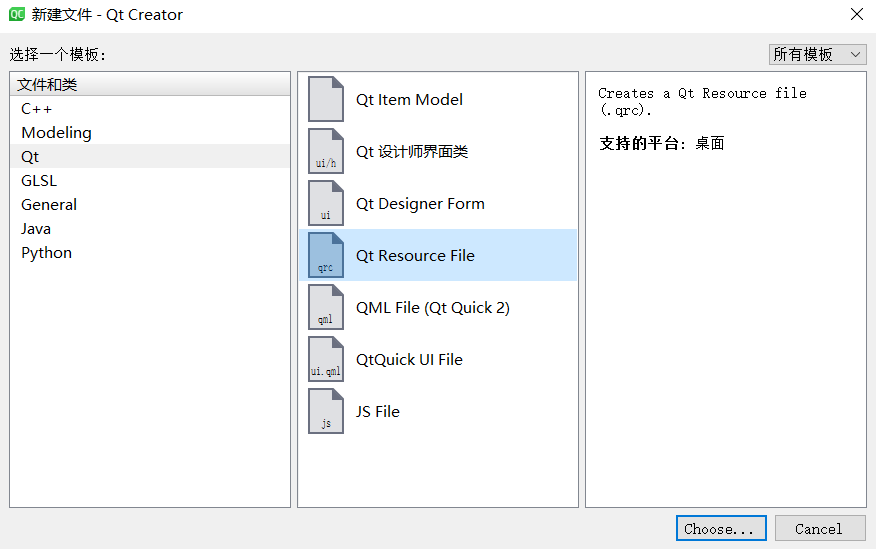
First
在项目中创建一个qrc文件,文件名不要带中文和特殊符号.
Second
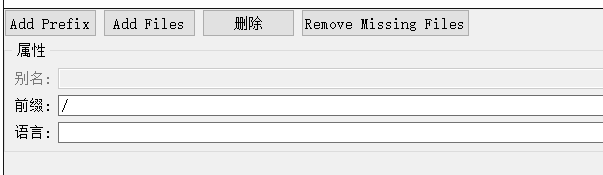
先添加一个前缀,前缀的名字改成 / 即可

- 前缀可以理解成虚拟目录,这个目录在我们的电脑上并没有真实存在,是Qt自己抽象出来的.
- qrc机制本质就是把图片的二进制数据转换成C++代码(最终就会在代码看到很大的char 数组,里面就是图片的二进制数据).
- 为了方便Qt代码访问到这个图片,Qt就抽象出了虚拟的目录.
Third
将图片导入到资源文件中.
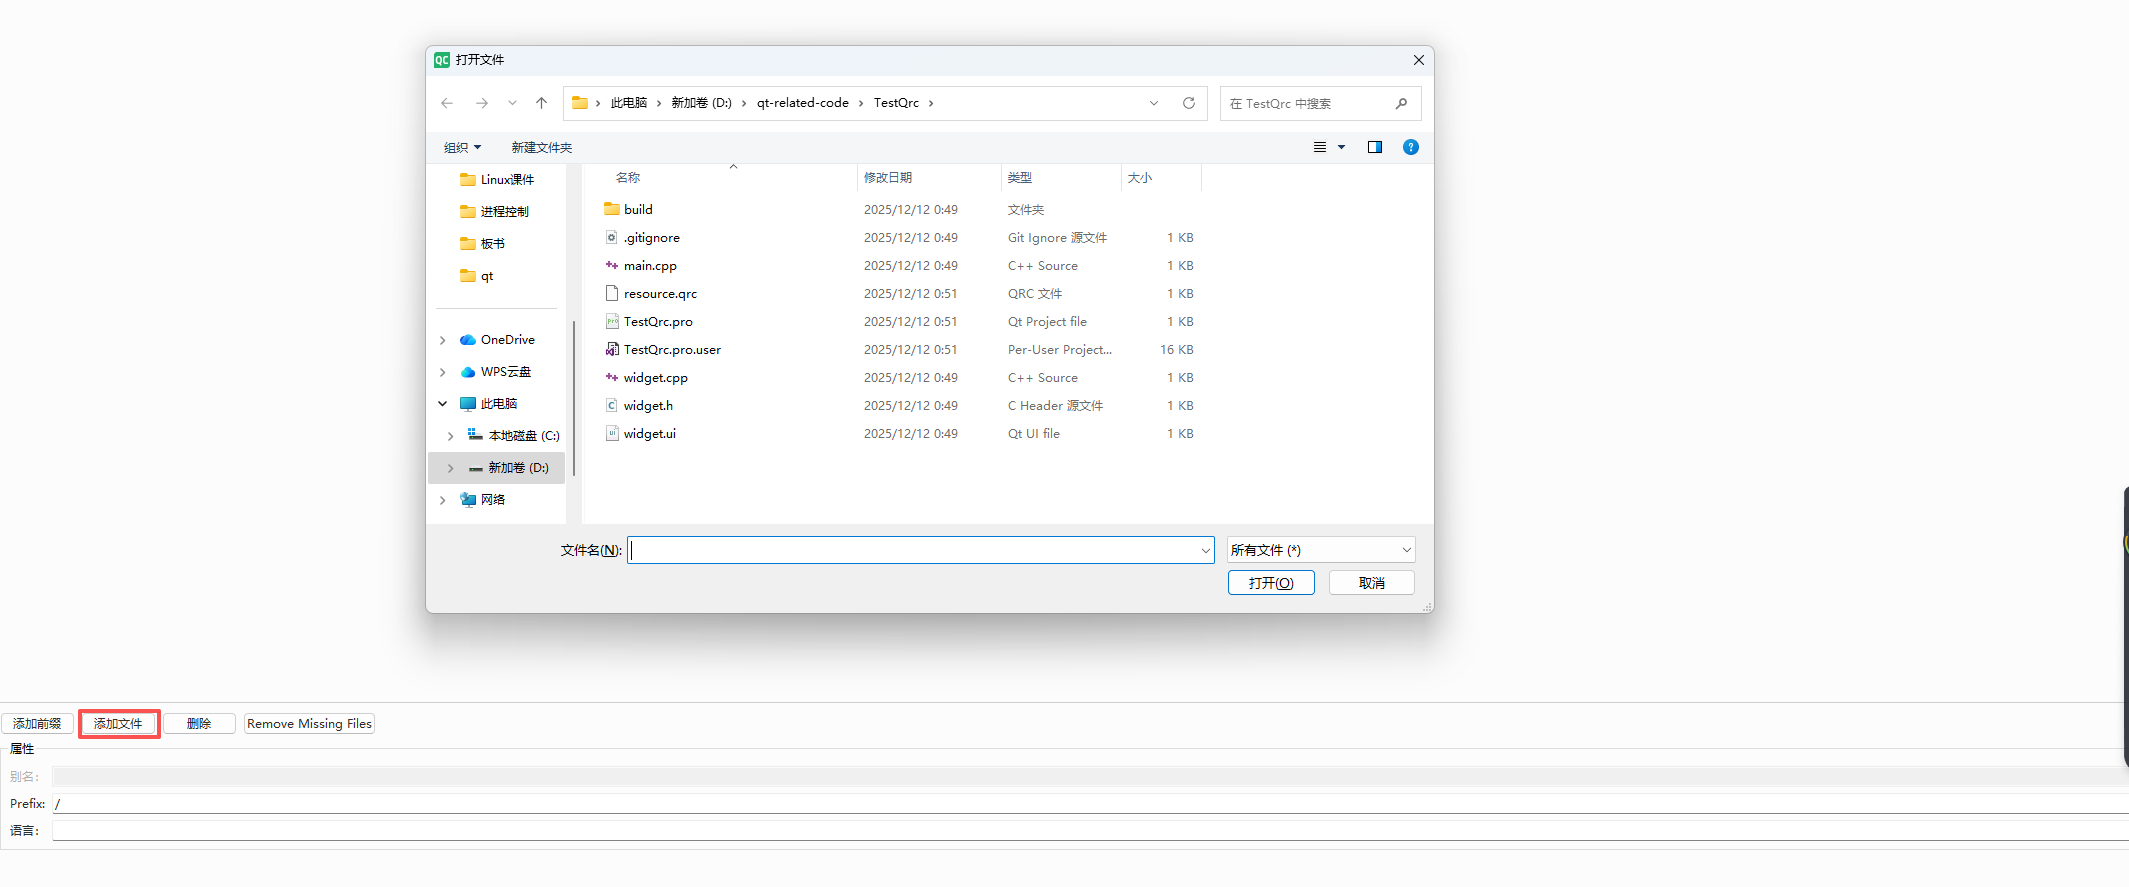
这个按钮在创建前缀之前是禁用的,创建好前缀后就能够使用了,添加的文件就是添加到前缀下面的,点击添加文件得到的目录就是当前代码所在的目录.
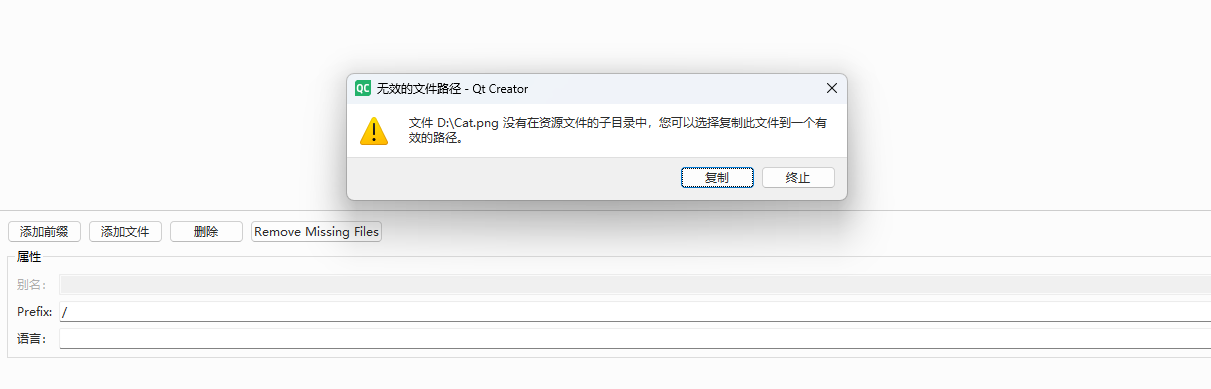
导入图片的时候,需要确保导入的图片在resource.qrc文件的同级目录,或者同级目录的子目录里.因此就可以把需要导入的图片拷贝到项目目录中即可~

看到这个效果,说明导入成功了,创建的前缀叫啥名字,代码中就叫啥名字.并且当代码中需要访问qrc中管理的文件时,就需要在路径上带有:前缀~~
widget.cpp
#include "widget.h"
#include "ui_widget.h"
#include <QIcon>
Widget::Widget(QWidget *parent)
    : QWidget(parent)
    , ui(new Ui::Widget)
{
    ui->setupUi(this);
    QIcon icon(":/Cat.png");
    this->setWindowIcon(icon);
}

Widget::~Widget()
{
    delete ui;
}
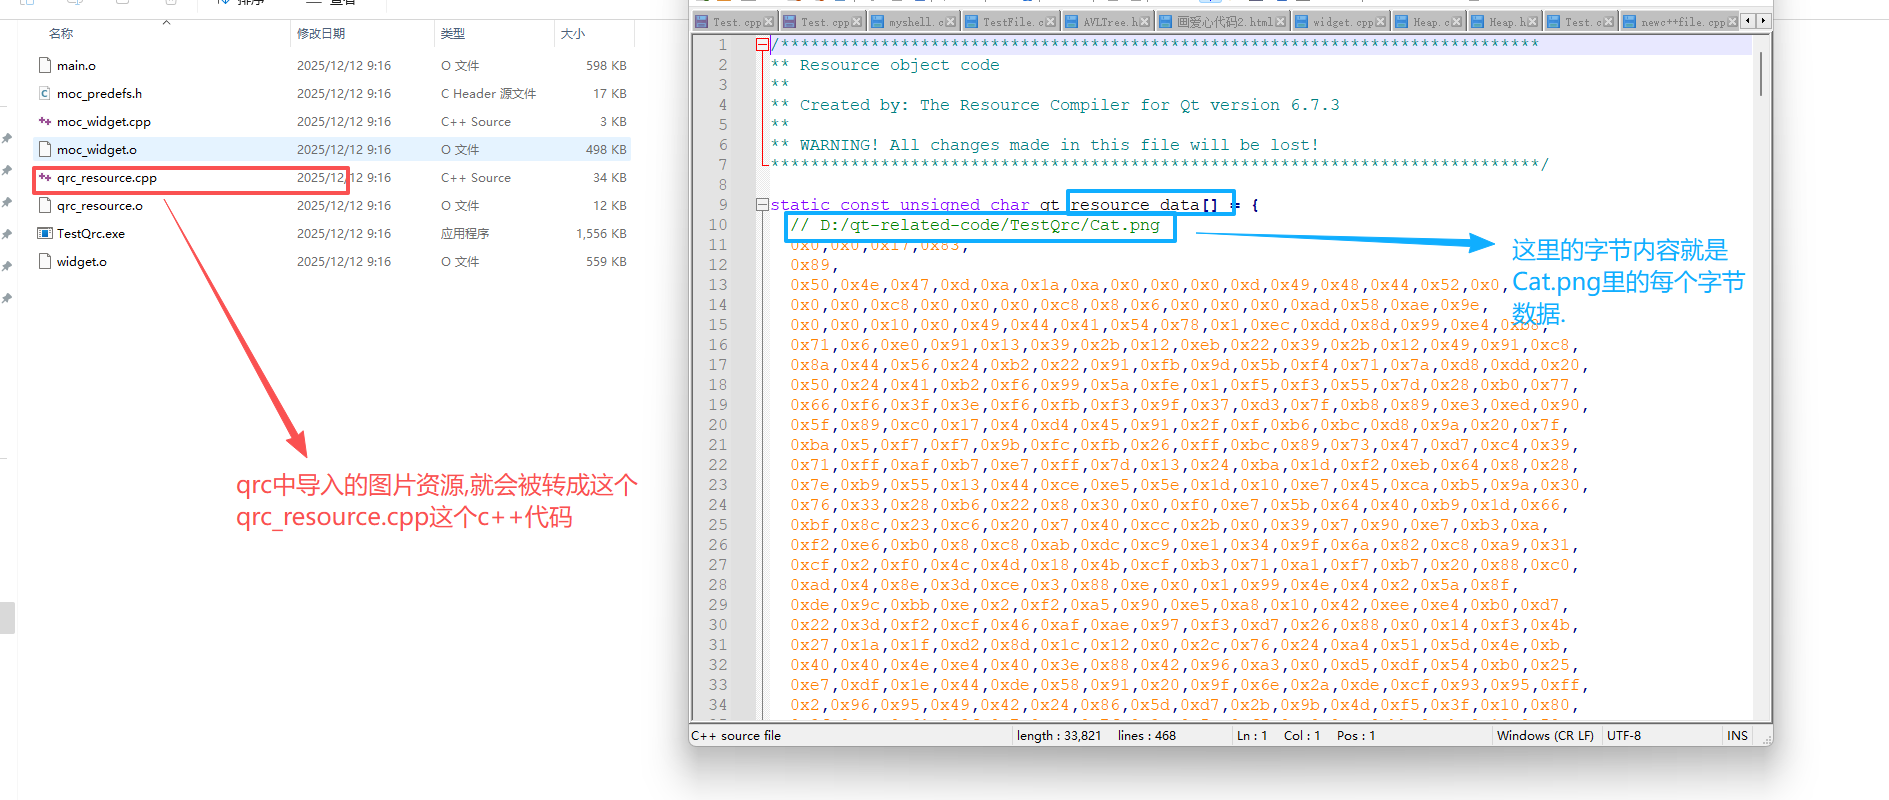
当Qt项目进行编译的时候,这个cpp文件就被一起编译到了exe中,当exe程序运行的时候,上述图片的数据也就被加载到了内存中.
2.7.2:qrc机制的优缺点
- 优点: 确保了图片, 字体, 声⾳等资源能够真正做到 "目录无关", ⽆论如何都不会出现资源丢失的情况.
- 缺点: 不适合管理体积大的资源. 如果资源比较大(比如是几个 MB 的⽂件), 或者资源特别多,生成的最终的 exe 体积就会比较大, 程序运行消耗的内存也会增大, 程序编译的时间也会显著增加.
3:QWidget核心属性(2)
3.1:windowOpacity
API | 说明 |
|---|---|
windowOpacity() | 获取到控件的不透明数值. 返回 float, 取值为 0.0 -> 1.0 其中 0.0表示全透明, 1.0表示完全不透明. |
setWindowOpacity(flo at n) | 设置控件的不透明数值. |
代码示例
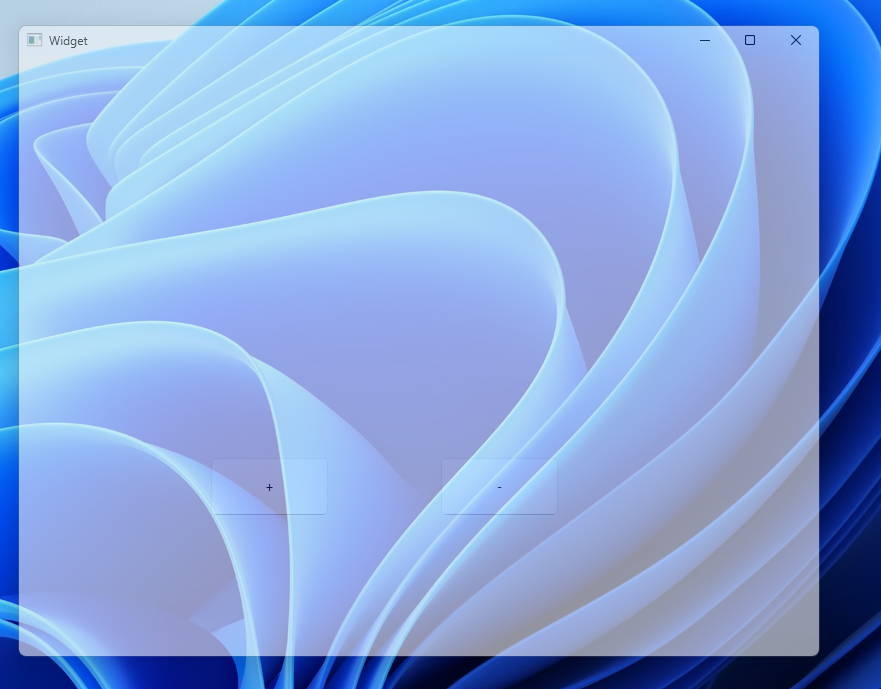
在界面上拖放两个按钮, 分别⽤来增加不透明度和减少不透明度.objectName 分别为 pushButton_add 和 pushButton_sub.
- 编写 wdiget.cpp, 编写两个按钮的 slot 函数.
- 点击 pushButton_sub 会减少不透明度, 也就是窗⼝越来越透明.
- 点击 pushButton_add 会增加不透明度, 窗口会逐渐恢复
widget.cpp
#include "widget.h"
#include "ui_widget.h"
#include <QDebug>
Widget::Widget(QWidget *parent)
    : QWidget(parent)
    , ui(new Ui::Widget)
{
    ui->setupUi(this);
}

Widget::~Widget()
{
    delete ui;
}

void Widget::on_pushButton_add_clicked()
{
    float Opacity = this->windowOpacity();
    //0.0表示完全透明,1.0表示完全不透明
    if(Opacity >= 1.0)
        return;
    qDebug()<< Opacity;
    Opacity += 0.1;
    this->setWindowOpacity(Opacity);
}


void Widget::on_pushButton_sub_clicked()
{
    float Opacity = this->windowOpacity();
    //0.0表示完全透明,1.0表示完全不透明
    if(Opacity <= 0.0)
        return;
    qDebug()<< Opacity;
    Opacity -= 0.1;
    this->setWindowOpacity(Opacity);
}
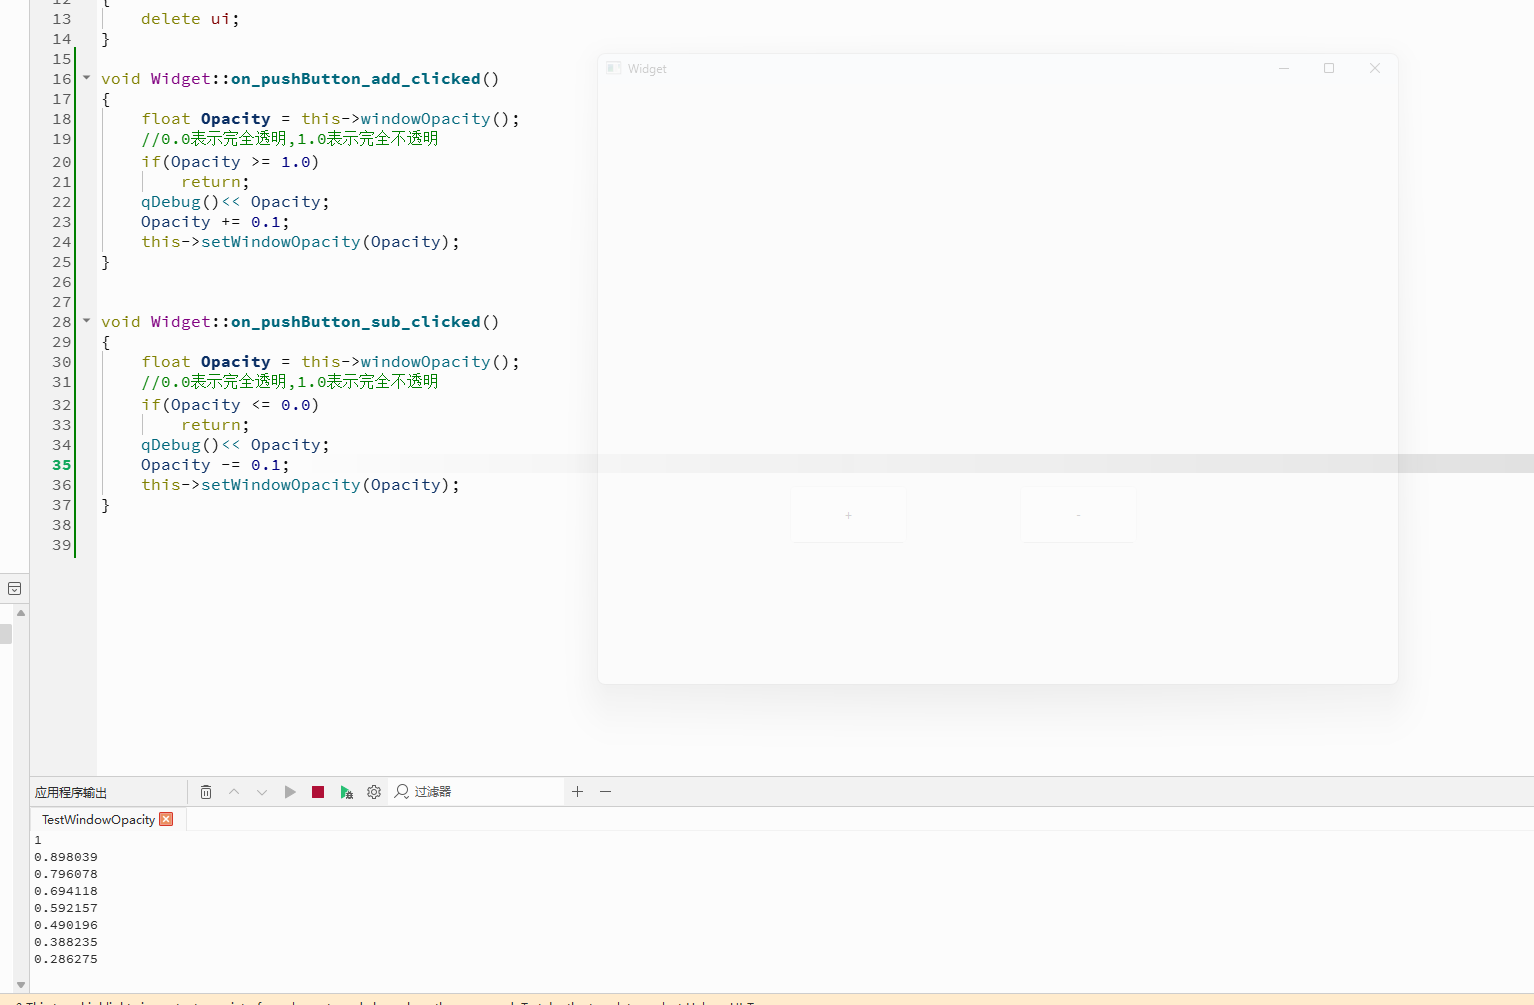
执行程序, 可以看到, 点击了几下 - 之后, 就可以透过窗口看到后⾯的蓝色背景了. 点击 + 又会逐渐恢复.同时控制台中也可以看到 opacity 数值的变化.
注意, C++ 中 float 类型遵守 IEEE 754 标准, 因此在进⾏运算的时候会有⼀定的精度误差. 因此 1 - 0.1 的数值并非是 0.9.
3.2:cursor
API | 说明 |
|---|---|
cursor() | 获取到当前 widget 的 cursor 属性, 返回 QCursor 对象.当⿏标悬停在该 widget 上时, 就会显示出对应的形状. |
setCursor(const QCursor& cursor) | 设置该 widget 光标的形状. 仅在⿏标停留在该widget 上时⽣效. |
QGuiApplication::setOverrideCursor(co nst QCursor& cursor) | 设置全局光标的形状. 对整个程序中的所有 widget 都会生效.覆盖.上面的setCursor 设置的内容. |
QGuiApplication::setOverrideCursor(const QCursor& cursor)设置全局光标指的是系统内的全局光标,而不是系统级的全局.
在 Qt Designer 中设置按钮的光标
在界面中创建⼀个按钮.

直接在右侧属性编辑区修改 cursor 属性为 "等待"

运⾏程序, ⿏标悬停到按钮上, 即可看到光标的变化
截图无法截到鼠标光标, uu们自行运行验证
代码1
widget.cpp
#include "widget.h"
#include "ui_widget.h"
#include <QPushButton>
Widget::Widget(QWidget *parent)
    : QWidget(parent)
    , ui(new Ui::Widget)
{
    ui->setupUi(this);

    QPushButton * MyButton = new QPushButton(this);
    MyButton->move(100,100);
    MyButton->setText("这是一个按钮");

    //设置按钮的Cursor
    MyButton->setCursor(QCursor(Qt::OpenHandCursor));
}

Widget::~Widget()
{
    delete ui;
}
系统内置的光标形状如下
 enum CursorShape {
    ArrowCursor,
    UpArrowCursor,
    CrossCursor,
    WaitCursor,
    IBeamCursor,
    SizeVerCursor,
    SizeHorCursor,
    SizeBDiagCursor,
    SizeFDiagCursor,
    SizeAllCursor,
    BlankCursor,
    SplitVCursor,
    SplitHCursor,
    PointingHandCursor,
    ForbiddenCursor,
    WhatsThisCursor,
    BusyCursor,
    OpenHandCursor,
    ClosedHandCursor,
    DragCopyCursor,
    DragMoveCursor,
    DragLinkCursor,
    LastCursor = DragLinkCursor,
    BitmapCursor = 24,
    CustomCursor = 25
 }
代码2
⾃定义鼠标光标 Qt ⾃带的光标形状有限. 我们也可以自己找个图片, 做成⿏标的光标. 比如我们有请猫猫⽼铁
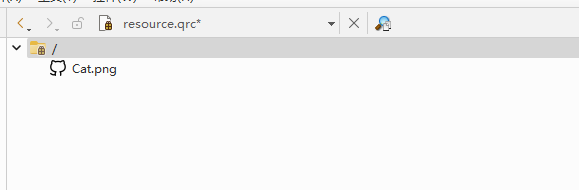
创建 qrc 资源⽂件, 添加前缀 / , 并加入Cat .png
widget.cpp
#include "widget.h"
#include "ui_widget.h"
#include <QPixmap>
Widget::Widget(QWidget *parent)
    : QWidget(parent)
    , ui(new Ui::Widget)
{
    ui->setupUi(this);
    QPixmap pixmap(":/Cat.png");
    //通过这个函数对图片进行播放,注意播放不是修改图片对象本身,而是返回一个新的图片对象副本
    pixmap = pixmap.scaled(70,70);
    // 创建 QCursor 对象, 并指定 "热点" 为 (2, 2) 坐标位置.
    // 所谓 "热点" 就是⿏标点击时⽣效的位置.
    QCursor cursor(pixmap,2,2);
    this->setCursor(cursor);
}

Widget::~Widget()
{
    delete ui;
}
3.3:font
API | 说明 |
|---|---|
font() | 获取当前 widget 的字体信息. 返回 QFont对象. |
setFont(const QFont& font) | 设置当前 widget 的字体信息. |
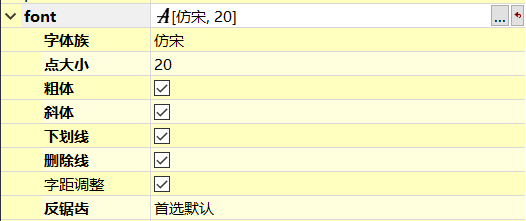
关于 QFont.
属性 | 说明 |
|---|---|
family | 字体家族. 比如 "楷体", "宋体", "微软雅⿊" 等. |
pointSize | 字体大小. |
weight | 字体粗细. 以数值⽅式表示粗细程度取值范围为 [0, 99], 数值越⼤, 越粗. |
bold | 是否加粗. 设置为 true, 相当于 weight 为 75. 设置为 false 相当于 weight 为 50. |
italic | 是否倾斜. |
underline | 是否带有下划线. |
strikeOut | 是否带有删除线. |
在 Qt Designer 中设置字体属性
在界面上创建⼀个 label;
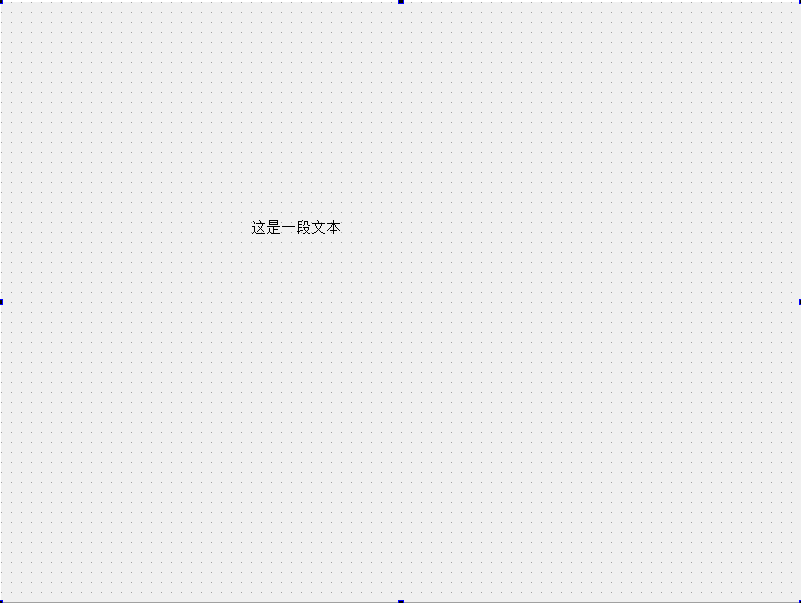
在右侧的属性编辑区, 设置该 label 的 font 相关属性
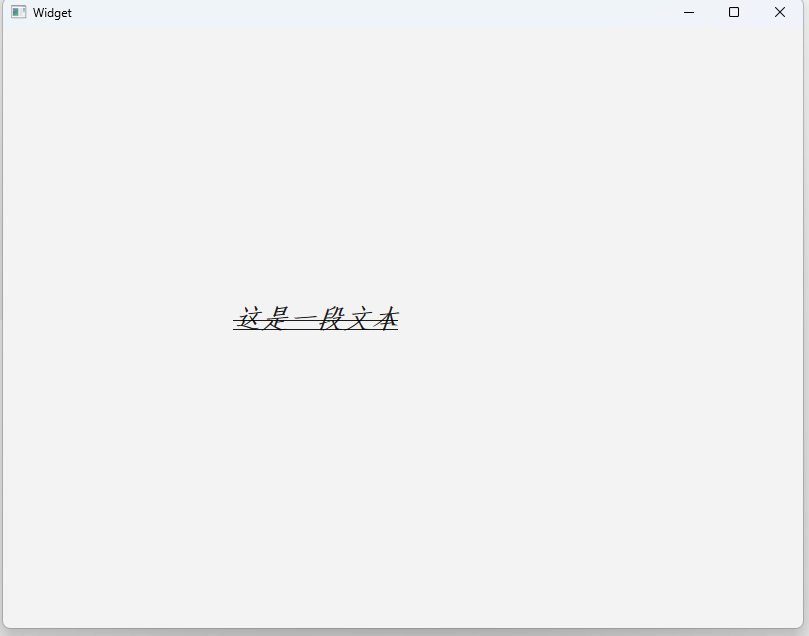
执行程序, 观察效果
代码示例
widget.cpp
#include "widget.h"
#include "ui_widget.h"
Widget::Widget(QWidget *parent)
: QWidget(parent)
, ui(new Ui::Widget)
{
ui->setupUi(this);
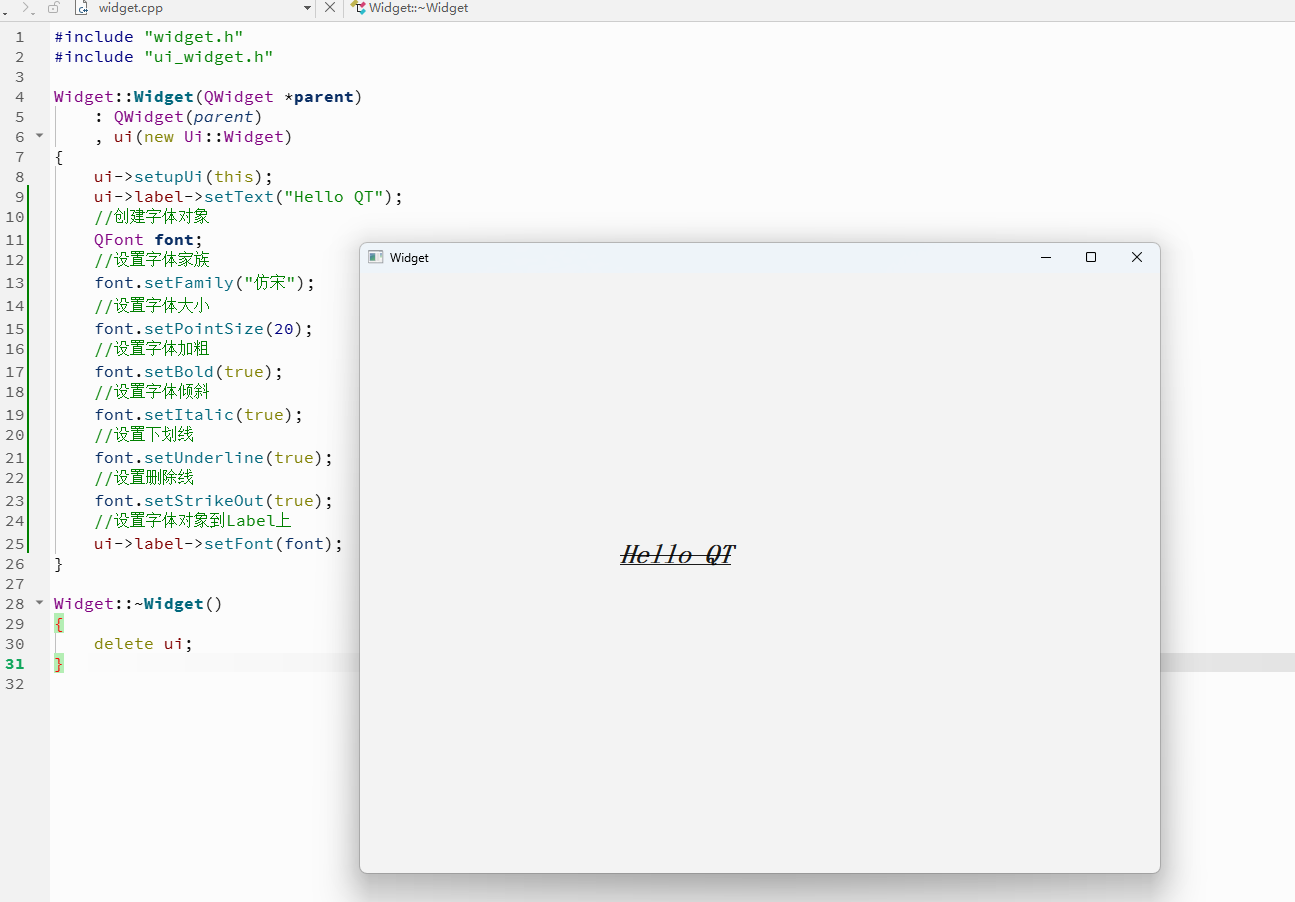
ui->label->setText("Hello QT");
//创建字体对象
QFont font;
//设置字体家族
font.setFamily("仿宋");
//设置字体大小
font.setPointSize(20);
//设置字体加粗
font.setBold(true);
//设置字体倾斜
font.setItalic(true);
//设置下划线
font.setUnderline(true);
//设置删除线
font.setStrikeOut(true);
//设置字体对象到Label上
ui->label->setFont(font);
}
Widget::~Widget()
{
delete ui;
}
3.4:toolTip
API | 说明 |
|---|---|
setToolTip | 设置 toolTip. ⿏标悬停在该 widget 上时会有提示说明. |
setToolTipDuring | 设置 toolTip 提⽰的时间. 单位 ms. 时间到后 toolTip ⾃动消失. |
代码示例
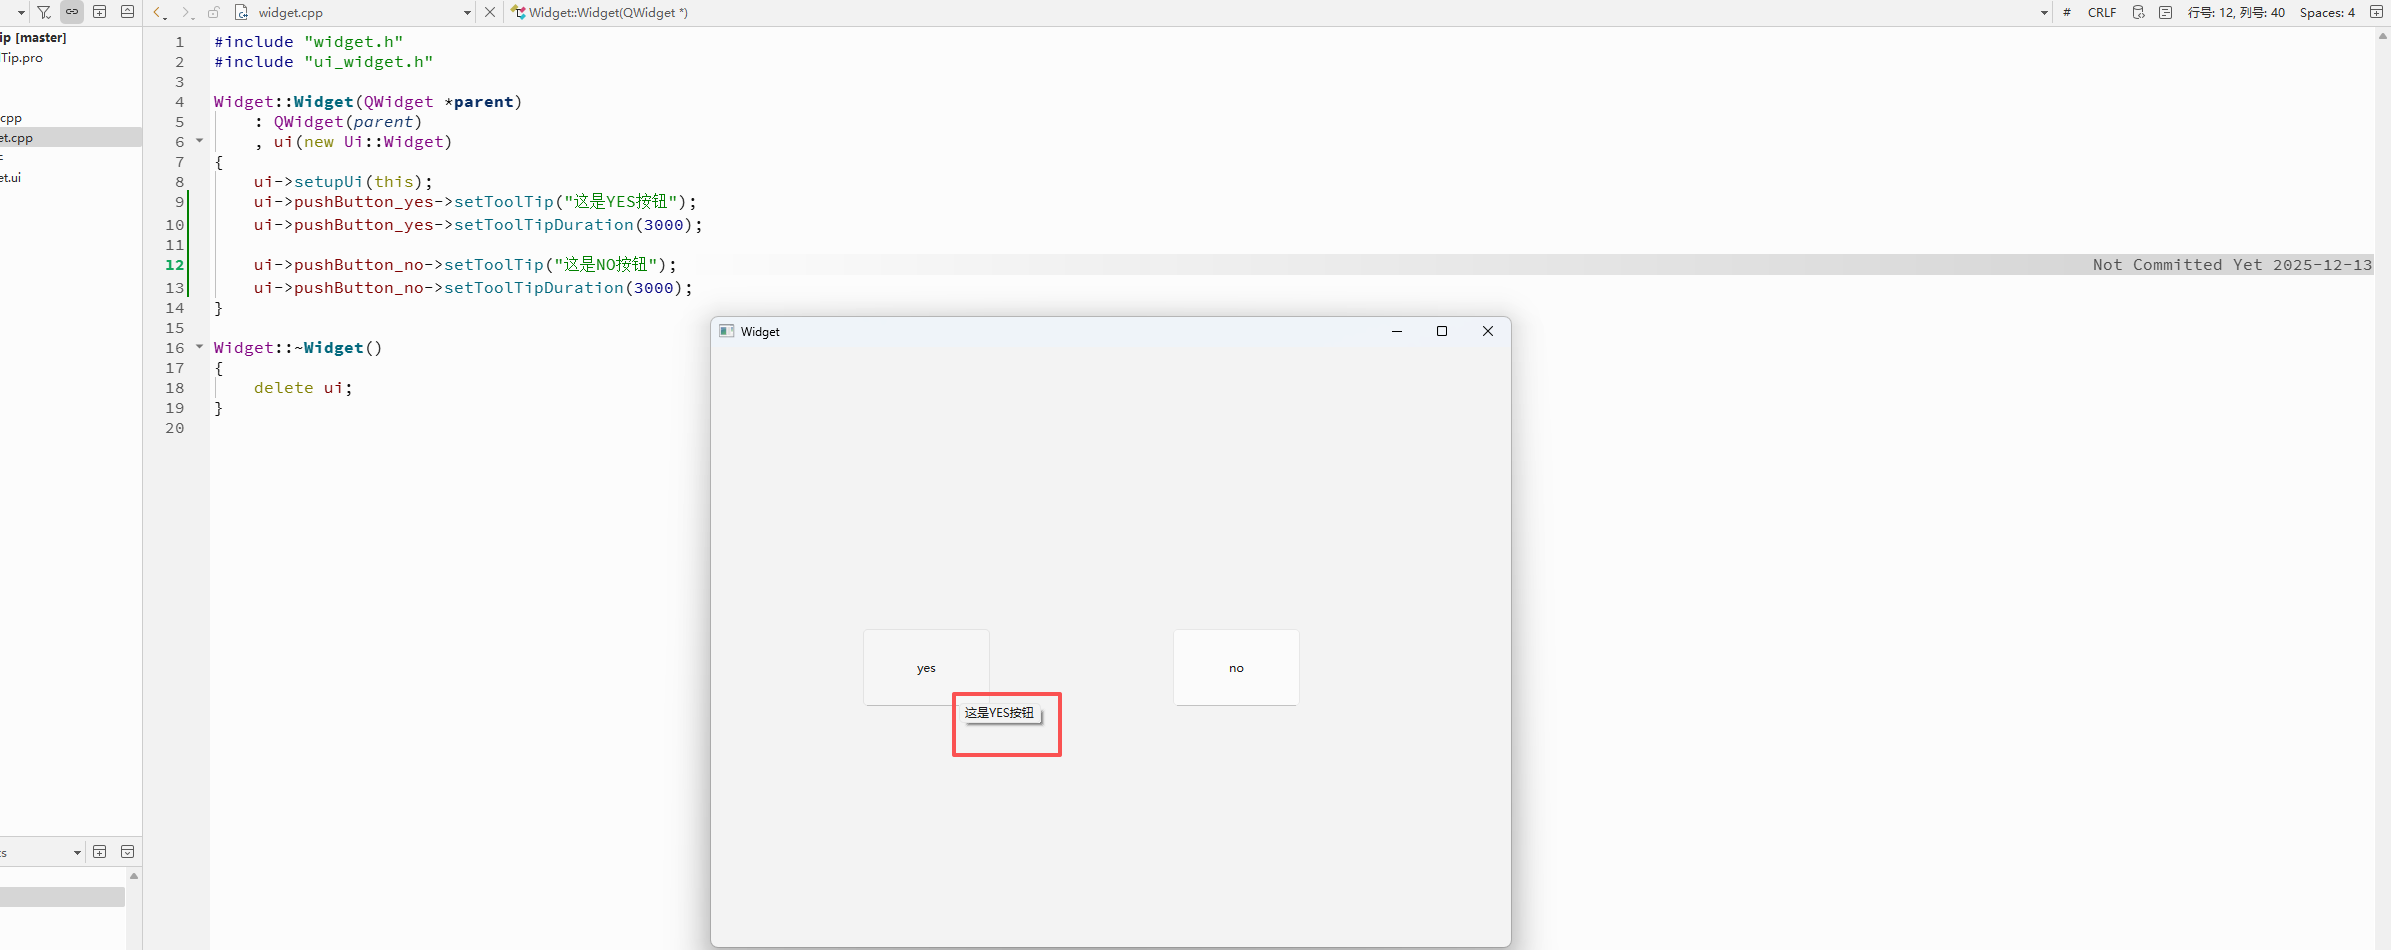
toolTip 只是给用户看的. 在代码中⼀般不需要获取到 toolTip.
在界⾯上拖放两个按钮. objectName 设置为 pushButton_yes 和 pushButton_no

widget.cpp
#include "widget.h"
#include "ui_widget.h"

Widget::Widget(QWidget *parent)
    : QWidget(parent)
    , ui(new Ui::Widget)
{
    ui->setupUi(this);
    ui->pushButton_yes->setToolTip("这是YES按钮");
    ui->pushButton_yes->setToolTipDuration(3000);

    ui->pushButton_no->setToolTip("这是NO按钮");
    ui->pushButton_no->setToolTipDuration(3000);
}

Widget::~Widget()
{
    delete ui;
}
3.5:focusPolicy
设置控件获取到焦点的策略. 比如某个控件能否用鼠标选中或者能否通过 tab 键选中.
- 所谓 "焦点" , 指的就是能选中这个元素. 接下来的操作 (比如键盘操作), 就都是针对该焦点元素进行的了. 这个对于输入框, 单选框, 复选框等控件非常有用的.
- 这个事情就和 war3 或者 sc2 中, 先选中单位, 再下达命令是⼀样的.
API | 说明 |
|---|---|
focusPolicy() | 获取该widget 的 focusPolicy, 返回 Qt::FocusPolicy |
setFocusPolicy(Qt::FocusPolicy policy | 设置 widget 的 focusPolicy |
Qt::FocusPolicy 是⼀个枚举类型. 取值如下.
- Qt::NoFocus :控件不会接收键盘焦点.
- Qt::TabFocus :控件可以通过Tab键接收焦点.
- Qt::ClickFocus :控件在鼠标点击时接收焦点.
- Qt::StrongFocus :控件可以通过Tab键和⿏标点击接收焦点 (默认值)
- Qt::WheelFocus : 类似于 Qt::StrongFocus , 同时控件也通过鼠标滚轮获取到焦点 (新增的选项, ⼀般很少使用.
在界⾯上创建四个单行输入框 (Line Edit)
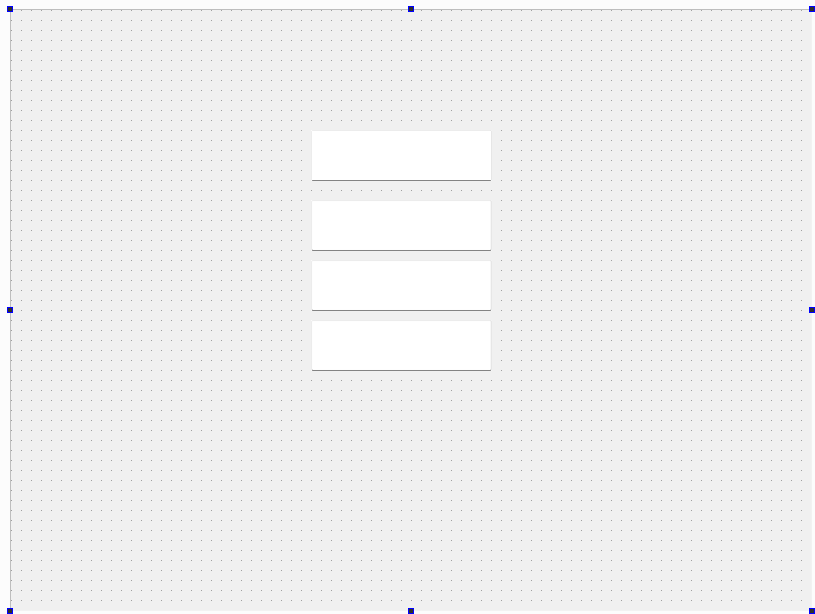
修改四个输入框的 focusPolicy 属性为 Qt::StrongFocus (默认取值, ⼀般不⽤额外修改)

此时运⾏程序, 可以看到, 使⽤鼠标单击/tab, 就可以移动光标所在输⼊框. 从⽽接下来的输⼊就是针对这个获取焦点的输入框展开的了.
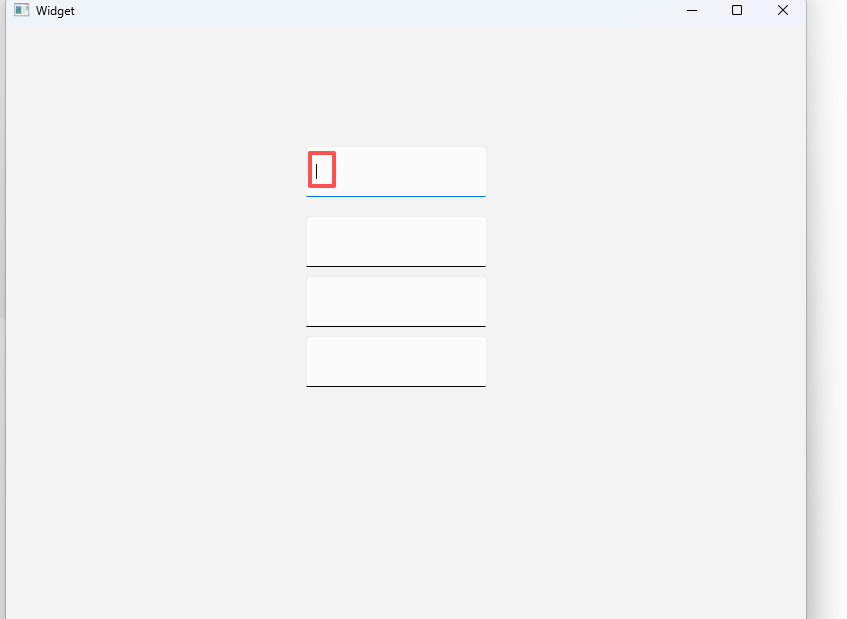
修改第⼆个输入框的 focusPolicy 为 Qt::NoFocus , 则第⼆个输⼊框不会被 tab / 鼠标左键 选中.

此时这个输入框也就⽆法输⼊内容了.
修改第⼆个输入框 focusPolicy 为 Qt::TabFocus , 则只能通过 tab 选中, ⽆法通过⿏标选 中.

3.6:stylesheet
通过 CSS 设置 widget 的样式.
- CSS (Cascading Style Sheets 层叠样式表) 本⾝属于网页前端技术. 主要就是用来描述界⾯的样式.
- 所谓 "样式", 包括不限于大小, 位置, 颜⾊, 间距, 字体, 背景, 边框等. 我们平时看到的丰富多彩的网页, 就都会用到大量的 CSS.
- Qt 虽然是做 GUI 开发, 但实际上和网页前端 有很多异曲同⼯之处. 因此 Qt 也引入了对于 CSS的支持.
CSS 中可以设置的样式属性非常多. 基于这些属性 Qt 只能支持其中⼀部分, 称为 QSS (Qt Style Sheet) 具体的⽀持情况可以参考 Qt ⽂档中 "Qt Style Sheets Reference" 章节.
代码示例1
在界面上创建 label
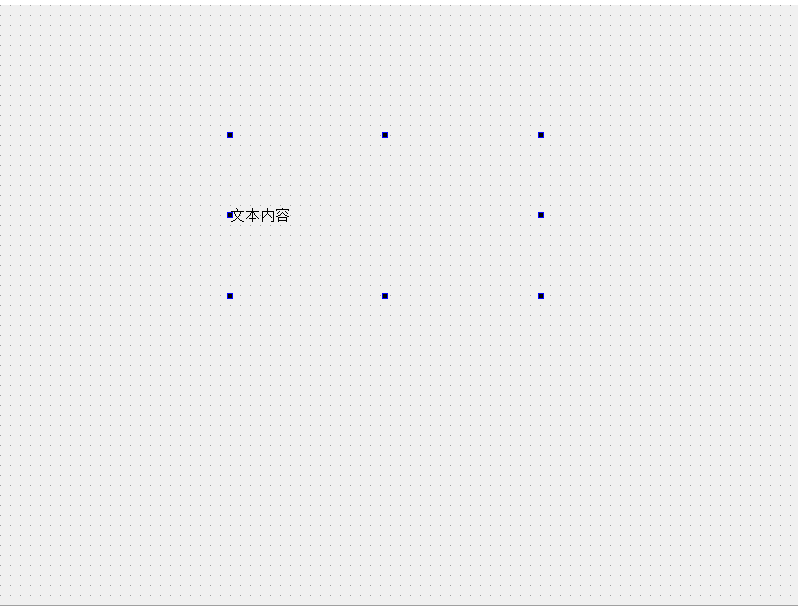
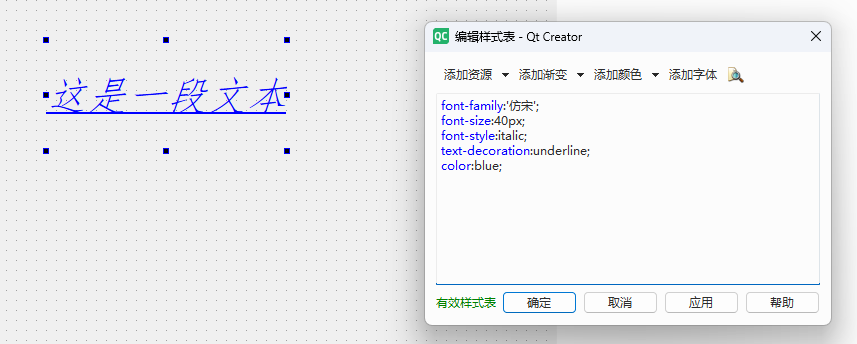
编辑右侧的 styleSheet 属性, 设置样式
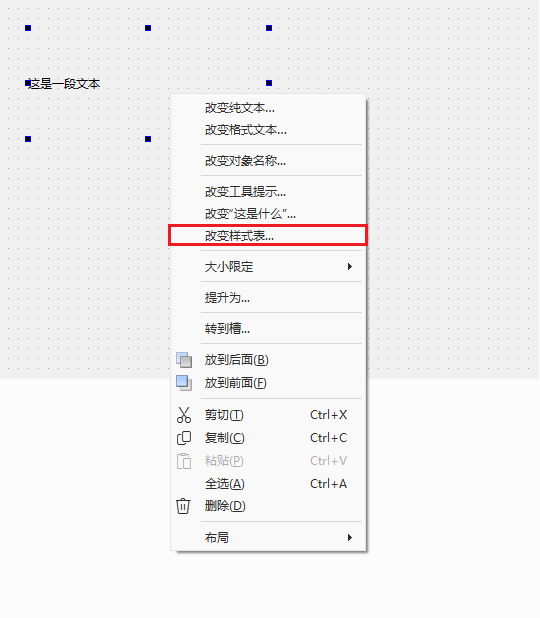
- 此处的语法格式同 CSS, 使用键值对的⽅式设置样式. 其中键和值之间使⽤ : 分割. 键值对之间使用; 分割.
- 另外, Qt Designer 只能对样式的基本格式进行校验, 不能检测出哪些样式不被 Qt 支持. 比如 text-align: center 这样的⽂本居中操作, 就无法支持.
编辑完成样式之后, 可以看到在 Qt Designer 中能够实时预览出效果
代码示例2
在界面上创建⼀个多行输入框 (Text Edit) 和两个按钮. objectName 分别为 pushButton_light 和 pushButton_dark
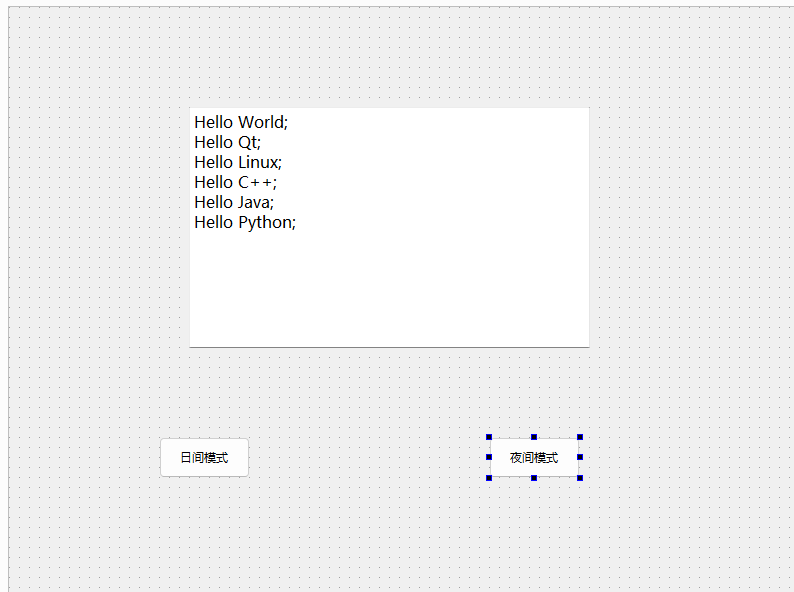
编写按钮的 slot 函数. #333 是深⾊, 但是没那么黑. #fff 是纯白色. #000 是纯黑色.
widget.cpp
#include "widget.h"
#include "ui_widget.h"

Widget::Widget(QWidget *parent)
    : QWidget(parent)
    , ui(new Ui::Widget)
{
    ui->setupUi(this);
}

Widget::~Widget()
{
    delete ui;
}

void Widget::on_pushButton_light_clicked()
{
    this->setStyleSheet("background-color: #f3f3f3");
    ui->textEdit->setStyleSheet("background-color:#fff;color:#000;");
    ui->pushButton_light->setStyleSheet("color:#000");
    ui->pushButton_dark->setStyleSheet("color:#000");
}


void Widget::on_pushButton_dark_clicked()
{
    this->setStyleSheet("background-color: #333");
    ui->textEdit->setStyleSheet("background-color:#333;color:#fff;");
    ui->pushButton_light->setStyleSheet("color:#fff");
    ui->pushButton_dark->setStyleSheet("color:#fff");
}
计算机中使⽤ "像素" 表示屏幕上的⼀个基本单位(也就是⼀个发亮的光点). 每个光点都使⽤三个字节表示颜色, 分别是 R (red), G (green), B (blue) ⼀个字节表示 (取值范围是 0-255, 或者 0x00-0xFF). 混合三种不同颜⾊的数值⽐例, 就能搭配出千千万万的颜⾊出来.
- rgb(255, 0, 0) 或者 #FF0000 或者 #F00 表示纯红⾊.
- rgb(0, 255, 0) 或者 #00FF00 或者 #0F0 表示纯绿⾊.
- rgb(0, 0, 255) 或者 #0000FF 或者 #00F 表示纯蓝⾊.
- rgb(255, 255, 255) 或者 #FFFFFF 或者 #FFFb表示纯白色.
- rgb(0, 0, 0) 或者 #000000 或者 #000 表示纯⿊⾊.
当然, 上述规则只是针对⼀般的程序而言是这么设定的. 实际的显示器, 可能有 8bit ⾊深或者 10bit色深等, 实际情况会更加复杂
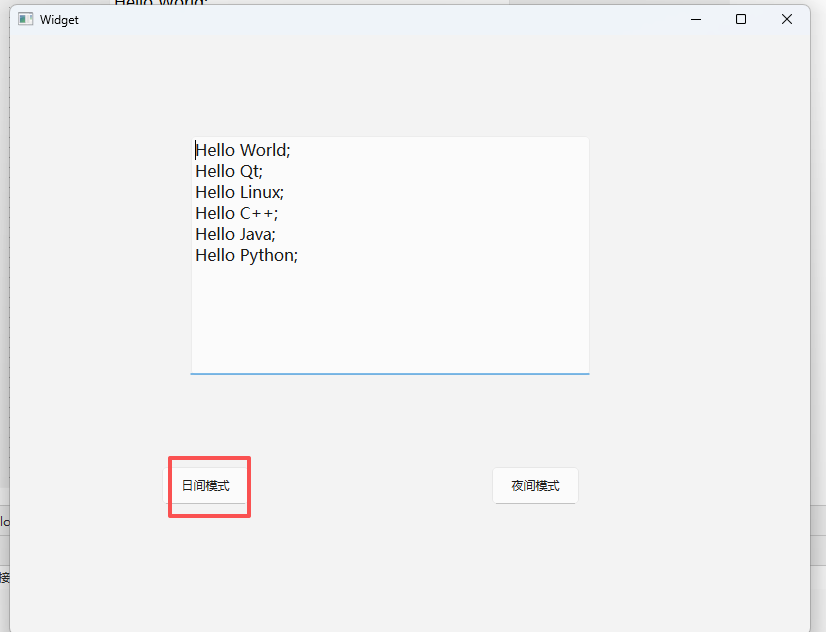
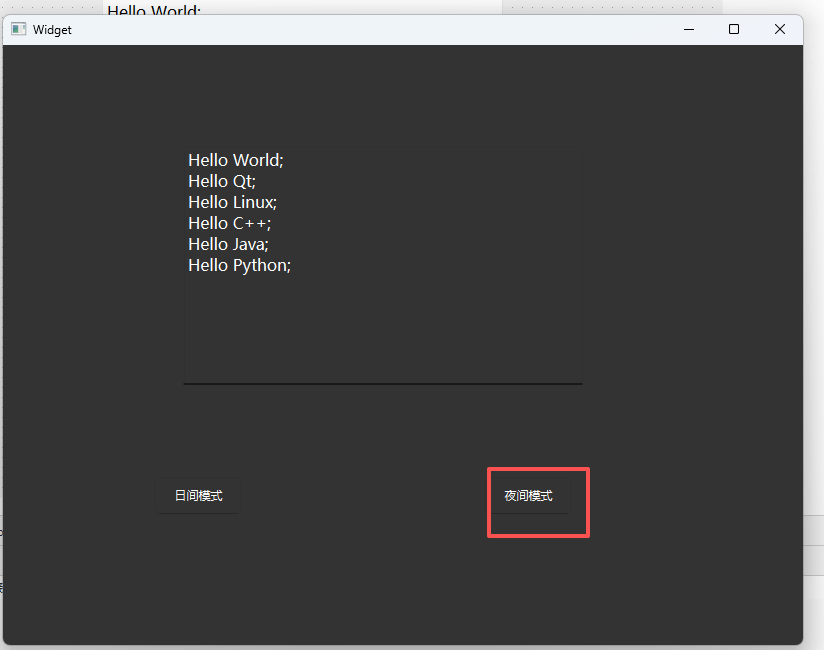
运行程序, 点击 "日间模式", 就是浅⾊背景, 深⾊文字; 点击 "夜间模式", 就是深⾊背景, 浅色文字.
本文参与 腾讯云自媒体同步曝光计划,分享自作者个人站点/博客。
原始发表:2026-01-12,如有侵权请联系 cloudcommunity@tencent.com 删除
评论
登录后参与评论
推荐阅读
目录
腾讯云开发者

Copyright © 2013 - 2026 Tencent Cloud. All Rights Reserved. 腾讯云 版权所有
深圳市腾讯计算机系统有限公司 ICP备案/许可证号:粤B2-20090059 ![]() 粤公网安备44030502008569号
粤公网安备44030502008569号
腾讯云计算(北京)有限责任公司 京ICP证150476号 | 京ICP备11018762号