
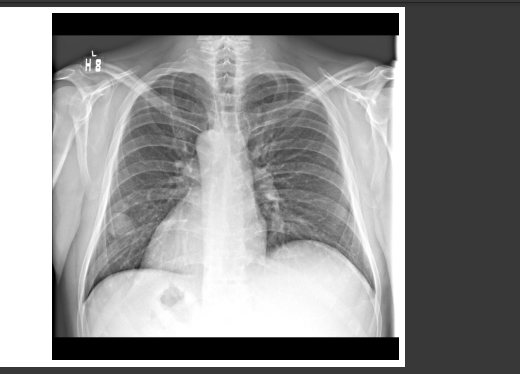
转换后图像变暗
我正在处理一个包含.mha文件的数据集。我想把这些文件转换成png/tiff来做一些工作。我正在使用Medpy库进行转换。
image_data, image_header = load('image_path/c0001.mha')
from medpy.io import save
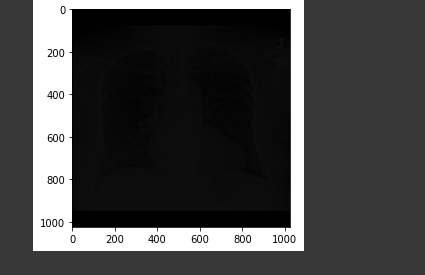
save(image_data, 'image_save_path/new_image.png', image_header)我实际上可以将图像转换为png/tiff格式,但是转换后的图像会变暗。我正在附上下面的截图。如何成功地转换图像?
回答 2
Stack Overflow用户
发布于 2022-01-27 22:50:33
您的数据显然仅限于12位(白色为2**12-1,即4095),而在此上下文中的PNG图像为16位(白色为2**16-1,即65535)。由于这个原因,你的PNG图像是如此的黑暗以至于它看起来几乎是黑色的(但是如果你仔细看它不是)。
您可以应用的最精确的转换如下:
import numpy as np
from medpy.io import load, save

def convert_to_uint16(data, source_max):
    target_max = 65535  # 2 ** 16 - 1
    # build a linear lookup table (LUT) indexed from 0 to source_max
    source_range = np.arange(source_max + 1)
    lut = np.round(source_range * target_max / source_max).astype(np.uint16)
    # apply it
    return lut[data]

image_data, image_header = load('c0001.mha')
new_image_data = convert_to_uint16(image_data, 4095)  # 2 ** 12 - 1
save(new_image_data, 'new_image.png', image_header)
输出:

注:new_image_data = image_data * 16对应于在convert_to_uint16中用65520 (4095 * 16)代替65535。
Stack Overflow用户
发布于 2022-01-27 22:01:19
你可以使用“对比拉伸”。
image_data的动态范围约为04095,最小值约为0,最大值约为4095 (2^12-1)。
您正在将图像保存为16位PNG。
当显示PNG文件时,查看器假定最大值为2^16-1 ( 16位的动态范围为0,65535)。
观看者假定0是黑色的,2^16-1是白色的,并且在鳞片之间是线性的.
在您的例子中,白色像素值约为4095,因此在65535,65535范围内它被转换为非常深灰色。
最简单的解决办法是将image_data乘以16。
from medpy.io import load, save

image_data, image_header = load('image_path/c0001.mha')

save(image_data*16, 'image_save_path/new_image.png', image_header)
一个更复杂的解决方案是应用线性“对比拉伸”。
我们可以将所有像素的下1%转换为0,将上1%的像素转换为2^16-1,并将像素线性地缩放。
import numpy as np
from medpy.io import load, save
image_data, image_header = load('image_path/c0001.mha')
tmp = image_data.copy()
tmp[tmp == 0] = np.median(tmp) # Ignore zero values by replacing them with median value (there are a lot of zeros in the margins).
tmp = tmp.astype(np.float32) # Convert to float32
# Get the value of lower and upper 1% of all pixels
lo_val, up_val = np.percentile(tmp, (1, 99)) # (for current sample: lo_val = 796, up_val = 3607)
# Linear stretching: Lower 1% goes to 0, upper 1% goes to 2^16-1, other values are scaled linearly
# Clipt to range [0, 2^16-1], round and convert to uint16
# https://stackoverflow.com/questions/49656244/fast-imadjust-in-opencv-and-python
img = np.round(((tmp - lo_val)*(65535/(up_val - lo_val))).clip(0, 65535)).astype(np.uint16) # (for current sample: subtract 796 and scale by 23.31)
img[image_data == 0] = 0 # Restore the original zeros.
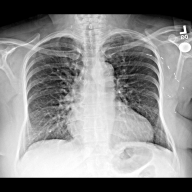
save(img, 'image_save_path/new_image.png', image_header)上述方法增强了对比,但对原始信息进行了丢失。
如果你想要更高的对比度,你可以使用非线性的方法,提高能见度,但失去一些“完整性”。
以下是“线性拉伸”结果(缩小规模):
https://stackoverflow.com/questions/70884117
复制相似问题
腾讯云开发者
