
如何在颤振中解决ListView项目的焦点问题?
我有一个列表视图,我希望启用类似Ctrl+c、Enter等快捷方式,这样可以改善用户体验。
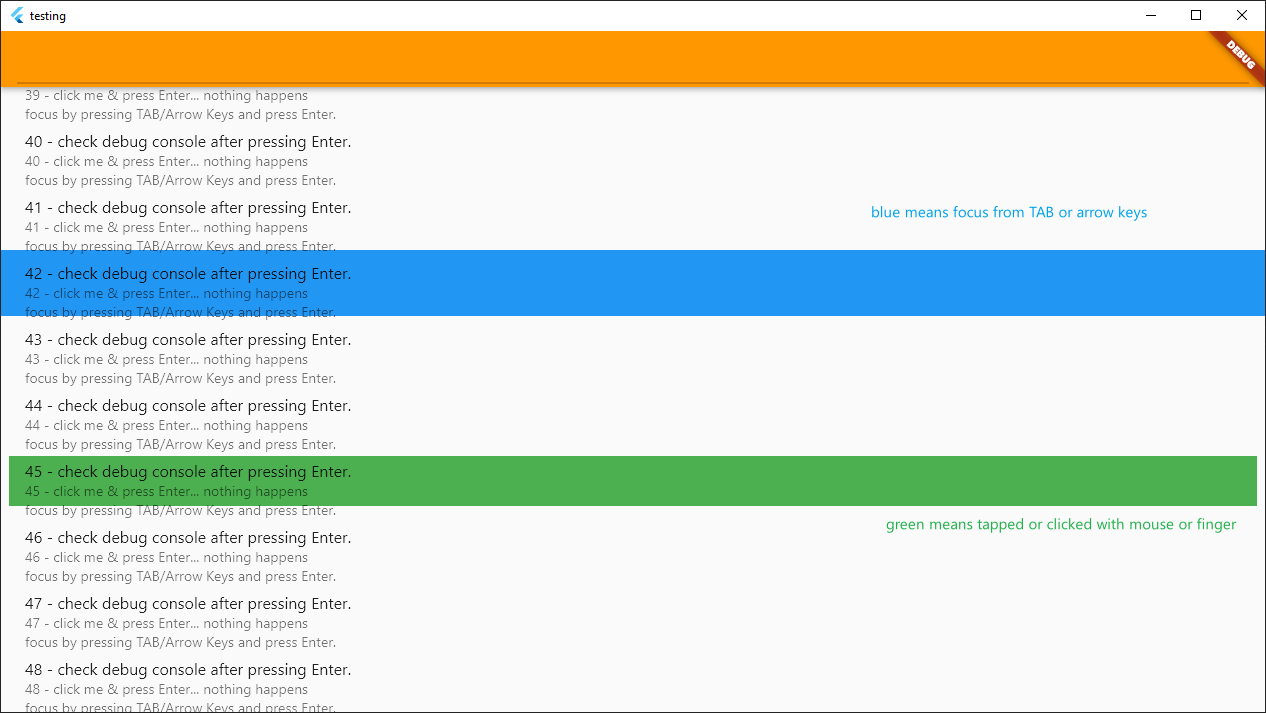
问题是在我单击/点击一个项目后,它会失去焦点,并且快捷键不再工作。
有解决这个问题的办法吗?
import 'package:flutter/material.dart';
import 'package:flutter/services.dart';
import 'package:get/get.dart';

void main() {
  runApp(const MyApp());
}

class SomeIntent extends Intent {}

class MyApp extends StatelessWidget {
  const MyApp({Key? key}) : super(key: key);

  // This widget is the root of your application.
  @override
  Widget build(BuildContext context) {
    return MaterialApp(
      title: 'Flutter Demo',
      theme: ThemeData(
        primarySwatch: Colors.orange,
      ),
      home: const MyHomePage(),
    );
  }
}

class MyHomePage extends StatelessWidget {
  const MyHomePage({Key? key}) : super(key: key);

  @override
  Widget build(BuildContext context) {
    return GetBuilder<Controller>(
      init: Get.put(Controller()),
      builder: (controller) {
        final List<MyItemModel> myItemModelList = controller.myItemModelList;
        return Scaffold(
          appBar: AppBar(
            title: RawKeyboardListener(
              focusNode: FocusNode(),
              onKey: (event) {
                if (event.logicalKey.keyLabel == 'Arrow Down') {
                  FocusScope.of(context).nextFocus();
                }
              },
              child: const TextField(
                autofocus: true,
              ),
            ),
          ),
          body: myItemModelList.isEmpty
              ? const Center(child: CircularProgressIndicator())
              : ListView.builder(
                  itemBuilder: (context, index) {
                    final MyItemModel item = myItemModelList[index];
                    return Shortcuts(
                      shortcuts: {
                        LogicalKeySet(LogicalKeyboardKey.enter): SomeIntent(),
                      },
                      child: Actions(
                        actions: {
                          SomeIntent: CallbackAction<SomeIntent>(
                            // this will not launch if I manually focus on the item and press enter
                            onInvoke: (intent) => print(
                                'SomeIntent action was launched for item ${item.name}'),
                          )
                        },
                        child: InkWell(
                          focusColor: Colors.blue,
                          onTap: () {
                            print('clicked item $index');
                            controller.toggleIsSelected(item);
                          },
                          child: Padding(
                            padding: const EdgeInsets.all(8.0),
                            child: Container(
                              color: myItemModelList[index].isSelected
                                  ? Colors.green
                                  : null,
                              height: 50,
                              child: ListTile(
                                title: Text(myItemModelList[index].name),
                                subtitle: Text(myItemModelList[index].detail),
                              ),
                            ),
                          ),
                        ),
                      ),
                    );
                  },
                  itemCount: myItemModelList.length,
                ),
        );
      },
    );
  }
}

class Controller extends GetxController {
  List<MyItemModel> myItemModelList = [];

  @override
  void onReady() {
    myItemModelList = buildMyItemModelList(100);

    update();

    super.onReady();
  }

  List<MyItemModel> buildMyItemModelList(int count) {
    return Iterable<MyItemModel>.generate(
      count,
      (index) {
        return MyItemModel('$index - check debug console after pressing Enter.',
            '$index - click me & press Enter... nothing happens\nfocus by pressing TAB/Arrow Keys and press Enter.');
      },
    ).toList();
  }

  toggleIsSelected(MyItemModel item) {
    for (var e in myItemModelList) {
      if (e == item) {
        e.isSelected = !e.isSelected;
      }
    }

    update();
  }
}

class MyItemModel {
  final String name;
  final String detail;
  bool isSelected = false;

  MyItemModel(this.name, this.detail);
}- 用Windows 10和颤振3.0.1测试
- 使用到达状态管理器。
回答 2
Stack Overflow用户
发布于 2022-10-12 22:34:21
在包含多个ListView小部件的GridView或ListTile中,您可能会注意到选择和焦点是分开的。我们还存在tap()问题,它理想地同时设置选择和焦点,但默认情况下,tap不会影响焦点或选择。
ListTile selected https://api.flutter.dev/flutter/material/ListTile/selected.html的正式演示展示了如何手动实现selected ListTile并获取tap()来更改所选的ListTile。但在同步焦点方面,这对我们没有任何帮助。
注意:正如该演示所显示的,跟踪
selectedListTile需要手动完成,方法是拥有一个selectedIndex变量,然后如果index与selectedIndex匹配,则将ListTile的selected属性设置为true。
下面是几个解决同步焦点问题的解决方案,选择并点击一个列表视图。
解决方案1(已不再建议,不建议):
主要问题是访问焦点行为--默认情况下,我们无法访问每个ListTile的FocusNode。
UPDATE:实际上有一种访问焦点节点的方法,因此没有必要分配我们自己的焦点节点--参见下面的解决方案2。您可以将
Focus小部件与child: Builder(builder: (BuildContext context)一起使用,然后可以使用FocusScope.of(context).focusedChild访问焦点节点。我把第一个解决方案留在这里学习,但建议解决方案2。
但是,通过为ListTile中的每个ListView项分配一个焦点节点,我们就会这样做。您知道,通常情况下,ListTile项分配自己的焦点节点,但这对我们不利,因为我们希望从外部访问每个焦点节点。因此,我们自己分配焦点节点,并在构建它们时将它们传递给ListTile项,这意味着ListTile不再需要分配FocusNode本身--注意:在ListTile API中支持的不是提供黑客的自定义FocusNodes。现在,我们可以访问每个FocusNode项的ListTile对象,并且
- 每当选择更改时调用其requestFocus()方法。
- 我们还在FocusNode对象中侦听焦点中的更改,并在焦点发生更改时更新所选内容。
我们为每个ListTile提供的自定义焦点节点的好处是:
- 我们可以从ListTile小部件外部访问焦点节点。
- 我们可以使用focus节点请求焦点。
- 我们可以倾听焦点的变化。
- 额外好处:我们可以将快捷键直接连接到焦点节点,而不需要通常的抖动快捷方式的复杂性。
此代码同步选择、焦点和点击行为,以及支持上下箭头更改所选内容。
import 'package:flutter/material.dart';
import 'package:flutter/services.dart';

// Enhancements to the official ListTile 'selection' demo
// https://api.flutter.dev/flutter/material/ListTile/selected.html to
// incorporate Andy's enhancements to sync tap, focus and selected.
// This version includes up/down arrow key support.

void main() => runApp(const MyApp());

class MyApp extends StatelessWidget {
  const MyApp({super.key});

  static const String _title =
      'Synchronising ListTile selection, focus and tap - with up/down arrow key support';

  @override
  Widget build(BuildContext context) {
    return MaterialApp(
      title: _title,
      home: Scaffold(
        appBar: AppBar(title: const Text(_title)),
        body: const MyStatefulWidget(),
      ),
    );
  }
}

class MyStatefulWidget extends StatefulWidget {
  const MyStatefulWidget({super.key});

  @override
  State<MyStatefulWidget> createState() => _MyStatefulWidgetState();
}

class _MyStatefulWidgetState extends State<MyStatefulWidget> {
  int _selectedIndex = 0;
  late List _focusNodes; // our custom focus nodes

  void changeSelected(int index) {
    setState(() {
      _selectedIndex = index;
    });
  }

  void changeFocus(int index) {
    _focusNodes[index].requestFocus(); // this works!
  }

  // initstate
  @override
  void initState() {
    super.initState();

    _focusNodes = List.generate(
        10,
        (index) => FocusNode(onKeyEvent: (node, event) {
              print(
                  'focusnode detected: ${event.logicalKey.keyLabel} ${event.runtimeType} $index ');
              // The focus change that happens when the user presses TAB,
              // SHIFT+TAB, UP and DOWN arrow keys happens on KeyDownEvent (not
              // on the KeyUpEvent), so we ignore the KeyDownEvent and let
              // Flutter do the focus change. That way we don't need to worry
              // about programming manual focus change ourselves, say, via
              // methods on the focus nodes, which would be an unecessary
              // duplication.
              //
              // Once the focus change has happened naturally, all we need to do
              // is to change our selected state variable (which we are manually
              // managing) to the new item position (where the focus is now) -
              // we can do this in the KeyUpEvent.  The index of the KeyUpEvent
              // event will be item we just moved focus to (the KeyDownEvent
              // supplies the old item index and luckily the corresponding
              // KeyUpEvent supplies the new item index - where the focus has
              // just moved to), so we simply set the selected state value to
              // that index.

              if (event.runtimeType == KeyUpEvent &&
                  (event.logicalKey == LogicalKeyboardKey.arrowUp ||
                      event.logicalKey == LogicalKeyboardKey.arrowDown ||
                      event.logicalKey == LogicalKeyboardKey.tab)) {
                changeSelected(index);
              }

              return KeyEventResult.ignored;
            }));
  }

  @override
  Widget build(BuildContext context) {
    return ListView.builder(
      itemCount: 10,
      itemBuilder: (BuildContext context, int index) {
        return ListTile(
          focusNode: _focusNodes[
              index], // allocate our custom focus node for each item
          title: Text('Item $index'),
          selected: index == _selectedIndex,
          onTap: () {
            changeSelected(index);
            changeFocus(index);
          },
        );
      },
    );
  }
}重要备注:当更改项目数时,上面的解决方案不起作用,因为所有焦点节点都是在initState期间分配的,而initState只调用一次。例如,如果条目的数量增加,那么就没有足够的焦点节点来执行,构建步骤就会崩溃。
下一个解决方案(下面)没有显式地分配焦点节点,而是一个更健壮的解决方案,它支持动态地重建、添加和删除项。
解决方案2(允许重新构建,建议)
import 'dart:convert';
import 'package:flutter/material.dart';
import 'package:flutter/services.dart';
import 'dart:developer' as developer;

void main() => runApp(const MyApp());

class MyApp extends StatelessWidget {
  const MyApp({super.key});

  static const String _title = 'Flutter selectable listview - solution 2';

  @override
  Widget build(BuildContext context) {
    return const MaterialApp(
      title: _title,
      home: HomeWidget(),
    );
  }
}

// ╦ ╦┌─┐┌┬┐┌─┐╦ ╦┬┌┬┐┌─┐┌─┐┌┬┐
// ╠═╣│ ││││├┤ ║║║│ │││ ┬├┤  │
// ╩ ╩└─┘┴ ┴└─┘╚╩╝┴─┴┘└─┘└─┘ ┴

class HomeWidget extends StatefulWidget {
  const HomeWidget({super.key});

  @override
  State<HomeWidget> createState() => _HomeWidgetState();
}

class _HomeWidgetState extends State<HomeWidget> {
  // generate a list of 10 string items
  List<String> _items = List<String>.generate(10, (int index) => 'Item $index');
  String currentItem = '';
  int currentIndex = 0;
  int redrawTrigger = 0;

  // clear items method inside setstate
  void _clearItems() {
    setState(() {
      currentItem = '';
      _items.clear();
    });
  }

  // add items method inside setstate
  void _rebuildItems() {
    setState(() {
      currentItem = '';
      _items.clear();
      _items.addAll(List<String>.generate(5, (int index) => 'Item $index'));
    });
  }

  // set currentItem method inside setstate
  void _setCurrentItem(String item) {
    setState(() {
      currentItem = item;
      currentIndex = _items.indexOf(item);
    });
  }

  // set currentindex method inside setstate
  void _setCurrentIndex(int index) {
    setState(() {
      currentIndex = index;
      if (index < 0 || index >= _items.length) {
        currentItem = '';
      } else {
        currentItem = _items[index];
      }
    });
  }

  // delete current index method inside setstate
  void _deleteCurrentIndex() {
    // ensure that the index is valid
    if (currentIndex >= 0 && currentIndex < _items.length) {
      setState(() {
        String removedValue = _items.removeAt(currentIndex);
        if (removedValue.isNotEmpty) {
          print('Item index $currentIndex deleted, which was $removedValue');

          // calculate new focused index, if have deleted the last item
          int newFocusedIndex = currentIndex;
          if (newFocusedIndex >= _items.length) {
            newFocusedIndex = _items.length - 1;
          }
          _setCurrentIndex(newFocusedIndex);
          print('setting new newFocusedIndex to $newFocusedIndex');
        } else {
          print('Failed to remove $currentIndex');
        }
      });
    } else {
      print('Index $currentIndex is out of range');
    }
  }

  @override
  Widget build(BuildContext context) {
    // print the current time
    print('HomeView build at ${DateTime.now()} $_items');
    return Scaffold(
      body: Column(
        children: [
          // display currentItem
          Text(currentItem),
          Text(currentIndex.toString()),
          ElevatedButton(
            child: Text("Force Draw"),
            onPressed: () => setState(() {
              redrawTrigger = redrawTrigger + 1;
            }),
          ),
          ElevatedButton(
            onPressed: () {
              _setCurrentItem('Item 0');
              redrawTrigger = redrawTrigger + 1;
            },
            child: const Text('Set to Item 0'),
          ),
          ElevatedButton(
            onPressed: () {
              _setCurrentIndex(1);
              redrawTrigger = redrawTrigger + 1;
            },
            child: const Text('Set to index 1'),
          ),
          // button to clear items
          ElevatedButton(
            onPressed: _clearItems,
            child: const Text('Clear Items'),
          ),
          // button to add items
          ElevatedButton(
            onPressed: _rebuildItems,
            child: const Text('Rebuild Items'),
          ),
          // button to delete current item
          ElevatedButton(
            onPressed: _deleteCurrentIndex,
            child: const Text('Delete Current Item'),
          ),
          Expanded(
            key: ValueKey('${_items.length} $redrawTrigger'),
            child: ListView.builder(
              itemBuilder: (BuildContext context, int index) {
                // print('  building listview index $index');
                return FocusableText(
                  _items[index],
                  autofocus: index == currentIndex,
                  updateCurrentItemParentCallback: _setCurrentItem,
                  deleteCurrentItemParentCallback: _deleteCurrentIndex,
                );
              },
              itemCount: _items.length,
            ),
          ),
        ],
      ),
    );
  }
}

// ╔═╗┌─┐┌─┐┬ ┬┌─┐┌─┐┌┐ ┬  ┌─┐╔╦╗┌─┐─┐ ┬┌┬┐
// ╠╣ │ ││  │ │└─┐├─┤├┴┐│  ├┤  ║ ├┤ ┌┴┬┘ │
// ╚  └─┘└─┘└─┘└─┘┴ ┴└─┘┴─┘└─┘ ╩ └─┘┴ └─ ┴

class FocusableText extends StatelessWidget {
  const FocusableText(
    this.data, {
    super.key,
    required this.autofocus,
    required this.updateCurrentItemParentCallback,
    required this.deleteCurrentItemParentCallback,
  });

  /// The string to display as the text for this widget.
  final String data;

  /// Whether or not to focus this widget initially if nothing else is focused.
  final bool autofocus;

  final updateCurrentItemParentCallback;
  final deleteCurrentItemParentCallback;

  @override
  Widget build(BuildContext context) {
    return CallbackShortcuts(
      bindings: {
        const SingleActivator(LogicalKeyboardKey.keyX): () {
          print('X pressed - attempting to delete $data');
          deleteCurrentItemParentCallback();
        },
      },
      child: Focus(
        autofocus: autofocus,
        onFocusChange: (value) {
          print(
              '$data onFocusChange ${FocusScope.of(context).focusedChild}: $value');
          if (value) {
            updateCurrentItemParentCallback(data);
          }
        },
        child: Builder(builder: (BuildContext context) {
        // The contents of this Builder are being made focusable. It is inside
        // of a Builder because the builder provides the correct context
        // variable for Focus.of() to be able to find the Focus widget that is
        // the Builder's parent. Without the builder, the context variable used
        // would be the one given the FocusableText build function, and that
        // would start looking for a Focus widget ancestor of the FocusableText
        // instead of finding the one inside of its build function.
          developer.log('build $data', name: '${Focus.of(context)}');
          return GestureDetector(
            onTap: () {
              Focus.of(context).requestFocus();
              // don't call updateParentCallback('data') here, it will be called by onFocusChange
            },
            child: ListTile(
              leading: Icon(Icons.map),
              selectedColor: Colors.red,
              selected: Focus.of(context).hasPrimaryFocus,
              title: Text(data),
            ),
          );
        }),
      ),
    );
  }
}Stack Overflow用户
发布于 2022-07-05 00:34:41
编辑:这是为了重新获得焦点,但是焦点再次从顶部小部件开始,而不是从单击的小部件开始。我希望这个答案仍然有帮助。
编辑2我找到了一个解决方案,您必须为listview()上的每个元素创建一个单独的FocusNode(),在inkwell中为该元素创建一个requestFocus()。完成更新后的工作示例(使用此示例,而不是原始答案中的示例):
import 'package:flutter/material.dart';

void main() {
  runApp(const MyApp());
}

class SomeIntent extends Intent {}

class MyApp extends StatelessWidget {
  const MyApp({Key? key}) : super(key: key);

  // This widget is the root of your application.
  @override
  Widget build(BuildContext context) {
    return MaterialApp(
      title: 'Flutter Demo',
      theme: ThemeData(
        primarySwatch: Colors.orange,
      ),
      home: MyHomePage(),
    );
  }
}

class MyHomePage extends StatelessWidget {
  MyHomePage({Key? key}) : super(key: key);

  @override
  Widget build(BuildContext context) {
    final myItemModelList = List.generate(10, (index) => Text('${index + 1}'));
    final _focusNodes = List.generate(myItemModelList.length, (index) => FocusNode());

    return Scaffold(
      appBar: AppBar(),
      body: myItemModelList.isEmpty
          ? const Center(child: CircularProgressIndicator())
          : ListView.builder(
              itemBuilder: (context, index) {
                final item = myItemModelList[index];
                return RawKeyboardListener(
                  focusNode: _focusNodes[index],
                  onKey: (event) {
                    if (event.logicalKey.keyLabel == 'Arrow Down') {
                      FocusScope.of(context).nextFocus();
                    }
                  },
                  child: Actions(
                    actions: {
                      SomeIntent: CallbackAction<SomeIntent>(
                        // this will not launch if I manually focus on the item and press enter
                        onInvoke: (intent) => print(
                            'SomeIntent action was launched for item ${item}'),
                      )
                    },
                    child: InkWell(
                      focusColor: Colors.blue,
                      onTap: () {
                        _focusNodes[index].requestFocus();
                      },
                      child: Padding(
                        padding: const EdgeInsets.all(8.0),
                        child: Container(
                          color: Colors.blue,
                          height: 50,
                          child: ListTile(
                              title: myItemModelList[index],
                              subtitle: myItemModelList[index]),
                        ),
                      ),
                    ),
                  ),
                );
              },
              itemCount: myItemModelList.length,
            ),
    );
  }
}编辑3:也可以检测up键,您可以尝试:
 onKey: (event) {
                    if (event.isKeyPressed(LogicalKeyboardKey.arrowDown)) {
                      FocusScope.of(context).nextFocus();
                    } else if (event.isKeyPressed(LogicalKeyboardKey.arrowUp)) {
                      FocusScope.of(context).previousFocus();
                    }
},原始答案(您仍然应该阅读以理解完整的答案)。
首先,在RawKeyboardListener()中添加appBar()不会这样做,而是将其添加到Scaffold()中。
现在,在FocusNode()方法之外创建一个Build:
class MyHomePage extends StatelessWidget {
  MyHomePage({Key? key}) : super(key: key);

  final _focusNode = FocusNode();
  @override
  Widget build(BuildContext context) {}
  ...
...把_focusNode放进RawKeyboardListener()
RawKeyboardListener(focusNode: _focusNode,
...这是重点。由于您不想在ListView()中丢失焦点,所以在onTap of your inkWell中,您必须再次请求焦点:
InkWell(
    focusColor: Colors.blue,
    onTap: () {
      _focusNode.requestFocus();
      print('clicked item $index');
    },
 ...
就这样。
下面是一个基于代码的完整的工作示例。(我需要修改一些东西,因为我没有您所有的数据):
import 'package:flutter/material.dart';
import 'package:flutter/services.dart';

void main() {
  runApp(const MyApp());
}

class SomeIntent extends Intent {}

class MyApp extends StatelessWidget {
  const MyApp({Key? key}) : super(key: key);

  // This widget is the root of your application.
  @override
  Widget build(BuildContext context) {
    return MaterialApp(
      title: 'Flutter Demo',
      theme: ThemeData(
        primarySwatch: Colors.orange,
      ),
      home: MyHomePage(),
    );
  }
}

class MyHomePage extends StatelessWidget {
  MyHomePage({Key? key}) : super(key: key);

  final _focusNode = FocusNode();
  @override
  Widget build(BuildContext context) {
    final myItemModelList = List.generate(10, (index) => Text('${index + 1}'));

    return Scaffold(
      appBar: AppBar(),
      body: myItemModelList.isEmpty
          ? const Center(child: CircularProgressIndicator())
          : RawKeyboardListener(
              focusNode: _focusNode,
              onKey: (event) {
                if (event.logicalKey.keyLabel == 'Arrow Down') {
                  FocusScope.of(context).nextFocus();
                }
              },
              child: ListView.builder(
                itemBuilder: (context, index) {
                  final item = myItemModelList[index];
                  return Shortcuts(
                    shortcuts: {
                      LogicalKeySet(LogicalKeyboardKey.enter): SomeIntent(),
                    },
                    child: Actions(
                      actions: {
                        SomeIntent: CallbackAction<SomeIntent>(
                          // this will not launch if I manually focus on the item and press enter
                          onInvoke: (intent) => print(
                              'SomeIntent action was launched for item ${item}'),
                        )
                      },
                      child: InkWell(
                        focusColor: Colors.blue,
                        onTap: () {
                          _focusNode.requestFocus();
                          print('clicked item $index');
                        },
                        child: Padding(
                          padding: const EdgeInsets.all(8.0),
                          child: Container(
                            color: Colors.blue,
                            height: 50,
                            child: ListTile(
                                title: myItemModelList[index],
                                subtitle: myItemModelList[index]),
                          ),
                        ),
                      ),
                    ),
                  );
                },
                itemCount: myItemModelList.length,
              ),
            ),
    );
  }
}
演示:

https://stackoverflow.com/questions/72757996
复制相似问题
腾讯云开发者
