
如何在vscode中调试deno测试
使用deno扩展可以很好地运行测试,但似乎没有调试测试的选项。
注意,我可以在vscode中调试deno代码,没有问题。调试测试才是问题所在。
回答 1
Stack Overflow用户
发布于 2022-08-28 23:51:09
我将提供一些步骤和一些示例文件,以帮助您重现成功。
在开始之前,以下是需要阅读的相关手册页:
您还需要确定以下几点:
- Deno已在您的
PATH中安装并可用。我的意思是-在VS代码终端中,- you可以键入下面的命令并查看版本信息:
> deno --version
deno 1.25.0 (release, x86_64-apple-darwin)
v8 10.6.194.5
typescript 4.7.4{
"deno.enable": true
}现在你可以继续:
为了清晰起见:以下是我写这篇文章时使用的软件版本:
% deno --version
deno 1.25.0 (release, x86_64-apple-darwin)
v8 10.6.194.5
typescript 4.7.4

% code --version
1.70.2
e4503b30fc78200f846c62cf8091b76ff5547662
x64

% code --list-extensions --show-versions | grep "deno"
denoland.vscode-deno@3.13.1
自定义调试测试运行程序配置
在创建
.vscode/launch.json文件之前,与提供程序模板中的代码为您提供了生成一个进行比较。如果您已经在.vscode/launch.json**,上创建了该文件,那么您将没有这个选项**,所以如果您已经创建了一个启动配置文件,就需要移动/删除现有的启动配置文件。
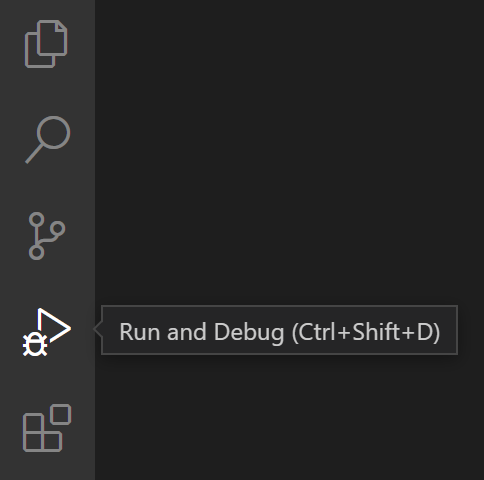
- 选择VS代码的主侧边栏中的Run和Debug视图:
- 如果您的工作区中没有
.vscode/launch.json文件,您将看到默认的开始视图:
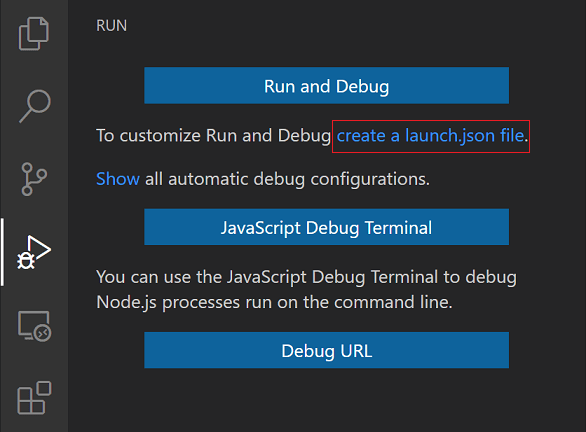
- 选择文本链接“创建一个launch.json文件”。您将收到调试器模板提供程序的列表:
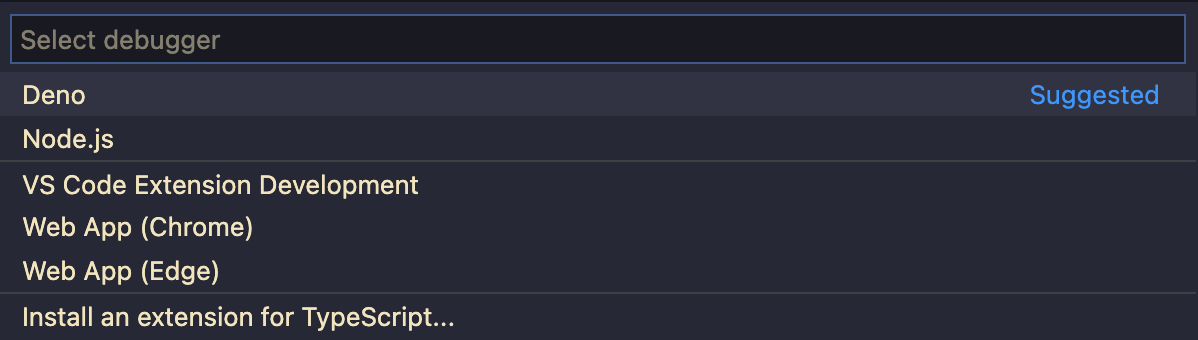
- 选择选项"Deno“,VS代码将为您生成一个带有默认选项的启动配置文件。下面我包含了我修改过的配置的版本,以及关于哪些值被修改以及原因的注释:
.vscode/launch.json
{
  // Use IntelliSense to learn about possible attributes.
  // Hover to view descriptions of existing attributes.
  // For more information, visit: https://go.microsoft.com/fwlink/?linkid=830387
  "version": "0.2.0",
  "configurations": [
    {
      "request": "launch",

      /* modified: descriptive name */
      "name": "Debug tests",

      /* modified: was generated as "pwa-node", but VS Code shows me
      a diagnostic warning for that value: "Please use type node instead(2)" */
      "type": "node",

      /* disabled specific entrypoint */
      // "program": "${workspaceFolder}/main.ts",

      "cwd": "${workspaceFolder}",

      /* modified: using deno process name from my PATH */
      "runtimeExecutable": "deno",

      "runtimeArgs": [
        /* modified: was generated as "run", but you asked about testing */
        "test",

        /* modified: was generated as "--inspect", but using this option
        causes an initial break to wait for the debugger to attach */
        "--inspect-brk"

        /* disabled: allowing all permissions is unsafe: only allow
        the specific permissions that your scripts need */
        // "--allow-all"
      ],
      "attachSimplePort": 9229
    }
  ]
}仅凭这一点,您就可以在工作区中调试不需要特定权限的测试。(如果是这样的话,您需要将它们作为额外的运行时参数来包含,而不是"--allow-all"。)
注意,当当前工作目录是您的工作区时,此配置等效于以下终端命令:
deno test --inspect-brk下面我将提供一个示例TypeScript模块和测试模块,以便这是一个完整的示例(注意,我编写这些模块只是为了给这个答案提供一个示例--它们不一定是声音逻辑和优秀风格的巅峰):
mod.ts
/**
 * Capitalizes the first letter of every word preceded by whitespace or a hyphen
 * (including articles, prepositions, etc.) — see
 * [Title case on Wikipedia](https://en.wikipedia.org/wiki/Title_case).
 */
export function getSimpleTitleCase(input: string): string {
  const delimiterRegexp = /[\s-]/;
  let result = "";
  let ready = true;

  for (const str of input) {
    const isDelimiter = delimiterRegexp.test(str);

    if (isDelimiter) {
      ready = true;
      result += str;
      continue;
    } else if (ready) {
      result += str.toUpperCase();
      ready = false;
      continue;
    }

    result += str.toLowerCase();
  }

  return result;
}
test.ts
import { assertStrictEquals } from "https://deno.land/std@0.153.0/testing/asserts.ts";
import { getSimpleTitleCase } from "./mod.ts";

const { test } = Deno;

test("getSimpleTitleCase: smoke test", async ({ step }) => {
  const testData: Record<"expected" | "input", string>[] = [
    {
      expected: "The Last Jedi",
      input: "the last jedi",
    },
    {
      expected: "My Old-Fashioned Grandparents",
      input: "my oLd-fAShiOned graNdPAreNTs",
    },
    {
      expected: "Html + Css + Js",
      input: "HTML + CSS + JS",
    },
  ];

  for (const { expected, input } of testData) {
    await step(`correctly transforms "${expected}"`, () => {
      const actual = getSimpleTitleCase(input);
      assertStrictEquals(actual, expected);
    });
  }
});
运行调试测试配置
现在您有了一个完整的示例,您可以运行它:
回到Run and Debug视图中,您应该可以看到"Debug测试“配置:
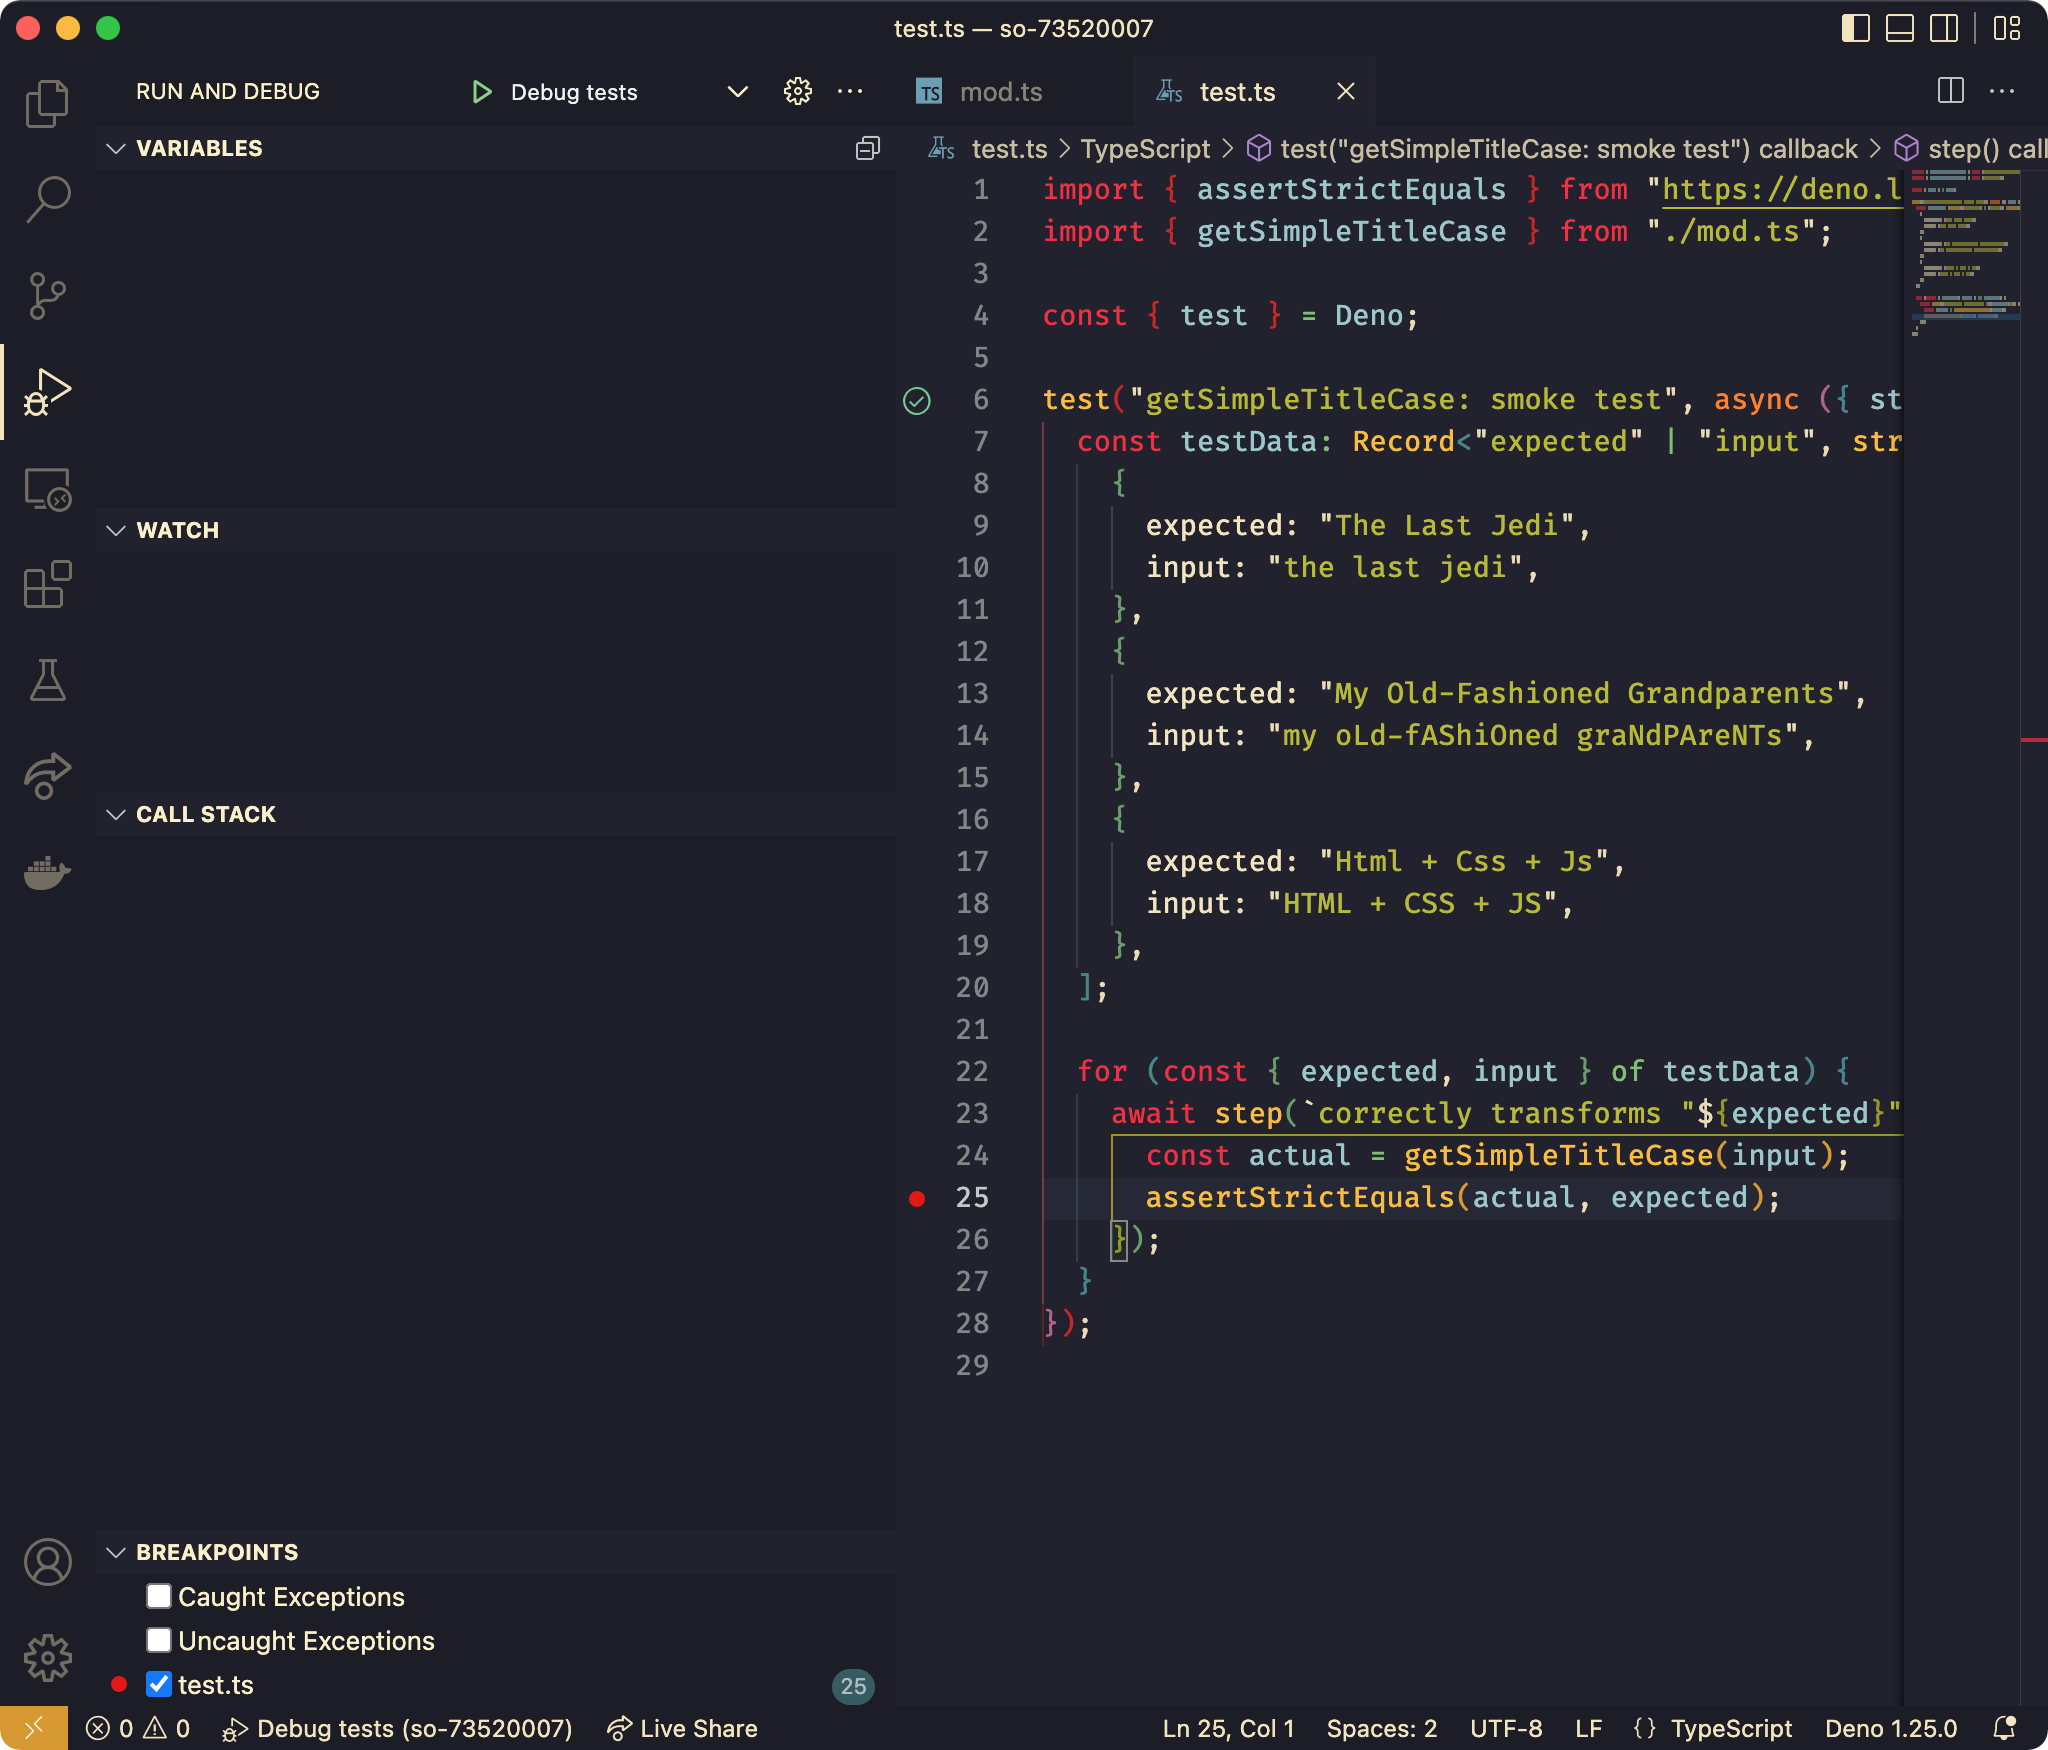
请注意,我还向25模块中的test.ts添加了一个断点,以便您可以在assertStrictEquals语句之前检查该模块中的测试程序状态,以便在执行断言之前直观地确认断言应该成功。
单击配置名"Debug“的绿色三角形图标将开始调试会话并启动Deno测试运行程序。测试运行程序停止在初始断点(因为使用了参数--inspect-brk ),并等待调试器在短时间内附加- after,调试器附加,我们看到初始断点:
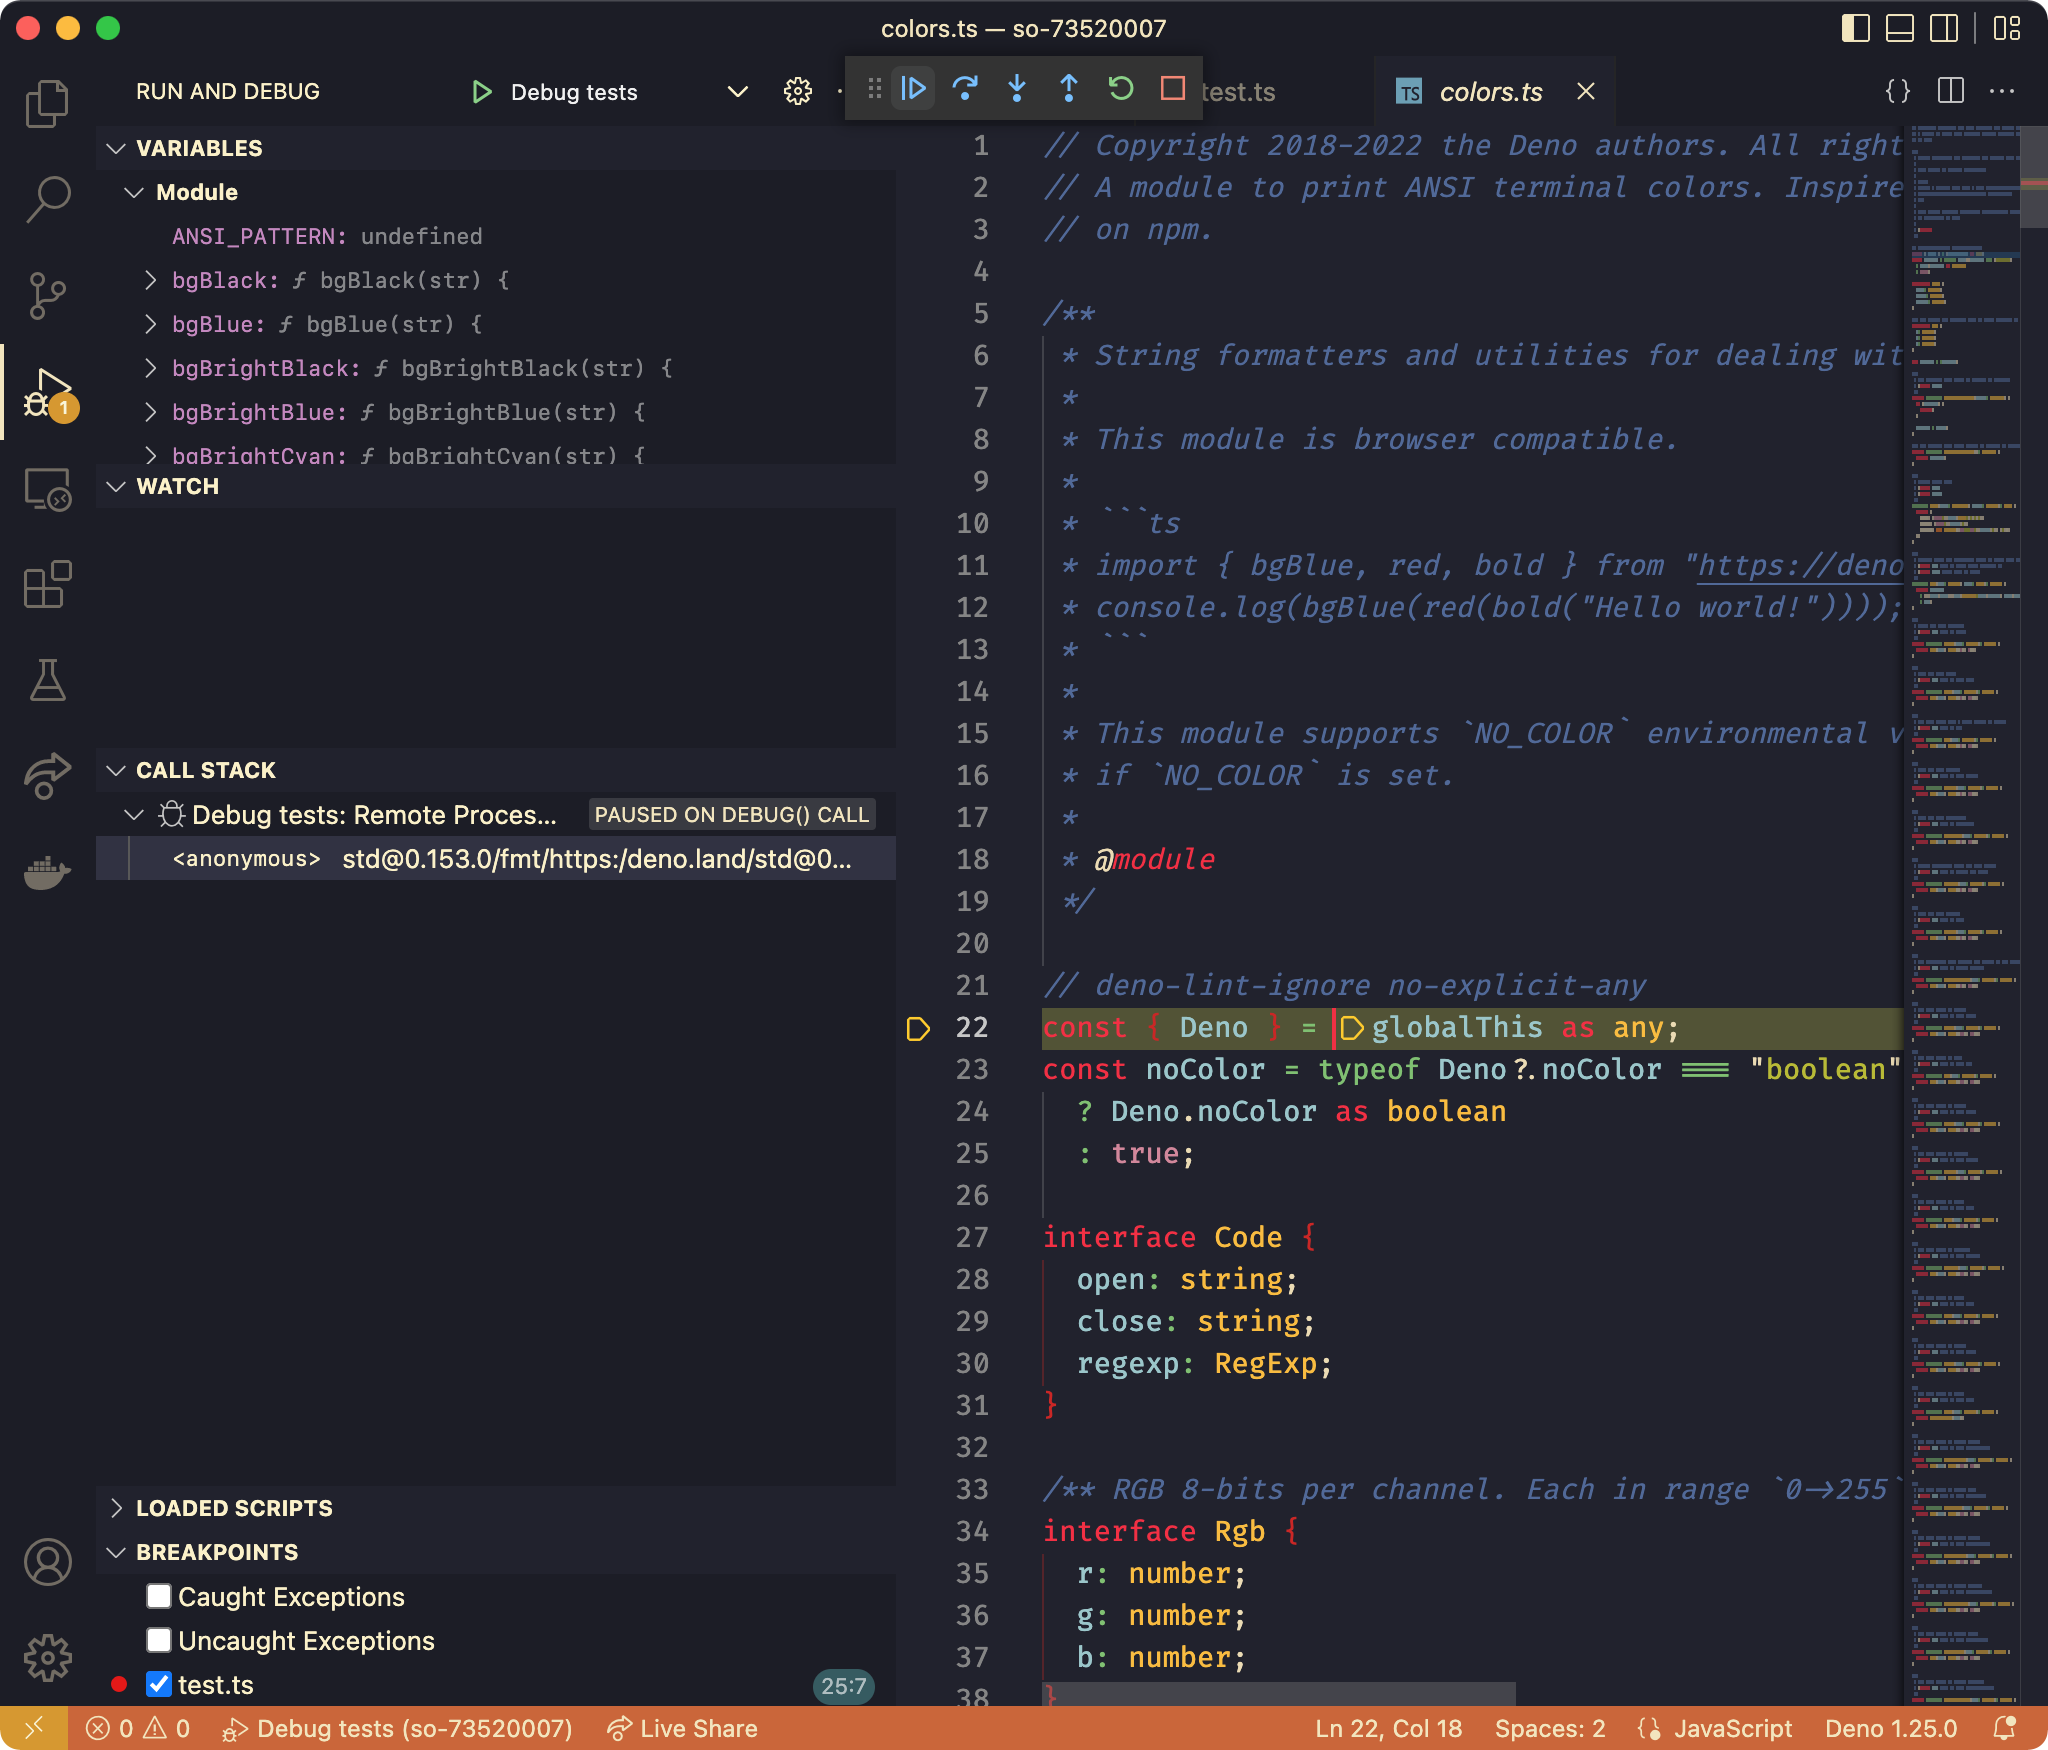
我们看到断点位于一个名为colors.ts的模块的第一行--这是初始断点的原因是它是模块图中的第一行执行。在本地test.ts模块中,第一个导入来自https://deno.land/std@0.153.0/testing/asserts.ts。在该模块的在线11中,您可以看到它还导入了另一个模块:https://deno.land/std@0.153.0/fmt/colors.ts。该模块没有导入,该模块中的第一行执行是行22,它是我们看到的初始断点的位置。
选择“继续”(窗口顶部中心的图标组左侧的蓝色三角形图标)继续到下一个手动设置断点(test.ts中的行test.ts):
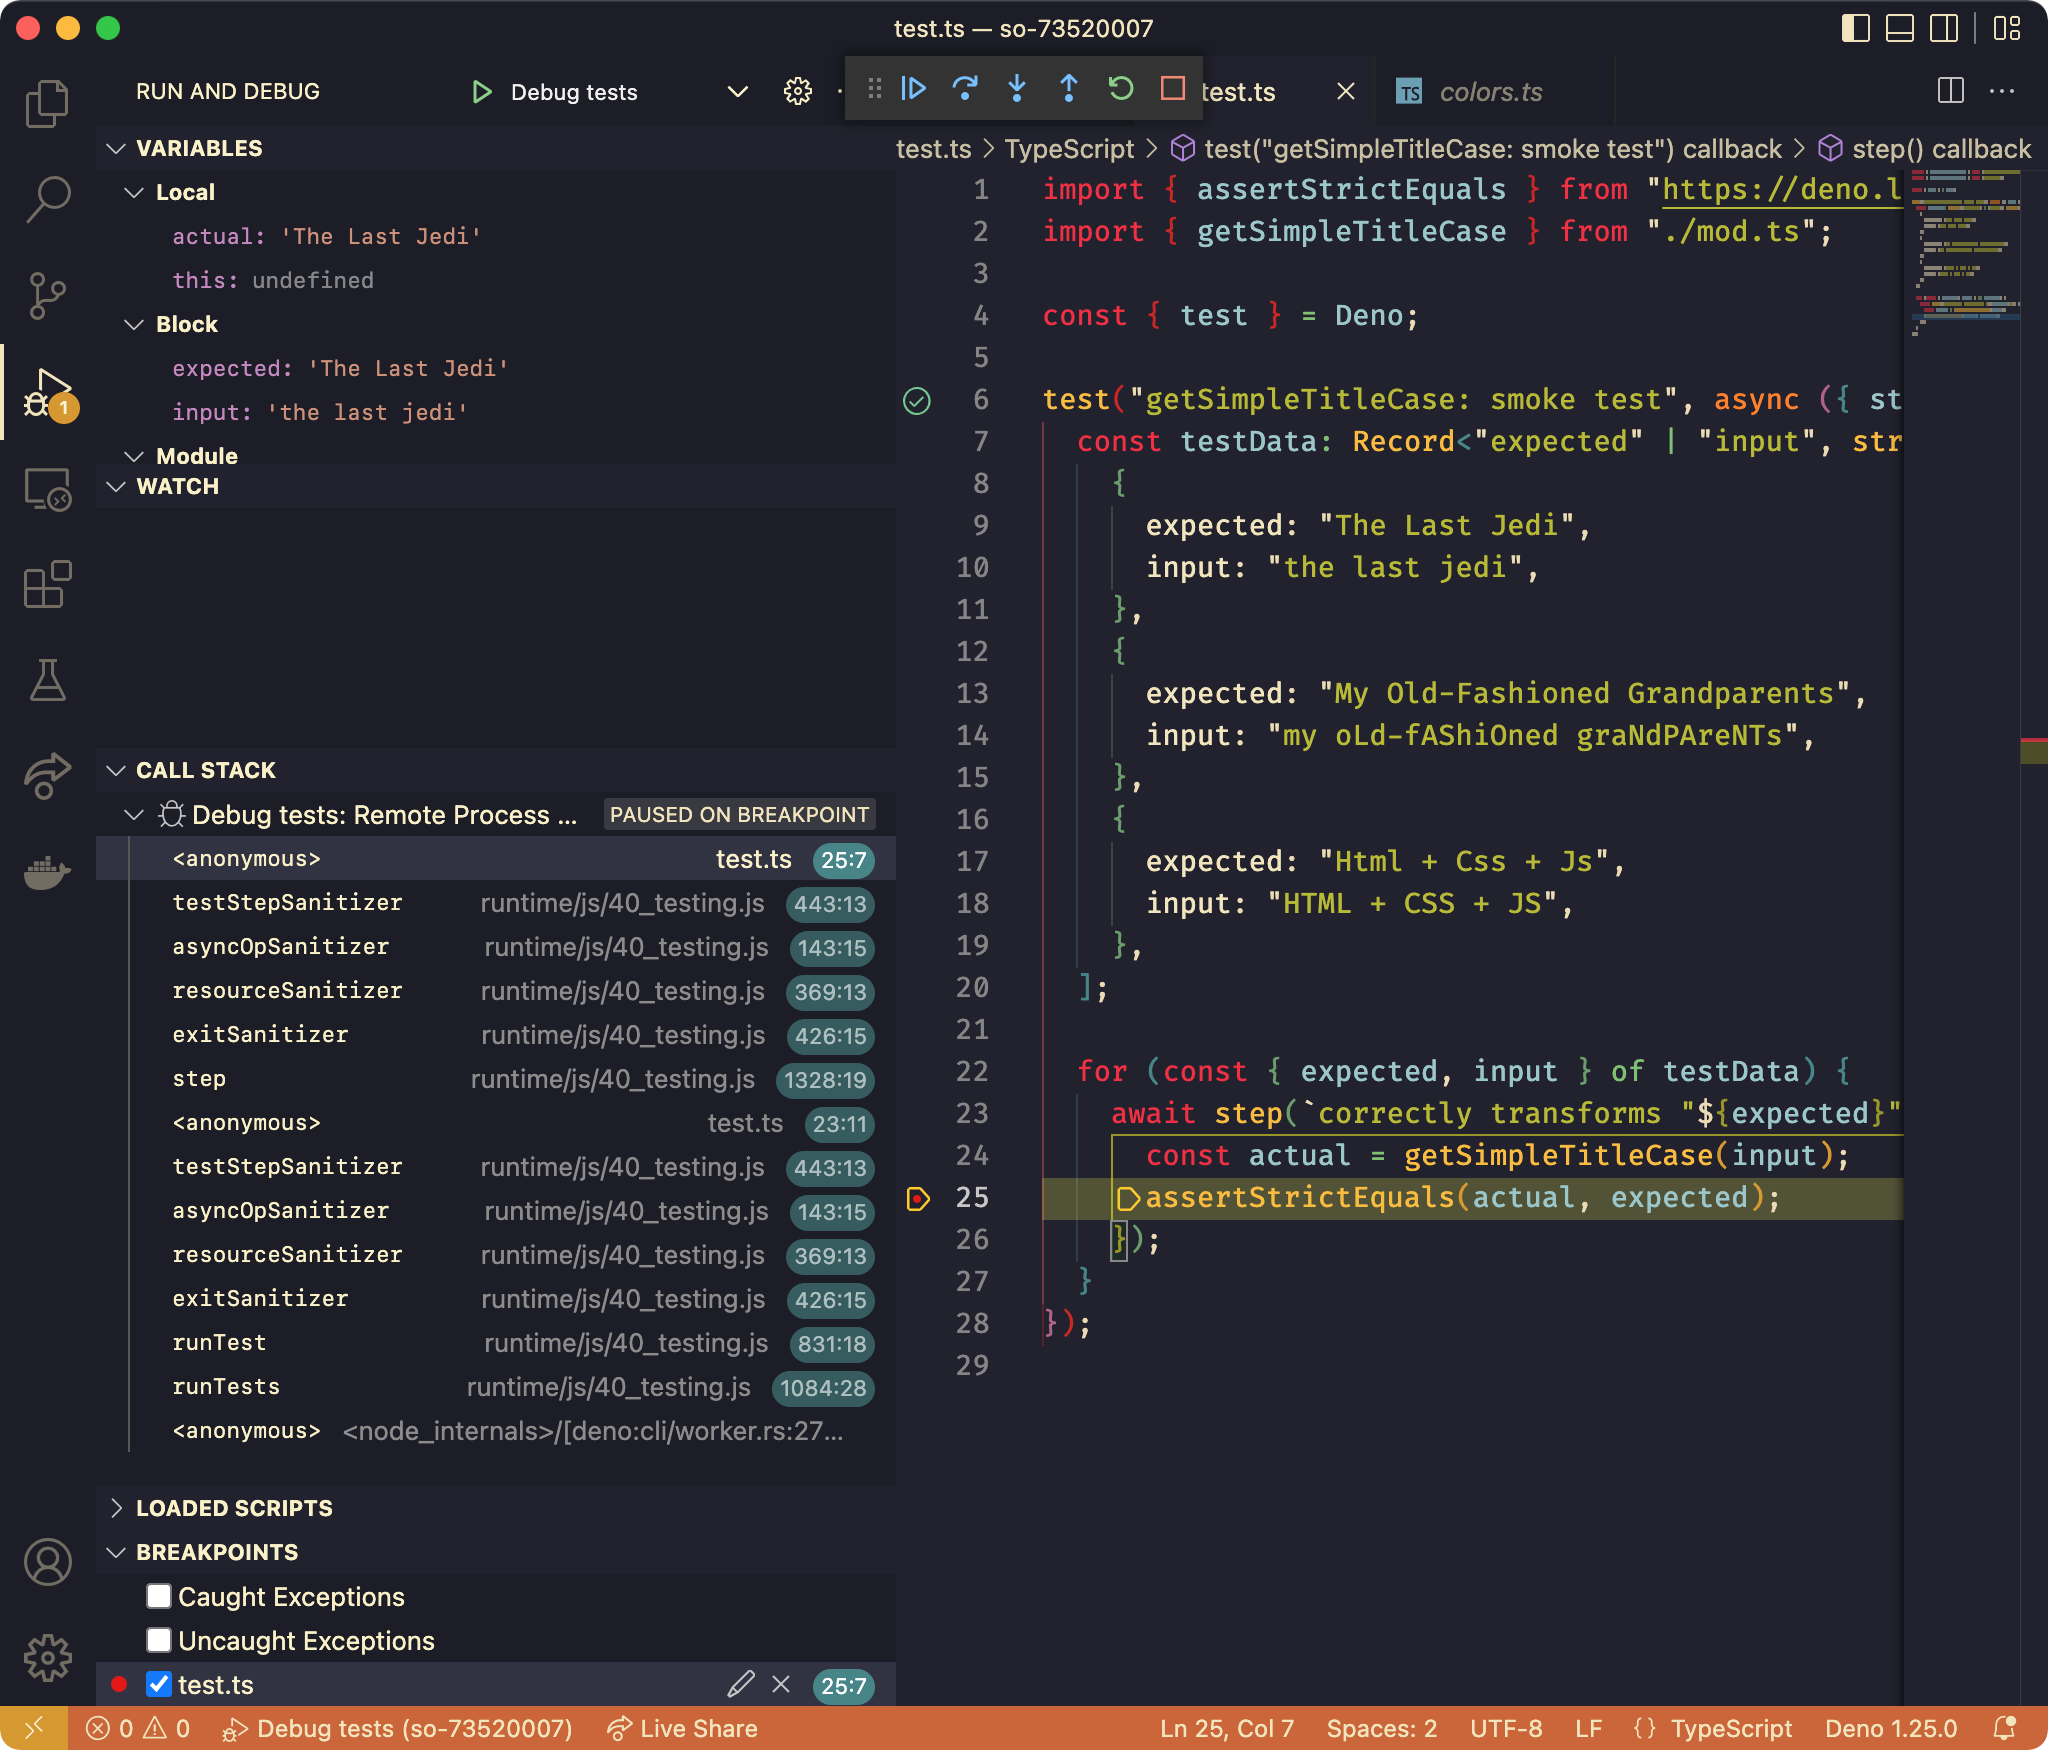
在这里,您可以像往常一样使用调试器--我们可以看到变量、调用堆栈等等。
在调用assertStrictEquals之前,我们可以在第一个循环迭代中看到变量的状态,并直观地验证调用是否成功:
{
  "Local": {
    "actual": "The Last Jedi",
    "this": undefined
  },
  "Block": {
    "expected": "The Last Jedi",
    "input": "the last jedi"
  }
}
在下一个循环迭代中,继续执行会再次中断,我们会看到新的变量:
{
  "Local": {
    "actual": "My Old-Fashioned Grandparents",
    "this": undefined
  },
  "Block": {
    "expected": "My Old-Fashioned Grandparents",
    "input": "my oLd-fAShiOned graNdPAreNTs"
  }
}
最后一次显示最后一个测试数据用例变量:
{
  "Local": {
    "actual": "Html + Css + Js",
    "this": undefined
  },
  "Block": {
    "expected": "Html + Css + Js",
    "input": "HTML + CSS + JS"
  }
}
单击“继续”完成测试运行程序的执行,因为这是唯一的断点,也是最后的循环迭代。调试器在测试运行程序完成后分离,并且窗口返回到启动前的状态:
对于感兴趣的人,上面截图中使用的VS代码主题的ID是
hedinne.popping-and-locking-vscode,字体是Fira码。
https://stackoverflow.com/questions/73520007
复制相似问题
腾讯云开发者
