
用巨蟒numpy制造霓虹灯
用巨蟒numpy制造霓虹灯
提问于 2022-11-03 20:28:04
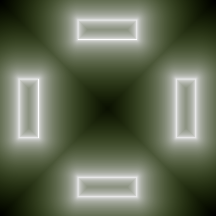
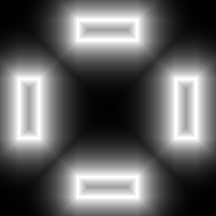
我试图创建一个霓虹灯效果w/ a源图像。我已经包括了三张图片,来源,我目前的尝试&一个目标。该程序获取图像,找到白色边缘,并计算从每个像素到最近的白色边缘的距离(这些部分都工作得很好);从那里,我很难找到正确的饱和度和值参数来创建霓虹灯。
从目标图像上看,我需要做的基本上是,在白色边缘上的饱和度是0,然后,为了使它离边缘越远,急剧增加;对于值,我需要它在一个白色边缘上,然后急剧减少。我无法找到最好的方法来操作distance_image (它保存每个像素与最近的白边之间的距离),例如通过饱和和值来实现这两个结果。
from PIL import Image
import cv2
import numpy as np
from scipy.ndimage import binary_erosion
from scipy.spatial import KDTree

def find_closest_distance(img):
    white_pixel_points = np.array(np.where(img))
    tree = KDTree(white_pixel_points.T)
    img_meshgrid = np.array(np.meshgrid(np.arange(img.shape[0]),
                                        np.arange(img.shape[1]))).T
    distances, _ = tree.query(img_meshgrid)
    return distances

def find_edges(img):
    img_np = np.array(img)
    kernel = np.ones((3,3))
    return img_np - binary_erosion(img_np, kernel)*255

img = Image.open('a.png').convert('L')
edge_image = find_edges(img)
distance_image = find_closest_distance(edge_image)
max_dist = np.max(distance_image)
distance_image = distance_image / max_dist

hue = np.full(distance_image.shape, 0.44*180)
saturation = distance_image * 255
value = np.power(distance_image, 0.2)
value = 255 * (1 - value**2)

new_tups = np.dstack((hue, saturation, value)).astype('uint8')
new_tups = cv2.cvtColor(new_tups, cv2.COLOR_HSV2BGR)
new_img = Image.fromarray(new_tups, 'RGB').save('out.png')
下面的图像显示源数据(左)、当前结果(中间)和所需的结果(右)。


回答 2
Stack Overflow用户
回答已采纳
发布于 2022-11-04 01:54:24
我想我应该用卷积来代替。使用高斯核转换图像是实现模糊形象的常见方法。您可以通过各种方式来实现它,但可能最容易使用的是scipy.ndimage.gaussian_filter。这里有一个实现所有这些的方法,看看您是否喜欢这个结果。
from PIL import Image
from io import BytesIO
import requests
import numpy as np
r = requests.get('https://i.stack.imgur.com/MhUQZ.png')
img = Image.open(BytesIO(r.content))
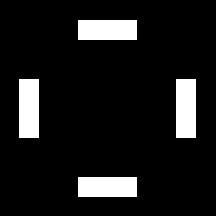
imarray = np.asarray(img)[..., 0] / 255这是你的第一张图片,白色的矩形。
现在我要做那些轮廓,做模糊,创建彩色图像,并将它们组合起来:
from scipy.ndimage import binary_erosion
from scipy.ndimage import gaussian_filter

eroded = binary_erosion(imarray, iterations=3)

# Make the outlined rectangles.
outlines = imarray - eroded

# Convolve with a Gaussian to effect a blur.
blur = gaussian_filter(outlines, sigma=11)

# Make binary images into neon green.
neon_green_rgb = [0.224, 1.0, 0.0784]
outlines = outlines[:, :, None] * neon_green_rgb
blur = blur[:, :, None] * neon_green_rgb

# Combine the images and constrain to [0, 1].
blur_strength = 3
glow = np.clip(outlines + blur_strength*blur, 0, 1)
看看它:
import matplotlib.pyplot as plt

plt.imshow(glow)
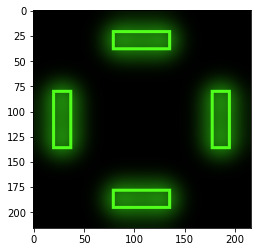
你会想调整高斯的sigma (它的宽度),颜色,模糊强度,等等。希望能帮上忙。
Stack Overflow用户
发布于 2022-11-04 05:15:13
这里有一种在Python/OpenCV中实现这一功能的方法。
- 读取输入
- 转换为灰度
- 阈值到二进制
- 利用形态学梯度求取期望厚度的边缘
- 将白色背景上黑色的边缘倒置
- Do距离变换
- 伸展至全动态范围
- 倒置
- 用最大值除以范围0到1。
- 衰减使用幂律控制距离滚下(倾斜)
- 创建输入和所需颜色大小的彩色图像。
- 将衰减图像与彩色图像相乘
- 保存结果
输入:
import cv2
import numpy as np
import skimage.exposure

# read input
img = cv2.imread('rectangles.png')

# convert to grayscale
gray = cv2.cvtColor(img, cv2.COLOR_BGR2GRAY)

# threshold
thresh = cv2.threshold(gray, 0, 255, cv2.THRESH_BINARY+cv2.THRESH_OTSU)[1]

# do morphology gradient to get edges and invert so black edges on white background
kernel = cv2.getStructuringElement(cv2.MORPH_RECT, (3,3))
edges = cv2.morphologyEx(thresh, cv2.MORPH_GRADIENT, kernel)
edges = 255 - edges

# get distance transform
dist = edges.copy()
distance = cv2.distanceTransform(dist, distanceType=cv2.DIST_L2, maskSize=3)
print(np.amin(distance), np.amax(distance))

# stretch to full dynamic range and convert to uint8 as 3 channels
stretch = skimage.exposure.rescale_intensity(distance, in_range=('image'), out_range=(0,255))

# invert
stretch = 255 - stretch
max_stretch = np.amax(stretch)

# normalize to range 0 to 1 by dividing by max_stretch
stretch = (stretch/max_stretch)

# attenuate with power law
pow = 4
attenuate = np.power(stretch, pow)
attenuate = cv2.merge([attenuate,attenuate,attenuate])

# create a green image the size of the input
color_img = np.full_like(img, (0,255,0), dtype=np.float32)

# multiply the color image with the attenuated distance image
glow = (color_img * attenuate).clip(0,255).astype(np.uint8)

# save results
cv2.imwrite('rectangles_edges.png', edges)
cv2.imwrite('rectangles_stretch.png', (255*stretch).clip(0,255).astype(np.uint8))
cv2.imwrite('rectangles_attenuate.png', (255*attenuate).clip(0,255).astype(np.uint8))
cv2.imwrite('rectangles_glow.png', glow)

# view results
cv2.imshow("EDGES", edges)
cv2.imshow("STRETCH", stretch)
cv2.imshow("ATTENUATE", attenuate)
cv2.imshow("RESULT", glow)
cv2.waitKey(0)
边缘(倒):
拉伸距离变换:

衰减距离变换:
辉光结果:

页面原文内容由Stack Overflow提供。腾讯云小微IT领域专用引擎提供翻译支持
原文链接:
https://stackoverflow.com/questions/74309185
复制相关文章
相似问题
腾讯云开发者
