
如何在Windows上安装pygalmesh (依赖于本征)?
编辑:对于那些感兴趣的人,创建者目前正在开发这个这里。
我正在尝试使用吡咯烷酮安装pip install pygalmesh,这取决于本征。我已经下载了Eigen,但是pip安装程序并不“知道”这一点。它返回以下错误消息:
ERROR: Could not build wheels for pygalmesh which use PEP 517 and cannot be installed directly更具体而言:
fatal error C1083: Cannot open include file: 'Eigen/Dense':pygalmesh的github有一个setup.py文件,我可以编辑,但是我不知道如何安装pygalmesh。还带着皮普吗?
是否有我可以编辑的setup.py文件,以便安装程序知道特征/密度在哪里?由于我有一台Windows,我至少认为/需要改为\。但是我找不到要编辑的setup.py。
我在网站的其他地方找到了关于这个问题的对话,也在这里上找到了。我不知道如何实现这些帖子中提到的内容。我也尝试过通过conda安装艾根,比如这里。这也不起作用。
错误信息全文:
Collecting pygalmesh
  Using cached pygalmesh-0.6.2.tar.gz (1.2 MB)
  Installing build dependencies ... done
  Getting requirements to build wheel ... done
  Installing backend dependencies ... done
    Preparing wheel metadata ... done
Collecting pybind11>=2.2
  Using cached pybind11-2.5.0.tar.gz (139 kB)
Collecting meshio<5.0.0,>=4.0.0
  Downloading meshio-4.0.11.tar.gz (302 kB)
     |████████████████████████████████| 302 kB 2.2 MB/s
  Installing build dependencies ... done
  Getting requirements to build wheel ... done
    Preparing wheel metadata ... done
Requirement already satisfied: importlib-metadata in c:\users\user\anaconda3\lib\site-packages (from pygalmesh) (1.5.0)
Requirement already satisfied: numpy in c:\users\user\anaconda3\lib\site-packages (from pygalmesh) (1.16.2)
Requirement already satisfied: zipp>=0.5 in c:\users\user\anaconda3\lib\site-packages (from importlib-metadata->pygalmesh) (2.2.0)
Skipping wheel build for pybind11, due to binaries being disabled for it.
Building wheels for collected packages: pygalmesh, meshio
  Building wheel for pygalmesh (PEP 517) ... error
  ERROR: Command errored out with exit status 1:
   command: 'C:\Users\User\Anaconda3\python.exe' 'C:\Users\User\Anaconda3\lib\site-packages\pip\_vendor\pep517\_in_process.py' build_wheel 'C:\Users\User\AppData\Local\Temp\tmpa0eqknmo'
       cwd: C:\Users\User\AppData\Local\Temp\pip-install-qm6jy0mx\pygalmesh
  Complete output (24 lines):
  running bdist_wheel
  running build
  running build_py
  creating build
  creating build\lib.win-amd64-3.7
  creating build\lib.win-amd64-3.7\pygalmesh
  copying pygalmesh\main.py -> build\lib.win-amd64-3.7\pygalmesh
  copying pygalmesh\__about__.py -> build\lib.win-amd64-3.7\pygalmesh
  copying pygalmesh\__init__.py -> build\lib.win-amd64-3.7\pygalmesh
  creating build\lib.win-amd64-3.7\pygalmesh\_cli
  copying pygalmesh\_cli\helpers.py -> build\lib.win-amd64-3.7\pygalmesh\_cli
  copying pygalmesh\_cli\_inr.py -> build\lib.win-amd64-3.7\pygalmesh\_cli
  copying pygalmesh\_cli\_remesh_surface.py -> build\lib.win-amd64-3.7\pygalmesh\_cli
  copying pygalmesh\_cli\_volume_from_surface.py -> build\lib.win-amd64-3.7\pygalmesh\_cli
  copying pygalmesh\_cli\__init__.py -> build\lib.win-amd64-3.7\pygalmesh\_cli
  running build_ext
  building '_pygalmesh' extension
  creating build\temp.win-amd64-3.7
  creating build\temp.win-amd64-3.7\Release
  creating build\temp.win-amd64-3.7\Release\src
  C:\Program Files (x86)\Microsoft Visual Studio\2019\Community\VC\Tools\MSVC\14.22.27905\bin\HostX86\x64\cl.exe /c /nologo /Ox /W3 /GL /DNDEBUG /MD -I/usr/include/eigen3/ -IC:\Users\User\AppData\Local\Temp\pip-build-env-bi2kt8ry\normal\Lib\site-packages\pybind11\include -IC:\Users\User\AppData\Local\Temp\pip-build-env-bi2kt8ry\normal\Lib\site-packages\pybind11\include -IC:\Users\User\Anaconda3\include -IC:\Users\User\Anaconda3\include "-IC:\Program Files (x86)\Microsoft Visual Studio\2019\Community\VC\Tools\MSVC\14.22.27905\ATLMFC\include" "-IC:\Program Files (x86)\Microsoft Visual Studio\2019\Community\VC\Tools\MSVC\14.22.27905\include" "-IC:\Program Files (x86)\Windows Kits\NETFXSDK\4.7.2\include\um" "-IC:\Program Files (x86)\Windows Kits\10\include\10.0.18362.0\ucrt" "-IC:\Program Files (x86)\Windows Kits\10\include\10.0.18362.0\shared" "-IC:\Program Files (x86)\Windows Kits\10\include\10.0.18362.0\um" "-IC:\Program Files (x86)\Windows Kits\10\include\10.0.18362.0\winrt" "-IC:\Program Files (x86)\Windows Kits\10\include\10.0.18362.0\cppwinrt" /EHsc /Tpsrc/generate.cpp /Fobuild\temp.win-amd64-3.7\Release\src/generate.obj
  generate.cpp
  C:\Users\User\AppData\Local\Temp\pip-install-qm6jy0mx\pygalmesh\src\domain.hpp(4): fatal error C1083: Cannot open include file: 'Eigen/Dense': No such file or directory
  error: command 'C:\\Program Files (x86)\\Microsoft Visual Studio\\2019\\Community\\VC\\Tools\\MSVC\\14.22.27905\\bin\\HostX86\\x64\\cl.exe' failed with exit status 2
  ----------------------------------------
  ERROR: Failed building wheel for pygalmesh
  Building wheel for meshio (PEP 517) ... done
  Created wheel for meshio: filename=meshio-4.0.11-py3-none-any.whl size=127526 sha256=cc63c5792c3d20bce3532742afcccc100bc6312c1254e029f8771f286a5979c2
  Stored in directory: c:\users\user\appdata\local\pip\cache\wheels\17\27\cf\b034bc0b8bffd85475dfbab9791fcdeea89c77f040c4537afe
Successfully built meshio
Failed to build pygalmesh
ERROR: Could not build wheels for pygalmesh which use PEP 517 and cannot be installed directly回答 2
Stack Overflow用户
发布于 2020-05-04 20:47:32
Stack Overflow用户
发布于 2021-09-28 19:50:35
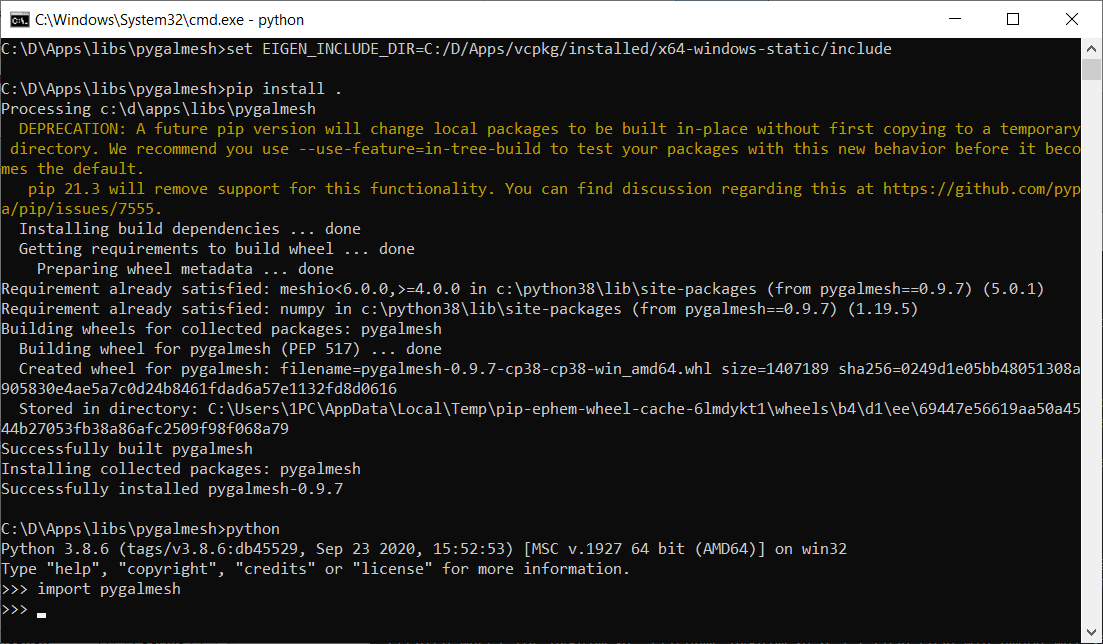
此解决方案适用于Windows 10,安装了python3.8和VisualStudioCommunity2019。
- 安装依赖关系:
gmp、mpfr、eigen3和cgal。我推荐用于libs构建和安装的vcpkg,如下所述。您还可以以自己的方式分别安装和构建这些依赖关系,而不需要vcpkg。 1.1。安装vcpkg(https://vcpkg.io/en/getting-started.html)。 1.2。安装对x64静态配置的依赖关系: 安装gmp:x64 windows静态vcpkg安装mpfr:x64 windows静态vcpkg安装特征3:x64 windows静态vcpkg安装cgal:x64 windows - 克隆
pygalmesh源: git克隆https://github.com/nschloe/pygalmesh.git - 将
library_dirs=["C:/path/to/vcpkg/installed/x64-windows-static/lib"]添加到pygalmesh/setup.py(请参阅post下面的修改setup.py,也可以检查备选解决方案)。不要忘记插入您自己的vcpkg/path/to/vcpkg.位置,而不是my 位置 - 构建和安装
pygalmesh: cd吡咯烷酮集EIGEN_INCLUDE_DIR=C:/path/to/vcpkg/installed/x64-windows-static/include pip安装。 - 确保安装了
pygalmesh: python >>>导入pygalmesh
改性setup.py
import os

from pybind11.setup_helpers import Pybind11Extension, build_ext
from setuptools import setup

# https://github.com/pybind/python_example/
ext_modules = [
    Pybind11Extension(
        "_pygalmesh",
        # Sort input source files to ensure bit-for-bit reproducible builds
        # (https://github.com/pybind/python_example/pull/53)
        sorted(
            [
                "src/generate.cpp",
                "src/generate_2d.cpp",
                "src/generate_from_inr.cpp",
                "src/generate_from_off.cpp",
                "src/generate_periodic.cpp",
                "src/generate_surface_mesh.cpp",
                "src/remesh_surface.cpp",
                "src/pybind11.cpp",
            ]
        ),
        include_dirs=[os.environ.get("EIGEN_INCLUDE_DIR", "/usr/include/eigen3/")],
        # no CGAL libraries necessary from CGAL 5.0 onwards
        libraries=["gmp", "mpfr"],

        # !!! ADD YOUR PATH HERE !!!
        library_dirs=["C:/D/Apps/vcpkg/installed/x64-windows-static/lib"]
    )
]

if __name__ == "__main__":
    setup(
        cmdclass={"build_ext": build_ext},
        ext_modules=ext_modules,
        zip_safe=False,
    )
替代解
实际上,pip有指向库路径的命令行参数(--global-option=build_ext、--include-path、--library-path 见pip文档和这个职位),并且潜在的安装可能是一对行(在安装C++ libs的步骤1之后):
set EIGEN_INCLUDE_DIR=C:/path/to/vcpkg/installed/x64-windows-static/include
pip install --global-option=build_ext --install-option="--include-path=C:\path\to\vcpkg\installed\x64-windows-static\include" --global-option="--library-path=C:\path\to\vcpkg\installed\x64-windows-static\lib" pygalmesh但。由于某些原因(可能只是我的系统配置特性,或者是setuptools==58.1.0版本特定的“功能”),在构建包时,setuptools不向MSVC link.exe的/LIBPATH:键添加--library-path参数,这会导致LNK错误。
https://stackoverflow.com/questions/61472028
复制相似问题
腾讯云开发者

Copyright © 2013 - 2026 Tencent Cloud. All Rights Reserved. 腾讯云 版权所有
深圳市腾讯计算机系统有限公司 ICP备案/许可证号:粤B2-20090059 ![]() 粤公网安备44030502008569号
粤公网安备44030502008569号
腾讯云计算(北京)有限责任公司 京ICP证150476号 | 京ICP备11018762号