
如何使用opencv4.2 (Android)检测方格
如何使用opencv4.2 (Android)检测方格
提问于 2020-02-26 13:08:36
我正在检测一个长方形,并将颜色与尿液测试条进行比较。
我怎么能检测到所有的方块?我想在下面的图片中检测到其余的方块。我试过改变亮度和对比度
这是我的代码:
MainActivity.java
...
@Override
    protected void onActivityResult(int requestCode, int resultCode, Intent data) {
        ...
                    Bitmap img = BitmapFactory.decodeStream(in);
                    in.close();
                    Bitmap changeImg = changeBitmapContrastBrightness(img, (float)1, 10);
                    Mat cMap = new Mat();
                    Utils.bitmapToMat(changeImg, cMap);
                    List<MatOfPoint> squres = processImage(cMap);

                    for (int i = 0; i < squres.size(); i++) {
                        setLabel(cMap, String.valueOf(i), squres.get(i));
                    }

                    Bitmap resultBitmap = Bitmap.createBitmap(cMap.cols(), cMap.rows(), Bitmap.Config.ARGB_8888);
                    Utils.matToBitmap(cMap, resultBitmap);
                    imgView.setImageBitmap(resultBitmap);
                ...
    }
...
private static List<MatOfPoint> processImage(Mat img){
        ArrayList<MatOfPoint> squares = new ArrayList<>();
        Mat matGray = new Mat();
        Mat matCny = new Mat();
        Mat matBlur = new Mat();
        Mat matThresh = new Mat();
        Mat close = new Mat();
        // 노이즈 제거위해 다운스케일 후 업스케일
//        Imgproc.pyrDown(matInit, matBase, matBase.size());
//        Imgproc.pyrUp(matBase, matInit, matInit.size());
        // GrayScale
        Imgproc.cvtColor(img, matGray, Imgproc.COLOR_BGR2GRAY);
        // Blur
        Imgproc.medianBlur(matGray, matBlur, 5);
        //        // Canny Edge 검출
//        Imgproc.Canny(matBlur, matCny, 0, 255);
//        // Binary
        Imgproc.threshold(matBlur, matThresh, 160, 255, Imgproc.THRESH_BINARY_INV);
        Imgproc.morphologyEx(matThresh, close, Imgproc.MORPH_CLOSE, Imgproc.getStructuringElement(Imgproc.MORPH_RECT, new Size(3,3)));
//        // 노이즈 제거
//        Imgproc.erode(matCny, matCny, Imgproc.getStructuringElement(Imgproc.MORPH_RECT, new org.opencv.core.Size(6, 6)));
//        Imgproc.dilate(matCny, matCny, Imgproc.getStructuringElement(Imgproc.MORPH_RECT, new org.opencv.core.Size(12, 12)));

        List<MatOfPoint> contours = new ArrayList<>();
        Mat hierarchy = new Mat();
        Imgproc.findContours(close, contours, hierarchy, Imgproc.RETR_EXTERNAL, Imgproc.CHAIN_APPROX_SIMPLE);
        double min_area = 0;
        double max_area = 10000;
        for(MatOfPoint cnt : contours){
            double contourArea = Imgproc.contourArea(cnt);

            if(contourArea > min_area && contourArea < max_area){
                squares.add(cnt);
            }
        }
        return squares;
    }
App结果图像
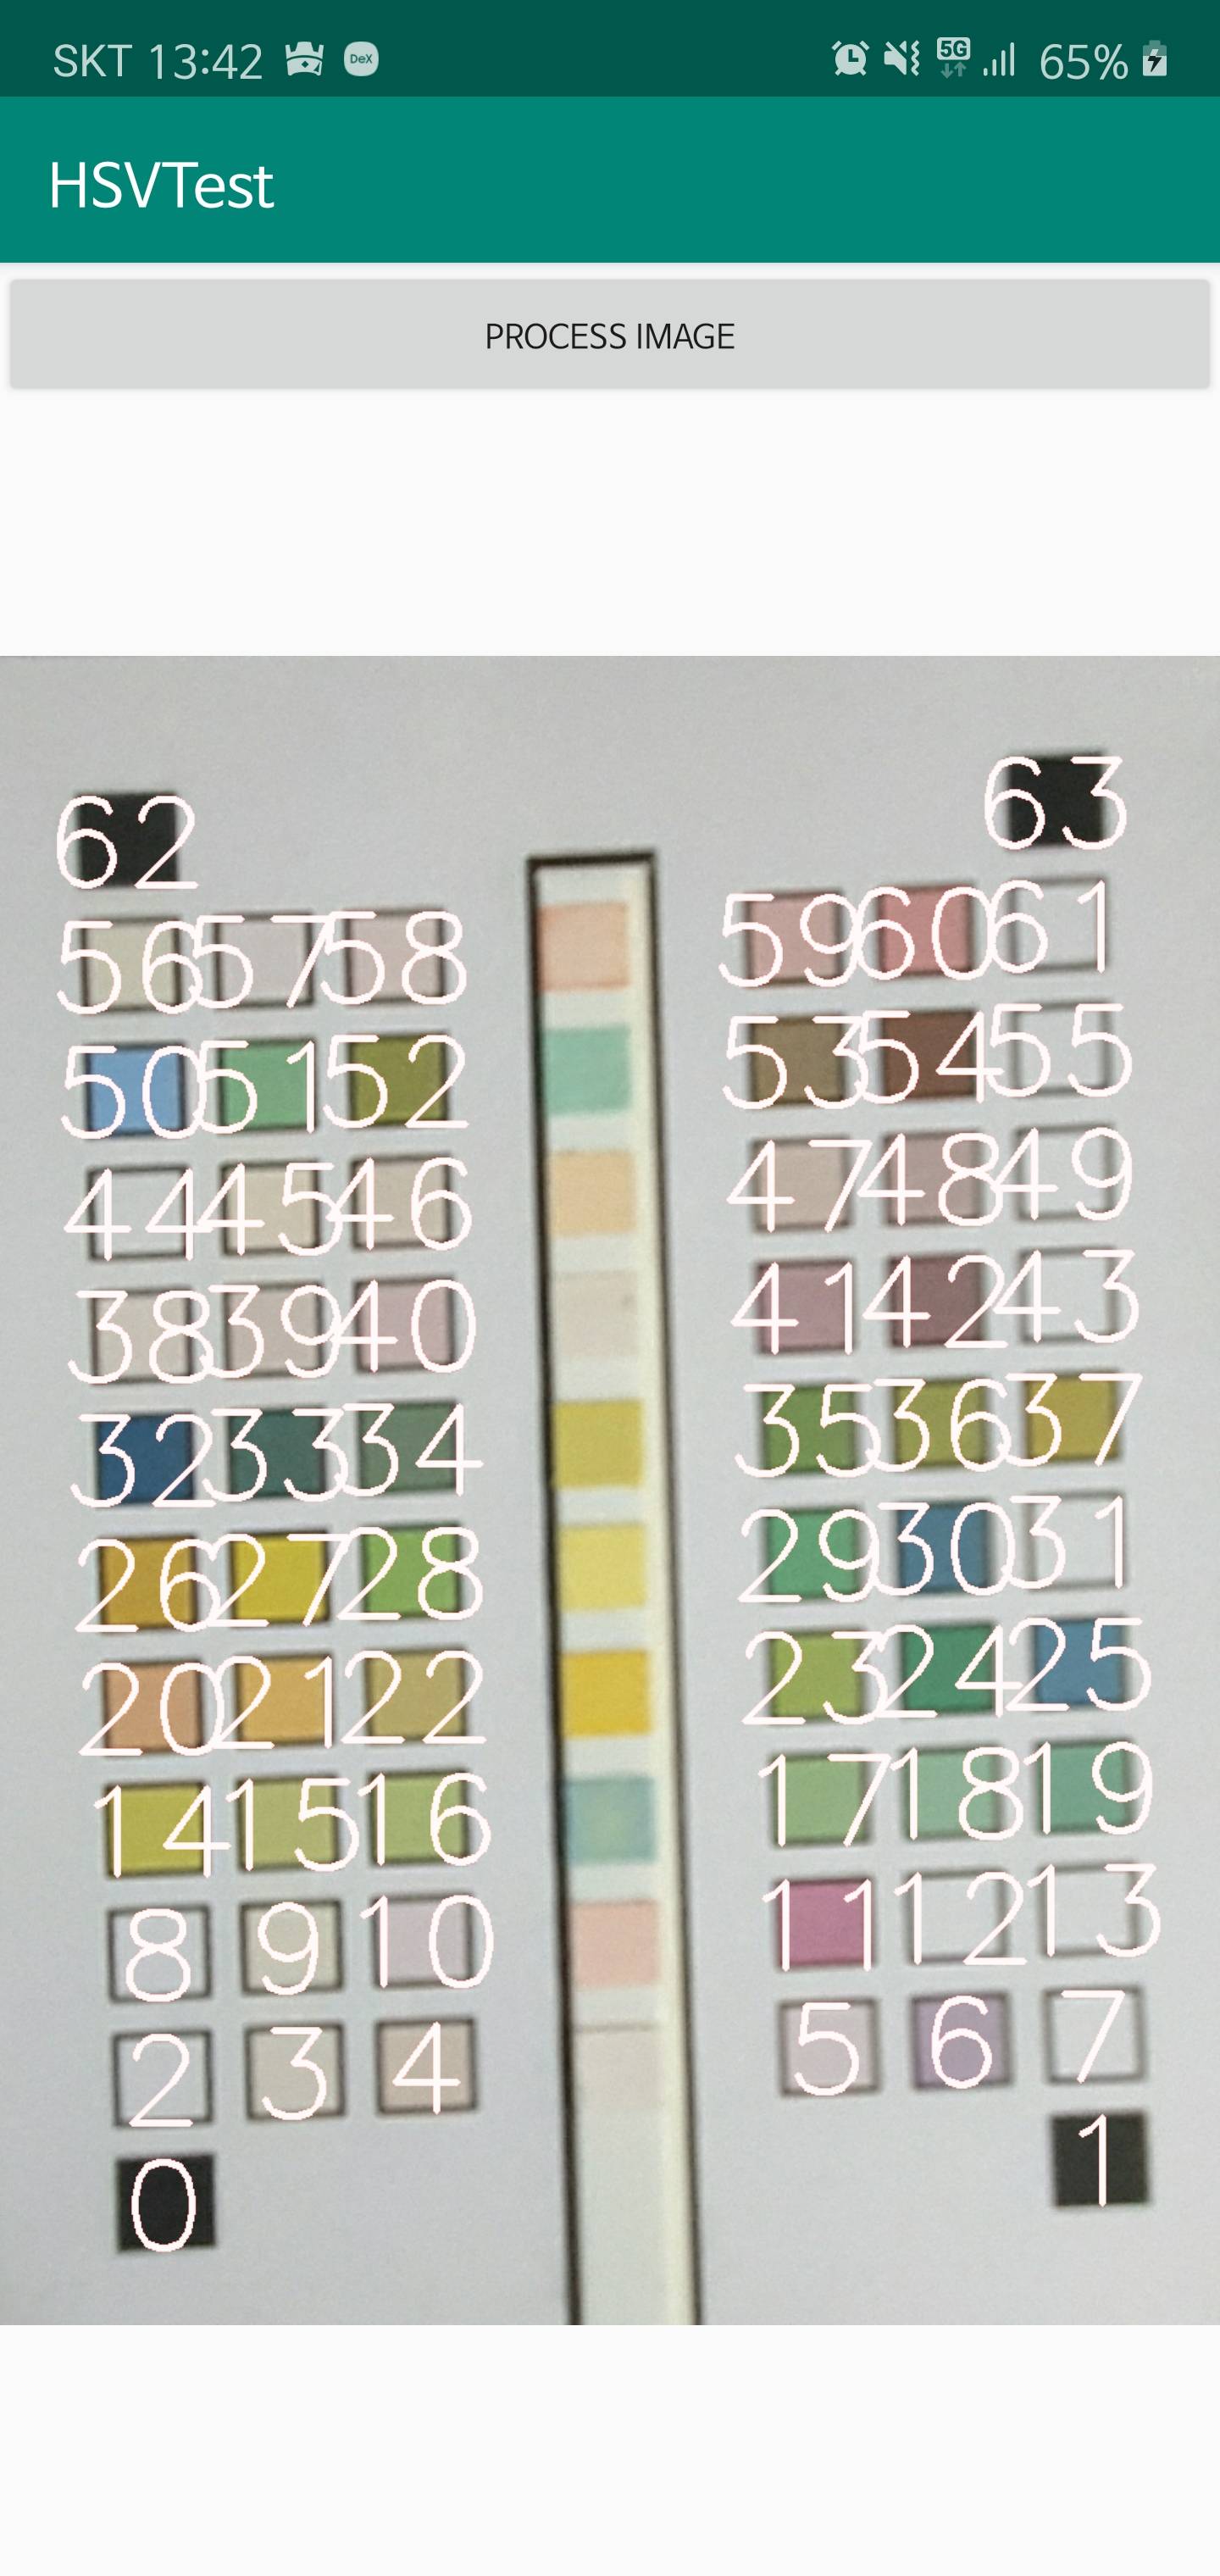
原始图像

请帮帮我..。
Stack Overflow用户
回答已采纳
发布于 2020-02-26 16:05:54
您的代码正确地标识了较小的框,而忽略了非常大的框,即条形框,因此基本功能已经就绪。
它没有识别条形上较小的框--考虑到您的轮廓查找显然有效,这意味着您的阈值函数(在上面的代码中为160)中的阈值可能需要调整,因此它包括在没有黑色轮廓的条形上的颜色框。黑色轮廓一定会被分离。
不管根本原因是什么,您可能会找到最简单的调试方法,那就是输出并查看生成的中间映像--这将使您能够非常快速地检查自己、模糊和阈值的结果。
如果您正在处理多幅图像,并且发现阈值不是可以可靠地预先确定的,您也可以考虑使用自适应阈值。文档在这里:https://docs.opencv.org/2.4/modules/imgproc/doc/miscellaneous_transformations.html?highlight=adaptivethreshold,在这个答案中有一个非常好的例子:https://stackoverflow.com/a/31290735/334402
adaptiveThreshold参数允许您微调它的行为,值得对它们进行实验,看看哪种方法对给定类型的图像最有效:

页面原文内容由Stack Overflow提供。腾讯云小微IT领域专用引擎提供翻译支持
原文链接:
https://stackoverflow.com/questions/60414692
复制相关文章
相似问题
腾讯云开发者
