
如何将代码从Arduino转换为Raspberry Pi?
如何将代码从Arduino转换为Raspberry Pi?
提问于 2015-12-15 21:15:38
我有一个Arduino Uno程序,想要翻译它编码一个Raspberry Pi 2。我正在建造一个自动厨房储藏室,并编码了一个LED状态机来表示它。我计划控制的物理机器有两个主要功能。
函数
(1)电梯移至以下三层之一:-0:重置/家庭-1:搁置1-2:搁置2
(2)架子进出电梯。-山-卸下
我目前正在使用LED来表示马达/传感器,以便对我的代码进行单元测试。我明白,为了使我的代码更健壮,我需要更好地处理时间,这是Raspberry Pi可以负担的。
以下是我的当前代码:
    // Sensors for shelves. True if shelf is loaded.
boolean s1 = false;
boolean s2 = false;

// Buttons to ask to shelves.
boolean input1 = false;
boolean input2 = false;

// Elevator level (0, 1, or 2)
int elevator = 0;

// Elevator Level LEDs (Red)
int elevatorReset = 13;
int elevatorOne = 12;
int elevatorTwo = 11;

// Shelve State LEDs (Green) (On if loaded, Off if hidden)
int ShelveOne = 10; // Top Shelve
int ShelveTwo = 9; // Bottom Shelve


// Buttons
int ButtonOne = 2; // Request Shelve One
int ButtonTwo = 3; // Request Shelve Two
int ButtonReset = 4; // Request Reset

// Debouncing
unsigned long lastTime1 = 0;
unsigned long lastTime2 = 0;
const long interval = 300;


void setup() {
pinMode(elevatorReset, OUTPUT); // declare LED as output
pinMode(elevatorOne, OUTPUT); // declare LED as output
pinMode(elevatorTwo, OUTPUT); // declare LED as output

pinMode(ShelveOne, OUTPUT); // declare LED as output
pinMode(ShelveTwo, OUTPUT); // declare LED as output

pinMode(ButtonOne, INPUT); // make button 1 an input
pinMode(ButtonTwo, INPUT); // make button 2 an input
pinMode(ButtonReset, INPUT); // make button 3 an input
}

void loop() {

unsigned long currentTime = millis();

level(0);

// Request Shelf 1
if (digitalRead(ButtonOne) == LOW)
{
  pickup(1);
  deliver(1);
}

// Request Shelf 2
if (digitalRead(ButtonTwo) == LOW)
{
  pickup(2);
  deliver(2);
}

// Request Reset
if (digitalRead(ButtonReset) == LOW)
{
  reset();
}

}

void pickup(int num){
  if (num == 1)
  {
    level(0);
    delay(500);
    level(1);
    delay(500);
    load(1);
  }
  else if (num == 2)
  {
    level(0);
    delay(500);
    level(1);
    delay(500);
    level(2);
    delay(500);
    load(2);
  }
  else if (num == 0)
  {

  }
}

void dropoff(int num){
  if (num == 1)
  {
    level(1);
    delay(500);
    unload(1);
  }
  else if (num == 2)
  {
    level(1);
    delay(500);
    level(2);
    delay(500);
    unload(2);
  }
}


void deliver(int num)
{
  if (elevator == 1)
  {
    delay(1000);
    level(0);
    //blink();
  }

  if (elevator == 2)
  {
    delay(1000);
    level(1);
    delay(500);
    level(0);
    //blink();
  }
}

void level(int num)
{
  if (num == 0)
  {
    digitalWrite(elevatorReset, HIGH);
    digitalWrite(elevatorOne, LOW);
    digitalWrite(elevatorTwo, LOW);
    elevator = 0;
  }
  else if (num == 1)
  {
    digitalWrite(elevatorReset, LOW);
    digitalWrite(elevatorOne, HIGH);
    digitalWrite(elevatorTwo, LOW);
    elevator = 1;
  }
  else if (num == 2)
  {
    digitalWrite(elevatorReset, LOW);
    digitalWrite(elevatorOne, LOW);
    digitalWrite(elevatorTwo, HIGH);
    elevator = 2;
  }
}

void load(int num){
  if (num == 1)
  {
    digitalWrite(ShelveOne, HIGH);
    digitalWrite(ShelveTwo, LOW);
    s1 = true;
  }
  else if (num == 2)
  {
    digitalWrite(ShelveOne, LOW);
    digitalWrite(ShelveTwo, HIGH);
    s2 = true;
  }
}

void unload(int num){
  if (num == 1)
  {
    digitalWrite(ShelveOne, LOW);
    s1 = false;
  }
  else if (num == 2)
  {
    digitalWrite(ShelveTwo, LOW);
    s2 = false;
  }
}

void reset()
{
if (s1 == true)
        {
            delay(500);
            dropoff(1);
            delay(500);
            level(0);
        }

else if (s2 == true)
        {
            delay(500);
            dropoff(2);
            delay(500);
            level(1);
            delay(500);
            level(0);
        }
}

void blink ()
{
  delay(1000);
  while( !(digitalRead(ButtonOne) == LOW || digitalRead(ButtonTwo) == LOW || digitalRead(ButtonReset) == LOW) )
  {
  digitalWrite(elevatorReset, HIGH);  // wait for a second
  delay(200);
  digitalWrite(elevatorReset, LOW);  // wait for a second
  delay(200);
  }
}回答 3
Stack Overflow用户
回答已采纳
发布于 2015-12-17 07:47:04
澄清一下,您仍然可以使用C++为Win10 IoT开发应用程序。
我在C#中为您创建了一个类似的版本:
using System;
using System.Collections.Generic;
using System.IO;
using System.Linq;
using System.Runtime.InteropServices.WindowsRuntime;
using System.Threading.Tasks;
using Windows.Devices.Gpio;
using Windows.Foundation;
using Windows.Foundation.Collections;
using Windows.UI.Xaml;
using Windows.UI.Xaml.Controls;
using Windows.UI.Xaml.Controls.Primitives;
using Windows.UI.Xaml.Data;
using Windows.UI.Xaml.Input;
using Windows.UI.Xaml.Media;
using Windows.UI.Xaml.Navigation;

// The Blank Page item template is documented at http://go.microsoft.com/fwlink/?LinkId=402352&clcid=0x409

namespace App6
{
    /// <summary>
    /// An empty page that can be used on its own or navigated to within a Frame.
    /// </summary>
    public sealed partial class MainPage : Page
    {
        private static GpioPin GpioPin1;
        private static GpioPin GpioPin2;
        private static GpioPin GpioPin3;
        private static GpioPin GpioPin4;
        private static GpioPin GpioPin5;
        private static GpioPin GpioPin6;
        private static GpioPin GpioPin7;
        private static GpioPin GpioPin8;

    // Sensors for shelves. True if shelf is loaded.
    bool s1 = false;
    bool s2 = false;

    // Buttons to ask to shelves.
    bool input1 = false;
    bool input2 = false;

    // Elevator level (0, 1, or 2)
    int elevator = 0;

    // Elevator Level LEDs (Red)
    int elevatorReset = 13;
    int elevatorOne = 12;
    int elevatorTwo = 11;

    // Shelve State LEDs (Green) (On if loaded, Off if hidden)
    int ShelveOne = 10; // Top Shelve
    int ShelveTwo = 9; // Bottom Shelve


    // Buttons
    int ButtonOne = 2; // Request Shelve One
    int ButtonTwo = 3; // Request Shelve Two
    int ButtonReset = 4; // Request Reset

    // Debouncing
    long lastTime1 = 0;
    long lastTime2 = 0;
    const long interval = 300;
    private DispatcherTimer timer;

    public MainPage()
    {
        this.InitializeComponent();

        timer = new DispatcherTimer();
        timer.Interval = TimeSpan.FromMilliseconds(500);
        timer.Tick += Timer_Tick;

        InitGPIO();
    }

    private void InitGPIO()
    {
        var gpio = GpioController.GetDefault();

        // Show an error if there is no GPIO controller
        if (gpio == null)
        {
            GpioPin1 = null;
            GpioPin2 = null;
            GpioPin3 = null;
            GpioPin4 = null;
            GpioPin5 = null;
            GpioPin6 = null;
            GpioPin7 = null;
            GpioPin8 = null;

            return;
        }
        //pinMode(elevatorReset, OUTPUT); // declare LED as output
        //pinMode(elevatorOne, OUTPUT); // declare LED as output
        //pinMode(elevatorTwo, OUTPUT); // declare LED as output

        //pinMode(ShelveOne, OUTPUT); // declare LED as output
        //pinMode(ShelveTwo, OUTPUT); // declare LED as output

        //pinMode(ButtonOne, INPUT); // make button 1 an input
        //pinMode(ButtonTwo, INPUT); // make button 2 an input
        //pinMode(ButtonReset, INPUT); // make button 3 an input
        GpioPin1 = gpio.OpenPin(elevatorReset);
        GpioPin2 = gpio.OpenPin(elevatorOne);
        GpioPin3 = gpio.OpenPin(elevatorTwo);
        GpioPin4 = gpio.OpenPin(ShelveOne);
        GpioPin5 = gpio.OpenPin(ShelveTwo);
        GpioPin6 = gpio.OpenPin(ButtonOne);
        GpioPin7 = gpio.OpenPin(ButtonTwo);
        GpioPin8 = gpio.OpenPin(ButtonReset);

        GpioPin1.Write(GpioPinValue.Low);
        GpioPin2.Write(GpioPinValue.Low);
        GpioPin3.Write(GpioPinValue.Low);
        GpioPin4.Write(GpioPinValue.Low);
        GpioPin5.Write(GpioPinValue.Low);

        GpioPin1.SetDriveMode(GpioPinDriveMode.Output);
        GpioPin2.SetDriveMode(GpioPinDriveMode.Output);
        GpioPin3.SetDriveMode(GpioPinDriveMode.Output);
        GpioPin4.SetDriveMode(GpioPinDriveMode.Output);
        GpioPin5.SetDriveMode(GpioPinDriveMode.Output);

        // Check if input pull-up resistors are supported
        if (GpioPin6.IsDriveModeSupported(GpioPinDriveMode.InputPullUp))
            GpioPin6.SetDriveMode(GpioPinDriveMode.InputPullUp);
        else
            GpioPin6.SetDriveMode(GpioPinDriveMode.Input);

        if (GpioPin7.IsDriveModeSupported(GpioPinDriveMode.InputPullUp))
            GpioPin7.SetDriveMode(GpioPinDriveMode.InputPullUp);
        else
            GpioPin7.SetDriveMode(GpioPinDriveMode.Input);

        if (GpioPin8.IsDriveModeSupported(GpioPinDriveMode.InputPullUp))
            GpioPin8.SetDriveMode(GpioPinDriveMode.InputPullUp);
        else
            GpioPin8.SetDriveMode(GpioPinDriveMode.Input);

    }

    private void Timer_Tick(object sender, object e)
    {

        //unsigned long currentTime = millis();

        level(0);

        // Request Shelf 1
        if (GpioPin6.Read() == GpioPinValue.Low)
        {
            pickup(1);
            deliver(1);
        }

        // Request Shelf 2
        if (GpioPin7.Read() == GpioPinValue.Low)
        {
            pickup(2);
            deliver(2);
        }

        // Request Reset
        if (GpioPin8.Read() == GpioPinValue.Low)
        {
            reset();
        }
    }


    async void pickup(int num)
    {
        if (num == 1)
        {
            level(0);
            await Task.Delay(500);
            level(1);
            await Task.Delay(500);
            load(1);
        }
        else if (num == 2)
        {
            level(0);
            await Task.Delay(500);
            level(1);
            await Task.Delay(500);
            level(2);
            await Task.Delay(500);
            load(2);
        }
        else if (num == 0)
        {

        }
    }

    async void dropoff(int num)
    {
        if (num == 1)
        {
            level(1);
            await Task.Delay(500);
            unload(1);
        }
        else if (num == 2)
        {
            level(1);
            await Task.Delay(500);
            level(2);
            await Task.Delay(500);
            unload(2);
        }
    }

    async void deliver(int num)
    {
        if (elevator == 1)
        {
            await Task.Delay(1000);
            level(0);
            //blink();
        }

        if (elevator == 2)
        {
            await Task.Delay(1000);
            level(1);
            await Task.Delay(500);
            level(0);
            //blink();
        }
    }

    void level(int num)
    {
        if (num == 0)
        {
            GpioPin1.Write(GpioPinValue.High);
            GpioPin2.Write(GpioPinValue.Low);
            GpioPin3.Write(GpioPinValue.Low);
            elevator = 0;
        }
        else if (num == 1)
        {
            GpioPin1.Write(GpioPinValue.Low);
            GpioPin2.Write(GpioPinValue.High);
            GpioPin3.Write(GpioPinValue.Low);
            elevator = 1;
        }
        else if (num == 2)
        {
            GpioPin1.Write(GpioPinValue.Low);
            GpioPin2.Write(GpioPinValue.Low);
            GpioPin3.Write(GpioPinValue.High);
            elevator = 2;
        }
    }

    void load(int num)
    {
        if (num == 1)
        {
            GpioPin4.Write(GpioPinValue.High);
            GpioPin5.Write(GpioPinValue.Low);
            s1 = true;
        }
        else if (num == 2)
        {
            GpioPin4.Write(GpioPinValue.Low);
            GpioPin5.Write(GpioPinValue.High);
            s2 = true;
        }
    }

    void unload(int num)
    {
        if (num == 1)
        {
            GpioPin4.Write(GpioPinValue.Low);
            s1 = false;
        }
        else if (num == 2)
        {
            GpioPin5.Write(GpioPinValue.Low);
            s2 = false;
        }
    }

    async void reset()
    {
        if (s1 == true)
        {
            await Task.Delay(500);
            dropoff(1);
            await Task.Delay(500);
            level(0);
        }

        else if (s2 == true)
        {
            await Task.Delay(500);
            dropoff(2);
            await Task.Delay(500);
            level(1);
            await Task.Delay(500);
            level(0);
        }
    }

    async void blink()
    {
        await Task.Delay(1000);
        while (!(GpioPin6.Read() == GpioPinValue.Low || GpioPin7.Read() == GpioPinValue.Low || GpioPin8.Read() == GpioPinValue.Low))
        {
            GpioPin1.Write(GpioPinValue.High);  // wait for a second
            await Task.Delay(200);
            GpioPin1.Write(GpioPinValue.Low);  // wait for a second
            await Task.Delay(200);
        }
    }

}
}
Stack Overflow用户
发布于 2015-12-17 16:28:08
这里有几个项目需要实现。
- IoT应用程序有后台应用程序的概念。参见这里的文档:http://ms-iot.github.io/content/en-US/win10/BackgroundApplications.htm备注:它说后台应用程序,这可能是令人困惑的,因为它的运行不像一个背景应用程序在典型的UWP运行。用于IoT的引导加载程序消除了通常强加于UWP的后台应用程序的性能和cpu优先级瓶颈,因此运行起来就像前台应用程序一样,只是它是无头的,是一个更简单的无头起点。它也更接近于您的Arduino代码。
- 您应该使用枚举来管理您的状态,这样它是集中的,并且更容易处理。
- 在windows 10 IoT中,您可以设置事件处理程序,以便在事件发生时进行处理,而不需要循环和监视。这将有助于将事件排队,然后进行处理。然而,在某些情况下,它可能没有那么快,但在这种情况下应该是可以的。如果您需要循环,您可能需要拆分一个循环和监视的任务。
- 最后,在基于事件的多线程系统中,需要通过锁定对象来同时保护来自不同线程的状态更改。
我提供了基于您的代码库的示例代码,以解决上述所有问题。注意它还没有完成,但是应该是一个很好的起点。
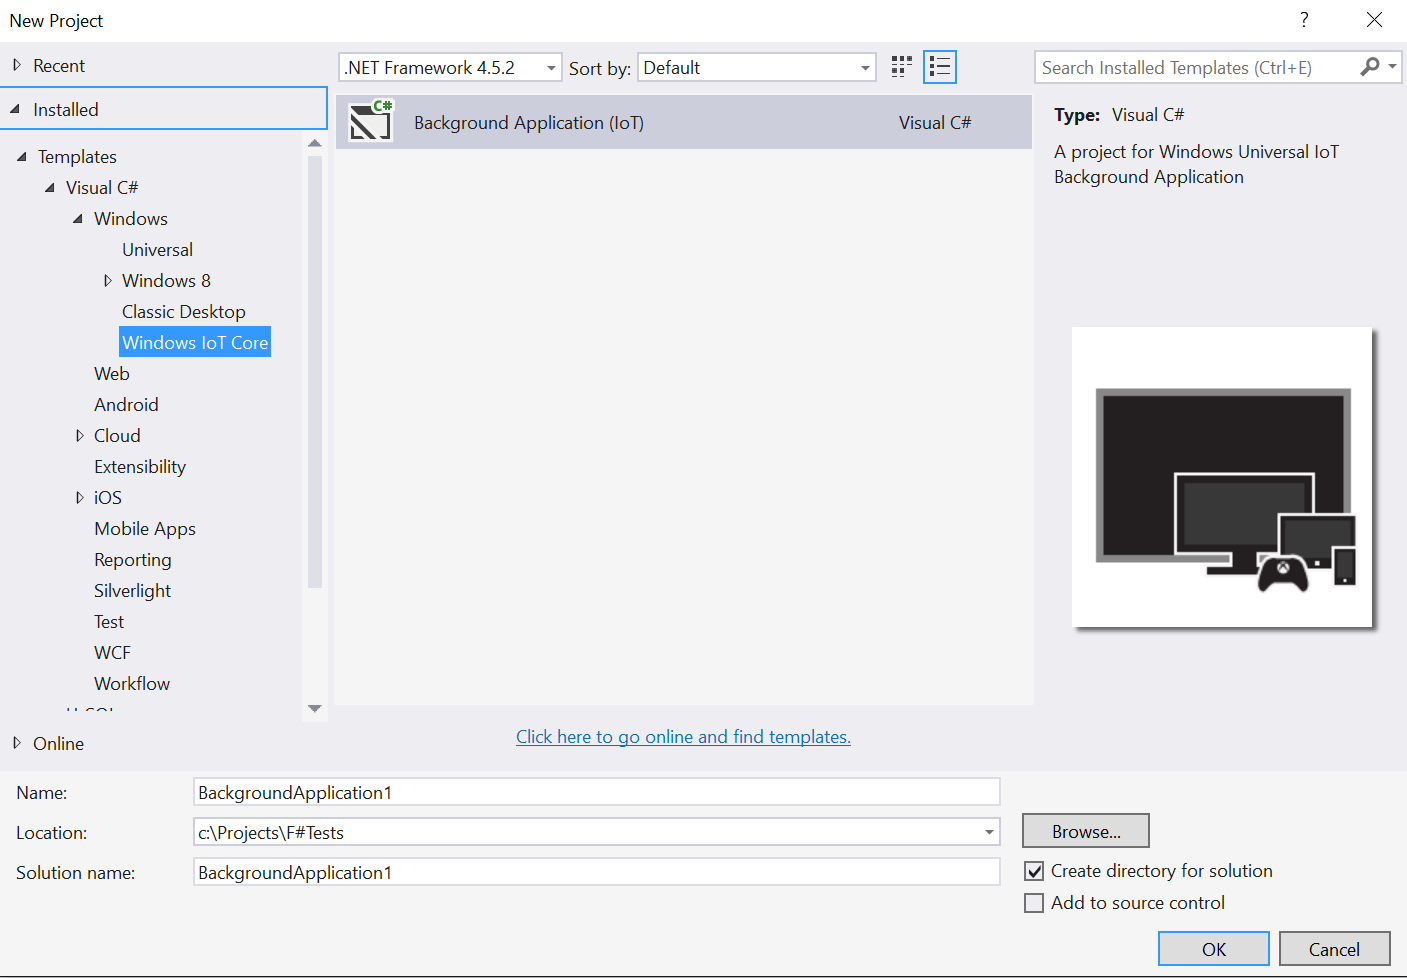
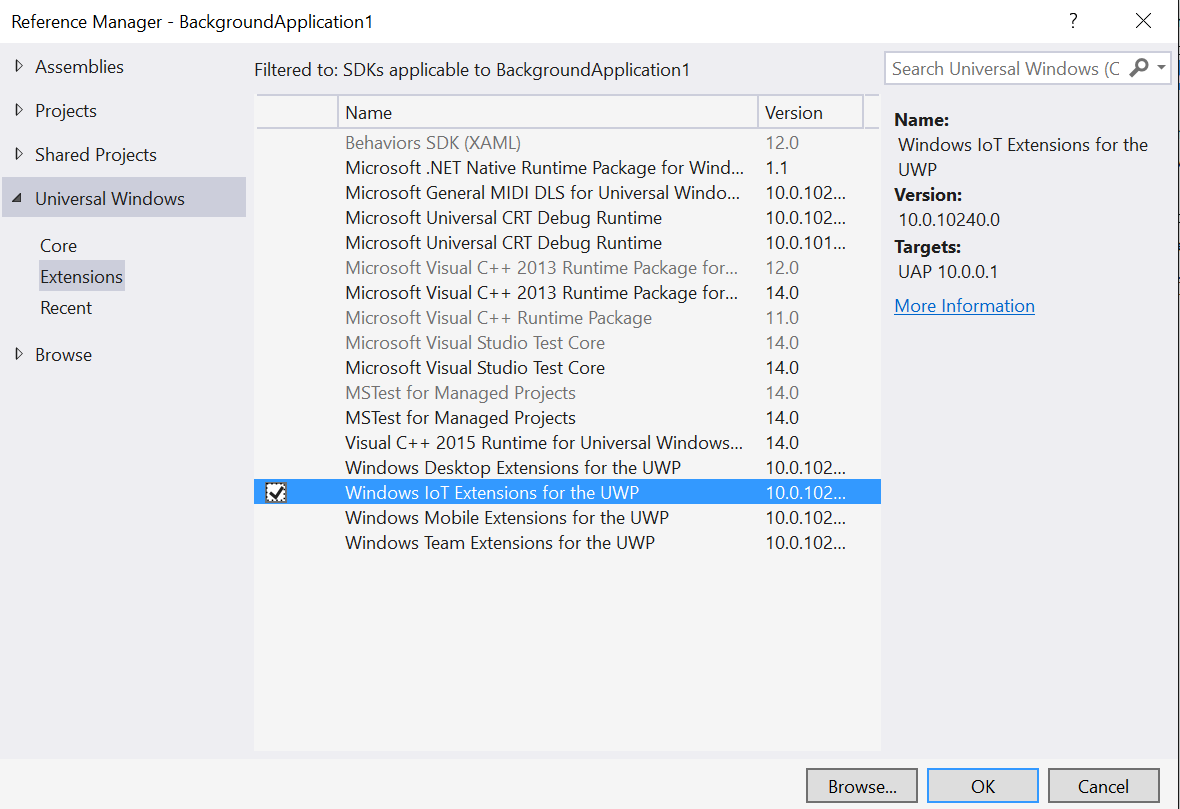
首先,您需要创建一个后台应用程序,并添加对IoT扩展的引用。
以下是代码:
using System;
using System.Collections.Generic;
using System.Linq;
using System.Text;
using System.Net.Http;
using Windows.ApplicationModel.Background;
using Windows.Devices.Gpio;
using System.Threading.Tasks;

// The Background Application template is documented at       http://go.microsoft.com/fwlink/?LinkID=533884&clcid=0x409
// Sensors for shelves. True if shelf is loaded.

namespace BackgroundApplication1
{
public sealed class StartupTask : IBackgroundTask
{
    public enum MachineState
    {
        unknown,
        initial,
        elevatorLevelOne,
        elevatorLevelTwo,
        transitionOnetoTwo,
        transitionTwotoOne,
        transitionOnetoReset,
        transitionTwotoReset
    }
    private MachineState currentState;
    private object lObj;
    // Elevator Level LEDs (Red)
    private const int elevatorResetPin = 13;
    private const int elevatorOnePin = 12;
    private const int elevatorTwoPin = 11;
    //Gpio for each
    GpioPin elevOneLed;
    GpioPin resetLed;
    GpioPin elevTwoLed;

    // Shelve State LEDs (Green) (On if loaded, Off if hidden)
    private const int ShelveOnePin = 10; // Top Shelve
    private const int ShelveTwoPin = 9; // Bottom Shelve
    GpioPin shelfOneLed;
    GpioPin shelfTwoLed;


    // Buttons
    private const int ButtonOne = 2; // Request Shelve One
    private const int ButtonTwo = 3; // Request Shelve Two
    private const int ButtonReset = 4; // Request Reset

    // Debouncing
    long lastTime1 = 0;
    long lastTime2 = 0;
    const long interval = 300;
    public void Run(IBackgroundTaskInstance taskInstance)
    {
        this.Initialize();
        Task.Run(() =>
        {
            while (true)
            {
                //thats right...do nothing.
            }
        });
    }

    public void Initialize()
    {
        GpioController gCon = GpioController.GetDefault();
        //Elevator LEDs
        elevOneLed = gCon.OpenPin(elevatorResetPin);
        resetLed = gCon.OpenPin(elevatorOnePin);
        elevTwoLed = gCon.OpenPin(elevatorTwoPin);
        elevOneLed.SetDriveMode(GpioPinDriveMode.Output);
        elevTwoLed.SetDriveMode(GpioPinDriveMode.Output);
        resetLed.SetDriveMode(GpioPinDriveMode.Output);
        //Shelf LEDs
        shelfOneLed = gCon.OpenPin(ShelveOnePin);
        shelfTwoLed = gCon.OpenPin(ShelveTwoPin);
        shelfOneLed.SetDriveMode(GpioPinDriveMode.Output);
        shelfTwoLed.SetDriveMode(GpioPinDriveMode.Output);

        //Buttons
        GpioPin buttonOne = gCon.OpenPin(ButtonOne);
        GpioPin buttonTwo = gCon.OpenPin(ButtonTwo);
        GpioPin buttonReset = gCon.OpenPin(ButtonReset);
        buttonOne.SetDriveMode(GpioPinDriveMode.Input);
        buttonTwo.SetDriveMode(GpioPinDriveMode.Input);
        buttonReset.SetDriveMode(GpioPinDriveMode.Input);
        buttonOne.ValueChanged += ButtonOne_ValueChanged;
        buttonTwo.ValueChanged += ButtonTwo_ValueChanged;
        buttonReset.ValueChanged += ButtonReset_ValueChanged;

        this.GetShelfOne();
    }

    private void GetShelfOne()
    {

            switch(this.currentState)
            {
                case MachineState.unknown: this.Reset();
                    break;
                case MachineState.elevatorLevelOne:
                    break;
                case MachineState.elevatorLevelTwo: this.TransitionToShelfTwoFromOne();
                    break;
                case MachineState.transitionOnetoReset: //handle the rest of your stuff similiarly...
                    break;
            }

    }

    private void TransitionToShelfTwoFromOne()
    {
        this.shelfOneLed.Write(GpioPinValue.Low);
        this.shelfTwoLed.Write(GpioPinValue.High);
        this.currentState = MachineState.elevatorLevelTwo;
    }

    private void Reset()
    {
        throw new NotImplementedException();
    }

    private void ButtonReset_ValueChanged(GpioPin sender, GpioPinValueChangedEventArgs args)
    {
        throw new NotImplementedException();
    }

    private void ButtonTwo_ValueChanged(GpioPin sender, GpioPinValueChangedEventArgs args)
    {
        throw new NotImplementedException();
    }

    private void ButtonOne_ValueChanged(GpioPin sender, GpioPinValueChangedEventArgs args)
    {
        //rising edge means you pushed the button
        if(args.Edge == GpioPinEdge.RisingEdge)
        {
            lock(lObj)
            {
                this.GetShelfOne();
            }
        }
        //falling edge means you released the button.
        //you could start a timer to see how long you held the button.
    }
}
}Stack Overflow用户
发布于 2015-12-24 18:18:44
有两种方式:
- 方法1-您可以直接在Windows上使用Arduino代码,只需稍作改动。
- 方法2-通过将Arduino代码转换为等效的C# UWP。
方法1:在IoT上直接使用Arduino代码
- 为Windows IoT (请参考此链接)安装Arduino接线
- 将您的Arduino代码(上面写的)移植到您的IoT上,并使用Raspberry Pi 2的贴图。重要注意:有一些规则可以将Arduino编写的代码移植到ms网站上描述的IoT。您提供的Arduino代码可以直接移植到Raspberry 2(确保将Arduino引脚号更改为RPi2 pinmap)。
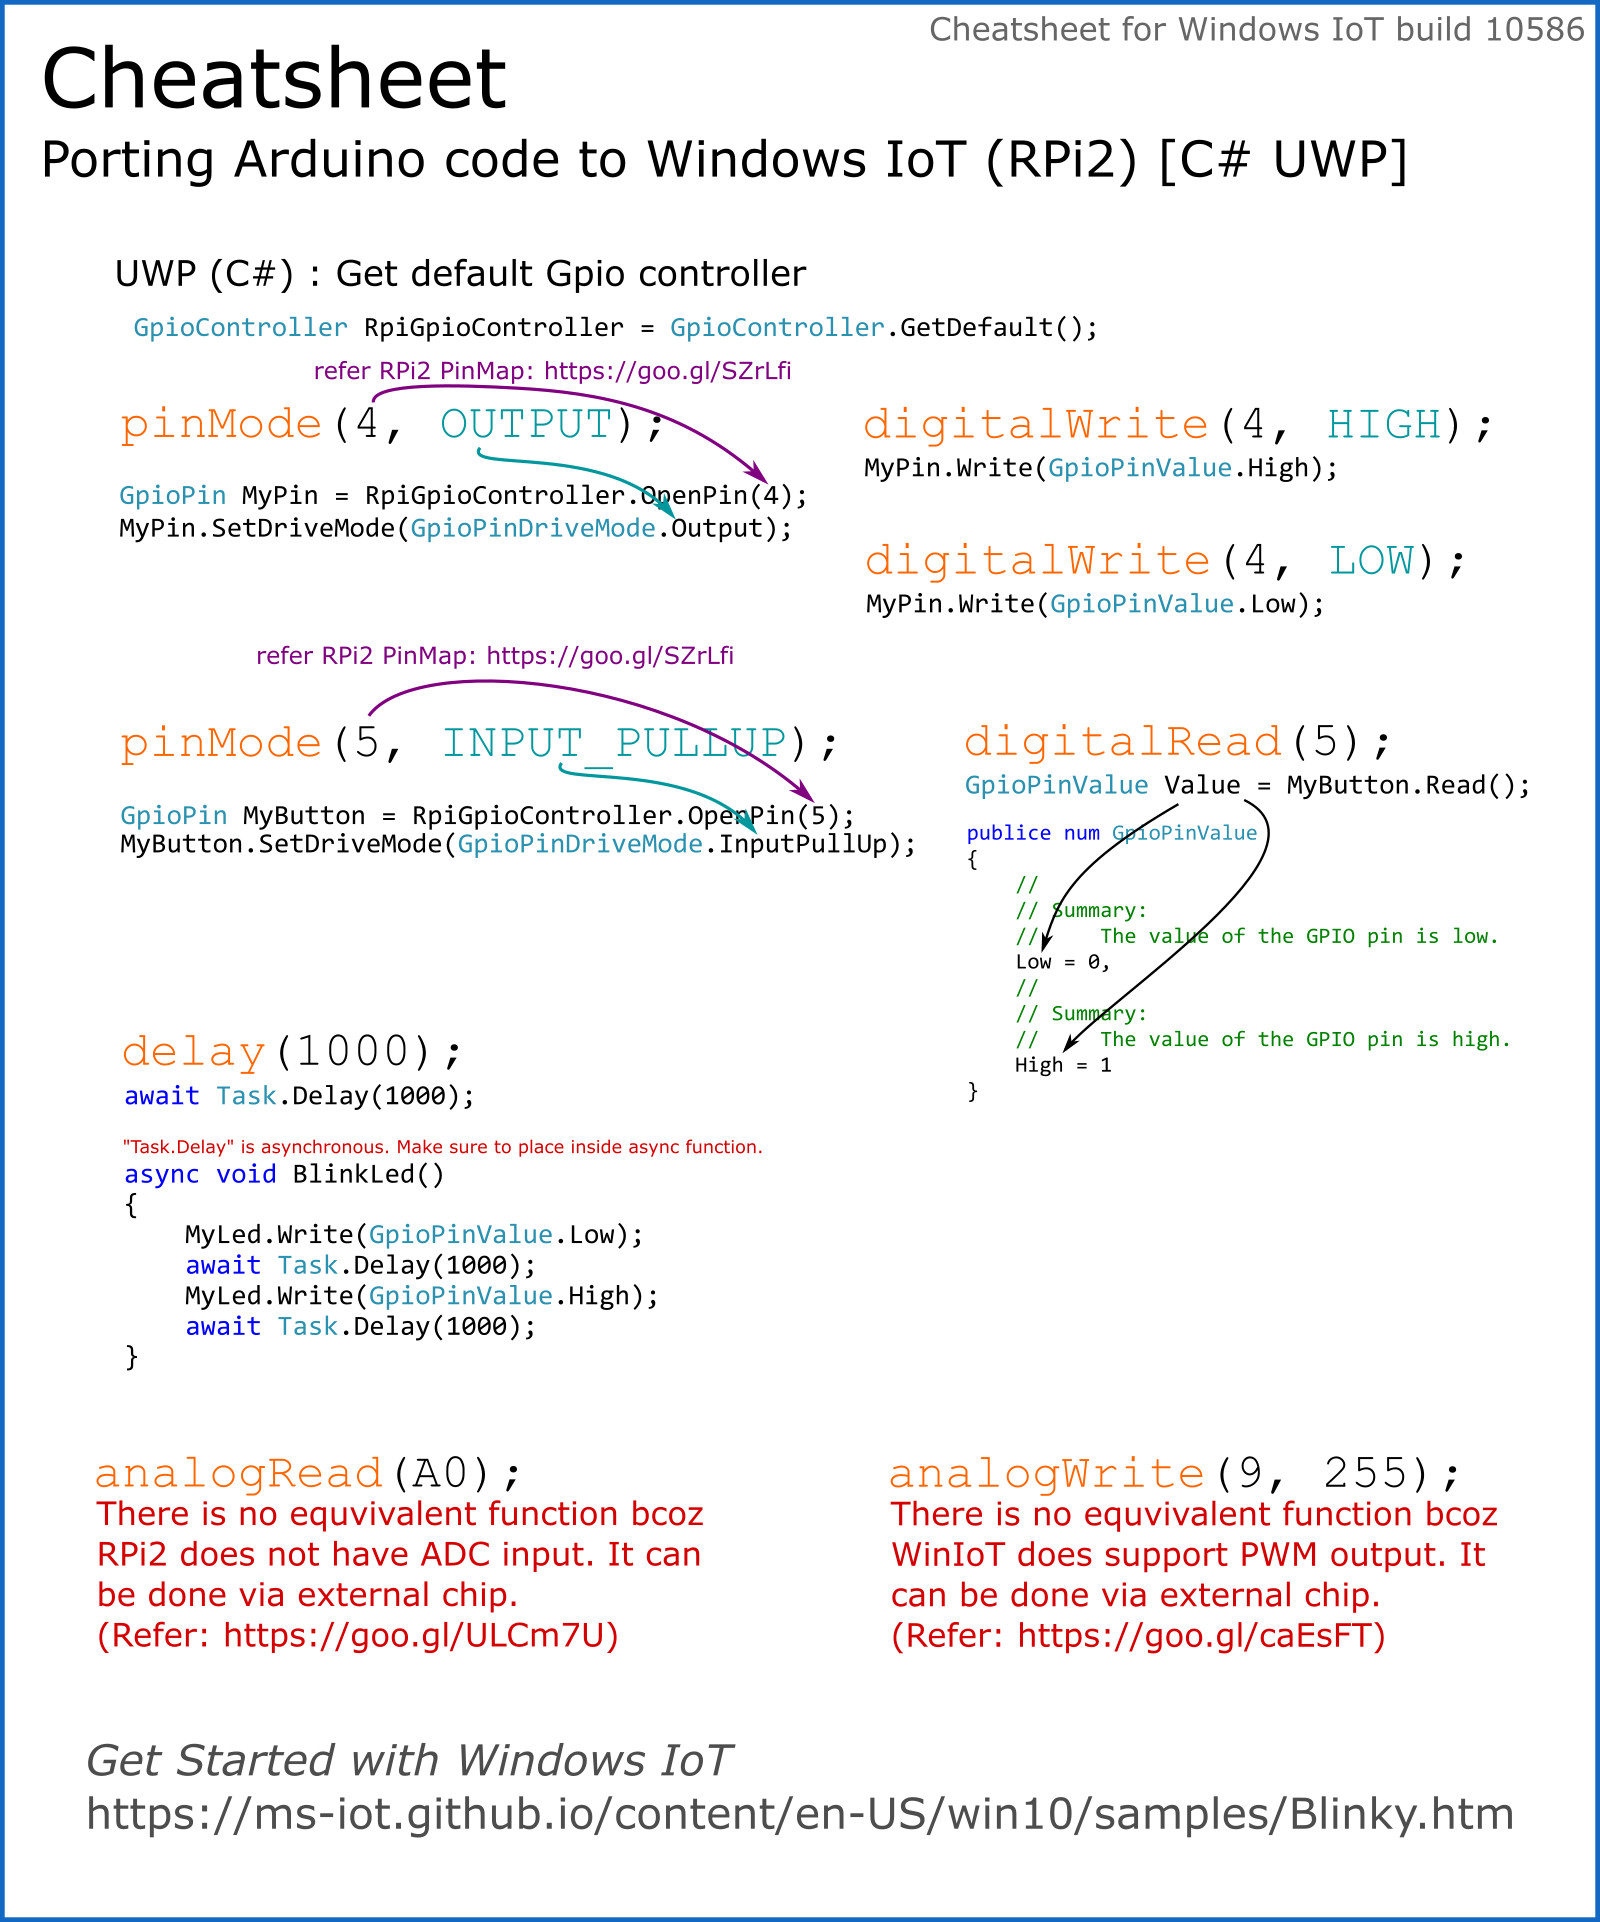
方法2:将Arduino代码转换为C# UWP
将Arduino代码转换为C# UWP并不是很复杂。您只需将Arduino函数转换为其等效的C# UWP IoT函数:
页面原文内容由Stack Overflow提供。腾讯云小微IT领域专用引擎提供翻译支持
原文链接:
https://stackoverflow.com/questions/34299529
复制相关文章
相似问题
腾讯云开发者
