
如何在不改变div大小的情况下垂直对齐中间的文本
如何在不改变div大小的情况下垂直对齐中间的文本
提问于 2016-11-14 09:55:34
我需要将左边框中的文字"Hello“设置为(垂直)中间。
如果我更改CSS
.red-banner .text { background: rgb(32,56,100); color: white; padding-top:8px; }
然后"Hello“将被稍微向下移动,但是黑色的背景也会被移动,并且重叠下面的横幅。
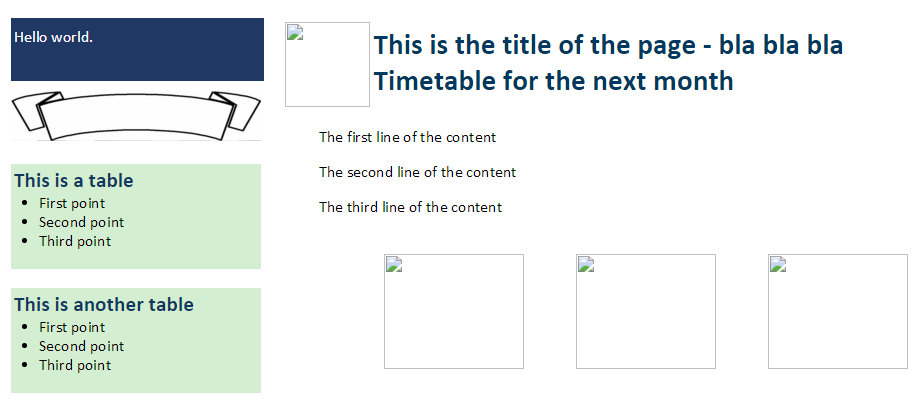
那么,如何在不改变黑色背景大小的情况下,对齐方框中的文本呢?(文本的内容最多为2行)。
#parent {
  overflow: hidden;
  margin:0px;
}

.right {
  border-left: 2px solid;
  border-color: rgb(215,217,216);
  padding-left: 20px;
  float: right;
  width: 270px;
}

.left {
  margin: 0px;
  overflow: hidden;
  height: 100%;
}

body {
  margin:0px;
  font-family: Calibri;
}

header20 {
  font-size: 16pt;
}

#inner {
  margin-left: 10px;
  width:730px;
  margin: 0 auto;
}

.banner {
  position: relative;
}

.banner .text {
  position: absolute;
  top: 0;
  left: 0;
  width: 250px;
  height: 100%;
  display: none;
}

.banner:hover .text {
  display: block;
}

.red-banner .text {
  background: rgb(32,56,100);
  color: white;
}

.green-banner .text {
  background: green;
}<div id="parent" class="row">
<div class="right">
<br>
<div class="banner red-banner">
<img src="http://dbclipart.com/wp-content/uploads/2016/03/Red-banner-clipart-image-1.png" style='width:250px;height:50px'>
<div class="text">
Hello world.
</div>
</div>
<br>
<div class="banner green-banner">
<img src="http://images.clipartpanda.com/banner-20clipart-normal_1283818525.jpg" style='width:250px;height:50px'>
<div class="text">
Hello world, this is a test message for the effect.
</div>
</div>
<br>
<table style='width:250px;background-color:rgb(211,238,208)'>
<tr>
<td>
<header20><span style='color:rgb(17,56,96)'><b>This is a table</b></span></header20>
<ul style='padding-left:25px;margin-top:0px;magrin-bottom:0px'>
<li>First point</li>
<li>Second point</li>
<li>Third point</li>
</ul>
</td>
</tr>
</table>
<br>
<table style='width:250px;background-color:rgb(211,238,208)'>
<tr>
<td>
<header20><span style='color:rgb(17,56,96)'><b>This is another table</b></span></header20>
<ul style='padding-left:25px;margin-top:0px;magrin-bottom:0px'>
<li>First point</li>
<li>Second point</li>
<li>Third point</li>
</ul>
</td>
</tr>
</table>
<br>
</div>
<div class="left">
<div id="inner">
<br>
<img src="smallpic.png" style='float:left;margin:0.1cm;width:85px;height:85px'>
<p style='margin-left:2cm;font-size:22.0pt;margin-top:6pt;color:rgb(0,56,96)'><b>This is the title of the page - bla bla bla <br>Timetable for the next month</b></p>
<p style='margin-left:1cm'> The first line of the content</p>
<p style='margin-left:1cm'> The second line of the content</p>
<p style='margin-left:1cm'> The third line of the content</p>
<br>
</div>
<table align='center'>
<tr>
<td style='padding-right:25px'><img src="pic1.png" style='width:140px;height:115px'/></td>
<td style ='padding-left:25px;padding-right:25px'><img src="pic2.png" style='width:140px;height:115px'/></td>
<td style ='padding-left:25px'><img src="pic3.png" style='width:140px;height:115px'/></td>
</tr>
</table>
</div>
</div>
回答 5
Stack Overflow用户
回答已采纳
发布于 2016-11-14 10:00:42
选项1:使用Flexbox对齐
将display: flex;属性应用于.text,使其成为一个柔性箱容器,以及
- 使用
justify-content对内容进行水平对齐。 - 使用
align-items垂直对齐内容。
请看下面的片段:
#parent {
  overflow: hidden;
  margin:0px;
}

.right {
  border-left: 2px solid;
  border-color: rgb(215,217,216);
  padding-left: 20px;
  float: right;
  width: 270px;
}

.left {
  margin: 0px;
  overflow: hidden;
  height: 100%;
}

body {
  margin:0px;
  font-family: Calibri;
}

header20 {
  font-size: 16pt;
}

#inner {
  margin-left: 10px;
  width:730px;
  margin: 0 auto;
}

.row {
  display: flex;
}

.banner {
  position: relative;
}

.banner .text {
  position: absolute;
  top: 0;
  left: 0;
  width: 250px;
  height: 100%;
  display: none;
}

.banner:hover .text {
  display: flex;
  justify-content: center;
  align-items: center;
}

.red-banner .text {
  background: rgb(32,56,100);
  color: white;
}

.green-banner .text {
  background: green;
}<div id="parent" class="row">
<div class="right">
<br>
<div class="banner red-banner">
<img src="http://dbclipart.com/wp-content/uploads/2016/03/Red-banner-clipart-image-1.png" style='width:250px;height:50px'>
<div class="text">
Hello world.
</div>
</div>
<br>
<div class="banner green-banner">
<img src="http://images.clipartpanda.com/banner-20clipart-normal_1283818525.jpg" style='width:250px;height:50px'>
<div class="text">
Hello world, this is a test message for the effect.
</div>
</div>
<br>
<table style='width:250px;background-color:rgb(211,238,208)'>
<tr>
<td>
<header20><span style='color:rgb(17,56,96)'><b>This is a table</b></span></header20>
<ul style='padding-left:25px;margin-top:0px;magrin-bottom:0px'>
<li>First point</li>
<li>Second point</li>
<li>Third point</li>
</ul>
</td>
</tr>
</table>
<br>
<table style='width:250px;background-color:rgb(211,238,208)'>
<tr>
<td>
<header20><span style='color:rgb(17,56,96)'><b>This is another table</b></span></header20>
<ul style='padding-left:25px;margin-top:0px;magrin-bottom:0px'>
<li>First point</li>
<li>Second point</li>
<li>Third point</li>
</ul>
</td>
</tr>
</table>
<br>
</div>
<div class="left">
<div id="inner">
<br>
<img src="smallpic.png" style='float:left;margin:0.1cm;width:85px;height:85px'>
<p style='margin-left:2cm;font-size:22.0pt;margin-top:6pt;color:rgb(0,56,96)'><b>This is the title of the page - bla bla bla <br>Timetable for the next month</b></p>
<p style='margin-left:1cm'> The first line of the content</p>
<p style='margin-left:1cm'> The second line of the content</p>
<p style='margin-left:1cm'> The third line of the content</p>
<br>
</div>
<table align='center'>
<tr>
<td style='padding-right:25px'><img src="pic1.png" style='width:140px;height:115px'/></td>
<td style ='padding-left:25px;padding-right:25px'><img src="pic2.png" style='width:140px;height:115px'/></td>
<td style ='padding-left:25px'><img src="pic3.png" style='width:140px;height:115px'/></td>
</tr>
</table>
</div>
</div>
选项2:使用表格和表格单元格对齐
您可以使用display: table。但是,要做到这一点,您必须稍微更改HTML结构,如下所示:
<div class="text table"> <!-- display: table -->
  <div class="table-cell"> <!-- display: table-cell -->
     Hello World
  </div>
</div>然后在vertical-align: middle & text-align: center元素上使用.table-cell元素。请看下面的片段:
#parent {
  overflow: hidden;
  margin:0px;
}

.right {
  border-left: 2px solid;
  border-color: rgb(215,217,216);
  padding-left: 20px;
  float: right;
  width: 270px;
}

.left {
  margin: 0px;
  overflow: hidden;
  height: 100%;
}

body {
  margin:0px;
  font-family: Calibri;
}

header20 {
  font-size: 16pt;
}

#inner {
  margin-left: 10px;
  width:730px;
  margin: 0 auto;
}

.row {
  display: flex;
}

.banner {
  position: relative;
}

.banner .text {
  position: absolute;
  top: 0;
  left: 0;
  width: 250px;
  height: 100%;
  display: none;
}

.banner:hover .text.table {
  display: table;
  height: 50px;
}

.banner:hover .text.table .table-cell {
  display: table-cell;
  vertical-align: middle;
  text-align: center;
}

.red-banner .text {
  background: rgb(32,56,100);
  color: white;
}

.green-banner .text {
  background: green;
}<div id="parent" class="row">
<div class="right">
<br>
<div class="banner red-banner">
<img src="http://dbclipart.com/wp-content/uploads/2016/03/Red-banner-clipart-image-1.png" style='width:250px;height:50px'>
<div class="text table">
<div class="table-cell">
Hello world.
</div>
</div>
</div>
<br>
<div class="banner green-banner">
<img src="http://images.clipartpanda.com/banner-20clipart-normal_1283818525.jpg" style='width:250px;height:50px'>
<div class="text table">
<div class="table-cell">
Hello world, this is a test message for the effect.
</div>
</div>
</div>
<br>
<table style='width:250px;background-color:rgb(211,238,208)'>
<tr>
<td>
<header20><span style='color:rgb(17,56,96)'><b>This is a table</b></span></header20>
<ul style='padding-left:25px;margin-top:0px;magrin-bottom:0px'>
<li>First point</li>
<li>Second point</li>
<li>Third point</li>
</ul>
</td>
</tr>
</table>
<br>
<table style='width:250px;background-color:rgb(211,238,208)'>
<tr>
<td>
<header20><span style='color:rgb(17,56,96)'><b>This is another table</b></span></header20>
<ul style='padding-left:25px;margin-top:0px;magrin-bottom:0px'>
<li>First point</li>
<li>Second point</li>
<li>Third point</li>
</ul>
</td>
</tr>
</table>
<br>
</div>
<div class="left">
<div id="inner">
<br>
<img src="smallpic.png" style='float:left;margin:0.1cm;width:85px;height:85px'>
<p style='margin-left:2cm;font-size:22.0pt;margin-top:6pt;color:rgb(0,56,96)'><b>This is the title of the page - bla bla bla <br>Timetable for the next month</b></p>
<p style='margin-left:1cm'> The first line of the content</p>
<p style='margin-left:1cm'> The second line of the content</p>
<p style='margin-left:1cm'> The third line of the content</p>
<br>
</div>
<table align='center'>
<tr>
<td style='padding-right:25px'><img src="pic1.png" style='width:140px;height:115px'/></td>
<td style ='padding-left:25px;padding-right:25px'><img src="pic2.png" style='width:140px;height:115px'/></td>
<td style ='padding-left:25px'><img src="pic3.png" style='width:140px;height:115px'/></td>
</tr>
</table>
</div>
</div>
希望这能有所帮助!
Stack Overflow用户
发布于 2016-11-14 09:59:34
尝试在css下面
text-align: center;在文本类中对齐文本。
Stack Overflow用户
发布于 2016-11-14 11:33:08
要使项目垂直对齐Flex框是最好的主意,旧技巧和黑客可以完成工作,但您的布局需要可靠的设计和灵活性,因此使用flex框是必要的:首先,我们更改父项的显示:
diplay:flex然后我们使用:
justify-content:center to center item horizontally ,对于垂直对齐,我们使用:
align-item :center 既然您说不能使用Flex,那么使用line-height还有另外一种方法
.banner:hover .text
    display: block;
    text-align: center;
    line-height: 50px;
#parent {
  overflow: hidden;
  margin:0px;
}

.right {
  border-left: 2px solid;
  border-color: rgb(215,217,216);
  padding-left: 20px;
  float: right;
  width: 270px;
}

.left {
  margin: 0px;
  overflow: hidden;
  height: 100%;
}

body {
  margin:0px;
  font-family: Calibri;
}

header20 {
  font-size: 16pt;
}

#inner {
  margin-left: 10px;
  width:730px;
  margin: 0 auto;
}

.row {
  display: flex;
}

.banner {
  position: relative;
}

.banner .text {
  position: flex;
  top: 0;
  left: 0;
  width: 250px;
  height: 100%;
  display: none;
}

.banner:hover .text {
  display: flex;
}

.red-banner .text {
  background: rgb(32,56,100);
  color: white;
  display:flex;
  justify-content:center;
  align-items:center;
}

.green-banner .text {
  background: green;
}<div id="parent" class="row">
<div class="right">
<br>
<div class="banner red-banner">
<img src="http://dbclipart.com/wp-content/uploads/2016/03/Red-banner-clipart-image-1.png" style='width:250px;height:50px'>
<div class="text">
Hello world.
</div>
</div>
<br>
<div class="banner green-banner">
<img src="http://images.clipartpanda.com/banner-20clipart-normal_1283818525.jpg" style='width:250px;height:50px'>
<div class="text">
Hello world, this is a test message for the effect.
</div>
</div>
<br>
<table style='width:250px;background-color:rgb(211,238,208)'>
<tr>
<td>
<header20><span style='color:rgb(17,56,96)'><b>This is a table</b></span></header20>
<ul style='padding-left:25px;margin-top:0px;magrin-bottom:0px'>
<li>First point</li>
<li>Second point</li>
<li>Third point</li>
</ul>
</td>
</tr>
</table>
<br>
<table style='width:250px;background-color:rgb(211,238,208)'>
<tr>
<td>
<header20><span style='color:rgb(17,56,96)'><b>This is another table</b></span></header20>
<ul style='padding-left:25px;margin-top:0px;magrin-bottom:0px'>
<li>First point</li>
<li>Second point</li>
<li>Third point</li>
</ul>
</td>
</tr>
</table>
<br>
</div>
<div class="left">
<div id="inner">
<br>
<img src="smallpic.png" style='float:left;margin:0.1cm;width:85px;height:85px'>
<p style='margin-left:2cm;font-size:22.0pt;margin-top:6pt;color:rgb(0,56,96)'><b>This is the title of the page - bla bla bla <br>Timetable for the next month</b></p>
<p style='margin-left:1cm'> The first line of the content</p>
<p style='margin-left:1cm'> The second line of the content</p>
<p style='margin-left:1cm'> The third line of the content</p>
<br>
</div>
<table align='center'>
<tr>
<td style='padding-right:25px'><img src="pic1.png" style='width:140px;height:115px'/></td>
<td style ='padding-left:25px;padding-right:25px'><img src="pic2.png" style='width:140px;height:115px'/></td>
<td style ='padding-left:25px'><img src="pic3.png" style='width:140px;height:115px'/></td>
</tr>
</table>
</div>
</div>
页面原文内容由Stack Overflow提供。腾讯云小微IT领域专用引擎提供翻译支持
原文链接:
https://stackoverflow.com/questions/40585937
复制相关文章
相似问题
腾讯云开发者
