
当图像不对齐x-y轴时,泛化ScaleTransform (WPF)。
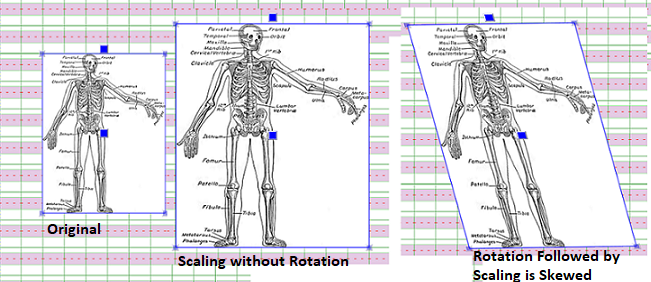
我的线性代数很弱。WPF是一个很好的系统,用于在图像上呈现不同的转换。然而,标准的ScaleTransform只会沿着x-y轴缩放图像.当第一次旋转边缘时,应用ScaleTransform的结果将导致倾斜的转换(如下图所示),因为边缘不再对齐。
因此,如果我的图像经过了几次不同的转换,并由WPF呈现系统显示结果,那么如何计算出正确的矩阵变换来获取(最终旋转的图像)并沿着呈现图像的轴缩放呢?
如有任何帮助或建议,将不胜感激。
提亚
(完整的代码,请参阅我前面的问题。)
编辑#1:要查看上述效果:
- 将图像放到Inkcavas上。-没有看到倾斜.
- 逆时针旋转图像(约45度)-没有看到倾斜。
- 使图像更大(大约是其预先标度大小的两倍) --没有看到倾斜。
- 顺时针旋转图像(大约回到它开始的地方) --在旋转过程中和旋转后立即看到倾斜。
如果跳过第三步,简单的旋转--不管做了多少次--都不会产生倾斜效应。实际上,这是有道理的。ScaleTransform保持从中心到图像边缘的距离。如果图像是在一个角度,x-y距离的边缘的转换不再是恒定的宽度和长度的渲染图像。因此边得到适当的缩放,但角度是改变的。
以下是最相关的代码:
private ImageResizing(Image image)
        {
            if (image == null)
                throw new ArgumentNullException("image");

           _image = image;
            TransformGroup tg = new TransformGroup();

            image.RenderTransformOrigin = new Point(0.5, 0.5);  // All transforms will be based on the center of the rendered element.
            tg.Children.Add(image.RenderTransform);             // Keeps whatever transforms have already been applied.
            image.RenderTransform = tg;
            _adorner = new MyImageAdorner(image);               // Create the adorner.

            InstallAdorner();                                   // Get the Adorner Layer and add the Adorner.
        }
注意: image.RenderTransformOrigin = new (0.5,0.5)被设置为呈现图像的中心。所有的转换都是基于图像的中心,在图像被变换时看起来是这样。
 public MyImageAdorner(UIElement adornedElement)
      : base(adornedElement)
    {
        visualChildren = new VisualCollection(this);


        // Initialize the Movement and Rotation thumbs.
        BuildAdornerRotate(ref moveHandle, Cursors.SizeAll);
        BuildAdornerRotate(ref rotateHandle, Cursors.Hand);

        // Add handlers for move and rotate.
        moveHandle.DragDelta += new DragDeltaEventHandler(moveHandle_DragDelta);
        moveHandle.DragCompleted += new DragCompletedEventHandler(moveHandle_DragCompleted);
        rotateHandle.DragDelta += new DragDeltaEventHandler(rotateHandle_DragDelta);
        rotateHandle.DragCompleted += new DragCompletedEventHandler(rotateHandle_DragCompleted);


        // Initialize the Resizing (i.e., corner) thumbs with specialized cursors.
        BuildAdornerCorner(ref topLeft, Cursors.SizeNWSE);

        // Add handlers for resizing.
        topLeft.DragDelta += new DragDeltaEventHandler(TopLeft_DragDelta);

        topLeft.DragCompleted += TopLeft_DragCompleted;

        // Put the outline border arround the image. The outline will be moved by the DragDelta's
        BorderTheImage();
    }

  #region [Rotate]
    /// <summary>
    /// Rotate the Adorner Outline about its center point. The Outline rotation will be applied to the image
    /// in the DragCompleted event.
    /// </summary>
    /// <param name="sender"></param>
    /// <param name="e"></param>
    void rotateHandle_DragDelta(object sender, DragDeltaEventArgs e)
    {
        // Get the position of the mouse relative to the Thumb.  (All cooridnates in Render Space)
        Point pos = Mouse.GetPosition(this);

        // Render origin is set at center of the adorned element. (all coordinates are in rendering space).
        double CenterX = AdornedElement.RenderSize.Width / 2;
        double CenterY = AdornedElement.RenderSize.Height / 2;

        double deltaX = pos.X - CenterX;
        double deltaY = pos.Y - CenterY;

        double angle;
        if (deltaY.Equals(0))
        {
            if (!deltaX.Equals(0))
                angle = 90;
            else
                return;

        }
        else
        {
            double tan = deltaX / deltaY;
            angle = Math.Atan(tan);  angle = angle * 180 / Math.PI;
        }

        // If the mouse crosses the vertical center,
        // find the complementary angle.
        if (deltaY > 0)
            angle = 180 - Math.Abs(angle);

        // Rotate left if the mouse moves left and right
        // if the mouse moves right.
        if (deltaX < 0)
            angle = -Math.Abs(angle);
        else
            angle = Math.Abs(angle);

        if (double.IsNaN(angle))
            return;

        // Apply the rotation to the outline.  All Transforms are set to Render Center.
        rotation.Angle = angle;
        rotation.CenterX = CenterX;
        rotation.CenterY = CenterY;
        outline.RenderTransform = rotation;
    }

    /// Rotates image to the same angle as outline arround the render origin.
    void rotateHandle_DragCompleted(object sender, DragCompletedEventArgs e)
    {
        // Get Rotation Angle from outline. All element rendering is set to rendering center.
        RotateTransform _rt = outline.RenderTransform as RotateTransform;

        // Add RotateTransform to the adorned element.
        TransformGroup gT = AdornedElement.RenderTransform as TransformGroup;
        RotateTransform rT = new RotateTransform(_rt.Angle);
        gT.Children.Insert(0, rT);
        AdornedElement.RenderTransform = gT;

        outline.RenderTransform = Transform.Identity;  // clear transform from outline.
    }
    #endregion  //Rotate


 #region [TopLeft Corner
    // Top Left Corner is being dragged. Anchor is Bottom Right.
    void TopLeft_DragDelta(object sender, DragDeltaEventArgs e)
    {
        ScaleTransform sT = new ScaleTransform(1 - e.HorizontalChange / outline.ActualWidth, 1 - e.VerticalChange / outline.ActualHeight,
            outline.ActualWidth, outline.ActualHeight);

        outline.RenderTransform = sT;   // This will immediately show the new outline without changing the Image.
    }


    /// The resizing outline for the TopLeft is based on the bottom right-corner. The resizing transform for the
    /// element, however, is based on the render origin being in the center. Therefore, the Scale transform
    /// received from the outling must be recalculated to have the same effect--only from the rendering center.
    ///
    /// TopLeft_DragCompleted resize the element rendering.
    private void TopLeft_DragCompleted(object sender, DragCompletedEventArgs e)
    {
        // Get new scaling from the Outline.
        ScaleTransform _sT = outline.RenderTransform as ScaleTransform;
        scale.ScaleX *= _sT.ScaleX; scale.ScaleY *= _sT.ScaleY;

        Point Center = new Point(AdornedElement.RenderSize.Width/2, AdornedElement.RenderSize.Height/2);

        TransformGroup gT = AdornedElement.RenderTransform as TransformGroup;

        ScaleTransform sT = new ScaleTransform( _sT.ScaleX, _sT.ScaleY, Center.X, Center.Y);
        gT.Children.Insert(0, sT);

        AdornedElement.RenderTransform = gT;
        outline.RenderTransform = Transform.Identity;           // Clear outline transforms. (Same as null).
    }
    #endregion
注意:我正在将每个新的转换添加到第一个子列表中。这使得在图像上的计算更容易。
回答 1
Stack Overflow用户
发布于 2017-07-12 03:06:36
我无法在Google或文本中找到完全回答这个问题所需的所有元素。所以,对于所有像我自己这样的新手,我会发这个(很长的)答案。(编辑和大师请随时纠正)。
一句关于设置的话。我有一个墨水帆布,其中一个图像被删除和添加作为一个孩子的墨水帆布。在下降时,一个装饰器包含一个拇指在每个角落进行大小调整,一个顶端-中间拇指用于旋转,一个中间拇指用于翻译,用于图像的最终定位。随着一个“大纲”设计为路径元素,拇指和轮廓完成Adorner,并创建了一种线框架周围的装饰元素。
有多个要点:
- WPF首先使用布局传递来定位元素在其父容器中的位置,然后使用呈现传递来安排元素。转换可以应用于任何一个或两个布局和呈现传递。但是,需要注意的是,布局传递使用了一个x-y坐标系,原点位于父元素的左上角,因为呈现系统本质上引用子元素的左上角。如果未明确定义已删除元素的布局位置,则默认情况下将将其添加到父容器的“源”中。
- 默认情况下,RenderTransform是一个MatrixTransform,但可以由一个TransformGroup代替。使用这两种方法之一或两者都可以使矩阵(在MatrixTransform中)或转换(在TransformGroup中)按任何顺序应用。我更喜欢使用MatrixTransforms来更好地了解缩放、旋转和平移之间的关系。
- 装饰器的呈现遵循它所装饰的元素。也就是说,元素的呈现也将应用于Adorner。这种行为可以通过使用公共覆盖GeneralTransform GetDesiredTransform(GeneralTransform transform)来实现。
正如在最初的问题中所指出的,我避免使用SetTop()和SetLeft(),因为它们扰乱了我的其他矩阵。事后看来,我的矩阵失败的原因是SetTop()和SetLeft()显然在布局阶段工作--所以我所有的渲染坐标都关闭了。(我使用TransalateTransform在拖放时定位图像。)但是,使用SetTop()和SetLeft()显然在布局阶段起作用。使用这大大简化了渲染阶段所需的计算,因为所有坐标都可以参考图像,而不考虑画布上的位置。
private void IC_Drop(object sender, DragEventArgs e)
    {
        InkCanvas ic = sender as InkCanvas;

        // Setting InkCanvasEditingMode.None is necessary to capture DrawingLayer_MouseDown.
        ic.EditingMode = InkCanvasEditingMode.None;

        ImageInfo image_Info = e.Data.GetData(typeof(ImageInfo)) as ImageInfo;
        if (image_Info != null)
        {
            // Display enlarged image on ImageLayer
            // This is the expected format for the Uri:
            //      ImageLayer.Source = new BitmapImage(new Uri("/Images/Female - Front.png", UriKind.Relative));
            // Source = new BitmapImage(image_Info.Uri);

            Image image = new Image();
            image.Width = image_Info.Width * 4;

            // Stretch.Uniform keeps the Aspect Ratio but totally screws up resizing the image.
            // Stretch.Fill allows for resizing the Image without keeping the Aspect Ratio.
            image.Stretch = Stretch.Fill;
            image.Source = new BitmapImage(image_Info.Uri);

            // Position the drop. Note that SetLeft and SetTop are active during the Layout phase of the image drop and will
            // be applied before the Image hits its Rendering stage.
            Point position = e.GetPosition(ic);
            InkCanvas.SetLeft(image, position.X);
            InkCanvas.SetTop(image, position.Y);
            ic.Children.Add(image);
            ImageResizing imgResize = ImageResizing.Create(image);
        }
    }
因为我希望能够从任何方向调整图像的大小,所以图像是用Stretch.Fill设置的。当Stretch.Uniform被使用时,图像似乎首先被调整大小,然后跳回到它的初始大小。
- 由于我使用的是MatrixTransform,所以矩阵的顺序很重要。所以当应用矩阵时,为了我的目的 //进行新的呈现转换。乘法的矩阵顺序是极其重要的。//缩放应首先完成,然后是(倾斜)、旋转和平移- in //顺序。MatrixTransform gT =新MatrixTransform {矩阵= sM * rM * tM };ele.RenderTransform = gT;
缩放(sM),在旋转之前执行(rM)。翻译是最后应用的。(C#从左到右进行矩阵乘法)。
在审查矩阵时,很明显,旋转矩阵也涉及斜元素。(这是有意义的,因为显然RotationTransform的目的是使边缘的角度保持不变)。因此,旋转矩阵取决于图像的大小。
在我的例子中,旋转后的缩放导致了倾斜,是因为缩放变换将图像的点与x-y轴之间的距离相乘。因此,如果图像的边缘与x-y轴的距离不是恒定的,缩放就会扭曲(即倾斜)图像。
将其结合在一起,将产生以下方法来调整图像的大小:
Action<Matrix, Vector> DragCompleted = (growthMatrix, v) =>
        {
            var ele = AdornedElement;

            // Get the change vector.  Transform (i.e, Rotate) change vector into x-y axes.
            // The Horizontal and Vertical changes give the distance between the the current cursor position
            // and the Thumb.
            Matrix m = new Matrix();
            m.Rotate(-AngleDeg);
            Vector v1 = v * m;

            // Calculate Growth Vector.
            var gv = v1 * growthMatrix;

            // Apply new scaling along the x-y axes to obtain the rendered size.
            // Use the current Image size as the reference to calculate the new scaling factors.
            var scaleX = sM.M11; var scaleY = sM.M22;
            var W = ele.RenderSize.Width * scaleX; var H = ele.RenderSize.Height * scaleY;
            var sx = 1 + gv.X/ W; var sy = 1 + gv.Y / H;

            // Change ScalingTransform by applying the new scaling factors to the existing scaling transform.
            // Do not add offsets to the scaling transform matrix as they will be included in future scalings.
            // With RenderTransformOrigin set to the image center (0.5, 0.5), scalling occurs from the center out.
            // Move the new center of the new resized image to its correct position such that the image's thumb stays
            // underneath the cursor.
            sM.Scale(sx, sy);


            tM.Translate(v.X / 2, v.Y / 2);


            // New render transform. The order of the transform's is extremely important.
            MatrixTransform gT = new MatrixTransform
            {
                Matrix = sM * rM * tM
            };
            ele.RenderTransform = gT;
            outline.RenderTransform = Transform.Identity;  // clear this transform from the outline.

        };
为了清楚起见,我的“增长矩阵”被定义为,当光标从图像的中心移开时,会产生“正”增长。例如,当移动到左边和上面时,TopLeft角将“增长”图像。因此
生长矩阵=左上角的新矩阵( -1,0,0,-1,0,0) .
最后一个问题是正确计算旋转中心(即,我想要旋转,而不是轨道)。通过使用
  // All transforms will be based on the center of the rendered element.
        AdornedElement.RenderTransformOrigin = new Point(0.5, 0.5);
最后,由于我是从一个角落缩放,图像的中心需要被转换,以保持在光标下面的角落。
很抱歉,这个答案太长了,但是还有很多需要讨论的地方(以及学习:)。希望这能帮上忙。
https://stackoverflow.com/questions/44854989
复制相似问题
腾讯云开发者
