
离子3:使用蓝牙打印机打印图像
离子3:使用蓝牙打印机打印图像
提问于 2017-10-24 07:09:34
我目前正在为我们的Ionic3应用程序而奋斗。我似乎找不出如何使用BT打印机和蓝牙串行插件打印图像。打印文本是很好的。
我们正在使用此文档(由我的前同事找到) 驱动程序命令文档测试RPP02N-BU打印机,但我无法获得
选择位图像模式
去工作。
我们首先调整上传图像的大小,使其不超过300 We,并将其转换为“黑白”。打印时,我们迭代图像并创建二进制字符串,然后将其转换为字节。这些字节遵循SELECT位映像模式命令。
我们的代码(在TypeScript中)如下:
/**
 * Image to printer command
 * @param image
 */
public static getImagePrintData(image: HTMLImageElement): Buffer {
    // Initialize list of commands
    let command: number[] = [ 0x1b, 0x2a, 33, 255, 3 ];

    // Get image bytes
    let bytes = this.getImageBytes(image);

    // Add bytes to command
    bytes.forEach((byte) => command.push(byte));

    // Return command
    return new Buffer(command);
}

/**
 * Get image bytes
 * @param image
 */
private static getImageBytes(image: HTMLImageElement): number[] {
    // Init result
    let result = [];

    // Create image padding
    let padding = this.getZeroBytePadding(image.width);

    // Get image context
    let ctx = this.getImageContext(image);

    // Iterate image pixels
    for (let y = 0; y < image.height; y++) {
        // Init row string
        let row = "";

        // Go through row of pixels
        for (let x = 0; x < image.width; x++) {
            // Get pixel
            let pixel = ctx.getImageData(x, y, 1, 1).data;

            // Get rgb value
            let rgbValue = pixel[0] + pixel[1] + pixel[2];

            // Add 0 or 1 based on value
            row = row + (rgbValue > 0 ? 0 : 1);
        }

        // Add padding
        row = row + padding;

        // Now we need to split the row into byte chunks
        let byteChunks = row.match(/.{1,8}/g);

        // Now add those byte chunks to result
        byteChunks.forEach((chunk) => result.push(parseInt(chunk, 2)));
    }

    // Return result
    return result;
}

/**
 * Get zero byte padding
 * @param value
 */
private static getZeroBytePadding(value: number): string {
    // Init padding
    let padding = "";

    // Get difference
    let diff = value % 8;

    // Create padding
    for (let i = 0; i < (8 - diff); i++) {
        padding = padding + "0";
    }

    // Return result
    return padding;
}

/**
 * Get image context
 * @param image
 */
private static getImageContext(image: HTMLImageElement): CanvasRenderingContext2D {
    // Prepare canvas to draw image into
    var canvas = document.createElement('canvas');
    canvas.width = image.width;
    canvas.height = image.height;

    // Context
    var ctx = canvas.getContext('2d');
    ctx.drawImage(image, 0, 0);

    return ctx;
}
然后命令被发送到BT打印机:
// Initialize image
let image = new Image();
// Set data
image.src = options.logo.content;
// Get image print data
let imagePrintData = PrinterUtils.getImagePrintData(image);
// Push image to print queue
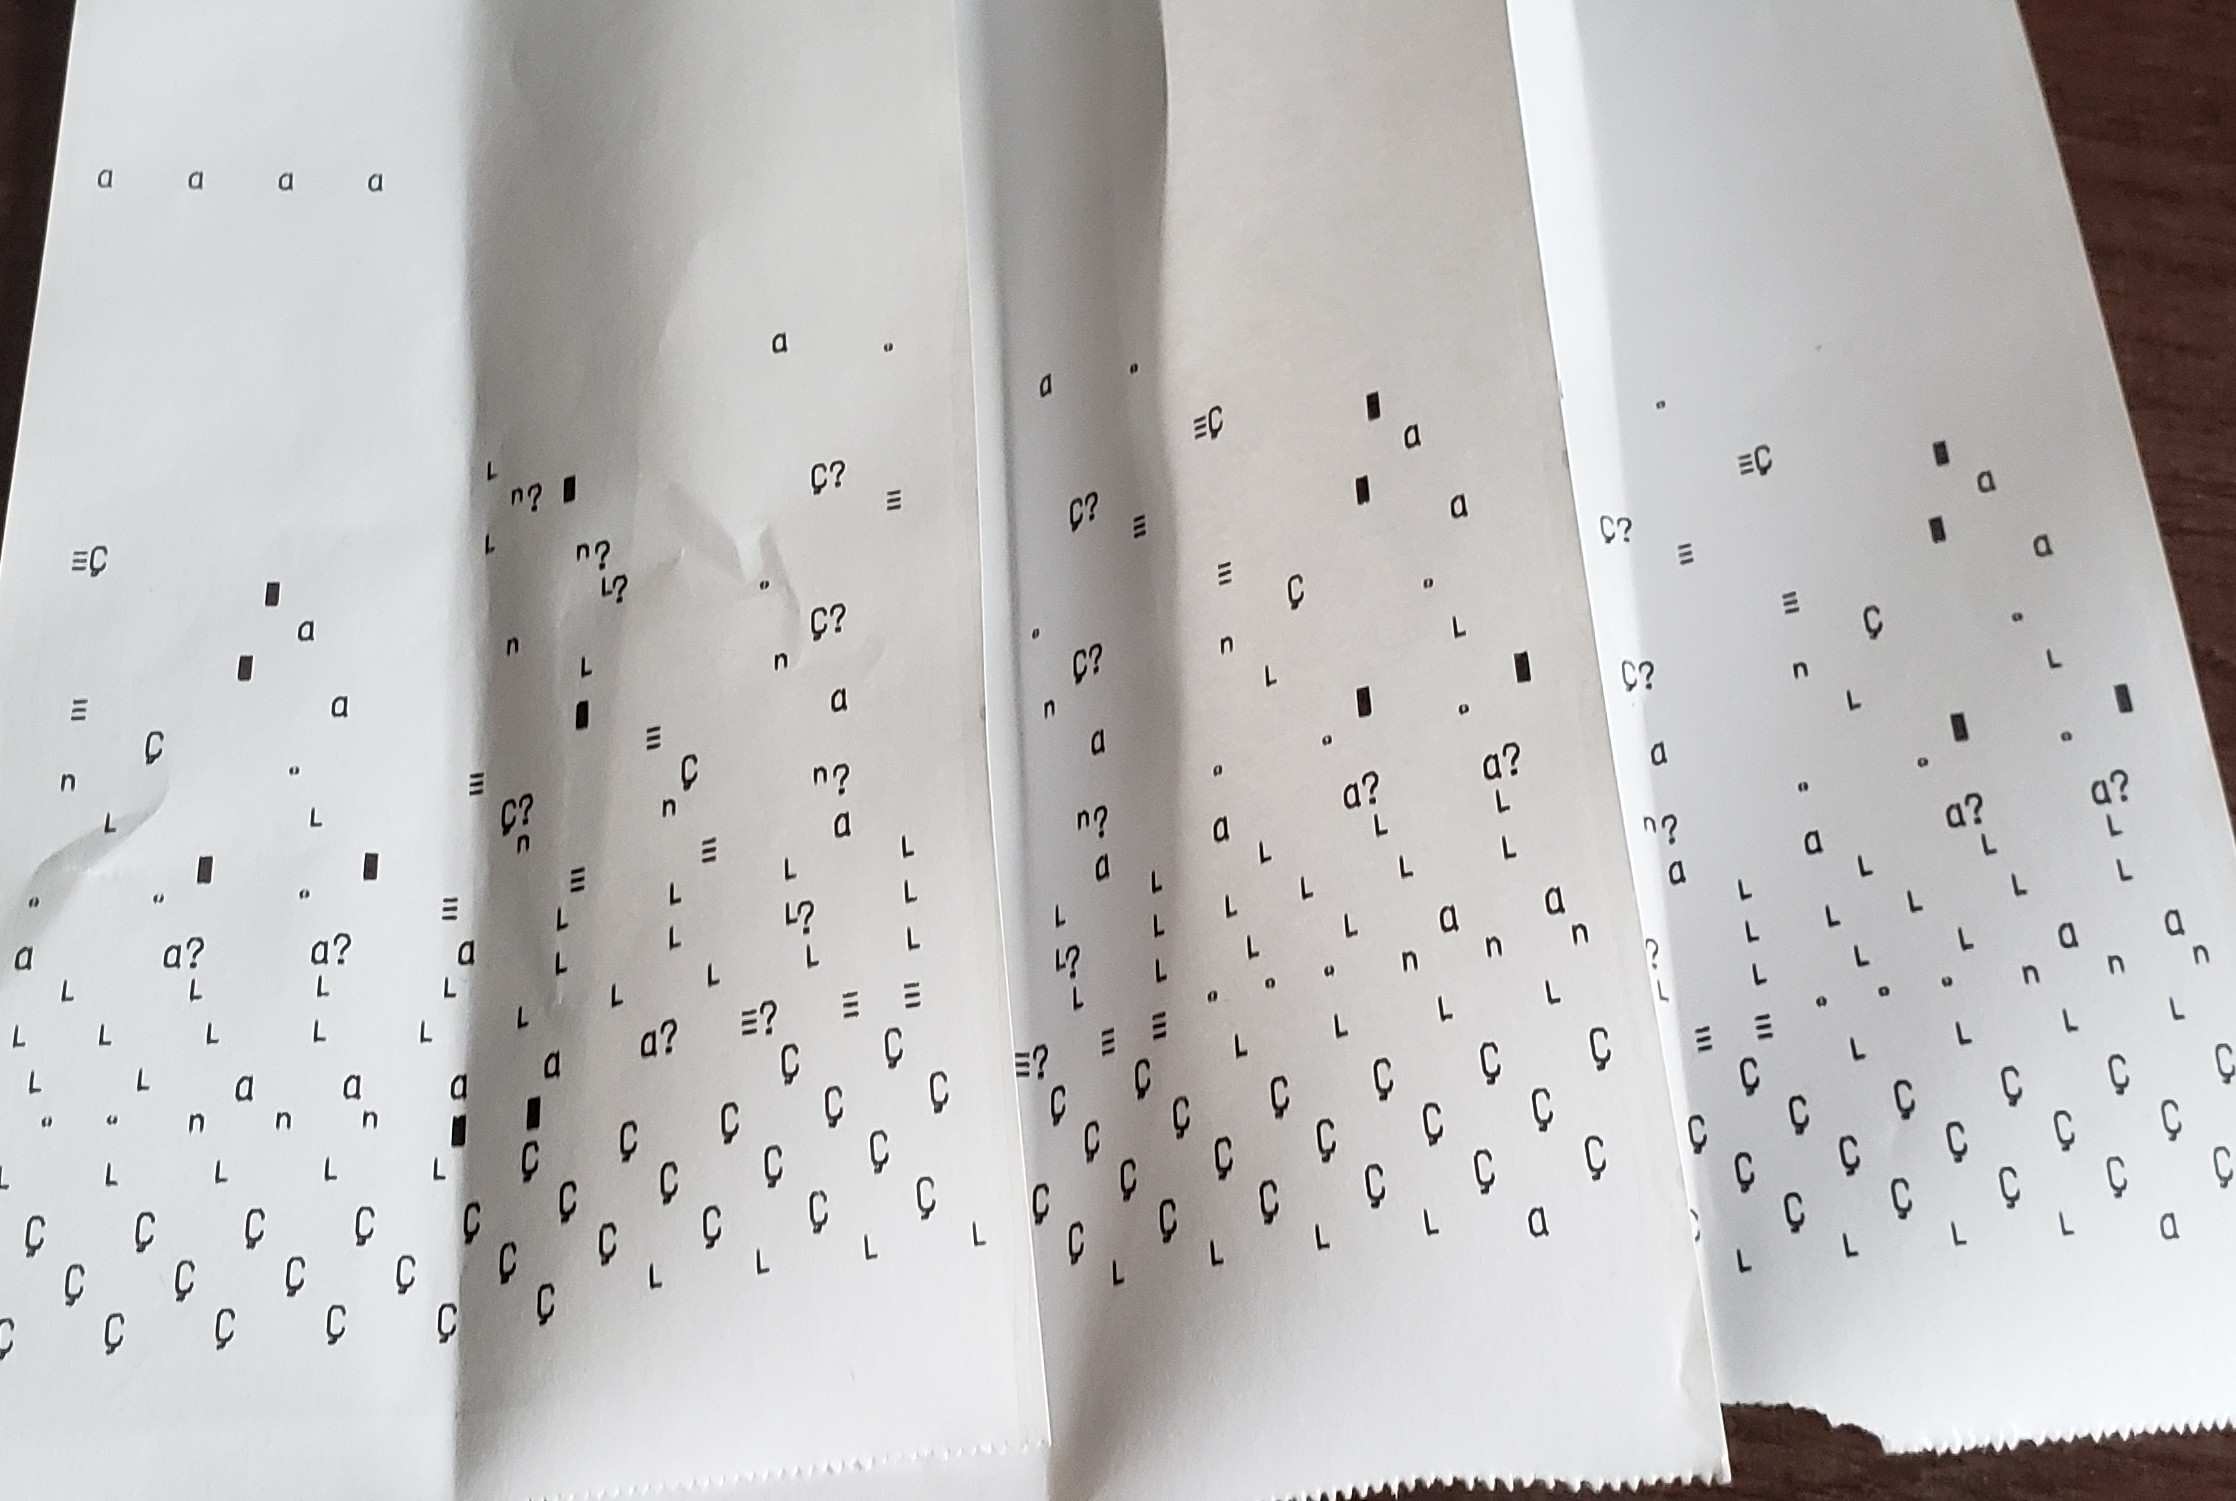
printQueue.push(this.bluetoothUtility.write(imagePrintData));生成的图像如下所示:

原文是:

回答 3
Stack Overflow用户
回答已采纳
发布于 2017-10-25 07:26:12
所以我终于成功了。我使用了部分代码:https://github.com/song940/node-escpos,并设法打印徽标,甚至居中。
下面的代码在TypeScript中
我创建了ESCPOSImage类:
/**
 * RGB interface
 */
interface IRGB {
    r: number;
    g: number;
    b: number;
    a: number;
}

/**
 * ESCPOS image
 */
export class ESCPOSImage {

    // Data
    private data: number[] = [];

    // Width
    private width: number = 0;

    // Height
    private height: number = 0;

    /**
     * Constructor
     * @param image
     */
    constructor(image: HTMLImageElement) {
        // Set width
        this.width = image.width;

        // Set height
        this.height = image.height;

        // Get image context
        let ctx = this.getContext(image);

        // Get data
        this.data = this.getBitData(ctx);
    }

    /**
     * Get bit data
     * @param ctx
     */
    private getBitData(ctx: CanvasRenderingContext2D): number[] {
        // Init result
        let result: number[] = [];

        // Iterate rows
        for (let y = 0; y < this.height; y++) {
            // Iterate columns
            for (let x = 0; x < this.width; x++) {
                // Get pixel
                let pixel = ctx.getImageData(x, y, 1, 1).data;

                // Get rgb
                let rgb = this.getRGB(pixel);

                // Get rgb value
                let value = rgb.r + rgb.g + rgb.b;

                // Add bit to result
                result.push(value > 0 ? 0 : 1);
            }
        }

        // Return result
        return result;
    }

    /**
     * Get image context
     * @param image
     */
    private getContext(image: HTMLImageElement): CanvasRenderingContext2D {
        // Create canvas
        var canvas = document.createElement('canvas');
        canvas.width = image.width;
        canvas.height = image.height;

        // Set context
        var context = canvas.getContext('2d');
        context.drawImage(image, 0, 0);

        // Return context
        return context;
    }

    /**
     * Get RGB
     * @param pixel
     */
    private getRGB(pixel: any): IRGB {
        // Return RGB
        return {
            r: pixel[0],
            g: pixel[1],
            b: pixel[2],
            a: pixel[3]
        }
    }

    /**
     * To raster
     */
    public toRaster() {
        // Init result
        let result = [];

        // Get width and height
        let width = this.width;
        let height = this.height;

        // N block lines
        let n = Math.ceil(width / 8);

        // Iterate
        for (let y = 0; y < height; y++) {
            for (let x = 0; x < n; x++) {
                for (let b = 0; b < 8; b++) {
                    let i = x * 8 + b;

                    if (result[y * n + x] === undefined) {
                        result[y * n + x] = 0;
                    }

                    let c = x * 8 + b;

                    if (c < width) {
                        if (this.data[y * width + i]) {
                            result[y * n + x] += (0x80 >> (b & 0x7));
                        }
                    }
                }
            }
        }

        // Return result
        return {
            data: result,
            width: n,
            height: height
        };
    }
}
该类实现toRaster方法,该方法稍后在ESCPOSPrinter类中使用:
/**
 * ESCPOS printer
 */
export class ESCPOSPrinter {

    // Buffer
    private buffer: Buffer;

    /**
     * Constructor
     * @param buffer
     */
    constructor(buffer: Buffer) {
        // Init buffer
        this.buffer = buffer;
    }

    /**
     * Write buffer
     * @param buffer
     */
    private write(buffer: Buffer) {
        this.buffer = Buffer.concat([this.buffer, buffer]);
    }

    /**
     * Print raster
     * @param image
     * @param mode
     */
    public raster(image: ESCPOSImage, mode: string = 'normal') {
        // Get header
        let header = COMMANDS.S_RASTER_N;

        // Get raster
        let raster = image.toRaster();

        // Set alignment
        this.align('center');

        // Write header
        this.write(new Buffer(header));
        this.write(new Buffer([raster.width, 0]));
        this.write(new Buffer([raster.height, 0]));
        // Write data
        this.write(new Buffer(raster.data));
    }

    /**
     * Print line
     */
    public printLn() {
        this.write(new Buffer([COMMANDS.CTL_CR, COMMANDS.CTL_LF]));
    }

    /**
     * Align
     * @param alignment ['left', 'center', 'right']
     */
    public align(alignment: string = 'left') {
        // Create alignment dictionary
        const aligments = {
            ['left']: COMMANDS.TXT_ALIGN_LT,
            ['center']: COMMANDS.TXT_ALIGN_CT,
            ['right']: COMMANDS.TXT_ALIGN_RT
        }

        // Write alignment
        this.write(new Buffer(aligments[alignment]));
    }

    /**
     * Get buffer
     */
    public getBuffer(): Buffer {
        return this.buffer;
    }
}
最后,大家一起使用:
// Create image
let image = new Image();

// Set data
image.src = options.logo.content;

// Create ESCPOS image
let escposImage = new ESCPOSImage(image);

// Initialize ESCPOS printer
let escposPrinter = new ESCPOSPrinter(new Buffer([]));

// Print image
escposPrinter.raster(escposImage);

// And also print new line
escposPrinter.printLn();

// Assign data to print queue
printData = Buffer.concat([escposPrinter.getBuffer(), printData]);
然后用蓝牙串行插件的写入方式将数据分成分组发送。
如果您想知道这些命令:
TXT_ALIGN_LT: [0x1b, 0x61, 0x00],     // Left justification
TXT_ALIGN_CT: [0x1b, 0x61, 0x01],     // Centering
TXT_ALIGN_RT: [0x1b, 0x61, 0x02],     // Right justification

S_RASTER_N: [0x1d, 0x76, 0x30, 0x00], // Set raster image normal size

CTL_LF: [0x0a], // Print and line feed
CTL_CR: [0x0d], // Carriage return
希望这能帮上忙。干杯
Stack Overflow用户
发布于 2021-04-15 20:56:52
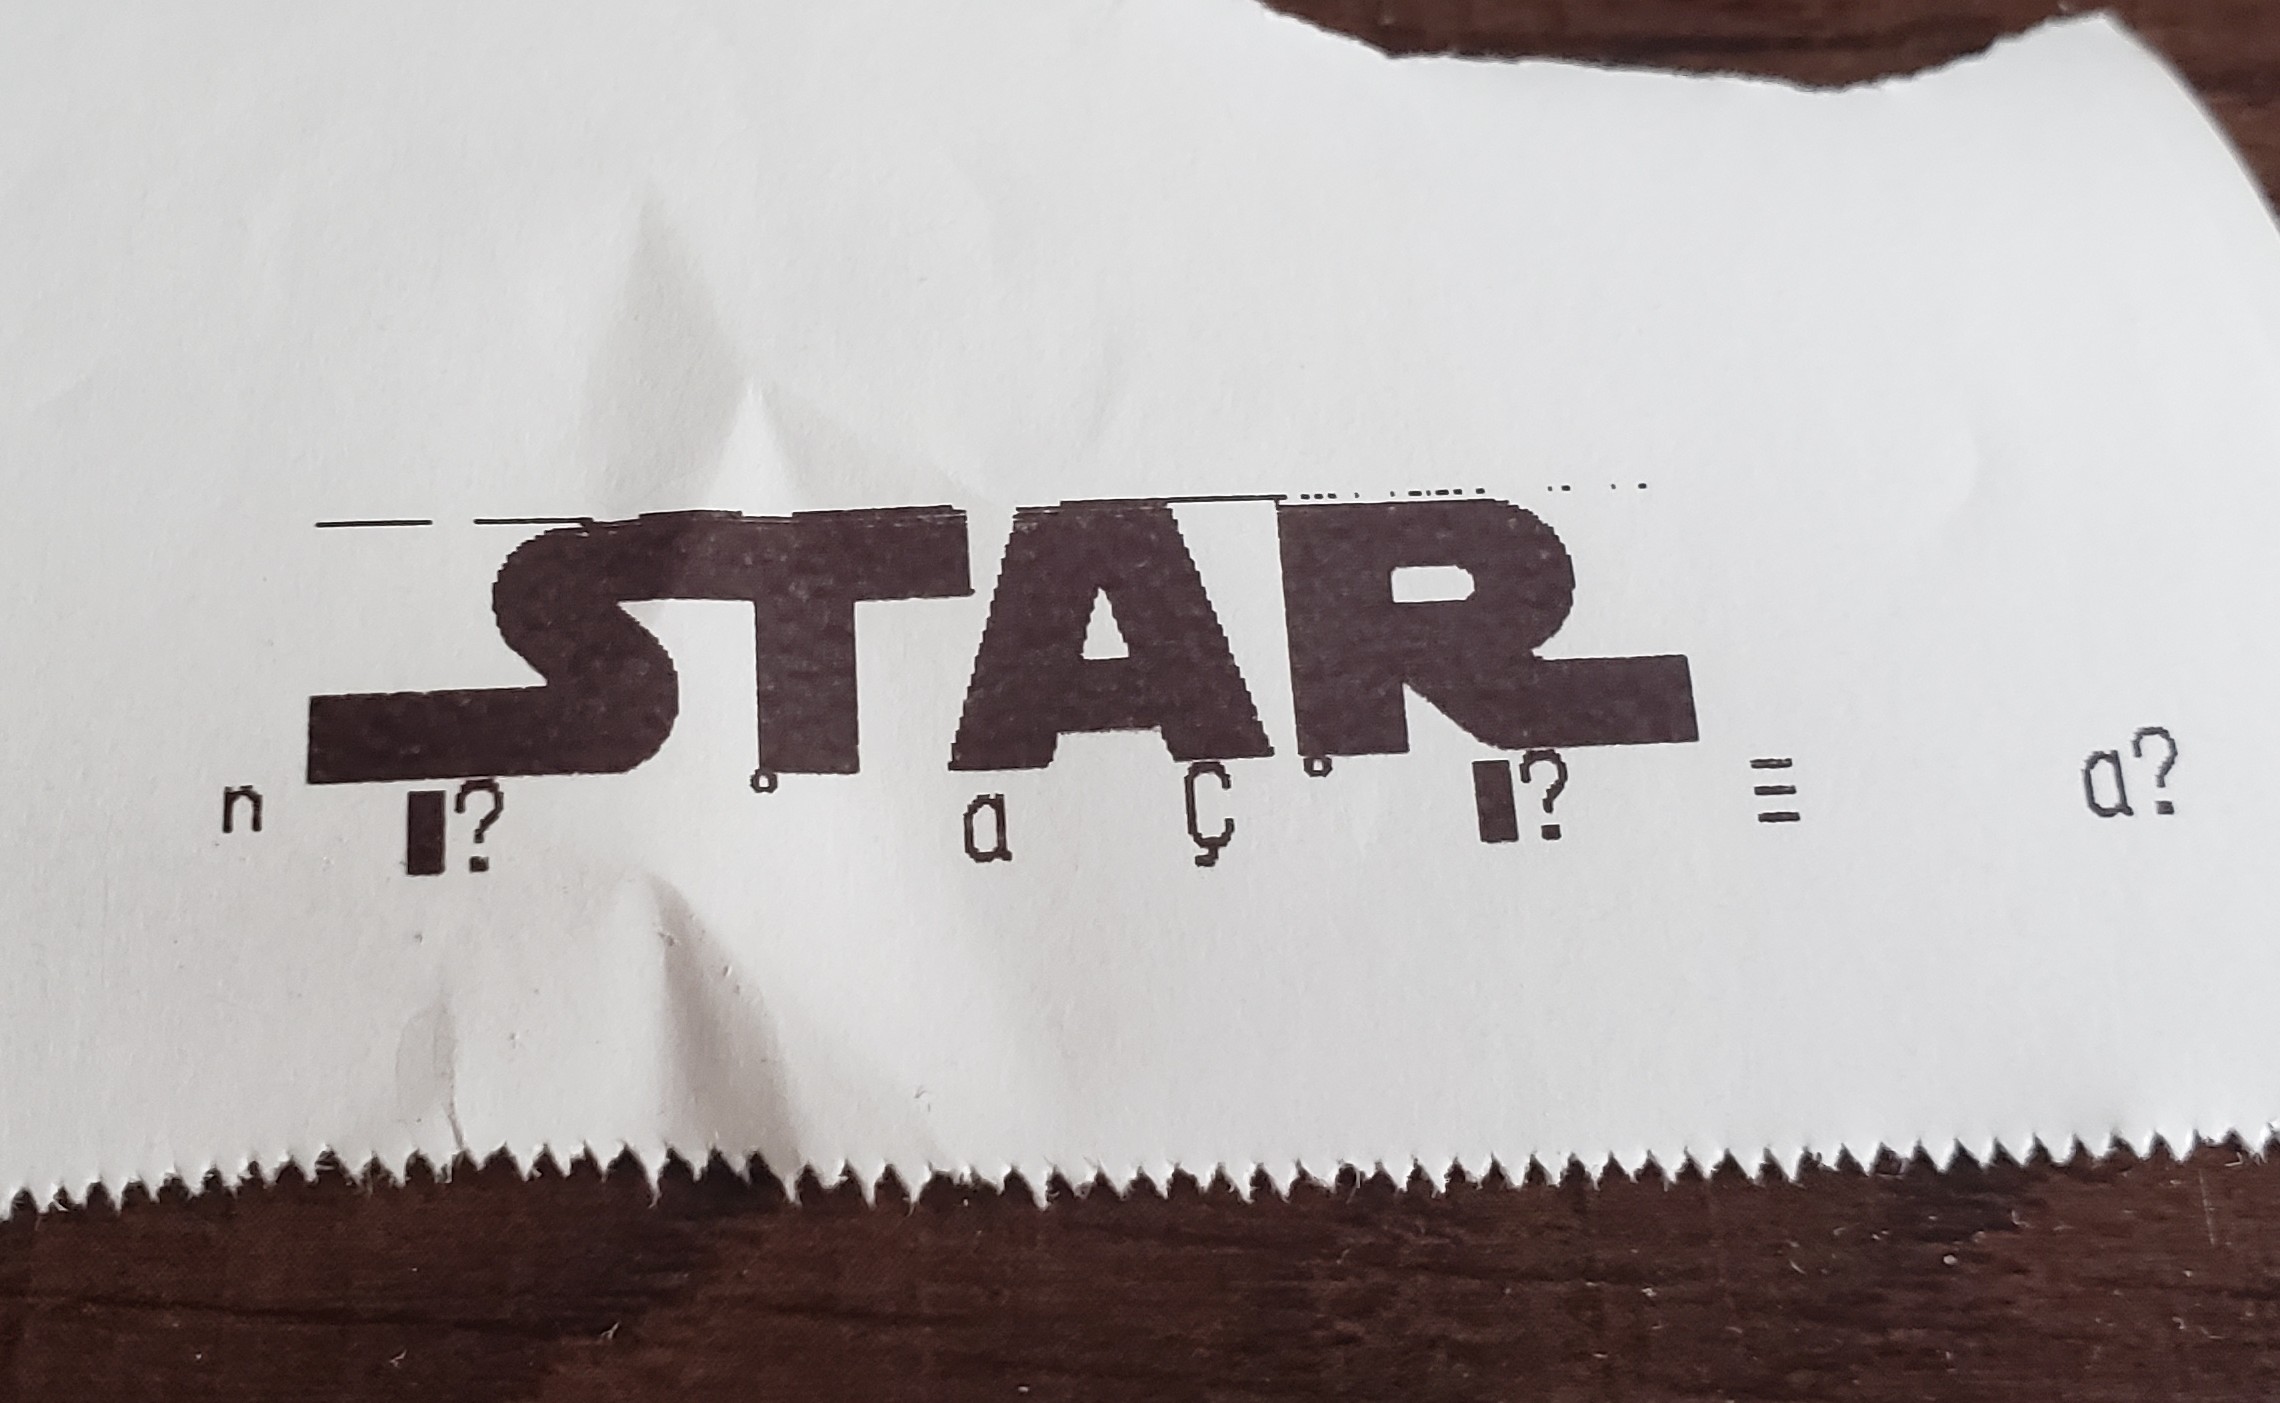
你好菲利普·马蒂
我试图打印您的StarWars图像与您的类和有混合的结果。据我所知,您试图重用节点托管文件,您找到了访问所有packags/打印机/index.js字体的方法吗?
比如:
printer
  .font('a')
  .align('ct')
  .style('bu')
  .size(1, 1)
  .text('The quick brown fox jumps over the lazy dog')
  .text('敏捷的棕色狐狸跳过懒狗')
  .barcode('1234567', 'EAN8')
  .table(["One", "Two", "Three"])
  .tableCustom([
    { text:"Left", align:"LEFT", width:0.33 },
     { text:"Center", align:"CENTER", width:0.33},
     { text:"Right", align:"RIGHT", width:0.33 }
  ])
  .qrimage('https://github.com/song940/node-escpos', function(err){
     this.cut();
     this.close();
});Stack Overflow用户
发布于 2021-04-16 02:37:30
我能够使用外部库打印到托管兼容的打印机上。
遵循这些指南:
- https://levelup.gitconnected.com/how-to-print-on-a-bluetooth-printer-using-your-ionic-application-ceabc45abf75
- https://www.neodynamic.com/articles/How-to-generate-and-print-raw-ESC-POS-commands-from-Javascript/
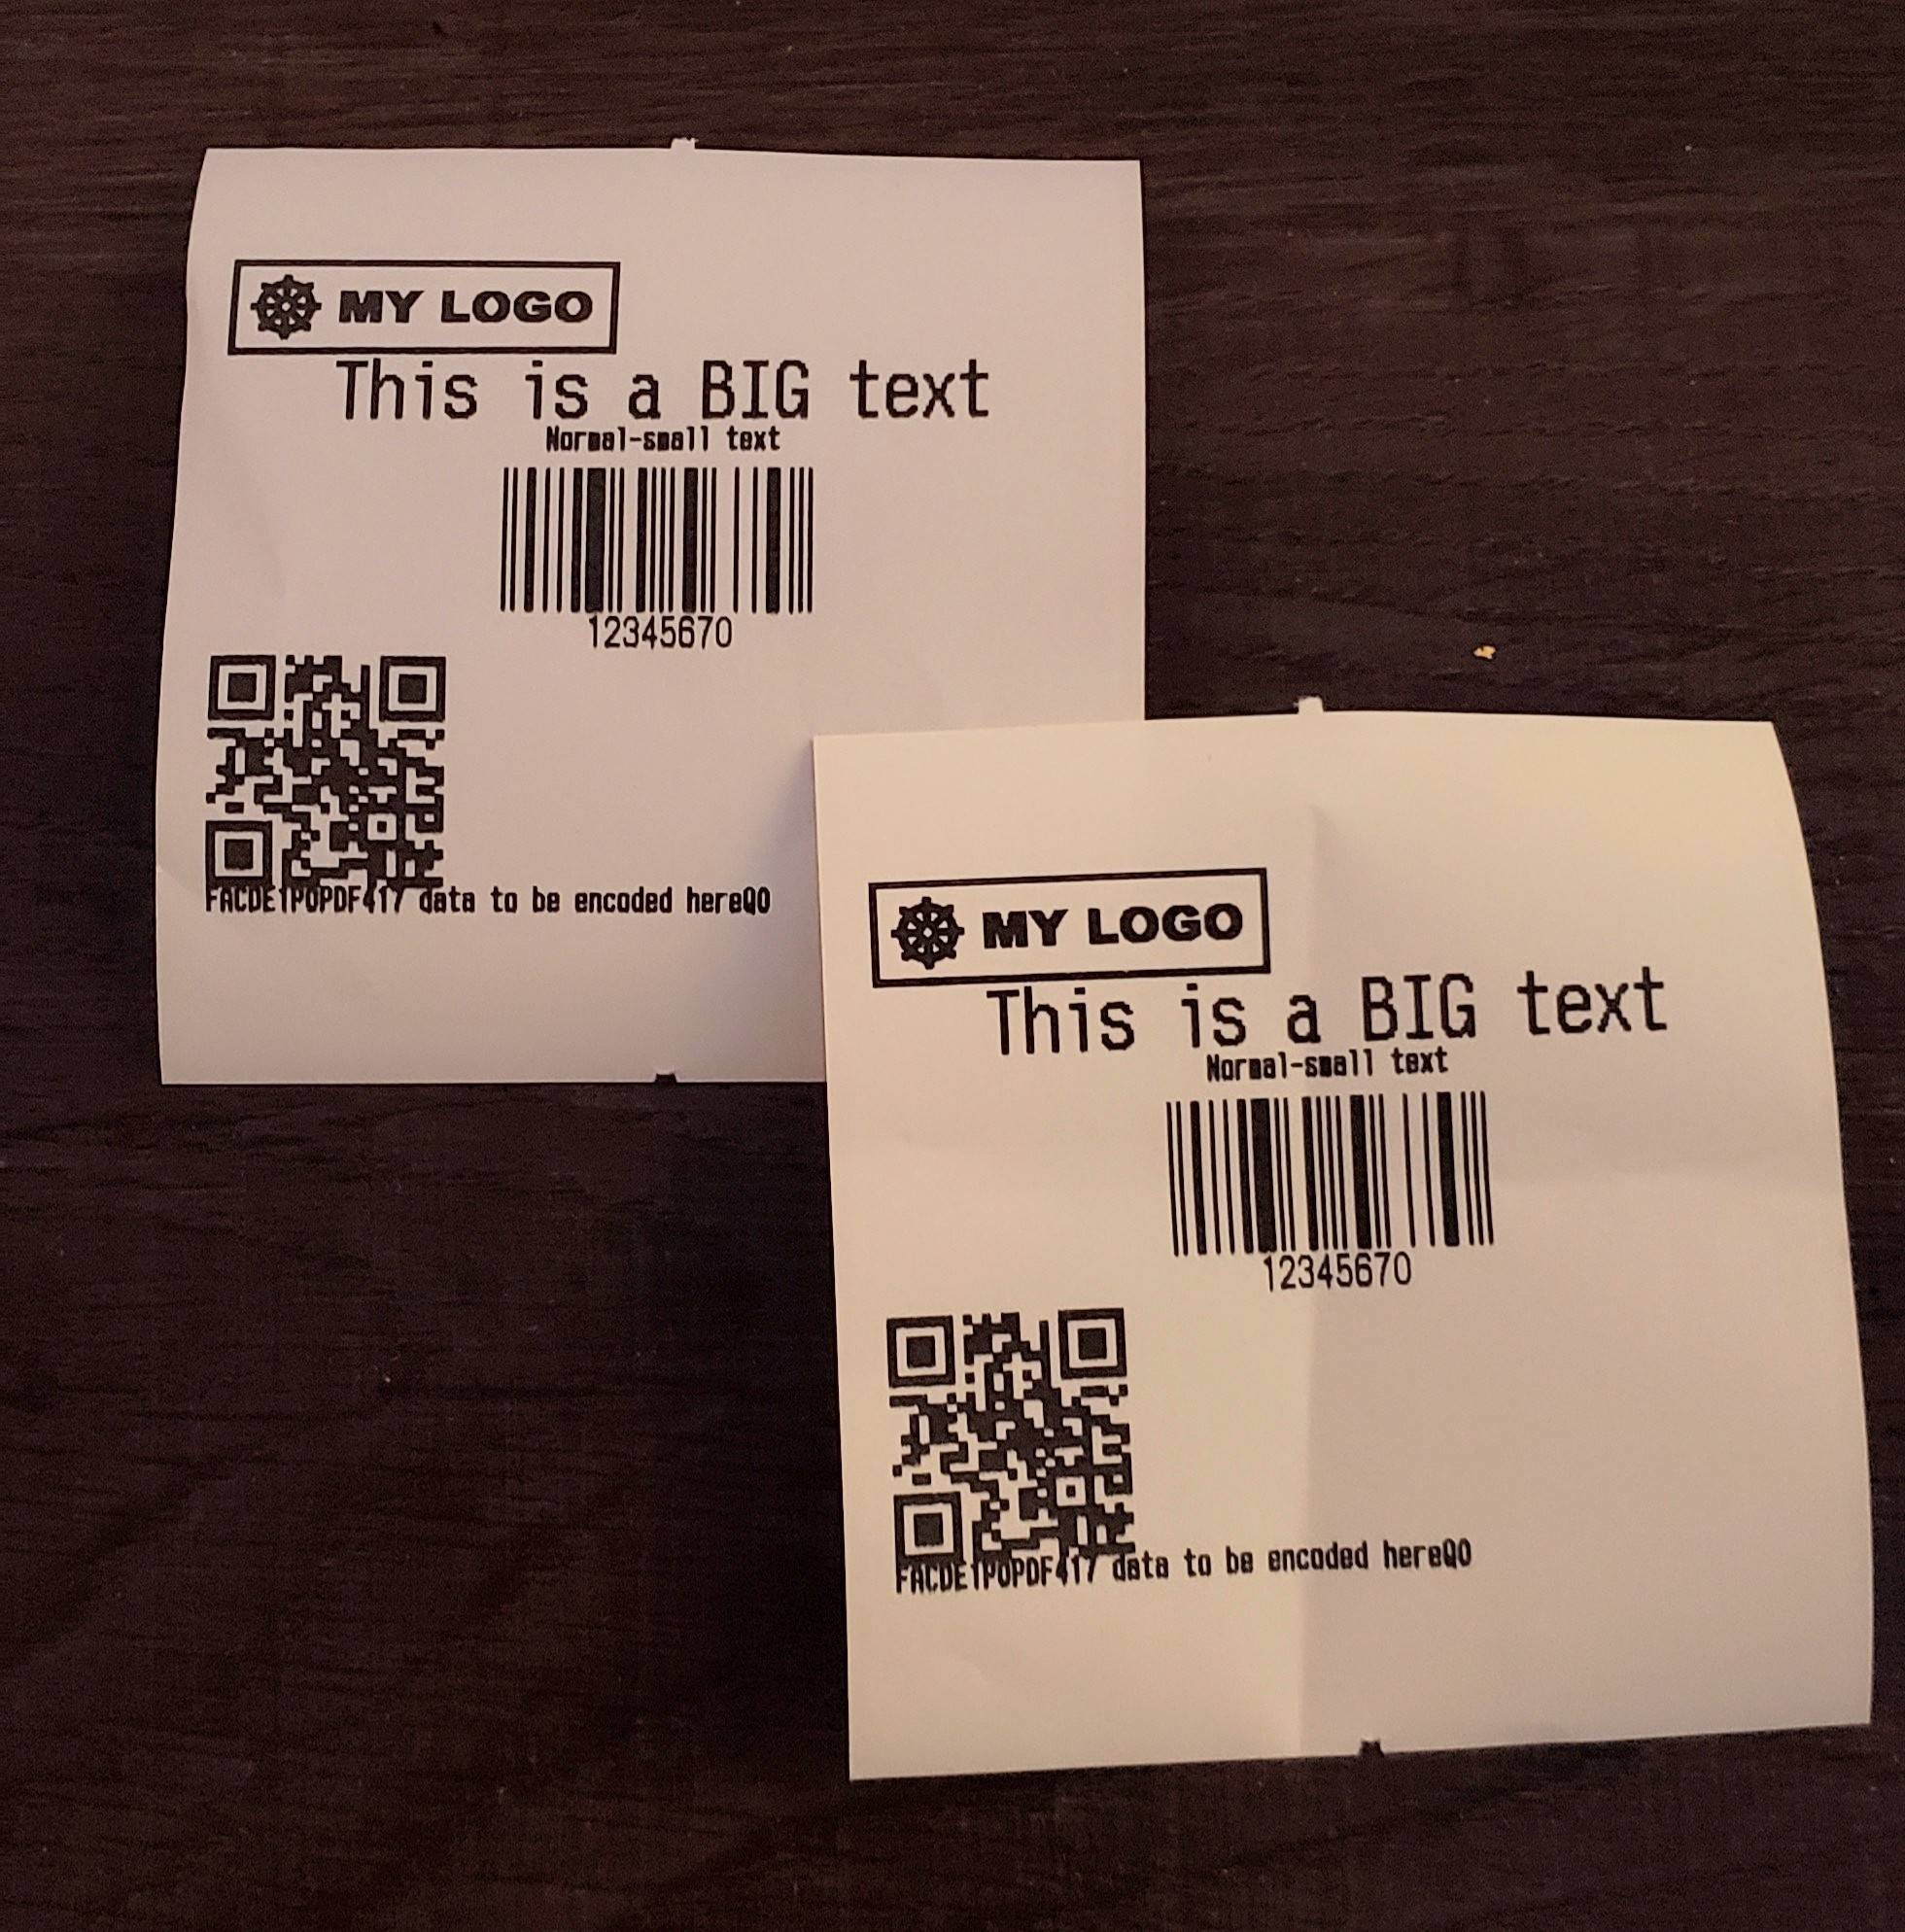
- 设备:三星Tab A10.1
- 打印机: MUNBYN POS
- 离子4,角8,离子本机蓝牙系列
页面原文内容由Stack Overflow提供。腾讯云小微IT领域专用引擎提供翻译支持
原文链接:
https://stackoverflow.com/questions/46904252
复制相关文章
相似问题
腾讯云开发者
