
SVG viewBox:精确的平移和缩放顺序
从技术角度(没有隐喻),我很难确切地理解min-x和min-y在viewBox上的工作原理。
我花了很多时间在两个有用的资源上:
- SVG 1.1 (官方规范)- 7.7‘viewBox’属性
- 理解SVG坐标系和转换(第一部分) - Soueidan
根据SVG1.1规范
“viewBox”属性的值是一个由四个数字组成的列表,用空格和/或逗号分隔,它们指定用户空间中的一个矩形,该矩形应该映射到给定元素建立的视图端口的边界,同时考虑到属性‘_
和:
“viewBox”属性的效果是用户代理自动提供适当的转换矩阵,以将用户空间中指定的矩形映射到指定区域(通常是视口)的边界。
和:
(注意:在某些情况下,用户代理除了规模转换外,还需要提供翻译转换。例如,在最外层的svg元素上,如果“viewBox”属性指定的值不是0 For或。)
因此,我的期望是定义viewBox与以下内容相同:
- 首先,缩放视图框,因此它填充视图端口(假设视图端口和viewbox的纵横比相同)
- 然后翻译 viewBox,因此它根据
min-x和min-yviewBox属性放置在视图端口中。
如果我们看看萨拉的两个例子,从这里开始,这似乎不是正在发生的事情。
在她的第一个示例(<svg width="800" height="600" viewbox="100 100 200 150">...</svg>)中,如下所示:
- viewBox按
min-x/min-y放置在视图中 - viewBox是缩放的,与视口大小相同。
- viewBox原点是翻译的(移动),以与视口原点一致。
然而,在她的第二个例子(<svg width="800" height="600" viewbox="-100 -100 400 300">...</svg>)中,它看起来是一个完全不同的顺序:
- viewBox是缩放的,与视口大小相同。
- viewBox原点是翻译的(移动),与viewBox
min-xmin-y所指的方向相反。它不符合viewport原点--这与第一个示例不同。
因此,我认识到我并不完全理解它,因为从技术上讲,在这两种情况下,它的工作方式应该是相同的。
最后,在Sara的例子中,我不明白为什么蓝色坐标系(用户坐标系)本身不移动到视口坐标系中的(100,100)或(-100,-100)。我以为viewBox应该翻译和缩放用户坐标系统?
编辑:
根据这就是答案的说法,min-x和min-y确实遵循了我的第一组步骤。viewBox原点根据min-x和min-y放置在视口中,然后翻译,使其原点位于视口原点的顶部。然后(前后)缩放以填充视图。
如果这是正确的,我很难理解为什么Sara的例子中的蓝色用户坐标系并不总是以它的原点位于viewport原点之上而结束。毕竟,viewBox应该修改用户坐标系。
回答 3
Stack Overflow用户
发布于 2018-12-02 19:35:25
坐标viewBox 在x轴 (min-x=70px)上的原点偏移量。
<svg width="400" height="400" viewBox="70px, 0, 400px, 400px">
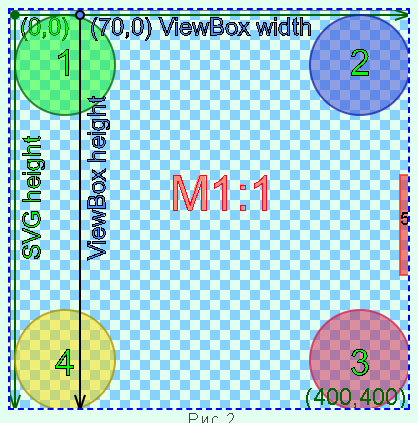
在图中,用户坐标的原点通过70px向右移动,从而使整个矩形视图区域viewBox (400 x 400px)沿着水平轴向右移动。
当发生这种情况时,捕获viewBox下的SVG文档片段的图像,然后带捕获片段的viewBox查看区域返回到固定的用户视图区,其原点(0,0)位于左上角。
图的坐标是用最后一次向左移动70 to重新计算的。形式上,当应用viewBox时,在视口的固定查看区域中,SVG文档的片段已经移到左边。
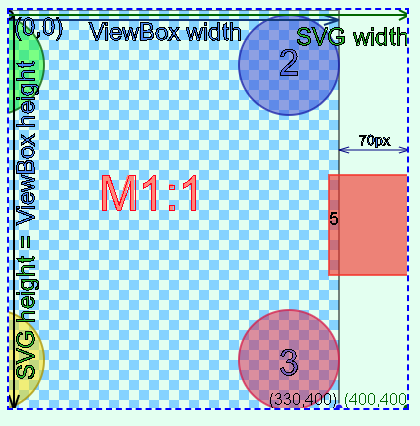
沿两轴的viewBox原点的偏移量
min-x=70px, min-y="70px"
<svg width="400" height="400" viewBox="70px, 70px, 400px, 400px">
为了清晰起见,在图片底部添加另一个红色矩形- 6。
在将原点传递到viewBox之后,一个从原点(70.70)开始具有宽度和高度计数的矩形400 × 400 px SVG文档片段将进入viewBox。
会发生图像捕获。接下来,viewBox (70,70)的起源与视口(0,0)的起源相结合。重新计算了这些数字的坐标。
因此,红色矩形5和6变得完全可见。所有不属于这一地区的东西都被切断了。例如,部分区域的有色圆圈,1,2和4。
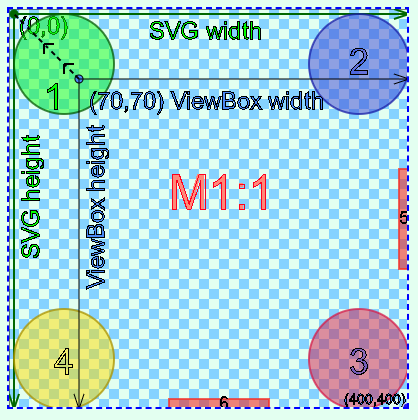
使用viewBox变焦
SVG文档片段的规模取决于高宽比:viewport和viewBox。
如果viewport /viewBox = 1,则比例为1
如果viewport /viewBox与之不同,则其规模将呈增减方向变化。
规模的增加如何解释下面的数字
一个像素viewBox延伸到两个像素viewport

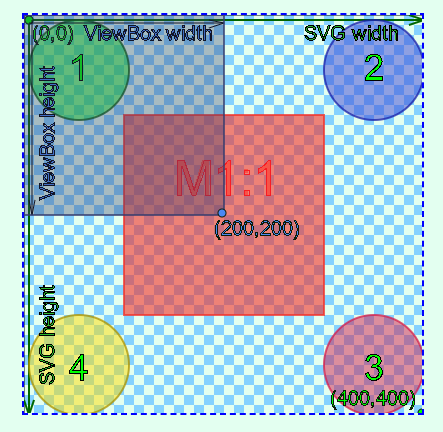
缩放svg图像1: 2
<svg width="400" height="400" version="1.1" viewBox="0 0 800 800">
viewport / viewBox = 1/2

viewBox捕获一个矩形片段800 x 800 px,即SVG 400 x 400 px的整个作用域,以及视图端口右侧和底部的附加400px。
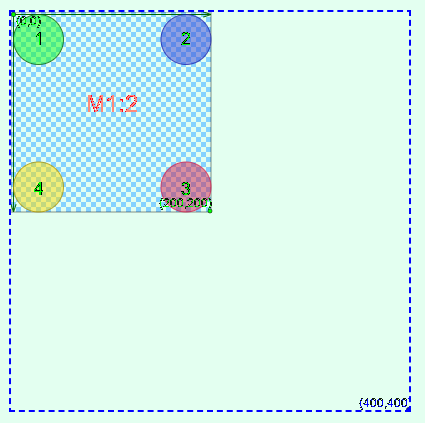
也就是说,viewBox的两个像素被压缩为viewport的一个像素。因此,SVG图像减少了一半。
Stack Overflow用户
发布于 2018-12-03 11:01:19

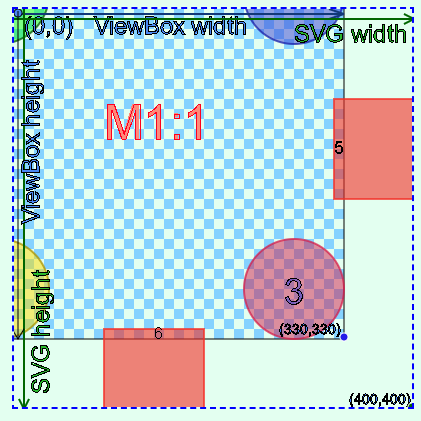
- 在图片中,灰色矩形是无限大的
SVG canvas。 - 绿色矩形是用户在其显示器上看到的
viewport。 - 黄色矩形是用户查看
viewBox的虚拟viewport区域。
viewBox可以沿着无限svg画布的坐标轴移动,如正方向x-min> 0;y-min> 0和负方向-x-min;-y-min。
图像处理svg
- 接下来是捕获位于viewBox下面的SVG画布片段。
- 在下一步中,viewBox的坐标系与
viewport坐标系的起源对齐。由viewBox图像捕获的片段被传递回viewport。 - 有一个谈判过程,在这里可以选择:
1. If `min-x = 0` and`min-y = 0`, the width and height of the `viewport`s are equal, respectively, to the width and height of`viewBox`s, then the fragment image does not move or scale.
2. If the `viewBox` is shifted to the right - `min-x> 0`, the image is shifted to the left. It is clear that by capturing an image to the right of the `viewport` and then combining it with the origin, we thereby shift the image to the left.
3. If the `viewBox` is shifted below the `viewport`s - `min-y> 0`, the image will go up.
在此基础上,您可以在不使用CSS、JavaScript的情况下实现水平和垂直视差。要做到这一点,只需沿着SVG画布移动viewBox,如下图所示。单击Start按钮。
<svg version="1.1"   xmlns="http://www.w3.org/2000/svg"
 xmlns:xlink="http://www.w3.org/1999/xlink"
   width="600" height="360" viewBox="0 0 600 360"   >
  <title> Explanation horizontal of parallax viewBox </title>
  <desc> animate the horizontal parallax  by modifying a coordinate of the viewBox </desc>
 <defs>
<g id="canvas-svg" stroke-width="2px">
  <g id="canvas-frame1">
   <rect id="v-port1" x="25" y="200" width="110" height="110" stroke="skyblue"   fill="yellowgreen" />
	<text id="t-port1" x="75" y="255" style="font-size: 16pt;">1 </text>
	<text  x="26" y="303" > 0 </text>
 </g>
  <g id="canvas-frame2">
		<rect id="v-port2" x="135" y="200" width="110" height="110" stroke="skyblue"  fill="dodgerblue" />
		<text id="t-port2" x="185" y="255" style="font-size: 16pt;">2 </text>
		<text  x="136" y="303" > 1168 </text>
 </g>
  <g id="canvas-frame3">
		<rect id="v-port3" x="245" y="200" width="110" height="110" stroke="skyblue"  fill="crimson"  />
		<text id="t-port3" x="295" y="255" style="font-size: 16pt;">3 </text>
		<text  x="246" y="303" > 2336 </text>
  </g>
      <g id="canvas-frame4">
		<rect id="v-port4" x="355" y="200" width="110" height="110" stroke="skyblue"  fill="orange" />
		<text id="t-port4" x="405" y="255" style="font-size: 16pt;">4 </text>
		<text  x="356" y="303" > 3504 </text>
     </g>
       <g id="canvas-frame5">
		<rect id="v-port5" x="465" y="200" width="110" height="110" stroke="skyblue" stroke-width="1px" fill="yellow" />
		<text id="t-port5" x="515" y="255" style="font-size: 16pt;">5 </text>
		<text  x="466" y="303" > 4672 </text>
       </g>
 </g>

 </defs>

  <g id="first-rect">
   <rect  x="25" y="25" width="110" height="110" stroke="skyblue" stroke-width="1px" fill="yellowgreen" />
	<text  x="75" y="85" style="font-size: 16pt;">1 </text>
	<text  x="26" y="135" > 0 </text>
 </g>


  <desc>The SVG canvas is infinite in size. In our example, user a viewport of SVG is in the leftmost position.</desc>
<use xlink:href ="#canvas-svg" x="0" y="0"> </use>

<desc> viewBox is moved along canvas SVG</desc>
 <g id="viewBox1">
 <rect id="v-box" x="25" y="200" width="110" height="110" stroke="skyblue" stroke-width="5px" fill="none" />
	 <text id="t-port1" x="45" y="225" style="font-size: 16pt; fill:blue;">viewBox </text>
	<animateTransform attributeName="transform" type="translate" begin="startButton.click+0.5s" end="stopButton.click" dur="20s" from="0 0" to="440 0" repeatCount="indefinite" restart="whenNotActive" fill="freeze"/>
 </g>


<desc> The image moves to the left viewport</desc>
<use xlink:href ="#canvas-svg" x="0" y="0">
    <animateTransform attributeName="transform" type="translate" begin="startButton.click+0.5s" end="stopButton.click" dur="20s" from="0 -170" to="-440 -170" repeatCount="indefinite" restart="whenNotActive" fill="freeze" />
  </use>

<desc> Grey background image of the canvas SVG</desc>
 <g fill="#E5E5E5" stroke="#E5E5E5">
 <rect  x="135" y="0" width="465" height="195"    />
  <rect  x="0" y="0" width="25" height="195"    />
  <rect  x="0" y="0" width="135" height="30"    />
  <rect  x="25" y="135" width="135" height="60" />
  <rect  x="0" y="315" width="600" height="85"  />
  <rect  x="0" y="195" width="25" height="120"  />
  <rect  x="575" y="195" width="25" height="120" />
 </g>

  <g stroke-width="1px" stroke-dasharray = "5 5">
  	<line x1="25" y1="140" x2="25" y2="195" stroke="blue"  />
 <line x1="135" y1="140" x2="135" y2="195" stroke="blue" stroke-width="1px"  />
  </g>
   <g style="font-size: 16pt; fill:blue;">
	<text  x="45" y="170"  > viewport </text>
	 <text  x="15" y="20" style="font-size: 14pt;"> display the user's  </text>
	    <text  x="230" y="90" style="font-size: 40pt; fill:#1E90FF"> canvas SVG </text>
   </g>

<g id="startButton">
	<rect  x="520" y="325" rx="8" ry="8" width="60" height="20" fill="#58AE2A" />
	<text  x="550" y="340" font-size="16" font-weight="bold" font-family="Arial" text-anchor="middle"
	fill="white" >Start</text>
</g>
        <g id="stopButton">
			<rect  x="450" y="325" rx="8" ry="8" width="60" height="20" fill="#1E90FF" />
			<text  x="480" y="340" font-size="16" font-weight="bold" font-family="Arial" text-anchor="middle"
			fill="white" >Stop</text>
		</g>

</svg>
Stack Overflow用户
发布于 2018-12-02 17:01:02
我总是把viewBox和viewport混在一起。所以我会尽量避免的。我不完全理解您想要设置浏览器的转换矩阵还是SVG的转换矩阵。所以我也会尽量避免的。
viewBox属性向浏览器提供有关SVG图形大小和坐标来源的信息。它定义了进入SVG的窗口。只有窗口中的部分是可见的。
让我们来看看一个例子:
<svg width="800" height="600" viewbox="100 100 200 150">这告诉浏览器,它应该绘制一个SVG图形,它的尺寸为800 by乘600 by在浏览器的坐标系中。因此,在浏览器DOM中,SVG组件将具有此大小。
viewbox属性然后告诉浏览器,SVG图形的相关/可见部分的大小为200 by (在SVG坐标系中)。因此浏览器知道需要应用400%的缩放来将SVG坐标转换为浏览器坐标。
此外,viewbox属性告诉浏览器,SVG坐标系中的点(100,100)将是可见SVG图形窗口的左上角。因此浏览器会相应地翻译它。
SVG坐标系中具有较小的x和y值的所有内容都将被裁剪,即不可见,因为它位于窗口外和浏览器为SVG创建的空间之外。类似地,SVG坐标300 (100 + 200)右侧和坐标250 (100 + 150)以下的所有东西都在窗口之外,不可见。
https://stackoverflow.com/questions/53582351
复制相似问题
腾讯云开发者
