
 Playwright浏览器自动化工具添加福利群:解决AI开发者的「MCP实战痛点」
 github
|
| MseeP.ai安全评估 |
Playwright MCP 服务器 🎭


一个基于Playwright提供浏览器自动化能力的模型上下文协议服务器。该服务器使LLM能够与网页交互、截图、生成测试代码、网页抓取以及在真实浏览器环境中执行JavaScript。
✨ v1.0.10版本新特性
🎯 支持143种真实设备预设的模拟功能!
通过简单命令即可在真实设备配置上测试您的网页应用:
// 在iPhone 13上测试(自动用户代理、触控支持和设备像素比)
await playwright_resize({ device: "iPhone 13" });

// 切换到横屏模式的iPad Pro
await playwright_resize({ device: "iPad Pro 11", orientation: "landscape" });

// 测试桌面视图
await playwright_resize({ device: "Desktop Chrome" });

AI助手的自然语言支持:
- "在iPhone 13上测试"
- "切换到iPad视图"
- "旋转到横屏模式"
支持143种设备: iPhone、iPad、Pixel、Galaxy和桌面浏览器,完整模拟视口、用户代理、触控事件和设备像素比。
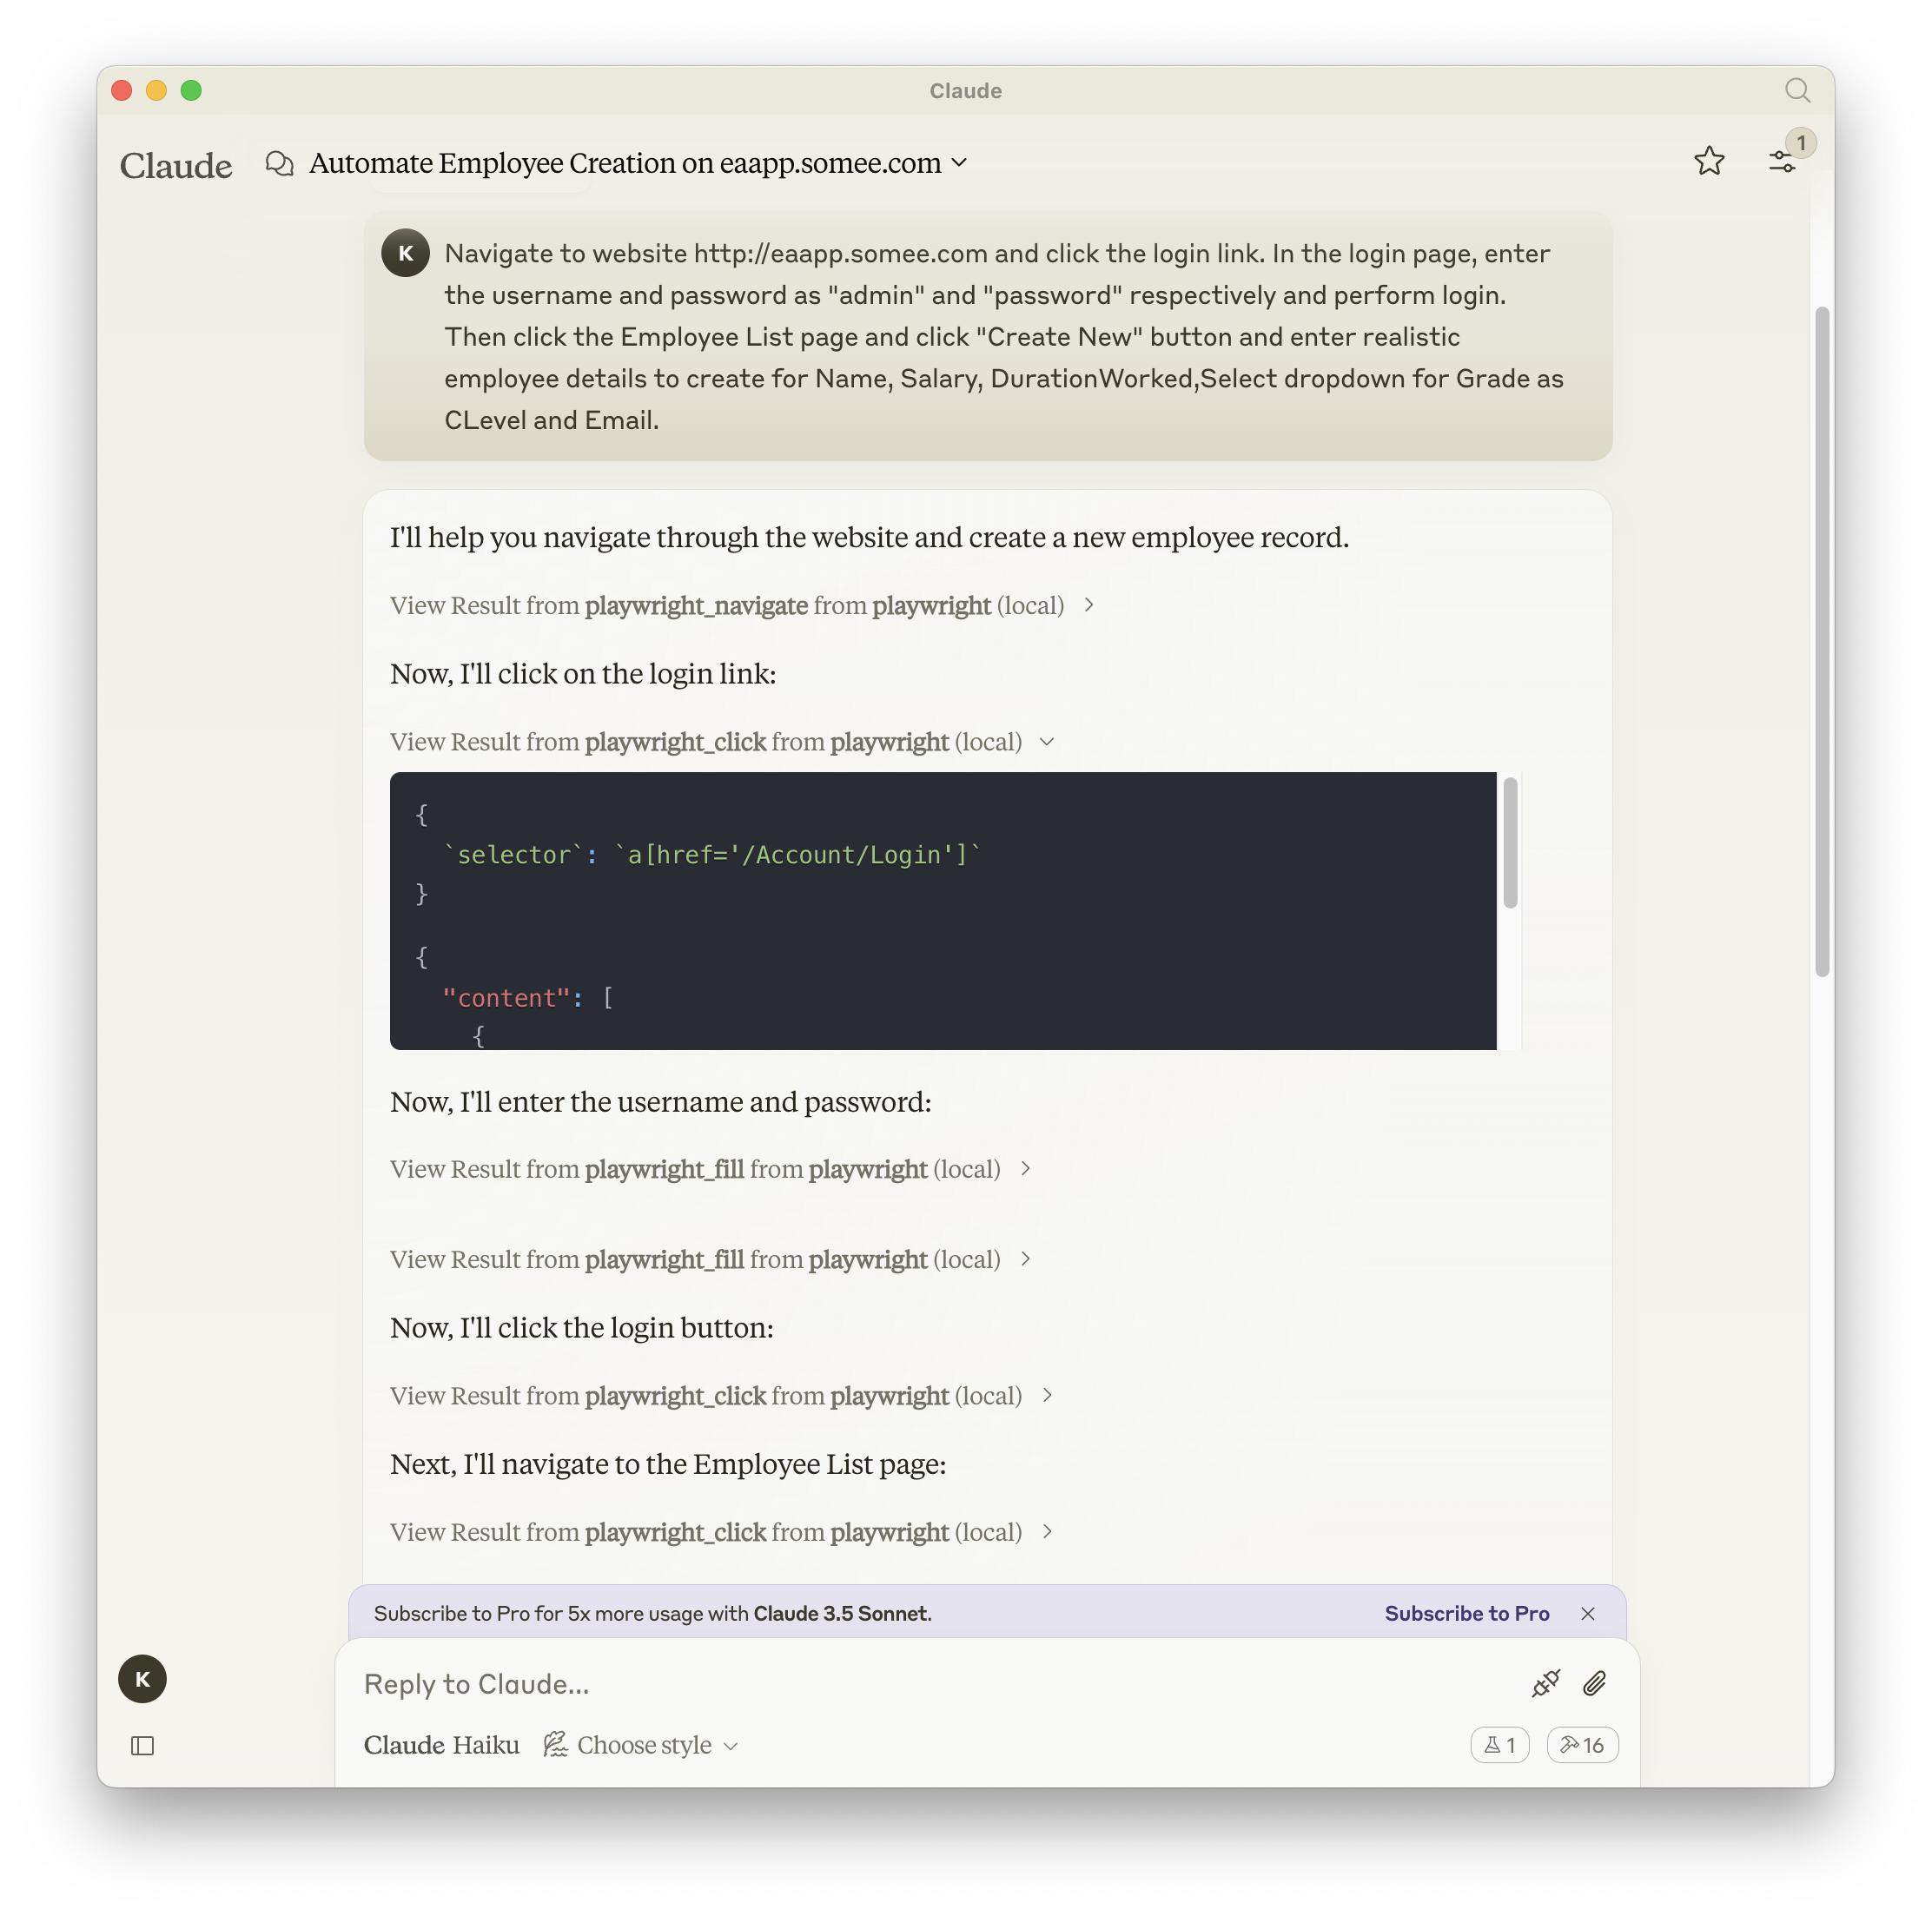
截图示例
文档中心 | API参考
安装指南
您可以通过npm、mcp-get或Smithery安装:
npm安装:
npm install -g @executeautomation/playwright-mcp-server
mcp-get安装:
npx @michaellatman/mcp-get@latest install @executeautomation/playwright-mcp-server
Smithery安装:
通过Smithery自动为Claude Desktop安装:
npx @smithery/cli install @executeautomation/playwright-mcp-server --client claude
Claude Code安装:
claude mcp add --transport stdio playwright npx @executeautomation/playwright-mcp-server
VS Code安装
通过以下按钮在VS Code中安装Playwright MCP服务器:


或使用VS Code CLI安装:
# VS Code版本
code --add-mcp '{"name":"playwright","command":"npx","args":["@executeautomation/playwright-mcp-server"]}'
# VS Code Insiders版本
code-insiders --add-mcp '{"name":"playwright","command":"npx","args":["@executeautomation/playwright-mcp-server"]}'
安装完成后,ExecuteAutomation Playwright MCP服务器即可在VS Code中与GitHub Copilot代理配合使用。
浏览器安装
自动安装(推荐)
Playwright MCP服务器首次使用时自动安装浏览器二进制文件。当检测到缺少浏览器时,服务器会:
- 自动下载并安装所需浏览器(Chromium、Firefox或WebKit)
- 在控制台显示安装进度
- 安装完成后自动重试请求
无需手动设置! 直接开始使用服务器,它将自动处理浏览器安装。
手动安装(可选)
如需手动安装或自动安装遇到问题:
# 安装所有浏览器
npx playwright install

# 或安装特定浏览器
npx playwright install chromium
npx playwright install firefox
npx playwright install webkit
浏览器存储路径
浏览器安装位置:
- Windows:
%USERPROFILE%\AppData\Local\ms-playwright - macOS:
~/Library/Caches/ms-playwright - Linux:
~/.cache/ms-playwright
服务器配置指南
标准模式(stdio)
Claude Desktop推荐使用此模式。
{
  "mcpServers": {
    "playwright": {
      "command": "npx",
      "args": ["-y", "@executeautomation/playwright-mcp-server"]
    }
  }
}
注意: 在stdio模式下,日志自动仅写入文件(不输出到控制台)以保持JSON-RPC通信清洁。日志写入~/playwright-mcp-server.log。
HTTP模式(独立服务器)
在无显示系统上运行图形化浏览器或从IDE工作进程运行时,可将MCP服务器作为独立HTTP服务器运行:
Claude Desktop用户注意: Claude Desktop当前需要stdio模式(命令/参数配置)。HTTP模式推荐用于VS Code、自定义客户端和远程部署。详见CLAUDE_DESKTOP_CONFIG.md。
启动HTTP服务器
# 使用npx
npx @executeautomation/playwright-mcp-server --port 8931

# 或全局安装后
playwright-mcp-server --port 8931
服务器启动后将显示可用端点:
==============================================
Playwright MCP服务器(HTTP模式)
==============================================
端口: 8931

端点:
- SSE流:     GET  http://localhost:8931/sse
- 消息:       POST http://localhost:8931/messages?sessionId=<id>
- MCP(统一):  GET  http://localhost:8931/mcp
- MCP(统一):  POST http://localhost:8931/mcp?sessionId=<id>
- 健康检查:   GET  http://localhost:8931/health
==============================================
HTTP模式客户端配置
⚠️ 重要:
"type": "http"字段是HTTP/SSE传输的必需项!
VS Code GitHub Copilot配置:
{
  "github.copilot.chat.mcp.servers": {
    "playwright": {
      "url": "http://localhost:8931/mcp",
      "type": "http"
    }
  }
}
自定义MCP客户端配置:
{
  "mcpServers": {
    "playwright": {
      "url": "http://localhost:8931/mcp",
      "type": "http"
    }
  }
}
重要说明: 缺少"type": "http"将导致连接失败。
Claude Desktop配置: 请使用stdio模式(见上文标准模式)
HTTP模式适用场景
- 在无显示系统上运行图形化浏览器(如远程服务器)
- 与VS Code GitHub Copilot集成
- 作为后台服务运行
- 多客户端访问服务器
- 使用
/health端点调试 - 自定义MCP客户端集成
监控: 服务器包含动态分配端口的监控系统(避免冲突)。查看控制台输出获取实际端口。
注意: Claude Desktop用户请继续使用stdio模式(见上文标准模式)。
故障排查
"未找到sessionId传输"错误
症状: 400错误提示"Bad Request: No transport found for sessionId"
解决方案:
-
检查配置是否包含
"type": "http"{ "url": "http://localhost:8931/mcp", "type": "http" // ← 此项必须存在! } -
验证服务器日志显示连接:
# 应按顺序出现: # 1. "Incoming request" - GET /mcp # 2. "Transport registered" - 含sessionId # 3. "POST message received" - 相同sessionId -
重启服务器和客户端
连接问题
- 服务器未启动: 检查8931端口是否可用
- 外部访问被阻止: 此为安全设计。服务器仅绑定到localhost
- 远程访问: 使用SSH隧道:
ssh -L 8931:localhost:8931 user@remote-server
测试
本项目使用Jest进行测试,测试文件位于src/__tests__目录。
运行测试
您可以通过以下任一命令运行测试:
# 使用自定义脚本运行测试(含覆盖率统计)
node run-tests.cjs

# 使用npm脚本运行测试
npm test           # 运行测试(不含覆盖率)
npm run test:coverage  # 运行测试(含覆盖率统计)
npm run test:custom    # 使用自定义脚本运行测试(等同于 node run-tests.cjs)
测试覆盖率报告将生成在 coverage 目录中。
运行评估
eval包会加载一个mcp客户端来执行index.ts文件,因此测试之间无需重新构建。您可以通过在npx命令前添加前缀来加载环境变量。完整文档请参阅此处。
OPENAI_API_KEY=您的密钥 npx mcp-eval src/evals/evals.ts src/tools/codegen/index.ts
贡献指南
添加新工具时,请注意工具名称长度。某些客户端(如Cursor)对服务端和工具名称的组合长度(server_name:tool_name)有60个字符的限制。
我们的服务端名称为playwright-mcp,请确保您的工具名称足够简短,不要超过此限制。
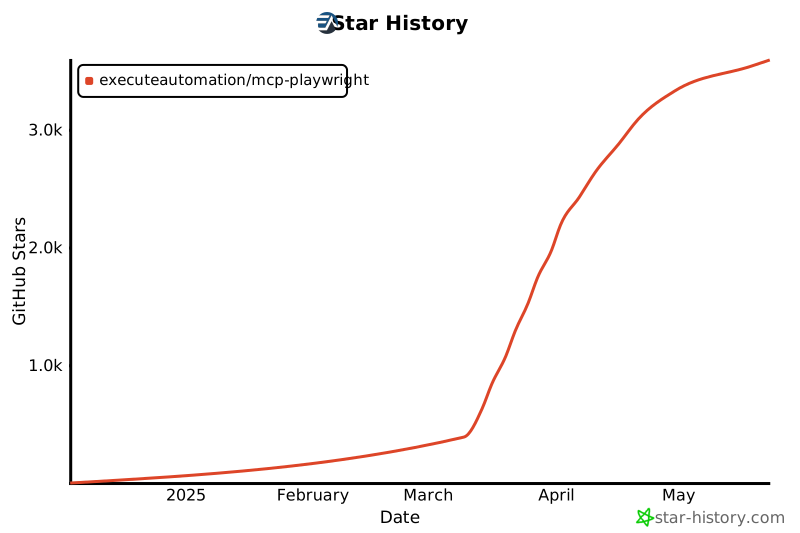
星标历史
腾讯云开发者

Copyright © 2013 - 2026 Tencent Cloud. All Rights Reserved. 腾讯云 版权所有
深圳市腾讯计算机系统有限公司 ICP备案/许可证号:粤B2-20090059  粤公网安备44030502008569号
腾讯云计算(北京)有限责任公司 京ICP证150476号 | 京ICP备11018762号