1. 申请实名信息返回
登录腾讯云 人脸核身控制台,单击自助接入-E证通服务,在E证通服务列表右侧操作栏中单击申请返回身份信息。
将 CA 证书申请表和 CSR(证书签名请求)文件上传到控制台,确认后单击提交进行申请。


CA 证书申请表参考 模板 进行填写,并上传到控制台。
注意
三联申请表及办理人身份证、营业执照复印件需要加盖单位公章。
CSR(证书签名请求)文件制作操作步骤参考如下步骤2。
2. 制作 CSR 文件
2.1 安装国密 SSL
注意
目前该工具安装暂不支持 Mac M1 处理器。
提供两种下载方式:
git 下载,需要先安装 git 工具。
# 拉取源码git clone -b GmSSL-v2 https://github.com/guanzhi/GmSSL.git# 进入目录cd GmSSL
链接下载。
# 下载源码包wget https://github.com/guanzhi/GmSSL/archive/refs/heads/GmSSL-v2.zip# 解压文件unzip GmSSL-v2.zip# 进入目录cd GmSSL-GmSSL-v2
下载方式任选一种,成功执行后,已经进入相应文件夹内,然后执行下方操作:
# 如果 MAC 机器,执行,Linux 环境机器跳过该步骤直接编译即可sed -i '' 's%qw/glob%qw/:glob%g' Configuresed -i '' 's%qw/glob%qw/:glob%g' test/build.info# 编译./config# 安装(如果有旧版本,可以使用 make uninstall 卸载,然后删除对应文件)makesudo make install# 安装成功后,查看安装信息gmssl version -a
2.2 生成公私钥对
gmssl ecparam -genkey -name sm2p256v1 -out CAkey.pem
2.3 查看并保留私钥
注意:
请务必复制保存私钥。
gmssl pkey -in CAkey.pem -noout -text


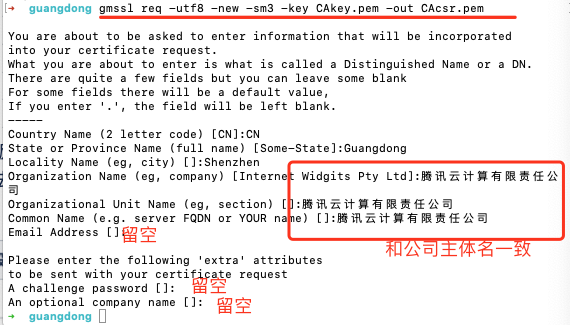
2.4 创建证书请求
gmssl req -utf8 -new -sm3 -key CAkey.pem -out CAcsr.pem


2.5 查看证书请求
gmssl req -in CAcsr.pem -noout -text -subject
3. 解密流程
在拉到核身结果后,EidInfo 中会有 DesKey 和 UserInfo,需要使用上面生成的私钥解密。解密过程如下:
使用 SM2 和上面生成的私钥对 DesKey(Base64 decode 成字节数组)解密获得“会话密钥”。
使用会话密钥和SM4算法 ECB 模式(无填充)解密获得明文字符串。
字符串格式为{"name":"姓名","idtype":"01(代表身份证)","idnum":"身份证号"}。
Demo 代码
Go 代码示例:
// require github.com/tjfoc/gmsm v1.4.1 或者go get github.com/tjfoc/gmsmimport("github.com/tjfoc/gmsm/sm2""github.com/tjfoc/gmsm/sm4""github.com/tjfoc/gmsm/x509")// 上述2.3 查看并保留私钥过程中获取到的priv内容,去掉冒号,即为PrivateKey的值const PrivateKey = "f9b587743f051b1e59efa05125f31b5bf371957bf3d3012c1739091334b73738"// GetEidResult接口返回的DesKey字段值const DesKey = "xxx"// GetEidResult接口返回的UserInfo字段值const UserInfo = "xxx"func decode() {privateKey, err := x509.ReadPrivateKeyFromHex(PrivateKey) //上述私钥16进制dek, _ := base64.StdEncoding.DecodeString(DesKey)sm4Key, err := sm2.Decrypt(privateKey, dek, 0)info, _ := base64.StdEncoding.DecodeString(UserInfo)out, err := sm4.Sm4Ecb(sm4Key, info, false)fmt.Println(string(out), err)}
Java 代码示例:
<dependency><groupId>org.bouncycastle</groupId><artifactId>bcprov-jdk15on</artifactId><version>1.62</version></dependency>// bouncycastle 版本 >=1.62。import org.bouncycastle.asn1.gm.GMNamedCurves;import org.bouncycastle.asn1.x9.X9ECParameters;import org.bouncycastle.crypto.engines.SM2Engine;import org.bouncycastle.crypto.engines.SM2Engine.Mode;import org.bouncycastle.crypto.params.ECDomainParameters;import org.bouncycastle.crypto.params.ECPrivateKeyParameters;import org.bouncycastle.jce.provider.BouncyCastleProvider;import org.bouncycastle.util.encoders.Base64;import org.bouncycastle.util.encoders.Hex;import javax.crypto.Cipher;import javax.crypto.spec.SecretKeySpec;import java.math.BigInteger;import java.security.Key;import java.security.Security;/*** EID解密工具类*/public class EIDUtil {static {Security.addProvider(new BouncyCastleProvider());}public static byte[] decodeUserInfo(String privateKeyHex, String desKey, String userInfo) throws Exception {byte[] sm4KeyBytes = EIDUtil.sm2Decrypt(privateKeyHex, Base64.decode(desKey));return EIDUtil.sm4Decrypt(sm4KeyBytes, Base64.decode(userInfo));}public static byte[] sm2Decrypt(String privateKeyHex, byte[] sm2Cipher) throws Exception {X9ECParameters sm2ECParameters = GMNamedCurves.getByName("sm2p256v1");ECDomainParameters domainParameters = new ECDomainParameters(sm2ECParameters.getCurve(),sm2ECParameters.getG(),sm2ECParameters.getN(),sm2ECParameters.getH());BigInteger d = new BigInteger(1, Hex.decode(privateKeyHex));ECPrivateKeyParameters privateKey = new ECPrivateKeyParameters(d, domainParameters);SM2Engine engine = new SM2Engine(Mode.C1C3C2);engine.init(false, privateKey);return engine.processBlock(sm2Cipher, 0, sm2Cipher.length);}public static byte[] sm4Decrypt(byte[] key, byte[] cipherText) throws Exception {Cipher cipher = Cipher.getInstance("SM4/ECB/PKCS5Padding", BouncyCastleProvider.PROVIDER_NAME);Key sm4Key = new SecretKeySpec(key, "SM4");cipher.init(Cipher.DECRYPT_MODE, sm4Key);return cipher.doFinal(cipherText);}public static void main(String[] args) throws Exception {// 上述2.3 查看并保留私钥过程中获取到的priv内容,去掉冒号,即为PrivateKey的值String PrivateKeyHex = "f9b587743f051b1e59efa05125f31b5bf371957bf3d3012c1739091334b73738";// GetEidResult接口返回的DesKey字段值String DesKey = "";// GetEidResult接口返回的UserInfo字段值String UserInfo = "";// 调用EIDUtil解密用户信息byte[] b = EIDUtil.decodeUserInfo(PrivateKeyHex, DesKey, UserInfo);System.out.println(new String(b));}}
Nodejs 代码示例:
const {SM2, SM4} = require('gm-crypto')// 上述2.3 查看并保留私钥过程中获取到的priv内容,去掉冒号,即为PrivateKey的值const PrivateKeyHex = "f9b587743f051b1e59efa05125f31b5bf371957bf3d3012c1739091334b73738"// GetEidResult接口返回的DesKey字段值const DesKey = "xxx"// GetEidResult接口返回的UserInfo字段值const UserInfo = "xxx"const sm4Key = SM2.decrypt(Buffer.from(DesKey, 'base64').toString("hex").substring(2),PrivateKeyHex, {inputEncoding: 'hex',outputEncoding: 'hex',mode: 1})const plaintext = SM4.decrypt(UserInfo, sm4Key, {inputEncoding: 'base64',outputEncoding: 'utf8'})console.log(plaintext)
PHP 代码示例:
<?php// 确保已通过 Composer 安装 phpsm2sm3sm4 库。composer require lpilp/guomi// 版本要求: PHP >= 7.2, 打开gmp组件支持 phpsm2sm3sm4 >= 2.0require 'vendor/autoload.php';use Rtgm\\sm\\RtSm2;use Rtgm\\sm\\RtSm4;// 上述2.3 查看并保留私钥过程中获取到的priv内容,去掉冒号,即为PrivateKey的值$privateKey = 'f9b587743f051b1e59efa05125f31b5bf371957bf3d3012c1739091334b73738';// GetEidResult接口返回的DesKey字段值$desKey = 'xxx';// GetEidResult接口返回的UserInfo字段值$userInfo = "xxx";// 使用sm2解密desKey$sm2 = new RtSm2();$key = $sm2->doDecrypt(bin2hex(base64_decode($desKey)), $privateKey, $trim = true, $model = C1C3C2);// 使用sm4解密userInfo$sm4 = new RtSm4($key);$userInfo = $sm4->decrypt(bin2hex(base64_decode($userInfo)),'sm4-ecb', '', 'hex');echo ("解密后的userInfo: ".$userInfo);
Python 代码示例:
# pip install gmsslfrom gmssl import sm2, sm4import base64# SM2私钥(十六进制字符串)sm2_private_key = "f9b587743f051b1e59efa05125f31b5bf371957bf3d3012c1739091334b73738"# SM2解密函数def decrypt(des_key, user_info):# 初始化SM2对象(私钥解密)sm2_crypt = sm2.CryptSM2(private_key=sm2_private_key, public_key='', mode=1)# Base64解码密文cipher_text = base64.b64decode(des_key)# 解密(SM2密文格式:C1+C3+C2,需按格式解析)cipher_text = bytes.fromhex(cipher_text.hex()[2:])print(cipher_text.hex())sm4_key = sm2_crypt.decrypt(cipher_text)sm4_crypt = sm4.CryptSM4(padding_mode=sm4.PKCS7)sm4_crypt.set_key(sm4_key, sm4.SM4_DECRYPT)return sm4_crypt.crypt_ecb(base64.b64decode(user_info))# 测试SM2解密if __name__ == "__main__":# GetEidResult接口返回的DesKey字段值des_key = ""# GetEidResult接口返回的UserInfo字段值user_info = ""# 解密密文信息result = decrypt(des_key, user_info)print(result.decode('utf-8'))